1
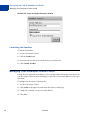
Sandbox User Guide
For Professional Use Only
Currently only available in English.
A usage Professional Uniquement
Disponible en Anglais uniquement pour l'instant.
Last Updated: June 2006
PayPal Sandbox User Guide
© 2006 PayPal Inc. All rights reserved. PayPal and the PayPal logo are registered trademarks of PayPal Inc. Other trademarks and brands are the
property of their respective owners.
The information in this document belongs to PayPal Inc. It may not be used, reproduced or disclosed without the written approval of PayPal Inc.
PayPal (Europe) Ltd. is authorised and regulated by the Financial Services Authority in the United Kingdom as an electronic money institution.
PayPal FSA Register Number: 226056.
Notice of non-liability:
PayPal Inc. is providing the information in this document to you “AS-IS” with all faults. PayPal Inc. makes no warranties of any kind (whether express,
implied or statutory) with respect to the information contained herein. PayPal Inc. assumes no liability for damages (whether direct or indirect), caused
by errors or omissions, or resulting from the use of this document or the information contained in this document or resulting from the application or use
of the product or service described herein. PayPal Inc. reserves the right to make changes to any information herein without further notice.
PayPal Inc. does not guarantee that the features described in this document will be announced or made available to anyone in the future.
Contents
Preface . . . . . . . . . . . . . . . . . . . . . . . . . . . . . . . . . . 9
This Document . . . . . . . . . . . . . . . . . . . . . . . . . . . . . . . . . . . . . . . . . 9
Intended Audience . . . . . . . . . . . . . . . . . . . . . . . . . . . . . . . . . . . . . . . 9
Organization of This Document . . . . . . . . . . . . . . . . . . . . . . . . . . . . . . . . 9
Notational Conventions . . . . . . . . . . . . . . . . . . . . . . . . . . . . . . . . . . . . 9
Revision History . . . . . . . . . . . . . . . . . . . . . . . . . . . . . . . . . . . . . . . 10
Chapter 1
Overview to the PayPal Sandbox . . . . . . . . . . . . . . 13
Get Started Quickly: Integration Center . . . . . . . . . . . . . . . . . . . . . . . . . . . 13
At a Glance: Differences between the Sandbox and Live PayPal . . . . . . . . . . . . . . 13
Chapter 2
Accessing the PayPal Sandbox and Email . . . . . . . . . 17
Signing Up for Developer Central . . . . . . . . . . . . . . . . . . . . . . . . . . . . . . 17
Getting to the Sandbox. . . . . . . . . . . . . . . . . . . . . . . . . . . . . . . . . . . . 17
Accessing the Sandbox Directly . . . . . . . . . . . . . . . . . . . . . . . . . . . . . 17
Launching the Sandbox . . . . . . . . . . . . . . . . . . . . . . . . . . . . . . . . . 18
Managing Your Developer Central Profile . . . . . . . . . . . . . . . . . . . . . . . . . . 18
Sandbox Email . . . . . . . . . . . . . . . . . . . . . . . . . . . . . . . . . . . . . . . . 19
Chapter 3
Setting up Test Users . . . . . . . . . . . . . . . . . . . . 21
Planning the Types of Test Accounts You Need . . . . . . . . . . . . . . . . . . . . . . . 21
Managing Test Accounts . . . . . . . . . . . . . . . . . . . . . . . . . . . . . . . . . . . 21
Creating a Personal Account . . . . . . . . . . . . . . . . . . . . . . . . . . . . . . 22
Creating a Business Account . . . . . . . . . . . . . . . . . . . . . . . . . . . . . . 22
Confirming an Email Address . . . . . . . . . . . . . . . . . . . . . . . . . . . . . . 23
“Unverified” Account Status . . . . . . . . . . . . . . . . . . . . . . . . . . . . . . . 23
Adding a Bank Account . . . . . . . . . . . . . . . . . . . . . . . . . . . . . . . . . . . 23
For Canada, Germany, or UK . . . . . . . . . . . . . . . . . . . . . . . . . . . . . . 23
Steps for All Countries . . . . . . . . . . . . . . . . . . . . . . . . . . . . . . . . . . 24
Adding a Credit Card Account . . . . . . . . . . . . . . . . . . . . . . . . . . . . . . . . 25
Adding a Credit Card for a New Test User. . . . . . . . . . . . . . . . . . . . . . . . 25
Adding More Credit Cards for an Existing Test User . . . . . . . . . . . . . . . . . . 25
June 2006
3
Contents
Generating a Credit Card Number to Test PayPal Account Optional . . . . . . . . . . 26
Signing Up for Website Payments Pro . . . . . . . . . . . . . . . . . . . . . . . . . . . . 26
Chapter 4
Testing PayPal Website Features . . . . . . . . . . . . . . 27
Website Payments with Buy Now Button . . . . . . . . . . . . . . . . . . . . . . . . . . 27
Encrypted Website Payments . . . . . . . . . . . . . . . . . . . . . . . . . . . . . . 27
Testing Payments with Buy Now Button . . . . . . . . . . . . . . . . . . . . . . . . . 28
Verifying a Test Payment . . . . . . . . . . . . . . . . . . . . . . . . . . . . . . . . 28
Instant Payment Notification (IPN) . . . . . . . . . . . . . . . . . . . . . . . . . . . . . . 28
Setting up IPN in the Sandbox. . . . . . . . . . . . . . . . . . . . . . . . . . . . . . 28
Verifying a Test Refund . . . . . . . . . . . . . . . . . . . . . . . . . . . . . . . . . . . 29
Transferring Funds to a Test Account . . . . . . . . . . . . . . . . . . . . . . . . . . . . 30
Clearing or Failing Test eCheck Transactions . . . . . . . . . . . . . . . . . . . . . . . . 30
Sending Funds to a Seller . . . . . . . . . . . . . . . . . . . . . . . . . . . . . . . . . . 31
Billing A Customer . . . . . . . . . . . . . . . . . . . . . . . . . . . . . . . . . . . . . . 31
Chapter 5
Testing PayPal Web Services API Applications . . . . . . . 33
PayPal WSDL/XSD Schema Definitions . . . . . . . . . . . . . . . . . . . . . . . . . . . 33
Requesting API Credentials from PayPal . . . . . . . . . . . . . . . . . . . . . . . . . . 34
To get a Sandbox certificate . . . . . . . . . . . . . . . . . . . . . . . . . . . . . . . 34
To get a live PayPal certificate . . . . . . . . . . . . . . . . . . . . . . . . . . . . . . 34
Testing with the PayPal SDK Console . . . . . . . . . . . . . . . . . . . . . . . . . . . . 35
API Overview By Business Function and Service Endpoint . . . . . . . . . . . . . . . . . 35
Chapter 6
Technical Support . . . . . . . . . . . . . . . . . . . . . . 37
Contacting Customer Service for Live PayPal Website Help . . . . . . . . . . . . . . . . 37
Contacting Developer Technical Support for API Help . . . . . . . . . . . . . . . . . . . . 37
Index . . . . . . . . . . . . . . . . . . . . . . . . . . . . . . . . . . . . 39
4
June 2006
List of Tables
Table P.1
Revision History . . . . . . . . . . . . . . . . . . . . . . . . . . . . . . 11
Table 1.1
Differences between Developer Central, Sandbox, and Live PayPal . . . 13
Table 3.1
German, Canadian, and UK Test Bank Account Information
Table 5.1
Location of PayPal WSDL and XSD Files . . . . . . . . . . . . . . . . . 33
Table 5.2
API Overview by Business Function and Service Endpoint . . . . . . . . 35
June 2006
. . . . . . . 24
5
List of Tables
6
June 2006
List of Figures
Figure 2.1
Login for PayPal Developer Central . . . . . . . . . . . . . . 18
Figure 2.2
Sandbox Email Client . . . . . . . . . . . . . . . . . . . . 19
June 2006
7
List of Figures
8
June 2006
Preface
This Document
This document, which describes the PayPal virtual test environment called the Sandbox,
replaces the PayPal Sandbox User Guide issued December, 2005.
Intended Audience
This document is written for merchants and developers who want to test their PayPal-based
applications before using them in production.
Organization of This Document
Chapter 1, “Overview to the PayPal Sandbox,” describes the Sandbox in general and lists the
differences between the Sandbox and the production PayPal services.
Chapter 2, “Accessing the PayPal Sandbox and Email,” describes how to gain access to the
Sandbox and your Sandbox email.
Chapter 3, “Setting up Test Users,” describes the different kinds of business roles and
corresponding test accounts you need to set up on the Sandbox for effective testing of your
PayPal-based applications.
Chapter 4, “Testing PayPal Website Features,” describes how you can use the Sandbox
(https://www.sandbox.paypal.com) to test features that correspond to the features on the main
PayPal interactive site https://www.paypal.com/.
Chapter 5, “Testing PayPal Web Services API Applications,” is an overview of testing PayPal
Web Services API applications with the Sandbox, API digital certificates, and other related
information.
Notational Conventions
This document uses typefaces to identify the characteristics of text. These typefaces and the
characteristics they imply are described below:
June 2006
9
Preface
Revision History
Typeface
How Used
serif italics
A document title.
A term being discussed or defined.
For example: A file is a readable or writable stream of characters …
Boolean values (not keywords).
For example: The function returns true if it encounters an error.
monospaced
Pathnames or file names that appear in body text frames.
Code-related names that appear in body text frames. Such names are used for
functions, callbacks, arguments, data structures, and fields.
For example: AbstractResponseType is the SOAP response type definition on
which all PayPal API response methods are based.
Components of Internet protocol requests and responses, such as HTTPS and FORM
variables.
For example: The PayPal system uses a method=POST request to return IPN status
variables related to subscriptions, such as txn_type.
Serif bold
User interface names, such as window names or menu selections.
For example: On the Profile page, click Email to confirm your email address.
San-serif
oblique
Placeholders used in the context of a format or programming standard or formal
descriptions of PayPal system syntax. Placeholders indicate values or names that
the reader should provide.
Example: For example, amount is the variable for a single-item shopping cart, but
amount_X is the name of the variable for a multi-item shopping cart. amount_3
is the item amount for the third item in a multiple-item shopping cart.
To convey additional information, this document may also apply color and underlining to
words or phrases that use the typefaces described above. Such use is described below:
Text attribute
How Used
xxxxxx
Hypertext link to a page in the current document or to another document in the set.
xxxxxx
Hypertext link to a URL or that initiates a web action, such as sending mail.
Revision History
Revision history for PayPal Sandbox User Guide.
10
June 2006
Preface
Revision History
TABLE P.1 Revision History
Date
Description
June 2006
Correction of Sort Code necessary to test UK accounts in Sandbox. Proper Sort
Code is 609204.
December 2005
Miscellaneous corrections.
June 2006
11
Preface
Revision History
12
June 2006
1
Overview to the PayPal Sandbox
The PayPal Sandbox is a self-contained environment within which you can prototype and test
your PayPal applications. Before moving any PayPal-based application into production, you
should test the application in the Sandbox to ensure that it functions as you intend and within
the guidelines and standards set forth by the PayPal Developer Network (PDN).
The Sandbox is for use by developers of business solutions. Business solutions integrated with
PayPal might involve the features of PayPal available through PayPal’s main web site,
https://www.paypal.com, or the business solutions might involve use of the PayPal Web Services
API.
Get Started Quickly: Integration Center
PayPal’s Integration Center at https://www.paypal.com/integration has step-by-step details for
getting started with the PayPal Software Development Kits (SDKs), Website Payments Pro,
Express Checkout, Website Payments Standard, Authorization & Capture, Instant Payment
Notification, and more.
Visit the Integration Center at:
https://www.paypal.com/integration
At a Glance: Differences between the Sandbox and Live PayPal
The following table compares the Sandbox and Live PayPal. This is an at-a-glance view of the
differences from the perspective of an in-house or third-party developer for a business.
You can also use this table as a checklist.
TABLE 1.1 Differences between Developer Central, Sandbox, and Live PayPal
Type of
PayPal
Accounts
PayPal Developer Central and Sandbox
Live PayPal Website and API Service
Depending on the feature you want to develop and
test, you need a Personal, Business, or Premier
account.
Personal, Business, or Premier account
June 2006
13
Overview to the PayPal Sandbox
At a Glance: Differences between the Sandbox and Live PayPal
TABLE 1.1 Differences between Developer Central, Sandbox, and Live PayPal
PayPal Developer Central and Sandbox
14
Live PayPal Website and API Service
Developer
Central: URL
and site logo
in upper left
corner
https://developer.paypal.com
Site logos in
upper left
corner
https://www.sandbox.paypal.com
https://www.paypal.com
API Servers
(SOAP
service
endpoints)
https://api.sandbox.paypal.com/2.0/
https://api-aa.sandbox.paypal.com/2.0/
https://api.paypal.com/2.0/
https://api-aa.paypal.com/2.0/
Business
roles
You fill all roles you need to test: merchant, buyer,
and seller.
Real-world people fill these roles.
Company
and people’s
names and
postal
addresses
Completely fictitious. Before you begin working
with the Sandbox, create the details for all the
business roles you must fulfill.
The Sandbox simulates verification of postal
addresses and names.
Real companies’ and people’s names and postal
addresses.
Email
addresses
and email
inboxes
The Sandbox has a special-purpose email inbox for
your testing, contained in the Sandbox itself.
Real email address and inbox for each business role
Bank
account and
credit card
numbers
The Sandbox creates all fictitious bank accounts,
credit card numbers, and CVV2 numbers you need
in order to develop and test. The Sandbox simulates
the verification of these numbers.
Actual verification of bank account numbers, credit
card numbers, and CVV2 numbers
Social
Security
Number for
Billing
Agreements
111-nn-nnnn
Real social security numbers
PayPal
transactions
The Sandbox creates all fictitious bank accounts,
credit card numbers, and CVV2 numbers you need
for development and testing. The Sandbox
simulates the verification of these numbers.
Live transactions, cleared by live PayPal processes
June 2006
Overview to the PayPal Sandbox
At a Glance: Differences between the Sandbox and Live PayPal
TABLE 1.1 Differences between Developer Central, Sandbox, and Live PayPal
PayPal Developer Central and Sandbox
Live PayPal Website and API Service
Fraud
detection
Fraud detection is not enabled for the Sandbox.
Full protection through PayPal’s fraud detection
Digital
certificates
After you request digital certificates for use with the
PayPal Web Services API, the Sandbox
automatically generates them. They are available
for immediate downloading.
To safeguard your and your customers’ security,
requests for digital certificates for use with the Live
PayPal Web Services API must be verified by
PayPal before they are issued. You are notified in
email when your request has been approved.
PayPal
Merchant
Features
supported
All features of the live PayPal website, except
closing an account, auction features, BillPay,
Anything Points, monthly statements, shipping
preferences, PayPal Shops, and Seller Protection
Policy
Technical
Support
Developer Technical Support is available from
Developer Central. No telephone support.
June 2006
Customer Service is available either by email or by
telephone. See “Contacting Customer Service
for Live PayPal Website Help” on page 37.
15
Overview to the PayPal Sandbox
At a Glance: Differences between the Sandbox and Live PayPal
16
June 2006
2
Accessing the PayPal Sandbox
and Email
To access the PayPal Sandbox, sign up for a Developer Central account. After becoming a
member of PayPal Developer Central, you access the Sandbox either directly or by launching
it after you log in to Developer Central.
Depending on the PayPal feature you want to test with an application, you need to set up
different types of PayPal accounts: PayPal Personal, Business, or Premier account. See
“Planning the Types of Test Accounts You Need” on page 21.
Signing Up for Developer Central
You do not need an existing, live PayPal account in order to sign up for Developer Central.
1. Go to https://developer.paypal.com
2. Click Sign Up Now.
3. Follow the on-screen instructions.
4. After you sign up, PayPal sends login instructions to the email address you used to sign-up.
If you have mail filtering enabled in your mail software, the email sent by PayPal might be
filtered out or stored in a folder where you are not expecting it to be. For instance, with
Microsoft Outlook mail software, your filtering might cause the email to be stored in
“Junk” or “Spam.”
Getting to the Sandbox
You have two ways to get to the PayPal Sandbox: direct access or logging in to Developer
Central and then launching the Sandbox.
Regardless of whether you get to the Sandbox directly or by launching it, log in to the Sandbox
as a test user of the necessary type to test the feature you want to test: Personal, Business, or
Premier account.
Accessing the Sandbox Directly
When you log in to Developer Central, you have the option to get to the Sandbox directly at
https://www.sandbox.paypal.com/. At the Developer Central login page, click Log me in
automatically, as shown in Figure 2.1, “Login for PayPal Developer Central” on page 18.
N O T E : To
access the Sandbox directly, you must enable cookies in your browser.
June 2006
17
Accessing the PayPal Sandbox and Email
Managing Your Developer Central Profile
FIGURE 2.1 Login for PayPal Developer Central
Launching the Sandbox
To launch the Sandbox:
1. Log in to Developer Central.
1. Click the Sandbox tab.
2. Select the test user that represents the feature you want to test.
3. Click Launch Sandbox.
Managing Your Developer Central Profile
Except for your registered email address, you can change all the information associated with
your Developer Central account, including your password. (Your email address is your login
username.)
To manage your Developer Central profile:
1. Log in to Developer Central.
2. Click profile in the upper left of the main Developer Central page.
3. Change any of details, except your email address.
4. Click Save
18
June 2006
Accessing the PayPal Sandbox and Email
Sandbox Email
Sandbox Email
When certain kinds of transactions occur in the live PayPal system, PayPal sends email
messages to participants in the transaction. From these email messages, the recipient or
initiator of an event or transaction can verify that the event took place and that the monetary
amounts associated with the event are correct. With the live PayPal system, email messages
are sent to the real email addresses of the participants.
PayPal Sandbox email, however, is a self-contained email system in the Sandbox itself. Each
developer registered with PayPal Developer Central has a single inbox to which all email
messages for test users are sent. See Figure 2.2, “Sandbox Email Client.” You see email
messages addressed only to test users associated with your Developer Central account: the
Sandbox test accounts you set up.
To access your email inbox in the Sandbox:
1. Log in to Developer Central.
2. Click the Email tab.
Up to 30 of the latest email messages are listed in your inbox. The subject line of email
messages you have not read are in bold. Click a subject line to read the message.
FIGURE 2.2 Sandbox Email Client
June 2006
19
Accessing the PayPal Sandbox and Email
Sandbox Email
20
June 2006
3
Setting up Test Users
Depending on the business application you are developing and testing, you need different
types of test accounts. There are two types of test accounts: Personal and Business.
Planning the Types of Test Accounts You Need
Determine the types of test accounts you need to test the applications you are developing. In
addition, determine the number of different accounts you need. You might need several
different Personal or Business PayPal test accounts to test your application.
The information you need to supply when you create test accounts is as follows. The email
address and password of a test account should never be those a real account on the live PayPal
site. The same applies to your answers to the security questions. All of this data should be
fictional.
z
Mailing address
z
Email address and password for the test PayPal account. You can use the same password
(not email address) for all your test accounts so that you can more easily remember it.
z
Security questions and answers. You can use the same security questions and answers for
all your test accounts so that you can more easily remember them.
z
Personal or Business account
z
Your agreement to the terms of using the Sandbox
For Business accounts, you also need to supply the following fictitious information for testing:
z
Business name and address
z
Customer service contact information
z
Business owner contact information
z
Business owner address
z
Social Security Number to sign up for Website Payments Pro
Managing Test Accounts
In Developer Central, you can view, work with, or launch the Sandbox for all your test
accounts. You can also create new accounts or remove test email addresses from your view.
z
To work with test accounts, log in to Developer Central, and click the Sandbox tab.
June 2006
21
Setting up Test Users
Managing Test Accounts
z
To create a new account, click the Create Account link in the upper left corner of the list of
accounts.
z
To work with the account, select the account by clicking the radio button associated with it
on the left.
You can start the Sandbox for the selected account by clicking Launch Sandbox. When you
logged in to Developer Central, you might have set the Log me in automatically checkbox to
allow direct access to https://www.sandbox.paypal.com/, in which case you do not have to launch
the Sandbox to access it.
N O T E : The
Delete button does not delete the test account. It removes the test account from
your list of accounts, but the email address for the test account is still on file for the
Sandbox. You cannot reuse an email address that is still on file for the Sandbox.
Creating a Personal Account
To create a test user with a Personal account:
1. Log in to Developer Central.
2. Click the Sandbox tab.
3. Click the Create Account link.
4. On the next page, select the Personal Account radio button. Then click Continue.
5. Next, enter the account information for the new test user’s PayPal Sandbox account. The
email address entered on this page serves as the PayPal ID for that test user. Use a fictitious
email address for each new test user, so that the PayPal ID is unique. Remember that
passwords are case-sensitive.
6. Click the Sign Up button.
7. On the next page (confirming email address), click the Continue button. This goes to the
My Account > Overview tab.
To confirm the email address for the new test user, see the steps in “Confirming an Email
Address” on page 23.
Creating a Business Account
To create a test user with a Business account:
1. Log in to Developer Central.
2. Click the Sandbox tab.
3. Click the Create Account link.
4. On the next page, select the Business Account radio button. Then click the Continue
button.
22
June 2006
Setting up Test Users
Adding a Bank Account
5. Next, enter account information for the business represented by the new PayPal account.
6. Click Continue when done.
7. Enter the user information for the new test user’s PayPal Sandbox account.
Click the Sign Up button when done.
8. Click Continue. This takes you to the My Account > Overview tab.
Confirming an Email Address
To confirm an email address for a test user:
1. Log in to Developer Central.
2. Click the Email tab.
3. On the next page, click the email link to open the email window.
4. In the window that appears, find the email for the new test user with a subject line of
“Activate Your PayPal Account!”
5. Open the email and click the confirmation link.
“Unverified” Account Status
At this point your new test users exist and have confirmed email addresses. However, they
have an “Unverified” status. To set a user to a status of “Verified”, add a bank account for it.
For more information, see “Adding a Bank Account” on page 23.
Adding a Bank Account
The next step in creating new test user and changing the status from “Unverified” to “Verified”
is adding a bank account for the test user. The bank account is a source of funds for the test
user’s PayPal account, and thus for transactions between that test user and other test users. A
test user can have multiple bank accounts, but at least one is required in order to verify the test
user.
The Sandbox automatically generates bank account and sort code numbers when you add a
bank account.
For Australia, Canada, Germany, or UK
Use the automatically generated bank account information only for test US bank accounts. To
add test Canadian, German, or UK bank account information, follow these guidelines.
June 2006
23
Setting up Test Users
Adding a Bank Account
TABLE 3.1 Australian German, Canadian, and UK Test Bank Account Information
Australia
Canada
Germany
UK
BSB Number: 242200
Transit Number: 00001
Routing Number:
37020500
Bank Account
Number: Any 8digit number
Account Number:
any random number
Institution Number: 311
Bank Account
Number: Any 10digit number
Sort Code: 609204
or 700709
Bank Account Number:
Any one-digit to 12-digit
number
Sort Code: Any 8digit number
Steps for All Countries
To add a bank account for a new test user:
1. After logging into Developer Central, launch the Sandbox as the test user.
2. Navigate to My Account > Overview.
3. In the Overview window, click the Add Bank Account link in the Activate Account box
on the left.
4. In the Add Bank Account window:
– Enter a fictitious bank name. If you copy-and-paste the automatically generated bank
account number as the name of the bank, that account number will be more visible to you
for use in later testing.
– Except for UK or German test bank accounts, leave all other automatically generated
information as is.
– Make a note of the test bank account number, because it will be handy to have when you
do your testing.
– Click Add Bank Account.
5. In the resulting success page, click Continue at the bottom.
The My Account > Overview page opens.
6. Click the Confirm Bank Account link in the Activate Account box at the left side.
7. In the Confirm Bank Account window, click Submit.
To create additional bank accounts for an existing test user:
1. After logging into Developer Central, launch the Sandbox as the test user.
2. Navigate to My Account > Profile.
24
June 2006
Setting up Test Users
Adding a Credit Card Account
3. Under the Financial Information header, click the Bank Accounts link.
4. In the Bank Account window, click Add.
5. In the Add Bank Account window:
– Enter a fictitious bank name. Using the automatically generated bank account number as
the name of the bank will make that account number visible to you for use in testing later.
– Except for UK or German test bank accounts, leave all other automatically generated
information as is.
– Make a note of the test bank account number, because it will be handy to have when you
do your testing.
– Click Add Bank Account.
6. In the resulting success window, click the Continue button at the bottom.
The My Account > Overview page opens.
7. Click the Confirm Bank Account link in the Activate Account box at the left side.
8. In the Confirm Bank Account window, click Submit.
Adding a Credit Card Account
The final step in creating a new test user is adding a credit card account for the test user. The
credit card account is a source of funds for the test user’s PayPal account, and thus can be used
for transactions between that test user and other test users. A test user can have multiple credit
card accounts.
Test credit card numbers cannot be used to pay for real-world transactions.
Adding a Credit Card for a New Test User
To add a credit card account for a new test user:
1. After logging into Developer Central, launch the Sandbox as the test user.
2. Navigate to My Account > Overview.
3. In the Overview window, click the Add Credit Card link in the Activate Account box on
the left.
4. In the Add Credit Card window, leave all information as it is (automatically generated)
and click Add Credit Card.
Adding More Credit Cards for an Existing Test User
To create additional credit card accounts for an already existing test user:
June 2006
25
Setting up Test Users
Signing Up for Website Payments Pro
1. Log in to the Sandbox as the test user.
2. Navigate to My Account > Profile.
3. Under the Financial Information header, click the Credit Cards link.
4. In the Credit Cards window, click the Add button.
5. In the Add Credit Card window, leave the automatically generated information as is.
6. Make a note of the credit card number for your use in later testing.
7. Click Add Credit Card.
Generating a Credit Card Number to Test PayPal Account Optional
To obtain a test credit card number for testing PayPal Account optional:
1. Log in to the Sandbox as the test user.
2. Navigate to My Account > Profile.
3. Under the Financial Information header, click the Credit Cards link.
4. Make a note of the credit card number for your use in later testing.
Signing Up for Website Payments Pro
To sign up for Website Payments Pro, create a Business account, as described in “Creating a
Business Account” on page 22.”
To complete the application for Website Payments Pro, you must enter a Social Security
Number. You can enter a Social Security Number in the following format:
111xxxxxx
where x is any digit.
N O T E : The
SSN you enter must not have already been recorded for some other user of the
Sandbox.
26
June 2006
4
Testing PayPal Website Features
You can use the PayPal Sandbox to test your website features that do not rely on the PayPal
Web Services API. The website features you can learn, develop, or test in the Sandbox are as
follows:
z
Website Payments with Buy Now Buttons: Use the Sandbox to test accepting PayPal as a
payment mechanism on a website. For more information, refer to
https://www.paypal.com/pdn-item.
z
Instant Payment Notification (IPN)
z
Shopping Cart Purchases: Use the Sandbox to test the purchase of multiple items in a
single transaction using a single payment. For more information, refer to
https://www.paypal.com/shoppingcart.
z
Subscriptions: Use the Sandbox to test recurring payments. For more information, refer to
https://www.paypal.com/pdn-recurring.
z
Refunds: Use the Sandbox to test refunding payments from a test buyer.
Website Payments with Buy Now Button
You can use the Sandbox to familiarize yourself with the PayPal Buy Now button, with which
you can associate PayPal with a specific item you sell on your website.
To create a test Buy Now Button:
1. After logging into Developer Central, launch the Sandbox as the test seller account.
2. Go to the Merchant Services tab.
3. Select the Buy Now Buttons link under the Website Payments heading to get to the
Button Factory.
4. Follow the online instructions to create a Buy Now button. For more information, see the
PayPal Website Payments Standard Integration Guide.
5. Copy and paste the code into your web page file wherever you would like the button image
to appear. Typically, the button should be located next to the description of the item or
service. Your web page does not have to be published to your web server for you to check
the button placement; it can be on you own local hard drive.
Encrypted Website Payments
The Sandbox also supports Encrypted Website Payments (EWP), as does the PayPal SDK
console.
June 2006
27
Testing PayPal Website Features
Instant Payment Notification (IPN)
For information about what EWP is and how to use it, see the PayPal Website Payments
Standard Integration Guide.
For information about using the PayPal SDK console to generate EWP HTML, see the PayPal
SDK Guide.
Testing Payments with Buy Now Button
For the purposes of testing the Buy Now button, your web page does not need to be published
to your web server. It can reside on your local hard drive. However, you do need to be logged
in to the Sandbox.
1. Log in to Developer Central, click the Sandbox tab, select the desired test user, and click
Launch Sandbox.
2. Open the HTML file containing the Buy Now Button.
3. Click the Buy Now Button.
4. Log in using your test buyer account.
5. Follow the on-screen instructions to complete your test payment.
Verifying a Test Payment
1. Log in to Developer Central.
2. Click the Email tab.
Your Sandbox inbox shows payment confirmation email messages for the seller and buyer.
3. To further verify that the payment was successful:
– Check your web server for IPN notifications related to the payment.
– Launch the Sandbox as your test buyer or seller account and navigate to My Account >
Overview to see the transaction in your Recent Activity.
Instant Payment Notification (IPN)
You can use the Sandbox to test Instant Payment Notification, such as the PayPal Buy Now
button or reversals.
Setting up IPN in the Sandbox
For information about implementing IPN, see the following:
z
Technical overview at https://www.paypal.com/cgi-bin/webscr?cmd=p/xcl/rec/ipn-techviewoutside
28
June 2006
Testing PayPal Website Features
Verifying a Test Refund
z
PayPal Order Management Integration Guide at
https://www.paypal.com/en_US/pdf/PP_OrderManagement_IntegrationGuide.pdf
ipn_test Variable
The Sandbox sets the variable ipn_test with a value of 1 in the HTTP response back to your
IPN page. The purpose of this variable is to clearly differentiate between live and Sandbox
IPN, so you can write your processing programs to work with either live or Sandbox IPN. If
the test_ipn variable is not present in the HTTP response, you are working with Live PayPal.
To enable IPN for a test user:
1. Log in to Developer Central, click the Sandbox tab, select the desired test user, and click
Launch Sandbox.
2. Click the Profile subtab.
3. Click the Instant Payment Notification Preferences link in the Selling Preferences
column.
4. Click Edit.
5. Click the checkbox and enter the URL at which you would like to receive your IPN
notifications.
6. Click Save.
7. Install IPN on your web server. You might want to start with one of PayPal’s source code
samples available at https://www.paypal.com/ipn under the Code Samples section. There are
source code samples for the following programming languages and development
environments.
–
–
–
–
–
ASP/VBScript
ColdFusion
Java/JSP
PERL
PHP
Verifying a Test Refund
To verify a test refund, you must have already made a test payment.
1. Log in to Developer Central.
2. Click the Email tab.
Your Sandbox inbox shows refund confirmation email messages for the seller and buyer.
3. To further verify that the refund was successful:
– Check your Web server for IPN notifications related to the refund.
June 2006
29
Testing PayPal Website Features
Transferring Funds to a Test Account
– Launch the Sandbox as your test buyer or seller account and navigate to My Account >
Overview to see the transaction in your Recent Activity.
Transferring Funds to a Test Account
Before a test user can exchange funds with other test users in transactions, you must manually
transfer funds to the test user’s account.
To transfer funds to a test user’s PayPal account:
1. After logging into Developer Central, launch the Sandbox as the test user.
2. Navigate to My Account > Add Funds.
3. Click the Transfer funds from a Bank Account link.
4. On the Add Funds by Electronic Funds Transfer page:
– Select the bank account from which the funds are coming in the From drop-down list.
– Enter the amount to transfer in the Amount box.
– Click Continue.
5. On the resulting Add Funds Confirmation page, click Submit.
6. Navigate to My Account > Overview to see that the transfer transaction is listed.
Clearing or Failing Test eCheck Transactions
When you use eCheck to transfer funds or send payments, the transaction appears as pending
until you manually clear or fail it. Manual clearing is only necessary in the Sandbox.
To clear or fail test eCheck transactions:
1. In the transactions log, click the Details link (in the Details column).
2. In the Transaction Detail window, there are two links to simulate actual bank clearing.
These links appear only in the Sandbox:
– Clear Transaction: Click to complete the transaction.
– Fail Transaction: Click to cancel the transaction.
3. Click Return to Log to see the transfer completed and the money in the Sandbox account.
The My Account > Overview page opens.
4. Click the View Limits links on the My Account > Overview page to see the spending
limits for the current test user.
30
June 2006
Testing PayPal Website Features
Sending Funds to a Seller
Sending Funds to a Seller
To purchase goods or services, a PayPal user must send funds to a seller. In the PayPal
Sandbox, you can simulate the actions of a buyer by manually initiating the payment of funds.
You must use a Personal account that represents a paying customer.
To send funds from one test user to another:
1. Log in to Developer Central, click the Sandbox tab, select the desired test user, and click
Launch Sandbox.
2. Navigate to the Send Money tab.
3. On the Send Money page, enter the email address (PayPal account name) for the test user
in Recipient’s Email box.
4. Enter the amount to send to the seller test user in the Amount box.
5. Select the currency for the funds in the Currency drop-down list. (Note: Auction is not an
option in the drop-down list.)
6. Select the reason for sending the funds in the Type drop-down list.
7. Enter text in the Subject box, if you want to. This text is the subject of the email sent to the
recipient about the transfer of funds.
8. Enter text in the Note memo box. This text appears in the body of the notification email.
9. Click Continue. This does not send the money; a confirmation step follows.
10.On the Check Payment Details page, review the transaction details for correctness. You
can click More Funding Options to change the source of fund used for payment.
11. Click Send Money. This triggers the actual transfer of funds.
12.Your Sandbox email inbox contains all the email messages that are sent to the test user
sending the money and the test user receiving the money. See “Sandbox Email” on
page 19.
Log in as the seller test user and navigate to the My Account > Overview tab to see the
transaction for the recipient’s account.
Billing A Customer
PayPal Business users can bill another PayPal user for the purchase of goods or services. In
PayPal terminology, the feature to bill a customer is called Request Money. In the PayPal
Sandbox, you can manually initiate a request for funds from another test user. One test account
is the biller. The other test account is the customer.
To request funds from another test user:
June 2006
31
Testing PayPal Website Features
Billing A Customer
1. After logging into Developer Central, launch the Sandbox as the test user requesting the
funds.
2. Navigate to the Request Money tab.
3. On the Request Money page, enter the email address (PayPal login name) for the test user
being billed in the Recipient’s Email box.
4. Enter the billed amount in the Amount box.
5. Select the currency for the funds in the Currency drop-down list.
6. Select the reason for the request for funds (billing) in the Type drop-down list. (Note:
Auction is not an option in the drop-down list.)
7. Enter text in the Subject box. This text is the subject of the email sent to the recipient
regarding the sent funds.
8. Enter text in the Note memo box. This text appears in the body of the notification email.
9. Click Continue.
10.On the Request Money – Confirm page, click Request Money. This triggers the actual
request for funds.
11. Navigate to the My Account > Overview tab. The request for money should be listed.
12.Log in as the billed test user and navigate to the My Account > Overview tab to see the
transaction for the billed user’s account. The transaction for the request for money appears
on the My Account > Overview tab with Pay and Cancel buttons. Click Pay, and in the
confirmation window, click Send Money. This completes the transfer of requested funds.
To view the email messages sent to both test users, go to your Sandbox email. For details
about your Sandbox email, see “Sandbox Email” on page 19.
32
June 2006
5
Testing PayPal Web Services API
Applications
This chapter describes using the Sandbox for testing your PayPal Web Services API
applications:
z
Requesting and installing a PayPal-issued digital certificate and private key for use with the
Sandbox
z
The PayPal SDK console
z
API Overview by business function and service endpoint
This chapter does not contain step-by-step procedures for every aspect of your own software
environment for using the Sandbox or the live PayPal Web Services API.
PayPal WSDL/XSD Schema Definitions
The PayPal Web Services schema and its underlying eBay Business Language (eBL) base and
core components are required for developing applications with the PayPal Web Services API.
The following are the locations of the WSDL and XSD files.
TABLE 5.1 Location of PayPal WSDL and XSD Files
Development and Test with the PayPal Sandbox API Service
PayPal Schema
https://www.sandbox.paypal.com/wsdl/PayPalSvc.wsdl
eBL Base
Components and
Component Types
https://www.sandbox.paypal.com/wsdl/eBLBaseComponents.xsd
https://www.sandbox.paypal.com/wsdl/CoreComponentTypes.xsd
Production with Live PayPal Web Services API Service
PayPal Schema
https://www.paypal.com/wsdl/PayPalSvc.wsdl
eBL Base
Components and
Component Types
http://www.paypal.com/wsdl/eBLBaseComponents.xsd
http://www.paypal.com/wsdl/CoreComponentTypes.xsd
June 2006
33
Testing PayPal Web Services API Applications
Requesting API Credentials from PayPal
Requesting API Credentials from PayPal
API credentials consist of the following:
z
API username that identifies you to the PayPal Web Services API service
z
API password for that API username
z
PayPal-issued digital certificate. To ensure security for your customers and your business, a
public certificate and private key issued by PayPal are required for use of the PayPal Web
Services API, SDK, and Sandbox. The certificate file is in PEM format, contains both your
private key and your public certificate, and must be converted to PKCS12 format.
To obtain a PayPal Web Services API username, password, and digital certificate, you must
first create a Business or Premier account and apply online in either the Sandbox or the live
PayPal site, https://www.paypal.com.
To get a Sandbox certificate
PayPal automatically issues digital certificates for use with the Sandbox.
1. With your PayPal Business or Premier account email address, log in to Developer Central
at https://developer.paypal.com/.
2. Launch the Sandbox.
3. Log in to the Sandbox
4. Navigate to My Account > Profile.
5. Click the API Access link.
6. Click the API Certificate Request link.
7. Follow the on-screen instructions to complete your certificate request.
To download your PayPal API test certificate:
1. Log in to Developer Central.
2. Click the Test Certificates tab.
3. Click Download at the lower right.
4. Save the file to your local disk.
To get a live PayPal certificate
The steps to get a live certificate are the same as those for a Sandbox certificate, except for
Step 1, 2, and 3:
z
34
Login to https://www.paypal.com/ to request the certificate.
June 2006
Testing PayPal Web Services API Applications
Testing with the PayPal SDK Console
Follow the remaining steps begining with Step 4.
Testing with the PayPal SDK Console
The PayPal SDK includes a self-contained console for testing basic features of the SDK. With
the console, you can make actual PayPal Web Services API calls and is a good tool for
checking that your environment is properly configured and for learning the API structures and
elements.
For more information about the PayPal SDK, see the PayPal SDK Guide for any of the
supported platforms: Java, Microsoft .NET Framework, and PHP with PEAR.
API Overview By Business Function and Service Endpoint
The PayPal Web Services API consists of individual APIs for specific business uses, and the
individual APIs are grouped into two service endpoints.
TABLE 5.2 API Overview by Business Function and Service Endpoint
Business
Function
SOAP Request/Response
Service
Endpoint:
Production
Service Endpoint: Test
Authorization &
Capture API
DoCaptureRequest
api.paypal.com/2
DoCaptureResponse
.0/
DoAuthorizationRequest
DoAuthorizationResponse
DoVoidRequest
DoVoidResponse
DoReauthorizationRequest
DoReauthorizationResponse
api-aa.sandbox.paypal.com/2.0/
Direct Payment API
DoDirectPaymentRequest
DoDirectPaymentResponse
api.paypal.com/2
.0/
apiaa.sandbox.paypal.com/2.0/
Express Checkout
API
SetExpressCheckoutRequest api.paypal.com/2
SetExpressCheckoutRespons .0/
e
GetExpressCheckoutDetails
Request
GetExpressCheckoutDetails
Response
DoExpressCheckoutPaymentR
equest
DoExpressCheckoutPaymentR
esponse
api-aa.sandbox.paypal.com/2.0/
June 2006
35
Testing PayPal Web Services API Applications
API Overview By Business Function and Service Endpoint
TABLE 5.2 API Overview by Business Function and Service Endpoint
Business
Function
36
SOAP Request/Response
Service
Endpoint:
Production
Service Endpoint: Test
GetTransactionDeta
ils API
GetTransactionDetailsRequ api.paypal.com/2
est
.0/
GetTransactionDetailsResp
onse
api-aa.sandbox.paypal.com/2.0/
MassPay API
MassPayRequest
MassPayResponse
api.paypal.com/2
.0/
apiaa.sandbox.paypal.com/2.0/
RefundTransaction
API
RefundTransactionRequest
api.paypal.com/2
RefundTransactionResponse .0/
apiaa.sandbox.paypal.com/2.0/
TransactionSearch
API
TransactionSearchRequest
api.paypal.com/2
TransactionSearchResponse .0/
apiaa.sandbox.paypal.com/2.0/
June 2006
6
Technical Support
Depending on the PayPal product you need assistance with, contact either Customer Service or
Developer Technical Support.
Contacting Customer Service for Live PayPal Website Help
Use PayPal Help to find an answer to any problem you might encounter with live products
such as Website Payments or Instant Payment Notification.
To contact Customer Service about issues with the Live PayPal website:
1. Go to https://www.paypal.com/
2. Click Help in the upper left corner of the page.
3. Click Contact Us in the lower left of the page.
4. Chose either Help by Email or Help by Phone.
5. Follow the remaining instructions.
Contacting Developer Technical Support for API Help
For information about PayPal Web Services API, Developer Central, and using the Sandbox,
refer to the following resources:
z
Help Center: In Developer Central, click Help Center to access developer manuals and
links.
z
Forums: In Developer Central, click Forums to share information with the PayPal
developer community.
z
Online Developer Support Portal at https://ppdts.custhelp.com
Use the Forums first to find answers about any questions or problems you might have.
Another developer might have already posted information about your question or problem.
To contact Developer Technical Support about the PayPal Web Services API:
1. Log in to your account at https://developer.paypal.com/ by entering your email address and
password in the Member Log In box
2. Click Help Center at the bottom of the box on the right side of the page.
3. Click Email PayPal Support.
June 2006
37
Technical Support
Contacting Developer Technical Support for API Help
4. Complete the form.
38
June 2006
Index
A
E
adding a bank account 23
API
certificate 34
password 34
username 34
API Access link for username, password, and
certificate 34
API server for Sandbox 14
api.paypal.com 35, 36
api-aa.sandbox.paypal.com 35, 36
Authorization & Capture 35
eBL 33
eBLBaseComponents.xsd 33
eCheck 30
email in Sandbox 19
Express Checkout 35
B
German bank account info 23
GetTransactionDetails 36
bank account
adding 23
for Canadian test users 23
for German test users 23
for UK test users 23
billing a customer 31
Business account 22
Buy Now 27
F
fraud detection in Sandbox 15
G
I
Instant Payment Notification. See IPN.
Integration Center 13
IPN
ipn_test variable 29
technical overview 28
testing in Sandbox 29
C
Canadian bank account info 23
certificate 34
cookies 17
CoreComponentTypes.xsd 33
L
launching the Sandbox 18
M
D
Developer Central
direct access to Sandbox 17
signing up for 17
direct access to Sandbox 17
Direct Payment 35
MassPay 36
message URL https
//www.paypal.com/ipn 29
P
password, API 34
paying 31
PayPal Developer Network 13
June 2006
39
Index
W
PayPalSvc.wsdl 33
PDN 13
Personal account 22
private key 34
Website Payments 27
Website Payments Pro 21, 26
WSDL 33
location of PayPal WSDL configuration file 33
R
X
RefundTransaction 36
Request Money testing 31
XSD
location for PayPal Web Services 33
S
Sandbox
API server for 14
direct access to 17
email 19
launching 18
SDKs 13
Send Money 31
Social Security Number for Website Payments Pro 26
sort code for Canada, Germany, and UK 24
source code samples
for IPN 29
T
test accounts 21
testing
billing a customer 31
Buy Now 28
eCheck 30
IPN 29
paying 31
Send Money 31
transferring funds for test set-up 30
verifying a payment 28
verifying a refund 29
Website Payments 27
TransactionSearch 36
transfering funds for test set-up 30
U
UK bank account info 23
username for PayPal Web Services API 34
40
June 2006