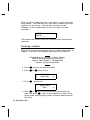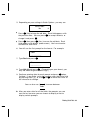
1
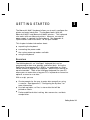
Monarch® 939i Intelligent Keyboard TC0939IOI Rev. AC 5/06 ©2004 Paxar Americas, Inc. All rights reserved. Each product and program carries a respective written warranty, the only warranty on which the customer can rely. Paxar reserves the right to make changes in the product, the programs, and their availability at any time and without notice. Although Paxar has made every effort to provide complete and accurate information in this manual, Paxar shall not be liable for any omissions or inaccuracies. Any update will be incorporated in a later edition of this manual. ©2004 Paxar Americas, Inc. All rights reserved. No part of this publication may be reproduced, transmitted, stored in a retrieval system, or translated into any language in any form by any means, without the prior written permission of Paxar Americas, Inc. WARNING This equipment has been tested and found to comply with the limits for a Class A digital device, pursuant to Part 15 of the FCC Rules. These limits are designed to provide reasonable protection against harmful interference when the equipment is operated in a commercial environment. This equipment generates, uses, and can radiate radio frequency energy and, if not installed and used in accordance with the instruction manual, may cause harmful interference to radio communications. Operation of this equipment in a residential area is likely to cause harmful interference in which case the user will be required to correct the interference at his own expense. CANADIAN D.O.C. WARNING This digital apparatus does not exceed the Class A limits for radio noise emissions from digital apparatus set out in the Radio Interference Regulations of the Canadian Department of Communications. Le présent appareil numérique n’émet pas de bruits radioélectriques dépassant les limites applicables aux appareils numériques de la classe A prescrites dans le Réglement sur le brouillage radioélectrique édicte par le ministère des Communications du Canada. Trademarks Monarch®, 938, 939, 939i, 9855, and 9860 are trademarks of Paxar Americas, Inc. Paxar® is a trademark of Paxar Corporation. UFST, Monotype, the Monotype logo, and CG Triumvirate are trademarks of Monotype Imaging, Inc. Paxar Americas, Inc. 170 Monarch Lane Miamisburg, OH 45342 TA B L E O F C O N T E N T S GETTING STARTED. . . . . . . . . . . . . . . . . . . . . . . . . . . . . . . . . . . . . . . . . . . . . . . . . . . . . 1-1 Overview. . . . . . . . . . . . . . . . . . . . . . . . . . . . . . . . . . . . . . . . . . . . . . . . . . . . . . . Power-Up Modes . . . . . . . . . . . . . . . . . . . . . . . . . . . . . . . . . . . . . . . . . . . . . . . . About This Manual . . . . . . . . . . . . . . . . . . . . . . . . . . . . . . . . . . . . . . . . . . . . . . . About Scripts . . . . . . . . . . . . . . . . . . . . . . . . . . . . . . . . . . . . . . . . . . . . . . . . . . . Unpacking the Keyboard . . . . . . . . . . . . . . . . . . . . . . . . . . . . . . . . . . . . . . . . . . Connecting the Keyboard’s Cable . . . . . . . . . . . . . . . . . . . . . . . . . . . . . . . . . . . Connecting the Scanner’s Cables . . . . . . . . . . . . . . . . . . . . . . . . . . . . . . . . . . . Using the Keyboard . . . . . . . . . . . . . . . . . . . . . . . . . . . . . . . . . . . . . . . . . . . . . . Control Keys. . . . . . . . . . . . . . . . . . . . . . . . . . . . . . . . . . . . . . . . . . . . . 1-1 1-2 1-2 1-3 1-3 1-4 1-5 1-6 1-7 SETTING BATCH OPTIONS . . . . . . . . . . . . . . . . . . . . . . . . . . . . . . . . . . . . . . . . . . . . . . 2-1 Setting Prompts and Defaults. . . . . . . . . . . . . . . . . . . . . . . . . . . . . . . . . . . . . . . 2-2 Non-Knife Setup. . . . . . . . . . . . . . . . . . . . . . . . . . . . . . . . . . . . . . . . . . 2-5 ENTERING BATCH DATA . . . . . . . . . . . . . . . . . . . . . . . . . . . . . . . . . . . . . . . . . . . . . . . . 3-1 Entering a Batch . . . . . . . . . . . . . . . . . . . . . . . . . . . . . . . . . . . . . . . . . . . . . . . . . Printing Tags Without Cutting. . . . . . . . . . . . . . . . . . . . . . . . . . . . . . . . Using Print Multiple with Inc/Dec Fields . . . . . . . . . . . . . . . . . . . . . . . Examples . . . . . . . . . . . . . . . . . . . . . . . . . . . . . . . . . . . . . . . . . . . . . . . 3-2 3-7 3-8 3-8 TROUBLESHOOTING . . . . . . . . . . . . . . . . . . . . . . . . . . . . . . . . . . . . . . . . . . . . . . . . . . . 4-1 SPECIFICATIONS & ACCESSORIES . . . . . . . . . . . . . . . . . . . . . . . . . . . . . . . . . . . . . . . A-1 Accessories & Options . . . . . . . . . . . . . . . . . . . . . . . . . . . . . . . . . . . . . . . . . . . . A-1 Flat Surface Mount. . . . . . . . . . . . . . . . . . . . . . . . . . . . . . . . . . . . . . . . A-2 Wall Mount . . . . . . . . . . . . . . . . . . . . . . . . . . . . . . . . . . . . . . . . . . . . . . A-3 Table of Contents i CHARACTER SETS . . . . . . . . . . . . . . . . . . . . . . . . . . . . . . . . . . . . . . . . . . . . . . . . . . . . B-1 Supported Symbol Sets and Code Pages . . . . . . . . . . . . . . . . . . . . . . . . . . . . . Internal (Standard and Reduced Font) . . . . . . . . . . . . . . . . . . . . . . . . Bold . . . . . . . . . . . . . . . . . . . . . . . . . . . . . . . . . . . . . . . . . . . . . . . . . . . ANSI . . . . . . . . . . . . . . . . . . . . . . . . . . . . . . . . . . . . . . . . . . . . . . . . . . Code Page 437 . . . . . . . . . . . . . . . . . . . . . . . . . . . . . . . . . . . . . . . . . . Code Page 850 . . . . . . . . . . . . . . . . . . . . . . . . . . . . . . . . . . . . . . . . . . B-1 B-2 B-3 B-4 B-5 B-6 CONFIGURING THE SYSTEM . . . . . . . . . . . . . . . . . . . . . . . . . . . . . . . . . . . . . . . . . . . . C-1 Accessing the Keyboard’s Main Menu . . . . . . . . . . . . . . . . . . . . . . . . . . . . . . Operating in Script Mode . . . . . . . . . . . . . . . . . . . . . . . . . . . . . . . . . . . . . . . . . . About the Scanner . . . . . . . . . . . . . . . . . . . . . . . . . . . . . . . . . . . . . . . . . . . . . . . Operating the Scanner . . . . . . . . . . . . . . . . . . . . . . . . . . . . . . . . . . . . Troubleshooting the Scanner. . . . . . . . . . . . . . . . . . . . . . . . . . . . . . . . Cleaning . . . . . . . . . . . . . . . . . . . . . . . . . . . . . . . . . . . . . . . . . . . . . . . Enabling the Scanner . . . . . . . . . . . . . . . . . . . . . . . . . . . . . . . . . . . . . . . . . . . . Configuring the Scanner . . . . . . . . . . . . . . . . . . . . . . . . . . . . . . . . . . . . . . . . . . Enable the Communications Port . . . . . . . . . . . . . . . . . . . . . . . . . . . . Reset to Default Values. . . . . . . . . . . . . . . . . . . . . . . . . . . . . . . . . . . . Set the Communications Port Defaults . . . . . . . . . . . . . . . . . . . . . . . . Set the Minimum Bar Code Width. . . . . . . . . . . . . . . . . . . . . . . . . . . . ii Table of Contents C-1 C-1 C-2 C-2 C-3 C-3 C-4 C-5 C-5 C-6 C-6 C-8 1 G E T T I N G S TA R T E D The Monarch® 939i keyboard allows you to easily configure the printer and enter batch data. The keyboard works with the Monarch® 9855 and Monarch® 9860 printers. This keyboard also works with non-Monarch printers. However, an external power supply is required for the keyboard. See Appendix A, "Specifications and Accessories" for the part number. This chapter includes information about N unpacking the keyboard. N connecting the power cable. N the various power-up modes available N using the keyboard. Overview The 939i keyboard is an "intelligent" keyboard that can be programmed to show user prompts and collect data. Using the Application Development Kit II (ADK2), an application, or script, can be written to program the keyboard. See the ADK manual for more information. Think of the intelligent keyboard like your PC, where you can enter data using your PC’s keyboard or connect an optional scanner to scan data. With a script, you can N Create prompts for the user to enter data manually or using a scanner. See Appendix C, "Configuring the System," for more information. N Use look-up tables, or files, to store data that will be printed on labels. N Perform additional data tracking, data conversion, and data manipulation. Getting Started 1-1 Throughout this manual, you will see references to the term script. The script is the program that runs on the keyboard to perform a specific task, such as scanning or collecting data. Monarch® offers custom script writing. Contact your Monarch Representative for information and pricing on custom scripts. Power-Up Modes Your 939i keyboard has the ability to operate in "terminal" mode or in "intelligent" mode (using a custom ADK2 script). If there is no ADK2 script loaded in the keyboard, the keyboard operates in terminal mode. You can enter data and configure the printer. In terminal mode, the keyboard does not access the intelligent functionality provided by a script. If an ADK2 script is loaded in the keyboard, the script automatically runs when the keyboard and printer are turned on. The prompts you see and what you do are controlled by the script. About This Manual This manual is arranged in several sections: N Use Chapters 2 through 4 when your keyboard is operating in terminal mode. N Use Appendix A for keyboard specifications. N Use Appendix B for the available character sets. N Use Appendix C, with information for your System Administrator on intelligent (script) mode and configuring the scanner. 1-2 Getting Started About Scripts This manual does not cover any specific information about what may be in your script, because each script is different. Your script is written based on jobs you need to perform. A script should contain several basics features: N A way to enter and exit the script. N A way to enter terminal mode (required for 9860 printer). N A message about the keyboard’s backup battery when it requires replacing. N The prompts for entering the date and time each time you turn on the printer. N The scanner’s configuration and setup (if you are using a scanner). Contact your System Administrator for more information about these items. Unpacking the Keyboard After unpacking the keyboard, look through all packaging material for parts. Keep the box and packaging material in case the keyboard ever needs repair. 1. Pull the long, coiled cable out from the bottom of the base. 2. Slide the first loop in the cable slot as shown. Cable Slot Getting Started 1-3 Connecting the Keyboard’s Cable When using the keyboard with a Monarch® 9855 or 9860 printer, the keyboard receives power from the printer. 1. Turn OFF the printer before you connect the keyboard’s cable. 2. Plug the 9-pin coiled keyboard cable into the back of the printer. Keyboard Cable Goes Here ON/OFF Switch 3. Tighten the screws on the cable to secure the cable to the printer. 4. Turn ON the printer. On the back of the printer, press (I) to turn on and (O) to turn off the printer. You will see the prompts for your job. If a script is not written for your job, the keyboard displays PRINT MODE Ready See your System Administrator for information about your job. 1-4 Getting Started Connecting the Scanner’s Cables A scanner is optional for the keyboard. You need to connect the cable to the scanner and keyboard before you can use it. The scanner receives power through the keyboard. For more information about the scanner or other peripheral devices, refer to their User Manuals. 1. Turn OFF the printer before you connect the scanner’s cable. 2. Reach into the bottom of the keyboard’s base and locate the keyboard’s auxiliary serial port, which is on a short, straight cable as shown. 3. Slide the cable into the slot on the keyboard’s base. Auxiliary Serial Port Cable Slot Keyboard Cable to Printer Scanner Cable 4. On the scanner, connect the RJ45 male connector end of the cable into the scanner. You will hear it click into place. 5. Connect the other end (9-pin male) of the cable to the keyboard’s auxiliary serial port (9-pin female). 6. Tighten the screws on the cable to secure the scanner cable to the auxiliary serial port. Getting Started 1-5 7. Tuck the connectors into the keyboard’s base if necessary. 8. Turn ON the printer. Press (I) to turn on and (O) to turn off the printer. Using the Keyboard The keyboard has full alphabetic keys with 10 numeric keys, 5 function keys, 4 arrow keys, and several special keys. 1-6 Getting Started Control Keys E Escape. Returns the display to the previous menu. Also clears an error. C Clear. Clears the entire field. P Pause. Interrupts printing. Press Pause again to resume printing. F Feed. Feeds a blank label if there is no print job. Prints a label in on-demand mode. Prints a label with error information that is useful to your System Administrator if an error is displayed. C Cut. Cuts the supply. L R Displays menu items and allows you to move the cursor. u d Moves between fields in Batch Entry. N Enter. Selects the displayed menu item. S Shift. Toggles between upper and lower-case. Use with other keys to display ¢, ", @, :, ;, -, =, +, #, %, (, ), &, *. f - g Functions keys that are reserved for future use. c Caps Lock. Allows you to type all upper-case characters. When the caps lock is on, a padlock symbol is displayed in the upper right hand corner. a Enters an international character for printing when pressed and held along with a character code. See Appendix B, "Character Sets" for the character codes. s Space. Inserts a blank space between characters. Getting Started 1-7 1-8 Getting Started 2 S E T T I N G B AT C H O P T I O N S This chapter only applies when using the keyboard in terminal mode. When using the keyboard in intelligent mode, your script controls the prompts you see and each script is different. You can select Batch Options to change which prompts appear during Batch Entry mode and set default values for those prompts. Customizing which prompts appear during batch entry can reduce the time it takes to enter data for a format. If a knife is not installed on the printer, you can prevent those prompts from appearing during batch entry mode. If you set a new default value for an option, that value is used even if the prompt is not displayed. If you do not change a default value for an option, the system default is used if the prompt is not displayed. MAIN MENU CANCEL ALL PRINT MODE BATCH ENTRY Option Default Clear Fields Number of Parts Print Multiple Quantity Cut Option Cut Multiple Cut Last Ticket No 1 1 1 No 1 No REPEAT BATCH BATCH OPTIONS SETUP SCRIPTS DIAG. Setting Batch Options 2-1 Setting Prompts and Defaults Use the following steps to customize which prompts appear during batch entry and to specify defaults for these prompts. 1. Press N at the Main menu, when you see Batch Options. If you have password protection enabled, you will see Enter Password: _______ 2. Press F three times and then press N. Clear Fields? Prompt? Yes 3. Decide if you want to see this prompt in Batch Entry mode and press either l or r to display your selection. Press N. Clear Fields? No r 4. Decide if you want to change the default (No) and press either l or r to display your selection. Press N. Number of parts Prompt? Yes 5. Decide if you want to see this prompt in Batch Entry mode and press either l or r to display your selection. Press N. Number of parts [1/5]: +1 6. Decide if you want to change the default (1) part printed across the supply. Press r to change the number of parts (1-5). Press N. 2-2 Setting Batch Options Cut Option Prompt? Yes 7. Decide if you want to see this prompt in Batch Entry mode and press either l or r to display your selection. Press N. Cut Option No r 8. Decide if you want to change the default (No) and press either l or r to display your selection. Press N. Cut Multiple Prompt? Yes 9. Decide if you want to see this prompt in Batch Entry mode and press either l or r to display your selection. Press N. Cut Multiple 1________ 10. Decide if you want to change the default (1) tag printed before cutting. Enter a quantity (1-32000). Press N. To cut between batches, make the Cut Multiple the same as the print quantity. Cut Last Ticket? Prompt? Yes 11. Decide if you want to see this prompt in Batch Entry mode and press either l or r to display your selection. Press N. Cut Last Ticket? No r Setting Batch Options 2-3 12. Decide if you want to change the default (No) and press either l or r to display your selection. If you select "Yes," the last tag in the batch is cut. The printer must feed one or two tags past the printhead to cut the last tag in the batch. Press N. Cut After Batch? Prompt? Yes 13. Decide if you want to see this prompt in Batch Entry mode and press either l or r to display your selection. If you select "Yes," the last tag in the batch is cut. The printer must feed one or two tags past the printhead to cut the last tag in the batch. Press N. Cut After Batch? No r 14. Decide if you want to change the default (No) and press either l or r to display your selection. If you select "Yes," the knife cuts before the first tag and cuts after batch, so the tags are cuts in strips. Press N. No Cut Before? Prompt? Yes 15. Decide if you want to see this prompt in Batch Entry mode and press either l or r to display your selection. Press N. No Cut Before? No r 16. Decide if you want to change the default (No) and press either l or r to display your selection. If you select "Yes," the knife does not cut before the first tag in a batch, but does cut between each tag and after the last tag in a batch. Press N. 2-4 Setting Batch Options Quantity? Prompt? Yes 17. Decide if you want to see this prompt in Batch Entry mode and press either l or r to display your selection. Press N. Quantity 1________ 18. Decide if you want to change the default (1) for the quantity of tags to print in a batch. Enter a quantity (1-32000). Press N. After setting the batch options, you are ready to use Batch Entry mode to enter data for your formats. See Chapter 3, "Entering Batch Data," for more information. Non-Knife Setup If you do not have a knife attached to the printer, you are prompted for Print Multiple, instead of Cut Multiple. Print Multiple Prompt? Yes 1. Decide if you want to see this prompt in Batch Entry mode and press either l or r to display your selection. Press N. Print Multiple 1________ 2. Decide if you want to change the default (No) for the number of copies of each tag to print as a set within a batch. Enter a quantity (1-32000). Press N. Quantity? Prompt? Yes Setting Batch Options 2-5 3. Decide if you want to see this prompt in Batch Entry mode and press either l or r to display your selection. Press N. Quantity 1________ 4. Decide if you want to change the default (1) for the quantity of tags to print in a batch. Enter a quantity (1-32000). Press N. After setting the batch options, you are ready to use Batch Entry mode to enter data for your formats. See Chapter 3, "Entering Batch Data," for more information. Keep in mind the following definitions: Number of Parts Number of times data prints across the tag’s width. Using one to print data once on the tag. Using three to print data three times across the tag. Cut Multiple Number of tags printed between cuts as a set. A cut multiple of one cuts after each tag. To cut after each batch, set the cut multiple equal to the print quantity. If the cut multiple is three and the print quantity is 15, five sets of three tags are printed and cut (15 tags). If the cut multiple is three and the print quantity is 16, five sets of three tags and one set of one tag are printed and cut (16 tags). The cut multiple does NOT affect the printed quantity. 2-6 Setting Batch Options Print Multiple Number of copies of each tag to print as a set within a batch. A print multiple of one prints one set of one tag. A print multiple of three prints three copies of each tag as a set. If the print multiple is three and the print quantity is 15, then 15 sets of tags with three tags per set are printed (45 tags). If the print multiple is two and the print quantity is four, then four sets of tags with two tags per set are printed (8 tags). The most common application for print multiple is with incrementing or decrementing fields. See "Using Print Multiple with Inc/Dec Fields" for more information. The print multiple DOES affect the printed quantity. Print Quantity Number of tags or sets of tags printed in a batch. A print quantity of 30 prints 30 tags when the print multiple is one. Set Number of tags to be printed together within a batch. Setting Batch Options 2-7 2-8 Setting Batch Options 3 E N T E R I N G B AT C H D ATA This chapter only applies when using the keyboard in terminal mode. When using the keyboard in intelligent mode, your script controls the prompts you see and each script is different. This chapter explains how to enter batch data from the keyboard. You can enter numbers, letters, and a variety of symbols (including punctuation and international characters) from the keyboard. See Appendix B, "Character Sets" for information about international characters. Some fields specifically require numeric or alphabetic data. If you try to enter numeric data for an alpha field, or alphabetic data for a numeric field, the printer does not accept the data. Enter the correct data and press N. To enter numeric data, press the key that shows the number you want. The screen displays the number and the cursor moves to the next position in the field. This is also how you enter a period (.), comma (,), or dollar sign ($). To enter alpha characters, press the key that shows the letter you want. The screen displays the character and the cursor moves to the next position in the field. Here is an example of how to enter the word Red. Not all fonts support lower-case letters. 1. Press and hold S while pressing the R key. An upper-case R appears on the display. 2. Press the E key. A lower-case e appears on the display. 3. Press the D key. A lower-case d appears on the display. Entering Batch Data 3-1 When a field has fixed characters, they appear as part of the data entry prompt. The fixed data stays the same, and prints on every tag that uses the format. Only the data you enter can be changed. In the example below, the first six digits are fixed characters. UPCA Barcode: 004156 _ _ _ _ _ The printed field contains both the fixed characters and the data you enter. Entering a Batch Batch Entry lets you enter the data to print a batch (or batches) of supplies. You must first download your formats to the printer. Depending on your settings in Batch Options, some of these prompts may or may not appear. See Chapter 2, "Setting Batch Options" for more information. 1. Press E until you see the Main menu. 2. Press L or R until you see l MAIN MENU Batch Entry r 3. Press N. You will see Select Format: FMT-1 r 4. Press L or R until you see the name of the format you want, then press N. You can also type the first letter of the format name and the display jumps to formats beginning with that letter. 3-2 Entering Batch Data 5. Depending on your settings in Batch Options, you may see Clear Fields? No r N Press N (No) to keep the old data. Each field appears with the previous data. You can press N to accept the data, or change it and press N. N Press R then press N (Yes) to erase the old data. Each field appears with blanks (underscores). You have to enter new data for each field. 6. You will see the first prompt for the format. For example Color: ________ 7. Type Red and press N. Price: ________ 8. Type $99.99 and press N. (Depending on your format, you may not need to type the dollar sign.) 9. Continue entering data for each prompt and press N when finished. If you make a mistake, you can clear the entire field by pressing clear (C) or use L or R to move the cursor to the character to change. You can also use u or d to move between fields. 10. After you enter data for all the fields, the prompts you see next varies, because you can choose to display or not to display certain prompts. Entering Batch Data 3-3 You may see Number of parts? [1/5]: _ 11. Type the number of times the data prints across the tag width. Press N. Cut Option No r N If your printer has a knife and you want to cut tags, press R to display "Yes" and press N. N If your printer does not have a knife, the Cut Option prompt does not appear. See "Printing Tags Without Cutting" for more information. If you answered "Yes" to the cut option, you have several cut modes to select from. Cut after tag (Cut Mode 1) Cut after batch (Cut Mode 2) Cut last ticket (Cut Mode 3) No cut before (Cut Mode 4) Cut in Strips (Cut Mode 5) 3-4 Entering Batch Data Cuts before first tag, cuts each tag, and cuts after last tag. Printed tags left between knife and printhead. Cuts before first tag, cuts after batch. Cuts in strips, not each tag. Printed tags left between knife and printhead. Cuts before first tag, cuts each tag, cuts after the last tag and feeds one or two tags past the printhead when it cuts the last tag in the last batch. Does not cut before the first tag in a batch, but cuts between each tag and after the last tag in the batch. Printed tags left between knife and printhead. Cuts before first tag, cuts after batch. Cuts in strips, not each tag. Feeds one or two tags past the printhead when it cuts the last tag in the batch. If you do not specify a cut mode (cut last ticket, cut after batch, or no cut before), the knife cuts after each tag. This is the same as cut mode 1. The knife uses the last selected cut mode. For example, if you select "Cut Last Ticket" and then select "Yes" to "Cut After Batch," the knife only cuts after each batch instead of after the last tag in the batch. Cut multiple [1/32000]: 1 _ _ _ _ 12. Type the number of tags to print before cutting and press N, or accept the default value of 1 by pressing N. A cut multiple of one cuts after each tag. This is the same as cut mode 1. Cut Last Ticket: No r 13. If you want to cut the last tag in the batch, press R to display "Yes" and press N. The printer feeds one or two tags past the printhead when it cuts the last tag in the last batch. Depending on the length of your supply, you may lose up to two tags after the last batch. This is the same as cut mode 3. Cut After Batch: No r 14. If you want to cut after every batch, press R to display "Yes" and press N. The knife cuts before the first tag and cuts after batch, so the tags are cuts in strips. This is the same as cut mode 2. No Cut Before? No r Entering Batch Data 3-5 15. If you do not want to cut before the first tag in a batch, press R to display "Yes" and press N. The knife does not cut before the first tag in a batch, but does cut between each tag and after the last tag in a batch. This is the same as cut mode 4. Quantity [1/32000]: 1 _ _ _ _ 16. Type the number of tags or sets of tags you want to print in this batch and press N. A cut multiple of two with a batch quantity of 30 prints 30 tags (15 sets of two tags). Print Now? No r 17. Select either "No" or "Yes" and press N. If you select "No," the batch data is saved to print later and you return to the format selection prompt in Batch Entry mode. To print the format later, press N when you see "PRINT MODE Ready." If you select "Yes," the batch begins to print and cut (if cut options were enabled). The display counts the tags as they print and how many tags are in the batch. After the batch prints, you return to the "Select Format" prompt in Batch Entry. 3-6 Entering Batch Data P r i n t i n g Ta g s W i t h o u t C u t t i n g Depending on your settings in Batch Options, some of these prompts may or may not appear. See Chapter 2, "Setting Batch Options" for more information. If you answered "No" to the cut option, you may see Print Multiple [1/32000]: _ _ _ _ _ 1. Type the number of copies of each tag to print as a set within a batch. If you want three copies of each tag, use a print multiple of 3. Press N. Quantity [1/32000]: _ _ _ _ _ 2. Type the number of tags or sets of tags you want to print in this batch and press N. A print multiple of two with a batch quantity of 30 prints 60 tags (30 sets of tags with two tags per set). Print Now? No r 3. Select either "No" or "Yes" and press N. If you select "No," the batch data is saved to print later and you return to the format selection prompt in Batch Entry mode. To print the format later, press N when you see "PRINT MODE Ready." If you select "Yes," the batch begins to print and cut (if cut options were enabled). The display counts the tags as they print and how many tags are in the batch. After the batch prints, you return to the "Select Format" prompt in Batch Entry. Entering Batch Data 3-7 Using Print Multiple with Inc/Dec Fields If your tag has an incrementing or decrementing field, the print multiple is the number of tags printed as a set before incrementing or decrementing. If the incrementing field is set to 10, the print multiple is 2, and the print quantity is 2, then four tags are printed. Two tags print "10" in the incrementing field, the other two tags print "11" in the incrementing field. Examples N Number of parts = 1, cut multiple or print multiple = 1, print quantity = 4: Four sets of one tag are printed (and cut after each tag if using cut multiple). N Number of parts = 3, cut multiple = 2, print quantity = 2: Two tags are printed and cut after the second tag is printed. N Number of parts = 3, print multiple = 2, print quantity = 2: Four tags are printed as two sets of two tags. N Number of parts = 3, print multiple = 2, print quantity = 4: Eight tags are printed as four sets of two tags. The following graphic shows the relationship between the number of parts, cut multiple, and print multiple. 3-8 Entering Batch Data Three-part tag (number of parts = 3) Cut here for a cut multiple of 1 (Cut after one tag) OR Print multiple = 1 (Prints one tag as a set) Cut here for a cut multiple of 2 (Cut after two tags) OR Print multiple = 2 (Prints two tags as a set) Entering Batch Data 3-9 3-10 Entering Batch Data 4 TROUBLESHOOTING This chapter provides solutions to keyboard problems and explains common status code messages you may receive when using the keyboard. Problem The keyboard display is blank. The data you entered is not accepted. Your data was not accepted and blanks are still showing. You entered an incorrect check digit. You tried to skip a required field. Letters are not in the expected case. Monetary symbols do not print as expected. Script is not running. Scanner does not work. Action Make sure the printer is ON. Make sure the keyboard cable is securely attached to the printer. If the keyboard was attached while the printer was on, turn the printer OFF and then back ON. Refer to your format for acceptable characters for this field. Some fields accept only letters, some accept only numbers, and some accept only specific ranges of letters or numbers. This field requires data for all underscores shown. Enter the correct data and press N. The data and check digit must be the correct combination. Enter the correct data and press the N. This field requires data before continuing to the next field. Enter data and press the N. Make sure the Caps Lock ( c) is not on. Make sure your font supports the selected code page (Bold, ANSI, etc.). For more information, see Appendix B, "Character Sets." Turn printer off and then back on. If this does not solve the problem, contact Technical Support for more information. If using "terminal mode," make sure the scanner has been enabled. See Appendix C, "Configuring the System," for more information. Troubleshooting 4-1 4-2 Troubleshooting A S P E C I F I C AT I O N S & ACCESSORIES Height: 4.0 inches (102 mm) Width: 8.25 inches (210 mm) Depth: 8.75 inches (222 mm) Weight: 2.33 lbs. (1.06 kg) Shipping Weight: 3.4 lbs. (1.5 kg) Power Source: Supplied by printer Operating Limits: For Thermal Transfer (ribbon) 40° to 95° F (4° to 35° C) For Thermal Direct 40° to 104° F (4° to 40° C) Accessories & Options An optional stand is available for the keyboard. It can be used on a flat surface or mounted on a wall. An optional scanner, which includes a scanner stand, is also available. N External Power Supply (part number 126813) Only required when using a non-Monarch printer. N 9 to 9-pin Programming Cable (part number 126660) Specifications & Accessories A-1 Flat Surface Mount Make sure all surfaces you apply the dual lock fasteners to are free from dirt and oil. If necessary, clean with isopropyl alcohol. 1. Pull the cord through the large hole in the stand. 2. Set the keyboard into the stand. 3. Attach either the rubber pads or dual lock fasteners to the base of the keyboard stand. If using the dual lock fasteners, attach the other side of the fastener to the tabletop. To remove the keyboard from the stand, lift the keyboard from the bottom. A-2 Specifications & Accessories Wa l l M o u n t 1. Hold the bottom of the stand against the wall (hinge side up). Mark the mounting holes with a pencil. 2. Screw the stand onto the wall (screws not included). 3. Pull the cord through the large hole in the stand. 4. Set the keyboard into the stand. To remove the keyboard from the stand, lift the keyboard from the bottom. Specifications & Accessories A-3 A-4 Specifications & Accessories B CHARACTER SETS This appendix contains a listing of the symbol sets and code pages the printer supports. Supported Symbol Sets and Code Pages The CG Triumvirate typefaces support only the ANSI and DOS Code Page 437 and 850 Symbol Sets. These fonts print a slashed zero when using the ANSI symbol set. However, the scalable font does not print a slashed zero or support Code Page 1256 (Arabic). Internal Use this set to print international monetary symbols, the trademark () symbol, and for formats that may be used on other MPCLII printers. ANSI Use this set with proportionally spaced fonts. DOS Code Pages 437 or 850 Use this set for extended and international characters with proportionally spaced fonts. To enter a character code: Press and hold a. Use the numeric keys to enter a three-digit character code. For example, press a 179 for ¥ . The keyboard’s display may not match the character printed. If you selected monetary signs from the Setup, Defaults menu and use the Standard, Reduced or Bold font, the monetary symbols from the selected country will be printed. However, if using the CG-Triumvirate Fonts, the monetary symbols may not print as expected. Make sure your font requirements are supported by the selected code page. Character Sets B-1 Internal (Standard and Reduced Font) B-2 Character Sets Bold Character Sets B-3 ANSI B-4 Character Sets Code Page 437 Character Sets B-5 Code Page 850 B-6 Character Sets CONFIGURING THE SYSTEM C This chapter contains information useful for your System Administrator: N Accessing the Keyboard’s Main Menu N Operating in Script Mode N Configuring the Scanner Accessing the Keyboard’s Main Menu The Keyboard’s Main Menu allows you to load scripts, setup communication parameters, and select a display language for the Keyboard’s Main Menu. Changing a display language does not change the language of any script messages. To access the Keyboard’s Main Menu, press X on the keyboard within the first two seconds when the printer/keyboard are turned on to see the Keyboard’s Main Menu. Operating in Script Mode This manual does not cover any specific information about what may be in your script, because every script is different. Your script is written based on jobs you need to perform. Your script automatically runs when you turn on the printer and keyboard. The prompts you see and what you do are controlled by the script. Configuring the System C-1 About the Scanner A scanner is optional for the keyboard. For more information about the scanner or other peripheral devices, refer to their User Manuals. Use this section to N operate the scanner N troubleshoot the scanner N clean the scanner’s window N configure the scanner. Your ADK script should already be written to enable and configure the scanner for you. N enable the scanner. If you do not have an ADK script running, terminal mode provides support for the scanner; however, the scanner must be enabled through the Keyboard’s Main Menu. See "Enabling the Scanner" for more information. The scanner must be connected before you can use it. See "Connecting the Scanner’s Cables" in Chapter 1 for more information. Operating the Scanner CAUTION Do Not stare into the beam. To scan a bar code: 1. Point the scanner at a slight angle to, and approximately four to eight inches from the bar code symbol. 2. Press the button on the scanner. When the scanner is in the stand, it automatically scans any bar codes held in front of the scanner’s window. Make sure you do not scan data twice or accidentally scan the wrong data. C-2 Configuring the System Tr o u b l e s h o o t i n g t h e S c a n n e r If the bar code does not scan: N Change the scanner’s angle slightly and try again. N Move the scanner four to eight inches away from the bar code. Adjust this distance as needed to find the correct distance. N Try scanning another bar code that you have scanned successfully. If that scan is successful, the scanning problem may be with the bar code. N Move to a more dimly lit area. N Ensure there are no voids (streaks) in the bar code symbol. N Clean the scanner window. See "Cleaning" for more information. N If the scanner stays in the same place without scanning anything for awhile, the scanner may appear to "time out." If this happens move the scanner slightly and then towards the bar code you want to scan. The scanner should scan the bar code. Make sure you do not scan data twice or accidentally scan the wrong data. N Before you call Service, print a set of test labels. The test labels contain information to help Service diagnose mechanical and setup problems. To print a set of test labels, press f when you see "Print Mode Ready." Cleaning Clean the scanner window whenever it appears to be dirty or smeared. To clean it: 1. Moisten a soft cloth with water. 2. Wipe the window until it is completely clean. Configuring the System C-3 Enabling the Scanner If you do not have an ADK script running, terminal mode provides support for the scanner; however, the scanner must be enabled through the Keyboard’s Main Menu. This section is not necessary if using Version 2.3 or greater of the Keyboard’s software, because the COM2 Port is always enabled. 1. Press X on the keyboard within the first two seconds when the printer/keyboard are turned on to see the Keyboard’s Main Menu. 2. Press L or R until you see l MAIN MENU Setup r SETUP COM1 r 3. Press N. 4. Press L or R until you see SETUP l COM2 (Scanner) r 5. Press N. COM2 (Scanner) Enable Scanner r 6. Press N to save the setting. 7. Press E until you see the Main Menu. 8. Turn off and then turn on the printer to initialize the scanner. The scanner beeps on initialization. Now, you need to configure the scanner. C-4 Configuring the System Configuring the Scanner The scanner may already be configured to work with your ADK script. If not, use these bar codes to configure the scanner: N Reset to default values. N Enable the communications port. N Set the communication port to match the keyboard’s settings. N Set the minimum bar code width (if necessary). For additional bar codes to program your scanner, refer to your scanner’s Installation and User’s Guide for more information. Enable the Communications Port The communications port must be enabled before the scanner and keyboard can communicate with each other. To enable the communications port, scan the following series of bar codes, one at a time, from top to bottom. This section is not necessary if using Version 2.3 or greater of the Keyboard’s software. Configuring the System C-5 R e s e t t o D e f a u l t Va l u e s To reset the scanner to default settings, scan this bar code: Set the Communications Port Defaults To set the communications port to the same defaults as the keyboard, scan the following series of bar codes, one at a time, from top to bottom. C-6 Configuring the System You can also set the communication values by using the Keyboard’s Main Menu. The keyboard defaults are 9600 Baud, 8-bit Word Length, 2 Stop Bits, No Parity, and No Flow Control. 1. Press X on the keyboard within the first two seconds when the printer/keyboard are turned on to see the Keyboard’s Main Menu. 2. Select Setup. Press L or R until you see SETUP l COM2 (Scanner) r 3. Press Enter. You see a list of communication options to change (Baud Rate, Word Length, Stop Bits, Parity, and Flow Control). COM2 (Scanner) Baud Rate r 4. Press Enter to change the Baud Rate. Use L or R to scroll through the choices. Press Enter when the Baud Rate you need appears. Continue through the list for the other communication settings and make changes if necessary. Configuring the System C-7 Set the Minimum Bar Code Width To scan single-digit bar codes, scan the following series of bar codes, one at a time, from top to bottom. C-8 Configuring the System