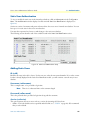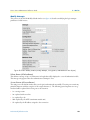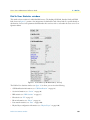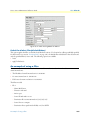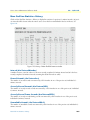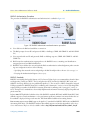
1
Model 29xx Series
Remote Access Server
Administrator’s Reference Guide
Sales Office: +1 (301) 975-1000
Technical Support: +1 (301) 975-1007
E-mail: [email protected]
WWW: www.patton.com
Part Number: O7MDAS-ARG, Rev. I
Revised: February 28, 2012
Patton Electronics Company, Inc.
7622 Rickenbacker Drive
Gaithersburg, MD 20879 USA
Voice: +1 (301) 975-1000
Fax: +1 (301) 869-9293
Technical Support: +1 (301) 975-1007
Technical Support e-mail: [email protected]
WWW: www.patton.com
Copyright © 2012, Patton Electronics Company. All rights reserved.
The information in this document is subject to change without notice. Patton Electronics assumes no liability
for errors that may appear in this document.
The software described in this document is furnished under a license and may be used or copied only in accordance with the terms of such license.
Contents
Audience................................................................................................................................................................. 9
Structure................................................................................................................................................................. 9
Typographical conventions used in this document................................................................................................ 10
1 Introduction .................................................................................................................................................. 12
Introduction ..........................................................................................................................................................13
Logging into the HTTP/HTML Administration Pages .........................................................................................13
HTTP/HTML and SNMP Object Format ...........................................................................................................13
Saving HTTP/HTML Object Changes .................................................................................................................14
2 Home............................................................................................................................................................. 15
Introduction ..........................................................................................................................................................16
Operating Status Variables ....................................................................................................................................17
Immediate Actions ................................................................................................................................................18
3 Import/Export ............................................................................................................................................... 19
Introduction ..........................................................................................................................................................20
Export Configuration ............................................................................................................................................20
Import Configuration............................................................................................................................................22
4 Alarms ........................................................................................................................................................... 23
Introduction ..........................................................................................................................................................24
Displaying the Alarms window ..............................................................................................................................25
Modify Response—Configuring the alarm response system...................................................................................27
Modify Alarms—Configuring alarm severity levels................................................................................................29
5 Authentication............................................................................................................................................... 30
Introduction ..........................................................................................................................................................32
Displaying the Authentication window..................................................................................................................32
The Statistics section .............................................................................................................................................32
The Configuration section.....................................................................................................................................34
Setting Up Authentication.....................................................................................................................................37
Static User Authentication.....................................................................................................................................41
Adding Static Users ...............................................................................................................................................41
Modify Static User ................................................................................................................................................42
6 DAX .............................................................................................................................................................. 44
Introduction ..........................................................................................................................................................45
Configuring the DAX............................................................................................................................................45
7 Dial In........................................................................................................................................................... 48
Introduction ..........................................................................................................................................................54
Dial In main window ............................................................................................................................................55
Dial Modulations window.....................................................................................................................................57
Dial Telco window ................................................................................................................................................60
3
Contents
Access Server Administrators’ Reference Guide
Dial Protocol window............................................................................................................................................62
Dial In Details.......................................................................................................................................................65
Dial In Modify default window .............................................................................................................................66
Manage DNIS Window ........................................................................................................................................77
Dial In User Statistics window...............................................................................................................................88
8 Dial Out ...................................................................................................................................................... 103
Introduction ........................................................................................................................................................107
Dial Out Main Window......................................................................................................................................107
Dial Out Details window ....................................................................................................................................110
Dial Out Modify window....................................................................................................................................111
Dial Out Locations Window ...............................................................................................................................117
Dial Out User Statistics Window ........................................................................................................................123
An example section of dialout..............................................................................................................................132
9 Callback ...................................................................................................................................................... 133
Introduction ........................................................................................................................................................134
Dial-in Modify Configuration .............................................................................................................................134
Dial-in Main Window.........................................................................................................................................135
Static User Authentication...................................................................................................................................136
RADIUS Configuration ......................................................................................................................................136
Accounting information ......................................................................................................................................137
Dialout................................................................................................................................................................137
10 Drop and Insert........................................................................................................................................... 138
Introduction ........................................................................................................................................................139
Drop and Insert main window.............................................................................................................................139
How Drop and Insert works................................................................................................................................140
11 Digital Signal Processing (DSP).................................................................................................................. 142
Introduction ........................................................................................................................................................144
DSP Settings main window .................................................................................................................................145
DSP Connection Performance.............................................................................................................................147
DSP information window....................................................................................................................................151
12 Ethernet....................................................................................................................................................... 154
Introduction ........................................................................................................................................................155
Ethernet Main Window ......................................................................................................................................155
Ethernet Modify Window ...................................................................................................................................157
Ethernet Statistics ................................................................................................................................................158
13 Filter IP ....................................................................................................................................................... 161
Introduction ........................................................................................................................................................162
Defining a filter ...................................................................................................................................................162
Modify Filter .......................................................................................................................................................162
An example of using a filter .................................................................................................................................167
14 Frame Relay................................................................................................................................................. 170
Introduction ........................................................................................................................................................172
4
Access Server Administrators’ Reference Guide
Contents
The Frame Relay main window...........................................................................................................................172
DLMI Window ...................................................................................................................................................174
DLCI window .....................................................................................................................................................176
15 Interfaces ..................................................................................................................................................... 178
Introduction ........................................................................................................................................................179
Interfaces main window.......................................................................................................................................179
Interface Details ..................................................................................................................................................181
16 IP................................................................................................................................................................. 184
Introduction ........................................................................................................................................................187
IP main window ..................................................................................................................................................187
Modify ................................................................................................................................................................190
TCP ....................................................................................................................................................................191
UDP....................................................................................................................................................................194
ICMP..................................................................................................................................................................195
Addressing Information .......................................................................................................................................198
Routing Information ...........................................................................................................................................199
O/S forwarding table window..............................................................................................................................203
IP Routing Destination window ..........................................................................................................................205
Address Translation Information .........................................................................................................................206
17 MFR Version 2 ............................................................................................................................................ 208
Introduction ........................................................................................................................................................210
MFR Version 2 main window .............................................................................................................................210
Interregister Signalling.........................................................................................................................................211
MFR Version 2—Modify ....................................................................................................................................212
18 RIP Version 2 .............................................................................................................................................. 219
Introduction ........................................................................................................................................................220
RIP Version 2 main window ...............................................................................................................................220
RIP Version 2—Configuration............................................................................................................................222
RIP Version 2 (Statistics).....................................................................................................................................223
19 SNMP.......................................................................................................................................................... 225
Introduction ........................................................................................................................................................226
SNMP window....................................................................................................................................................226
In ........................................................................................................................................................................227
Out .....................................................................................................................................................................228
20 System ......................................................................................................................................................... 230
Introduction ........................................................................................................................................................232
System main window...........................................................................................................................................232
System—Modify window....................................................................................................................................237
System—Packet Holding Message Blocks............................................................................................................239
21 System Log .................................................................................................................................................. 241
Introduction ........................................................................................................................................................242
System Log Main Window ..................................................................................................................................242
5
Contents
Access Server Administrators’ Reference Guide
System Log—Modify ..........................................................................................................................................243
System Log—Volatile Memory ...........................................................................................................................247
System Log—Non-Volatile Memory ...................................................................................................................248
What the System Log messages are telling you.....................................................................................................248
22 T1/E1 Link.................................................................................................................................................. 249
Introduction ........................................................................................................................................................252
T1/E1 Link Activity main window ......................................................................................................................253
Alarms Present.....................................................................................................................................................254
Line Status—Configuration ................................................................................................................................258
WAN Circuit Configuration—Modify................................................................................................................259
Line Status—Channel Assignment ......................................................................................................................264
Near End Line Statistics—Current ......................................................................................................................265
Near End Line Statistics—History.......................................................................................................................267
Near End Line Statistics—Totals.........................................................................................................................268
Far End Line Statistics—Current ........................................................................................................................270
Far End Line Statistics—History .........................................................................................................................271
Far End Line Statistics—Totals ...........................................................................................................................273
23 Sync PPP ..................................................................................................................................................... 276
Introduction ........................................................................................................................................................278
WAN Circuit CONFIGURATION window ......................................................................................................278
24 Layer 2 Tunneling Protocol (L2TP)............................................................................................................ 290
Introduction ........................................................................................................................................................291
L2TP Configuration............................................................................................................................................291
25 Contacting Patton ....................................................................................................................................... 295
Introduction ........................................................................................................................................................296
Patton Electronics Company contact information ...............................................................................................296
26 License......................................................................................................................................................... 297
Introduction ........................................................................................................................................................298
End User License Agreement ...............................................................................................................................298
A Supported RADIUS Attributes ................................................................................................................... 300
Access-Accept Attributes......................................................................................................................................301
Access-Request Attributes ....................................................................................................................................301
Access-Challenge Attributes.................................................................................................................................302
Accounting-Start Attributes.................................................................................................................................302
Accounting-Stop Attributes .................................................................................................................................303
B MIB trees .................................................................................................................................................... 304
Model 2960 MIB Tree Structure.........................................................................................................................305
C Technical Reference .................................................................................................................................... 306
Introduction ........................................................................................................................................................307
Configuring a RADIUS server.............................................................................................................................307
Using SNMP with the Access Server....................................................................................................................313
6
Access Server Administrators’ Reference Guide
Contents
Configuring Non-Facility Associated Signaling (NFAS) ......................................................................................316
Configuring Frame Relay ....................................................................................................................................317
Configuring DNIS ..............................................................................................................................................323
Configuring a leased line/dedicated line connection ............................................................................................324
7
Contents
8
Access Server Administrators’ Reference Guide
About this guide
This guide describes configuring a Patton Electronics access server. This section describes the following:
• Who should use this guide (see “Audience”)
• How this document is organized (see “Structure”)
• Typographical conventions and terms used in this guide (see “Typographical conventions used in this document” on page 10)
Audience
This guide is intended for the following users:
• System administrators
• Operators
• Installers
• Maintenance technicians
Structure
This guide contains the following chapters:
• Chapter 1 describes configuring the Administration Page window
• Chapter 2 describes configuring the Home window
• Chapter 3 describes configuring the Import/Export window
• Chapter 4 describes configuring the Alarms window
• Chapter 5 describes configuring the Authentication window
• Chapter 6 describes configuring the DAX window
• Chapter 7 describes configuring the Dial In window
• Chapter 8 describes configuring the Dial Out window
• Chapter 9 describes configuring the Callback window
• Chapter 10 describes configuring the Drop and Insert window
• Chapter 11 describes configuring the DSP window
• Chapter 12 describes configuring the Ethernet window
• Chapter 13 describes configuring the Filter IP window
• Chapter 14 describes configuring the Frame Relay window
• Chapter 15 describes configuring the Interfaces window
• Chapter 16 describes configuring the IP window
• Chapter 17 describes configuring the MFR Version 2 window
9
Access Server Administrator’s Reference Guide
About this guide
• Chapter 18 describes configuring the RIP Version 2 window
• Chapter 19 describes configuring the SNMP window
• Chapter 20 describes configuring the System window
• Chapter 21 describes configuring the System Log window
• Chapter 22 describes configuring the T1/E1 Link window
• Chapter 23 describes configuring the Sync PPP window
• Chapter 24 describes configuring Layer 2 Tunneling Protocol (L2TP)
• Chapter 25 describes the contents of the About window
• Chapter 26 describes the contents of the License window
• Appendix A lists supported RADIUS attributes
• Appendix B lists supported RADIUS attributes
• Appendix C provides information on configuring a RADIUS server, using SNMP with the access server,
configuring NFAS, configuring Frame Relay, configuring DNIS, and configuring a leased-line/dedicatedline connection
Typographical conventions used in this document
This section describes the typographical conventions and terms used in this guide.
General conventions
The procedures described in this manual use the following text conventions:
Table 1. Text conventions
Convention
Meaning
Futura bold type
Indicates the names of menu bar options.
Italicized Futura type
Indicates the names of options on pull-down menus.
Futura type
Indicates the names of fields or windows.
Garamond bold type
Indicates the names of command buttons that execute an action.
<>
Angle brackets indicate function and keyboard keys, such as <SHIFT>,
<CTRL>, <C>, and so on.
Are you ready?
All system messages and prompts appear in the Courier font as the
system would display them.
% dir *.*
Bold Courier font indicates where the operator must type a response or
command
10
Access Server Administrator’s Reference Guide
About this guide
Mouse conventions
The following conventions are used when describing mouse actions:
Table 2. Mouse conventions
Convention
Meaning
Left mouse button
This button refers to the primary or leftmost mouse button (unless you have
changed the default configuration).
Right mouse button
This button refers the secondary or rightmost mouse button (unless you have
changed the default configuration)
Point
This word means to move the mouse in such a way that the tip of the pointing
arrow on the screen ends up resting at the desired location.
Click
Means to quickly press and release the left or right mouse button (as instructed in
the procedure). Make sure you do not move the mouse pointer while clicking a
mouse button. Double-click means to press and release the same mouse button two
times quickly
Drag
This word means to point the arrow and then hold down the left or right mouse button (as instructed in the procedure) as you move the mouse to a new location.
When you have moved the mouse pointer to the desired location, you can release
the mouse button.
11
Chapter 1
Introduction
Chapter contents
Introduction ..........................................................................................................................................................13
Logging into the HTTP/HTML Administration Pages .........................................................................................13
HTTP/HTML and SNMP Object Format ...........................................................................................................13
Saving HTTP/HTML Object Changes .................................................................................................................14
12
Access Server Administrators’ Reference Guide
1 • Introduction
Introduction
You may configure the access server by using its internal HTTP/HTML Administration Pages. However, to
enter into the HTTP/HTML pages, you must first define the LAN Address Technique, LAN IP Address, and
LAN Subnet Mask for the access server. If you have not done so, refer to the Model 29xx Series RAS User Manual available online at www.patton.com/manuals/29xx.pdf.
Logging into the HTTP/HTML Administration Pages
To log into the HTTP/HTML Administration pages, you must enter the 4-octet Internet Protocol (IP) (for
example, http://your.server.ip.address) address as the Universal Resource Locator (URL) into a World-Wide Web
(WWW) browser. After you enter the IP address, the access server will ask for your user name and password as
shown in figure 1.
Figure 1. Access server login window
Your access server will accept the following default administrative passwords:
• superuser—this password carries full permission to change and view any parameters in the access server
• monitor—this password allows full viewing of any non-password oriented variables.
Note
For security reasons, we recommend that you change these passwords immediately after initial configuration.
HTTP/HTML and SNMP Object Format
In this document, we shall describe the variables found on each of the internal HTTP/HTML pages. This
description will include brief definitions of the Patton Enterprise MIB or SNMP MIB II object identifiers
wherever applicable. The format of the variables will resemble figure 2.
Figure 2. HTTP/HTML and SNMP object format
Introduction
13
Access Server Administrators’ Reference Guide
1 • Introduction
Saving HTTP/HTML Object Changes
Sometimes you will need to save changes that you have made in the HTTP/HTML pages. Do the following to
make changes to read/write variables:
1. Select the appropriate Modify screen.
2. Make changes to the desired parameter.
3. Click on the Submit button.
4. Return to the HOME screen.
5. Click on the Record Current Configuration button.
Note
Make sure you follow steps 1 through 5 when modifying the HTTP/HTML
pages. Otherwise, your changes will be lost when the access server is powercycled.
Saving HTTP/HTML Object Changes
14
Chapter 2
Home
Chapter contents
Introduction ..........................................................................................................................................................16
Operating Status Variables ....................................................................................................................................17
Active Calls (diActive) .....................................................................................................................................17
Peak Active Calls (diMaxActive) .....................................................................................................................17
Total Calls (diTotalCallAttempts) ...................................................................................................................17
DSPs Not Working (dspFailed) ......................................................................................................................17
Total DRAM Detected (boxDetectedMemory) ..............................................................................................17
Running Since Last Boot (sysUpTime) ...........................................................................................................17
Immediate Actions ................................................................................................................................................18
15
Access Server Administrators’ Reference Guide
2 • Home
Introduction
This chapter describes the HOME window—the first Administration Page that you see after logging into the
access server (see figure 3). From HOME, you can monitor current system status, modify the Static User database, save any system changes, or reset the system without power-cycling the server.
Note
Clicking on the HOME link in the Configuration Menu pane will return you
to the HOME page from any other page.
The HOME window is divided into two panes: the Configuration Menu pane and the configuration/information pane (see figure 3). The Configuration Menu contains the links to the various access server subsystems,
while the configuration/information pane is where you can view status and other information, or make changes
to the system configuration. Unlike the Configuration Menu pane, which looks the same no matter which subsystem page you may move to, the configuration/information pane contents will change as you move from one
subsystem page to another.
Figure 3. HOME page
Introduction
16
Access Server Administrators’ Reference Guide
2 • Home
Operating Status Variables
There are seven system variables which describe the immediate operating status access server. These variables
are shown in figure 4 and are described in the following sections.
Figure 4. STATUS menu
Active Calls (diActive)
This number, ranging from 0 to 120 displays the total number of calls being processed (connecting, online,
authenticating, and so on) in the access server at the time the HOME page was displayed.
Peak Active Calls (diMaxActive)
The maximum number of active calls seen at one time since the access server was powered on.
Total Calls (diTotalCallAttempts)
The total number of calls attempted since the last boot of the box.
DSPs Not Working (dspFailed)
This number should always be zero. The DSPs in the access server are arranged as a resource pool and called
upon at ring-time. If a DSP fails to respond to the access server’s CPU, it is determined to have failed, at which
point the CPU will remove the DSP from the resource pool. If an incoming call attempts to access the failed
DSP, the RAS will answer, then terminate the call (to a person monitoring the failed call through a telephone
handset, he or she will hear only silence during the call, ending with a faint click as the call is terminated). One
symptom indicating that a DSP has failed is if the access server is not handling as many calls as it normally does.
Total DRAM Detected (boxDetectedMemory)
This number shows the total number of bits of installed and available DRAM.
Running Since Last Boot (sysUpTime)
This tells you how long the access server has been running since the it was last reset. It displays the number of
hours and rolls over after 1,193 hours (497 days).
Operating Status Variables
17
Access Server Administrators’ Reference Guide
2 • Home
Immediate Actions
There are several immediate actions (see figure 5) which, when in superuser mode, will cause the access server
to operate according to the descriptions in the following sections.
Figure 5. Immediate Actions buttons
• Record Current Configuration —clicking this button causes the current configuration to be stored in
FLASH memory. Any changes made to the access server configuration are stored in non-volatile RAM. This
allows the user to set the box up with a running configuration before committing it to FLASH. Configuration changes become permanent when you select Record Current Configuration. You will lose all changes
not stored to FLASH the next time the access server is re-booted.
• Hard Reset—this button causes the access server to perform a cold restart. When you select Hard Reset, the
access server confirm that you want to execute this command. Then, the access server will disconnect all
current sessions, re-initialize the interfaces, and re-load configuration parameters from FLASH.
• Set Factory Default Configuration—this button clears out the configuration in FLASH and loads the factory default parameters into FLASH memory. The factory default settings will not execute on the access
server until it is re-booted.
Note
Immediate Actions
Set Factory Default Configuration will delete any routing information, the
access server’s Ethernet IP address, and any other site specific settings made
for your particular installation. You will have to re-enter the access server’s
Ethernet IP address and netmask using the front panel control port in order
to use the HTTP/HTML Management pages.
18
Chapter 3
Import/Export
Chapter contents
Introduction ..........................................................................................................................................................20
Export Configuration ............................................................................................................................................20
Import Configuration............................................................................................................................................22
19
Access Server Administrators’ Reference Guide
3 • Import/Export
Introduction
The Import/Export function enables you to make a backup (or export) copy of your access server’s configuration parameters. By exporting the configurations, the saved files can quickly be loaded, or imported, into a
replacement access server—greatly speeding up the installation process should an access server need replacing.
Note
All actions for Import/Export require superuser access privileges.
To import or export a configuration, click on Import/Export under the Configuration Menu to display the
Import/Export main window (see figure 6).
Figure 6. Import/Export main window
Export Configuration
Note
The exported configuration file is a text-format file. Do not try, however to
edit the operating characteristics contained in the file.
Note
The parameters that will be exported are the power-up settings as they are
stored in flash memory and may not be the current operating parameters. To
ensure that you export the most current parameters, go to HOME, then click
on the Record Current Configuration button under Immediate Actions.
Introduction
20
Access Server Administrators’ Reference Guide
3 • Import/Export
To export the flash configuration, click on the Export Flash link on the Import/Export main page. The access
server will display text configuration information resembling that shown in figure 7.
Figure 7. Typical access server flash memory configuration data
Export Configuration
21
Access Server Administrators’ Reference Guide
3 • Import/Export
To save the displayed data as a text file, select the Save option on your browser (see figure 8). For example,
under Netscape, select File > Save As. A dialog box will display enabling you to save the contents of the export
parameters to a text file. Select the location where you want the file stored, type a file name, and click Save.
Figure 8. Saving the access server flash memory configuration data as a text file
Import Configuration
To import a configuration file into the access server, type the complete path and filename for the configuration
file you wish to load or click on the Browse… button to select the desired file, then click on the Submit Query
button (see figure 6 on page 20).
Upon successfully importing the file, the access server will display Configuration Load Complete, indicating that
the new operating parameters have been loaded into flash memory.
Click on HOME under the Configuration Menu, then click on the Hard Reset button under Immediate Actions.
Note
Do not select Record Current Configuration after importing configuration
parameters.
Import Configuration
22
Chapter 4
Alarms
Chapter contents
Introduction ..........................................................................................................................................................24
Displaying the Alarms window ..............................................................................................................................25
Total System Alarms:X (alarmTotal) ...............................................................................................................25
Alarm Response Outputs ................................................................................................................................26
Alarm Syslog Priority (syslogAlarmPriority) ..............................................................................................26
Alarm SNMP Trap IP 1 (alarmTrapIp0) ...................................................................................................26
Alarm SNMP Trap IP 2 (alarmTrapIp1) ...................................................................................................26
Alarm SNMP Trap IP 3 (alarmTrapIp2) ...................................................................................................26
Alarm SNMP Trap IP 4 (alarmTrapIp3) ...................................................................................................26
Temperature Threshold (boxAlarmTemperature) ......................................................................................26
Current Box Temperature (boxTemperature) ............................................................................................26
Clear All Alarms ........................................................................................................................................26
Alarms ............................................................................................................................................................26
Alarm ID (alarmDefIndex) ........................................................................................................................26
Alarm Name (alarmName) ........................................................................................................................27
Alarm Severity (alarmSeverity) ..................................................................................................................27
Time Since Alarm (alarmTicks) .................................................................................................................27
Alarm Count (alarmCount) ......................................................................................................................27
Generate Alarm .........................................................................................................................................27
Clear Alarm ...............................................................................................................................................27
Modify Response—Configuring the alarm response system...................................................................................27
Alarm Syslog Priority (syslogAlarmPriority) ....................................................................................................28
Alarm SNMP Trap IP 1 (alarmTrapIp0) ........................................................................................................28
Alarm SNMP Trap IP 2 (alarmTrapIp1) ........................................................................................................28
Alarm SNMP Trap IP 3(alarmTrapIp2) .........................................................................................................28
Alarm SNMP Trap IP 4(alarmTrapIp3) .........................................................................................................28
Temperature Threshold(boxAlarmTemperature) ............................................................................................28
Modify Alarms—Configuring alarm severity levels................................................................................................29
23
Access Server Administrators’ Reference Guide
4 • Alarms
Introduction
The access server has an extensive alarm reporting system which enables users to configure, monitor, and test
major and minor alarms. The alarm system can be set to notify if equipment fails (for example, a power supply
failure) or if a T1/E1/PRI port malfunctions. There are 11 access server items that can be configured by the
user to generate alerts based on the condition of the access server. The access server has three methods to notify
of an alarm condition:
• Front panel LED—The front panel ALARM LED has three states that indicate the presence and severity of
an alarm. The states are:
- Off—No alarm present
- Solid—Minor alarm
- Flashing—Major alarm.
• Administration web page indication—The alarms window of the administration page uses highlighting to
indicate which items are in alarm state and how critical the alarm is according to the alarm severity set (see
figure 9):
- Red—Indicates that the alarm has been designated as a critical alarm by the system administrator
- Gold—Indicates that the alarm has been designated as a major alarm by the system administrator
- Yellow—Iindicates that the alarm has been designated as a minor alarm by the system administrator
- Blue—Indicates that the alarm has informational value only as designated by the system administrator
- None—There is no alarm present or the system administrator has chosen for the alarm to be ignored
Figure 9. Sample alarm indication
Introduction
24
Access Server Administrators’ Reference Guide
4 • Alarms
• SYSLOG/SNMP—For external notification, the access server can be configured to send a SYSLOG message or an SNMP TRAP to an external management host. To configure the alarm response for either SNMP
Traps or SYSLOG messages, click on the Alarm Response link (go to “Modify Response—Configuring the
alarm response system” on page 27).
Displaying the Alarms window
Click on Alarms under the Configuration Menu to display the Alarm System main window (figure 10).
Note
The system administrator can manually generate a specific alarm for testing
purposes or clear the alarm counters from the main window.
Figure 10. Alarms main window
Note
The POWER LED will flash if a power supply failure alarm is present.
Total System Alarms:X (alarmTotal)
The total number of alarms currently active on the system.
Besides enabling a user to view current alarm status, manually generate an alarm as a test, and clear the alarm
time and alarm count variables, the Alarms main window also contains links to the following:
• Modify Response—Clicking on this link takes you to a window where you can change how the SYSLOG/
SNMP function notifies remote users of an alarm (see “Modify Response—Configuring the alarm response
system” on page 27)
Displaying the Alarms window
25
Access Server Administrators’ Reference Guide
4 • Alarms
• Modify Alarms—Clicking on this link takes you to a window where you can change how the access server
perceives the severity of each alarm (“Modify Alarms—Configuring alarm severity levels” on page 29)
Alarm Response Outputs
Alarm Response Outputs display the current settings for handling alarm notification via SYSLOG/SNMP
messages. To change how the SYSLOG/SNMP function notifies remote users of an alarm, refer to “Modify
Response—Configuring the alarm response system” on page 27.
Alarm Syslog Priority (syslogAlarmPriority)
Displays the SYSLOG priority of the alarm SYSLOG message. If the minimum priority for SYSLOG daemon
(set under the System Log link) is less than this value, the SYSLOG daemon will receive the major or critical
alarm SYSLOG message.
Alarm SNMP Trap IP 1 (alarmTrapIp0)
The IP address of a host system which is running the SNMP trap daemon. Critical and major alarm messages
will be sent to the system. If set to 0.0.0.0 then no trap message will be sent in response to a major alarm.
Alarm SNMP Trap IP 2 (alarmTrapIp1)
The IP address of a host system which is running the SNMP trap daemon. Critical and major alarm messages
will be sent to the system. If set to 0.0.0.0 then no trap message will be sent in response to a major alarm.
Alarm SNMP Trap IP 3 (alarmTrapIp2)
The IP address of a host system which is running the SNMP trap daemon. Critical and major alarm messages
will be sent to the system. If set to 0.0.0.0 then no trap message will be sent in response to a major alarm.
Alarm SNMP Trap IP 4 (alarmTrapIp3)
The IP address of a host system which is running the SNMP trap daemon. Critical and major alarm messages
will be sent to the system. If set to 0.0.0.0 then no trap message will be sent in response to a major alarm.
Temperature Threshold (boxAlarmTemperature)
If the box registers a temperature greater than this temperature an alarm will be reported. Temperature is
reported in degrees Celsius.
Current Box Temperature (boxTemperature)
Displays the current temperature in Celsius.
Clear All Alarms
Clicking on this button resets all alarms to a non-alarm condition. Clear All Alarms does the following for all
alarms: it resets the alarm, resets Alarm Time to 0.0 seconds, and resets the Alarm Count to 0.
Alarms
This portion of the Alarms main window displays the alarm status table, where you can view current alarm status, manually generate an alarm as a test, and clear the alarm time and alarm count variables.
Alarm ID (alarmDefIndex)
This number identifies the alarm item.
Displaying the Alarms window
26
Access Server Administrators’ Reference Guide
4 • Alarms
Alarm Name (alarmName)
The alarm items are grouped into two categories: Box and WAN trunk alarms. The Box group category lists
access server temperature and power supply status. The WAN category monitors the T1/E1/PRI ports for yellow and red alarms.
Alarm Severity (alarmSeverity)
Shows the alarm severity selected by the system administrator.
Time Since Alarm (alarmTicks)
The Alarm Time column displays the number of seconds the alarm has been activated.
Alarm Count (alarmCount)
The Alarm Count column indicates how many times the alarm has occurred since the last time alarms were
cleared. It is a useful tool for monitoring self-clearing alarms.
Generate Alarm
For testing purposes, clicking the Generate Alarm button next to each alarm name will cause that alarm condition to be activated, as if the actual alarm trigger had occurred.
Clear Alarm
Clicking the Clear Alarm button resets the alarm to a non-alarm condition. Clear Alarm resets Alarm Time to
0.0 seconds, and resets the Alarm Count to 0.
Modify Response—Configuring the alarm response system
The alarm response outputs only effect external notification via SYSLOG/SNMP as the front panel ALARM
LED and the web administration pages will always indicate an alarm condition. The following user configuration items can be set to permit external notification of access server alarm conditions:
Figure 11. Alarm Response System window
Modify Response—Configuring the alarm response system
27
Access Server Administrators’ Reference Guide
4 • Alarms
Alarm Syslog Priority (syslogAlarmPriority)
The SYSLOG priority of the alarm SYSLOG message. If the minimum priority for SYSLOG daemon (set
under the System Log link) is less than this value, the SYSLOG daemon will receive the major or critical alarm
SYSLOG message (prioritySystem has the highest priority; priorityVerbose the lowest).
• priorityVerbose(5)
• priorityDebug(10)
• priorityInfo(20)
• priorityOddity(40)
• priorityService(60)
• prioritySystem(80)
• priorityDisable(1000)
• priorityDisable(1000)
Alarm SNMP Trap IP 1 (alarmTrapIp0)
The IP address of a host system which is running the SNMP trap daemon. Critical and major alarm messages
will be sent to the system. If set to 0.0.0.0 then no trap message will be sent in response to a major alarm.
Alarm SNMP Trap IP 2 (alarmTrapIp1)
The IP address of a host system which is running the SNMP trap daemon. Critical and major alarm messages
will be sent to the system. If set to 0.0.0.0 then no trap message will be sent in response to a major alarm.
Alarm SNMP Trap IP 3(alarmTrapIp2)
The IP address of a host system which is running the SNMP trap daemon. Critical and major alarm messages
will be sent to the system. If set to 0.0.0.0 then no trap message will be sent in response to a major alarm.
Alarm SNMP Trap IP 4(alarmTrapIp3)
The IP address of a host system which is running the SNMP trap daemon. Critical and major alarm messages
will be sent to the system. If set to 0.0.0.0 then no trap message will be sent in response to a major alarm.
Temperature Threshold(boxAlarmTemperature)
If the box registers a temperature greater than this temperature an alarm will be reported. Temperature is in
degrees Celsius.
Modify Response—Configuring the alarm response system
28
Access Server Administrators’ Reference Guide
4 • Alarms
Modify Alarms—Configuring alarm severity levels
The Modify Alarms window (see figure 12) is where you can set the severity level each alarm condition generates and whether it can be a self-clearing condition.
Figure 12. Modify Alarms settings window
The following alarm items that can be configured to generate alarm conditions:
• Box: Over Temperature—An alarm will be triggered when the current temperature exceeds the temperature
threshold.
• Box: Power Supply 1–2 Fail—An alarm will be triggered if power supply 1 or 2 fails.
• Box: Main and Fallback Clock Fail—An alarm will be triggered when either the main or fallback clock fail.
• WAN 1–4 Yellow Alarm—When a WAN port detects a yellow alarm condition, the specific WAN alarm
will be set.
• WAN 1–4 Red Alarm—When a WAN port detects a red alarm condition, the specific WAN alarm will be set.
Each alarm item can be set for one of the following severity levels:
• Critical(4)
• Major(5)
• Minor(6)
• Informational(7)
• Ignore(8)
Note
For maximum flexibility, defining the severity level of the alarm is left up to
the administrator. To set an alarm, click on the drop-down menu for the
desired alarm item, choose the new setting, then click on Submit Query.
Modify Alarms—Configuring alarm severity levels
29
Chapter 5
Authentication
Chapter contents
Introduction ..........................................................................................................................................................32
Displaying the Authentication window..................................................................................................................32
The Statistics section .............................................................................................................................................32
Validated authentications (auAuthenticationsValidTotal) ...............................................................................32
Validated via primary server (auAuthenticationsValidPrimary) .......................................................................32
Validated via secondary server (auAuthenticationsValidSecondary) .................................................................32
Validated via static database (auAuthenticationsValidStatic) ...........................................................................33
Denied authentications (auAuthenticationsDenied) ........................................................................................33
Primary server retries (auPrimaryServerRetrys) ................................................................................................33
Secondary server retries (auSecondaryServerRetrys) .........................................................................................33
Accounting server retries (auAccountingServerRetrys) .....................................................................................33
Primary server timeouts (auPrimaryServerTimeouts) ......................................................................................33
Secondary server timeouts (auSecondaryServerTimeouts) ...............................................................................33
Accounting server timeouts (auAccountingServerTimeouts) ...........................................................................33
Maximum Response Time ..............................................................................................................................33
Last Response Time ........................................................................................................................................33
The Configuration section.....................................................................................................................................34
Validation (auValidation) ...............................................................................................................................34
Host Address (auHostAddress) ........................................................................................................................35
Secondary Host Address (auSecondaryHostAddress) .......................................................................................35
Host Port (auHostPort) ..................................................................................................................................35
Timeout (auTimeout) .....................................................................................................................................35
Retries (auRetries) ...........................................................................................................................................35
Secret (auSecret) .............................................................................................................................................35
NAS Identifier (auNASIdentifier) ...................................................................................................................35
Accounting Address (auAcctAddress) ..............................................................................................................35
Secondary Accounting Address (auSecondaryAcctAddress) .............................................................................35
Accounting Port (auAcctPort) .........................................................................................................................36
Accounting Enable (auAccountingEnable) ......................................................................................................36
Radius Packet Format (auRadiusPacketFormat) ..............................................................................................36
Radius Session ID Size (auRadiusRunningIdSize) ...........................................................................................36
Radius Session ID (auRadiusRunningId) ........................................................................................................37
Setting Up Authentication.....................................................................................................................................37
Validation (auValidation) ...............................................................................................................................38
Host Address (auHostAddress) ........................................................................................................................39
Secondary Host Address (auSecondaryHostAddress) .......................................................................................39
Host Port (auHostPort) ..................................................................................................................................39
Timeout (auTimeout) .....................................................................................................................................39
Retries (auRetries) ...........................................................................................................................................39
30
Access Server Administrators’ Reference Guide
5 • Authentication
Secret (auSecret) .............................................................................................................................................39
NAS Identifier (auNASIdentifier) ...................................................................................................................39
Accounting Address (auAcctAddress) ..............................................................................................................39
Secondary Accounting Address (auSecondaryAcctAddress) .............................................................................39
Accounting Port (auAcctPort) .........................................................................................................................40
Accounting Enable (auAccountingEnable) ......................................................................................................40
Radius Packet Format (auRadiusPacketFormat) ..............................................................................................40
Radius Session ID Size (auRadiusRunningIdSize) ...........................................................................................40
Static User Authentication.....................................................................................................................................41
Adding Static Users ...............................................................................................................................................41
ID (suID) .......................................................................................................................................................41
Username (suUsername) .................................................................................................................................41
Password (suPassword) ....................................................................................................................................41
Service (suService) ...........................................................................................................................................41
Modify Static User ................................................................................................................................................42
Service IP (suServiceIP) ...................................................................................................................................43
Service Port (suServicePort) ............................................................................................................................43
Service Mask (suServiceMask) .........................................................................................................................43
Filter ID (suFilterId) .......................................................................................................................................43
31
Access Server Administrators’ Reference Guide
5 • Authentication
Introduction
Use the Authentication pages to set up system security and to provide specific users with access to appropriate
network services. This section describes the authentication parameters. The access server uses static and/or
RADIUS authentication to decide which dial-in users can access the system (refer to A, “Supported RADIUS
Attributes” on page 300 for a full list of RADIUS attributes).
Displaying the Authentication window
Do the following:
1. Click on Authentication under the Configuration Menu (see figure 13).
Figure 13. Authentication main screen (Statistics section)
2. Select Modify to set up or change access server Authentication parameters.
The Statistics section
The Statistics section of the main Authentication screen lists running totals of statistics for RADIUS and Static
User logins gathered since the last access server reset.
Validated authentications (auAuthenticationsValidTotal)
The total number of validated authentications since the last access server reset.
Validated via primary server (auAuthenticationsValidPrimary)
The number of authentications validated by the primary RADIUS authentication server since the last access
server reset.
Validated via secondary server (auAuthenticationsValidSecondary)
The number of authentications validated by the secondary RADIUS authentication server since the last access
server reset.
Introduction
32
Access Server Administrators’ Reference Guide
5 • Authentication
Validated via static database (auAuthenticationsValidStatic)
The number of authentications validated by the Static User database since the last access server reset.
Denied authentications (auAuthenticationsDenied)
The total number of authentication attempts requested but denied since the last access server reset.
Primary server retries (auPrimaryServerRetrys)
The number of times the access server needed to make subsequent requests for a call to the primary RADIUS
authentication server.
Secondary server retries (auSecondaryServerRetrys)
The number of times the access server needed to make subsequent requests for a call to the secondary RADIUS
authentication server.
Accounting server retries (auAccountingServerRetrys)
The number of times the access server needed to make subsequent accounting requests for a call.
Primary server timeouts (auPrimaryServerTimeouts)
The total number of authentication timeouts by the primary RADIUS authentication server.
Secondary server timeouts (auSecondaryServerTimeouts)
The total number of authentication timeouts by the secondary RADIUS authentication server.
Accounting server timeouts (auAccountingServerTimeouts)
The total number of accounting timeouts by the primary RADIUS accounting server.
Maximum Response Time
The maximum time it has taken for authentication to be completed since the server rebooted.
Last Response Time
The time taken for the last authentication to be completed.
The Statistics section
33
Access Server Administrators’ Reference Guide
5 • Authentication
The Configuration section
The configuration section of the main Authentication screen (see figure 14) shows how the authentication
method used by the RAS is configured.
Figure 14. Authentication main screen (Configuration section)
Validation (auValidation)
Selects how the access server will authenticate an incoming call. Select from:
•
No Validation(0)—Select this to allow un-authenticated calls into the access server, and on to your LAN,
using the default service.
• static Users(1)—Use the access server internal user database only to authenticate. Static users are simply
users and passwords entered into the access server’s internal users database.
• radius Users(2)—Use RADIUS to authenticate and provision user services. RADIUS is a client-server system developed to manage the flexible requirements of remote dial-in users. The RADIUS protocol is specified under RFC 2138 for authentication and RFC 2139 for accounting. RADIUS servers are available as
freeware for most computer platforms and is an excellent method for managing user dial-in security. Any
RADIUS entries will require an associated server to process authentication requests from the access server or
the access server will reject users access. For more information about RADIUS, see RADIUS User Authentication, below.
• tacacs Users(3)—This feature is not currently available
• static Then RADIUS(4)—Check the internal user database first, if no match is found, then use RADIUS to
authenticate and provision user services.
• static Then Tacacs(5)— Check the internal user database first, if no match is found, then use TACACS to
authenticate and provision user services. Not currently implemented.
Note
The following options apply only when using an external authentication
server.
The Configuration section
34
Access Server Administrators’ Reference Guide
5 • Authentication
Host Address (auHostAddress)
Tells the access server the IP address of the primary external authentication server. This must be the IP address
as the access server will not resolve a Fully Qualified Domain Name.
Secondary Host Address (auSecondaryHostAddress)
When using a remote authentication server (RADIUS) this variable provides an alternative server IP address.
Host Port (auHostPort)
This variable tells the access server which UDP port to use when connecting to the host specified in the Host
Address variable. The RADIUS standard, as per RFC 2138, specifies port 1812 for RADIUS authentication.
Some older installations of RADIUS use port 1645.
Timeout (auTimeout)
This option specifies the time, in seconds, before the access server will retransmit an authentication request to
an external authentication server.
Retries (auRetries)
This option specifies the number of times the access server will resend an authentication request to a RADIUS
server after a TIMEOUT occurs. If this number is exceeded then the secondary host will be tried. If this number is exceeded by the secondary host, the user will be rejected.
Secret (auSecret)
The Secret variable sets the shared secret between the authentication client (access server) and the authentication server (RADIUS). It is used to encrypt an authentication request and to decrypt an incoming reply from
the server. The secret on the access server and the RADIUS server must match and must be 15 or fewer printable, non space, ASCII characters.
Note
The same secret word must used on the access server and in the RADIUS clients file.
NAS Identifier (auNASIdentifier)
This variable is used to identify the access server to the remote authentication server. If this option is blank,
then the access server will use it’s IP address to identify itself to the remote server. It does this by using the
NAS-IP-Address attribute instead of the NAS-Identifier attribute.
Accounting Address (auAcctAddress)
This is the IP address of the accounting server. RADIUS also allows for the recording of accounting information.
Secondary Accounting Address (auSecondaryAcctAddress)
When using a remote accounting server (such as RADIUS Accounting) this variable provides the IP address of
the accounting server.
The Configuration section
35
Access Server Administrators’ Reference Guide
5 • Authentication
Accounting Port (auAcctPort)
This is the UDP port on the accounting server specified in Acct Address that the access server should use to
transfer accounting information. RFC 2139 states that port 1813 is the standard RADIUS accounting port.
Some older implementations of RADIUS use port 1646 as the accounting port.
Accounting Enable (auAccountingEnable)
This is a switch that allows the enabling or disabling the reporting of accounting information on the access
server. The following options are available:
• enableAccounting—Begin accounting of RADIUS authenticated users.
• disableAccounting—Disable the accounting feature.
• enableAccounting-no validation—When a response is received from either the authentication or the
accounting server it is validated using the defined secret. If the secret does not match, the reply packet is
dropped just as if it never existed.
Early versions of the Livingston RADIUS server used a method for encoding the accounting reply packet
that was incorrect. Accounting replies from these servers would therefore be dropped because they could
not be authenticated, eventually resulting in timeouts and shutting the call down with the reason authenAccountingTimeout. As a workaround for this issue, the state enableAccountingNoValidation—which does not
check for valid encoding on the accounting reply packet—was added as an option.
Radius Packet Format (auRadiusPacketFormat)
The following options are available:
• fullRfcPacket—The accept request packet includes Calling-Station-Id and Service-Type RADIUS
attributes.
• minimumRfcPacket—This setting does not include Calling-Station-Id and Service-Type RADIUS
attributes.
Radius Session ID Size (auRadiusRunningIdSize)
The session ID—which is sent in the Accounting start and stop packets—can be configured as either an 8 or
12-character string.
Figure 15. 8-Character String RADIUS Session ID format
The 8-character session ID is formatted as follows (see figure 15):
• MM—The last two digits of the MAC address
• R—The number of times the RAS has rebooted since the last code upload. This rolls over to 0 after 10
reboots
The Configuration section
36
Access Server Administrators’ Reference Guide
5 • Authentication
• CCCCC—Call ID in hex. The call ID used is the one recorded on the main dial-in screen.
Figure 16. 12-Character String RADIUS Session ID format
The 12-character session ID is formatted as follows (see figure 16):
• MMMM—The last four digits of the MAC address
• RR—The number of times the RAS has rebooted since the last code upload. This rolls over to 0 after 100
reboots
• S—Not used.
• CCCCC—Call ID in hex. The call ID used is the one recorded on the main dial-in screen.
Radius Session ID (auRadiusRunningId)
The RADIUS session ID shows the identifier—created anew each time power is cycled on and off. The ID is
prepended onto the call ID to create the session ID that is sent to the RADIUS server.
Setting Up Authentication
After selecting Modify from the main Authentication screen, you may set up or change authentication parameters for both RADIUS users and Static users. After configuring the Validation method (see “Validation
Setting Up Authentication
37
Access Server Administrators’ Reference Guide
5 • Authentication
(auValidation)” below), configure the additional parameters as shown in figure 17 to configure RADIUS
parameters. See “Static User Authentication” on page 41 to set up Static users.
Figure 17. Authentication Configuration screen
Validation (auValidation)
Selects how the access server will authenticate an incoming call. Select from:
•
No Validation(0)—Select this to allow un-authenticated calls into the access server, and on to your LAN,
using the default service.
• static Users(1)—Use the access server internal user database only to authenticate. Static users are simply
users and passwords entered into the access server’s internal users database.
• radius Users(2)—Use RADIUS to authenticate and provision user services. RADIUS is a client-server system developed to manage the flexible requirements of remote dial-in users. The RADIUS protocol is specified under RFC 2138 for authentication and RFC 2139 for accounting. RADIUS servers are available as
freeware for most computer platforms and is an excellent method for managing user dial-in security. Any
RADIUS entries will require an associated server to process authentication requests from the access server or
the access server will reject users access. For more information about RADIUS, see RADIUS User Authentication, below.
• tacacs Users(3)—This feature is not currently available
• static Then RADIUS(4)—Check the internal user database first, if no match is found, then use RADIUS to
authenticate and provision user services.
• static Then Tacacs(5)— Check the internal user database first, if no match is found, then use TACACS to
authenticate and provision user services. Not currently implemented.
Note
The following options apply only when using an external authentication
server.
Setting Up Authentication
38
Access Server Administrators’ Reference Guide
5 • Authentication
Host Address (auHostAddress)
Tells the access server the IP address of the primary external authentication server. This must be the IP address
as the access server will not resolve a Fully Qualified Domain Name.
Secondary Host Address (auSecondaryHostAddress)
When using a remote authentication server (RADIUS) this variable provides an alternative server IP address.
Host Port (auHostPort)
This variable tells the access server which UDP port to use when connecting to the host specified in the Host
Address variable. The RADIUS standard, as per RFC 2138, specifies port 1812 for RADIUS authentication.
Some older installations of RADIUS use port 1645.
Timeout (auTimeout)
This option specifies the time, in seconds, before the access server will retransmit an authentication request to
an external authentication server.
Retries (auRetries)
This option specifies the number of times the access server will resend an authentication request to a RADIUS
server after a TIMEOUT occurs. If this number is exceeded then the secondary host will be tried. If this number is exceeded by the secondary host, the user will be rejected.
Secret (auSecret)
The Secret variable sets the shared secret between the authentication client (access server) and the authentication server (RADIUS). It is used to encrypt an authentication request and to decrypt an incoming reply from
the server. The secret on the access server and the RADIUS server must match and must be 15 or fewer printable, non space, ASCII characters.
Note
The same secret word must used on the access server and in the RADIUS clients file.
NAS Identifier (auNASIdentifier)
This variable is used to identify the access server to the remote authentication server. If this option is blank,
then the access server will use it’s IP address to identify itself to the remote server. It does this by using the
NAS-IP-Address attribute instead of the NAS-Identifier attribute.
Accounting Address (auAcctAddress)
This is the IP address of the accounting server. RADIUS also allows for the recording of accounting information.
Secondary Accounting Address (auSecondaryAcctAddress)
When using a remote accounting server (such as RADIUS Accounting) this variable provides the IP address of
the accounting server.
Setting Up Authentication
39
Access Server Administrators’ Reference Guide
5 • Authentication
Accounting Port (auAcctPort)
This is the UDP port on the accounting server specified in Acct Address that the access server should use to
transfer accounting information. RFC 2139 states that port 1813 is the standard RADIUS accounting port.
Some older implementations of RADIUS use port 1646 as the accounting port.
Accounting Enable (auAccountingEnable)
This is a switch that allows the enabling or disabling the reporting of accounting information on the access
server. The following options are available:
• enableAccounting—Begin accounting of RADIUS authenticated users.
• disableAccounting—Disable the accounting feature.
• enableAccounting-no validation—When a response is received from either the authentication or the
accounting server it is validated using the defined secret. If the secret does not match, the reply packet is
dropped just as if it never existed.
Early versions of the Livingston RADIUS server used a method for encoding the accounting reply packet
that was incorrect. Accounting replies from these servers would therefore be dropped because they could
not be authenticated, eventually resulting in timeouts and shutting the call down with the reason authenAccountingTimeout. As a workaround for this issue, the state enableAccountingNoValidation—which does not
check for valid encoding on the accounting reply packet—was added as an option.
Radius Packet Format (auRadiusPacketFormat)
The following options are available:
• fullRfcPacket—The accept request packet includes Calling-Station-Id and Service-Type RADIUS
attributes.
• minimumRfcPacket—This setting does not include Calling-Station-Id and Service-Type RADIUS
attributes.
Radius Session ID Size (auRadiusRunningIdSize)
The session ID—which is sent in the Accounting start and stop packets—can be configured as either an 8 or
12-character string.
The 8-character session ID is formatted as follows (see figure 15 on page 36):
• MM—The last two digits of the MAC address
• R—The number of times the RAS has rebooted since the last code upload. This rolls over to 0 after 10
reboots
• CCCCC—Call ID in hex. The call ID used is the one recorded on the main dial-in screen.
The 12-character session ID is formatted as follows (see figure 16 on page 37):
• MMMM—The last four digits of the MAC address
• RR—The number of times the RAS has rebooted since the last code upload. This rolls over to 0 after 100
reboots
• S—Not used.
• CCCCC—Call ID in hex. The call ID used is the one recorded on the main dial-in screen.
Setting Up Authentication
40
Access Server Administrators’ Reference Guide
5 • Authentication
Static User Authentication
To view or modify the static users in the internal user database, click on Authentication in the Configuration
Menu. The Authentication window displays. Scroll down until Static User Identification is displayed (see
figure 18).
Static users consist of usernames and passwords entered into the access server’s internal users database. You can
have up to 111 static users in the access server database.
You must have superuser-level access to make changes to the static users database.
The following sections describe each of the variables found in the Static User Identification section.
Figure 18. Static User Identification setup
Adding Static Users
ID (suID)
Identifies the entry in the table of users. For the next user, select the next unused number. If you select a number that is already displayed in the Static User Identification table, you will overwrite a current entry in user
database.
Username (suUsername)
This is a unique name, to be provided at login time.
Note
There is a 19-character limit on the username length.
Password (suPassword)
This is the password that is provided at login time along with the username.
Service (suService)
This option instructs the access server on how to service the incoming call. Select from:
• default—This is the default service as specified under Dial-In (see 7, “Dial In” on page 48). We recommend
that you select default.
Static User Authentication
41
Access Server Administrators’ Reference Guide
5 • Authentication
• admin—Not currently implemented.
• monitor—Not currently implemented.
• rlogin—Causes the access server to rlogin into another host. See “Service IP (suServiceIP)” on page 43 for
information on configuring the remote host IP addresss.
• telnet—Causes the access server to telnet into another host.
• tcpraw—All 8 bits are passed unchecked and unaltered.
• ppp—Access server will try to negotiate a PPP session.
• cppp—Access server will try to negotiate a Compressed-PPP session.
Note
If a user attempts to login in using a different service than the one he or she
has been provided, the access server will reject the user. The exception to this
is CPPP which will revert to PPP if CPPP is not available on the client.
• slip—Access server will negotiate a SLIP connection. Not currently implemented.
• cslip—Access server will negotiate a Compressed-SLIP connection. Not currently implemented.
• dialout—Access server will give a dialout connection. The dialout connection is an AT command set driven
connection into one of the access server modems. On line help is provided by typing at help <cr>.
• vpn—This option is currently not supported.
Note
If a user attempts to login in using a different service than the one he or she
has been provided, the access server will reject the user. The exception to this
is CPPP which will revert to PPP if CPPP is not available on the client.
Note
All changes made to the running configuration must be saved to FLASH by
selecting Record Current Configuration under Immediate Actions on the
HOME page of the access server. Failure to do so will cause all configuration
information to be lost the next time the access server is re-booted.
After the user information has been entered, click Submit.
Modify Static User
To modify or further configure the user, click the username you just created to display the Static User window
(see figure 19). Refer to the following sections while modifying the Static User settings. When you are finished,
click Submit to store the changes.
Modify Static User
42
Access Server Administrators’ Reference Guide
5 • Authentication
Figure 19. Static User settings window
Service IP (suServiceIP)
This is the IP of the RLogin or Telnet host, or the static IP address assigned to the user. This is determined by
the option selected in Service (see “Service (suService)” on page 41).
Service Port (suServicePort)
This is the port number to connect to the service host. If the number is 0, the access server will use the default
values for Telnet (port number 23) and RLogin (port number 513).
Note
After you have submitted all changes, click on the HOME link in the Configuration Menu. Once there, click on the Record Current Configuration button (located under Immediate Actions) to save the changes to FLASH
memory on the access server.
All changes made to the running configuration must be saved to FLASH
memory. Failure to do so will cause all configuration information to be lost
the next time the access server is re-booted.
Service Mask (suServiceMask)
This parameter defines the IP mask of the user.
Filter ID (suFilterId)
This is the ID of the filter assigned to the static user. A filter controls packets that can be sent or received by the
dial-in user to which it is applied. Only one filter can be assigned to a user defined in the static user authentication database.
Note
Modify Static User
Explicitly assigning a filter to a static user will keep default dial-in filters
from being applied.
43
Chapter 6
DAX
Chapter contents
Introduction ..........................................................................................................................................................45
Configuring the DAX............................................................................................................................................45
Circuit Type (daxClockMode) ........................................................................................................................45
Main Reference (daxClockMainRef) ...............................................................................................................46
Fallback Reference (daxClockFallbackRef) ......................................................................................................46
Clock Status (daxClockFailure) .......................................................................................................................47
44
Access Server Administrators’ Reference Guide
6 • DAX
Introduction
The digital cross-connect (DAX) link allows configuration of the access servers’ digital cross-connect that manages the time slots and clocking between the WAN ports.
The access server uses a single clock source for all WAN ports. Therefore, to avoid data loss caused by variations
in network timing, each access server should terminate WAN connections from a single timing provider. WAN
connections from multiple timing providers can be terminated in the access server if all the providers source
their timing from the same stratum clock or if the access server provides the network clock.
Click on DAX under the Configuration Menu to display the DAX main window (see figure 20).
Figure 20. DAX main window
Configuring the DAX
There are three variables to select when configuring the DAX circuit:
• Circuit Type—Defines the overall clocking scheme for the entire access server (refer to “Circuit Type (daxClockMode)”
• Main Reference—Determines which WAN link supplies the clock for the system (refer to “Main Reference
(daxClockMainRef)” on page 46)
• Fallback Reference—Enables the configuration of a back-up clock reference should the Main Reference fail
(refer to “Fallback Reference (daxClockFallbackRef)” on page 46)
Circuit Type (daxClockMode)
Defines the overall clocking scheme for the entire access server. For each circuit a selection must be made as to
the overall clocking scheme of the entire system. If your system has only one circuit displayed, then that circuit
must be set to Master.
The following settings are available:
• master(1)—The master device is responsible for providing the master system clock in synchronization with
one of its references. If your access server has only one circuit, then this setting must be Master.
• secondary(2)—The secondary circuit provides the master system clock if the master circuit fails.
• slave(3)—Slave devices provide the system clock references for use by the master or secondary.
Introduction
45
Access Server Administrators’ Reference Guide
6 • DAX
Main Reference (daxClockMainRef)
The main reference parameter determines which WAN link will supply the clock for the system.
The following settings are available:
• none(0)—No clock selection. This would be used in conjunction with either a secondary or slave circuit.
• wan-1(1)—Use WAN Port 1 for primary timing. Generally the first WAN connection will be used as the
main reference.
• wan-2(2)—Use WAN Port 2 for primary timing. Generally the second WAN connection will be used as the
fallback reference (see “Fallback Reference (daxClockFallbackRef)”).
• wan-3(3)—Use WAN Port 3 for primary timing.
• wan-4(4)—Use WAN Port 4 for primary timing.
• wan-5(5)—Use WAN Port 5 for primary timing.
• wan-6(6)—Use WAN Port 6 for primary timing.
• wan-7(7)—Use WAN Port 7 for primary timing.
• wan-8(8)—Use WAN Port 8 for primary timing.
• netref-1(101)—Use to obtain system timing from a slave circuit.
• netref-2(102)—Use to obtain system timing from a slave circuit.
• internal(200)—Use internal free-run oscillator for the system clock.
• external(300)—Not currently implemented.
Fallback Reference (daxClockFallbackRef)
The fallback reference enables the configuration of a back-up clock reference should the main reference fail.
The following settings are available:
• none(0)—No clock selection. This would be used in conjunction with either a secondary or slave circuit.
• wan-1(1)—Use WAN Port 1 for secondary timing. Generally the first WAN connection will be used as the
main reference.
• wan-2(2)—Use WAN Port 2 for secondary timing. Generally the second WAN connection will be used as
the fallback reference. If there is only one WAN connection, then the fallback reference should be set to
oscillator.
• wan-3(3)—Use WAN Port 3 for secondary timing.
• wan-4(4)—Use WAN Port 4 for secondary timing.
• wan-5(5)—Use WAN Port 5 for secondary timing.
• wan-6(6)—Use WAN Port 6 for secondary timing.
• wan-7(7)—Use WAN Port 7 for secondary timing.
• wan-8(8)—Use WAN Port 8 for secondary timing.
• netref-1(101)—Use to obtain system timing from a slave circuit.
Configuring the DAX
46
Access Server Administrators’ Reference Guide
6 • DAX
• netref-2(102)—Use to obtain system timing from a slave circuit.
• internal(200)—Use internal free-run oscillator for the system clock
• external(300)—Not currently implemented.
Clock Status (daxClockFailure)
The clock status indicates alarm conditions relating to the system clock. If there are no alarms, the DAX page
will indicate No Alarms (see figure 20 on page 45). Should one or more alarms be present, an Alarms Present
message will be displayed with the following list of potential clock failures (figure 21).
• Main Reference Fail(1)—The main clock reference has failed
• Fallback Reference Fail(2)—The fall back clock reference has failed
• Master System Fail(4)—The Master System clock has failed
• Secondary System Fail(8)—The Secondary System clock has failed.
Figure 21. DAX Clock Status alarm condition
Configuring the DAX
47
Chapter 7
Dial In
Chapter contents
Introduction ..........................................................................................................................................................54
Dial In main window ............................................................................................................................................55
Call Sorting (diPageSort) ................................................................................................................................55
Active Calls (diActive) .....................................................................................................................................55
Peak Active Calls (diMaxActive) .....................................................................................................................55
Total Calls (diTotalCallAttempts) ...................................................................................................................55
Call ID (diactIndex) ........................................................................................................................................55
Call ID (diactIndex) ........................................................................................................................................55
ML ID (diactMultiIndex) ...............................................................................................................................55
User (diactusername) ......................................................................................................................................55
State (diactState) .............................................................................................................................................56
Duration (diactSessionTime) ..........................................................................................................................56
Disconnect Reason (diactTerminateReason) ...................................................................................................56
Modulation (diactModulation) .......................................................................................................................56
Connect Speed (diactTxSpeed) .......................................................................................................................57
Dial Modulations window.....................................................................................................................................57
Call ID: (diactIndex) .......................................................................................................................................57
Username (diactUsername) .............................................................................................................................57
State (diactState) .............................................................................................................................................57
DSP Link (diactDSPIndex) .............................................................................................................................58
Connection Modulation (diactModulation) ....................................................................................................58
Transmit Connection Speed (diactTxSpeed) ...................................................................................................58
Receive Connection Speed (diactRxSpeed) .....................................................................................................59
Error Correction (diactErrorCorrection) .........................................................................................................59
Data Compression Protocol (diactCompression) .............................................................................................59
Locally Initiated Renegotiates (diactLocalRenegotiates) ..................................................................................59
Locally Initiated Retrains (diactLocalRetrains) ................................................................................................59
Remote Initiated Renegotiates (diactRemoteRenegotiates) ..............................................................................59
Remote Initiated Retrains (diactRemoteRetrains) ...........................................................................................59
Dial Telco window ................................................................................................................................................60
Call ID: (diactIndex) .......................................................................................................................................60
Username (diactUsername) .............................................................................................................................60
State (diactState) .............................................................................................................................................60
Transmit Connection Speed (diactTxSpeed) ...................................................................................................61
WAN Link (diactLinkIndex) ..........................................................................................................................61
Time Slot (diactSlotIndex) ..............................................................................................................................61
Time Call Is/Was Active (diactSessionTime) ..................................................................................................61
Termination Reason (diactTerminateReason) .................................................................................................61
State at termination (diactTerminateState) ......................................................................................................61
48
Access Server Administrators’ Reference Guide
7 • Dial In
Number Called (diactNumberDialed) ............................................................................................................61
Number Called From (diactCallingPhone) .....................................................................................................61
Dial Protocol window............................................................................................................................................62
Call ID: (diactIndex) .......................................................................................................................................62
Shared Unique ID (diactMultiIndex) ..............................................................................................................62
Username (diactUsername) .............................................................................................................................62
State (diactState) .............................................................................................................................................62
Protocol (diactProtocol) ..................................................................................................................................63
IP Address (diactIP) ........................................................................................................................................63
Port # on Remote Machine (diactPort) ...........................................................................................................63
Local MRU (diStatLocalMRU) ......................................................................................................................63
Remote MRU (diStatRemoteMRU) ...............................................................................................................63
LCP Authentication (LCPAuthOptions) ........................................................................................................63
Local-Remote VJ Protocol Comprsn (diIpLocalToRemoteCompProt) ...........................................................64
Remote-Local VJ Protocol Comprsn (diIpRemoteToLocalCompProt) ...........................................................64
Next Hop (diForceNextHop) .........................................................................................................................64
Dial In Details.......................................................................................................................................................65
Dial In Modify default window .............................................................................................................................66
Modify Login ..................................................................................................................................................67
IP Address Pool (diIpPool) ........................................................................................................................67
Login Technique (diLoginTechnique) ......................................................................................................67
Username Prompt (diUsernamePrompt) ...................................................................................................68
Password Prompt (diPasswordPrompt) .....................................................................................................68
Initial Banner (diBanner) ..........................................................................................................................68
Modify Service ................................................................................................................................................68
Default Service (diService) .........................................................................................................................68
Default IP Service (diServiceIP) ................................................................................................................69
Default Service Port (diServicePort) ..........................................................................................................69
Force Next Hop (diForceNextHop) ..........................................................................................................69
Modify Domain Name Server .........................................................................................................................69
Primary Domain Name Server (diPrimaryDNS) .......................................................................................69
Secondary Domain Name Server (diSecondaryDNS) ................................................................................69
Primary WINS (diPrimaryWINS) .............................................................................................................69
Secondary WINS (diSecondaryWINS) .....................................................................................................69
Modify Attempts ............................................................................................................................................70
Failure Banner (diFailureBanner) ..............................................................................................................70
Success Banner (diSuccessBanner) .............................................................................................................70
Login Attempts Allowed (diAllowAttempts) ..............................................................................................71
Modify Configuration .....................................................................................................................................71
Link Compression (diLinkCompression) ..................................................................................................71
Default Max Receive Unit (diConfigInitialMRU) .....................................................................................71
Allow Magic Number Negotiation (diConfigMagicNumber) ....................................................................71
Frame Check Sequence Size (diConfigFcsSize) ..........................................................................................71
Compression (diIpConfigCompression) ....................................................................................................71
49
Access Server Administrators’ Reference Guide
7 • Dial In
MultiLink (diConfigMultilink) .................................................................................................................71
MultiBox (diConfigMMP) ........................................................................................................................72
Modify Maximum Time .................................................................................................................................72
Maximum Session Time (min) (diSessionTimeout) ..................................................................................72
Maximum Idle Time (min) (diIdleTimeout) .............................................................................................72
Time to login (sec) (diLoginTimeout) .......................................................................................................72
Call History Timeout (min) (diLingerTime) .............................................................................................72
Modify ISDN Configuration ..........................................................................................................................73
V.110 (diV110Enable) ..............................................................................................................................73
Modify V.92 Configuration ............................................................................................................................74
V.92 Features (diModemV92Enable) ........................................................................................................74
Quick Connect (diV92QuickConnect) .....................................................................................................74
Modem on Hold (diV92ModemOnHold) ................................................................................................74
Modem on Hold Timeout(diV92ModemOnHoldTimeout) .....................................................................74
Modify Modem Configuration .......................................................................................................................74
V90(diModemV90Enable) .......................................................................................................................75
K56flex(diModemK56Enable) ..................................................................................................................75
V34(diModemV34Enable) .......................................................................................................................75
V32(diModemV32Enable) .......................................................................................................................75
V23(diModemV23Enable) .......................................................................................................................75
V22 (diModemV22Enable) ......................................................................................................................75
V21(diModemV21Enable) .......................................................................................................................75
Maximum V8 Failures (diModemMaxV8Failures) ....................................................................................75
MaxSpeed (diModemMaxSpeed)—Not Currently Implemented ..............................................................75
MinSpeed (diModemMinSpeed)—Not Currently Implemented ..............................................................75
Guard Tone (diModemGuardTone) .........................................................................................................76
CarrierLossDuration (diModemCarrierLossDuration) ..............................................................................76
Billing Delay (diBillingDelay) ...................................................................................................................76
Answer Tone Length(diModemAnswerToneLength) ................................................................................76
Retrain (diModemRetrain) ........................................................................................................................76
TxLevel (diModemTxLevel)—Not Currently in Use ................................................................................76
Protocol (diModemProtocol) ....................................................................................................................76
Compression (diModemCompression) ......................................................................................................76
Manage DNIS Window ........................................................................................................................................77
Manage DNIS main window ..........................................................................................................................78
ID (dnisPoolID) .......................................................................................................................................78
WAN Link (dnisPoolDesrcWan) ..............................................................................................................78
Dialed Number (dnisPoolDesrcDialedNumber) .......................................................................................78
DNIS profile (dnisPoolAssignedProfile) ....................................................................................................78
Status (dnisPoolStatus) ..............................................................................................................................78
Add a DNIS Group: .................................................................................................................................78
DNIS Entry Window .....................................................................................................................................79
WAN Link (dnisPoolDesrcWan) ..............................................................................................................79
Called (Calling) Number (dnisPoolDesrcDialedNumber) .........................................................................79
50
Access Server Administrators’ Reference Guide
7 • Dial In
DNIS profile (dnisPoolAssignedProfile) ....................................................................................................79
Status (dnisPoolStatus) ..............................................................................................................................79
DNIS Profiles .................................................................................................................................................80
DNIS Profiles Main Window .........................................................................................................................81
ID (dnisIpProfileId) ..................................................................................................................................81
IP Pool (dnisProfileAssignedIpPool) ..........................................................................................................81
Login Technique (dnisProfileLoginTechnique) .........................................................................................81
DOVBS (dnisProfileDOVBS) ...................................................................................................................82
Service Port (dnisProfileServicePort) .........................................................................................................82
Service IP (dnisProfileServiceIP) ................................................................................................................82
Telnet UserId (dnisProfileTelnetUserId) ...................................................................................................82
Telnet Mode (dnisProfileTelnetMode) ......................................................................................................82
Status (dnisIpProfileStatus) .......................................................................................................................83
Add a DNIS Profile ...................................................................................................................................83
DNIS Profile Entry Window ..........................................................................................................................83
IP Pool (dnisProfileSAssignedIpPool) ........................................................................................................83
Login Technique (dnisProfileLoginTechnique) .........................................................................................83
DOVBS (dnisProfileDOVBS) ...................................................................................................................84
Service Port (dnisProfileServicePort) .........................................................................................................85
Service IP (dnisProfileServiceIP) ................................................................................................................85
Telnet UserId (dnisProfileTelnetUserId) ...................................................................................................85
Telnet Mode (dnisProfileTelnetMode) ......................................................................................................85
Status (dnisIpProfileStatus) .......................................................................................................................85
DNIS IP Pools Window .................................................................................................................................86
ID (dnisIpPoolId) .....................................................................................................................................86
IP Address Pool (dnisIpPool) ....................................................................................................................86
Status (dnisIpPoolStatus) ..........................................................................................................................86
Add a DNIS Profile ...................................................................................................................................86
DNIS IP Pool Entry Window .........................................................................................................................87
IP Address Pool (dnisIpPool) ....................................................................................................................87
Status (dnisIpPoolStatus) ..........................................................................................................................87
Dial In User Statistics window...............................................................................................................................88
Call Identification ...........................................................................................................................................89
Call ID: (diactIndex) .................................................................................................................................89
State (diactState) .......................................................................................................................................89
Username (diactUsername) .......................................................................................................................89
Password (diactPassword) ..........................................................................................................................89
Shared Unique ID (diactMultiIndex) ........................................................................................................89
Protocol (diactProtocol) ............................................................................................................................89
Security Level (diactAccessLevel) ...............................................................................................................90
DSP Link (diactDSPIndex) .......................................................................................................................90
Interface Link (diactIFIndex) ....................................................................................................................90
WAN Link (diactLinkIndex) .....................................................................................................................90
Time Slot (diactSlotIndex) ........................................................................................................................90
51
Access Server Administrators’ Reference Guide
7 • Dial In
IP Address (diactIP) ..................................................................................................................................90
Port # on Remote Machine (diactPort) .....................................................................................................90
Session ............................................................................................................................................................90
Start time of call (diactSessionStartTime) ..................................................................................................90
Time Call Is/Was Active (diactSessionTime) .............................................................................................90
Minutes Until Timeout (diactRemainingIdle) ...........................................................................................90
Time Left In Session (diactRemainingSession) ..........................................................................................91
Termination Reason (diactTerminateReason) ...........................................................................................91
State at termination (diactTerminateState) ................................................................................................94
PPP Statistics ..................................................................................................................................................95
Bad Address (diStatBadAddresses) .............................................................................................................95
Bad Controls (diStatBadControls) .............................................................................................................95
Packets Too Long (diStatPacketTooLongs) ...............................................................................................95
Bad Frame Check Sequences (diStatBadFCSs) ..........................................................................................95
LCP Statistics ..................................................................................................................................................95
Local MRU (diStatLocalMRU) .................................................................................................................95
Remote MRU (diStatRemoteMRU) .........................................................................................................96
Local Multilink MRRU (diStatLcpLocalMRRU) ......................................................................................96
Remote Multilink MRRU (diStatLcpRemoteMRRU) ..............................................................................96
LCP Authentication (LCPAuthOptions) ...................................................................................................96
ACC Map (diStatLocalToPeerACCMap) ..................................................................................................96
Peer-Local ACC Map (diStatPeerToLocalACCMap) ................................................................................96
Local-Remote PPP Protocol Comprsn (diStatLocalToRemoteProtComp) ................................................96
Remote-Local PPP Protocol Comprsn (diStatRemoteToLocalProtComp) ................................................97
Local-Remote AC Comprsn (diStatLocalToRemoteACComp) .................................................................97
Remote-Local AC Comprsn (diStatRemoteToLocalACComp) .................................................................97
Transmit Frame Check Seq. Size (diStatTransmitFcsSize) .........................................................................97
Receive Frame Check Seq. Size (diStatReceiveFcsSize) ..............................................................................97
IP ....................................................................................................................................................................97
Operational Status (diIpOperStatus) .........................................................................................................98
Local-Remote VJ Protocol Comprsn (diIpLocalToRemoteCompProt) .....................................................98
Remote-Local VJ Protocol Comprsn (diIpRemoteToLocalCompProt) .....................................................98
Remote Max Slot ID (diIpRemoteMaxSlotId) ..........................................................................................98
Local Max Slot ID (diIpLocalMaxSlotId) ..................................................................................................98
Next Hop Gateway (diForceNextHop) .....................................................................................................98
Primary Domain Name Server (diactPrimaryDNS) ...................................................................................99
Secondary Domain Name Server (diactSecondaryDNS) ...........................................................................99
Filters (diStatIpFilterAtoJ) .........................................................................................................................99
Phone .............................................................................................................................................................99
Number Called (diactNumberDialed) .....................................................................................................100
Number Called From (diactCallingPhone) .............................................................................................100
Data ..............................................................................................................................................................100
Octets Sent (diactSentOctets) .................................................................................................................100
Octets Received (diActReceivedOctets) ...................................................................................................100
52
Access Server Administrators’ Reference Guide
7 • Dial In
Packets Sent (diactSentDataFrames) ........................................................................................................100
Packets Received (diactReceivedDataFrames) ..........................................................................................100
Bad Packets (diactErrorFrames) ...............................................................................................................100
Physical Layer ...............................................................................................................................................100
Connection Modulation (diactModulation) ............................................................................................100
Transmit Connection Speed (diactTxSpeed) ...........................................................................................101
Receive Connection Speed (diactRxSpeed) ..............................................................................................101
Error Correction (diactErrorCorrection) .................................................................................................101
Data Compression Protocol (diactCompression) .....................................................................................101
Modulation Symbol Rate (diactSymbolRate) ..........................................................................................101
Locally Initiated Renegotiates (diactLocalRenegotiates) ...........................................................................101
Locally Initiated Retrains (diactLocalRetrains) ........................................................................................102
Remote Initiated Renegotiates (diactRemoteRenegotiates) ......................................................................102
Remote Initiated Retrains (diactRemoteRetrains) ....................................................................................102
53
Access Server Administrators’ Reference Guide
7 • Dial In
Introduction
The Dial In main window (see figure 22) is where you can change or view items that are associated with the
user dialing in—including call statistics, type of service used, modem specific statistics, as well as configuration
parameters for login, service, domain name service, login attempts, configuration of link, maximum time, and
modem configuration.
Note
The Dial In main window can be automatically refreshed by setting the Web
Page Refresh Rate under the System menu (see section “SNMP and HTTP”
on page 237).
Click on Dial In under the Configuration Menu to display the Dial In main window.
The Dial In window contains the following items:
• The ability to change the order of the calls on the main dial-in screen.
• Statistics for individual users (for example, users jill, jeff, and jay, as shown in figure 22). For more information about the statistics displayed on the Dial In main window, refer to “Dial In main window” below.
To view or modify individual user settings, select an active user in the State column (for example, if you
wanted to modify user jill, you would click on the online(6) link next to jill’s username.) For more information about individual user settings, refer to “Dial In User Statistics window” on page 88.
• Default Details link—clicking on the Details… link takes you to the page where you can see how the system
is currently set up to handle dial in users. For more information about the Details page, refer to “Dial In
Details” on page 65.
• Modify default link—clicking on the Modify… link takes you to the page where you can make global
changes to items that are associated with the user dialing in—including type of service used, configuration
parameters for login, service, domain name service, login attempts, configuration of link, maximum timeouts, and modem configuration. For more information about the Modify page, refer to “Dial In Modify
default window” on page 66.
• Manage DNIS link—clicking on the Manage DNIS… link takes you to a page where you can make
changes to the dial-in user’s configuration based on the number dialed by the end users.
• Modulations link—clicking on the Modulations… link takes you to the page that shows statistics about the
modem connection, listed by individual users. For more information about the Modulations page, refer to
“Dial Modulations window” on page 57.
• Telco link—clicking on the Telco… link takes you to a page that shows the Telco characteristics for individual users. For more information about the Modify page, refer to “Dial Telco window” on page 60.
• Protocol link—clicking on the Protocol… link takes you to a page that shows the protocol negotiations of
the connection for individual users. For more information about the Modify page, refer to “Dial Protocol
window” on page 62.
Introduction
54
Access Server Administrators’ Reference Guide
7 • Dial In
Figure 22. Dial In main window
Dial In main window
The Dial In window displays statistics for individual users. This window shows currently attached users, the
users state, and time that the user has been on access server. This window can also display recently disconnected
sessions. The following sections explain the meaning of each statistic.
Call Sorting (diPageSort)
Change the order of the calls on the screen.
• Descending—calls are sorted from the latest call at the top to the oldest call at the bottom
• Ascending—calls are sorted from the oldest call at the top to the latest call at the bottom
Active Calls (diActive)
The total number of active calls and calls that are being initiated.
Peak Active Calls (diMaxActive)
The maximum number of active calls seen at one time since the unit was powered up.
Total Calls (diTotalCallAttempts)
The total number of calls attempted since the last boot of the box.
Call ID (diactIndex)
Unique identification of this active call for internal use.
Call ID (diactIndex)
Subsequent calls in a multilink PPP/ISDN call refer to this ID as a pointer to the bundlehead or originating
call.
ML ID (diactMultiIndex)
Subsequent calls in a multilink PPP/ISDN call have a pointer to the bundlehead or originating call.
User (diactusername)
The user name that the caller entered. This can be a static user or a radius user’s login name.
Dial In main window
55
Access Server Administrators’ Reference Guide
7 • Dial In
State (diactState)
As the call comes into the access server it can be in one of five states.
• Ringing—The call has been recognized by the access server and is in process of going off hook.
• Connecting—The unit has assigned a DSP to the incoming call and is now in the process of negotiation of
the type of modulation—V.34, V.32, ISDN, or 56K.
• Authenticating—The access server is in the process of verifying the users passwords by using static or
RADIUS authentication.
• Online—The access server has completed authentication and we are ready to access the Internet.
• Dead—The user has been disconnected and this message will go away after the linger time has expired.
• Bury—Kill the call and remove it from the dial-in main window.
Duration (diactSessionTime)
The number of seconds this call was/is active. Time in seconds the user has been connected.
Disconnect Reason (diactTerminateReason)
The reason a call was disconnected (refer to “Termination Reason (diactTerminateReason)” on page 91 for the
complete list of reasons).
Modulation (diactModulation)
The modulation of the link:
• unknown(0)
• v21(1)—V.21 modulation
• v22(2)—V.22 modulation
• v32(3)—V.32 modulation
• v34(4)—V.34 modulation
• k56(5)—K56 Flex modulation
• x2(6)—X.2 modulation
• v90(7)—V.90 modulation
• v110(8)—V.110 modulation
• isdn64(9)—ISDN 64 modulation
• isdn56(10)—ISDN 56 modulation
• 12tp(11)—12tp tunnelled multilink call
• phase2(20)—Phase 2, an advanced state of modulation in v34 and higher
• answerack(21)—acknowledgement phase of modulation
• V92(22)—V.92 modulation
• moh(23)—Modem is using V.92’s modem-on-hold feature
Dial In main window
56
Access Server Administrators’ Reference Guide
7 • Dial In
• v23(24)—V.23 modulation
Connect Speed (diactTxSpeed)
The connected speed of the link.
Dial Modulations window
This window shows statistics about the modem connection, listed by unique user ID.
Figure 23. Dial Modulations window
Call ID: (diactIndex)
Unique identification of this active call (for internal use).
Username (diactUsername)
The caller’s username.
State (diactState)
Indicates current progress of the selected call.
• Ringing—The call has been recognized by the access server and is in the process of going off hook
• Connecting—The access server has assigned a DSP to the incoming call and is now in the process of negotiating the type of modulation (V.34, V.32, ISDN, or 56K).
• LcpNegotiate—The link is negotiating LCP parameters.
• Authenticating—The access server is in the process of verifying the user’s password by using static or
RADIUS authentication.
Dial Modulations window
57
Access Server Administrators’ Reference Guide
7 • Dial In
• Online—The access server has completed authentication and the user is now able to access the Internet.
• 12tpTunneled—Subsequent multilink call that was answered by another access server and tunneled to the
access server that has the originating call.
• Kill—The administrator can manually disconnect the user by activating this parameter.
• Dead—The user’s call has been disconnected. This message disappears when the linger time expires.
• Bury—The call has been killed and removed from the dial-in main window.
DSP Link (diactDSPIndex)
The physical DSP chip that the user’s call is on. This is a number from 0 to 59.
Connection Modulation (diactModulation)
The modulation type of the modem link (for example, V.34). The modem link can have these modulation or
data types:
• unknown(0)
• v21(1)—V.21 modulation
• v22(2)—V.22 modulation
• v32(3)—V.32 modulation
• v34(4)—V.34 modulation
• k56(5)—K56 Flex modulation
• x2(6)—X.2 modulation
• v90(7)—V.90 modulation
• v110(8)—V.110 modulation
• isdn64(9)—ISDN 64 modulation
• isdn56(10)—ISDN 56 modulation
• 12tp(11)—12tp tunnelled multilink call
• phase2(20)—Phase 2, an advanced state of modulation in v34 and higher
• answerack(21)—acknowledgement phase of modulation
• V92(22)—V.92 modulation
• moh(23)—Modem is using V.92’s modem-on-hold feature
• v23(24)—V.23 modulation
Transmit Connection Speed (diactTxSpeed)
The connected speed of the modem link (for example, 28.8 bps). These values, in bits per second, range from
300–33,600.
Dial Modulations window
58
Access Server Administrators’ Reference Guide
7 • Dial In
Receive Connection Speed (diactRxSpeed)
The connected speed of the modem link (for example, 28.8 bps). These values, in bits per second, range from
300–53,000.
Error Correction (diactErrorCorrection)
The modem error correction scheme used during this call.
• None(1)—No error correction on the call
• V42(2)—Error correction mode
• V120(4)—Mode for ISDN B
Data Compression Protocol (diactCompression)
The modem data compression technique used during this call.
• None(1)—No compression
• V42bis(2)—Compression is running
• Stac(4)—Compression is running
• v44(5)—V44 compression is running
Locally Initiated Renegotiates (diactLocalRenegotiates)
The number of times the local modem has initiated a modem speed renegotiate.
Locally Initiated Retrains (diactLocalRetrains)
The number of times the local modem has initiated a modem carrier retrain.
Remote Initiated Renegotiates (diactRemoteRenegotiates)
The number of times the remote modem has initiated a modem speed renegotiate.
Remote Initiated Retrains (diactRemoteRetrains)
The number of times the remote modem has initiated a modem carrier retrain.
Dial Modulations window
59
Access Server Administrators’ Reference Guide
7 • Dial In
Dial Telco window
This window shows the telco characteristics for individual users.
Figure 24. Dial Telco window
Call ID: (diactIndex)
Unique identification of this active call (for internal use).
Username (diactUsername)
The caller’s username.
State (diactState)
Indicates current progress of the selected call.
• Ringing—The call has been recognized by the access server and is in the process of going off hook
• Connecting—The access server has assigned a DSP to the incoming call and is now in the process of negotiating the type of modulation (V.34, V.32, ISDN, or 56K).
• LcpNegotiate—The link is negotiating LCP parameters.
• Authenticating—The access server is in the process of verifying the user’s password by using static or
RADIUS authentication.
• Online—The access server has completed authentication and the user is now able to access the Internet.
• 12tpTunneled—Subsequent multilink call that was answered by another access server and tunneled to the
access server that has the originating call.
Dial Telco window
60
Access Server Administrators’ Reference Guide
7 • Dial In
• Kill—The administrator can manually disconnect the user by activating this parameter.
• Dead—The user’s call has been disconnected. This message disappears when the linger time expires.
• Bury—The call has been killed and removed from the dial-in main window.
Transmit Connection Speed (diactTxSpeed)
The connected speed of the modem link (for example, 28.8 bps). These values, in bits per second, range from
300–33,600.
WAN Link (diactLinkIndex)
The T1/E1 WAN port number that the call is on.
Time Slot (diactSlotIndex)
Shows which T1/E1 channel the call is on. This is a number from 1-30.
Time Call Is/Was Active (diactSessionTime)
The amount of time the call was/is active.
Termination Reason (diactTerminateReason)
The reason a call was disconnected. For the listing of reasons, see “Termination Reason (diactTerminateReason)” on page 91.
State at termination (diactTerminateState)
Indicates the value of diactState when the call was terminated. A value of 0 indicates the call is still online.
Number Called (diactNumberDialed)
The phone number that was used to dial into the access server.
Number Called From (diactCallingPhone)
The user’s phone number—this is a caller ID feature.
Dial Telco window
61
Access Server Administrators’ Reference Guide
7 • Dial In
Dial Protocol window
This window shows the protocol negotiations of the connection for individual users.
Figure 25. Dial Protocol window
Call ID: (diactIndex)
Unique identification of this active call (for internal use).
Shared Unique ID (diactMultiIndex)
Used for multi-link PPP, this is the unique identification shared between multi-link active calls.
Username (diactUsername)
The caller’s username.
State (diactState)
Indicates current progress of the selected call.
• Ringing—The call has been recognized by the access server and is in the process of going off hook
• Connecting—The access server has assigned a DSP to the incoming call and is now in the process of negotiating the type of modulation (V.34, V.32, ISDN, or 56K).
• LcpNegotiate—The link is negotiating LCP parameters.
• Authenticating—The access server is in the process of verifying the user’s password by using static or
RADIUS authentication.
• Online—The access server has completed authentication and the user is now able to access the Internet.
Dial Protocol window
62
Access Server Administrators’ Reference Guide
7 • Dial In
• 12tpTunneled—Subsequent multilink call that was answered by another access server and tunneled to the
access server that has the originating call.
• Kill—The administrator can manually disconnect the user by activating this parameter.
• Dead—The user’s call has been disconnected. This message disappears when the linger time expires.
• Bury—The call has been killed and removed from the dial-in main window.
Protocol (diactProtocol)
Indicates the type of service or link being provided for this call.
• PPP—The user has a PPP link running.
• Slip—The user has a Slip link running
• Telnet—The user has a telnet session running
• Rlogin —The user has an rlogin session running
IP Address (diactIP)
The currently assigned IP address from the IP address pool or the RADIUS server. The remote users’ PC is
assigned to this address. The address appears in the IP address (0.0.0.0) format.
Port # on Remote Machine (diactPort)
The TCP port number being used by this connection. The range is from 0 to 65,535. Ports in the range of 0 to
1023 are well-known ports used to access standard services. Telnet uses port 23 and rlogin uses port 513.
Local MRU (diStatLocalMRU)
The current value of the MRU for the local PPP entity. This value is the MRU that the remote entity is using
when sending packets to the local PPP entity. This setting becomes active when the link is in the up—able to
pass packets—operational state (for more information, refer to “Operational Status (diIpOperStatus)” on
page 98).
Remote MRU (diStatRemoteMRU)
The current value of the MRU for the remote PPP entity. This value is the MRU that the local entity is using
when sending packets to the remote PPP entity. This setting becomes active when the link is in the up—able to
pass packets—operational state (for more information, refer to “Operational Status (diIpOperStatus)” on
page 98).
LCP Authentication (LCPAuthOptions)
Authentication type used by the dial-in user. The following options are available:
• None(1)
• Pap(2)
• Chap(3)
• MSChapV1(4)
• MsChapV2(5)
Dial Protocol window
63
Access Server Administrators’ Reference Guide
7 • Dial In
• Tacacs(6)- Not currently implemented
• Edp(7)
• ShivaPap(8)- Not currently implemented
Local-Remote VJ Protocol Comprsn (diIpLocalToRemoteCompProt)
The IP compression protocol that the local IP entity uses when sending packets to the remote IP entity. The
available settings are:
• none(1)—no compression
• vjTCP(2)—compression is enabled
Remote-Local VJ Protocol Comprsn (diIpRemoteToLocalCompProt)
The IP compression protocol that the remote IP entity uses when sending packets to the local IP entity. The
available settings are:
• none(1)—no compression
• vjTCP(2)—enabled
Next Hop (diForceNextHop)
All packets received on the dial-up link are forwarded to this gateway. A setting of 0.0.0.0 indicates that this
option is not in effect.
Dial Protocol window
64
Access Server Administrators’ Reference Guide
7 • Dial In
Dial In Details
The Dial In Details window (see figure 26) shows how the system is currently set up to handle dial in users. To
view this page, select Default Details from the main Dial In window. Scroll down the window to view additional Dial In access server parameters. To modify the Dial In access server parameters, click on the Modify
default… link. For more information about modifying Dial In settings, refer to “Dial In Modify default window” on page 66.
Figure 26. Dial In Details window
Dial In Details
65
Access Server Administrators’ Reference Guide
7 • Dial In
Dial In Modify default window
The Dial In Modify default window (see figure 27) is where you can make changes to the following:
• Login access server parameters (see “Modify Login”)
• User login services (see “Modify Service” on page 68)
• Primary and secondary domain name servers (see “Modify Domain Name Server” on page 69)
• Dial-in attempts access server parameters (see “Modify Attempts” on page 70)
• Link compression, MRUs, MultiLink, and MultiBox access server parameters (see “Modify Configuration”
on page 71)
• Time-out access server parameters for the session idle time to login and the MIB data linger time (see
“Modify Maximum Time” on page 72)
• Modem configuration objects for dial in users (see “Modify Modem Configuration” on page 74)
To reach this window, select Modify from the Dial In Details window or the Dial In main window.
Figure 27. Dial In Modify window (modify Login, Service, and DNS objects)
Dial In Modify default window
66
Access Server Administrators’ Reference Guide
7 • Dial In
Modify Login
This portion of the Dial In Modify default window (see figure 27 on page 66) describes configuring the IP
address pool, login technique and general login information.
IP Address Pool (diIpPool)
The IP address pool contains the IP addresses that are assigned dynamically to the dial-in connections. Type the
IP address pool in the space provided. The IP addresses can be non-contiguous addresses configured as follows:
– Blocks of IP addresses are designated with a dash (-) separating the first and last host in the block (for
example, 192.49.110.151-155)
– The addresses can be from a subnet other than the local network the RAS is on
– The IP address pool can have IP addresses from multiple subnets. The subnets must be separated by a
semi-colon (for example, 192.155.155.1-6; 192.155.160.41-46)
Note
The IP address pool is limited to 39 characters.
Login Technique (diLoginTechnique)
This variable defines the login sequence that a dial-up user will see. The various options are defined below:
• none(0)—no login sequence is enabled
• textORpap(1)—This setting enables clear text logins or PPP calls using PAP authentication.
• text(2)—A username prompt is displayed and a username must be entered. If the received username is a
static user with no password defined, then the connection completes and no password prompt is issued. If a
password is required then a password prompt is displayed and a password must be entered.
Note
Text login with 56k ISDN and 64k ISDN is not supported.
• pap(3)—This setting assumes that all calls will be PPP users. No username or password prompt will be displayed. The system will go directly to PPP processing. The dial-up user must be configured for PAP authentication.
Note
If the user trying to connect to the access server is not configured for PAP he
will be disconnected.
• chap(4)—This setting assumes that all calls will be PPP users. No username or password prompt will be displayed. The system will go directly to PPP processing. The dial-up user must be configured on his computer
for CHAP authentication.
Note
If the user trying to connect to the access server is not configured for CHAP
he will be disconnected.
• chapORpap(5)—This setting assumes that all calls will be PPP users. No username or password prompt
will be displayed. The system will go directly to PPP processing. The dial-up user must be configured for
PAP or CHAP authentication. The access server will always request CHAP authentication first. Therefore,
if a user can negotiate either CHAP or PAP, CHAP authentication will be performed.
Dial In Modify default window
67
Access Server Administrators’ Reference Guide
7 • Dial In
• textORchapORpap(6)—This setting enables clear text logins or PPP calls using PAP or CHAP
authentication.
• MschapV1 - This setting assumes that all calls will be PPP users. No username or password prompt will be
displayed. The system will go directly to PPP processing. The dial-up user must be configured on his computer for MS-CHAP V1 authentication
• MschapV2 - This setting assumes that all calls will be PPP users. No username or password prompt will be
displayed. The system will go directly to PPP processing. The dial-up user must be configured on his computer for MS-CHAP V2 authentication
• MschapV1ORV2 - This setting assumes that all calls will be PPP users. No username or password prompt
will be displayed. The system will go directly to PPP processing. The dial-up user must be configured on his
computer for MS-CHAP V1 OR V2 authentication
Username Prompt (diUsernamePrompt)
This is what will be displayed when the user first connects after the Initial Banner is displayed. The string can
be up to 39 characters. This should be a ASCII printable string and can include carriage returns and line feeds.
This applies only for text users not PPP. (See also Initial Banner.) For example the prompt could be:
Enter your username:
Password Prompt (diPasswordPrompt)
This defines the character string that will be displayed at user authentication time to request the users password. The string can be up to 39 characters. This should be a ASCII printable string and can include carriage
returns and line feeds. This applies only for text users not PPP. For example, the prompt could be:
Enter your password:
Initial Banner (diBanner)
This is usually a message welcoming the user. The message can be up to 39 characters and should be an ASCII
printable string. It can include carriage returns and line feeds. The username prompt immediately follows the
initial banner. This banner only appears for text login users.
Modify Service
This portion of the Dial In Modify default window (see figure 27 on page 66) describes changing user login
services.
Default Service (diService)
This object defines the default service that will be provided if the authentication technique does not specifically
name a service type, and if no service is specified in the static user’s profile under Authentication. For information about the static users database, see 5, “Authentication” on page 30.
The options are:
• rlogin(1)—User will be automatically given a rlogin prompt.
• telnet(2)—User will be automatically given a telnet prompt.
• tcpraw(3)—All 8 bits are passed unchecked and unaltered.
• ppp(4)—Only a PPP connection will be allowed.
Dial In Modify default window
68
Access Server Administrators’ Reference Guide
7 • Dial In
• slip(5)—SLIP or PPP connection will be allowed. SLIP is not currently implemented.
• vpn(6)—Not currently implemented.
• tcpraw_cpn(7)–Send a Called Party Number Information Element (CPNIE) Packet to the server that
accepts the TCP-RAW connection. (This feature is for a proprietary application only; do not use.)
Default IP Service (diServiceIP)
This object defines the IP address that will be used for login connections (telnet or rlogin) when the authentication technique has not provided an IP address to connect to.
Default Service Port (diServicePort)
This object defines the IP port number that will be used for login connections (telnet or rlogin) when the
authentication technique has not provided a port number to connect to. If no TCP port number is provided
then the following UNIX defaults will be used:
• telnet port 23
• rlogin port 513
Force Next Hop (diForceNextHop)
All packets received on the specified dial-up link will be forwarded to the specified gateway. The gateway must
be on the same network at the remote access server. This is the default setting that will be used if the setting is
not overridden by the RADIUS response for that particular user. A setting of 0.0.0.0 indicates that this option
is not in effect.
The RADIUS attribute used to set the Force Next Hop is attribute 209, a Patton vendor extension. For a full
list of RADIUS attributes, see A, “Supported RADIUS Attributes” on page 300.
Modify Domain Name Server
This portion of the Dial In Modify default window (see figure 27 on page 66) describes modifying the primary
and secondary domain name servers for IP and Microsoft Windows.
Primary Domain Name Server (diPrimaryDNS)
The primary domain name server address to pass to the caller (Win95 PPP). The first place to try to resolve
host names. i.e. IP address 204.91.99.128
Secondary Domain Name Server (diSecondaryDNS)
The secondary domain name server address to pass to the caller (Win95 PPP). The next place to try to resolve
the host name.
Primary WINS (diPrimaryWINS)
The primary Windows name server address to pass to the caller (Win95 PPP). The Windows Internet Naming
Service (WINS).
Secondary WINS (diSecondaryWINS)
The secondary Windows name server address to pass to the caller (Win95 PPP). The Windows Internet Naming Service (WINS).
Dial In Modify default window
69
Access Server Administrators’ Reference Guide
7 • Dial In
Modify Attempts
This portion of the Dial In Modify default window (see figure 28) describes modifying the login attempts
parameters for dial in users.
Figure 28. Dial In Modify window (modify Attempts, Configuration, and Maximum Time objects)
Failure Banner (diFailureBanner)
This defines a message of up to 254 characters in length that will be displayed to a user if authentication fails.
This message only appears when the authentication technique is Text.
Success Banner (diSuccessBanner)
The string sent to the dial-in window after a text login is authenticated successfully. The string can contain any
printable characters with the exception of the excape character (\). The following special sequences are recognized and will be replaced before being sent to the customer:
• \r— carriage return
• \n—replaced with a new line
• \t—replaced by a tab
• \M—replaced by the MTU (maximum transfer unit)
• \I—replaced by the IP address assigned to the connection
Dial In Modify default window
70
Access Server Administrators’ Reference Guide
7 • Dial In
Login Attempts Allowed (diAllowAttempts)
The maximum number of attempts a user will be given to login before being disconnected. This applies to Text
authentication only. PAP and CHAP authentication are only allowed a single attempt.
Modify Configuration
This portion of the Dial In Modify window (see figure 28 on page 70) describes modifying the link compression, MRUs, and MultiLink, and MultiBox parameters.
Link Compression (diLinkCompression)
This object enables the PPP link layer address and protocol field compression. The following options are available:
• enable(1)—PPP negotiations will perform link compression unless the other end of the link is unable to
work with compression
• disable(2)—No compression will be used on the PPP link. This is the default setting
Default Max Receive Unit (diConfigInitialMRU)
This is the default setting for Maximum Receive Unit (MRU). This value can be changed by authentication or PPP.
Allow Magic Number Negotiation (diConfigMagicNumber)
Determines if magic number negotiation should be done. This access server parameter is used to check
whether a link is in a looped-back state. The following options are available:
• enable(1)—The local node will attempt to perform Magic Number negotiation with the remote node.
• disable(2)—Magic Number negotiation will not be performed.
In any event, the local node will comply with any magic number negotiations attempted by the remote node,
per the PPP specification. Changes to this object take effect when the link is restarted.
For more information, see Section 7.6, "Magic Number," of RFC1331.
Frame Check Sequence Size (diConfigFcsSize)
The size (in bits) of the frame check sequence (FCS) that the local node will generate when sending packets to
the remote node. This setting becomes active when the link is in the up—able to pass packets—operational
state (for more information, refer to “Operational Status (diIpOperStatus)” on page 98).
Compression (diIpConfigCompression)
Determines whether the local node will attempt to negotiate IP compression. The following options are available:
• none(1)—The local node will not attempt to negotiate IP compression
• vj-tcp(2)—The local node will attempt to negotiate compression mode indicated by the enumerated value
Changes to this object take effect when the link is restarted.
For more information, see Section 4.0, "Van Jacobson TCP/IP Header Compression" of RFC1332.
MultiLink (diConfigMultilink)
MultiLink enables a user to connect using multiple channels. This enables dial-up users whose equipment supports MultiLink PPP or multi-channel ISDN to use multiple channels to get higher data transfer rates.
Dial In Modify default window
71
Access Server Administrators’ Reference Guide
7 • Dial In
Set the MultiLink—Max # of Calls per User parameter to the maximum number of channels a user can take for
a single connection. Setting the parameter to 0 disables the MultiLink option.
MultiBox (diConfigMMP)
MultiBox enables a user to have multiple connections even if the subsequent call for an additional channel is
on a different access server from the originating channel (bundlehead). MultiBox is useful when a single number called by a user accesses multiple T1/E1s and subsequently different access servers.
Setting the MultiBox—Query timeout parameter to enable(1) activates the MultiBox option. Setting the
parameter to disable(0) disables the MultiBox option. If MultiBox is disabled, then acquiring an additional
channel will fail if the bundlehead is not on the same access server.
Modify Maximum Time
This portion of the Dial In Modify window (see figure 28 on page 70) describes modifying the time-out values
for the session idle time, time to login, and the MIB data linger time.
Maximum Session Time (min) (diSessionTimeout)
This is the maximum time (in minutes) that a connection is allowed to be maintained. After this time the connection will be terminated, even if there is active traffic on the connection. This is a default setting, and it can
be overridden by the authentication settings of a specific user. Setting the parameter to 0 means the connection
will never be terminated.
Note
The maximum value is 357,910 minutes.
Maximum Idle Time (min) (diIdleTimeout)
This is the maximum time (in minutes) that a connection is allowed to be idle with no traffic. After this time,
the connection will be terminated. This is a default setting, and it can be overridden by the authentication settings of a specific user.
Note
The maximum value is 357,910 minutes.
Time to login (sec) (diLoginTimeout)
This is the maximum time (in seconds) that a user is given to log in. This only applies to the time before the
user is authenticated. This setting should take into account any time delays incurred when querying a remote
authentication server (such as a RADIUS).
Call History Timeout (min) (diLingerTime)
Number of minutes a MIB entry will remain in the Active table after the call it pertains to is disconnected. Up
to 15 dead calls can be displayed. Setting the parameter to 0 disables the timeout feature.
Dial In Modify default window
72
Access Server Administrators’ Reference Guide
7 • Dial In
Figure 29. V.92 Configuration window
Modify ISDN Configuration
V.110 signaling is a form of ISDN rate adaptation (see figure 29). V.110 is a fixed-frame based rate adaptation
standard that allows lower data rates to be communicated across 64-kbps ISDN.
The following rates are supported: 600, 1200, 2400, 3600, 4800, 7200, 9600, 14400, 19200, 38400, 4800
and 56000. V.110 and its data rate is determined via the bearer capability information element or the lower
layer compatibility information element in the ISDN SETUP message as defined in the Q931 specification
Limitations:
• 56000 only supports PAP and CHAP, MS-CHAP v1 and MS-CHAP v2 authentication. All other data rates
support text, PAP, or CHAP.
• 56000 only supports a synchronous connection; all other data rates support both synchronous and asynchronous connections.
Note
If V.110 is disabled and a V.110 call comes in, the call will be terminated and
V110 disabled will be displayed on the dial-in screen as the disconnect reason.
V.110 (diV110Enable)
The following options are available (see figure 29):
• Enable or disable V.110 modem modulation.
• Enable or disable 56K ISDN connections.
Dial In Modify default window
73
Access Server Administrators’ Reference Guide
7 • Dial In
Modify V.92 Configuration
This portion of the Dial In Modify Default window (see figure 29) describes modifying the V.92 Configuration parameters.
V.92 Features (diModemV92Enable)
Enables and disables V92 functionality.
Quick Connect (diV92QuickConnect)
Quick connect shortens a modem’s time to learn a phone line’s characteristics by reusing some information previously learned. This setting enables or disables quick connect.
Modem on Hold (diV92ModemOnHold)
Modem on Hold allows a user to accept a phone call without breaking the connecting to the Internet. This setting enables or disables modem on hold
Modem on Hold Timeout(diV92ModemOnHoldTimeout)
If modem on hold is enabled, sets the length of time the user can be in the modem on hold state before disconnecting the call.
Modify Modem Configuration
This portion of the Dial In Modify window (see figure 30) describes modifying modem configuration access
server parameters for dial in users.
Figure 30. Dial In Modify window (modify Modem Configuration objects)
Dial In Modify default window
74
Access Server Administrators’ Reference Guide
7 • Dial In
V90(diModemV90Enable)
Enables or disables V90 modem modulation
K56flex(diModemK56Enable)
Enables or disables K56flex modem modulation
V34(diModemV34Enable)
Enables or disables V34 modem modulation
V32(diModemV32Enable)
Allows V.32 and V.32bix modulations up to 14.4 kbps. The following options are available:
• disable(0)—neither option is enabled
• enable(1)—support V.32 and V.32bis modulations.
V23(diModemV23Enable)
Enables or disables V23 modem modulation
V22 (diModemV22Enable)
Allow V.22 or Bell 212 modulations. The following options are available:
• disable(0)—Neither option is enabled
• enableV22(1)—Enable V.22 modulation
• enableBell212(2)—Enable Bell 212 modulation
V21(diModemV21Enable)
Allow V.21 or Bell 103 modulations. The following options are available:
• disable(0)—Neither option is enabled
• enableV21(1)—Enable V.21 modulation
• enableBell103(2)—Enable Bell 103 modulation
Maximum V8 Failures (diModemMaxV8Failures)
Number of times the modem will attempt a V.8 connection before it is reinitialized. Upon reinitialization it
will automatically start making a V.8 connection.
Note
This is for leased line operation only.
MaxSpeed (diModemMaxSpeed)—Not Currently Implemented
This variable assigns the fastest data rate that will be negotiated. The range is 300–64000.
MinSpeed (diModemMinSpeed)—Not Currently Implemented
This variable assigns the slowest data rate that will be negotiated. The range is 300–33600.
Note
Increasing this number may prevent users with slower modems from successfully connecting.
Dial In Modify default window
75
Access Server Administrators’ Reference Guide
7 • Dial In
Guard Tone (diModemGuardTone)
Normally a guard tone is not required, but one can be inserted. This setting works for Phase Shift Key (PSK)
modulations only, not for V.32 or V.34.
• tone None(1)—Guard tone is not used
• tone1800(3)—Guard tone is enabled
CarrierLossDuration (diModemCarrierLossDuration)
The number of seconds that the carrier signal must be missing before the connection is considered lost. Choosing a setting of 25 indicates forever. The range is 1 to 25.
Billing Delay (diBillingDelay)
The number of seconds after answering the call during which the modem should remain silent.
Answer Tone Length(diModemAnswerToneLength)
The answer tone length can be adjusted for low speed modems. If only modulations below v.34 are enabled,
the tone length can be reduced to a minimum of 1 millisecond which will reduce the total time it takes for the
modem to connect. The connection time can be reduced by up to 3.5 seconds.
Retrain (diModemRetrain)
Enables the modem to monitor line quality and request a fallback or retrain for poor quality and a fall forward
for good quality.
• none (0)—Do not allow modem to retrain, fallback, or fall forward.
• retrain(1)—Allow the modem to retrain if the line quality is poor.
• FallForwardFallBack(2)—Allow the modem to fallback to a slower speed if the line quality is poor, or fall
forward to a faster speed if the line quality is good.
TxLevel (diModemTxLevel)—Not Currently in Use
This variable should be set with caution; and normally only after talking to a factory representative. This sets
the transmit level power level of the modem. The scale is 12 (-12 dB) to 20 (-20 dB) in 1 db increments.
Note
Larger numbers mean less transmit power is being output (in other words, a
setting of 20 will result in less power than a setting of 12).
Protocol (diModemProtocol)
Assigns the error correction protocol to use with the modem. The following options are available:
• Direct(0)—No error correction will be used.
• requestV42(1)—Enables V.42 error correction. If this is selected, the modem will either negotiate for V.42
error correction or—if V.42 correction is not available—will use no error correction.
• requireV42(2)—V.42 error correction is mandatory, otherwise disconnect.
Compression (diModemCompression)
Assigns the data compression protocol to use with the modem. This setting is in effect only when V.42bis error
correction (see “Protocol (diModemProtocol)”) is active.
Dial In Modify default window
76
Access Server Administrators’ Reference Guide
7 • Dial In
• Direct(0)—No compression will be used.
• requestV42bis(1)—Enable V.42bis compression. If this is selected, the modem will either negotiate for
V.42bis data compression or—if V.42bis compression is not available—will use no data compression.
• requireV42bis(2)—V.42bis data compression is mandatory, otherwise disconnect.
• V44(3)—allows V.44 and V.42bis data compression.
Manage DNIS Window
The Manage DNIS window (see figure 31) shows the current configurations for dial-in users based on WAN
link and called number.
Figure 31. Manage DNIS window
This feature makes use of DNIS (Dialed Number Identification Service), a feature that can be implemented on
your T1/E1. DNIS is a telephone service that identifies for the receiver or a call, the number that the caller
dialed. DNIS works by passing the touch-tone digits (dual-tone multi-frequency or MF digits) to the destination for use by the terminating device.
The RAS uses its ability to capture DNIS information to provide the customer with the ability to set up dial-in
parameters for their dial-in clients based on the phone number dialed and the physical WAN port they have
dialed into or just the number dialed. The DNIS management feature allows you to configure the authentication method and the IP address pool.
The Manage DNIS Window contains the following items:
• Information about DNIS configurations set-up—to view or modify individual DNIS configurations, select
an ID in the ID column. For more information about modifying a DNIS configuration, refer to “DNIS
Entry Window” on page 79
Manage DNIS Window
77
Access Server Administrators’ Reference Guide
7 • Dial In
• DNIS Profiles—clicking on the DNIS Profiles link takes you to the page where you can view and change
the DNIS profiles. Refer to “DNIS Profiles” on page 80
• DNIS Ip Pools—clicking on the DNIS Ip Pools link takes you to the page where you can view and change
the IP address pools. Refer to “DNIS IP Pools Window” on page 82
Manage DNIS main window
ID (dnisPoolID)
The identification number that uniquely identifies the DNIS configuration.
WAN Link (dnisPoolDesrcWan)
The WAN link the dial-in user must be connected to in order to use this DNIS configuration.
Note
0 indicates that the WAN Link is not considered when determining if the
dial-in user matches the conditions of the DNIS configuration.
Dialed Number (dnisPoolDesrcDialedNumber)
The number the dial-in user must call in order to use this DNIS configuration. If more than one number is
specified, they must be separated by semi-colons (;).
Note
This field has a limit of 80 characters.
DNIS profile (dnisPoolAssignedProfile)
The DNIS profile used if the dial-in user meets the conditions of this configuration.
Note
A DNIS profile of 0 indicates that no profile has been selected and the DNIS
configuration is not activated.
Status (dnisPoolStatus)
Indicates if the DNIS Configuration will be used.
• active(1)—This configuration will be compared to the inbound call and used if the dial-in user meets its
conditions.
• notUsed(2)—This configuration will not compared to the inbound call to determine if the dial-in user
matches its conditions.
Add a DNIS Group:
Use this portion of the window to add a DNIS configuration.
1. Enter a unique ID in the ID field.
2. If needed, enter the WAN link.
3. Enter the dialed number.
4. Enter the DNIS profile to activate the configuration.
Note
Entering an ID that is already configured will change the configuration.
Manage DNIS Window
78
Access Server Administrators’ Reference Guide
7 • Dial In
DNIS Entry Window
Clicking on the ID in the Manage DNIS Window displays the DNIS Entry window (see figure 32) where you
can change the DNIS configuration.
Figure 32. DNIS Entry window
WAN Link (dnisPoolDesrcWan)
The WAN link the dial-in user must be connected to in order to use this DNIS configuration.
Note
0 indicates that the WAN Link is not considered when determining if the
dial-in user matches the conditions of the DNIS configuration.
Called (Calling) Number (dnisPoolDesrcDialedNumber)
The number the dial-in user must call in order to use this DNIS configuration. If more than one number is
specified, they must be separated by semi-colons (;).
Note
This field has a limit of 80 characters.
DNIS profile (dnisPoolAssignedProfile)
The DNIS profile used if the dial-in user meets the conditions of this configuration. The profile indicates the
authentication method and IP address pool that the IP address will be selected from for the dial-in user that
matches the conditions of the configuration.
Note
A DNIS profile of 0 indicates that no profile has been selected and the DNIS
configuration is not activated.
Status (dnisPoolStatus)
Indicates if the DNIS Configuration will be used.
• active(1)—This configuration will be compared to the inbound call and used if the dial-in user meets its
conditions.
• notUsed(2)—This configuration will not compared to the inbound call to determine if the dial-in user
matches its conditions.
• destroy(3)—Deletes the DNIS configuration
Manage DNIS Window
79
Access Server Administrators’ Reference Guide
7 • Dial In
DNIS Profiles
DNIS profiles can be set in two different ways:
• Per CALLED number: Configured DNIS profile would apply for all calls TO the number specified in the
DNIS Profile regardless of the calling number.
OR
• Per CALLING number Configured DNIS Profile would apply only for the calls made FROM the number
specified in the DNIS Profile.
In either case, the "Dialed Number" field should be used when creating or modifying a DNIS group.
The DNIS profile lookup first tries to find the match for a given CALLED number. If the Profile for a given
number is not found, it tries to find the match for a given CALLING number. If the Profile for a given number
is not found, the default configuration is used.
If no DNIS groups/profiles have been created, or if a calling number does not match the number in any of the
configured groups, ASCII telnet mode will be used for the call, and no telnet environment user option
exchange will take place.
The DNIS Profiles Window (see figure 33) contains the following items:
• Information about DNIS profiles set-up—To view or modify individual DNIS profiles, select an ID in the
ID column. For more information about modifying a DNIS profile, refer to “DNIS Profile Entry Window”
on page 83.
• Manage DNIS—clicking on the Manage DNIS link takes you to the link that shows the DNIS configurations including the DNIS Profiles used. Refer to “Manage DNIS main window” on page 78
• DNIS Ip Pools—clicking on the DNIS Ip Pools link takes you to the page where you can view and change
the IP address pools associated with the DNIS profiles. Refer to “DNIS IP Pools Window” on page 82
Manage DNIS Window
80
Access Server Administrators’ Reference Guide
7 • Dial In
DNIS Profiles Main Window
Figure 33. DNIS Profiles window
ID (dnisIpProfileId)
The ID that uniquely identifies the DNIS profile.
IP Pool (dnisProfileAssignedIpPool)
The ID of the IP Address Pool that will be used to select an IP address for the dial-in user. The IP Pool is configured using the DNIS Ip Pool link.
Login Technique (dnisProfileLoginTechnique)
This variable defines the login sequence that a dial-up user will see. The various options are defined below:
• none(0)—no login sequence is enabled
• textORpap(1)—This setting enables clear text logins or PPP calls using PAP authentication.
• text(2)—A username prompt is displayed and a username must be entered. If the received username is a
static user with no password defined, then the connection completes and no password prompt is issued. If a
password is required then a password prompt is displayed and a password must be entered.
Note
Text login with ISDN is not currently implemented.
• pap(3)—This setting assumes that all calls will be PPP users. No username or password prompt will be displayed. The system will go directly to PPP processing. The dial-up user must be configured for PAP authentication.
Note
If the user trying to connect to the DMA is not configured for PAP he will
be disconnected.
Manage DNIS Window
81
Access Server Administrators’ Reference Guide
7 • Dial In
• chap(4)—This setting assumes that all calls will be PPP users. No username or password prompt will be displayed. The system will go directly to PPP processing. The dial-up user must be configured on his computer
for CHAP authentication.
Note
If the user trying to connect to the DMA is not configured for CHAP he will
be disconnected.
• chapORpap(5)—This setting assumes that all calls will be PPP users. No username or password prompt
will be displayed. The system will go directly to PPP processing. The dial-up user must be configured for
PAP or CHAP authentication. The DMA will always request CHAP authentication first. Therefore, if a
user can negotiate either CHAP or PAP, CHAP authentication will be performed.
• textORchapORpap(6)—This setting enables clear text logins or PPP calls using PAP or CHAP
authentication.
• MschapV1 - This setting assumes that all calls will be PPP users. No username or password prompt will be
displayed. The system will go directly to PPP processing. The dial-up user must be configured on his computer for MS-CHAP V1 authentication
• MschapV2 - This setting assumes that all calls will be PPP users. No username or password prompt will be
displayed. The system will go directly to PPP processing. The dial-up user must be configured on his computer for MS-CHAP V2 authentication
• MschapV1ORV2 - This setting assumes that all calls will be PPP users. No username or password prompt
will be displayed. The system will go directly to PPP processing. The dial-up user must be configured on his
computer for MS-CHAP V1 OR V2 authentication
DOVBS (dnisProfileDOVBS)
With Data over Voice Bearer Service (DOVBS) the remote end initiates a voice call that is to be terminated digitally. A voice call carrying data is indicated by the presence of 3.1khz or speech in the bearer capability information element of the SETUP message.
• disable(0) —DOVBS is not supported
• dovbs56(1)—The voice call will be terminated as a 56k digital call.
• dovbs64(2)—The voice call will be terminated as a 64k digital call.
Service Port (dnisProfileServicePort)
The TCP port on the remote machine listening for TCP raw or telnet connections
Service IP (dnisProfileServiceIP)
The IP address of the remote machine that the dial-in customer is to be redirected.
Telnet UserId (dnisProfileTelnetUserId)
Specifies the ID string that the device will submit during a Telnet session.
Telnet Mode (dnisProfileTelnetMode)
Specifies the mode–ASCII or Binary– that the device will use to start a Telnet session.
Manage DNIS Window
82
Access Server Administrators’ Reference Guide
7 • Dial In
Status (dnisIpProfileStatus)
Indicates if the DNIS Profile is used in any DNIS configuration.
• active(1)—This profile is used in one or more DNIS configurations
• notUsed(2)—This profile is not used in any configurations
Add a DNIS Profile
Use this portion of the window to add a DNIS Profile.
1. Enter a unique ID in the ID field.
2. Enter a valid IP Pool Id
3. Enter the login technique for authentication.
Note
Entering an ID that is already configured will change the configuration.
DNIS Profile Entry Window
Clicking on the ID in the DNIS Profiles Window displays this window (see figure 34). In this window you can
change the DNIS profile.
Figure 34. DNIS Profile 1 window
IP Pool (dnisProfileSAssignedIpPool)
The ID of the IP Address Pool that will be used to select an IP address for the dial-in user. The IP Pool is configured using the DNIS Ip Pool link. See “DNIS IP Pool Entry Window” on page 87 for more information
Note
Do not enter actual IP address range here.
Login Technique (dnisProfileLoginTechnique)
The authentication method used to authenticate the dial-in user. The following methods are available choices:
• none(0)—no login sequence is enabled
• textORpap(1)—This setting enables clear text logins or PPP calls using PAP authentication.
Manage DNIS Window
83
Access Server Administrators’ Reference Guide
7 • Dial In
• text(2)—A username prompt is displayed and a username must be entered. If the received username is a
static user with no password defined, then the connection completes and no password prompt is issued. If a
password is required then a password prompt is displayed and a password must be entered.
Note
Text login for 56k and 64k ISDN is not currently supported.
• pap(3)—This setting assumes that all calls will be PPP users. No username or password prompt will be displayed. The system will go directly to PPP processing. The dial-up user must be configured for PAP authentication.
Note
If the user trying to connect to the access server is not configured for PAP he
will be disconnected.
• chap(4)—This setting assumes that all calls will be PPP users. No username or password prompt will be displayed. The system will go directly to PPP processing. The dial-up user must be configured on his computer
for CHAP authentication.
Note
If the user trying to connect to the access server is not configured for CHAP
he will be disconnected.
• chapORpap(5)—This setting assumes that all calls will be PPP users. No username or password prompt
will be displayed. The system will go directly to PPP processing. The dial-up user must be configured for
PAP or CHAP authentication. The access server will always request CHAP authentication first. Therefore,
if a user can negotiate either CHAP or PAP, CHAP authentication will be performed.
• textORchapORpap(6)—This setting enables clear text logins or PPP calls using PAP or CHAP
authentication.
• MschapV1 - This setting assumes that all calls will be PPP users. No username or password prompt will be
displayed. The system will go directly to PPP processing. The dial-up user must be configured on his computer for MS-CHAP V1 authentication
• MschapV2 - This setting assumes that all calls will be PPP users. No username or password prompt will be
displayed. The system will go directly to PPP processing. The dial-up user must be configured on his computer for MS-CHAP V2 authentication
• MschapV1ORV2 - This setting assumes that all calls will be PPP users. No username or password prompt
will be displayed. The system will go directly to PPP processing. The dial-up user must be configured on his
computer for MS-CHAP V1 OR V2 authentication.
DOVBS (dnisProfileDOVBS)
With Data over Voice Bearer Service (DOVBS) the remote end initiates a voice call that is to be terminated digitally.
• disable(0) —DOVBS is not supported
• dovbs56(1)—The voice call will be terminated as a 56k digital call. This option allows an ISDN type call
over a robbed-bit T1.
• dovbs64(2)—The voice call will be terminated as a 64k digital call.
Manage DNIS Window
84
Access Server Administrators’ Reference Guide
7 • Dial In
Service Port (dnisProfileServicePort)
The TCP port that the remote server is listening at for connections.
Service IP (dnisProfileServiceIP)
The host IP address that rlogin, telnet and tcpraw connections will be forwarded to.
Note
If the login technique is set to a value other than none, the default service
must be configured via RADIUS or the static user database for the user(s) to
make use of this redirection feature.
Telnet UserId (dnisProfileTelnetUserId)
Specifies the ID string that the device will submit during a Telnet session.
Telnet Mode (dnisProfileTelnetMode)
Specifies the mode–ASCII or Binary– that the device will use to start a Telnet session.
Status (dnisIpProfileStatus)
Indicates if the DNIS Profile is used in any DNIS configuration.
• active(1)—This profile is used in one or more DNIS configurations
• notUsed(2)—This profile is not used in any configurations
• destroy(3)—deletes the DNIS profile
Manage DNIS Window
85
Access Server Administrators’ Reference Guide
7 • Dial In
DNIS IP Pools Window
Figure 35. DNIS IP Pools window
The DNIS IP Pools Window (see figure 35) contains the following items:
• Information about DNIS IP Pools set up—to view or modify individual DNIS IP Pools, select an ID in the
ID column. For more information about modifying a DNIS IP Pool, refer to “DNIS IP Pool Entry Window” on page 87.
• Manage DNIS—clicking on the Manage DNIS link takes you to the link that shows the DNIS configurations including the DNIS Profiles used. Refer to page “Manage DNIS main window” on page 78.
• DNIS Profiles—clicking on the DNIS Profiles link takes you to the page where you can view and change
the DNIS profiles. Refer to “DNIS Profiles” on page 80.
ID (dnisIpPoolId)
An identification number that uniquely identifies the DNIS IP Pool.
IP Address Pool (dnisIpPool)
The IP Address pool that an IP address will be selected from for a dial-in user.
Status (dnisIpPoolStatus)
Indicates if the IP pool is used in any DNIS Profile.
• active(1)—This IP pool is used in one or more DNIS Profiles
• notUsed(2)—This IP pool is not used in any configurations
Add a DNIS Profile
Use this portion of the window to add a DNIS Profile.
1. Enter a unique ID in the ID field.
Manage DNIS Window
86
Access Server Administrators’ Reference Guide
7 • Dial In
2. Enter a valid IP Address range. A valid IP address range is of the format xxx.xxx.xxx.aaa-bbb where aaa is
less than bbb
Note
Entering an ID that is already configured will change the configuration.
DNIS IP Pool Entry Window
Clicking on ID in the DNIS IP Pool Window will take you to this window (see figure 36). In this window you
can change the IP Address Pool.
Figure 36. DNIS IP Pools Entry window
IP Address Pool (dnisIpPool)
The IP Address pool that an IP address will be selected from for a dial-in user.
Status (dnisIpPoolStatus)
Indicates if the IP pool is used in any DNIS Profile.
• active(1)—This IP pool is used in one or more DNIS Profiles
• notUsed(2)—This IP pool is not used in any configurations
• destroy(3)—deletes the IP Address Pool entry
Manage DNIS Window
87
Access Server Administrators’ Reference Guide
7 • Dial In
Dial In User Statistics window
This window shows statistics for individual dial-in users. The headings DSP Link, Interface Link, and WAN
Link, shown in figure 37, pertain to the unique time slot defined for each of these links. For specific details on
the function of access server parameters defined under these sections, refer to each under the access server Configuration Menu.
Figure 37. User Statistics (Call Identification, Session)
The Dial In User Statistics window (see figure 27) is where you can view the following:
• Call Identification information (see “Call Identification” on page 89)
• Session information (see “Session” on page 90)
• PPP statistics (see “PPP Statistics” on page 95)
• IP statistics (see “IP” on page 97)
• Phone information (see “Phone” on page 99)
• Data transfer statistics (see “Data” on page 100)
• Physical layer configuration information (see “Physical Layer” on page 100)
Dial In User Statistics window
88
Access Server Administrators’ Reference Guide
7 • Dial In
To view individual user statistics, select an active user in the State column on the Dial In main window (see
“Dial In main window” on page 55). For example, if you wanted to modify user jill, you would click on the
online(6) link next to jill’s username.
Call Identification
This portion of the Dial In User Statistics window (see figure 37 on page 88) shows user information for a
unique user ID.
Call ID: (diactIndex)
Unique identification of this active call (for internal use).
State (diactState)
Indicates current progress of the selected call.
• Ringing—The call has been recognized by the access server and is in the process of going off hook
• Connecting—The access server has assigned a DSP to the incoming call and is now in the process of negotiating the type of modulation (V.34, V.32, ISDN, or 56K).
• LcpNegotiate—The link is negotiating LCP parameters.
• Authenticating—The access server is in the process of verifying the user’s password by using static or
RADIUS authentication.
• Online—The access server has completed authentication and the user is now able to access the Internet.
• 12tpTunneled—Subsequent multilink call that was answered by another access server and tunneled to the
access server that has the originating call.
• Kill—The administrator can manually disconnect the user by activating this parameter.
• Dead—The user’s call has been disconnected. This message disappears when the linger time expires.
• Bury—The call has been killed and removed from the dial-in main window.
Username (diactUsername)
The caller’s username.
Password (diactPassword)
The caller’s password.
Shared Unique ID (diactMultiIndex)
Used for multi-link PPP, this is the unique identification shared between multi-link active calls.
Protocol (diactProtocol)
Indicates the type of service or link being provided for this call.
• PPP—The user has a PPP link running.
• Slip—The user has a Slip link running
• Telnet—The user has a telnet session running
Dial In User Statistics window
89
Access Server Administrators’ Reference Guide
7 • Dial In
• Rlogin —The user has an rlogin session running
Security Level (diactAccessLevel)
This is the security level assigned to the selected call. Passthru is the default security level. Monitor and Change
security levels are used by the access server administrator.
• Passthru(1)—Allows no access to the configuration screens.
• Monitor(2)—Allows read-only access to the configuration screens.
• Admin(4)—Allows full read and write access to the configuration screens.
• None(0)—Validation failed.
DSP Link (diactDSPIndex)
The physical DSP chip that the user’s call is on. This is a number from 0 to 59.
Interface Link (diactIFIndex)
Virtual interface in the PPP multiplexer inside the access server that accepts packets from the Ethernet port for
the connected dial-in user.
WAN Link (diactLinkIndex)
The T1/E1 WAN port number that the call is on.
Time Slot (diactSlotIndex)
Shows which T1/E1 channel the call is on. This is a number from 1-30.
IP Address (diactIP)
The currently assigned IP address from the IP address pool or the RADIUS server. The remote users’ PC is
assigned to this address. The address appears in the IP address (0.0.0.0) format.
Port # on Remote Machine (diactPort)
The TCP port number being used by this connection. The range is from 0 to 65,535. Ports in the range of 0 to
1023 are well-known ports used to access standard services. Telnet uses port 23 and rlogin uses port 513.
Session
This portion of the Dial In User Statistics window (see figure 37 on page 88) shows session information for a
unique user ID.
Start time of call (diactSessionStartTime)
The amount of time the access server had been up when the call was initiated.
Time Call Is/Was Active (diactSessionTime)
The amount of time the call was/is active.
Minutes Until Timeout (diactRemainingIdle)
Number of minutes remaining until idle timeout.
Dial In User Statistics window
90
Access Server Administrators’ Reference Guide
7 • Dial In
Time Left In Session (diactRemainingSession)
Number of seconds remaining in this session. This value is only displayed if session timeout has been activated.
Termination Reason (diactTerminateReason)
The reason a call was disconnected.
• stillActive(0)—Call is currently connected
• idleTimeout(2)—Call exceeded idle timeout parameter
• killed(3)—Call terminated by administrator
• userHangup (5)—DSP discovered remote modem was hung up abruptly. Examples could be that the phone
line was pulled out of the wall jack or the user terminated the communications without closing the connection down. If the modems are unable to bring up the physical line by successfully negotiating the modulation, userHangup will be registered if the remote modem gave up trying to complete the call.
• modemCanNotConnect(6)—The modems are not able to bring up the physical line by successfully negotiating the modulation. The remote access server has given up trying further to complete the physical connection.
• pppClose(8)—This termination reason will be given after PPP is initiated and the connection is disconnected. An example would be if LCP negotiations failed. Another cause could be if the bundlehead in a
multilink call is terminated before the tunneled call is termination.
• lcpClose(9)—Close initiated by LCP. normal shutdown of call
• loginTimeOut(10)—Exceeded login timeout parameter
• userTerminated(11)—A problem is discovered initiating the dial-in users telnet, rlogin or tcpclear session.
• maxNumCalls(21)—Exceeds maximum number of channels that can be allocated to the same call.
• notPapReq(24)—The access server is waiting for a PAP request packet containing the username/password
for a call but the packet received was not a PAP request packet.
• noIpPoolAddr(30)—Authentication server did not assign an IP address and access had no IP address pool
defined to assign an IP address
• noIpAddr(31)—Authenticator did not return an IP address for the service (e.g. telnet or rlogin) and the
default service defined does not specify the service IP address
• maxLoginAttempts(32)—Exceeded maximum login attempts as defined under the Dial-in link.
• invalidDefaults(44)—Default service is set to a value other than rlogin, telnet, tcpraw, ppp, slip or vpn
when using a login technique of None. No IP address is defined when using rlogin or telnet. Invalid telnet
or rlogin services ports have been defined in the default service.
• noDspAvailable(45)—When the remote access server attempted to connect the incoming call to an available DSP, no DSP could be found. Some examples why a DSP could not be found are:
– DSPs are no longer available to the resource pool because they are in reboot or hardware failure states.
– DSPs are in an unavailable administrative state although they are functional.
– The DSP resource pool is split between link A and link B and a call has been routed to a link over and
above the number of DSPs allocated to that link.
Dial In User Statistics window
91
Access Server Administrators’ Reference Guide
7 • Dial In
• papAuthenticationFailure(49)—Invalid username/password combination
• papInvalidPacket(50)—Non-printable characters in username or password received from remote end during authentication
• authenServerTimeout(51)—Authentication request timed out. The RADIUS server did not send a
response to the authentication request before the timer expired.
• authenAccountingTimeout(52)—Accounting request timed out. The RADIUS server did not send a
response to the accounting request before the timer expired.
• unknownProtocol(53)—The user initiates a PPP connection but the RADIUS replies to the remote access
server that the user is not allowed to connect using PPP.
• mfr2DisWaitCalled(54)—Call disconnected while we were waiting for the next expected called number
digit. The number of called number digits expected is more than the digits actually being sent or the Last
response code is configured incorrectly so the remote access server and switch can not continue on with the
interregister signalling.
• mfr2DisAckCalled(55)—Call disconnected while we were in the process of sending back the ack tone for a
called number digit or while we were waiting for the termination of the far end tone in response to our ack.
• mfr2DisAckLastCalled(56)—Call disconnected while we were in the process of sending back the ack tone
for the last expected called digit or while we were waiting for the termination of the far end tone in response
to our ack.
• mfr2DisWaitCalling(57)—Call disconnected while we were waiting for the next expected calling number
digit. The number of calling number digits expected is more than the digits actually being sent or the Last
response code is configured incorrectly so the remote access server and switch can not continue on with the
interregister signalling.
• mfr2DisAckCalling(58)—Call disconnected while we were in the process of sending back the ack tone for a
calling number digit or while we were waiting for the termination of the far end tone in response to our ack.
• mfr2DisAckLastCalling(59)—Call disconnected while we were in the process of sending back the ack tone
for the last expected calling digit or while we were waiting for the termination of the far end tone in
response to our ack.
• mfr2DisWhileComplete(60)—Call disconnected after the last expected digit was sent and acked. The number of calling digits expected may be less than the number of digits sent or the last response code for the
calling number is incorrect.
• exceedsMultiLinkLimit(64)—Exceeds multilink channel limit set either on the remote access server or in
the user entry on the RADIUS server
• sessionTimeout(66)—The length of the connection exceeds the session time limit allowed
• l2tpCallDisconnected—l2tp tunnel disconnected. The tunnel will be disconnected at the normal termination of the call.
• callingback(88)—call has been disconnected and user is being called back.
The following error messages are as a result of problems with connecting to the IP address/port specified for
the connection:
• tcpSideClosure(61)
Dial In User Statistics window
92
Access Server Administrators’ Reference Guide
7 • Dial In
• telnetError(62)
• rloginError(63)
• tcpConnAborted(67)—Connection to the remote service has been disconnected abruptly. For example, the
administrator of the remote machine killed the process.
• tcpConnRefused(69)—Connection to specified service on the remote machine was refused
• tcpConnReset(70)—Connection was reset
• tcpTimedOut(71)—Request to initiate connection to the remote service timed out. Connection timed out
because the remote side did not respond on the connection in a timely manner.
• l2tpCallDisconnected(80)—Client disconnected the call
• l2tpLNSConnectTimeout(81)—We accepted a tunnel and did not get a response from authenticator in
time (5 seconds)
• l2tpLACConnectTimeout(82)—We initiated the tunnel, but the other RAS didn't get back to us in time
(within 5 seconds)
• v110disabled(83)—User with V110 attempted to connect but V.110 (under Dial-in > Modify Defaults is
disabled.
The following are internal access server errors. Please contact technical support if you see these termination
reasons:
• noPoll(12)
• ipcPutMsdErr(13)
• pollErr(15)
• ioctlErr(16)
• pppPutMsgErr(17)
• dspIoctlErr(18)
• timerErr(19)
• pppOpenErr(22)
• ipLinkErr(23)
• pppLinkErr(25)
• tcpOpenErr(26)
• tcpPushErr(27)
• tcpPutMsgErr(28)
• invalidPrim(29)
• noTimers(33)
• tcpLinkErr(34)
• dspLinkErr(35)
Dial In User Statistics window
93
Access Server Administrators’ Reference Guide
7 • Dial In
• dspPutMsgErr(36)
• noDsp(37)
• lisIpcErr(38)
• dspOpenErr(39)
• invalidCode(40)
• callContention(41)
• dspCommErr(42)
• unknownBearerContent(43)
• dspOutOfState(46)
• dspRequestUnsupported(47)
• dspBadPrimitive(48)
• tcpNoBuffers(68)
• udpOpenErr(75)
• udpBindErr(76)
• l2tpOpenErr(77)
• l2tpLinkErr(78)
• reLinkErr(79)
State at termination (diactTerminateState)
Indicates the value of diactState when the call was terminated. A value of 0 indicates the call is still online.
Dial In User Statistics window
94
Access Server Administrators’ Reference Guide
7 • Dial In
PPP Statistics
This portion of the Dial In User Statistics window (see figure 38) shows PPP statistics (as 32-bit variables) of
the current user selected.
Figure 38. User Statistics (PPP Statistics, LCP Statistics, IP)
Bad Address (diStatBadAddresses)
The number of packets received with an incorrect address field.
Bad Controls (diStatBadControls)
The number of packets received on this link with an incorrect control field.
Packets Too Long (diStatPacketTooLongs)
The number of received packets that have been discarded because their length exceeded the maximum receive
unit (MRU).
Note
Packets that exceed the MRU but are successfully received and processed
anyway are not included in this count.
Bad Frame Check Sequences (diStatBadFCSs)
The number of packets received on this link with an incorrect control field.
LCP Statistics
This portion of the Dial In User Statistics window (see figure 38 on page 95) shows LCP statistics of the current user selected.
Local MRU (diStatLocalMRU)
The current value of the MRU for the local PPP entity. This value is the MRU that the remote entity is using
when sending packets to the local PPP entity. This setting becomes active when the link is in the up—able to
pass packets—operational state (for more information, refer to “Operational Status (diIpOperStatus)” on
page 98).
Dial In User Statistics window
95
Access Server Administrators’ Reference Guide
7 • Dial In
Remote MRU (diStatRemoteMRU)
The current value of the MRU for the remote PPP entity. This value is the MRU that the local entity is using
when sending packets to the remote PPP entity. This setting becomes active when the link is in the up—able to
pass packets—operational state (for more information, refer to “Operational Status (diIpOperStatus)” on
page 98).
Local Multilink MRRU (diStatLcpLocalMRRU)
Multilink maximum receive reconstruction unit for the local device.
Remote Multilink MRRU (diStatLcpRemoteMRRU)
Multilink maximum receive reconstruction unit for the remote device.
LCP Authentication (LCPAuthOptions)
Authentication type used by the dial-in user. The following options are available:
• none(1)
• pap(2)
• chap(3)
• MSChapV1(4)
• MSChapV2(5)
• tacacs(6)—not currently implemented
• edp(7)
• ShivaPap(8)—not currently implemented
ACC Map (diStatLocalToPeerACCMap)
The current value of the ACC Map used for sending packets from the local modem to the remote modem. The
local modem sends this character map to the remote peer modem to ensure that the data being transferred is
interpreted correctly. This setting becomes active when the link is in the up—able to pass packets—operational
state (for more information, refer to “Operational Status (diIpOperStatus)” on page 98).
Peer-Local ACC Map (diStatPeerToLocalACCMap)
The current value of the ACC Map used by the remote peer modem when transmitting packets to the local
modem. The local modem sends this character map to the remote peer modem to ensure that the data being
transferred is interpreted correctly. The remote peer modem combines its ACC Map with the map received
from the local modem. This setting becomes active when the link is in the up—able to pass packets—operational state (for more information, refer to “Operational Status (diIpOperStatus)” on page 98).
Local-Remote PPP Protocol Comprsn (diStatLocalToRemoteProtComp)
Indicates whether the local PPP entity will use protocol compression when transmitting packets to the remote
PPP entity. This setting becomes active when the link is in the up—able to pass packets—operational state (for
more information, refer to “Operational Status (diIpOperStatus)” on page 98). These are the available options:
• disabled(0)—PPP compression is disabled
• enabled(1)—PPP compression is enabled
Dial In User Statistics window
96
Access Server Administrators’ Reference Guide
7 • Dial In
Remote-Local PPP Protocol Comprsn (diStatRemoteToLocalProtComp)
Indicates whether the remote PPP entity will use protocol compression when transmitting packets to the local
PPP entity. This setting becomes active when the link is in the up—able to pass packets—operational state (for
more information, refer to “Operational Status (diIpOperStatus)” on page 98). These are the available options:
• disabled(0)—PPP compression is disabled
• enabled(1)—PPP compression is enabled
Local-Remote AC Comprsn (diStatLocalToRemoteACComp)
Indicates whether the local PPP entity will use address and control compression (ACC) when transmitting
packets to the remote PPP entity. This setting becomes active when the link is in the up—able to pass packets—operational state (for more information, refer to “Operational Status (diIpOperStatus)” on page 98).
These are the available options:
• disabled(0)—ACC is disabled
• enabled(1)—ACC is enabled
Remote-Local AC Comprsn (diStatRemoteToLocalACComp)
Indicates whether the remote PPP entity will use address and control compression (ACC) when transmitting
packets to the local PPP entity. This setting becomes active when the link is in the up—able to pass packets—
operational state (for more information, refer to “Operational Status (diIpOperStatus)” on page 98). These are
the available options:
• disabled(0)—ACC is disabled
• enabled(1)—ACC is enabled
Transmit Frame Check Seq. Size (diStatTransmitFcsSize)
The size of the Frame Check Sequence (FCS) in bits that the local node will generate when sending packets to
the remote node. This setting becomes active when the link is in the up—able to pass packets—operational
state (for more information, refer to “Operational Status (diIpOperStatus)” on page 98). The values are from
0 to 128.
Receive Frame Check Seq. Size (diStatReceiveFcsSize)
The size (in bits) of the frame check sequence (FCS) that the remote node will generate when sending packets
to the local node. This setting becomes active when the link is in the up—able to pass packets—operational
state (for more information, refer to “Operational Status (diIpOperStatus)” on page 98). The values are from
0 to 128.
IP
This portion of the Dial In User Statistics window (see figure 38 on page 95) shows operational status and the
type of IP compression used.
Dial In User Statistics window
97
Access Server Administrators’ Reference Guide
7 • Dial In
Figure 39. IP window
Operational Status (diIpOperStatus)
The current operational state of the interface. These are the available options:
• up(1)—able to pass packets
• down(2)—unable to pass packets
• testing(3)—in test mode and unable to pass packets
Local-Remote VJ Protocol Comprsn (diIpLocalToRemoteCompProt)
The IP compression protocol that the local IP entity uses when sending packets to the remote IP entity. The
available settings are:
• none(1)—no compression
• vjTCP(2)—compression is enabled
Remote-Local VJ Protocol Comprsn (diIpRemoteToLocalCompProt)
The IP compression protocol that the remote IP entity uses when sending packets to the local IP entity. The
available settings are:
• none(1)—no compression
• vjTCP(2)—enabled
Remote Max Slot ID (diIpRemoteMaxSlotId)
The Max-Slot-Id access server parameter that the remote node has announced and that is in use on the link. If
vjTCP header compression is not in use on the link, the value of this object will be 0. The range is from 0 to 255.
Local Max Slot ID (diIpLocalMaxSlotId)
The Max-Slot-Id access server parameter that the local node has announced and that is in use on the link. If
vjTCP header compression is not in use on the link, the value of this object will be 0. The range is from 0 to 255.
Next Hop Gateway (diForceNextHop)
All packets received on the dial-up link are forwarded to this gateway. A setting of 0.0.0.0 indicates that this
option is not in effect.
Dial In User Statistics window
98
Access Server Administrators’ Reference Guide
7 • Dial In
Primary Domain Name Server (diactPrimaryDNS)
This is the DNS sent to us using RADIUS attribute 135.
Secondary Domain Name Server (diactSecondaryDNS)
This is the DNS sent to us using RADIUS attribute 136.
Filters (diStatIpFilterAtoJ)
The filters applied to the user’s connection. This includes inactive filters. If an inactive filter is activated, the
rules of the filter will be applied immediately to the connection.
Phone
This portion of the Dial In User Statistics window (see figure 40) shows the phone numbers that were used by
this caller.
Figure 40. User Statistics (Phone, Data, Physical Layer)
Dial In User Statistics window
99
Access Server Administrators’ Reference Guide
7 • Dial In
Number Called (diactNumberDialed)
The phone number that was used to dial into the access server.
Number Called From (diactCallingPhone)
The user’s phone number—this is a caller ID feature.
Data
This portion of the Dial In User Statistics window (see figure 40 on page 99) describes the amount of PPP data
sent and received by this user.
Octets Sent (diactSentOctets)
The number of octets (bytes) sent during this call.
Octets Received (diActReceivedOctets)
The number of octets (bytes) received during this call.
Packets Sent (diactSentDataFrames)
The number of packets sent to the user during this call. Version 6 nomenclature for a packet is Ipv6 header
plus payload.
Packets Received (diactReceivedDataFrames)
The number of packets received by the user during this call. Version 6 nomenclature for a packet is Ipv6 header
plus payload.
Bad Packets (diactErrorFrames)
Number of bad received packets received during this call. Bad packets are those that failed CRC error checks.
Physical Layer
This portion of the Dial In User Statistics window (see figure 40 on page 99) contains statistics about the
modem connection. It includes modulation, levels, and other modem-related statistics that are helpful when
troubleshooting modem problems. This section covers only modem-type statistics, not ISDN connections.
Connection Modulation (diactModulation)
The modulation type of the modem link (for example, V.34). The modem link can have these modulation or
data types:
• unknown(0)
• v21(1)—V.21 modulation
• v22(2)—V.22 modulation
• v32(3)—V.32 modulation
• v34(4)—V.34 modulation
• k56(5)—K56 Flex modulation
• x2(6)—X.2 modulation
Dial In User Statistics window
100
Access Server Administrators’ Reference Guide
7 • Dial In
• v90(7)—V.90 modulation
• v110(8)—V.110 modulation (not currently implemented)
• isdn64(9)—ISDN 64 modulation
• isdn56(10)—ISDN 56 modulation (not currently implemented)
• 12tp(11)—12tp tunnelled multilink call
• phase2(20)—Phase 2, an advanced state of modulation in v34 and higher
• answerack(21)—acknowledgement phase of modulation
• V92(22)—V.92 modulation
• moh(23)—Modem is using V.92’s modem-on-hold feature
• v23(24)—V.23 modulation
Transmit Connection Speed (diactTxSpeed)
The connected speed of the modem link (for example, 28.8 bps). These values, in bits per second, range from
300–33,600.
Receive Connection Speed (diactRxSpeed)
The connected speed of the modem link (for example, 28.8 bps). These values, in bits per second, range from
300–53,000.
Error Correction (diactErrorCorrection)
The modem error correction scheme used during this call.
• None(1)—No error correction on the call
• V42(2)—Error correction mode
• V120(4)—Mode for ISDN B
Data Compression Protocol (diactCompression)
The modem data compression technique used during this call.
• None(1)—No compression
• V42bis(2)—Compression is running
• Stac(4)—Compression is running
• v44(5)—V44 compression is running
Modulation Symbol Rate (diactSymbolRate)
The modulation symbol rate during the call. This is used only when in V.34 and above modulations.
Locally Initiated Renegotiates (diactLocalRenegotiates)
The number of times the local modem has initiated a modem speed renegotiate.
Dial In User Statistics window
101
Access Server Administrators’ Reference Guide
7 • Dial In
Locally Initiated Retrains (diactLocalRetrains)
The number of times the local modem has initiated a modem carrier retrain.
Remote Initiated Renegotiates (diactRemoteRenegotiates)
The number of times the remote modem has initiated a modem speed renegotiate.
Remote Initiated Retrains (diactRemoteRetrains)
The number of times the remote modem has initiated a modem carrier retrain.
Dial In User Statistics window
102
Chapter 8
Dial Out
Chapter contents
Introduction ........................................................................................................................................................107
Dial Out Main Window......................................................................................................................................107
Call Sorting (doPageSort) .............................................................................................................................107
Active Calls (doActive) ..................................................................................................................................107
Call ID (doactIndex) .....................................................................................................................................107
ML ID (doactMultiIndex) ............................................................................................................................107
User (doactUsername) ..................................................................................................................................108
State (doactState) ..........................................................................................................................................108
Duration (doactSessionTime) .......................................................................................................................108
Disconnect Reason (doactTerminateReason) ................................................................................................108
Modulation (doactModulation) ....................................................................................................................110
Speed (doactTxSpeed) ...................................................................................................................................110
Dial Out Details window ....................................................................................................................................110
Dial Out Modify window....................................................................................................................................111
Modify Login ................................................................................................................................................112
TCP Port (doTcpPort) ............................................................................................................................112
TCP Type (doServiceType) .....................................................................................................................112
Restrict to Lan (doRestrictToLan) ...........................................................................................................112
Login Technique (doLoginTechnique) ....................................................................................................112
Username Prompt (doUsernamePrompt) ................................................................................................112
Password Prompt (doPasswordPrompt) ...................................................................................................112
Initial Banner (doBanner) .......................................................................................................................112
Modify Attempts ..........................................................................................................................................112
Failure Banner (doFailureBanner) ...........................................................................................................113
Login Attempts Allowed (doAllowAttempts) ...........................................................................................113
Modify Maximum Time ...............................................................................................................................113
Maximum Session Time (doSessionTimeout) .........................................................................................114
Maximum Idle Time (doIdleTimeout) ....................................................................................................114
Time to Login (sec) (doLoginTimeout) ...................................................................................................114
Call History Timeout (min) (doLingerTime) ..........................................................................................114
Modify V.92 Configuration ..........................................................................................................................114
V.92 Features (diModemV92Enable) ......................................................................................................114
Quick Connect (diV92QuickConnect) ...................................................................................................114
Modem on Hold (diV92ModemOnHold) ..............................................................................................114
Modem on Hold Timeout(diV92ModemOnHoldTimeout) ...................................................................114
V.59 Messages to Radius(diV59Enable) ..................................................................................................114
Modify Modem Configuration .....................................................................................................................115
ISDN (doModemISDNEnable) ..............................................................................................................115
V90(diModemV90Enable) .....................................................................................................................115
103
Access Server Administrators’ Reference Guide
8 • Dial Out
K56flex(diModemK56Enable) ................................................................................................................115
V34(diModemV34Enable) .....................................................................................................................115
V32(diModemV32Enable) .....................................................................................................................115
V23(diModemV23Enable) .....................................................................................................................115
V22 (doModemV22Enable) ....................................................................................................................115
V21 (doModemV21Enable) ....................................................................................................................115
Maximum Speed (doModemMaxSpeed) .................................................................................................115
Minimum Speed (doModemMinSpeed) .................................................................................................116
Guard Tone (doModemGuardTone) ......................................................................................................116
Carrier Loss Duration (doModemCarrierLossDuration) .........................................................................116
Retrain (doModemRetrain) .....................................................................................................................116
Tx Level (doModemTxLevel) ..................................................................................................................116
Protocol (doModemProtocol) .................................................................................................................116
Compression (doModemCompression) ...................................................................................................116
Restrict Modification (doModemRestrictMods) ......................................................................................117
Dial Out Locations Window ...............................................................................................................................117
status (locationstatus) ....................................................................................................................................117
Add Location ................................................................................................................................................118
Id (locationId) .........................................................................................................................................118
Location Name (locationName) ..............................................................................................................118
User Name (locationUserName) .............................................................................................................118
Password (locationPassword) ...................................................................................................................118
Phone Number (locationPhoneNumber) ................................................................................................118
Destination IP (locationDestinationIP) ...................................................................................................118
Destination NetMask (locationDestinationNet) ......................................................................................118
Multilink (locationConfigMultilink) .......................................................................................................119
Connection Type (locationConnectType) ...............................................................................................119
Idle Timeout (locationIdleTimeout) .......................................................................................................119
Maximum Session Time (locationSessionTimeout) .................................................................................119
Authentication Technique (locationAuthTechnique) ..............................................................................119
Ip Filters (LocationIpFilters) ...................................................................................................................119
Modem Profile (locationModemProfile) .................................................................................................119
View/Modify location details ........................................................................................................................120
Dialing Locations ..........................................................................................................................................120
Dial Out Modem Profiles Window ...............................................................................................................121
Add Modem Profile ......................................................................................................................................121
Locations Link ........................................................................................................................................121
Profile ID (modemProfileId) ...................................................................................................................121
Modem Modulation (modemType) ........................................................................................................121
Guard Tone (modemGuardTone) ...........................................................................................................122
Carrier Loss Duration (modemCarrierLossDuration) ..............................................................................122
Retrain(modemRetrain) ..........................................................................................................................122
Transmit Level (modemTxLevel)—not in use .........................................................................................122
Protocol (modemProtocol) ......................................................................................................................122
104
Access Server Administrators’ Reference Guide
8 • Dial Out
Compression (modemCompression) .......................................................................................................122
Billing Delay (modemBillingDelay) ........................................................................................................123
Status (modemStatus) .............................................................................................................................123
View modem profile .....................................................................................................................................123
Dial Out User Statistics Window ........................................................................................................................123
Call Identification ...................................................................................................................................124
Call ID (doactIndex) ...............................................................................................................................124
Username (doactUsername) ....................................................................................................................124
Password (doactPassword) .......................................................................................................................124
Shared Unique ID (doactMultiIndex) .....................................................................................................124
Dsp Link (doactDSPIndex) .....................................................................................................................125
Wan Link (doactLinkIndex) ....................................................................................................................125
Time Slot (doactSlotIndex) .....................................................................................................................125
IP Address (doactIP) ...............................................................................................................................125
Session ....................................................................................................................................................125
Start time of call (doactSessionStartTime) ...............................................................................................125
Time Call Is/Was active (doactSessionTime) ...........................................................................................125
Minutes until timeout (doactRemainingIdle) ..........................................................................................125
Time left in session (doactRemainingSession) .........................................................................................125
Termination Reason (doactTerminateReason) ........................................................................................125
PPP Statistics ..........................................................................................................................................127
Bad Address (doStatBadAddresses) ..........................................................................................................127
Bad Controls (doStatBadControls) ..........................................................................................................127
Packets too long (doStatPacketTooLongs) ...............................................................................................127
Bad Frame Check Sequences (doStatBadFCSs) .......................................................................................127
LCP Statistics ................................................................................................................................................127
Local MRU (doStatLocalMRU) ..............................................................................................................128
Remote MRU (doStatRemoteMRU) ......................................................................................................128
Local Multilink MRRU (doStatLcpLocalMRRU) ...................................................................................128
Remote Multilink MRRU (doStatLcpRemoteMRRU) ...........................................................................128
Remote LCP Authentication (doStatLcpAuth) ........................................................................................128
Local ACC Map (doStatLocalToPeerACCMap) .....................................................................................128
Remote ACC Map (doStatPeerToLocalACCMap) ..................................................................................128
Local PPP Protocol Compression (doStatLocalToRemoteProtComp) .....................................................129
Remote PPP Protocol Compression (doStatRemoteToLocalProtComp ..................................................129
Local AC Compression (doStatLocalToRemoteACComp) ......................................................................129
Remote AC Compression (doStatRemoteToLocalACComp) ..................................................................129
Local Frame Check Sequence size (doStatTransmitFcsSize) ....................................................................129
Remote Frame Check Sequence size (doStatReceiveFcsSize) ...................................................................129
Phone ...........................................................................................................................................................130
Number Called (doactNumberDialed) ....................................................................................................130
Data ..............................................................................................................................................................130
Octets Sent (doactSentOctets) .................................................................................................................130
Octets Received (doactReceivedOctets ) ..................................................................................................130
105
Access Server Administrators’ Reference Guide
8 • Dial Out
Packets Sent (doactSentDataFrames) .......................................................................................................130
Packets Received (doactReceivedDataFrames) .........................................................................................130
Bad Packets (doactErrorFrames) ..............................................................................................................130
Physical Layer ...............................................................................................................................................131
Connection Modulation (doactModulation) ...........................................................................................131
Tx Connection Speed (doactTxSpeed) ....................................................................................................131
Rx Connection Speed (doactRxSpeed) ....................................................................................................131
Error Correction Protocol (doactErrorCorrection) ..................................................................................131
Data Compression Protocol (doactCompression) ....................................................................................132
Modulation Symbol Rate (doactSymbolRate) .........................................................................................132
Locally Initiated Renegotiated (doactLocalRenegotiates) .........................................................................132
Locally Initiated Retrains (doactLocalRetrains) .......................................................................................132
Remote Initiated Renegotiates (doactRemoteRenegotiates) .....................................................................132
Remote Initiated Retrains (doactRemoteRetrains) ...................................................................................132
An example section of dialout..............................................................................................................................132
106
Access Server Administrators’ Reference Guide
8 • Dial Out
Introduction
The Dial Out PPP feature allows the Remote Access Server to initiate PPP calls to remote locations. The
administrator can set locations to be called manually, continuously, or only when needed (dial-on-demand).
The Dial Out window (see figure 41) contains the following items:
• Ability to change the order of calls on the main dial-out screen.
• Statistics for individual users—able to view user settings
• Details link—view dialout parameters
• Modify link—modify dialout parameters
• Locations link—view, add, and modify dial out locations
• Modem Profiles link—view, add, and modify modem profiles used to dial locations
Figure 41. Dial Out main window
Dial Out Main Window
The Dial Out main window displays statistics for individual calls. The following section explains the meaning
of each statistic.
Call Sorting (doPageSort)
Change the order of the calls on the screen.
• Descending—calls are sorted from the latest call at the top to the oldest call at the bottom.
• Ascending—calls are sorted from the oldest call at the top to the latest call at the bottom.
Active Calls (doActive)
The total number of active outbound calls.
Call ID (doactIndex)
Unique identification of this call for internal use. Subsequent calls in a multilink PPP session refer to this ID as
a pointer to the bundlehead or originating call.
ML ID (doactMultiIndex)
Pointer to the bundle head or originating call of a multlink PPP session.
Introduction
107
Access Server Administrators’ Reference Guide
8 • Dial Out
User (doactUsername)
The username that the caller entered for a character based call or the location name for a location based call.
State (doactState)
Indicates current call progress as follows:
• commandmode(1)—dial-out character based user is connected to access server, but has no active
outbound call.
• ringing(2)—The outbound call has been dialed and is waiting for the remote site to go off hook.
• connecting(3)—call is in the process of negotiating the type of connection (v.34, v.90, IDSN, etc.)
• lcpNegotiate(4)—the physical layer is connected and lcp options are being negotiated for PPP based calls.
• authenticating(5)—The call is currently in the authenticating process.
• online(7)—Dial-out user is connected to remote site
• disconnecting(8)—The call is in the process of disconnecting.
• dead(10)—Dial-out user has disconnected from remote access server
• kill(11)—Kills dial-out user’s connection to access server
• bury(12)—kill the call and/or remove from the call from dial-out main window.
• waitingForIpcp(14)—the unit is in the process of negotiating an IP address for PPP based calls.
• waitingRedial(15)—The location is disconnected and waiting to 30 seconds to redial for continuous based
calling.
• waitingOnDemand(16)—The location is disconnected and waiting for demand to initiate a call.
Duration (doactSessionTime)
The amount of time the call session has been active.
Disconnect Reason (doactTerminateReason)
The reason the call was disconnected:
• stillActive(0)—call is currently connected
• notKnown(1)—unknown disconnect reason
• idleTimeout(2)—call exceeded idle timeout parameter
• killed(3)—call terminated by administrator
• userHangup(5)—DSP discovered remote modem was hung up abruptly. Examples could be that the phone
line was pulled out of the wall jack, or the user terminated the communications without closing the connection down. If the modems are unable to bring up the physical line by successfully negotiating the modulation, userHangup will be registered if the remote modem gave up trying to complete the call.
• modemCanNotConnect(6)—the modems are not able to bring up the physical line by successfully negotiating the modulation. The remote access server has given up trying further to complete the physical connection.
Dial Out Main Window
108
Access Server Administrators’ Reference Guide
8 • Dial Out
• modemError(7)—an internal DSP error has occurred.
• pppClose(8)—This reason will be given after PPP is initiated and the connection is disconnected. An example would be if LCP negotiations failed.
• lcpClose(9)—close initiated by LCP. This is a normal shutdown of a call.
• loginTimeOut(10)—exceeded time limit to login.
• userTerminated(11)—the TCP connection was terminated from the remote side.
• maxNumCalls(21)—exceeds the maximum number of channels that can be allocated to the same call.
• maxLoginAttempts(32)—exceeded maximum login attempts as defined under the dial-out link
• noDspAvailable(45)—when the server tried to allocate a DSP for an outbound call but no available DSP’s
were available.
• papAuthenticationFailure(49)—invalid username/password combination for tcp based calling.
• exceedsMultiLinkLimit(64)—exceeds the maximum multilink calls set in the location table.
• sessionTimeout(66)—the length of the connection exceeds the session time limit allowed.
• noAnswer(85)—the remote modem did not answer the call.
• userBusy(86)—the remote location is busy and did not answer the call
• noChannelAvail(87)—no channels on the T1/E1 port were available to dialout with.
The following are internal access server errors. Please contact technical support if you see these termination reasons on a consistent basis.
• noPoll(12)
• ipcPutMsgErr(13)
• pollErr(15)
• ioctlErr(16)
• pppPutMsgErr(17)
• dspIoctlErr(18)
• timerErr(19)
• pppOpenErr(22)
• pppLinkErr(25)
• tcpOpenErr(26)
• tcpPushErr(27)
• tcpPutMsgErr(28)
• invalidPrim(29)
• noTimers(33)
• tcpLinkErr(34)
Dial Out Main Window
109
Access Server Administrators’ Reference Guide
8 • Dial Out
• dspLinkErr(35)
• dspPutMsgErr(36)
• lisIpcErr(38)
• dspOpenErr(39)
• invalidCode(40)
• dspCommErr(42)
• unknownBearerContent(43)
Modulation (doactModulation)
The modulation of the link:
• unknown(0)—unknown modulation
• v21(1)—v.21 modulation
• v22(2)—v.22, v.22bis modulation
• v32(3)—v.32, v.32bis modulation
• v34(4)—v.34 modulation
• k56(5)—K56 Flex modulation
• v90(7)—v.90 modulation
• v110(8)—v.110 ISDN connection
• isdn64(9)—64k ISDN connection
• isdn56(10)—56k ISDN connection
• phase2(20)—currently training to a modulation
• answerAck(21)—acknowledge state of the modulation
• v92(22)—v.92 modulation
• moh(23)—Modem is using v.92’s modem on hold feature
• v23(24)—v.23 modulation
Speed (doactTxSpeed)
The transmit (in relation to the access server) speed of the modulation.
Dial Out Details window
The Dial Out Details window (see figure 42) shows the active Dial Out configuration of the access server.
Scroll down the window to view additional Dial Out access server parameters.You can modify Dial Out
parameters by clicking on the Modify… link (see figure 42). For more information about modifying Dial Out
settings, refer to “Dial Out Modify window” on page 111.
Dial Out Details window
110
Access Server Administrators’ Reference Guide
8 • Dial Out
Figure 42. Dial Out Details window
Dial Out Modify window
The Dial Out Modify window (see figure 43) is where you can make changes to the following:
• Login settings (see “Modify Login”)
• Maximum number of login attempts and the authentication failure banner (see “Modify Attempts” on
page 112)
• Maximum session time, idle time, time to login, and call history timeout (see “Modify Maximum Time” on
page 113)
• Outgoing modem configuration parameters “Modify Modem Configuration” on page 115)
To reach this window, select Modify from the Dial Out Details window or in the Dial Out main window.
Figure 43. Dial Out Modify window (Login, Attempts)
Dial Out Modify window
111
Access Server Administrators’ Reference Guide
8 • Dial Out
Modify Login
Use this section to configure the outgoing TCP port and general login information.
TCP Port (doTcpPort)
The TCP port number that the dialout operation will listen to for connections.
TCP Type (doServiceType)
TCP Service Type that will be placed on the TCP connection when established.
• telnet(0)—Telnet protocol.
• tcpclear(1)—All 8 bits are passed unchecked and unaltered.
Restrict to Lan (doRestrictToLan)
Enabling the restriction to LAN will stop dialout attempts from originating at any port other than the LAN
port. The options are defined below:
• disable(1)
• enable(2)
Login Technique (doLoginTechnique)
This variable defines the login sequence that a dial-up user will see. The options are defined below:
• none(1)—Simply connecting to the TCP pipe enables dialout.
• text(2)—A valid username must be entered. If the username is a static user with no password defined, the
connection will complete without requesting a password. Otherwise, a valid password must be entered.
Username Prompt (doUsernamePrompt)
This prompt for a username is displayed at user authentication time. A valid username should consist of ASCII
characters and can include carriage returns and line feeds. For example, the prompt could be:
Enter your username:
Password Prompt (doPasswordPrompt)
This prompt for a password is displayed at user authentication time. A valid password should consist of ASCII
characters and can include carriage returns and line feeds. For example, the prompt could be:
Enter your password:
Initial Banner (doBanner)
This is usually a message welcoming the user. The message should consist of ASCII and can include carriage
returns and line feeds.
Modify Attempts
This portion of the Dial Out Modify window (see figure 43 on page 111) describes configuring the maximum
number of login attempts and the authentication failure banner.
Dial Out Modify window
112
Access Server Administrators’ Reference Guide
8 • Dial Out
Failure Banner (doFailureBanner)
This defines a message that will be displayed to a user if authentication fails. This message only appears when
the authentication technique is Text.
Login Attempts Allowed (doAllowAttempts)
The maximum number of attempts a user will be given to login before being disconnected. This applies to Text
authentications only.
Modify Maximum Time
This portion of the Dial Out Modify window (see figure 44) describes configuring the maximum session time,
idle time, time to login, and call history timeout settings.
Figure 44. Dial Out Modify window (Maximum Time, V.92 Configuation, Modem Configuration)
Dial Out Modify window
113
Access Server Administrators’ Reference Guide
8 • Dial Out
Maximum Session Time (doSessionTimeout)
This is the maximum time (in minutes) that a connection is allowed to be maintained. After this time the connection will be terminated, even if there is active traffic on the connection. This is a default setting which can
be overridden by the authentication of a specific user.
Maximum Idle Time (doIdleTimeout)
This is the maximum time (in minutes) that a connection is allowed to be idle with no traffic. After this time,
the connection will be terminated. This is a default setting that can be overridden by the authentication of a
specific user.
Time to Login (sec) (doLoginTimeout)
This is the maximum time (in seconds) that a user is given to log in. This only applies to the time before the
user is authenticated. This setting should take into account any time delays incurred when querying a remote
authentication server (such as a RADIUS).
Call History Timeout (min) (doLingerTime)
Number of minutes a MIB entry remains in the Active table after the call it pertains to is disconnected. This
setting is the amount of time dead calls remain on the dial out page.
Modify V.92 Configuration
This portion of the Dial In Modify Default window (see figure 30 on page 74) describes modifying the V.92
Configuration parameters.
V.92 Features (diModemV92Enable)
Enables and disables V92 functionality.
Quick Connect (diV92QuickConnect)
Quick connect shortens a modem’s time to learn a phone line’s characteristics by reusing some information previously learned. This setting enables or disables quick connect.
Modem on Hold (diV92ModemOnHold)
Modem on Hold allows a user to accept a phone call without breaking the connecting to the Internet. This setting enables or disables modem on hold
Modem on Hold Timeout(diV92ModemOnHoldTimeout)
If modem on hold is enabled, sets the length of time the user can be in the modem on hold state before disconnecting the call.
V.59 Messages to Radius(diV59Enable)
V.59 specifies a set of Modem Managed Objects (MMO) intended for modem diagnostics across "standardized" interfaces on V-series modems. This will allow information from the remote modem to be accessed for
fault finding and performance optimization. This setting enables or disables the sending of V.59 packets to the
RADIUS server using the RADIUS protocol.
Note
V.59 generates an enormous amount of data. This can interfere with your
RADIUS server’s ability to perform authentication and accounting and fill up
Dial Out Modify window
114
Access Server Administrators’ Reference Guide
8 • Dial Out
hard disk space on your server. It is recommended that you only enable this
feature when performing specific troubleshooting.
Modify Modem Configuration
This portion of the Dial Out Modify window (see figure 44 on page 113) describes modifying the outgoing
modem configuration.
ISDN (doModemISDNEnable)
Enables ISDN modulation. Not currently implemented.
V90(diModemV90Enable)
Enables or disables V90 modem modulation
K56flex(diModemK56Enable)
Enables or disables K56flex modem modulation
V34(diModemV34Enable)
Enables or disables V34 modem modulation
V32(diModemV32Enable)
Allows V.32 and V.32bix modulations up to 14.4 kbps. The following options are available:
• disable(0)—neither option is enabled
• enable(1)—support V.32 and V.32bis modulations.
V23(diModemV23Enable)
Enables or disables V23 modem modulation
V22 (doModemV22Enable)
Allow V.22 or Bell 212 modulations. The following options are available:
• disable(0)—Neither option is enabled
• enableV22(1)—V.22 modulation is enabled
• enableBell212(2)—Bell 212 modulation is enabled
V21 (doModemV21Enable)
Allow V.21 or Bell 103 modulations. The following options are available:
• disable(0)—Neither option is enabled
• enableV21(1)—V.21 modulation is enabled
• enableBell103(2)—Bell 103 modulation is enabled
Maximum Speed (doModemMaxSpeed)
This setting determines the fastest data rate that will be negotiated.
Dial Out Modify window
115
Access Server Administrators’ Reference Guide
8 • Dial Out
Minimum Speed (doModemMinSpeed)
This setting determines the slowest data rate that will be negotiated.
Guard Tone (doModemGuardTone)
Normally a guard tone is not required. But, one can be inserted. This operates for Phase Shift Key modulations
only.
• toneNone(1)
• tone1800(3)
Carrier Loss Duration (doModemCarrierLossDuration)
The number of seconds the carrier must be lost before the connection is determined to have been lost. A setting above 25 indicates forever.
Retrain (doModemRetrain)
Enables the modem to monitor the line quality and request a fallback or retrain for poor quality and a fall forward for good quality.
• none(0)—Do not allow modem to retrain, fallback, or fall forward
• retrain(1)—Allow the modem to retrain if the line quality is poor
• fallForwardFallBack(2)—Allow the modem to fallback to a slower speed if the line quality is poor, of fall
forward to a faster speed if the line quality is good
Tx Level (doModemTxLevel)
Not currently implemented.
Protocol (doModemProtocol)
Assigns the data error correction protocol to use with the modem. The following options are available:
• Direct(0)—No compression will be used.
• requestV42(1)—Enable V.42 compression. If this is selected, the modem will either negotiate for V.42 data
compression or—if V.42 compression is not available—will use no data compression.
• requireV42(2)—V.42 data compression is mandatory, otherwise disconnect.
Compression (doModemCompression)
Assigns the data compression protocol to use with the modem. This setting is in effect only when V.42bis error
correction (see “Protocol (doModemProtocol)”) is active.
• Direct(0)—No compression will be used.
• requestV42bis(1)—Enable V.42bis compression. If this is selected, the modem will either negotiate for
V.42bis data compression or—if V.42bis compression is not available—will use no data compression.
• requireV42bis(2)—V.42bis data compression is mandatory, otherwise disconnect.
• V44(3)—allows V.44 and V.42bis data compression.
Dial Out Modify window
116
Access Server Administrators’ Reference Guide
8 • Dial Out
Restrict Modification (doModemRestrictMods)
Enabling this feature restricts the dialout user from modifying the modem settings. Normally, the dialout user
has the ability to alter modem operation through the use of AT commands.
• disable(0)—The user can alter modem operation through the use of AT commands
• enable(1)—The user is prevented from modifying the modem settings
Dial Out Locations Window
The first part of the locations window shows each location in the table. There is a status column showing the
current status of each location. Calls are initiated from this column. The continuous and Dial-On-Demand
call cycles are stopped from this column as well. To initiate a call, the status is set to “dial(2)” and submitted. To
remove a location from the table, the status is set to “destroy(7)” and submitted. To stop a dial-on-demand call
or continuous call from dialing, set the status to “stop(6).”
Figure 45. Location Table
status (locationstatus)
This shows the current status of the location as well as accepts input from the administrator.
• idle(1)—the location is currently idle, administrator has to set this to dial in order for a call to be initiated.
• dial(2)—(user selectable) set by the administrator to initiate a call
• active(3)—when a location is currently in use
• waitingRedial(4)—for continuous calling, when a location has been disconnected, the location waits in this
state for 30 seconds before dialing.
• waitingDemand(5)—for dial-on-demand calling, the location waits in this state until data is preset in which
case it will initiate a call.
• stop(6)—(user selectable) set by the administrator to stop continuous or dial-on-demand calling cycle.
When this is set, no more calls will be placed to this location. Current calls to this location will not be
affected.
• destroy(7)—(user selectable) set by the administrator to remove the location from the table.
Dial Out Locations Window
117
Access Server Administrators’ Reference Guide
8 • Dial Out
Add Location
Locations are added to the table using the following form at the bottom of the locations window.
Figure 46. Add Location Form.
Id (locationId)
The unique identifier for this location. There are a maximum of 120 locations so the range is from 1 to 120.
Location Name (locationName)
A name can be given to each location. Maximum size is 12 characters.
User Name (locationUserName)
This is the username to log into the remote location. Maximum size is 32 characters.
Password (locationPassword)
This is the password to log into the remote location. Maximum size is 32 characters.
Phone Number (locationPhoneNumber)
This is the phone number to dial to reach the remote location. Maximum size is 80 characters.
Destination IP (locationDestinationIP)
This is the IP address of the remote location. This field is required for Dial-On-Demand calls. If this field is left
to 0.0.0.0, the IP address will be negotiated.
Destination NetMask (locationDestinationNet)
This is the net mask of the remote location.
Dial Out Locations Window
118
Access Server Administrators’ Reference Guide
8 • Dial Out
Multilink (locationConfigMultilink)
This is the number of calls to multilink together. When placing more than one call, the first call will be placed,
then once it is online, the additional calls will be dialed and multilinked together.
Connection Type (locationConnectType)
This is the type of dial out to use. The following options are available:
• Manual(0)—administrator will manually initiate the call by setting status to “dial”
• Continuous(1)—after the administrator initiates the first call, the server will automatically reconnect after a
30 second delay if the connection goes down.
• Dial-on-demand(2)—if the access server receives data destined for the IP address or net specified for this
location, the location will be dialed. The connection will be dropped after the idle timeout or session timeout specified.
Idle Timeout (locationIdleTimeout)
Maximum idle time before link is shut down. Especially useful for Dial-On-Demand calls.
Maximum Session Time (locationSessionTimeout)
Maximum session time before link is shut down.
Authentication Technique (locationAuthTechnique)
Technique used to authenticate at the remote location.
Ip Filters (LocationIpFilters)
Id of up to 10 IP filters which can be assigned to this interface. See section “Ip Filters (LocationIpFilters)” on
page 119.
Modem Profile (locationModemProfile)
ID of the modem profile to use to dial to this location. If no profile is specified, the default settings from the
details page will be used.
Dial Out Locations Window
119
Access Server Administrators’ Reference Guide
8 • Dial Out
View/Modify location details
To view and/or modify the location details, click on the location ID link on the locations page. From this page,
location settings can be modified and submitted. Any changes made will take effect on the next call to
this location.
Figure 47. View/Modify location details.
Dialing Locations
To initiate an outbound PPP call to a location, set the status of the location to “dial” and submit. To stop a
continuous or dial-on-demand call, set the status to “stop.” When the current call is disconnected, no further
calls will be placed.
Dial Out Locations Window
120
Access Server Administrators’ Reference Guide
8 • Dial Out
Dial Out Modem Profiles Window
This window allows the administrator to set up different modem profiles to be used for dialing out to locations. For example, an ISDN modem profile can be set up to dial to locations using ISDN TA’s and v.34
modem profiles can be set up to dial to v.34 based locations.
Figure 48. Modem Profile table
Add Modem Profile
New modem profiles are added to the table using the add modem profile form. The following describes
each setting.
Locations Link
This will take you to the location table window.
Profile ID (modemProfileId)
This is a unique ID for each modem profile. Valid range is 1 to 20. Click on the ID link on the modem profile
page to view and modify the settings for each individual profile. The settings change will take effect on the next
call to the location using this profile.
Modem Modulation (modemType)
This is the type of modem modulation to use when dialing out. The following options are valid:
• digital-64k(1)
• analog-v90(2)
• analog-k56(3)
Dial Out Locations Window
121
Access Server Administrators’ Reference Guide
8 • Dial Out
• analog-v34(4)
• analog-v32(5)
• analog-v22bis(6)
• analog-v22(7)
• analog-v21(8)
Guard Tone (modemGuardTone)
Normally a guard tone is not required, but one can be inserted. This setting works for Phase Shift Key (PSK)
modulations only, not for v.32, v.34, or v.90.
• toneNone(1)—guard tone not used
• tone1800(3)—guard tone is inserted
Carrier Loss Duration (modemCarrierLossDuration)
The number of seconds the carrier signal must be missing before the connection is considered lost.
Retrain(modemRetrain)
Enable the modem to monitor line quality and request a fallback or retrain for poor quality and a fall forward
for good quality.
• none(0)—do not allow modem to retrain, fall forward, or fall back.
• ratrain(1)—all modem to retrain or fallback if the line quality is poor, or fall forward to a faster speed if the
line quality is good.
• fallForwardFallBack(2)—allow the modem to fallback to a slower speed if the line quality is poor, or fall forward to a faster speed if the line quality is good.
Transmit Level (modemTxLevel)—not in use
Protocol (modemProtocol)
Assigns the error correction protocol for use with the modem. The following options are available:
• direct(0)—no error correction will be used
• requestV42(1)—enables v.42 error correction. If this is selected, the modem will either negotiate for v.42
error correction or—if v.42 correction is not available will not use any error correction.
• requireV42(2)—V.42 error correction is mandatory, otherwise disconnect.
Compression (modemCompression)
Assigns the data compression protocol to use with the modem. This setting is in effect only when v.42 error
correction is active.
• direct(0)—no compression will be used.
• requestV42bis(1)—enable v.42bis data compression. If this is selected, the modem will negotiate for
v.42bis, and if it is not available, will use no compression.
Dial Out Locations Window
122
Access Server Administrators’ Reference Guide
8 • Dial Out
• requireV42bis(2)—v.42bis compression is mandatory, otherwise disconnect.
• v44(3)—allow v.42bis and v.44 data compression. Will negotiated for v.44 compression first, if that’s not
available, then it will try v.42bis, and if neither is available, will use no compression.
Billing Delay (modemBillingDelay)
The number of seconds after answering the call during which the modem should be silent.
Status (modemStatus)
This is the status of the modem profile entry. “valid(1)” means the entry is valid. Set the profile to “destroy(2)”
to remove the profile.
View modem profile
To view and/or modify a modem profile, click on the profile ID in the table and you will see the following
page. Settings can be modified and submitted on this page. Any changes will take place on the next call to the
location(s) which are using this profile. See the section “Add Modem Profile” on page 121 for an explanation
of each field.
Figure 49. View/modify modem profile.
Dial Out User Statistics Window
Clicking on the state link of an individual call will show the statistics for that call. The hyperlink headings DSP
Link, and WAN Link shown below point to the DSP and WAN information used for the outbound call. For
specific details about the function of parameters defined under these sections, refer to the appropriate section
under the access server Configuration menu.
The Dial Out Statistics window is where you can view the following:
• Unique ID information
• Session information
• PPP statistics (for location based calls)
• IP statistics (for location based calls)
Dial Out User Statistics Window
123
Access Server Administrators’ Reference Guide
8 • Dial Out
• Phone information
• Data transfer statistics
• Physical layer configuration information
Figure 50. Dial out user statistics window.
Call Identification
This portion of the dial out user statistics window shows user information for a unique user ID.
Call ID (doactIndex)
Unique identification of this call (for internal use)
Username (doactUsername)
The callers username for Tcp based calls or the location name for location based calls.
Password (doactPassword)
The callers password for Tcp based calls or blank for location based calls.
Shared Unique ID (doactMultiIndex)
Used for multilink-PPP, this is the unique identification shared between multi-link calls.
Dial Out User Statistics Window
124
Access Server Administrators’ Reference Guide
8 • Dial Out
Dsp Link (doactDSPIndex)
The physical DSP chip that the outbound call is on. This is a number from 1 to 64.
Wan Link (doactLinkIndex)
The T1/E1 port number that the call is on.
Time Slot (doactSlotIndex)
Shows which T1/E1 channel the call is on. This is a number between 1 and 30.
IP Address (doactIP)
Used for location based calls. This is the currently assigned IP address of the remote location.
Session
This section of the dial out user statistics window shows session information for a unique call ID.
Start time of call (doactSessionStartTime)
The amount of time the server has been up since the start of this call.
Time Call Is/Was active (doactSessionTime)
The amount of time the call is/was active.
Minutes until timeout (doactRemainingIdle)
Number of minutes remaining until idle timeout, if an idle timeout was specified.
Time left in session (doactRemainingSession)
Number seconds remaining in this session if a maximum session time was specified.
Termination Reason (doactTerminateReason)
Reason why the call was disconnected.
• stillActive(0)—call is currently connected
• notKnown(1)—unknown disconnect reason
• idleTimeout(2)—call exceeded idle timeout parameter
• killed(3)—call terminated by administrator
• userHangup(5)—DSP discovered remote modem was hung up abruptly. Examples could be that the phone
line was pulled out of the wall jack, or the user terminated the communications without closing the connection down. If the modems are unable to bring up the physical line by successfully negotiating the modulation, userHangup will be registered if the remote modem gave up trying to complete the call.
• modemCanNotConnect(6)—the modems are not able to bring up the physical line by successfully negotiating the modulation. The remote access server has given up trying further to complete the physical connection.
• modemError(7)—an internal DSP error has occurred.
Dial Out User Statistics Window
125
Access Server Administrators’ Reference Guide
8 • Dial Out
• pppClose(8)—This reason will be given after PPP is initiated and the connection is disconnected. An example would be if LCP negotiations failed.
• lcpClose(9)—close initiated by LCP. This is a normal shutdown of a call.
• loginTimeOut(10)—exceeded time limit to login.
• userTerminated(11)—the TCP connection was terminated from the remote side.
• maxNumCalls(21)—exceeds the maximum number of channels that can be allocated to the same call.
• maxLoginAttempts(32)—exceeded maximum login attempts as defined under the dial-out link
• noDspAvailable(45)—when the server tried to allocate a DSP for an outbound call but no available DSP’s
were available.
• papAuthenticationFailure(49)—invalid username/password combination for tcp based calling.
• exceedsMultiLinkLimit(64)—exceeds the maximum multilink calls set in the location table.
• sessionTimeout(66)—the length of the connection exceeds the session time limit allowed.
• noAnswer(85)—the remote modem did not answer the call.
• userBusy(86)—the remote location is busy and did not answer the call
• noChannelAvail(87)—no channels on the T1/E1 port were available to dialout with.
The following are internal access server errors. Please contact technical support if you see these termination reasons on a consistent basis.
• noPoll(12)
• ipcPutMsgErr(13)
• pollErr(15)
• ioctlErr(16)
• pppPutMsgErr(17)
• dspIoctlErr(18)
• timerErr(19)
• pppOpenErr(22)
• pppLinkErr(25)
• tcpOpenErr(26)
• tcpPushErr(27)
• tcpPutMsgErr(28)
• invalidPrim(29)
• noTimers(33)
• tcpLinkErr(34)
• dspLinkErr(35)
Dial Out User Statistics Window
126
Access Server Administrators’ Reference Guide
8 • Dial Out
• dspPutMsgErr(36)
• lisIpcErr(38)
• dspOpenErr(39)
• invalidCode(40)
• dspCommErr(42)
• unknownBearerContent(43)
PPP Statistics
This portion of the dial out user statistics window shows PPP statistics of the current user selected.
Figure 51. PPP user statistics
Bad Address (doStatBadAddresses)
The number of packets received with an invalid address field.
Bad Controls (doStatBadControls)
The number of packets received with an incorrect control field.
Packets too long (doStatPacketTooLongs)
The number of packets received that were discarded because their length exceeded the MRU.
Bad Frame Check Sequences (doStatBadFCSs)
The number of packets received with bad frame check sequences.
LCP Statistics
This portion of the Dial Out User Statistics window (see figure 51) shows LCP statistics of the current user
selected.
Dial Out User Statistics Window
127
Access Server Administrators’ Reference Guide
8 • Dial Out
Local MRU (doStatLocalMRU)
The current value of the MRU for the local PPP entity. This value is the MRU that the remote entity is using
hen sending packets to the local PPP entity. This setting becomes active when the link is in the up—able to
pass packets—operational state (for more information, refer to “Operational Status (diIpOperStatus)” on
page 98).
Remote MRU (doStatRemoteMRU)
The current value of the MRU for the remote PPP entity. This value is the MRU that the local entity is using
when sending packets to the remote PPP entity. This setting becomes active when the link is in the up—able to
pass packets—operational state (for more information, refer to “Operational Status (diIpOperStatus)” on
page 98).
Local Multilink MRRU (doStatLcpLocalMRRU)
Multilink maximum receive reconstruction unit for the local device.
Remote Multilink MRRU (doStatLcpRemoteMRRU)
Multilink maximum receive reconstruction unit for the remote device.
Remote LCP Authentication (doStatLcpAuth)
Authentication type used by the dial-in user. The following options are available:
• none(1)
• pap(2)
• chap(3)
• MSChap(4)—not currently implemented
• tacacs(5)—not currently implemented
• edp(6)
• ShivaPap(7)—not currently implemented
Local ACC Map (doStatLocalToPeerACCMap)
The current value of the ACC Map used for sending packets from the local modem to the remote modem. The
local modem sends this character map to the remote peer modem to ensure that the data being transferred is
interpreted correctly. This setting becomes active when the link is in the up—able to pass packets—operational
state (for more information, refer to “Operational Status (diIpOperStatus)” on page 98).
Remote ACC Map (doStatPeerToLocalACCMap)
The current value of the ACC Map used by the remote peer modem when transmitting packets to the local
modem. The local modem sends this character map to the remote peer modem to ensure that the data being
transferred is interpreted correctly. The remote peer modem combines its ACC Map with the map received
from the local modem. This setting becomes active when the link is in the up—able to pass packets—operational state (for more information, refer to “Operational Status (diIpOperStatus)” on page 98).
Dial Out User Statistics Window
128
Access Server Administrators’ Reference Guide
8 • Dial Out
Local PPP Protocol Compression (doStatLocalToRemoteProtComp)
Indicates whether the local PPP entity will use protocol compression when transmitting packets to the remote
PPP entity. This setting becomes active when the link is in the up—able to pass packets—operational state (for
more information, refer to “Operational Status (diIpOperStatus)” on page 98). These are the available options:
• disabled(0)—PPP compression is disabled
• enabled(1)—PPP compression is enabled
Remote PPP Protocol Compression (doStatRemoteToLocalProtComp
Indicates whether the remote PPP entity will use protocol compression when transmitting packets to the local
PPP entity. This setting becomes active when the link is in the up—able to pass packets—operational state (for
more information, refer to “Operational Status (diIpOperStatus)” on page 98). These are the available options:
• disabled(0)—PPP compression is disabled
• enabled(1)—PPP compression is enabled
Local AC Compression (doStatLocalToRemoteACComp)
Indicates whether the local PPP entity will use address and control compression (ACC) when transmitting
packets to the remote PPP entity. This setting becomes active when the link is in the up—able to pass packets
—operational state (for more information, refer to “Operational Status (diIpOperStatus)” on page 98). These
are the available options:
• disabled(0)—ACC is disabled
• enabled(1)—ACC is enabled
Remote AC Compression (doStatRemoteToLocalACComp)
Indicates whether the remote PPP entity will use address and control compression (ACC) when transmitting
packets to the local PPP entity. This setting becomes active when the link is in the up—able to pass packets—
operational state (for more information, refer to “Operational Status (diIpOperStatus)” on page 98). These are
the available options:
• disabled(0)—ACC is disabled
• enabled(1)—ACC is enabled
Local Frame Check Sequence size (doStatTransmitFcsSize)
The size of the Frame Check Sequence (FCS) in bits that the local node will generate when sending packets to
the remote node. This setting becomes active when the link is in the up—able to pass packets—operational
state (for more information, refer to “Operational Status (diIpOperStatus)” on page 98). The values are from 0
to 128.
Remote Frame Check Sequence size (doStatReceiveFcsSize)
The size (in bits) of the frame check sequence (FCS) that the remote node will generate when sending packets
to the local node. This setting becomes active when the link is in the up—able to pass packets—operational
state (for more information, refer to “Operational Status (diIpOperStatus)” on page 98). The values are from 0
to 128.
Dial Out User Statistics Window
129
Access Server Administrators’ Reference Guide
8 • Dial Out
Phone
This portion of the Dial Out User Statistics window (see figure 52) shows the phone numbers that were used
by this caller.
Figure 52. Dial Out User Statistics window
Number Called (doactNumberDialed)
The phone number that was used to dial the remote location
Data
This portion of the Dial Out User Statistics window (see figure 52) describes the amount of PPP data sent and
received by this user.
Octets Sent (doactSentOctets)
The number of octets (bytes) sent during this call.
Octets Received (doactReceivedOctets )
The number of octets (bytes) received during this call.
Packets Sent (doactSentDataFrames)
The number of packets sent to the user during this call. Version 6 nomenclature for a packet is Ipv6 header
plus payload.
Packets Received (doactReceivedDataFrames)
The number of packets received by the user during this call. Version 6 nomenclature for a packet is Ipv6 header
plus payload.
Bad Packets (doactErrorFrames)
Number of bad received packets received during this call. Bad packets are those that failed CRC error checks.
Dial Out User Statistics Window
130
Access Server Administrators’ Reference Guide
8 • Dial Out
Physical Layer
This portion of the Dial Out User Statistics window (see figure 52 on page 130) contains statistics about the
modem connection. It includes modulation, levels, and other modem-related statistics that are helpful when
troubleshooting modem problems. This section covers only modem-type statistics, not ISDN connections.
Connection Modulation (doactModulation)
The modulation type of the modem link (for example, V.34). The modem link can have these modulation or
data types:
• unknown(0)
• v21(1)—V.21 modulation
• v22(2)—V.22 modulation
• v32(3)—V.32 modulation
• v34(4)—V.34 modulation
• k56(5)—K56 Flex modulation
• x2(6)—X.2 modulation
• v90(7)—V.90 modulation
• v110(8)—V.110 modulation (not currently implemented)
• isdn64(9)—ISDN 64 modulation
• isdn56(10)—ISDN 56 modulation (not currently implemented)
• 12tp(11)—12tp tunneled multilink call
• phase2(20)—Phase 2, an advanced state of modulation in v34 and higher
• answerack(21)—acknowledgement phase of modulation
Tx Connection Speed (doactTxSpeed)
The connected speed of the modem link (for example, 28.8 bps). These values, in bits per second, range from
300–33,600.
Rx Connection Speed (doactRxSpeed)
The connected speed of the modem link (for example, 28.8 bps). These values, in bits per second, range from
300–53,000.
Error Correction Protocol (doactErrorCorrection)
The modem error correction scheme used during this call.
• None—No error correction on the call.
• V42—Error correction mode
• V120—Mode for ISDN B
Dial Out User Statistics Window
131
Access Server Administrators’ Reference Guide
8 • Dial Out
Data Compression Protocol (doactCompression)
The modem data compression technique used during this call.
• None—No compression.
• V42bis—Compression is running.
• Stac—Not currently implemented.
Modulation Symbol Rate (doactSymbolRate)
The modulation symbol rate during the call. This is used only when in V.34 and above modulations.
Locally Initiated Renegotiated (doactLocalRenegotiates)
The number of times the local modem has initiated a modem speed renegotiate.
Locally Initiated Retrains (doactLocalRetrains)
The number of times the local modem has initiated a modem carrier retrain.
Remote Initiated Renegotiates (doactRemoteRenegotiates)
The number of times the remote modem has initiated a modem speed renegotiate.
Remote Initiated Retrains (doactRemoteRetrains)
The number of times the remote modem has initiated a modem carrier retrain.
An example section of dialout
1. Display the Dial-Out main window.
— Click on the Modify link.
— Set the TCP port to 24 or some other unused port.
— Set TCP Type to telnet.
— Set Login Technique to Text.
— Click on Submit Query.
2. Display the Authentication main window. Scroll down until Static User Identification is displayed (see
figure 18 on page 41) then click on Static User Identification.
— Refer to section “Adding Static Users” on page 41 to create a static user with dialOut as the service.
— Click on Submit Query.
3. Telnet x.x.x.x aa
where x.x.x.x is the IP of your remote access server and
aa is the port Dial-Out is listening to for connections
4. Log in as the user you made in the static database in step 2.
5. At the OK prompt, type ATDT then a phone number to place an analog call or ATDI then a phone number to digital 64k ISDN call.
An example section of dialout
132
Chapter 9
Callback
Introduction ........................................................................................................................................................134
Dial-in Modify Configuration .............................................................................................................................134
Callback (diCallbackConfig) .........................................................................................................................134
Dial-in Main Window.........................................................................................................................................135
State (diactState) ...........................................................................................................................................135
Static User Authentication...................................................................................................................................136
Callback Configuration (suCallbackConfig) .................................................................................................136
Callback phone number (suCallbackNumber) ..............................................................................................136
RADIUS Configuration ......................................................................................................................................136
Accounting information ......................................................................................................................................137
Dialout................................................................................................................................................................137
133
Access Server Administrators’ Reference Guide
9 • Callback
Introduction
The RAS has the ability to call back any user dialing into it. This can provide extra security since you can verify
the user’s identity by calling back to a known number. Callback can also be used to reverse or reduce toll
charges by having the server call the user back.
Callback can be configured on a global basis for all users or on a per-user basis. You can also specify whether
the user dialing in can specify a callback number or must be called back at a pre-determined number. A number captured by Caller ID can also be used as the number to call back.
At the present time LCP negotiated callback and callback control protocol (CBCP) are supported; text or
script based callback are not supported (Microsoft Windows uses CBCP).
Callback is supported on PRI and robbed bit lines, it is not supported on E1 R2 lines.
Dial-in Modify Configuration
Both the dial-in details and modify windows have an extra entry for callback under configuration. The following describes this setting.
Figure 53. Dial-in Configuration showing callback config
Callback (diCallbackConfig)
This is the global callback configuration. This configuration takes precedence over user configuration through
static or RADIUS database. The following options are available:
• noCallback(0)—callback is globally disabled.
• setByAuth(1)—callback type is determined by either the static user configuration or radius user configuration.
• setByCaller(2)—callback is determined by the caller during LCP or CBCP negotiations. The user will set
the phone number to be called back.
• callingNum(3)—callback using caller ID. The calling number will be used to call back.
Introduction
134
Access Server Administrators’ Reference Guide
9 • Callback
Dial-in Main Window
Figure 54. Dial-in user waiting to be called back
State (diactState)
• ringing(1)—leave as is
• connecting(2)—leave as is
• lcpNegotiate(3)—PPP LCP negotiations are currently taking place
• authenticating(4)—leave as is
• tcpEstablish(5)—telnet or raw TCP based connection is being established
• online(6)—leave as is
• disconnecting(7)—call is currently disconnecting
• cleaningup(8)—call is disconnected, waiting on reply from radius server for stop packet.
• dead(9)—leave as is
• l2tpTunneled(12)—call is tunneled through L2TP.
• waitCallback(13)—callback has been negotiated and the call has been disconnected and is waiting the
negotiated delay before calling back.
Dial-in Main Window
135
Access Server Administrators’ Reference Guide
9 • Callback
Static User Authentication
In the Modify Static User window are two extra settings for callback. The callback type and callback number
can be set on a user basis.
Figure 55. Static user configuration showing callback configuration
Callback Configuration (suCallbackConfig)
This is the type of callback allowed for this user. The following options are available:
• noCallback(0)—no callback allowed for this user (default).
• setByCaller(1)—callback and phone number assigned by the user.
• alwaysCallbackTo(2)—always call back to the phone number specified by suCallbackNumber—callback
number needs to be specified.
• callbackToCallingNum(3)—call back to the calling phone number. This is only available with ISDN
PRI lines.
Callback phone number (suCallbackNumber)
When the callback type is set to alwaysCallbackTo, this is the phone number that the RAS will call after callback is negotiated. This entry has a limit of 80 characters.
RADIUS Configuration
If using a radius server for authentication and global callback is enabled and set to setByAuth, the user profile in
radius will determine callback. If the service-type attribute is not Callback Framed, no callback will be allowed.
If the service-type attribute is set to Callback Framed with no phone number, the user will be allowed to assign
the callback number. If the service-type attribute is set to Callback Framed and the Callback-Number attribute
has a valid telephone number, the user will be called back at that number.
Static User Authentication
136
Access Server Administrators’ Reference Guide
9 • Callback
Accounting information
Before callback is initiated, the accounting start and stop packets will have service-type set to Callback Framed.
The accounting stop packet will have the Callback-Number attribute present with the number the server is
calling back. On the callback call, the start and stop packets will have service-type set to framed with no Callback-Number attribute.
Dialout
When callback is being used and the user is being called back, the outbound call will be shown in the dialout window.
Figure 56. Dial-out window showing callback outbound call
Configuration for the outbound callback call (timeouts, modulations, compression, etc.) is set through the
dial-out settings (Modify…).
Authentication on the outbound call is done in the same way as an inbound call. DNS and WINS entries are
passed from the dial-in call to the dial-out call.
Accounting information
137
Chapter 10 Drop and Insert
Introduction ........................................................................................................................................................139
Drop and Insert main window.............................................................................................................................139
Session Timeout (drSessionTimeout) ............................................................................................................139
Call History Timeout (drLingerTime) ..........................................................................................................139
Active Calls (drActive) ..................................................................................................................................139
Session ID (dractIndex) ................................................................................................................................139
Originating Link (dractLinkIndex) ...............................................................................................................140
Originating Channel (dractChannel) ............................................................................................................140
Passed to Link (dractPassLinkIndex) .............................................................................................................140
Passed to Channel (dractPassChannel) ..........................................................................................................140
Number Dialed (dractNumberDialed) ..........................................................................................................140
Calling Number (dractCallingPhone) ...........................................................................................................140
Session Time (dractSessionTime) ..................................................................................................................140
Remaining Time (dractRemainingSession) ...................................................................................................140
State (dractState) ...........................................................................................................................................140
How Drop and Insert works................................................................................................................................140
Using Drop and Insert ..................................................................................................................................141
138
Access Server Administrators’ Reference Guide
10 • Drop and Insert
Introduction
The Drop and Insert window (see figure 57) contains setup objects associated with using the access server as a
drop and insert box to an upstream or downstream location.
Figure 57. Drop and Insert window
Click on Drop and Insert under the Configuration Menu to display the Drop and Insert main window.
Drop and Insert main window
This Drop and Insert window contains channel information for each unique session ID. If there are no drop
and insert connections to the access server, this screen will be blank.
Session Timeout (drSessionTimeout)
This is the maximum time (in minutes) which a connection is allowed to be maintained. After this time the
connection will be terminated, even if there is active traffic on the connection. A setting of 0 disables the timeout.
Call History Timeout (drLingerTime)
Number of seconds a MIB entry remains in the Active table will remain after the call is disconnected.
Active Calls (drActive)
The total number of active calls.
Session ID (dractIndex)
Unique identification of this active call
Introduction
139
Access Server Administrators’ Reference Guide
10 • Drop and Insert
Originating Link (dractLinkIndex)
Which WAN link this call originated on.
Originating Channel (dractChannel)
Which channel this call originated on.
Passed to Link (dractPassLinkIndex)
Which link this call was passed to.
Passed to Channel (dractPassChannel)
Which channel this call was passed to.
Number Dialed (dractNumberDialed)
The phone number that was used to dialed into the server (if this service is available from the exchange).
Calling Number (dractCallingPhone)
The phone number that was dialed from (if this service is available from the exchange).
Session Time (dractSessionTime)
The amount of time this call was/is active.
Remaining Time (dractRemainingSession)
The amount of time remaining in this session.
State (dractState)
Indicates current call progress.
• setup(1)—Idle state waiting for call to be attached
• alerting(2)—Channel is being alerted for transfer of call connecting on other WAN link
• flash(3)—An incoming and outgoing call are contending for the same channel
• online(4)—Call is actively being transferred through remote access server
• sessiontime(5)—Call is transitioning to down state
• clearForward(6)—Call is transitioning to down state
• clearBackward(7)—Call is transitioning to down state
• dead(8)—Call is disconnected
• kill(9)—Call is disconnected by administrator
How Drop and Insert works
The Telco informs the RAS that a call is inbound on a specific channel. If the desired function for that channel
is set for dropInsert then the RAS will redirect the call out another WAN port (see figure 58). In effect, it looks
as if the RAS is not there.
How Drop and Insert works
140
Access Server Administrators’ Reference Guide
10 • Drop and Insert
Figure 58. Drop and insert diagram
Note
This functionality can only be done on robbed bit lines. You can not perform drop and insert on a PRI line.
Using Drop and Insert
1. Configure each WAN port doing drop and insert. Links 1 and 2 perform drop and insert together. Links 3
and 4 perform drop and insert together.
The line type/coding for all of the lines can be either D4/AMI or ESF/B8ZS
WAN A can have the following types of line signalling:
– EMWinkStart
– GroundStart
– LoopStart
– EMImmediate
WAN B and x on PBX must be configured identically.
WAN B can have the following types of line signalling:
– EMWinkStart
– EMImmediateStart
2. Set the Desired Function for each channel on WAN A and B to dropInsert(7) (using channel assignment
under the T1/E1 link that is going to be performing drop and insert). The channels on WAN A selected
for drop and insert must match the channels on WAN B selected for drop and insert.
Note
We do not send digits with the EMWinkStart signalling. What this means is
that you can not direct the inbound call to a specific extension on the PBX.
How Drop and Insert works
141
Chapter 11 Digital Signal Processing (DSP)
Chapter contents
Introduction ........................................................................................................................................................144
DSP Settings main window .................................................................................................................................145
DSPs Available (dspAvailable) .......................................................................................................................145
Detected (dspDetected) ................................................................................................................................145
HW Failures (dspFailed) ...............................................................................................................................145
Calls without an available DSP (dspDspNotAvailable) ..................................................................................145
DSP Index (dspIndex) ..................................................................................................................................145
Admin Desire (dspDesiredState) ...................................................................................................................145
Instance #1 State (dspStatefirst) ....................................................................................................................145
Instance #1 Use (dspUsefirst) ........................................................................................................................146
Instance #2 State (dspStateSecond) ...............................................................................................................146
Instance #2 Use (dspUseSecond) ...................................................................................................................146
DSP Memory Capture ..................................................................................................................................147
DSP PCM Capture .......................................................................................................................................147
DSP Debugging Events .................................................................................................................................147
DSP Connection Performance.............................................................................................................................147
Failure to Negotiate (dspFailurePercent) .......................................................................................................147
Connection Summaries .................................................................................................................................148
Originating Calls (dspTotalOriginatingCalls) .........................................................................................148
Answering Calls (dspTotalAnsweringCalls) .............................................................................................148
Successful Connects (dspTotalSuccessfulConnects) .................................................................................148
Failed Connect PreV8 (dspTotalFailedConnectPreV8) ...........................................................................148
Failed Connect PostV8 (dspTotalFailedConnectPostV8) ........................................................................148
Remote Retrains (dspTotalRemoteRetrains) ............................................................................................148
Remote Renegotiates (dspTotalRemoteRenegotiates) ..............................................................................148
Local Retrains (dspTotalLocalRetrains) ...................................................................................................148
Local Renegotiates (dspTotalLocalRenegotiates) .....................................................................................148
Suspect—A) Transitions into suspect state (dspTotalWentSuspect) ........................................................148
Suspect—B) Recoveries from suspect state (dspTotalSavedFromSuspect) ................................................148
Reboot—A) Reboots due to consecutive fails (dspTotalRebootDueToFails) ...........................................148
Reboot—B) Reboots due to error detection (dspTotalRebootDueToError) ............................................148
DSP Connection Totals ................................................................................................................................149
DSP Index (dspIndex) .............................................................................................................................149
Connects—Good (dspSuccessfulConnects) .............................................................................................149
Connects—No Modem (dspFailedConnectPreV8) .................................................................................149
Connects—Failed Neg (dspFailedConnectPostV8) .................................................................................149
Remote—Retrain (dspRemoteRetrains) ..................................................................................................149
Remote—Reneg (dspRemoteRenegotiates) .............................................................................................150
Local—Retrain (dspLocalRetrains) ..........................................................................................................150
142
Access Server Administrators’ Reference Guide
11 • Digital Signal Processing (DSP)
Local—Reneg (dspLocalRenegotiates) .....................................................................................................150
Suspect—A (dspTotalWentSuspect) .......................................................................................................150
Suspect—B (dspTotalSavedFromSuspect) ...............................................................................................150
Reboot—A (dspTotalRebootDueToFails) ...............................................................................................150
Reboot—B (dspTotalRebootDueToError) ..............................................................................................150
DSP information window....................................................................................................................................151
DSP Status ....................................................................................................................................................151
Desired State (dspDesiredState) ..............................................................................................................151
Instance First State (dspStatefirst) ...........................................................................................................152
Instance First Used By (dspUseFirst) .......................................................................................................152
Instance Second State (dspStateSecond) ..................................................................................................152
Instance Second Used By (dspUseSecond) ..............................................................................................152
Call Statistics ................................................................................................................................................152
Originating Calls (dspOriginatingCalls) ..................................................................................................152
Answering Calls (dspAnsweringCalls) ......................................................................................................152
Successful Connects (dspSuccessfulConnects) .........................................................................................153
Failed Connect (no far modem) (dspFailedConnectPreV8) .....................................................................153
Failed Connect (bad negotiation) (dspFailedConnectPostV8) .................................................................153
Remote—Retrains (dspRemoteRetrains) .................................................................................................153
Remote—Renegotiates (dspRemoteRenegotiates) ...................................................................................153
Local—Retrains (dspLocalRetrains) ........................................................................................................153
Local—Renegotiates (dspLocalRenegotiates) ...........................................................................................153
Page Requests(dspPageRequests) .............................................................................................................153
Debug Statistics ............................................................................................................................................153
Reserved A (dspReservedA) .....................................................................................................................153
Reserved B (dspReservedB) .....................................................................................................................153
143
Access Server Administrators’ Reference Guide
11 • Digital Signal Processing (DSP)
Introduction
The access server uses between 12 and 60 digital signal processors (DSPs) to pass digital information. Each
DSP can accept two incoming calls, one on each “instance.” The DSPs are located on chips that contain eight
DSPs each. The access server can access these DSPs in several ways:
• On a per-instance basis—When a DSP is set to AvailableSecondOnly, the access server can disable the second instance of a DSP.
• On a per-DSP basis—Each DSP can be set to available, unavailable, or RebootNow in order to enable, disable, disabling or reboot both instances simultaneously
Note
On boards manufactured before October 31, 2001 (printed circuit board
revisions 1 or less), DSPs are rebooted on a per-chip basis. (For information
on displaying the PCB revision number, refer to “PCB Revision (boxManufacturePcbRevision)” on page 233.) When a DSP is selected to be rebooted,
not only will that DSP be rebooted, but so will the other seven DSPs that are
located on the same chip. For example, if DSP1 is set to reboot, DSPs 2–8
will also reboot.
Click on DSP under the Configuration Menu to display the DSP Settings main window.
The DSP main window (see figure 59) displays the current state of the DSPs (see “DSP Settings main window”).
Clicking on the Connection Summary… link takes you to a page that displaying summarized statistics for the
DSPs as a group, and individual statistics for each DSP. For more information about the Connection Summary
window, refer to “DSP Connection Performance” on page 147).
Clicking on the DSP Index link displays detailed information about the DSP (see section “DSP information
window” on page 151.
Figure 59. DSP main window
Introduction
144
Access Server Administrators’ Reference Guide
11 • Digital Signal Processing (DSP)
DSP Settings main window
This is where you can view and modify current DSP parameters. The following sections describe each parameter.
DSPs Available (dspAvailable)
Indicates the number of DSPs available for use.
Detected (dspDetected)
Indicates the number of installed DSPs the access server detected at time of boot up.
HW Failures (dspFailed)
Indicates the number of DSPs taken out of the DSP resource pool.
Calls without an available DSP (dspDspNotAvailable)
Indicates the number of calls taken by the RAS when a DSP was not available to be assigned to the call. This
statistic is only valid for PRI. For CAS lines, channels on the T1/E1 are busied out if DSP resources are not
available.
DSP Index (dspIndex)
The unique identifier of the DSP being reported on.
Admin Desire (dspDesiredState)
The state of the DSP desired by the administrator—this state may be different than its actual state.
• pendingReboot(1)—This will put the individual DSP into the pendingBoot reset state and reserve all DSPs
in the group. It will not perform the reboot until there are no calls in the group of associated DSPs, or until
10 minutes have elapsed, at which point it will disconnect any remaining calls to do the reboot.
• RebootNow(2)—This will disconnect all calls on the group of associated DSPs and perform the DSP
reboot immediately.
• unavailable(3)—DSP has been taken out of the resource pool.
• available(4)—DSP is available for use.
• availableFirstOnly(17)—Marks the second instance of the DSP unavailable.
• availableSecondOnly(18)—Marks the first instance of the DSP available.
• ForceDerail(19)—This is for use by the engineers and technical support for testing purposes only. Do not
use.
Instance #1 State (dspStatefirst)
Identifies the current state of the first instance of the DSP.
• hardwareFailure(1)—During power up a self test routine detected a problem with this DPS. It will not be
booted with code or used for calls.
• pendingBoot(2)—Software on this DSP has stopped acting properly. This DSP will not be used for calls. At
the next convenient time the DSP will be rebooted.
DSP Settings main window
145
Access Server Administrators’ Reference Guide
11 • Digital Signal Processing (DSP)
• booting(3)—The DSP has just been loaded with code and we are now waiting for an indication from the
DSP that the code loaded properly and is running.
• hwReseted(4)—The DSP is reset.
• swLoaded(5)—Software is downloaded to the DSP or DSP group.
• waitForGroup(6)—DSP has responded to start command. DSP is now waiting for other DSPs in the group
to respond.
• unavailable(7)—The instance is fully operational and could be used to take a call except that the administrator has indicated that this instance should not be used.
• reserved(8)—The instance is fully operational and could be used to take a call. But, another DSP in the
same boot group as this one is pendingBoot. Therefore we are not to use this until the reboot occurs. This
state only appears where the PCB version is 1 or less (for information on displaying the version, refer to section “PCB Revision (boxManufacturePcbRevision)” on page 233).
• suspect(9)—The instance is operational and could be used to take a call. But, we have seen a number of
consecutive failures so it will not be used until no other available instances can be found. A successful call
will place this instance back into the available state.
• available(10)—The instance is fully operational and can be used to take a call
Instance #1 Use (dspUsefirst)
Identifies whether the first instance of the DSP is in use or free.
Instance #2 State (dspStateSecond)
Identifies the current state of the second instance of the DSP. See “Instance #1 State (dspStatefirst)” for parameter values.
Instance #2 Use (dspUseSecond)
Identifies whether the second instance of the DSP is in use or free.
Figure 60. DSP Memory Capture and DSP PCM Capture settings
DSP Settings main window
146
Access Server Administrators’ Reference Guide
11 • Digital Signal Processing (DSP)
DSP Memory Capture
This portion of the DSP Settings window (see figure 60) will store the memory content in 5 rotating circular
buffers. Each buffer contains the program and data memory associated with a call on the DSP. The buffer content is saved when the memory capture is triggered. Do not turn on unless requested by technical support.
DSP PCM Capture
This portion of the DSP Settings window (see figure 60) captures the first 30 seconds of the pulse code modulation on the incoming call on the specified DSP. Do not turn on unless requested by technical support.
DSP Debugging Events
Events for each call are automatically saved into a buffer. This buffer holds the last 100 DSP events for each
DSP. These are used for analysis by Patton Electronics.
DSP Connection Performance
This window (see figure 61) shows connection summaries and statistics about the individual DSPs. Click on
Connection Summary… on the DSP main window (see figure 59 on page 144) to display this window.
Figure 61. DSP Connection Performance window
Failure to Negotiate (dspFailurePercent)
Indicates the percentage of incoming calls that failed during modem negotiation.
DSP Connection Performance
147
Access Server Administrators’ Reference Guide
11 • Digital Signal Processing (DSP)
Connection Summaries
This part of the window shows DSP statistics as a whole.
Originating Calls (dspTotalOriginatingCalls)
The number of calls the DSP initiates for outbound calls.
Answering Calls (dspTotalAnsweringCalls)
The number of calls answered regardless if the call was successfully completed.
Successful Connects (dspTotalSuccessfulConnects)
The number of calls that successfully connected.
Failed Connect PreV8 (dspTotalFailedConnectPreV8)
The number of calls that failed before modulation V8 was completed.
Failed Connect PostV8 (dspTotalFailedConnectPostV8)
The number of calls that failed to connect after V8 modulation was completed.
Remote Retrains (dspTotalRemoteRetrains)
The number of times the remote modem has asked for a retrain to be done.
Remote Renegotiates (dspTotalRemoteRenegotiates)
The number of times the remote modem has asked for a renegotiation to be done.
Local Retrains (dspTotalLocalRetrains)
The number of times the local DSP has requested a retrain to be done.
Local Renegotiates (dspTotalLocalRenegotiates)
The number of times the local DSP has requested a renegotiation to be done.
Suspect—A) Transitions into suspect state (dspTotalWentSuspect)
The number of times an instance went into the suspect state. An instance will go into the suspect state when it
fails to complete several calls in succession.
Suspect—B) Recoveries from suspect state (dspTotalSavedFromSuspect)
An instance in the suspect state will recover from the suspect state as soon as it successfully takes an incoming
call.
Reboot—A) Reboots due to consecutive fails (dspTotalRebootDueToFails)
The number of times a DSP has been rebooted because it was in the suspect state and then took additional
calls which also did not connect successfully.
Reboot—B) Reboots due to error detection (dspTotalRebootDueToError)
The number of times a DSP has been rebooted because it was not responding properly to the main CPU driver
code.
DSP Connection Performance
148
Access Server Administrators’ Reference Guide
11 • Digital Signal Processing (DSP)
DSP Connection Totals
This portion of the window (see figure 62) shows statistics on a per-DSP basis.
Figure 62. Connection Summary portion of DSP Connection Performance window
DSP Index (dspIndex)
The unique identifier of the DSP being reported on. Clicking on the DSP Index link displays detailed information about the DSP (see section “DSP information window” on page 151).
Connects—Good (dspSuccessfulConnects)
The number of calls that successfully connected
Connects—No Modem (dspFailedConnectPreV8)
The number of calls that failed before modulation V8 was completed.
Connects—Failed Neg (dspFailedConnectPostV8)
The number of calls that failed to connect after V8 modulation was completed.
Remote—Retrain (dspRemoteRetrains)
The number of times the remote modem has asked for a retrain to be done.
DSP Connection Performance
149
Access Server Administrators’ Reference Guide
11 • Digital Signal Processing (DSP)
Remote—Reneg (dspRemoteRenegotiates)
The number of times the remote modem has asked for a renegotiation to be done.
Local—Retrain (dspLocalRetrains)
The number of times the local DSP has requested a retrain to be done.
Local—Reneg (dspLocalRenegotiates)
The number of times the local DSP has requested a renegotiation to be done.
Suspect—A (dspTotalWentSuspect)
The number of times an instance on this DSP went into the suspect state. An instance will go into the suspect
state when it fails to complete several calls to succession.
Suspect—B (dspTotalSavedFromSuspect)
An instance in the suspect state will recover from the suspect state as soon as it successfully takes an incoming
call.
Reboot—A (dspTotalRebootDueToFails)
The number of times a DSP has been rebooted because it was in the suspect state and then took additional
calls which also did not connect successfully.
Reboot—B (dspTotalRebootDueToError)
The number of times a DSP has been rebooted because it was not responding properly to the main CPU driver
code.
DSP Connection Performance
150
Access Server Administrators’ Reference Guide
11 • Digital Signal Processing (DSP)
DSP information window
This is where you can view and modify parameters for a single DSP.
Figure 63. DSP information window (Call and Debug Statistics)
DSP Status
This portion of the DSP information window shows information about the overall status of the selected DSP.
Desired State (dspDesiredState)
The state of the DSP desired by the administrator—this state may be different than its actual state.
• pendingReboot(1)—This will put the individual DSP into the pendingBoot reset state and reserve all DSPs
in the group. It will not perform the reboot until there are no calls in the group of associated DSPs, or until
10 minutes have elapsed, at which point it will disconnect any remaining calls to do the reboot.
• RebootNow(2)—This will disconnect all calls on the group of associated DSPs and perform the DSP
reboot immediately.
• unavailable(3)—DSP has been taken out of the resource pool
• available(4)—DSP is available for use
• availableFirstOnly(17)—Marks the second instance of the DSP unavailable.
• availableSecondOnly(18)—Marks the first instance of the DSP available.
• forceDerail(19)—This is for use by the engineers and technical support for testing purposes only. Do not
use.
DSP information window
151
Access Server Administrators’ Reference Guide
11 • Digital Signal Processing (DSP)
Instance First State (dspStatefirst)
Identifies the current state of the first instance of the DSP.
• hardwareFailure(1)—During power up a self test routine detected a problem with this DPS. It will not be
booted with code or used for calls.
• pendingBoot(2)—Software on this DSP has stopped acting properly. This DSP will not be used for calls. At
the next convenient time the DSP will be rebooted.
• booting(3)—The DSP has just been loaded with code and we are now waiting for an indication from the
DSP that the code loaded properly and is running.
• hwReseted(4)—The DSP is reset.
• swLoaded(5)—Software is downloaded to the DSP or DSP group.
• waitForGroup(6)—DSP has responded to start command. DSP is now waiting for other DSPs in the group
to respond.
• unavailable(7)—The instance is fully operational and could be used to take a call except that the administrator has indicated that this instance should not be used.
• reserved(8)—The instance is fully operational and could be used to take a call. But, another DSP in the
same boot group as this one is pendingBoot. Therefore we are not to use this until the reboot occurs. This
state only appears where the PCB version is 1 or less, (for information on displaying the version, refer to
section “PCB Revision (boxManufacturePcbRevision)” on page 233.
• suspect(9)—The instance is operational and could be used to take a call. But, we have seen a number of
consecutive failures so it will not be used until no other available instances can be found. A successful call
will place this instance back into the available state.
• available(10)—The instance is fully operational and can be used to take a call
Instance First Used By (dspUseFirst)
Identifies whether the first instance is in use or free.
Instance Second State (dspStateSecond)
Identifies the current state of the second instance of the DSP. See dspStateFirst for parameter values.
Instance Second Used By (dspUseSecond)
Identifies whether the second instance of the DSP is in use or free.
Call Statistics
This portion of the DSP information window (see figure 63 on page 151) shows the statistics of the individual
DSP.
Originating Calls (dspOriginatingCalls)
The number of calls the DSP initiates for outbound calls.
Answering Calls (dspAnsweringCalls)
The number of calls answered regardless if the call was successfully completed.
DSP information window
152
Access Server Administrators’ Reference Guide
11 • Digital Signal Processing (DSP)
Successful Connects (dspSuccessfulConnects)
The number of calls that successfully connected.
Failed Connect (no far modem) (dspFailedConnectPreV8)
The number of calls that failed before modulation V8 was completed.
Failed Connect (bad negotiation) (dspFailedConnectPostV8)
The number of calls that failed to after V8 modulation was completed.
Remote—Retrains (dspRemoteRetrains)
The number of times the remote modem has asked for a retrain to be done.
Remote—Renegotiates (dspRemoteRenegotiates)
The number of times the remote modem has asked for a renegotiation to be done.
Local—Retrains (dspLocalRetrains)
The number of times the local DSP has requested a retrain to be done.
Local—Renegotiates (dspLocalRenegotiates)
The number of times the local DSP has requested a renegotiation to be done.
Page Requests(dspPageRequests)
This is the number of page requests the DSP has made. The DSP does not have enough memory to hold all of
the modulation protocols. The DSP will make a page request when it needs to download a new protocol not
currently in its memory.
Debug Statistics
This portion of the DSP information window (see figure 63 on page 151) shows statistics on DSP rebooting.
The information contained within these MIB variables are subject to change without notice.
Reserved A (dspReservedA)
No assigned functionality at this time
Reserved B (dspReservedB)
No assigned functionality at this time.
DSP information window
153
Chapter 12 Ethernet
Chapter contents
Introduction ........................................................................................................................................................155
Ethernet Main Window ......................................................................................................................................155
State (boxEtherAState) ..................................................................................................................................155
PrimaryIPAddress (boxEtherAPrimaryIpAddress) .........................................................................................156
PrimaryIpMask (boxEtherAPrimaryIpMask) ................................................................................................156
PrimaryIpFilters (boxEtherAPrimaryIpFilters) ..............................................................................................156
SecondaryIpAddress (boxEtherASecondaryIpAddress) ..................................................................................156
SecondaryIpMask (boxEtherASecondaryIpMask) .........................................................................................156
SecondaryIpFilters (boxEtherASecondaryIpFilters) .......................................................................................156
Technique (boxEtherATechnique) ................................................................................................................156
Config ..........................................................................................................................................................156
Ethernet Modify Window ...................................................................................................................................157
State (boxEtherAState) ..................................................................................................................................157
PrimaryIPAddress (boxEtherAPrimaryIpAddress) .........................................................................................157
PrimaryIpMask (boxEtherAPrimaryIpMask) ................................................................................................157
PrimaryIpFilters (boxEtherAPrimaryIpFilters) ..............................................................................................157
SecondaryIpAddress (boxEtherASecondaryIpAddress) ..................................................................................158
SecondaryIpMask (boxEtherASecondaryIpMask) .........................................................................................158
SecondaryIpFilters (boxEtherASecondaryIpFilters) .......................................................................................158
Technique (boxEtherATechnique) ................................................................................................................158
Technique (Configuration) ...........................................................................................................................158
Ethernet Statistics ................................................................................................................................................158
Alignment Errors (dot3StatsAlignmentErrors) ..............................................................................................158
FCS Errors (dot3StatsFCSErrors) .................................................................................................................159
Single Collision Frames (dot3StatsSingleCollision Frames) ...........................................................................159
Multiple Collision Frames (dot3StatsMultipleCollisionFrames) ....................................................................159
SQE Test Errors (dot3StatsSQETestErrors) ..................................................................................................159
Deferred Transmissions (dot3StatsDeferredTransmissions) ...........................................................................159
Late Collisions (dot3StatsLateCollisions) ......................................................................................................159
Excessive Collisions (dot3StatsExcessiveCollisions) .......................................................................................159
Other Errors (dot3StatsInternalMacTransmitErrors) ....................................................................................159
Carrier Sense Errors (dot3StatsCarrierSenseErrors) .......................................................................................159
Received Frames Too Long (dot3StatsFrameTooLongs) ...............................................................................160
Other Received Errors (dot3StatsInternalMacReceiveErrors) ........................................................................160
Chip Set ID (dot3StatsEtherChipSet) ...........................................................................................................160
154
Access Server Administrators’ Reference Guide
12 • Ethernet
Introduction
The access server provides management and statistical information in the Ethernet window (see figure 66).
Detailed information regarding the SNMP MIB II variables may be downloaded from RFC 1643, Definitions
of Managed Objects for the Ethernet-like Interface Types.
Click on Ethernet under the Configuration Menu to display the Ethernet main window.
The Ethernet main window displays information about the configuration of the Ethernet interface including IP
addresses, subnet masks, and state of the Ethernet link.
The ethernet interface contains the following links:
• Statistics link—Clicking on the Statistics link takes you to the page where you can see the statistics on the
ethernet interface. For more information about the Statistics page, refer to “Ethernet Statistics” on
page 158.
• Modify—Clicking on the Modify link takes you to the page where you can change the configuration of your
ethernet interface. For more information about modifying Ethernet settings, refer to “Ethernet Modify
Window” on page 157.
Figure 64. Ethernet Main Window
Ethernet Main Window
The Ethernet main window shows the current configuration of the ethernet interface. The following sections
describe each parameter.
State (boxEtherAState)
Indicates the state of the ethernet interface. The following states are valid:
• notInstalled(0)—Ethernet interface is not installed in the hardware
• noLinkIndication(1)—The link is in the “down” state
• adminOff(2)—The link is administratively down
• linkIndication10M(3)—The link is up and running at 10M half duplex
• linkIndication10Duplex(4)—The link is up and running at 10M full duplex
• linkIndication100M(5)—The link is up and running at 100M half duplex
• linkIndication100Duplex(6)—The link is up and running at 100M full duplex
Introduction
155
Access Server Administrators’ Reference Guide
Note
12 • Ethernet
Note that the speed settings indicated above could indicate that the device
reached this speed duplex as a result of an auto-negotiated link, or from
being forced into this link state.
PrimaryIPAddress (boxEtherAPrimaryIpAddress)
The Primary ethernet IP address.
PrimaryIpMask (boxEtherAPrimaryIpMask)
The primary ethernet IP subnet mask.
PrimaryIpFilters (boxEtherAPrimaryIpFilters)
Filters packets based on the filters assigned to the Primary IP address of the Ethernet port. Enter the Filter ID
of a filter configured under Filter IP. Separate multiple filters using a comma (,).
SecondaryIpAddress (boxEtherASecondaryIpAddress)
The secondary ethernet IP address.
Note
This address is not propagated via RIP.
SecondaryIpMask (boxEtherASecondaryIpMask)
The secondary IP ethernet IP subnet mask.
SecondaryIpFilters (boxEtherASecondaryIpFilters)
Filters packets based on the filters assigned to the Secondary IP address of the Ethernet port. Enter the Filter
ID of a filter configured under Filter IP. Separate multiple filters using a comma (,).
Note
Only outbound filters can be applied to the secondary Ethernet. Inbound filters for the secondary Ethernet must be entered in the Primary IP Filter field.
Technique (boxEtherATechnique)
Turns ethernet port off and on. The remote access server must be reset for this setting to take effect.
• disable(0)—ethernet port is disabled
• static(1)—ethernet port is turned on. IP address(es) and mask(s) are obtained from data entered under the
Ethernet link.
Config
Indicates the specified fixed rate and duplex for the Ethernet interface.
• auto(0)-- auto-negotiate the settings for the interface (default)
• 100M_full(1)-- force the interface to 100M & full duplex
• 100M_half(2)-- force the interface to 100M & half duplex
• 10M_full(3)-- force the interface to 10M & full duplex
• 10M_half(4)-- force the interface to 100M & half duplex
Ethernet Main Window
156
Access Server Administrators’ Reference Guide
12 • Ethernet
Ethernet Modify Window
This window allows you to make changes to the ethernet configuration.
To reach this window, select Modify from the Ethernet main window.
Figure 65. Ethernet Modify Window
State (boxEtherAState)
Indicates the state of the ethernet interface. The following states are valid:
• notInstalled(0)—Ethernet interface is not installed in the hardware
• noLinkIndication(1)—The link is in the “down” state
• adminOff(2)—The link is administratively down
• linkIndication10M(3)—The link is up and running at 10M half duplex
• linkIndication10Duplex(4)—The link is up and running at 10M full duplex
• linkIndication100M(5)—The link is up and running at 100M half duplex
• linkIndication100Duplex(6)—The link is up and running at 100M full duplex
Note
Note that the speed settings indicated above could indicate that the device
reached this speed duplex as a result of an auto-negotiated link, or from
being forced into this link state.
PrimaryIPAddress (boxEtherAPrimaryIpAddress)
The Primary ethernet IP address.
PrimaryIpMask (boxEtherAPrimaryIpMask)
The primary ethernet IP subnet mask.
PrimaryIpFilters (boxEtherAPrimaryIpFilters)
Filters packets based on the filters assigned to the Primary IP address of the Ethernet port. Enter the Filter ID
of a filter configured under Filter IP. Separate multiple filters using a comma (,).
Ethernet Modify Window
157
Access Server Administrators’ Reference Guide
12 • Ethernet
SecondaryIpAddress (boxEtherASecondaryIpAddress)
The secondary ethernet IP address.
Note
This address is not propagated via RIP.
SecondaryIpMask (boxEtherASecondaryIpMask)
The secondary IP ethernet IP subnet mask.
SecondaryIpFilters (boxEtherASecondaryIpFilters)
Filters packets based on the filters assigned to the Secondary IP address of the Ethernet port. Enter the Filter
ID of a filter configured under Filter IP. Separate multiple filters using a comma (,).
Technique (boxEtherATechnique)
Turns ethernet port off and on. The remote access server must be reset for this setting to take effect.
• disable(0)—ethernet port is disabled
• static(1)—ethernet port is turned on. IP address(es) and mask(s) are obtained from data entered under the
Ethernet link.
Technique (Configuration)
Indicates the specified fixed rate and duplex for the Ethernet interface.
• auto(0)-- auto-negotiate the settings for the interface (default)
• 100M_full(1)-- force the interface to 100M & full duplex
• 100M_half(2)-- force the interface to 100M & half duplex
• 10M_full(3)-- force the interface to 10M & full duplex
• 10M_half(4)-- force the interface to 100M & half duplex
Ethernet Statistics
This window shows statistics about the Ethernet Interface. To reach this window select Statistics from the
Ethernet main window.
Alignment Errors (dot3StatsAlignmentErrors)
The number of frames received that are not an integral number of octets in length and do not pass the FCS check.
Ethernet Statistics
158
Access Server Administrators’ Reference Guide
12 • Ethernet
Figure 66. Ethernet window
FCS Errors (dot3StatsFCSErrors)
The number of frames received that are an integral number of octets in length but do not pass the FCS check.
Single Collision Frames (dot3StatsSingleCollision Frames)
The number of successfully transmitted frames in which there was exactly one collision.
Multiple Collision Frames (dot3StatsMultipleCollisionFrames)
The number of successfully transmitted frames in which there was more than one collision.
SQE Test Errors (dot3StatsSQETestErrors)
The number of times that the SQE TEST ERROR message is generated by the PLS sublayer.
Deferred Transmissions (dot3StatsDeferredTransmissions)
The number of times in which the first transmission attempt is delayed because the medium is busy. This number does not include frames involved in collisions.
Late Collisions (dot3StatsLateCollisions)
The number of times that a collision is detected later than 512 bit-times into the transmission of a packet. Five
hundred and twelve bit-times corresponds to 51.2 microseconds on a 10 Mbps system.
Excessive Collisions (dot3StatsExcessiveCollisions)
The number of frames in which transmission failed due to excessive collisions.
Other Errors (dot3StatsInternalMacTransmitErrors)
The number of frames transmission on a fails due to an internal MAC sublayer transmit error.
Carrier Sense Errors (dot3StatsCarrierSenseErrors)
The number of times that the carrier sense condition was lost or never asserted when attempting to transmit a
frame on a particular interface.
Ethernet Statistics
159
Access Server Administrators’ Reference Guide
12 • Ethernet
Received Frames Too Long (dot3StatsFrameTooLongs)
The number of frames received that exceed the maximum permitted frame size.
Other Received Errors (dot3StatsInternalMacReceiveErrors)
The number of frames in which reception fails due to an internal MAC sublayer receive error.
Chip Set ID (dot3StatsEtherChipSet)
Ethernet-like interfaces are typically built out of several different chips. This value identifies the chip set that
gathers the transmit and receive statistics and error indications.
Ethernet Statistics
160
Chapter 13 Filter IP
Chapter contents
Introduction ........................................................................................................................................................162
Defining a filter ...................................................................................................................................................162
Modify Filter .......................................................................................................................................................162
Name (filterIpName) ....................................................................................................................................163
Direction (filterIpDirection) .........................................................................................................................163
Action (filterIpAction) ..................................................................................................................................164
Source IP ......................................................................................................................................................164
Comparison (filterIpSourceAddressCmp) ................................................................................................164
Address (filterIpSourceIp) .......................................................................................................................164
Mask (filterIpSourceMask) ......................................................................................................................164
Destination IP ..............................................................................................................................................165
Comparison (filterIpDestinationAddressCmp) ........................................................................................165
Address(filterIpDestinationIp) .................................................................................................................165
Mask(filterIpDestinationMask) ...............................................................................................................165
Source Port ...................................................................................................................................................165
Comparison (filterIpSourcePortCmp) .....................................................................................................165
Port (filterIpSourcePort) .........................................................................................................................165
Destination Port ...........................................................................................................................................165
Comparison (filterIpDestinationPortCmp) .............................................................................................165
Port (filterIpDestinationPort) ..................................................................................................................166
Protocol (filterIpProtocol) .............................................................................................................................166
TCP Established (filterIpTcpEstablished) .....................................................................................................166
Default for dialin (filterIpDefaultDialin) ......................................................................................................166
Default for dialout (filterIpDefaultDialout) ..................................................................................................167
An example of using a filter .................................................................................................................................167
161
Access Server Administrators’ Reference Guide
13 • Filter IP
Introduction
The access server software provides an IP filtering system that enables you to set up security as well as to provision services for selected customers. While IP filters are typically thought of as a security measure, many providers wish to limit some services a customer may have access to. These could include such things as limited
access only to an e-mail server or proxy server. IP filters also include the ability to encapsulate all packets
received on the specified dialup link in an extra IP header using RFC 2003. This would allow packets on a dialup link to be tunneled to a specific host.
Each filter is a defined list of parameters based upon attributes in the IP, TCP, and UDP headers. There are two
major steps to filter creation: first defining the filter, then applying it to a user connection. The same filter can
be shared by several users.
The access server enables 20 separate filters to be defined, of which up to 10 can be used on a single user connection. A single filter can be assigned to a user via the Static Users Authentication. Multiple filters can be
assigned by using the RADIUS Filter-Id attribute.
Filters can be configured with default settings that are used for all dial-in sessions. If any filters are applied
through either RADIUS or the Static User filter parameter, then all of the dial-in defaults will be disabled and
only the specified filters will be applied.
Click on Filter IP under the Configuration Menu to display the Filter IP main window (see figure 67). The following sections describe each of the parameters found in FilterIP.
Figure 67. Filter IP main window
Defining a filter
To define a new filter, select a number and a name, then click on the Submit Query button to submit the
request. The number and name must not already exist in the IP FILTER list, and the number must be an integer between 1 and 20. To delete a filter, enter just the ID number without a name and click on the Submit
Query button.
Modify Filter
After entering a number and name, click on the name of the filter to display the filter parameters window (see
figure 68).
Introduction
162
Access Server Administrators’ Reference Guide
13 • Filter IP
Figure 68. Filter IP parameters window
The following parameters can be configured for IP Filtering:
Note
Any changes to a filter take place immediately. This can aid in troubleshooting a filter profile while the user is online.
Name (filterIpName)
This is the name of the filter
Direction (filterIpDirection)
Specifies the direction of the filter (that is, whether it applies to data packets inbound or outbound from the
access server). The filter only applies to dial in users, users on other interfaces (that is, Ethernet, Frame Relay,
and so on) are not affected. The following options are available:
• inactive(0)—Disables filter operation
• inbound(1)—Relates to packets coming into the access server
• outbound(2)—Relates to packets leaving the access server
• both(3)—Specifies both inbound and outbound operation
Note
Modify Filter
Enabling or disabling filters that are applied to dial-in users who are currently
online will immediately change those users’ ability to send or receive packets,
depending on the changes that are made to the filters.
163
Access Server Administrators’ Reference Guide
13 • Filter IP
Action (filterIpAction)
Specifies the action to take on a packet whether to block or pass the packet. The following options are available:
• pass(0)—If pass is selected, checking will continue on to other filters until either a match occurs, a block
occurs, or there are no more filters remaining to check.
Note
If there are any applied PASS filters, then at least one of them must match or
the packet will be dropped.
• block(1)—If a filter has block set and the filter matches the block, the packet is discarded and no further
processing is done.
• wrap(2)—All packets received on the specified dialup link will be encapsulated in an extra IP header as
defined in RFC2003. The destination IP address of the wrapper is given by the destination IP setting in the
filter. The source IP address of the wrapper is the ethernet address of the remote access server.
All wrap filters are inbound only.
Note
Block filters take priority, therefore any applied and matching block filters
will drop the packet. Next, pass filters are examined, if PASS filters have been
defined, then at least one of them must match or else the packet will be
dropped. After the block and pass filters are examined, the WRAP filter, if it
exists, will be applied.
Source IP
Applies the filter action based on the results of the stated comparison to the IP address and subnet mask.
Comparison (filterIpSourceAddressCmp)
• equal(0)—apply the action of the filter if the Source IP equals the IP address/subnet mask combination
supplied
• notEqual(1)—apply the action of the filter if the Source IP does not equal the IP address/subnet mask combination supplied
Address (filterIpSourceIp)
The IP address to which the filter will compare the source IP address.
Mask (filterIpSourceMask)
The subnet mask the filter will apply to the source IP address to make the comparison.
Note
Modify Filter
These fields are ignored unless either the IP address or Mask have been
entered. Bit positions that are set to 1 will be compared and 0s will be
ignored. Thus, a setting of 0.0.0. will have the effect of disabling source IP
address comparison.
164
Access Server Administrators’ Reference Guide
13 • Filter IP
Destination IP
Applies the action based on the results of the stated comparison to the IP address and subnet mask.
Comparison (filterIpDestinationAddressCmp)
• equal(0) – apply the action of the filter if the destination IP equals the IP address/subnet mask combination
supplied
• notEqual(1) – apply the action of the filter if the destination IP does not equal the IP address/subnet mask
combination supplied
Address(filterIpDestinationIp)
The IP address the filter will apply to the destination IP address to make the comparison.
Mask(filterIpDestinationMask)
The subnet mask the filter will apply to the destination IP address to make the comparison.
Note
These fields are ignored unless either the IP address or Mask have been
entered. Bit positions that are set to 1 will be compared and 0s will be
ignored. Thus, a setting of 0.0.0. will have the effect of disabling destination
IP address comparison.
Source Port
Applies the filter action based on the stated comparison to the source port number (TCP or UDP)
Comparison (filterIpSourcePortCmp)
• noCompare(0) – no comparison to the source port in the IP packet
• equal(1) – the source port in the IP action must be the same for the filter to be applied
• lessThan(2) – the source port in the IP packet must be less than the source port specified for the filter to be
applied
• greaterThan(3) – the source port in the IP packet must be greater than the source port specified for the filter
to be applied
Port (filterIpSourcePort)
The port number to be compared to the source port in the IP packet
Destination Port
Applies the filter action based on the stated comparison to the destination port number
Comparison (filterIpDestinationPortCmp)
• noCompare(0) – no comparison to the destination port in the IP packet
• equal(1) – the destination port in the IP action must be the same for the filter to be applied
• lessThan(2) – the destination port in the IP packet must be less than the source port specified for the filter
to be applied
Modify Filter
165
Access Server Administrators’ Reference Guide
13 • Filter IP
• greaterThan(3) – the destination port in the IP packet must be greater than the source port specified for the
filter to be applied
Port (filterIpDestinationPort)
The port number to be compared to the destination port in the IP packet
Protocol (filterIpProtocol)
Specifies the IP Protocol number to use for filtering. Some examples of protocol numbers are 1 for ICMP; 6 for
TCP; and 17 for UDP. A list of protocol numbers can be found in RFC 1340. A setting of 0 disables processing based on protocol number.
TCP Established (filterIpTcpEstablished)
Specifies whether the filter should match only those packets which indicate in the TCP header flags that the
connection is established. The following choices are available:
• anyPackets(0)—Applies the filter to all packets
• onlyEstablishedConnections(1)—Only applies the filter to established TCP connections
Default for dialin (filterIpDefaultDialin)
This option applies the filter to as a default filter for all dial-in users. If another filter is specified, either in
RADIUS or in the static user profiles, then all dial-in defaults are disabled and only the specified filters are
applied. The following choices are available:
• no(0)
• applyToDialin(1)
Modify Filter
166
Access Server Administrators’ Reference Guide
13 • Filter IP
Figure 69. IP Filter showing default for dialout
Default for dialout (filterIpDefaultDialout)
This option applies the filter as a default for all dialout locations. If a location has a filter specifically specified
for that location (see section “Locations Link” on page 121), the default filter is disabled for that location and
only the specified filter(s) is/are used. The following options are available:
• no(0)
• applyToDialout(1)
An example of using a filter
All customers are limited to the local mail server (mail.internal.com) and an internal website
(www.internal.com).
• The IP address for mail.internal.com is: 192.10.10.1
• for: www.internal.com is: 192.10.10.2
• DNS server for name resolution is 192.10.10.1.
The filters needed:
• ID:1
– Name: Mail Server
– Direction: inbound
– Action: pass
– Source IP and mask: not set
– Destination IP: 192.10.10.1 mask: 255.255.255.255
– Source Port: no compare
– Destination Port: equal 110 for POP3 or 25 for SMTP
An example of using a filter
167
Access Server Administrators’ Reference Guide
13 • Filter IP
– Protocol: not set
– TCP Established: anyPackets
– Default for dial-in: apply to Dial-in
• ID:2
– Name: WebSite
– Direction: inbound
– Action:pass
– Source IP and mask: not set
– Destination IP: 192.10.10.2 mask: 255.255.255.255
– Source Port: no compare
– Destination Port: equal 80
– Protocol: not set
– TCP Established: anyPackets
– Default for dial-in: apply to Dial-in
• ID:3
– Name:DNS
– Direction: inbound
– Action:pass
– Source IP and mask: not set
– Destination IP: 192.10.10.1 mask: 255.255.255.255
– Source Port: no compare
– Destination Port: equal 53
– Protocol: not set
– TCP Established anyPackets
– Default for dial-in: apply to Dial-in
Note
If the DNS filter was not created, then users would have to use IP addresses
to access the web server and the mail server.
Now if you wanted to add the ability to ping to test the dial-in users connectivity to the network, the following
filter would be created:
• ID:4
• Name: PING
• Direction: both
An example of using a filter
168
Access Server Administrators’ Reference Guide
13 • Filter IP
• Action: pass
• Source IP and mask: not set
• Destination IP and mask: not set
• Source Port: no compare
• Destination Port: no compare
• Protocol: 1
• TCP Established: anyPackets
• Default for dial-in: apply to Dial-in
Note
This would also allow traceroute to work.
An example of using a filter
169
Chapter 14 Frame Relay
Chapter contents
Introduction ........................................................................................................................................................172
The Frame Relay main window...........................................................................................................................172
Link X (frDlcmiIfIndex) ...............................................................................................................................173
Status: X (framerelStatus) ........................................................................................................................173
HDLC Statistics on Link ..............................................................................................................................173
Transmit (Bits/Sec) (framerelTxOctets) ..................................................................................................173
Receive (Bits/Sec) (framerelRxOctets) .....................................................................................................173
No Buffers Available (framerelRxNoBufferAvailable) ..............................................................................173
Data Overflow (framerelRxDataOverflow) ..............................................................................................173
Message Ends (framerelRxMessageEnds) .................................................................................................173
Packets Too Long (framerelRxPacketTooLong) ......................................................................................173
Overflow (framerelRxOverflow) ..............................................................................................................173
Aborts (FramerelRxAbort) .......................................................................................................................173
Bad CRC (framerelRxBadCrc) ................................................................................................................174
Invalid Frames (framerelRxInvalidFrame) ...............................................................................................174
Tx Underrruns (framerelTxUnderrun) ....................................................................................................174
LINK Resets (framerelResets) ..................................................................................................................174
Produce Status Change Trap (frTrapState) ..............................................................................................174
DLMI Window ...................................................................................................................................................174
Signalling (frDlcmiState) ..............................................................................................................................175
Data Link Protocol (frDlcmiAddress) ...........................................................................................................175
DLCI Length (frDlcmiAddressLen) ..............................................................................................................175
Polling Interval (T391)( frDlcmiPollingInterval) ..........................................................................................175
Full Enquiry Interval (N391)( frDlcmiFullEnquiryInterval) .........................................................................175
Error Threshold (N392)( frDlcmiErrorThreshold) .......................................................................................175
Monitored Events (N393)( frDlcmiMonitoredEvents) .................................................................................175
MultiCast Service (frDlcmiMulticast) ...........................................................................................................175
Max Virtual Circuits (frDlcmiMaxSupportedVCs) .......................................................................................175
LMI Interface (frDlcmiInterface) ..................................................................................................................176
Bidirectional Polling(frDlc rDlcmiPollingBiDir) ..........................................................................................176
Polling Verification (T392)( frDlcmiPollingVerification) .............................................................................176
DLCI window .....................................................................................................................................................176
DLCI (frCircuitDlci) ....................................................................................................................................177
Interface # (FrameIPInterfaceNum) ..............................................................................................................177
State (frCircuitState) .....................................................................................................................................177
Committed Burst (bits) (frCircuitCommitedBurst) ......................................................................................177
Excess Burst (bits) (frCircuitExcessBurst) ......................................................................................................177
Throughput (bits) (frCircuitThroughput) .....................................................................................................177
IP Address (FrameIPAddr) ............................................................................................................................177
170
Access Server Administrators’ Reference Guide
14 • Frame Relay
Congestion (frameEnableCongestion) ...........................................................................................................177
171
Access Server Administrators’ Reference Guide
14 • Frame Relay
Introduction
Frame Relay is a high-speed datalink communications technology that is used in hundreds of networks
throughout the world to connect LAN, SNA, Internet, and voice applications. Within the network, Frame
Relay uses a simple form of packet switching that provides high throughput and reliability. (For more information, refer to the Frame-Relay MIB: 1315 Management Base for Frame Relay DTEs.)
The access server offers IP-in-Frame Relay, or RFC-1490 Multi-protocol encapsulation. Because the access
server has a built-on router, the access server can route IP traffic to multiple locations over multiple virtual
channels. Using a T1 or E1 WAN link the access server can function as a network-to-network interface (NNI)
switch or as a User-to-Network Interface (UNI). Most applications will be as an UNI.
A Frame Relay network consists of endpoints (the access server), frame relay access equipment (bridges, routers, hosts, frame relay access devices) and network devices (switches, network routers, T1/E1 multiplexers).
The most popular application is to use the access server as a POP-in-a-box with a Frame Relay IP connection
to the Internet backbone.
The Frame Relay main window
The Frame Relay main window displays diagnostic information about the Frame Relay link, and lists complete
statistics/configuration information for each WAN link that has been selected for Frame Relay service. Click on
Frame Relay on the left hand frame to display this window. (see figure 70).
Figure 70. Frame Relay main window
Note
Introduction
If frame relay has not already been configured under T1/E1, this win-dow
will only show the Produce Status Change Trap setting.
172
Access Server Administrators’ Reference Guide
14 • Frame Relay
The Frame Relay main window also has the following links:
• Modify—Clicking on the Modify link enables you to set-up Frame Relay or to change any configuration
parameters (see “DLMI Window” on page xxx).
• DLCI—The Data Link Connection Identifier (DLCI) provides each PVC with a unique identifier at both
the access server and the Frame Relay switch. Within each link (DLMI) there can be multiple Permanent
Virtual Circuits (PVC). Each of these PVCs are point-to-point links to remote locations, and define the
data path between the access server and the Frame Relay network. Clicking on the DLCI link displays the
DLCI window (see “DLCI window” on page 176) that enables you to configure PVCs on the access server.
Link X (frDlcmiIfIndex)
The Data Link Management Interface number.
Status: X (framerelStatus)
This specifies LMI Link Status. If the management DLCI (either DLCI 0 or 1023) is established, then the status will be UP. If the management channel has not been established, the status will indicate DOWN.
HDLC Statistics on Link
The HDLC statistics on the link are defined as follows:
Transmit (Bits/Sec) (framerelTxOctets)
This statistic shows the transmit rate in bits-per-second.
Receive (Bits/Sec) (framerelRxOctets)
This statistic shows the receive rate in bits-per-second.
No Buffers Available (framerelRxNoBufferAvailable)
The number of packets received when no buffers were available.
Data Overflow (framerelRxDataOverflow)
The number of packets received with overflow (as indicated by hardware).
Message Ends (framerelRxMessageEnds)
The number of packets received with message-correct endings. This value increases each time a valid Frame
Relay packet is received.
Packets Too Long (framerelRxPacketTooLong)
The number of packets received that were too long.
Overflow (framerelRxOverflow)
The number of packets received with overflow (as indicated by software).
Aborts (FramerelRxAbort)
The number of packets received that were aborted.
The Frame Relay main window
173
Access Server Administrators’ Reference Guide
14 • Frame Relay
Bad CRC (framerelRxBadCrc)
The number of packets received that had bad CRC values.
Invalid Frames (framerelRxInvalidFrame)
The number of packets received that had invalid frames.
Tx Underrruns (framerelTxUnderrun)
The number of times the transmit buffer was not replenished in time to be sent out on the line.
LINK Resets (framerelResets)
Number of times the link management (LMI) was reset.
Produce Status Change Trap (frTrapState)
This feature is not currently implemented.
DLMI Window
Each Frame Relay instance with the access server is known as the Data Link Management Interface or DLMI.
The access server software currently supports one Frame Relay Link, or DLMI, on each of the T1/E1 WAN
ports. Frame Relay has a set of protocols responsible for maintaining the link. This is known as the management link interface or LMI.
Figure 71. DLMI window
DLMI Window
174
Access Server Administrators’ Reference Guide
14 • Frame Relay
Signalling (frDlcmiState)
Inband signalling used to communicate link and PVC status between the User equipment and the Network
equipment. LMI is the generic term used to indicate Frame Relay signaling, however the three specific types of
signaling are:
• LMI Frame Relay Forum Implementation agreement. Uses DLCI = 1023 for management
• Annex D. ANSI T1.617 Uses DLCI = 0 for management
• Annex A. ITU Q.933 Uses DLCI = 0 for management
Data Link Protocol (frDlcmiAddress)
The layer 2 link protocol for Frame Relay is LAPF, otherwise referred to as Q.922. The factory default of
q922(4) will be the most common.
DLCI Length (frDlcmiAddressLen)
The DLCI identifies the virtual connection on the bearer channel for the Frame Relay Interface. The factory
setting of two-octets(2) represents 10-bit addressing. Your access server can support a maximum of 32 separate
PVCs or virtual channels per Frame Relay link.
Polling Interval (T391)( frDlcmiPollingInterval)
Each side of the Frame Relay interface, the Network side and the User side, communicate status. T391 is the
number of seconds between subsequent Status Enquiry messages. An Error Count is logged if no response
from the previous Status Enquiry message was received during the T391 interval. The default value is 10.
Full Enquiry Interval (N391)( frDlcmiFullEnquiryInterval)
Status Enquiry messages are of two different varieties: 1) Link Integrity Verification, which simply exchange
sequence numbers between peers and 2) Full Status messages, which is a request from the peer for the list of all
active/inactive PVCs. The default is 6.
Error Threshold (N392)( frDlcmiErrorThreshold)
N392 is the number of errors (T392 and T391 timeouts and sequence number errors) before action is taken.
Action consists of changing all the PVCs from active to inactive. N392 must be less than or equal to N393.
The default value is 3.
Monitored Events (N393)( frDlcmiMonitoredEvents)
Expected and unexpected events are counted up till the Event Count reaches N393, whereupon the Event
Count is cleared and the Error Threshold Count is cleared. Events consist of timer (T391 and T392) expirations and received Status Enquiry messages. N393 must be greater or equal to N392. The default value is 4.
MultiCast Service (frDlcmiMulticast)
TBD.
Max Virtual Circuits (frDlcmiMaxSupportedVCs)
The maximum number of PVCs determines the amount of internal resources are allocated for the Frame Relay
system. The default value is 32.
DLMI Window
175
Access Server Administrators’ Reference Guide
14 • Frame Relay
LMI Interface (frDlcmiInterface)
LMI is used in the generic sense as an in-band signaling system. The signaling is slightly different depending
on which end of the Frame Relay Interface it is, or in other words its orientation. The User end issues periodic
STATUS ENQUIRY messages and waits for a STATUS reply from the Network. The USER setting is correct
if the access server is a DCE connecting to a Frame Relay network. It is possible to configure an access server to
“look” like a Frame Relay Network. By setting the LMI Interface to NETWORK, you can connect another
Frame Device directly to the access server. This is also the setting if you were to connect two access servers
back-to-back without the benefit of an established Frame Relay network.
Bidirectional Polling(frDlc rDlcmiPollingBiDir)
Bidirectional Polling pertains only to the Network LMI side. If enabled, the Network LMI issues STATUS
ENQUIRY messages and waits for a STATUS reply from the User.
Polling Verification (T392)( frDlcmiPollingVerification)
Polling Verification pertains only to the Network LMI side. It is the amount of time permitted without receiving a STATUS ENQUIRY message from the User before Counting an Error.
DLCI window
The Data Link Connection Identifier (DLCI) provides each PVC with a unique identifier at both the access
server and the Frame Relay switch. Within each link (DLMI) there can be multiple Permanent Virtual Circuits
(PVC). Each of these PVCs are point-to-point links to remote locations, and define the data path between the
access server and the Frame Relay network.
Within each DLMI are one or more Data Link Channel Identifier (DLCIs). This is the identification of a PVC
within the Frame Relay link.
There will be at least one PVC automatically installed. This is the management DLCI or LMI. This DLCI,
often DLCI 0, is the communication channel between the access server and the Frame Relay network switch.
This management channel communicates configuration and health information of the Frame Relay link. See
figure 72.
Figure 72. DLMI—Configuration View window
DLCI window
176
Access Server Administrators’ Reference Guide
14 • Frame Relay
DLCI (frCircuitDlci)
The Data Link Connection Identifier (DLCI) for this virtual circuit.
Note
DLCIs can automatically appear if your Frame Relay Service provider has
already configured your link. In this case, all you will need to enter is the IP
address of the router at the far end of the link.
Interface # (FrameIPInterfaceNum)
The interface number assigned to a DLCI. This is a variable number which is assigned from a resource pool
within the access server.
State (frCircuitState)
This is the state of the interface with the following definitions:
• invalid(1)—Use this setting to delete DLCI’s on your access server’s configuration view. To delete a DLCI,
simply set the state to invalid(1) and Submit Query. Note: A deleted DLCI will reappear if your service provider’s Frame Relay switch is still configured to recognize that DLCI. This occurs after a Frame Relay Full
Status Enquiry.
• active(2)—The link is up and passing data. This is the desired condition of the link.
• invalid(3)—The link is down and not passing data. Reasons for this may be your service provider hasn’t
enabled your service or the link is not yet connected to your access server.
• needIPaddr(4)—This is when the IP address needs to be entered for this DLCI.
• wait4peer(5)—In this state, the Link is waiting for the far end to synchronize.
Committed Burst (bits) (frCircuitCommitedBurst)
This specifies the committed data rate for the link in bits-per-second.
Excess Burst (bits) (frCircuitExcessBurst)
This specifies the excess data rate for the link in bits-per-second.
Throughput (bits) (frCircuitThroughput)
This specifies the throughput for the link in bits-per-second.
IP Address (FrameIPAddr)
As all of the interfaces on the access server run in un-numbered mode, the IP address to enter is that of the far
end router. This is not the IP address of the access server. After the IP address is entered, it will appear as a
point-to-point link in the IP routing table with this address.
Congestion (frameEnableCongestion)
This option enables or disables congestion tracking.
• enable(0)—Enables Congestion tracking
• disable(1)—Disables Congestion tracking
DLCI window
177
Chapter 15 Interfaces
Chapter contents
Introduction ........................................................................................................................................................179
Interfaces main window.......................................................................................................................................179
Number (ifIndex) .........................................................................................................................................179
Type (ifType) ................................................................................................................................................180
Admin Stat (ifAdminStatus) ..........................................................................................................................180
Operational Status (ifOperStatus) .................................................................................................................180
Interface Details ..................................................................................................................................................181
Description (ifDescr) ....................................................................................................................................181
Type (ifType) ................................................................................................................................................181
Max Transfer Unit (ifMTU) .........................................................................................................................182
Speed (ifSpeed) .............................................................................................................................................182
Physical Address (ifPhysAddress) ...................................................................................................................182
Admin Stat (ifAdminStatus) ..........................................................................................................................182
Operational Status (ifOperStatus) .................................................................................................................182
Last Change (ifLastChange) ..........................................................................................................................182
Received Octets (ifInOctets) .........................................................................................................................182
Received Unicast Packets (ifUcastPkts) .........................................................................................................182
Received Non-Unicast Packets (ifNUcastPkts) ..............................................................................................182
Received and Discarded w/No Errs (ifInDiscards) ........................................................................................183
Received Errored Packets (ifInErrors) ...........................................................................................................183
Received w/Unknown Protocol (ifInUnknownProtos) ..................................................................................183
Transmitted Octets (ifOutOctets) .................................................................................................................183
Requested Unicast Packets (ifOutUcastPkts) ................................................................................................183
Requested Non-Unicast Packets (ifOutNUcastPkts) .....................................................................................183
Requested and Discarded w/No Errs (ifOutDiscards) ...................................................................................183
Requested Errored Packets (ifOutErrors) ......................................................................................................183
Output Packet Queue Length (ifOutQLen) ..................................................................................................183
178
Access Server Administrators’ Reference Guide
15 • Interfaces
Introduction
The Interfaces window (see figure 73) shows the quantity of incoming and outgoing traffic, as well as errors
that cause frames to be discarded for each of the local interfaces. The statistics listed on the access server Interfaces page comprise those contained in RFC 1213—Management Information Base for Network Management of
TCP/IP-based internets: MIB-II. Frames are counted when they arrive on the network. Some frames are then
discarded during error screening. The remaining frames are delivered to the appropriate higher layer or sublayer. Implementation of the Interfaces group is mandatory for all systems.
Figure 73. Interfaces main window
Click on Interfaces under the Configuration Menu to monitor interfaces statistics.
Interfaces main window
This section explains the meaning of the other items contained in the main window.
Click on the Details link to monitor the status of each connected interfaces (see “Interface Details” on
page 181).
The Interfaces main window displays the total number (ifNumber) of network interfaces (regardless of their
current state) present on this system.
Number (ifIndex)
A unique number for each interface that ranges between 1 and the value of ifNumber. The value for each interface must remain constant at least from one re-initialization of the entity’s network management system to the
next re-initialization. Many MIB tables refer back to the interfaces table.
Introduction
179
Access Server Administrators’ Reference Guide
15 • Interfaces
Type (ifType)
The type of interface, distinguished according to the physical/link protocol(s) immediately “below” the network layer in the protocol stack. The following valid interface options are available:
• other(1)
• ethernet-csmacd(6)
• iso88023-csmacd(7)
• ds1(18)
• e1(19)
• basicISDN(20)
• primaryISDN(21)
• ppp(23)
• softwareLoopback(24)
• slip(28)
• frame-relay(32)
Admin Stat (ifAdminStatus)
The desired state of the interface.
• up(1)—The selected interface is ready to pass frames
• down(2)—The selected interface is not ready to pass frames
• testing(3)—The selected interface is being tested. No operational frames may be passed in this mode.
Operational Status (ifOperStatus)
The current operational state of the interface.
• up(1)—The selected interface is ready to pass frames.
• down(2)—The selected interface is not ready to pass frames.
• testing(3)—The selected interface is being tested. No operational frames may be passed in this mode.
Interfaces main window
180
Access Server Administrators’ Reference Guide
15 • Interfaces
Interface Details
When you click on a Details link, the type and description of the interface, speed, status, maximum size of protocol data units (PDUs), and physical address display (see figure 74). The SNMP variables for this table are referenced through the SNMP MIB interfaces table.
Figure 74. Interface Details window
Description (ifDescr)
A textual string containing information about the interface. This string should include the name of the manufacturer, the product name and the version of the hardware interface.
Type (ifType)
The type of interface, distinguished according to the physical/link protocol(s) immediately “below” the network layer in the protocol stack. The following interface types are available:
• other(1)
• ethernet-csmacd(6)
• iso88023-csmacd(7)
• ds1(18)
• e1(19)
• basicISDN(20)
• primaryISDN(21)
• ppp(23)
• softwareLoopback(24)
Interface Details
181
Access Server Administrators’ Reference Guide
15 • Interfaces
• slip(28)
• frame-relay(32)
Max Transfer Unit (ifMTU)
The size of the largest protocol data unit which can be sent/received on the interface, specified in octets. For
interfaces that are used for transmitting network protocol data units, this is the size of the largest network protocol data unit that can be sent on the interface.
Speed (ifSpeed)
An estimate of the interface’s current bandwidth in bits per second. For interfaces which do not vary in bandwidth or for those in which no accurate estimation can be made, this object should contain the nominal bandwidth.
Physical Address (ifPhysAddress)
This value is the MAC address of the Ethernet port.
Admin Stat (ifAdminStatus)
The desired state of the interface.
• up(1)—The selected interface is ready to pass frames.
• down(2)—The selected interface is not ready to pass frames.
• testing(3)—The selected interface is being tested. No operational frames may be passed in this mode.
Operational Status (ifOperStatus)
The current operational state of the interface.
• up(1)—The selected interface is ready to pass frames.
• down(2)—The selected interface is not ready to pass frames.
• testing(3)—The selected interface is being tested. No operational frames may be passed in this mode.
Last Change (ifLastChange)
The value of sysUpTime at the time the interface entered its current operational state. If the current state was
entered prior to the last re-initialization of the local network management subsystem, then this object will be
zero.
Received Octets (ifInOctets)
The number of octets received on the interface, including framing characters.
Received Unicast Packets (ifUcastPkts)
The number of subnetwork-unicast packets delivered to a higher layer protocol.
Received Non-Unicast Packets (ifNUcastPkts)
The number of non-unicast (that is, sub-network-broadcast or sub-network-multicast) packets delivered to a
higher layer protocol.
Interface Details
182
Access Server Administrators’ Reference Guide
15 • Interfaces
Received and Discarded w/No Errs (ifInDiscards)
The number of inbound packets which were chosen to be discarded even though no errors had been detected
to prevent their being deliverable to a higher layer protocol. One possible reason for discarding such a packet
could be to free up buffer space.
Received Errored Packets (ifInErrors)
The number of inbound packets that contained errors preventing them from being deliverable to a higher layer
protocol.
Received w/Unknown Protocol (ifInUnknownProtos)
The number of packets received via the interface which were discarded because of an unknown or unsupported
protocol.
Transmitted Octets (ifOutOctets)
The total number of octets transmitted out of the interface, including framing characters.
Requested Unicast Packets (ifOutUcastPkts)
The total number of packets that higher level protocols requested be transmitted to a subnetwork-unicast
address, including those that were discarded or not sent.
Requested Non-Unicast Packets (ifOutNUcastPkts)
The total number of packets that higher level protocols requested be transmitted to a non-unicast (that is, a
sub-network-broadcast or sub-network-multicast) address, including those that were discarded or not sent.
Requested and Discarded w/No Errs (ifOutDiscards)
The number of outbound packets which were chosen to be discarded even though no errors had been detected
to prevent their being transmitted. One possible reason for discarding such a packet could be to free up buffer
space.
Requested Errored Packets (ifOutErrors)
The number of outbound packets that could not be transmitted because of errors.
Output Packet Queue Length (ifOutQLen)
The length of the output packet queue (in packets).
Interface Details
183
Chapter 16 IP
Chapter contents
Introduction ........................................................................................................................................................187
IP main window ..................................................................................................................................................187
Forwarding (ipForwarding) ...........................................................................................................................188
Default Time-To-Live (ipDefaultTTL) .........................................................................................................188
Total Datagrams Received (ipInReceives) .....................................................................................................188
Discarded for Header Errors (ipInHdrErrors) ...............................................................................................188
Discarded for Address Errors (ipInAddrErrors) .............................................................................................188
Forwarded Datagrams (ipForwDatagrams) ...................................................................................................189
Discarded for Unknown Protos (ipInUnknownProtos) .................................................................................189
Discarded w/No Errors (ipInDiscards) ..........................................................................................................189
Total Deliveries (ipInDelivers) ......................................................................................................................189
Out Requests (ipOutRequests) ......................................................................................................................189
Out Discards (ipOutDiscards) ......................................................................................................................189
Discarded for No Routes (ipOutNoRoutes) ..................................................................................................189
Reassembly Timeout (ipReasmTimeout) ......................................................................................................189
# of Reassembled Fragments (ipReasmReqds) ...............................................................................................190
# Successfully Reassembled (ipReasmOKs) ...................................................................................................190
Reassembly Failures (ipReasmFails) ..............................................................................................................190
# Fragmented OK (ipFragOKs) ....................................................................................................................190
# Fragmented Failed (ipFragFails) .................................................................................................................190
# Fragments Created (ipFragCreates) ............................................................................................................190
# Valid but Discarded (ipRoutingDiscards) ..................................................................................................190
Modify ................................................................................................................................................................190
Forwarding (ipForwarding) ...........................................................................................................................190
Default Time-To-Live (ipDefaultTTL) .........................................................................................................191
TCP ....................................................................................................................................................................191
TCP main window .......................................................................................................................................191
Retransmit-Timeout Algorithm (tcpRtoAlgorithm) ................................................................................192
Retransmit-Timeout Minimum (tcpRtoMin) .........................................................................................192
Retransmit-Timeout Maximum (tcpRtoMax) .........................................................................................192
Maximum Connections (tcpMaxConn) ..................................................................................................192
Active Opens (tcpActiveOpens) ..............................................................................................................192
Passive Opens (tcpPassiveOpens) ............................................................................................................192
Attempt/Fails (tcpAttemptFails) ..............................................................................................................192
ESTABLISHED Resets (tcpEstabResets) ................................................................................................192
Current ESTABLISHED (tcpCurrEstab) ................................................................................................192
Total Received (tcpInSegs) ......................................................................................................................192
Total Sent (tcpOutSegs) ..........................................................................................................................192
Total Retransmitted (tcpRetransSegs) .....................................................................................................193
184
Access Server Administrators’ Reference Guide
16 • IP
Total Received in Error (tcpInErrs) .........................................................................................................193
Total Sent w/RST Flag (tcpOutRsts) ......................................................................................................193
TCP Details ..................................................................................................................................................193
Local Port (tcpConnLocalPort) ...............................................................................................................193
Remote Address (tcpConnRemAddress) ..................................................................................................193
Remote Port (tcpConnRemPort) ............................................................................................................193
State (tcpConnState) ...............................................................................................................................193
UDP....................................................................................................................................................................194
Handling of NETBIOS UDP Broadcasts (boxNetbiosUdpBridging) ............................................................195
Received (udpInDatagrams) ..........................................................................................................................195
Received With No Ports (udpNoPorts) .........................................................................................................195
Others Received with No Delivery (udpInErrors) .........................................................................................195
Sent (udpOutDatagrams) ..............................................................................................................................195
Listener Table (udpTable) .............................................................................................................................195
Local Address (udpLocalAddress) ..................................................................................................................195
Local Port (udpLocalPort) ............................................................................................................................195
ICMP..................................................................................................................................................................195
Block ICMP redirects (boxBLockIcmpRedirects) ..........................................................................................196
ICMP Receive/Send Messages window .........................................................................................................196
Total Received/Sent (icmpInMsgs, imcpOutMsgs) .................................................................................196
w/Errors (icmpInErrors, icmpOutErrors) ................................................................................................196
Destinations Unreachable (IcmpInDestUnreachs, IcmpOutDestUnreachs) ............................................197
Times Exceeded (icmpInTimeExcds, icmpOutTimeExcds) ....................................................................197
Parameter Problems (icmpInParmProbs, icmpOutParmProbs) ...............................................................197
Source Quenchs (icmpInSrcQuenchs, icmpOutSrcQuenchs) ..................................................................197
Redirects (icmpInRedirects, icmpOutRedirects) ......................................................................................197
Echos (icmpInEchos, icmpOutEchos) .....................................................................................................197
Echo Replys (icmpInReps, icmpOutReps) ..............................................................................................198
Time Stamps (icmpInTimestamps, icmpInTimestamps) .........................................................................198
Time Stamp Replys (icmpInTimestampsReps) (icmpOutTimestampsReps) ...........................................198
Address Mask Requests (icmpInAddrMasks) (icmpOutAddrMasks) .......................................................198
Address Mask Replys (icmpInAddrMasksReps) (icmpOutAddrMasksReps) ............................................198
Addressing Information .......................................................................................................................................198
IP addressing Information Details .................................................................................................................198
Entry Interface Index (ipAdEntIfIndex) ..................................................................................................199
Entry Subnet Mask (ipAdEntNetMask) ..................................................................................................199
Entry Broadcast Address (ipAdEntBcastAddr) .........................................................................................199
Entry Reassembly Maximum Size (ipAdEntReasmMaxSize) ...................................................................199
Routing Information ...........................................................................................................................................199
Destination (ipRouteDest) ............................................................................................................................200
Mask (ipRouteMask) ....................................................................................................................................200
Gateway (RouteGateway) .............................................................................................................................201
Cost (RouteCost) ..........................................................................................................................................201
Interface (ipRouteIfIndex) ............................................................................................................................201
185
Access Server Administrators’ Reference Guide
16 • IP
State (RouteState) .........................................................................................................................................201
Add a route: ..................................................................................................................................................201
Adding the default gateway .....................................................................................................................201
Adding a point-to-point route .................................................................................................................202
Adding a static point-to-point route to a remote host ..............................................................................202
Adding a static routes to a remote network ..............................................................................................202
Advanced… ..................................................................................................................................................203
O/S forwarding table window..............................................................................................................................203
Destination (ipRouteDest) ............................................................................................................................203
Mask (ipRouteMask) ....................................................................................................................................203
Next Hop (ipRouteNextHop) .......................................................................................................................204
Interface (ipRouteIfIndex) ............................................................................................................................204
Type (ipRouteType) .....................................................................................................................................204
Protocol (ipRouteProto) ...............................................................................................................................204
Info (ipRouteInfo) ........................................................................................................................................205
IP Routing Destination window ..........................................................................................................................205
Route Destination (ipRouteDest) .................................................................................................................205
Mask (ipRouteMask) ....................................................................................................................................205
Interface (ipRouteIfIndex) ............................................................................................................................205
Protocol (ipRouteProto) ...............................................................................................................................205
Seconds Since Updated (ipRouteAge) ...........................................................................................................206
Tag (RouteTag) ............................................................................................................................................206
Gateway (RouteGateway) .............................................................................................................................206
Cost (RouteCost) ..........................................................................................................................................206
State (RouteState) .........................................................................................................................................206
Address Translation Information .........................................................................................................................206
Interface (ipNetToMediaEntry) ....................................................................................................................207
Net Address (ipNetToMediaNetAddress) .....................................................................................................207
Physical (ipNetToMediaPhysAddress) ..........................................................................................................207
Type (ipNetToMediaType) ..........................................................................................................................207
186
Access Server Administrators’ Reference Guide
16 • IP
Introduction
The IP (Internet Protocol) window lists IP configuration statistics and parameters, and enables you to modify
IP settings.
All items described in this chapter are defined in RFC 1213: Management Information Base for Network Management of TCP/IP-based internets: MIB-II. As specified in the RFC, implementation of the IP, TCP, UDP, and
ICMP MIB groups are required for all TCP/IP networks.
Figure 75. IP main window
Click on IP under the Configuration Menu to display the IP window.
IP main window
The IP main window contains basic IP configuration parameters and statistics, and it has the following links to
windows that will enable you to modify IP parameters and view IP statistics:
• TCP—Displays information about the TCP protocol such as TCP segments received and sent, and remote
and local TCP connections. (See “TCP” on page 191.)
• UDP—Displays information about the UDP protocol such as the number of UDP datagrams sent and
received. (See “UDP” on page 194.)
• ICMP—Displays information about the ICMP protocol such as the number of echo replies sent. (See
“ICMP” on page 195.)
Introduction
187
Access Server Administrators’ Reference Guide
16 • IP
• Modify—This window is where you can modify forwarding and time-to-live settings (see “Modify” on
page 190).
• Addressing Info—This window (see “Addressing Information” on page 198) displays IP addressing details
for the default address for outgoing IP datagrams, the local or loopback address of the box and the IP
address of the box as defined in 20, “System” on page 230.
• Routing Info—This window displays routing information for routing IP datagrams (the IP address, subnet
mask, next hop router, and interface for each network interface defined in the box) (see “Routing Information” on page 199).
• Address Translation Info—The IP address translation table contains the IP address to physical address
equivalences (see “Address Translation Information” on page 206).
Forwarding (ipForwarding)
The indication of whether this entity is acting as an IP gateway in respect to the forwarding of datagrams
received by, but not addressed to, this entity. IP gateways forward datagrams, IP hosts do not (except those
source-routed via the host).
Note
For some managed nodes, this object may take on only a subset of the values
possible. Accordingly, it is appropriate for an agent to return a “badValue”
response if a management station attempts to change this object to an inappropriate value.
The following conditions can be displayed:
• forwarding(1)—acting as a gateway
• not-forwarding(2)—not acting as a gateway; in this condition, packets will not be forwarded to dial-in users
Default Time-To-Live (ipDefaultTTL)
The default value inserted into the time-to-live field of the IP header of datagrams originated at this entity,
whenever a TTL value is not supplied by the transport layer protocol.
Total Datagrams Received (ipInReceives)
The total number of input datagrams received from interfaces, including those received in error.
Discarded for Header Errors (ipInHdrErrors)
The number of input datagrams discarded due to errors in their IP headers, including bad checksums, version
number mismatch, other format errors, time-to-live exceeded, errors discovered in processing their IP options,
and so on.
Discarded for Address Errors (ipInAddrErrors)
The number of input datagrams discarded because the IP address in their IP header’s destination field was not
a valid address to be received at this entity. This count includes invalid addresses (e.g., 0.0.0.0) and addresses of
unsupported Classes (e.g., Class E). For entities which are not IP Gateways and therefore do not forward datagrams, this counter includes datagrams discarded because the destination address was not a local address.
IP main window
188
Access Server Administrators’ Reference Guide
16 • IP
Forwarded Datagrams (ipForwDatagrams)
The number of input datagrams for which this entity was not their final IP destination, as a result of which an
attempt was made to find a route to forward them to that final destination. In entities which do not act as IP
Gateways, this counter will include only those packets which were source-routed via this entity, and the sourceroute option processing was successful.
Discarded for Unknown Protos (ipInUnknownProtos)
The number of locally-addressed datagrams received successfully but discarded because of an unknown or
unsupported protocol.
Discarded w/No Errors (ipInDiscards)
The number of input IP datagrams for which no problems were encountered to prevent their continued processing, but which were discarded (for example, due to lack of buffer space).
Note
The Discarded w/No Errors counter does not include any datagrams discarded while awaiting re-assembly.
Total Deliveries (ipInDelivers)
The total number of input datagrams successfully delivered to IP user-protocols (including ICMP).
Out Requests (ipOutRequests)
The total number of IP datagrams which local IP user-protocols (including ICMP) supplied to IP in requests
for transmission.
Note
The Out Requests counter does not include any datagrams counted in
ipForwDatagrams.
Out Discards (ipOutDiscards)
The number of output IP datagrams for which no problem was encountered to prevent their transmission to
their destination, but which were discarded (e.g., for lack of buffer space).
Note
The Out Discards counter would include datagrams counted in ipForwDatagrams if any such packets met this (discretionary) discard criterion.
Discarded for No Routes (ipOutNoRoutes)
The number of IP datagrams discarded because no route could be found to transmit them to their destination.
Note
The Discarded for No Routes counter includes any packets counted in
ipForwDatagrams which meet this “no-route” criterion. This includes any
datagrams which a host cannot route because all of its default gateways are
down.
Reassembly Timeout (ipReasmTimeout)
The maximum number of seconds which received fragments are held while they are awaiting reassembly at
this entity.
IP main window
189
Access Server Administrators’ Reference Guide
16 • IP
# of Reassembled Fragments (ipReasmReqds)
The number of IP fragments received which needed to be reassembled at this entity.
# Successfully Reassembled (ipReasmOKs)
The number of IP datagrams successfully reassembled.
Reassembly Failures (ipReasmFails)
The number of failures detected by the IP reassembly algorithm (for whatever reason: timed out, errors, etc.).
Note
The Reassembly Failures value is not necessarily a count of discarded IP fragments since some algorithms (notably the algorithm in RFC 815) can lose
track of the number of fragments by combining them as they are received.
# Fragmented OK (ipFragOKs)
The number of IP datagrams that have been successfully fragmented at this entity.
# Fragmented Failed (ipFragFails)
The number of IP datagrams that have been discarded because they required fragmenting at this entity, but
were not fragmented because their Don’t Fragment option was set.
# Fragments Created (ipFragCreates)
The number of IP datagram fragments that have been generated at this entity.
# Valid but Discarded (ipRoutingDiscards)
The number of routing entries which were chosen to be discarded even though they are valid. One possible
reason for discarding such an entry could be to make more buffer space available for other routing entries.
Modify
The Modify IP configuration window (see figure 76) is where you can change IP forwarding and time-to-live
settings.
Figure 76. IP configurations modification window
Forwarding (ipForwarding)
Determines whether this entity is acting as an IP gateway that will forward datagrams received by—but not
addressed to—this entity. IP gateways forward datagrams, IP hosts do not (except those source-routed via the host).
Modify
190
Access Server Administrators’ Reference Guide
Note
16 • IP
For some managed nodes, this object may take on only a subset of the values
possible. Accordingly, it is appropriate for an agent to return a "badValue"
response if a management station attempts to change this object to an inappropriate value.
The following options are available:
• forwarding(1)—acting as a gateway
• not-forwarding(2)—not acting as a gateway
Note
Setting forwarding to not-forwarding will prevent the access server from forwarding packets to dial-in users.
Default Time-To-Live (ipDefaultTTL)
The default value inserted into the Time-To-Live (TTL) field in the IP header of datagrams originating from this
entity, whenever a TTL value is not already supplied by the transport layer protocol.
TCP
Transmission Control Protocol (TCP) is the most widely used protocol among the TCP/IP suite. The access
server provides management and statistical information on TCP.
Click on TCP under the Configuration Menu to display the TCP main window (see figure 77).
Figure 77. TCP main window
TCP main window
The TCP main window contains the Details… link that displays port details for remote and local TCP connections (see “TCP Details” on page 193), and TCP statistics.
TCP
191
Access Server Administrators’ Reference Guide
16 • IP
Retransmit-Timeout Algorithm (tcpRtoAlgorithm)
The algorithm that determines the timeout value used for retransmitting unacknowledged octets.
Retransmit-Timeout Minimum (tcpRtoMin)
The minimum value permitted by a TCP implementation for the retransmission timeout, measured in milliseconds. More refined semantics for objects of this type depend upon the algorithm used to determine the
retransmission timeout. In particular, when the timeout algorithm is rsre(3), an object of this type has the
semantics of the LBOUND quantity described in RFC 793.
Retransmit-Timeout Maximum (tcpRtoMax)
The maximum value permitted by a TCP implementation for the retransmission timeout, measured in milliseconds. More refined semantics for objects of this type depend upon the algorithm used to determine the
retransmission timeout. In particular, when the timeout algorithm is rsre(3), an object of this type has the
semantics of the UBOUND quantity described in RFC 793.
Maximum Connections (tcpMaxConn)
The limit on the total number of TCP connections the entity can support. In entities where the maximum
number of connections is dynamic, this object should contain the value -1.
Active Opens (tcpActiveOpens)
The number of times TCP connections have made a direct transition to the SYN-SENT state from the
CLOSED state.
Passive Opens (tcpPassiveOpens)
The number of times TCP connections have made a direct transition to the SYN-RCVD state from the LISTEN state.
Attempt/Fails (tcpAttemptFails)
The number of times TCP connections have made a direct transition to the CLOSED state from either the
SYN-SENT state or the SYN-RCVD state, plus the number of times TCP connections have made a direct
transition to the LISTEN state from the SYN-RCVD state.
ESTABLISHED Resets (tcpEstabResets)
The number of times TCP connections have made a direct transition to the CLOSED state from either the
ESTABLISHED state or the CLOSE-WAIT state.
Current ESTABLISHED (tcpCurrEstab)
The number of TCP connections for which the current state is either ESTABLISHED or CLOSE-WAIT.
Total Received (tcpInSegs)
The total number of segments received, including those received in error. This count includes segments
received on currently established connections.
Total Sent (tcpOutSegs)
The total number of segments sent, including those on current connections but excluding those containing
only retransmitted octets.
TCP
192
Access Server Administrators’ Reference Guide
16 • IP
Total Retransmitted (tcpRetransSegs)
The total number of segments retransmitted—that is, the number of TCP segments transmitted containing
one or more previously transmitted octets.
Total Received in Error (tcpInErrs)
The total number of segments received in error (e.g., bad TCP checksums).
Total Sent w/RST Flag (tcpOutRsts)
The number of TCP segments sent containing the RST flag.
TCP Details
From this screen you can view port details for remote and local TCP connections (see figure 78). You must
enable the Facility Data Link (FDL) object in the T1/E1 Link section to read remote TCP port connections.
To reach this screen, click on the Details link from the TCP main window.
Figure 78. TCP Details window
Local Port (tcpConnLocalPort)
The local port number for this TCP connection.
Remote Address (tcpConnRemAddress)
The remote IP address for this TCP connection.
Remote Port (tcpConnRemPort)
The remote port number for this TCP connection.
State (tcpConnState)
The state of this TCP connection. The only value which may be set by a management station is
deleteTCB(12). Accordingly, it is appropriate for an agent to return a ‘badValue’ response if a management station attempts to set this object to any other value. If a management station sets this object to the value
TCP
193
Access Server Administrators’ Reference Guide
16 • IP
deleteTCB(12), then this has the effect of deleting the TCB (as defined in RFC 793) of the corresponding connection on the managed node, resulting in immediate termination of the connection.
• closed(1)—Connection closed
• listen(2)—The access server is listening for connections
• synSent(3)—Waiting for a matching connection request after having sent a connection request
• synReceived(4)—Waiting for a confirming connection request acknowledgement after having both received
and sent a connection request
• established(5)—The link is open, data can be transferred
• finWait1(6)—Waiting for a connection termination request from the remote TCP or an acknowledgement
of the connection termination request previously sent
• finWait2(7)—Waiting for a connection termination request from the remote TCP
• closeWait(8)—Waiting for a connection termination request from the local user
• lastAck(9)—Waiting for an acknowledgement of the connection termination request previously sent to the
remote TCP
• closing(10)—Waiting for a connection termination request acknowledgement from the remote TCP
• timeWait(11)—Waiting for enough time to pass to be sure the remote TCP received the acknowledgement
of its connection termination request
• deleteTCB(12)—Delete connection immediately
UDP
User Datagram Protocol (UDP) is supported by the access server. To manage and collect statistics on UDP,
click on UDP under the Configuration Menu to display the UDP window (see figure 79).
Figure 79. UDP window
UDP
194
Access Server Administrators’ Reference Guide
16 • IP
Handling of NETBIOS UDP Broadcasts (boxNetbiosUdpBridging)
Enables the passing of broadcast UDP packets with a port of 137 and 138 from other interfaces to the local
LAN interface. Netbios uses these packets to communicate with WINS servers. A WINS server can work without this option enabled, but the remote PC will appear to be on the LAN. The following options are available:
• doNotPassNetbiosBroadcasts(0)
• passNetbiosBroadcasts(1)
Received (udpInDatagrams)
The total number of UDP datagrams delivered to UDP users.
Received With No Ports (udpNoPorts)
The total number of received UDP datagrams for which there was no application at the destination port.
Others Received with No Delivery (udpInErrors)
The number of received UDP datagrams that could not be delivered for reasons other than the lack of an
application at the destination port.
Sent (udpOutDatagrams)
The total number of UDP datagrams sent from this entity.
Listener Table (udpTable)
A table containing UDP listener information.
Local Address (udpLocalAddress)
The local IP address for this UDP listener. In the case of a UDP listener that is willing to accept datagrams for
any IP interface associated with the node, the value 0.0.0.0 is used.
Local Port (udpLocalPort)
The local port number for this UDP listener.
ICMP
Under normal circumstances, IP makes very efficient use of system resources. However errors, congestion and
system malfunctions occur periodically. ICMP (Internet Control Message Protocol) assists network managers
with IP routing by sending control and error reporting messages between IP hosts.
ICMP
195
Access Server Administrators’ Reference Guide
16 • IP
Figure 80. ICMP window
Click on ICMP under the Configuration Menu to monitor access server ICMP statistics (see figure 80).
Block ICMP redirects (boxBLockIcmpRedirects)
Enables you to configure how the access server handles ICMP redirects. Enabling the access server to receive
redirected messages is generally considered a security breach.
The following options are available:
• allowredirects(0)
• stopredirects(1)
ICMP Receive/Send Messages window
The ICMP window displays the ICMP message counters. ICMP messages are displayed in the window as columns comprising two types of messages:
• Messages received by the access server (InMibVariable)
• Messages sent by the access server (OutMibVariable)
The numbers following the parameters can be a good source of what is happening on the network to point out
potential problems. Both gateways (routers) and hosts can send ICMP messages.
Total Received/Sent (icmpInMsgs, imcpOutMsgs)
The number of ICMP messages the access server has received/sent. This number also includes ICMP messages
received/sent which have ICMP specific errors.
w/Errors (icmpInErrors, icmpOutErrors)
The number of ICMP messages which the access server has received/sent but are deemed to be faulty (for
example, bad ICMP checksums, bad length, or non-routable errors).
ICMP
196
Access Server Administrators’ Reference Guide
16 • IP
Destinations Unreachable (IcmpInDestUnreachs, IcmpOutDestUnreachs)
The number of ICMP destination unreachable messages received/sent. For instance, if the information in a
gateway’s routing table determines that the network specified in a packet is unreachable, the gateway will send
back an ICMP message stating that the network is unreachable. The following conditions will send back an
unreachable message:
• The network is unreachable.
• The host is unreachable.
• The protocol is not available to the network.
• The port on the host is unavailable. A specified source route failed.
• A packet must be fragmented (that is, broken up into two or more packets) before being sent to the next
hop, but the packet was sent anyway with instructions not to be fragmented.
Times Exceeded (icmpInTimeExcds, icmpOutTimeExcds)
The number of ICMP time exceeded messages received/sent. Each time a packet passes through a gateway, that
gateway reduces the time-to-live (TTL) field by one. The default starting number is defined under the IP section. If the gateway processing a packet finds that the TTL field is zero it will discard the packet and send the
ICMP time exceeded message. Time exceeded will also be incremented when a host which is reassembling a
fragmented packet cannot complete the reassembly due to missing packets within its time limit. In this case,
ICMP will discard the packet and send the time exceeded message.
Parameter Problems (icmpInParmProbs, icmpOutParmProbs)
The number of ICMP parameter problem messages received/sent. If while processing a packet, a gateway or
host finds a problem with one or more of the IP header parameters which prohibits further processing, the
gateway or host will discard the packet and return an ICMP parameter problem message. One potential source
of this problem may be with incorrect or invalid arguments in an option. ICMP sends the parameter problems
message if the gateway or host has discarded the whole packet.
Source Quenchs (icmpInSrcQuenchs, icmpOutSrcQuenchs)
The number of ICMP source quench messages received/sent. A gateway will discard packets if it cannot allocate the resources, such as buffer space, to process the packet. If a gateway discards the packet, it will send an
ICMP source quench message back to the sending device. A host may send this messages if packets arrive too
fast to be processed or if there is network congestion. The source quench message is a request to reduce the rate
at which the source is sending traffic. If the access server receives a source quench, it will wait for acknowledgment of all outstanding packets before sending more packets to the remote destination. Then it will begin
sending out packets at an increasing rate until the connection is restored to standard operating conditions.
Redirects (icmpInRedirects, icmpOutRedirects)
The number of ICMP redirect messages received/sent. A gateway sends a redirect message to a host if the network gateways find a shorter route to the destination through another gateway.
Echos (icmpInEchos, icmpOutEchos)
The number of ICMP echo request messages received/send. The ICMP echo is used whenever one uses the diagnostic tool ping. Ping is used to test connectivity with a remote host by sending regular ICMP echo request packets and then waiting for a reply. Received echos (icmpInEchos) will increment when the access server is pinged.
ICMP
197
Access Server Administrators’ Reference Guide
16 • IP
Echo Replys (icmpInReps, icmpOutReps)
The number of ICMP echo reply messages received/sent. An echo reply is a response to an echo request. Send
echos (icmpOutEchos) will increment when the access server is pinged.
Time Stamps (icmpInTimestamps, icmpInTimestamps)
The number of ICMP time stamp messages received/sent. Time stamp and time stamp replies were originally
designed into the ICMP facility to allow network clock synchronization. Subsequently, a new protocol—Network time protocol (NTP) has taken over this function. Normally, this number will be zero.
Time Stamp Replys (icmpInTimestampsReps) (icmpOutTimestampsReps)
The number of ICMP timestamp reply messages received/sent. This message is part of a time stamp (see “Time
Stamps (icmpInTimestamps, icmpInTimestamps)”) request. Normally, this number will be zero.
Address Mask Requests (icmpInAddrMasks) (icmpOutAddrMasks)
The number of ICMP address mask request messages received/sent. this message is generally used for diskless
workstations which use this request at boot time to obtain their subnet mask. This number will increase if there
are hosts on the network which broadcast these requests.
Address Mask Replys (icmpInAddrMasksReps) (icmpOutAddrMasksReps)
The number of ICMP address mask reply messages received/sent. Normally, this number will be zero.
Addressing Information
The IP addressing Information window (see figure 81) is where you can view the default address for outgoing IP
datagrams, the local or loopback address of the box, and the IP address of the box as defined in 20, “System” on page
230.
Figure 81. IP addressing Information window
Click on the Details link to display IP address Table entries for each defined network interface (see “IP addressing Information Details”.
IP addressing Information Details
This window (see figure 82) shows IP address Table entries for each defined network interface.
Addressing Information
198
Access Server Administrators’ Reference Guide
16 • IP
Figure 82. IP addressing Details window
Entry Interface Index (ipAdEntIfIndex)
The index value that identifies the interface to which this entry applies.
Entry Subnet Mask (ipAdEntNetMask)
The subnet mask associated with the IP address of this entry. The value of the mask is an IP address with all the
network bits set to 1 and all the hosts bits set to 0.
Entry Broadcast Address (ipAdEntBcastAddr)
The value of the least-significant bit in the IP broadcast address used for sending datagrams on the interface
associated with the IP address of this entry. For example, when the Internet standard all-ones broadcast address
is used, the value will be 1. This value applies to both the subnet and network broadcast addresses used by the
entity on this interface.
Entry Reassembly Maximum Size (ipAdEntReasmMaxSize)
The size of the largest IP datagram which this entity can re-assemble from incoming IP fragmented datagrams
received on this interface.
Routing Information
The IP Routing Information window (see figure 83) displays information required to route IP datagrams,
including the IP address, subnet mask, next-hop router, and interface for each network interface defined in the
access server.
Routing Information
199
Access Server Administrators’ Reference Guide
16 • IP
Figure 83. IP Routing Information window
The IP Routing Information window also has a link to the O/S forwarding table where the forwarding parameters are displayed (“O/S forwarding table window” on page 203).
Destination (ipRouteDest)
The destination IP address of this route. An entry with a value of 0.0.0.0 is considered a default route. Multiple
routes to a single destination can appear in the table, but access to such multiple entries is dependent on the
table-access mechanisms defined by the network management protocol in use.
To view or modify next-hop routing information for each destination, click on a destination link in the Destination column. For more information about modifying next-hop routing information settings, refer to “IP
Routing Destination window” on page 205.
Mask (ipRouteMask)
Indicates the mask to be logical-ANDed with the destination address before being compared to the value in the
ipRouteDest field. For those systems that do not support arbitrary subnet masks, an agent constructs the value
of the ipRouteMask by determining whether the value of the corresponding ipRouteDest field belongs to a
Class A, B, or C network, and then using the appropriate mask from table 3.
Table 3. Masks
Mask
Routing Information
Network
255.0.0.0
class-A
255.255.0.0
class-B
200
Access Server Administrators’ Reference Guide
16 • IP
Table 3. Masks
Mask
Network
255.255.255.0
class-C
Gateway (RouteGateway)
Specifies the IP address to which the packets should be forwarded.
Cost (RouteCost)
This is the cost of the route as defined by RIP standards. Cost is sometimes considered to be number of hops.
A cost of 16 is considered to be infinite. A cost can be given to user-entered routes so their preference in relation to learned routes can be calculated.
Interface (ipRouteIfIndex)
The index value that identifies the local interface through which the next hop of this route should be reached.
The interface identified by a particular value of this index is the same interface as identified by the same value
of ifIndex.
State (RouteState)
• invalid(1)—This setting deletes the route.
• active(2)—A valid route is in use.
• nopath(3)—No route is available to the specified gateway. The gateway is not known to local networks.
• agedout(4)—Invalid route (soon to be removed).
• costly(5)—A valid route, but not in use because of it’s higher cost.
Add a route:
This portion of the IP Routing Information window is where you can add a new route to the IP Routing Information table. The first entry (see figure 84) can be used to add or change the default gateway or as a short-cut
to creating a point-to-point connection. The second entry under Add a route: (see figure 84) is where static
routes to remote networks or a specific remote host are created.
Figure 84. Add a route portion of IP Routing Information window
Adding the default gateway
Do the following:
Routing Information
201
Access Server Administrators’ Reference Guide
16 • IP
1. Type the IP address of the host that serves as a gateway for your local network in the Gateway column of
the first entry.
2. Click Add Route.
Adding a point-to-point route
Do the following:
1. Under Destination in the first entry, type the IP address of the remote host to which you want make a point-topoint connection.
2. Under Gateway, type the IP address of the host that will be forwarding packets to the IP address you
entered in the Destination field in step 1.
3. Click Add Route.
Note
The appropriate subnet mask (255.255.255.255) for a point-to-point route
will automatically be added for you.
Adding a static point-to-point route to a remote host
Do the following:
1. Under Destination in the second entry, type the IP address of the remote host to which you want to make a
point-to-point connection.
2. Type 255.255.255.255 for the subnet mask.
3. Under Gateway, type the IP address of the host that will be forwarding packets to the IP address you
entered in the Destination field in step 1.
4. Click Add Route.
Adding a static routes to a remote network
Do the following:
1. Under Destination, type the IP address of the remote network for which you want to provide a static route.
2. Type the appropriate subnet mask in the Mask field.
3. Under Gateway, type the IP address of the host that will be forwarding packets to the network you entered
in the Destination field in step 1.
4. Click Add Route.
Note
If the destination and subnet mask are incompatible or the Gateway address
is not entered an error screen will appear.
Examples of correct and incorrect routes are shown in table 4.
Table 4. Examples of IP routes
Examples of correct entries
Destination
Mask
Examples of incorrect entries
Destination
Mask
192.10.10.11 255.255.255.255 192.10.10.11 255.255.255.0
Routing Information
202
Access Server Administrators’ Reference Guide
16 • IP
Table 4. Examples of IP routes
Examples of correct entries
Examples of incorrect entries
192.10.10.0
255.255.255.0
178.3.4.32
255.255.255.224
178.3.4.16
255.255.255.240 178.3.4.16
255.255.255.224
Advanced…
Enables a route to be attached to an interface. Packets to a network will be routed to that interface, allowing
the gateway IP address to be dynamic.
O/S forwarding table window
The O/S forwarding table window lists forwarding information for all routes. Click on the O/S forwarding
table window link on the IP Routing Information page to display this page.
Figure 85. IP Routing Forwarding Table
Destination (ipRouteDest)
The destination IP address of this route. An entry with a value of 0.0.0.0 is considered a default route. Multiple
routes to a single destination can appear in the table, but access to such multiple entries is dependent on the
table-access mechanisms defined by the network management protocol in use.
Mask (ipRouteMask)
Indicates the mask to be logical-ANDed with the destination address before being compared to the value in the
ipRouteDest field. For those systems that do not support arbitrary subnet masks, an agent constructs the value
of the ipRouteMask by determining whether the value of the correspondent ipRouteDest field belongs to a
Class A, B, or C network, and then using the appropriate mask from Table 3 on page 200.
O/S forwarding table window
203
Access Server Administrators’ Reference Guide
16 • IP
Next Hop (ipRouteNextHop)
The IP address of the next hop of this route. (In the case of a route bound to an interface which is realized via
a broadcast media, the value of this field is the agent's IP address on that interface.)
Interface (ipRouteIfIndex)
The index value that identifies the local interface through which the next hop of this route should be reached.
The interface identified by a particular value of this index is the same interface as identified by the same value
of ifIndex.
Type (ipRouteType)
One of the following route types:
• other(1)—none of the following
• invalid(2)—an invalidated route
• direct(3)—route to directly connected (sub-)network
• indirect(4)—route to a non-local host/network/sub-network
Note
The values direct(3) and indirect(4) refer to the notion of direct and indirect
routing in the IP architecture.
Note
Setting this object to the value invalid(2) has the effect of invalidating the
corresponding entry in the ipRouteTable object. That is, it effectively disassociates the destination identified with said entry from the route identified
with said entry. It is an implementation-specific matter as to whether the
agent removes an invalidated entry from the table. Accordingly, management
stations must be prepared to receive tabular information from agents that
corresponds to entries not currently in use. Proper interpretation of such
entries requires examination of the relevant ipRouteType object.
Protocol (ipRouteProto)
The routing mechanism via which this route was learned. Inclusion of values for gateway routing protocols is
not intended to imply that hosts must support those protocols.
• unknown(0)
• local(1)—Added by the access server to support an interface. For example, adding a route for a new dial-in
user.
• user(2)—Added by an administrator on the IP Routing Information table or via SNMP management tools.
• dspf(3)—Not currently implemented.
• rip(4)—Learned via reception of RIP packet.
• icmp(5)—Learned via reception of ICMP packet.
• radius(6)—Provided in RADIUS response packet.
O/S forwarding table window
204
Access Server Administrators’ Reference Guide
16 • IP
Info (ipRouteInfo)
A reference to MIB definitions specific to the particular routing protocol which is responsible for this route, as
determined by the value specified in the route’s ipRouteProto value. If this information is not present, its value
should be set to the OBJECT IDENTIFIER { 0 0 }, which is a syntactically valid object identifier, and any
conformant implementation of ASN.1 and BER must be able to generate and recognize this value.
IP Routing Destination window
The IP Routing Destination window (see figure 86) shows next-hop routing information. Clicking on a Destination in the IP Routing Information window displays this window.
Figure 86. Routing Destination window
Route Destination (ipRouteDest)
The destination IP address of this route. An entry with a value of 0.0.0.0 is considered a default route. Multiple
routes to a single destination can appear in the table, but access to such multiple entries is dependent on the
table-access mechanisms defined by the network management protocol in use.
Mask (ipRouteMask)
Indicates the mask to be logical-ANDed with the destination address before being compared to the value in the
ipRouteDest field. For those systems that do not support arbitrary subnet masks, an agent constructs the value
of the ipRouteMask by determining whether the value of the corresponding ipRouteDest field belongs to a
Class A, B, or C network, and then using the appropriate mask from Table 3 on page 200.
Interface (ipRouteIfIndex)
The index value which uniquely identifies the local interface through which the next hop of this route should
be reached. The interface identified by a particular value of this index is the same interface as identified by the
same value of ifIndex.
Protocol (ipRouteProto)
The routing mechanism via which this route was learned. Inclusion of values for gateway routing protocols is
not intended to imply that hosts must support those protocols.
• unknown(0)
• local(1)—Added by the access server to support an interface. For example, adding a route for a new dial-in
user.
IP Routing Destination window
205
Access Server Administrators’ Reference Guide
16 • IP
• user(2)—Added by an administrator on the IP Routing Information table or via SNMP management tools.
• dspf(3)—Not currently implemented.
• rip(4)—Learned via reception of RIP packet.
• icmp(5)—Learned via reception of ICMP packet.
• radius(6)—Provided in RADIUS response packet.
Seconds Since Updated (ipRouteAge)
The number of seconds since this route was last updated or otherwise determined to be correct.
Tag (RouteTag)
An identifier associated with the route. This can have different meanings depending on the protocol. For example, this gives the tag that was passed with a learned RIP route.
Gateway (RouteGateway)
Specifies the IP address to which the packets should be forwarded.
Cost (RouteCost)
This is the cost of the route as defined by RIP standards. Cost is sometimes considered to be number of hops.
A cost of 16 is considered to be infinite. A cost can be given to user-entered routes so their preference in relation to learned routes can be calculated.
State (RouteState)
Defines the state which a route may be in during its lifetime.
• invalid(1)—This setting deletes the route.
• active(2)—A valid route is in use.
• nopath(3)—No route is available to the specified gateway. The gateway is not known to local networks.
• agedout(4)—Invalid route (soon to be removed).
• costly(5)—A valid route, but not in use because of it’s higher cost.
Address Translation Information
The IP address translation table window (see figure 87) contain the IP address to physical address equivalences.
Some interfaces do not use translation tables for determining address equivalences (for example, DDN-X.25
uses an algorithmic method)—if all interfaces are of this type, then the Address Translation table is empty (zero
entries).
Address Translation Information
206
Access Server Administrators’ Reference Guide
16 • IP
Figure 87. Address Translation Information window
Interface (ipNetToMediaEntry)
Each entry contains one IP address to physical address equivalence.
Net Address (ipNetToMediaNetAddress)
The IP address corresponding to the media-dependent physical address.
Physical (ipNetToMediaPhysAddress)
The media-dependent physical address.
Type (ipNetToMediaType)
The type of mapping. Setting this object to the value invalid(2) has the effect of invalidating the corresponding
entry in the ipNetToMediaTable. That is, it effectively disassociates the interface identified with said entry
from the mapping identified with said entry. It is an implementation-specific matter as to whether the agent
removes an invalidated entry from the table. Accordingly, management stations must be prepared to receive
tabular information from agents that corresponds to entries not currently in use. Proper interpretation of such
entries requires examination of the relevant ipNetToMediaType object.
• other(1)—none of the following
• invalid(2)—an invalidated mapping
• dynamic(3)—created by access server
• static(4)—created by administrator
Address Translation Information
207
Chapter 17 MFR Version 2
Chapter contents
Introduction ........................................................................................................................................................210
MFR Version 2 main window .............................................................................................................................210
Line Signalling ..............................................................................................................................................210
Country (lineSigCountry) .......................................................................................................................210
Idle Code (lineSigIdleCode) ....................................................................................................................211
Forward Seize (lineSigForwardSeize) .......................................................................................................211
Back Acknowledge (lineSigBackAck) .......................................................................................................211
Back Answer (lineSigBackAnswer) ..........................................................................................................211
Minimum Transition Time (lineSigMinTransTime) ..............................................................................211
Minimum Detection Time (lineSigMinDetectTime) ..............................................................................211
Protocol Timeout (lineSigProtoTimeout) ...............................................................................................211
Interregister Signalling.........................................................................................................................................211
Called Number .......................................................................................................................................211
Total Digits (interRegCalledNumDig).............................................................................................. 211
First and Middle Response Code (interRegCalledNumFirst)............................................................. 211
Last Response Code (interRegCalledNumLast) ................................................................................. 211
Calling Number ......................................................................................................................................211
Total Digits (interRegCallingNumDig) ............................................................................................ 211
First and Middle Response Code (interRegCallingNumFirst) ........................................................... 211
Last Response Code (interRegCallingNumLast)................................................................................ 211
Speech Condition Set-up (interRegGroupBAck ................................................................................ 211
MFR Version 2—Modify ....................................................................................................................................212
Line Signalling ..............................................................................................................................................212
Country (lineSigCountry) .......................................................................................................................213
Idle Code (lineSigIdleCode) ....................................................................................................................213
Forward Seize (lineSigForwardSeize) .......................................................................................................214
Back Acknowledge (lineSigBackAck) .......................................................................................................214
Back Answer (lineSigBackAnswer) ..........................................................................................................215
Minimum Transition Time (lineSigMinTransTime) ..............................................................................215
Minimum Detection Time (lineSigMinDetectTime) ..............................................................................215
Protocol Timeout (lineSigProtoTimeout) ...............................................................................................215
Interregister Signalling ..................................................................................................................................215
Called Number .......................................................................................................................................216
Total Digits (interRegCalledNumDig).............................................................................................. 216
First and Middle Response Code (interRegCalledNumFirst)............................................................. 216
Last Response Code (interRegCalledNumLast) ................................................................................. 216
Calling Number ......................................................................................................................................217
Total Digits (interRegCallingNumDig) ............................................................................................ 217
First and Middle Response Code (interRegCallingNumFirst) ........................................................... 217
208
Access Server Administrators’ Reference Guide
17 • MFR Version 2
Last Response Code (interRegCallingNumLast)................................................................................ 217
Speech Condition Set-up (interRegGroupBAck ................................................................................ 218
209
Access Server Administrators’ Reference Guide
17 • MFR Version 2
Introduction
The MFR Version 2 window (see figure 88) contains objects for networks that use Signalling System R2. (To
set up R2 Signalling in the access server, refer to Recommendations Q.400—Q.490 and to the host country’s
PTT for national signalling specifications).
Figure 88. MFR Version 2 main window
Click on MFR Version 2 under the Configuration Menu to display the MFR Version 2 main window.
MFR Version 2 main window
The MFR Version 2 window displays parameters for networks that use Signalling System R2. The MFR Version 2 window also has the Modify link that you can click to modify Line Signalling parameters (see “MFR
Version 2—Modify” on page 212).
Line Signalling
This portion of the MFR Version 2 main window contains information described in the following sections.
Country (lineSigCountry)
Displays a particular country or itu Standard. Custom allows for any values in the following fields (Line Signalling objects are country-specific. Please refer to the host country’s PTT for national signalling specifications).
Introduction
210
Access Server Administrators’ Reference Guide
17 • MFR Version 2
Idle Code (lineSigIdleCode)
Code to indicate that a line is in use.
Forward Seize (lineSigForwardSeize)
Code to indicate there is a desire to use a line.
Back Acknowledge (lineSigBackAck)
Code to indicate there is an agreement to use a line.
Back Answer (lineSigBackAnswer)
Code to indicate a call has been completed.
Minimum Transition Time (lineSigMinTransTime)
The minimum transition time in milliseconds.
Minimum Detection Time (lineSigMinDetectTime)
The minimum detect time in milliseconds.
Protocol Timeout (lineSigProtoTimeout)
The time for a protocol timeout in milliseconds.
Interregister Signalling
This portion of the MFR Version 2 main window contains information described in the following sections.
Called Number
Total Digits (interRegCalledNumDig). The number of digits expected for the called number.
First and Middle Response Code (interRegCalledNumFirst). The code specifying what is done after every
digit is sent except the last for the called number.
Last Response Code (interRegCalledNumLast). The code specifying what is done after the last digit is sent
for the called number.
Calling Number
Total Digits (interRegCallingNumDig). The number of digits expected for the calling number.
First and Middle Response Code (interRegCallingNumFirst). The code specifying what is done after every
digit is sent except the last for the calling number.
Last Response Code (interRegCallingNumLast). The code specifying what is done after the last digit is sent
for the calling number.
Speech Condition Set-up (interRegGroupBAck. The code sent when acknowledging the Group B digit to
set-up speech conditions.
Interregister Signalling
211
Access Server Administrators’ Reference Guide
17 • MFR Version 2
MFR Version 2—Modify
In the MFR Version 2 Modify window (see figure 89) you can modify Line Signalling parameters. The Line
Signalling parameters are link-by-link digital signals that use two signalling channels in each direction per circuit.
Figure 89. MFR Version 2 Modify window
Line Signalling
This portion of the MFR Version 2—Modify window contains information described in the following sections.
Set the access server objects based upon codes that pertain to Idle, Seized, Answered, Clear-back, Release, and
Blocked conditions.
Note
Line Signalling setup codes are country-specific. Please refer to Recommendation Q.400 -Q.490 and to the host country’s PTT for national signalling
specifications.
MFR Version 2—Modify
212
Access Server Administrators’ Reference Guide
17 • MFR Version 2
Country (lineSigCountry)
Specifying a particular country or itu Standard defines the values of the remaining fields based on the specs.
Custom allows for any values in the following fields (Line Signalling objects are country-specific. Please refer to
the host country’s PTT for national signalling specifications).
• ituStandard(1)
• custom(2)
• mexicoModified(3)
• czechRepublic(4)
• pbxDropOut(5)
• brazil(6)
• chinaRI(7)
• southAfrica(8)
• india(9)
Idle Code (lineSigIdleCode)
Code to indicate that a line is in use.
• abcd-0000(0)
• abcd-0001(1)
• abcd-0010(2)
• abcd-0011(3)
• abcd-0100(4)
• abcd-0101(5)
• abcd-0110(6)
• abcd-0111(7)
• abcd-1000(8)
• abcd-1001(9)
• abcd-1010(10)
• abcd-1011(11)
• abcd-1100(12)
• abcd-1101(13)
• abcd-1110(14)
• abcd-1111(15)
MFR Version 2—Modify
213
Access Server Administrators’ Reference Guide
17 • MFR Version 2
Forward Seize (lineSigForwardSeize)
Code to indicate there is a desire to use a line.
• abcd-0000(0)
• abcd-0001(1)
• abcd-0010(2)
• abcd-0011(3)
• abcd-0100(4)
• abcd-0101(5)
• abcd-0110(6)
• abcd-0111(7)
• abcd-1000(8)
• abcd-1001(9)
• abcd-1010(10)
• abcd-1011(11)
• abcd-1100(12)
• abcd-1101(13)
• abcd-1110(14)
• abcd-1111(15)
Back Acknowledge (lineSigBackAck)
Code to indicate there is an agreement to use a line.
• abcd-0000(0)
• abcd-0001(1)
• abcd-0010(2)
• abcd-0011(3)
• abcd-0100(4)
• abcd-0101(5)
• abcd-0110(6)
• abcd-0111(7)
• abcd-1000(8)
• abcd-1001(9)
• abcd-1010(10)
• abcd-1011(11)
MFR Version 2—Modify
214
Access Server Administrators’ Reference Guide
17 • MFR Version 2
• abcd-1100(12)
• abcd-1101(13)
• abcd-1110(14)
• abcd-1111(15)
Back Answer (lineSigBackAnswer)
Code to indicate a call has been completed.
• abcd-0000(0)
• abcd-0001(1)
• abcd-0010(2)
• abcd-0011(3)
• abcd-0100(4)
• abcd-0101(5)
• abcd-0110(6)
• abcd-0111(7)
• abcd-1000(8)
• abcd-1001(9)
• abcd-1010(10)
• abcd-1011(11)
• abcd-1100(12)
• abcd-1101(13)
• abcd-1110(14)
• abcd-1111(15)
Minimum Transition Time (lineSigMinTransTime)
The minimum transition time in milliseconds.
Minimum Detection Time (lineSigMinDetectTime)
The minimum detect time in milliseconds.
Protocol Timeout (lineSigProtoTimeout)
The time for a protocol timeout in milliseconds.
Interregister Signalling
The Interregister Signalling parameters are end-to-end 2-out-of-6 in-band code signals that use backward and
forward-compelled signalling. Set the access server objects based upon codes that pertain to Forward Line Signals, Forward Register Signals, Backward Line, and Backward Register Signals.
MFR Version 2—Modify
215
Access Server Administrators’ Reference Guide
Note
17 • MFR Version 2
Interregister Signalling setup codes are country-specific. Please refer to Recommendation Q.400 -Q.490 and to the host country’s PTT for national signalling specifications.
Called Number
Total Digits (interRegCalledNumDig). The number of digits expected for the called number.
First and Middle Response Code (interRegCalledNumFirst). The code specifying what is done after every
digit is sent except the last for the called number.
• a1(1)
• a2(2)
• a3(3)
• a4(4)
• a5(5)
• a6(6)
• a7(7)
• a8(8)
• a9(9)
• a10(10)
• a11(11)
• a12(12)
• a13(13)
• a14(14)
• a15(15)
Last Response Code (interRegCalledNumLast). The code specifying what is done after the last digit is sent
for the called number.
•
a1(1)
• a2(2)
• a3(3)
• a4(4)
• a5(5)
• a6(6)
• a7(7)
• a8(8)
• a9(9)
MFR Version 2—Modify
216
Access Server Administrators’ Reference Guide
17 • MFR Version 2
• a10(10)
• a11(11)
• a12(12)
• a13(13)
• a14(14)
• a15(15)
Calling Number
Total Digits (interRegCallingNumDig). The number of digits expected for the calling number. If an a15
tone will be sent after all the calling number digits are sent, set the total digits to a large number (for example,
30). The access server will send the last response code when it sees the a15 tone
First and Middle Response Code (interRegCallingNumFirst). The code specifying what is done after every
digit is sent except the last for the calling number.
• a1(1)
• a2(2)
• a3(3)
• a4(4)
• a5(5)
• a6(6)
• a7(7)
• a8(8)
• a9(9)
• a10(10)
• a11(11)
• a12(12)
• a13(13)
• a14(14)
• a15(15)
Last Response Code (interRegCallingNumLast). The code specifying what is done after the last digit is sent
for the calling number.
• a1(1)
• a2(2)
• a3(3)
• a4(4)
MFR Version 2—Modify
217
Access Server Administrators’ Reference Guide
17 • MFR Version 2
• a5(5)
• a6(6)
• a7(7)
• a8(8)
• a9(9)
• a10(10)
• a11(11)
• a12(12)
• a13(13)
• a14(14)
• a15(15)
Speech Condition Set-up (interRegGroupBAck. The code sent when acknowledging the Group B digit to
set-up speech conditions.
• b1(1)
• b6(6)
MFR Version 2—Modify
218
Chapter 18 RIP Version 2
Chapter contents
Introduction ........................................................................................................................................................220
RIP Version 2 main window ...............................................................................................................................220
Route Changes Made (rip2GlobalRouteChanges) .........................................................................................220
Responses Sent (rip2GlobalQueries) .............................................................................................................220
Address (rip2IfConfAddress) .........................................................................................................................220
Send (rip2IfConfSend) .................................................................................................................................220
Receive (rip2IfConfReceive) .........................................................................................................................221
Adding a RIP address ....................................................................................................................................221
RIP Version 2—Configuration............................................................................................................................222
Address (rip2IfConfAddress) .........................................................................................................................222
Domain (rip2IfConfDomain) .......................................................................................................................222
Authentication Type (rip2IfConfAuthType) .................................................................................................222
Authentication Key (rip2IfConfAuthKey) .....................................................................................................222
Send (rip2IfConfSend) .................................................................................................................................222
Receive (rip2IfConfReceive) .........................................................................................................................223
Metric (rip2IfConfDefaultMetric) ................................................................................................................223
Status (rip2IfConfStatus) ..............................................................................................................................223
RIP Version 2 (Statistics).....................................................................................................................................223
Subnet IP Address (rip2IfStatAddress) ..........................................................................................................223
Bad Packets (rip2IfStatRcvBadPackets) .........................................................................................................223
Bad Routes (rip2IfStatRcvBadRoutes) ..........................................................................................................223
Sent Updates (rip2IfStatSentUpdates) ...........................................................................................................224
Status (rip2IfStatStatus) ................................................................................................................................224
219
Access Server Administrators’ Reference Guide
18 • RIP Version 2
Introduction
The RIP Version 2 main window (see figure 90) describes routing information as defined by the Routing
Information Protocol (RIP). All object identifiers described in this chapter comply with those contained in
RFC 1389: RIP Version 2 MIB Extension.
\
Figure 90. RIP Version 2 window
Click on RIP Version 2 under the Configuration Menu to display the RIP Version 2 main window.
RIP Version 2 main window
The RIP Version 2 window describes routing information as defined by the Routing Information Protocol
(RIP). The window also contains the following links:
• Statistics (xxx.xx.xxx.xxx)—Clicking on the link under the Address column displays the RIP Version 2 Status window (see “RIP Version 2 (Statistics)” on page 223) where you can view routing and update information for each subnet address
• Address—Clicking on this link displays the RIP Version 2 Configuration window (see “RIP Version 2—
Configuration” on page 222). This window is where you can configure objects for each subnet address
including authentication method, RIP Version 1 or Version 2 compatibility, and metric value.
Route Changes Made (rip2GlobalRouteChanges)
The number of route changes made to the IP Route Database by RIP. This does not include the refresh of a
route's age.
Responses Sent (rip2GlobalQueries)
The number of responses sent to RIP queries from other systems.
Address (rip2IfConfAddress)
The IP address of the interface on the access server.
Send (rip2IfConfSend)
The types of RIP packets the router sends on this interface.
• doNotSend (1)
Introduction
220
Access Server Administrators’ Reference Guide
18 • RIP Version 2
• ripVersion1 (2)—Send RIP updates compliant with RFC 1058
• rip1Compatible (3)—Broadcast RIP-2 updates using RFC 1058 route subsumption rules
• ripVersion2 (4)—Send multicasting RIP-2 updates
Receive (rip2IfConfReceive)
This indicates which version of RIP updates are to be accepted. Note that rip2 and rip1OrRip2 implies reception of multicast packets.
• rip1 (1)—Accept RIP updates compliant with RFC 1058
• rip2 (2)—Accept multicasting RIP-2 updates
• rip1OrRip2 (3)—Accept both
• doNotRecieve (4)
Adding a RIP address
Do the following:
1. Enter the IP network address of the interface on the access server that you want to enable RIP. This is not
the IP address of the device you want to direct RIP packets to.
2. Enter the protocol version to be used for sending RIP packets. The following choices are available:
– doNotSend (1)
– ripVersion1 (2)—Broadcasting RIP updates compliant with RFC 1058
– rip1Compatible (3)—Broadcasting RIP-2 updates using RFC 1058 route subsumption rules
– ripVersion2 (4)—Multicasting RIP-2 updates
3. Enter the protocol version to be used for receiving RIP packets. The following choices are available (note
that rip2 and rip1OrRip2 implies reception of multicast packets):
– rip1 (1)—Accept RIP updates compliant with RFC 1058
– rip2(2)—Accept multicasting RIP-2 updates
– rip1Orrip2(3)—Accept both
– doNotReceive(4)
4. Click on Submit.
Further modifications can be made by clicking on the Address link of the specific subnet (see “RIP Version
2—Configuration”).
RIP Version 2 main window
221
Access Server Administrators’ Reference Guide
18 • RIP Version 2
RIP Version 2—Configuration
The RIP Version 2 Configuration window (see figure 91) shows objects for each subnet address including
authentication method, RIP Version 1 or Version 2 compatibility, and metric value.
Figure 91. RIP Version 2—Statistics Configuration window
Address (rip2IfConfAddress)
The IP address of the interface on the access server.
Domain (rip2IfConfDomain)
Value inserted into the Routing Domain field of all RIP packets sent on this interface.
Authentication Type (rip2IfConfAuthType)
The type of Authentication used on this interface.
• noAuthentication (1)
• simplePassword (2)
Authentication Key (rip2IfConfAuthKey)
The value to be used as the Authentication Key whenever the corresponding instance of rip2IfConfAuthType
has a value other than authentication. A modification of the corresponding instance of rip2IfConfAuthType
does not modify the rip2IfConfAuthKey value. If a string shorter than 16 octets is supplied, it will be left-justified and padded to 16 octets, on the right, with nulls (0x00).
Reading this object always results in an OCTET STRING of length zero; authentication may not be bypassed
by reading the MIB object.
Send (rip2IfConfSend)
The types of RIP packets the router sends on this interface.
• doNotSend (1)
• ripVersion1 (2)—Send RIP updates compliant with RFC 1058
• rip1Compatible (3)—Broadcast RIP-2 updates using RFC 1058 route subsumption rules
• ripVersion2 (4)—Send multicasting RIP-2 updates
RIP Version 2—Configuration
222
Access Server Administrators’ Reference Guide
18 • RIP Version 2
Receive (rip2IfConfReceive)
This indicates which version of RIP updates are to be accepted. Note that rip2 and rip1OrRip2 implies reception of multicast packets.
• rip1 (1)—Accept RIP updates compliant with RFC 1058
• rip2 (2)—Accept multicasting RIP-2 updates
• rip1OrRip2 (3)—Accept both
• doNotRecieve (4)
Metric (rip2IfConfDefaultMetric)
This variable indicates the metric that is to be used for the default route entry in RIP updates originated on this
interface. A value of zero indicates that no default route should be originated; in this case, a default route via
another router may be propagated.
Status (rip2IfConfStatus)
Choosing invalid has the effect of deleting this interface.
• valid (1)
• invalid (2)
RIP Version 2 (Statistics)
The RIP Version 2 Status window (see figure 92) displays routing and update information for each subnet
address.
Figure 92. RIP Version 2 details window
Subnet IP Address (rip2IfStatAddress)
The IP address of the interface on the access server.
Bad Packets (rip2IfStatRcvBadPackets)
The number of RIP response packets received by the RIP process which were subsequently discarded for any
reason (e.g. a version 0 packet, or an unknown command type).
Bad Routes (rip2IfStatRcvBadRoutes)
The number of routes, in valid RIP packets, which were ignored for any reason (e.g. unknown address family,
or invalid metric).
RIP Version 2 (Statistics)
223
Access Server Administrators’ Reference Guide
18 • RIP Version 2
Sent Updates (rip2IfStatSentUpdates)
The number of triggered RIP updates actually sent on this interface. This explicitly does NOT include full
updates sent containing new information.
Status (rip2IfStatStatus)
Indicates validity of this interface.
RIP Version 2 (Statistics)
224
Chapter 19 SNMP
Chapter contents
Introduction ........................................................................................................................................................226
SNMP window....................................................................................................................................................226
In ........................................................................................................................................................................227
Packets (snmpInPkts) ....................................................................................................................................227
Bad Version (snmpInBadVersions) ...............................................................................................................227
Bad Community Names (snmpInBadCommunityNames) ............................................................................227
Bad Community Uses (snmpInBadCommunity) ..........................................................................................227
ASN ParseErrors (snmpInASNParseErrs) ......................................................................................................227
Error Status “Too Big” (snmpInTooBigs) .....................................................................................................227
No Such Names (snmpInNoSuchNames) .....................................................................................................227
Bad Values (snmpInBadValues) ....................................................................................................................227
Error Status “Read Only” (snmpInReadOnlys) .............................................................................................227
Generated Errors (snmpInGenErrs) ..............................................................................................................227
Get/Get Next Variables (snmpInTotalReqVars) ...........................................................................................228
Set Variables (snmpInTotalSetVars) ..............................................................................................................228
Get Requests (snmpInGetRequests) ..............................................................................................................228
Get Next Requests (snmpInGetNexts) ..........................................................................................................228
Set Requests (snmpInSetRequests) ................................................................................................................228
Get Responses (snmpInGetResponses) ..........................................................................................................228
Traps (snmpInTraps) ....................................................................................................................................228
Out .....................................................................................................................................................................228
Out Packets (snmpOutPkts) .........................................................................................................................228
Error Status “Too Big” (snmpOutTooBigs) ..................................................................................................228
No Such Names (snmpOutNoSuchNames) ..................................................................................................228
Bad Values (snmpOutBadValues) .................................................................................................................228
Generated Errors (snmpOutGenErrs) ...........................................................................................................229
Get Requests (snmpOutGetRequests) ...........................................................................................................229
Get Next Requests (snmpOutGetNexts) .......................................................................................................229
Set Requests (snmpOutSetRequests) .............................................................................................................229
Get Responses (snmpOutGetResponses) .......................................................................................................229
Traps (snmpOutTraps) .................................................................................................................................229
Authentication Failure Traps (snmpEnableAuthenTraps) .............................................................................229
225
Access Server Administrators’ Reference Guide
19 • SNMP
Introduction
The access server provides management and statistical information on SNMP. Detailed information on the
SNMP MIB variables are found in RFC 1213: Management Information Base for Network Management of TCP/
IP-based internets: MIB-II. Select SNMP from the access server Configuration Menu to monitor SNMP statistics. Click on SNMP under the Configuration Menu to display the SNMP window (see figure 93).
Figure 93. SNMP window
Note
Additional SNMP traps can be configured as described in Chapter 4, Alarms
on page 23 and Chapter 21, System Log on page 241. See those chapters for
details on SNMP trap configurations.
SNMP window
The SNMP window displays incoming and outgoing SNMP statistics, and has links for downloading and displaying the following MIB documents:
• Corporate MIB—defines overall structure of the RAS MIB
• Enterprise MIB—defines MIB variables applicable to a group of products
• Product MIB—defines MIB variables specific to a particular product
The access server also supports MIB variables defined in the following RFCs:
• 1155—Structure and Identification of Management Information for TCP/IP-based Internets
• 1213—Management Information Base for Network Management of TCP/IP-based Internets: MIB-II
• 1315—Management Information Base for Frame Relay DTEs
• 1389—RIP Version 2 MIB Extension
Introduction
226
Access Server Administrators’ Reference Guide
19 • SNMP
• 1406—Definitions of Managed Objects for the DS1 and E1 Interface Types
• 1643—Definitions of Managed Objects for the Ethernet-like Interface Types
In
Packets (snmpInPkts)
The total number of Messages delivered to the SNMP entity from the transport service.
Bad Version (snmpInBadVersions)
The total number of SNMP Messages that were delivered to the SNMP protocol entity and were for an unsupported SNMP version.
Bad Community Names (snmpInBadCommunityNames)
The total number of SNMP Messages delivered to the SNMP protocol entity which used a SNMP community
name not known to said entity.
Bad Community Uses (snmpInBadCommunity)
The total number of SNMP messages delivered to the SNMP protocol entity which represented an SNMP
operation which was not allowed by the SNMP community named in the message.
ASN ParseErrors (snmpInASNParseErrs)
The total number of ASN.1 or BER errors encountered by the SNMP protocol entity when decoding received
SNMP messages.
Error Status “Too Big” (snmpInTooBigs)
The total number of SNMP PDUs that were delivered to the SNMP protocol entity and for which the value of
the error-status field is tooBig.
No Such Names (snmpInNoSuchNames)
The total number of SNMP PDUs that were delivered to the SNMP protocol entity and for which the value of
the error-status field is noSuchName.
Bad Values (snmpInBadValues)
The total number of SNMP PDUs that were delivered to the SNMP protocol entity and for which the value of
the error-status field is badValue.
Error Status “Read Only” (snmpInReadOnlys)
The total number of valid SNMP PDUs that were delivered to the SNMP protocol entity and for which the
value of the error-status field is readOnly. It should be noted that it is a protocol error to generate an SNMP
PDU which contains the readOnly value in the error-status field, as such this object is provided as a means of
detecting incorrect implementations of the SNMP.
Generated Errors (snmpInGenErrs)
The total number of SNMP PDUs that were delivered to the SNMP protocol entity and for which the value of
the error-status field is genErr.
In
227
Access Server Administrators’ Reference Guide
19 • SNMP
Get/Get Next Variables (snmpInTotalReqVars)
The total number of MIB objects that have been retrieved successfully by the SNMP protocol entity as the
result of receiving valid SNMP Get-Request and Get-Next PDUs.
Set Variables (snmpInTotalSetVars)
The total number of MIB objects that have been altered successfully by the SNMP protocol entity as the result
of receiving valid SNMP Set-Request PDUs.
Get Requests (snmpInGetRequests)
The total number of SNMP Get-Request PDUs that have been accepted and processed by the SNMP protocol
entity.
Get Next Requests (snmpInGetNexts)
The total number of SNMP Get-Next PDUs that have been accepted and processed by the SNMP protocol
entity.
Set Requests (snmpInSetRequests)
The total number of SNMP Set-Request PDUs that have been accepted and processed by the SNMP protocol
entity.
Get Responses (snmpInGetResponses)
The total number of SNMP Get-Response PDUs that have been accepted and processed by the SNMP protocol entity.
Traps (snmpInTraps)
The total number of SNMP Trap PDUs that have been accepted and processed by the SNMP protocol entity.
Out
Out Packets (snmpOutPkts)
The total number of SNMP messages that were passed from the SNMP protocol entity to the transport service.
Error Status “Too Big” (snmpOutTooBigs)
The total number of SNMP PDUs that were generated by the SNMP protocol entity and for which the value
of the error-status field is tooBig.
No Such Names (snmpOutNoSuchNames)
The total number of SNMP PDUs that were generated by the SNMP protocol entity and for which the value
of the error-status is noSuchName.
Bad Values (snmpOutBadValues)
The total number of SNMP PDUs that were generated by the SNMP protocol entity and for which the value
of the error-status field is badValue.
Out
228
Access Server Administrators’ Reference Guide
19 • SNMP
Generated Errors (snmpOutGenErrs)
The total number of SNMP PDUs that were generated by the SNMP protocol entity and for which the value
of the error-status field is genErr.
Get Requests (snmpOutGetRequests)
The total number of SNMP Get-Request PDUs that have been generated by the SNMP protocol entity.
Get Next Requests (snmpOutGetNexts)
The total number of SNMP Get-Next PDUs that have been generated by the SNMP protocol entity.
Set Requests (snmpOutSetRequests)
The total number of SNMP Set-Request PDUs that have been generated by the SNMP protocol entity.
Get Responses (snmpOutGetResponses)
The total number of SNMP Get-Response PDUs that have been generated by the SNMP protocol entity.
Traps (snmpOutTraps)
The total number of SNMP Trap PDUs that have been generated by the SNMP protocol entity.
Authentication Failure Traps (snmpEnableAuthenTraps)
Indicates whether the SNMP agent process is permitted to generate authentication-failure traps. The value of
this object overrides any configuration information; as such, it provides a means whereby all authenticationfailure traps may be disabled.
• enable (1)
• disable (2)
Out
229
Chapter 20 System
Chapter contents
Introduction ........................................................................................................................................................232
System main window...........................................................................................................................................232
SNMP and HTTP ........................................................................................................................................232
Version (boxSnmpVersion) .....................................................................................................................232
Super User Password (boxSnmpMasterPassword) ....................................................................................233
User Password (boxSnmpMonitorPassword) ...........................................................................................233
Web Page Refresh Rate (boxWebRefreshRate) ........................................................................................233
Manufacturer ................................................................................................................................................233
Serial Number (boxManufactureDatecode) .............................................................................................233
PCB Revision (boxManufacturePcbRevision) ..........................................................................................233
General Information (boxManufactureGeneralInfo) ...............................................................................233
Message Blocks ........................................................................................................................................233
Packet Holding Message Blocks... ...........................................................................................................233
Total (boxMsgBlksConfigured) ...............................................................................................................233
Free (boxMsgBlksFree) ............................................................................................................................233
Total Time Waited (boxCountMsgBlkTaskWait) ...................................................................................233
Total Times Unavailable (boxCountMsgBlkUnavailable) ........................................................................233
Operating System Heap Memory ..................................................................................................................234
Total Size (boxHeapSize) ........................................................................................................................234
Free (boxHeapFreeSpace) ........................................................................................................................234
Largest (boxHeapLargestSpace) ...............................................................................................................234
Enclosure System ..........................................................................................................................................235
Internal Temperature (boxTemperature) .................................................................................................235
Highest Temperature (boxMaxTemperature) ..........................................................................................235
Payable features .............................................................................................................................................235
Enable Payable Features (boxFeatureEnableKey) .....................................................................................235
Installation ....................................................................................................................................................235
Country (installCountry) ........................................................................................................................235
Other ............................................................................................................................................................235
Total DRAM Detected (boxDetectedMemory) .......................................................................................235
SystemID (sysObjectID) .........................................................................................................................235
Running Since Last Boot (sysUpTime) ...................................................................................................235
System Manager (sysContact) .................................................................................................................235
Box Name (sysName) ..............................................................................................................................235
Physical Location (sysLocation) ...............................................................................................................236
System Services (sysServices) ...................................................................................................................236
Web Settings (boxBackgroundFlag) ........................................................................................................236
Monitor Privilege (boxMonitorPrivilege) ................................................................................................236
System—Modify window....................................................................................................................................237
230
Access Server Administrators’ Reference Guide
20 • System
SNMP and HTTP ........................................................................................................................................237
Version (boxSnmpVersion) .....................................................................................................................237
Super User Password (boxSnmpMasterPassword) ....................................................................................237
User Password (boxSnmpMonitorPassword) ...........................................................................................237
Web Page Refresh Rate (boxWebRefreshRate) ........................................................................................237
Payable Features ............................................................................................................................................238
Enable Payable Features(boxFeatureEnableKey) ......................................................................................238
Installation ....................................................................................................................................................238
Country (installCountry) ........................................................................................................................238
Other ............................................................................................................................................................238
System Manager (sysContact) .................................................................................................................238
Box Name (sysName) ..............................................................................................................................238
Physical Location (sysLocation) ...............................................................................................................238
System Services (sysServices) ...................................................................................................................238
Web Settings (boxBackgroundFlag) ........................................................................................................238
Monitor Privilege (boxMonitorPrivilege) ................................................................................................239
System—Packet Holding Message Blocks............................................................................................................239
Buffer Size (boxbuffersize) .............................................................................................................................239
No. of Buffers (boxbuffercount) ....................................................................................................................239
No. Free (boxbuffersfree) ..............................................................................................................................240
No. of Tasks Waited (boxCountBufferTaskWait) .........................................................................................240
No. of Times Unavailable(boxCountBufferUnavailable) ...............................................................................240
231
Access Server Administrators’ Reference Guide
20 • System
Introduction
The System main window (see figure 94) contains general setup information about the access server. System
parameters are Patton Enterprise MIB object identifiers, though some are contained in RFC 1213, Management Information Base for Network Management of TCP/IP-based internets: MIB-II. Click on System under the
Configuration Menu to display the System main window.
Figure 94. System main window (SNMP and HTTP, Manufacturer, and Message Blocks)
System main window
From this window you can view SNMP and HTTP, manufacturer, and message block information.
The main window also has the following links:
• Modify—click on this link to change SNMP and HTTP, payable features, country of installation, and other
parameters (see “System—Modify window” on page 237)
• Packet Holding Message Blocks—click on this link to view message block statistics (see “System—Packet
Holding Message Blocks...” on page 239)
This section describes certain CPU utilization parameters.
SNMP and HTTP
This portion of the System main window contains information described in the following sections (see
figure 94 on page 232).
Version (boxSnmpVersion)
This parameter indicates the SNMP version number supported by this unit (for example snmpv1(1) means
SNMP version 1 is supported). SNMP2 is not currently supported.
Introduction
232
Access Server Administrators’ Reference Guide
20 • System
Super User Password (boxSnmpMasterPassword)
This displays the super user password for SNMP and HTTP.
User Password (boxSnmpMonitorPassword)
This displays the user monitoring password for SNMP and HTTP.
Web Page Refresh Rate (boxWebRefreshRate)
The rate at which the main dial-in web page automatically refreshes. The refresh rate can be set from 5 seconds
to 5 minutes. The default is to never refresh.
Manufacturer
This portion of the System main window contains information described in the following sections (see
figure 94 on page 232).
Serial Number (boxManufactureDatecode)
The datecode of manufacture and serial number.
PCB Revision (boxManufacturePcbRevision)
The revision of the printed circuit board. The revision displayed will be a number, whereas the revision printed
on the ciruit board will be a letter. A display of 0 (zero) indicates that the circuit board is revision A. A display
of 1 corresponds to a revision B circuit board, and so on.
General Information (boxManufactureGeneralInfo)
A manufacturing notes area for additional information.
Message Blocks
This portion of the System main window contains information described in the following sections (see
figure 94 on page 232).
Packet Holding Message Blocks...
Buffer usage of access server message blocks based upon message block sizes.
Total (boxMsgBlksConfigured)
The total number of message blocks on the system.
Free (boxMsgBlksFree)
The number of free message blocks available.
Total Time Waited (boxCountMsgBlkTaskWait)
The number of times a CPU task had to wait for a message block.
Total Times Unavailable (boxCountMsgBlkUnavailable)
The number of times a message block was unavailable.
System main window
233
Access Server Administrators’ Reference Guide
20 • System
Figure 95. System main window (Operating System Heap Memory, Enclosure System, Payable Features,
Installation, and Other)
Operating System Heap Memory
This portion of the System main window contains information described in the following sections (see
figure 95).
Total Size (boxHeapSize)
The size of the operating system heap memory.
Free (boxHeapFreeSpace)
The amount of operating system heap memory currently available.
Largest (boxHeapLargestSpace)
The largest contiguous memory block in the memory heap.
System main window
234
Access Server Administrators’ Reference Guide
20 • System
Enclosure System
This portion of the System main window contains information described in the following sections (see
figure 95 on page 234).
Internal Temperature (boxTemperature)
Displays the current temperature in celsius (centigrade).
Highest Temperature (boxMaxTemperature)
The highest temperature registered in celsius (centigrade) sinc the access server was last re-booted.
Payable features
This portion of the System main window contains information described in the following section (see figure 95
on page 234).
Enable Payable Features (boxFeatureEnableKey)
This encoded string is used to enable payable features. This feature is not currently implemented.
Installation
This portion of the System main window contains information described in the following section (see figure 95
on page 234).
Country (installCountry)
Specifies the country that the access server is installed in so it can be configured in accordance with local laws.
Other
This portion of the System main window contains information described in the following sections (see
figure 95 on page 234).
Total DRAM Detected (boxDetectedMemory)
The total number of bytes of DRAM detected by the CPU
SystemID (sysObjectID)
This SNMP variable represents the type of access server being managed as defined by specification RFC
1213.MIB.
Running Since Last Boot (sysUpTime)
This SNMP variable represents the time (in hundreds of seconds) since the network management portion of
the system was last re-initialized, as specified in RFC 1213.
System Manager (sysContact)
This SNMP variable represents the textual identification of the contact person for this managed node, together
with information on how to contact this person as defined by specification RFC 1213.
Box Name (sysName)
This is an administratively assigned name for this managed node. By convention, this is the node’s fully-qualified domain name, as defined in RFC 1213.
System main window
235
Access Server Administrators’ Reference Guide
20 • System
Physical Location (sysLocation)
The physical location of this node (e.g., telephone closet, 3rd floor), as defined in RFC 1213.
System Services (sysServices)
A value which indicates the set of services that this entity primarily offers, as defined in RFC 1213.
Web Settings (boxBackgroundFlag)
The following options are available:
• disableGraphics(0)—When this option is selected, graphics on WWW pages will not be displayed. This
results in faster page display times.
• enableGraphics(1)—When this option is selected, graphics on WWW pages are displayed.
• disableWeb(2)—When this option is selected, access to the WWW pages is denied for everyone.
Monitor Privilege (boxMonitorPrivilege)
Specifies the privileges given to the monitor user. Privileges can be removed or additional write access can be
given beyond read-only access. The following options are available:
• none(0)—The monitor user can not log in.
• read-only(2)—This is the default setting. The monitor user can view but not change any parameters. Monitor can not view passwords.
• writeUser(18)—The monitor user can change all parameters—except passwords— under authentication,
drop-and-insert, and dial-in links.
• writeUserlp(50)—The monitor user can change all parameters—except passwords— under authentication,
drop-and-insert, dial-in, and IP links.
• writeUserlpWan(114)—The monitor user can change all parameters—except passwords— under authentication, drop-and-insert, dial-in, IP, T1/E1, and Frame Relay links.
• writeUserlpWanSystem(242)—The monitor user can change all parameters—except passwords— under
authentication, drop-and-insert, dial-in, IP, T1/E1, Frame Relay, System, and System Log links.
• writeUserlpWanSystemUpload(498)—The monitor user can change all parameters—except passwords—
under authentication, drop-and-insert, dial-in, IP, T1/E1, Frame Relay, System, and System Log links. The
monitor user can also load firmware updates into the access server.
System main window
236
Access Server Administrators’ Reference Guide
20 • System
System—Modify window
The System—Modify window (see figure 96) is where you can change SNMP and HTTP, payable features,
country of installation, and other parameters.
Figure 96. System—Modify window
SNMP and HTTP
This portion of the System—Modify window contains information described in the following sections.
Version (boxSnmpVersion)
This parameter selects the SNMP version number supported by this unit (see figure 96). Select snmpv1(1)
only, SNMP2 is not currently supported.
Super User Password (boxSnmpMasterPassword)
This modifies the super user password for SNMP and HTTP (see figure 96 on page 237).
User Password (boxSnmpMonitorPassword)
This modifies the user monitoring password for SNMP and HTTP.
Web Page Refresh Rate (boxWebRefreshRate)
The rate at which the main dial-in web page automatically refreshes. The refresh rate can be set from 5 seconds
to 5 minutes. The default is to never refresh.
System—Modify window
237
Access Server Administrators’ Reference Guide
20 • System
Payable Features
This portion of the System—Modify window contains information described in the following section.
Enable Payable Features(boxFeatureEnableKey)
Not currently implemented.
Installation
This portion of the System—Modify window contains information described in the following section.
Country (installCountry)
Specifies the country that the access server is installed in so it can be configured in accordance with local laws.
The following options are available:
• other(0)
• unitedStates(1)
• australia(2)
• canada(3)
• europeanUnion(4)
• france(5)
• germany(6)
Other
This portion of the System—Modify window contains information described in the following sections.
System Manager (sysContact)
This SNMP variable represents the textual identification of the contact person for this managed node, together
with information on how to contact this person as defined by specification RFC 1213.
Box Name (sysName)
This is an administratively assigned name for this managed node. By convention, this is the node’s fully-qualified domain name, as defined in RFC 1213.
Physical Location (sysLocation)
The physical location of this node (e.g., ‘telephone closet, 3rd floor), as defined in RFC 1213.
System Services (sysServices)
A value which indicates the set of services that this entity primarily offers, as defined in RFC 1213.
Web Settings (boxBackgroundFlag)
The following options are available:
• disableGraphics(0)—When this option is selected, graphics on WWW pages will not be displayed. This
results in faster page display times.
• enableGraphics(1)—When this option is selected, graphics on WWW pages are displayed.
System—Modify window
238
Access Server Administrators’ Reference Guide
20 • System
• disableWeb(2)—When this option is selected, access to the WWW pages is denied for everyone.
Monitor Privilege (boxMonitorPrivilege)
Specifies the privileges given to the monitor user. Privileges can be removed or additional write access can be
given beyond read-only access. The following options are available:
• none(0)—The monitor user can not log in.
• read-only(2)—This is the default setting. The monitor user can view but not change any parameters. Monitor can not view passwords.
• writeUser(18)—The monitor user can change all parameters—except passwords— under authentication,
drop-and-insert, and dial-in links.
• writeUserlp(50)—The monitor user can change all parameters—except passwords— under authentication,
drop-and-insert, dial-in, and IP links.
• writeUserlpWan(114)—The monitor user can change all parameters—except passwords— under authentication, drop-and-insert, dial-in, IP, T1/E1, and Frame Relay links.
• writeUserlpWanSystem(242)—The monitor user can change all parameters—except passwords— under
authentication, drop-and-insert, dial-in, IP, T1/E1, Frame Relay, System, and System Log links.
• writeUserlpWanSystemUpload(498)—The monitor user can change all parameters—except passwords—
under authentication, drop-and-insert, dial-in, IP, T1/E1, Frame Relay, System, and System Log links. The
monitor user can also load firmware updates into the access server.
System—Packet Holding Message Blocks...
The access server system manages the I960 processor utilization by allocating message blocks for data transfers.
This Message Blocks window (see figure 97) buffer usage of access server message blocks based upon message
block sizes.
Figure 97. Packet Holding Message Blocks window
Buffer Size (boxbuffersize)
The size in bytes of the buffer.
No. of Buffers (boxbuffercount)
The number of buffers this size which are currently free for use
System—Packet Holding Message Blocks...
239
Access Server Administrators’ Reference Guide
20 • System
No. Free (boxbuffersfree)
The number of buffers this size which are currently free for use
No. of Tasks Waited (boxCountBufferTaskWait)
The number of times a task has waited for this buffer size.
No. of Times Unavailable(boxCountBufferUnavailable)
The number of times one of these buffers was unavailable.
System—Packet Holding Message Blocks...
240
Chapter 21 System Log
Chapter contents
Introduction ........................................................................................................................................................242
System Log Main Window ..................................................................................................................................242
System Log—Modify ..........................................................................................................................................243
Daemons ......................................................................................................................................................243
SysLog Daemon IP Address(syslogDaemonIP) ........................................................................................243
SNMP Trap Daemon IP Address (syslogTrapIP) ....................................................................................243
Priority .........................................................................................................................................................243
Min Priority for SysLog Daemon (syslogDaemonPriority) ......................................................................243
Min Priority for Console RS-232 (syslogConsolePriority) .......................................................................244
Min Priority for Flash Storage (syslogFlashPriority) ................................................................................244
Min Priority for SNMP Trap Daemon (syslogTrapPriority) ...................................................................244
Min Priority for RAM (SyslogTablePriority) ...........................................................................................245
Unix Facility (syslogUnixFacility) ...........................................................................................................245
Call Trace (syslogCallTrace) ....................................................................................................................246
Maintenance .................................................................................................................................................246
Maintain Flash Storage (syslogFlashClear) ...............................................................................................246
System Log—Volatile Memory ...........................................................................................................................247
Time (slTick) ................................................................................................................................................247
Message (slMessage) ......................................................................................................................................247
System Log—Non-Volatile Memory ...................................................................................................................248
Time (slfTick) ...............................................................................................................................................248
Message (slfMessage) .....................................................................................................................................248
What the System Log messages are telling you.....................................................................................................248
241
Access Server Administrators’ Reference Guide
21 • System Log
Introduction
The System Log window (see figure 98) displays the results from the system-wide error reporting utility. The
object parameters in the system log are all Patton Enterprise MIB object identifiers.
Figure 98. System Log main window
System Log Main Window
Besides displaying the results from the system-wide error reporting utility, the System Log main window also
contains links to the following:
• Modify—Clicking on this link displays syslog and SNMP trap daemon locations, priority and maintenance
information (see “System Log—Modify” on page 243)
• Volatile Memory—Clicking on this link displays timestamp and stored system log message information
(“System Log—Volatile Memory” on page 247)
• Non-Volatile Memory—Clicking on this link displays non-volatile RAM messages for each 10ms time
stamp (see “System Log—Non-Volatile Memory” on page 248)
• DSP Errored Memory Dump—Clicking on this link exports or "dumps" the DSP memory to a text file.
The memory dump gives those troubleshooting the RAS information about registers and the state of the
DSPs at the moment of the dump. It is intended for debugging purposes.
• DSP Event Log—Clicking on this link exports or “dumps” the last 100 DSP events to a text file. It is
intended for debugging purposes
Click on System Log under the Configuration Menu to display the System Log main window.
Introduction
242
Access Server Administrators’ Reference Guide
21 • System Log
System Log—Modify
The System Log—Modify window (see figure 99) displays syslog and SNMP trap daemon locations, priority
and maintenance information.
Figure 99. System Log—Modify window
Daemons
This portion of the System Log—Modify window contains information described in the following sections.
SysLog Daemon IP Address(syslogDaemonIP)
The IP address of a host system which is running a syslog daemon. System messages with a priority greater
than or equal to Min. Priority for SysLog Daemon will be sent to this IP address.
SNMP Trap Daemon IP Address (syslogTrapIP)
The IP address of a host system which is running a SNMP trap daemon. System messages with a priority
greater than or equal to Min. Priority for SNMPtrap Daemon will be sent to this IP address.
Priority
This portion of the System Log—Modify window contains information described in the following sections.
Min Priority for SysLog Daemon (syslogDaemonPriority)
System messages which have a priority equal to or greater than this setting will be sent to the syslog daemon
defined by Syslog Daemon IP address. The lower the number next to the priority listed below, the more details
System Log—Modify
243
Access Server Administrators’ Reference Guide
21 • System Log
system logging will provide. PriorityVerbose will generate the most messages, while priorityDisable will turn off
all messages.
• priorityVerbose(5)
• priorityDebug(10)
• priorityInfo(20)
• priorityOddity(40)
• priorityService(60)
• prioritySystem(80)
• priorityDisable(1000)
Min Priority for Console RS-232 (syslogConsolePriority)
System messages which have a priority equal to or greater than this setting will be printed directly to the RS232 configuration port. Messages will be printed regardless of the current operating state of the RS-232 configuration port. If a manager is logged into the RS-232 port using PPP then syslog messages are not packed into
PPP packets. The lower the number next to the priority listed below, the more details system logging will provide. PriorityVerbose will generate the most messages, while priorityDisable will turn off all messages.
• priorityVerbose(5)
• priorityDebug(10)
• priorityInfo(20)
• priorityOddity(40)
• priorityService(60)
• prioritySystem(80)
• priorityDisable(1000)
Min Priority for Flash Storage (syslogFlashPriority)
System messages which have a priority equal to or greater than this setting will be permanently stored in the
Flash PROM. Some maximum number of messages may be stored in the Flash PROM before this storage area
must be cleared.
• prioritySystem(80)—Flash PROM will be used to store system-level messages.
• priorityDisable(1000)—No system-level messages will be stored.
Min Priority for SNMP Trap Daemon (syslogTrapPriority)
System messages which have a priority equal to or greater than this setting will be sent to the SNMP trap daemon defined by syslogTrapIP. The lower the number next to the priority listed below, the more details system
logging will provide. PriorityVerbose will generate the most messages, while priorityDisable will turn off all
messages.
• priorityVerbose(5)
• priorityDebug(10)
System Log—Modify
244
Access Server Administrators’ Reference Guide
21 • System Log
• priorityInfo(20)
• priorityOddity(40)
• priorityService(60)
• prioritySystem(80)
• priorityDisable(1000)
Min Priority for RAM (SyslogTablePriority)
System messages which have a priority equal to or greater than this setting will appear in System Log—Volatile
Memory. The lower the number next to the priority listed below, the more details system logging will provide.
PriorityVerbose will generate the most messages, while priorityDisable will turn off all messages.
• priorityVerbose(5)
• priorityDebug(10)
• priorityInfo(20)
• priorityOddity(40)
• priorityService(60)
• prioritySystem(80)
• priorityDisable(1000)
Unix Facility (syslogUnixFacility)
This setting is used when syslog messages are sent to a Unix-type syslog daemon. In this case the message will
include the facility and priority coding. Syslog messages from the access server can be directed to an individual
log file by selecting local0–local7. Syslog messages will be directed to a file called local0 if local0 is selected.
Note
The Syslog Daemon must be configured to direct incoming Syslog messages
to different files. If it is not configured correctly, the Syslog messages will be
dropped. The messages will not be recorded in the primary Syslog file.
• disable(0)
• user(1)
• mail(2)
• daemon(3)
• auth(4)
• syslog(5)
• lpr(6)
• news(7)
• uucp(8)
• cron(9)
System Log—Modify
245
Access Server Administrators’ Reference Guide
21 • System Log
• authpriv(10)
• ftp(11)
• local0(16)
• local1(17)
• local2(18)
• local3(19)
• local4(20)
• local5(21)
• local6(22)
• local7(23)
Call Trace (syslogCallTrace)
Enabling this will activate the call tracing utility. This is a powerful debugging utility which will log every single function call and return. At the death of a box the call trace will be printed out and can be sent to tech support. This utility will take a large amount of CPU power, therefore do not turn this feature on unless instructed
to do so by technical support.
• disable(0)—Disable function call tracing.
• enable(1)—Enable function call tracing.
• dump(2)—Display function call tracing on the computer monitor.
Maintenance
This portion of the System Log—Modify window contains information described in the following section.
Maintain Flash Storage (syslogFlashClear)
Setting this variable to syslogFlashClear will cause the erasing of any system messages which have been saved in
the Flash. On reading this variable, it will indicate if the syslog Flash is rejecting messages because it is full.
• syslogFlashOK(0)—Flash is accepting messages.
• syslogFlashFull(1)—Flash is rejecting messages because it is full. To empty the Flash PROM, click on the
Set Factory Default Configuration button (refer to section “Immediate Actions” on page 18), then click on
Record Current Configuration.
• syslogFlashClear(2)—Erase system messages stored in Flash.
System Log—Modify
246
Access Server Administrators’ Reference Guide
21 • System Log
System Log—Volatile Memory
The System Log—Volatile Memory window (see figure 100) displays timestamp and stored system log message information.
Figure 100. System Log—Volatile Memory window
Time (slTick)
The time stamp in 10 ms intervals of the stored message.
Message (slMessage)
Stored system log message.
System Log—Volatile Memory
247
Access Server Administrators’ Reference Guide
21 • System Log
System Log—Non-Volatile Memory
The System Log—Non-Volatile window (see figure 101) displays non-volatile RAM messages for each 10 ms
time stamp.
Figure 101. System Log—Non-Volatile Memory window
Time (slfTick)
The time stamp in 10 ms intervals of the stored message.
Message (slfMessage)
Stored system log message.
What the System Log messages are telling you
• DSP going suspect on 0x0000—An instance on this DSP transitioned into the Suspect state. If an entire
DSP is put into the suspect state this message will appear twice; once for each instance.
• DSP recovered from suspect on 0x0000—An instance on this DSP was in the suspect state and was placed
back into the Available state because it connected on the last call
• DSP being rebooted due to instance consecutive failures on 0x0000 or DSP being rebooted due to total
consecutive failures on 0x0000, followed by DSP group 0 HW reset—This DSP has been rebooted
because it was in the suspect state and then took additional calls which also did not connect successfully.
The DSP group refers to which group of 8 DSPs were rebooted. DSPs 1-8 are in group 0.
• DSP error detected initiating reboot on 0x0000 followed by DSP group 0 HW reset—This DSP has been
rebooted because it was not responding properly to the main CPU driver code. The DSP group refers to
which group of 8 DSPs were rebooted. DSPs 1-8 are in group 0.
System Log—Non-Volatile Memory
248
Chapter 22 T1/E1 Link
Chapter contents
Introduction ........................................................................................................................................................252
T1/E1 Link Activity main window ......................................................................................................................253
Link (dsx1LineIndex) ....................................................................................................................................253
Type (dsx1LineType) ....................................................................................................................................253
Circuit ID (dsx1CircuitIdentifier) .................................................................................................................254
Alarms Present.....................................................................................................................................................254
Physical Line Alarms (dsx1LineStatus) ..........................................................................................................254
Far End Alarm Failure .............................................................................................................................254
Alarm Indication Signal (AIS) Failure .....................................................................................................255
Loss Of Frame Failure .............................................................................................................................255
Loss Of Signal Failure .............................................................................................................................255
Loopback Pseudo-Failure ........................................................................................................................255
TS16 Alarm Indication Signal Failure .....................................................................................................255
Loss Of MultiFrame Failure ....................................................................................................................255
Far End Loss Of Multiframe Failure .......................................................................................................255
ISDN Signaling Alarms (linkSignalStatus) ....................................................................................................256
SNMP MIB definition ..................................................................................................................................256
Line Status—Configuration ................................................................................................................................258
Time Elapsed (dsx1TimeElapsed) .................................................................................................................258
Valid Intervals (dsx1ValidIntervals) ..............................................................................................................258
WAN Circuit Configuration—Modify................................................................................................................259
Line Interface Settings ...................................................................................................................................259
Circuit ID (dsx1CircuitIdentifier) ...........................................................................................................259
Line Type (dsx1LineType) ......................................................................................................................260
Line Coding (dsx1LineCoding) ...............................................................................................................260
Receive Equalizer (linkRxEqualizer) ........................................................................................................260
Line Build Out (linkLineBuildOut) ........................................................................................................261
Yellow Alarm Format (linkYellowFormat) ...............................................................................................261
FDL (dsx1FDL) ......................................................................................................................................261
Signalling Settings .........................................................................................................................................261
Signal Mode (dsx1SignalMode) ...............................................................................................................261
Robbed-Bit Signalling Protocol (linkSignalling) ......................................................................................262
Message-Oriented Switch Type (linkIsdnSwitchType) ............................................................................262
NFAS Interface ID (linkNfasInterfaceId) ................................................................................................262
NFAS Primary WAN (linkNfasPrimaryPointer) .....................................................................................262
Test Settings .................................................................................................................................................262
Force Yellow Alarm (linkYellowForce) ....................................................................................................262
Loopback Config (dsx1LoopbackConfig) ................................................................................................263
Send Code (dsx1SendCode) ....................................................................................................................263
249
Access Server Administrators’ Reference Guide
22 • T1/E1 Link
Error Injection (linkInjectError) ..............................................................................................................263
Line Status—Channel Assignment ......................................................................................................................264
Channel (channelIndex) ................................................................................................................................264
Desired Function (channelfunction) .............................................................................................................264
CurrentState (ChannelState) .........................................................................................................................265
Near End Line Statistics—Current ......................................................................................................................265
Errored Seconds (dsx1CurrentESs) ...............................................................................................................266
Severely Errored Seconds (dsx1CurrentSESs) ................................................................................................266
Severely Errored Frame Seconds (dsx1CurrentSEFSs) ...................................................................................266
Unavailable Seconds (dsx1CurrentUASs) ......................................................................................................266
Controlled Slip Seconds (dsx1CurrentCSSs) .................................................................................................266
Path Code Violations (dsx1CurrentPCVs) ....................................................................................................266
Line Errored Seconds (dsx1CurrentLESs) .....................................................................................................266
Bursty ErroredSeconds (dsx1CurrentBESs) ...................................................................................................266
Degraded Minutes (dsx1CurrentDMs) .........................................................................................................266
Line Code Violations (dsx1CurrentLCVs) ....................................................................................................266
Near End Line Statistics—History.......................................................................................................................267
Interval (dsx1IntervalNumber) ......................................................................................................................267
Errored Seconds (dsx1intervaless) .................................................................................................................267
Severely Errored Seconds (dsx1IntervalSESs) ................................................................................................267
Severely Errored Frame Seconds (dsx1IntervalSEFSs) ...................................................................................267
Unavailable Seconds (dsx1IntervalUASs) ......................................................................................................267
Controlled Slip Seconds (dsx1IntervalCSSs) .................................................................................................268
Path Code Violations (dsx1IntervalPCVs) ....................................................................................................268
Line Errored Seconds (dsx1IntervalLESs) ......................................................................................................268
Bursty ErroredSeconds (dsx1IntervalBESs) ...................................................................................................268
Degraded Minutes (dsx1IntervalDMs) ..........................................................................................................268
Line Code Violations (dsx1IntervalLCVs) .....................................................................................................268
Near End Line Statistics—Totals.........................................................................................................................268
Errored Seconds (dsx1TotalESs) ...................................................................................................................268
Severely Errored Seconds (dsx1TotalSESs) ....................................................................................................269
Severely Errored Frame Seconds (dsx1TotalSEFSs) .......................................................................................269
Unavailable Seconds (dsx1TotalUASs) ..........................................................................................................269
Controlled Slip Seconds (dsx1TotalCSSs) .....................................................................................................269
Path Code Violations (dsx1TotalPCVs) ........................................................................................................269
Line Errored Seconds (dsx1TotalLESs) .........................................................................................................269
Bursty ErroredSeconds (dsx1TotalBESs) .......................................................................................................269
Degraded Minutes (dsx1TotalDMs) .............................................................................................................269
Line Code Violations (dsx1TotalLCVs) ........................................................................................................269
Far End Line Statistics—Current ........................................................................................................................270
Time Elapsed (dsx1FarEndTimeElapsed) ......................................................................................................270
Errored Seconds (dsx1FarEndCurrentESs) ....................................................................................................270
Severely Errored Seconds (dsx1FarEnd CurrentSESs) ...................................................................................270
Severely Errored Frame Seconds (dsx1FarEndCurrentSEFSs) .......................................................................270
250
Access Server Administrators’ Reference Guide
22 • T1/E1 Link
Unavailable Seconds (dsx1FarEndCurrentUASs) ..........................................................................................270
Controlled Slip Seconds (dsx1FarEndCurrentCSSs) .....................................................................................270
Line Errored Seconds (dsx1FarEndCurrentLESs) ..........................................................................................270
Path Code Violations (dsx1FarEndCurrentPCVs) ........................................................................................271
Bursty Errored Seconds (dsx1FarEndCurrentBESs) ......................................................................................271
Degraded Minutes (dsx1FarEndCurrentDMs) ..............................................................................................271
Far End Line Statistics—History .........................................................................................................................271
Far End Interval (dsx1FarEndIntervalNumber) ............................................................................................271
Errored Seconds (dsx1FarEndIntervalESs) ....................................................................................................271
Severely Errored Seconds (dsx1FarEndIntervalSESs) .....................................................................................272
Severely Errored Frame Seconds (dsx1FarEndIntervalSEFSs) ........................................................................272
Unavailable Seconds (dsx1FarEndIntervalUASs) ...........................................................................................272
Controlled Slip Seconds (dsx1FarEndIntervalCSSs) ......................................................................................272
Path Code Violations (dsx1FarEndIntervalPCVs) .........................................................................................272
Line Errored Seconds (dsx1FarEndIntervalLESs) ..........................................................................................272
Bursty Errored Seconds (dsx1FarEndIntervalBESs) .......................................................................................272
Degraded Minutes (dsx1FarEndIntervalDMs) ..............................................................................................272
Line Code Violations (dsx1FarEndIntervalLCVs) .........................................................................................272
Far End Line Statistics—Totals ...........................................................................................................................273
Errored Seconds (dsx1FarEndTotalESs) ........................................................................................................273
Severely Errored Seconds (dsx1FarEndTotalSESs) ........................................................................................273
Severely Errored Frame Seconds (dsx1FarEndTotalSEFSs) ...........................................................................273
Unavailable Seconds (dsx1FarEndTotalUASs) ..............................................................................................273
Controlled Slip Seconds (dsx1FarEndTotalCSSs) .........................................................................................273
Line Errored Seconds (dsx1FarEndTotalLESs) ..............................................................................................273
Path Code Violations (dsx1FarEndTotalPCVs) ............................................................................................273
Bursty Errored Seconds (dsx1FarEndTotalBESs) ..........................................................................................274
Degraded Minutes (dsx1FarEndTotalDMs) ..................................................................................................274
Using Non-Facility Associated Signaling (NFAS) .........................................................................................274
Configuring NFAS ..................................................................................................................................274
251
Access Server Administrators’ Reference Guide
22 • T1/E1 Link
Introduction
The T1/E1 Link Activity window (see figure 102) shows the configuration of the T1/E1 Interface, and reports
statistics on the quality of the T1/E1 connection. The statistics listed in this section comprise those contained
in RFC 1406—Definitions of Managed Objects for the DS1 and E1 Interface Types.
Figure 102. T1/E1 Link Activity main window
Click on T1/E1 Link under the Configuration Menu to display the T1/E1 Link Activity main window.
The T1/E1 Link Activity main window contains the following items:
• Information that identifies the DS1 Interface on a managed device, indicates the type of DS1 line using the
circuit, and shows the transmission vendor’s circuit identifier (see figure 102). For more information about
the objects in this window, refer to “T1/E1 Link Activity main window” on page 253.
• Line Status—This variable indicates interface line status. If any condition other than No Alarms exists, you
can click on the Alarms Present link to view the Line Status Alarms window. For more information about
these objects, refer to “The physical line failures currently registering will be indicated by the ACTIVE label
next to the failure type.” on page 254.
• Line Status—Configuration… link—clicking on this link takes you to the page that displays the WAN Circuit Configuration window. This window contains general information about the DS1 interface, amount of
time intervals passed, and kind of line coding). For more information about this page, refer to “Line Status—Configuration” on page 258.
• Line Status—Channel Assignment… link—clicking on this link takes you to the page that displays the
WAN Circuit Channel Assignment window, where T1/E1 lines are segmented into individual channels or
time slots. For more information about this page, refer to “Line Status—Channel Assignment” on
page 264.
Introduction
252
Access Server Administrators’ Reference Guide
22 • T1/E1 Link
• Near End Line Statistics—Current… link—clicking on this link takes you to the page that displays line statistics for the current 15-minute interval. For more information about this page, refer to “Near End Line
Statistics—Current” on page 265.
• Near End Line Statistics—History… link—clicking on this link takes you to the page that displays line statistics for previous 15-minute intervals. For more information about this page, refer to “Near End Line Statistics—History” on page 267.
• Near End Line Statistics—Totals… link—clicking on this link takes you to the page that displays the total
statistics of errors that occurred during the previous 24-hour period. For more information about this page,
refer to “Near End Line Statistics—Totals” on page 268.
• Far End Line Statistics—Current… link—clicking on this link takes you to the page that displays far-end statistics for the current 15-minute interval. For more information about this page, refer to “Far End Line Statistics—Current” on page 270.
• Far End Line Statistics—History… link—clicking on this link takes you to the page that displays far-end statistics for previous 15-minute intervals. For more information about this page, refer to “Far End Line Statistics—History” on page 271.
• Far End Line Statistics—Totals… link—clicking on this link takes you to the page that displays the total farend statistics of errors that occurred during the previous 24-hour period. For more information about this
page, refer to “Far End Line Statistics—Totals” on page 273.
T1/E1 Link Activity main window
The T1/E1 Link Activity window has three main sections that display the following T1/E1 parameters:
• Line Status—Shows the configuration of the T1/E1 Interface and service provided on each user time slot.
• Near End Line Statistics—Show error statistics collected from the near-end of the T1/E1 line.
• Far End Line Statistics—Show statistics collected from the far-end T1/E1 line. Far End Line Statistics can
be used by devices that support the facility data link (FDL)
Link (dsx1LineIndex)
This object identifies a DS1 Interface on a managed device.
Type (dsx1LineType)
This variable indicates the type of DS1 line using the circuit. The circuit type determines the bits-per-second
rate that the circuit can carry and how it interprets error statistics. The values are as follows:
• dsx1ESF—Extended Superframe DS1
• dsx1D4—AT&T D4 format DS1
• dsx1E1—Based on CCITT/ITU G.704 without CRC
• dsx1E1-CRC—Based on CCITT/ITU G.704 with CRC
• dsx1E1-MF—Based on CCITT/ITU G.704 with TS16 multiframing, without CRC
• dsx1E1-CRC-MF—Based on CCITT/ITU G.704 with TS16 multiframing, with CRC
T1/E1 Link Activity main window
253
Access Server Administrators’ Reference Guide
22 • T1/E1 Link
Circuit ID (dsx1CircuitIdentifier)
This is the transmission vendor’s circuit identifier. Knowing the circuit ID can be helpful during
troubleshooting.
Alarms Present
This window indicates alarms on the physical line and in the case of a PRI the status of Layer 2.
Figure 103. Line Status Alarms window
The physical line failures currently registering will be indicated by the ACTIVE label next to the failure type.
Physical Line Alarms (dsx1LineStatus)
This variable indicates interface line status. It contains loopback, failure, received alarm and transmitted alarm
information. If any condition other than No Alarms exists, you can click on the Alarms Present link to view
the Line Status Alarms window (see figure 103).
The following failure states are reported in the dsx1LineStatus object. The items listed in this section comprise
those contained in RFC 1406—Definitions of Managed Objects for the DS1 and E1 Interface Types.
Far End Alarm Failure
Far End Alarm failure is also known as a Yellow Alarm in the T1 case or Distant Alarm in the E1 case.
For D4 links, the Far End Alarm failure occurs when bit 6 of all channels has been zero for at least 335 ms. The
alarm is cleared when bit 6 of at least one channel is non-zero for a period T, where T is usually less than 1 second and always less than 5 seconds. The Far End Alarm failure is not declared for D4 links when a Loss of Signal is detected.
For ESF links, the Far End Alarm failure is declared if the Yellow Alarm signal pattern occurs in at least 7 out of
10 contiguous 16-bit pattern intervals. The alarm is cleared when the Yellow Alarm signal pattern has not
occurred for 10 contiguous 16-bit signal pattern intervals.
Alarms Present
254
Access Server Administrators’ Reference Guide
22 • T1/E1 Link
For E1 links, the Far End Alarm failure is declared when bit 3 of time-slot zero is received set to 1 on two consecutive occasions. The Far End Alarm failure is cleared when bit 3 of time-slot zero is received set to zero.
Alarm Indication Signal (AIS) Failure
The Alarm Indication Signal failure is declared when an AIS defect is detected at the input and the AIS defect
still exists after the Loss Of Frame failure (which is caused by the unframed nature of the all-ones signal) is
declared. The AIS failure is cleared when the Loss Of Frame failure is cleared.
Loss Of Frame Failure
For T1 links, the Loss Of Frame failure is declared when an OOF or LOS defect has persisted for T seconds,
where 2 £ T £ 10. The Loss Of Frame failure is cleared when there have been no OOF or LOS defects during
a period T where 0 £ T £ 20. Many systems will perform hit integration within the period T before declaring or
clearing the failure (for more information, see TR 62411 [16]).
For E1 links, the Loss Of Frame Failure is declared when an OOF defect is detected.
Loss Of Signal Failure
For T1, the Loss Of Signal failure is declared upon observing 175 +/- 75 contiguous pulse positions with no
pulses of either positive or negative polarity. The LOS failure is cleared upon observing an average pulse density
of at least 12.5% over a period of 175 ±75 contiguous pulse positions, starting with the receipt of a pulse.
For E1 links, the Loss Of Signal failure is declared when greater than 10 consecutive zeroes are detected (see
O.162 Section 3.4.4).
Loopback Pseudo-Failure
The Loopback Pseudo-Failure is declared when the near end equipment has placed a loopback (of any kind) on
the DS1. This allows a management entity to determine from one object whether the DS1 can be considered
to be in service or not (from the point of view of the near end equipment).
TS16 Alarm Indication Signal Failure
For E1 links, the TS16 Alarm Indication Signal failure is declared when time-slot 16 is received as all ones for
all frames of two consecutive multiframes (see G.732 Section 4.2.6). This condition is never declared for T1.
Loss Of MultiFrame Failure
The Loss Of MultiFrame failure is declared when two consecutive multiframe alignment signals (bits 4 through 7
of TS16 of frame 0) have been received with an error. The Loss Of Multiframe failure is cleared when the first correct multiframe alignment signal is received. The Loss Of Multiframe failure can only be declared for E1 links
operating with G.732 [18] framing (sometimes called Channel Associated Signalling mode).
Far End Loss Of Multiframe Failure
The Far End Loss Of Multiframe failure is declared when bit 2 of TS16 of frame 0 is received set to one on two
consecutive occasions. The Far End Loss Of Multiframe failure is cleared when bit 2 of TS16 of frame 0 is
received set to zero. The Far End Loss Of Multiframe failure can only be declared for E1 links operating in
Channel Associated Signalling mode.
Alarms Present
255
Access Server Administrators’ Reference Guide
22 • T1/E1 Link
ISDN Signaling Alarms (linkSignalStatus)
Note
ISDN Signaling Alarms will only appear if the T1/E1 is configured as a PRI.
Figure 104. ISDN Signalling Alarms
• Class Resource—for future use
• Class Syntax—for future use
• Class State—for future use
• Class Unknown—for future use
• Q3 Close Anchor—indicates that the D channel is down
• Q3 Invalid Parameter—invalid parameter an information element for last call according to Q.931 specification
• Q3 Setup Anchor—invalid parameter in the ISDN Setup message according to Q.931 specification
• Q3 No stream Resource—Out of resources for last call
• Q3 Ie miss—mandatory information element missing for last call
Note
Except for Q3 Close Anchor, all other parameters are used for debugging
purposes.
Note
Alarm will activate for 5 seconds after the call is received for errors registered
on last call.
SNMP MIB definition
The SNMP MIB is defined as follows:
dsx1LineStatus OBJECT-TYPE
SYNTAX INTEGER (1..8191)
ACCESS read-only
STATUS mandatory
Alarms Present
256
Access Server Administrators’ Reference Guide
22 • T1/E1 Link
DESCRIPTION: This variable indicates the Line Status of the interface. It contains loopback, failure,
received ‘alarm’ and transmitted ‘alarm’ information.
The dsx1LineStatus is a bit map represented as a sum, therefore, it can represent multiple failures (alarms)
and a LoopbackState simultaneously
dsx1NoAlarm should be set if and only if no other flag is set.
If the dsx1LoopbackState bit is set, the loopback in effect can be determined from the dsx1LoopbackConfig
object.
The various bit positions are:
1
dsx1NoAlarm
No Alarm Present
2
dsx1RcvFarEndLOF
Far end LOF (a.k.a., Yellow Alarm)
4
dsx1XmtFarEndLOF
Near end sending LOF Indication
8
dsx1RcvAIS
Far end sending AIS
16
dsx1XmtAIS
Near end sending AIS
32
dsx1LossOfFrame
Near end LOF (a.k.a., Red Alarm)
64
dsx1LossOfSignal
Near end Loss Of Signal
128
dsx1LoopbackState
Near end is looped
256
dsx1T16AIS
E1 TS16 AIS
512
dsx1RcvFarEndLOMF
Far End Sending TS16 LOMF
1024
dsx1XmtFarEndLOMF
Near End Sending TS16 LOMF
2048
dsx1RcvTestCode
Near End detects a test code
4096
dsx1OtherFailure
any line status not defined here”
::=
{ dsx1ConfigEntry 10 }
Alarms Present
257
Access Server Administrators’ Reference Guide
22 • T1/E1 Link
Line Status—Configuration
Clicking on the Line Status—Configuration link in the T1/E1 Link Activity window displays the WAN Circuit Configuration window. This window contains general information about the DS1 interface, including the
type of line (D4 Superframe or Extended Superframe), and kind of line coding (B8ZS or AMI). To modify the
WAN circuit configuration, click on the Modify… link. For more information about modifying WAN circuit
settings, refer to “WAN Circuit Configuration—Modify” on page 259.
*
Figure 105. WAN Circuit Configuration window
Note
Use the DAX menu to view clock source for the Model 29XX series access
servers.
The WAN Circuit Configuration window also displays the amount of time that has passed and the number of
intervals passed during which valid data was collected.
Time Elapsed (dsx1TimeElapsed)
The number of seconds that have elapsed since the beginning of the current error-measurement period.
Valid Intervals (dsx1ValidIntervals)
The number of previous intervals for which valid data was collected. The value will be 96 unless the interface
was brought on-line within the last 24-hours, in which case the value will be the number of complete 15minute intervals since the interface has been online.
Line Status—Configuration
258
Access Server Administrators’ Reference Guide
22 • T1/E1 Link
WAN Circuit Configuration—Modify
Clicking on the Configuration link in the T1/E1 Link Activity window displays the WAN Circuit Configuration—Modify window. From this window, you can change line interface settings, signalling settings, test settings, and change the T1/E1 pulse shapes.
Figure 106. WAN Circuit Configuration—Modify window
Note
Use the DAX menu to view clock source for the Model 29XX series access
servers.
Line Interface Settings
This portion of the WAN Circuit Configuration window contains information described in the following
sections.
Circuit ID (dsx1CircuitIdentifier)
This variable contains the transmission vendor’s circuit identifier, for the purpose of facilitating
troubleshooting.
WAN Circuit Configuration—Modify
259
Access Server Administrators’ Reference Guide
22 • T1/E1 Link
Line Type (dsx1LineType)
This variable indicates the type of DS1 Line implemented on this circuit. The type of circuit affects the number of bits per second that the circuit can reasonably carry, as well as the interpretation of the usage and error
statistics. The values, in sequence, are:
• other(1) —Link is disabled
• dsx1ESF(2)—Extended Superframe DS1
• dsx1D4(3)—AT&T D4 format DS1
• dsx1E1(4)—Based on CCITT/ITU G.704 without CRC
• dsx1E1-CRC(5)—Based on CCITT/ITU G.704 with CRC
• dsx1E1-MF(6)—Based on CCITT/ITU G.704 with TS16 multiframing, without CRC
• dsx1E1-CRC-MF(7)—Based on CCITT/ITU G.704 with TS16 multiframing, with CRC
Line Coding (dsx1LineCoding)
This variable describes the type of Zero Code Suppression used on the link, which in turn affects a number of
its characteristics.
• dsx1JBZS(1)—Jammed Bit Zero Suppression, in which the AT&T specification of at least one pulse every
8 bit periods is literally implemented by forcing a pulse in bit 8 of each channel. Thus, only seven bits per
channel, or 1.344 Mbps, is available for data. This feature is not currently implemented.
• dsx1B8ZS (2)—Binary 8 Zero Suppression. The use of a specified pattern of normal bits and bipolar violations which are used to replace a sequence of eight zero bits.
• dsx1HDB3(3)—High Density Bipolar Order 3. It is based on AMI but extends this by inserting violation
codes whenever there is a run of 4 or more 0s.
• dsx1ZBTSI(4)—May use dsx1ZBTSI, or Zero Byte Time Slot Interchange. This feature is not currently
implemented.
• dsx1AMI(5)—Alternate Mark Inversion. Refers to a mode wherein no zero code suppression is present and
the line encoding does not solve the problem directly. In this application, the higher layer must provide data
which meets or exceeds the pulse density requirements, such as inverting HDLC data.
• other(6)—This feature is not currently supported.
Receive Equalizer (linkRxEqualizer)
This variable determines the equalization used on the received signal. Long haul signals should have the equalization set for more. Short haul signals require less equalization.
• linkRxEqualizerOff(1)
• linkRxEqualizerOn(2)
WAN Circuit Configuration—Modify
260
Access Server Administrators’ Reference Guide
22 • T1/E1 Link
Line Build Out (linkLineBuildOut)
This variable is used in T1 applications to adjust the T1 pulse shape at the cross connect point. Select the pulse
strength needed to minimize distortion at the remote T1 receiver end. The default is t1pulse0dB, which should
be adequate for most situations.
• triState(0)
• e1pulse(1)—Select for E1 configuration
• t1pulse0dB(2)—Strong pulse shape.
• t1pulse-7dB(3)—Medium pulse shape.
• t1pulse-15dB(4)—Weak pulse shape.
Yellow Alarm Format (linkYellowFormat)
This variable identifies which standard will be used to transmit and identify the Yellow Alarm.
• link YellowFormatBit2(1)—Bit-2 equal zero in every channel
• YellowFormatDL(2)—FF00 pattern in the Data Link
• YellowFormatFrame12FS(3)—FS bit of frame 12
FDL (dsx1FDL)
The framing bits used in a wide-area link that are used for control, monitoring, and testing. The following
options are available:
• other(1)—Indicates that a protocol other than one following is used.
• dsx1Ansi-T1-403(2)—Refers to the FDL exchange recommended by ANSI.
• dsx1Att-54016(3)—Refers to ESF FDL exchanges.
• dsx1Fdl-none(4)—Indicates that the device does not use the FDL.
Note
This is valid for T1 only.
Signalling Settings
This portion of the WAN Circuit Configuration window contains information described in the following
sections.
Signal Mode (dsx1SignalMode)
• none(1)—Indicates that no bits are reserved for signaling on this channel.
• robbedBit(2)—Indicates that T1 Robbed Bit Signaling is in use.
• bitOriented(3)—Indicates that E1 Channel Associated Signaling is in use.
• messageOriented(4)—Indicates that Common Channel Signaling is in use either on channel 16 of an E1
link or channel 24 of a T1.
WAN Circuit Configuration—Modify
261
Access Server Administrators’ Reference Guide
22 • T1/E1 Link
Robbed-Bit Signalling Protocol (linkSignalling)
This variable determines which robbed bit signalling technique is used. The techniques designated OFFICE
are used to simulate the central office site. These allow back to back connection of access servers. This is set
only when the signal mode is robbedBit(2)
• linkGroundStart(1)
• linkLoopStart(2)
• linkOfficeGroundStart(3)
• linkOfficeLoopStart(4)
• linkEMWinkStart(6)
• linkEMImmediateStart(7)
• linkTaiwanR1(8)
Message-Oriented Switch Type (linkIsdnSwitchType)
This object allows the selection of the ISDN variations on the ISDN protocol, depending on the brand of
switch to which the access server is connected. This only needs to be set when messageOriented is chosen for
signalling protocol.
• ni1(0)—National ISDN-1
• dms(1)—Northern Telecom
• att(2)—AT&T Lucent
• ctr4(3)—E1 ISDN
• ts014(4)—Australia AUSTEL
• ins1500(5)—Japan
• nfasSlave(7)—T1 that uses the D channel of another T1 for signalling
NFAS Interface ID (linkNfasInterfaceId)
The ID number assigned to the PRI by the telephone company. The interface ID is used by the common D
channel to determine which PRI in the NFAS group will receive the incoming call.
NFAS Primary WAN (linkNfasPrimaryPointer)
The WAN port that the PRI with the common D channel is plugged into.
Test Settings
This portion of the WAN Circuit Configuration window contains information described in the following
sections.
Force Yellow Alarm (linkYellowForce)
This variable identifies which standard will be used to transmit and identify the Yellow Alarm.
• linkYellowAuto—Do not force the transmission of a yellow alarm. But, yellow alarm may be automatically
transmitted.
WAN Circuit Configuration—Modify
262
Access Server Administrators’ Reference Guide
22 • T1/E1 Link
• linkYellowOn—Force the transmission of a yellow alarm even if the received signal is in frame.
• linkYellowDisable—Do NOT transmit a yellow alarm even if the received signal is out of frame.
Loopback Config (dsx1LoopbackConfig)
This variable represents the loopback configuration of the DS1 interface. Agents supporting read/write access
should return badValue in response to a requested loopback state that the interface does not support. The values mean:
• dsx1NoLoop—Not in the loopback state. A device that is not capable of performing a loopback on the
interface shall always return this as it's value.
• dsx1PayloadLoop—The received signal at this interface is looped through the device. Typically the received
signal is looped back for retransmission after it has passed through the device's framing function.
• dsx1LineLoop—The received signal at this interface does not go through the device (minimum penetration) but is looped back out.
• dsx1OtherLoop—Loopbacks that are not defined here.
Send Code (dsx1SendCode)
This variable indicates what type of code is being sent across the DS1 interface by the device. The values mean:
• dsx1SendNoCode—Sending looped or normal data
• dsx1SendLineCode—Sending a request for a line loopback
• dsx1SendPayloadCode—Sending a request for a payload loopback
• dsx1SendResetCode—Sending a loopback termination request
• dsx1SendQRS—Sending a Quasi-Random Signal (QRS) test pattern
• dsx1Send511Pattern—Sending a 511 bit fixed test pattern
• dsx1Send3in24Pattern—Sending a fixed test pattern of 3 bits set in 24
• dsx1SendOtherTestPattern—Sending a test pattern other than those described by this object.
Error Injection (linkInjectError)
Force an output error to see if the other end detects it
• noErrorInjection(0)
• injectCRCerrorBurst(1)
• injectLineErrorBurst(2)
WAN Circuit Configuration—Modify
263
Access Server Administrators’ Reference Guide
22 • T1/E1 Link
Line Status—Channel Assignment
Clicking on the Line Status—Channel Assignment link in the T1/E1 Link Activity window displays the WAN
Circuit Channel Assignment window (see figure 107). T1/E1 lines are segmented into twenty-four (T1) or
thirty (E1) individual channels or time slots.
Figure 107. WAN Circuit Channel Assignment
Channel (channelIndex)
This object is the identifier of an entry in the channel table.
Figure 108. Channel assignment showing dialout desired function
Desired Function (channelfunction)
This variable defines how the connection is made to each of the 24 or 30 T1/E1 time slots.
• off(0)—Do not signal on this channel in response to the central office. The access server will generate an
idle signal.
• dialin(1)—Used for dial-in.
• dialout(2)—used for dial-out. When dialing out of the server, the first available channel set to dialout will be used
(see figure 108). If no dialout channels are available, the server will search for the next available dialin channel.
Line Status—Channel Assignment
264
Access Server Administrators’ Reference Guide
22 • T1/E1 Link
• frameRelay(3)—64 k frame relay connection
• privateLine(4)—channel is a dedicated modem connection
• dropinsert(7)—the channel passes the data through to another channel on a different WAN port. See How
Drop and Insert Works on page xxxx
• blocked(8)—Signals the central office that the access server will not accept any signals on this channel.
• clear(9)—Intended for robbed-bit signalling protocols, the access server will not add bits to the signal.
CurrentState (ChannelState)
• off(0)—Do not signal on this channel in response to the central office. The access server will generate an
idle signal.
• idle(1)—Channel not in use
• active(2)—Channel in use
• frameRelay(3)—Channel configured for frame relay
• clear(4)—Intended for robbed bit signaling protocols, the access server will not add bits to the signal
• privateLineWait(5)—modem is attempting to establish a V.8 connection with a remote modem for leased
line operation but call is not yet connected
• privateLineActive(6)—leased line connection is up
• adminBlocked(10)—Administrator has blocked the channel
• resourceBlocked(11)—Channel is blocked due to lack of DSPs to answer the inbound call
• telcoBlocked(12)—The telco is blocking the channel because the channel is not active on the telco side
• dChannel(13)—The D channel for ISDN
Near End Line Statistics—Current
Click on Near End Line Statistics—Current to display line statistics for the current 15-minute interval (see
figure 109).
Figure 109. Current Near End Performance window
Near End Line Statistics—Current
265
Access Server Administrators’ Reference Guide
22 • T1/E1 Link
Errored Seconds (dsx1CurrentESs)
The number of errored seconds, encountered by a DS1 interface in the current 15-minute interval.
Severely Errored Seconds (dsx1CurrentSESs)
The number of severely errored seconds encountered by a DS1 interface in the current 15-minute interval.
Severely Errored Frame Seconds (dsx1CurrentSEFSs)
The number of severely errored framing seconds encountered by a DS1 interface in the current 15-minute
interval.
Unavailable Seconds (dsx1CurrentUASs)
The number of unavailable seconds encountered by a DS1 interface in the current 15-minute interval.
Controlled Slip Seconds (dsx1CurrentCSSs)
The number of Controlled Slip Seconds encountered by a DS1 interface in the current 15-minute interval.
Path Code Violations (dsx1CurrentPCVs)
The number of path coding violations encountered by a DS1 interface in the current 15-minute interval.
Line Errored Seconds (dsx1CurrentLESs)
The number of line errored seconds encountered by a DS1 interface in the current 15-minute interval.
Bursty ErroredSeconds (dsx1CurrentBESs)
The number of bursty errored seconds (BESs) encountered by a DS1 interface in the current 15-minute
interval.
Degraded Minutes (dsx1CurrentDMs)
The number of degraded minutes (DMs) encountered by a DS1 interface in the current 15-minute interval.
Line Code Violations (dsx1CurrentLCVs)
The number of line code violations (LCVs) encountered by a DS1 interface in the current 15-minute interval.
Near End Line Statistics—Current
266
Access Server Administrators’ Reference Guide
22 • T1/E1 Link
Near End Line Statistics—History
Click on Near End Line Statistics—History to display line statistics for previous 15-minute intervals (96 previous intervals will be shown unless the remote access server has been reinitialized in the last 24 hours). See
figure 110.
Figure 110. History of Near End Performance window
Interval (dsx1IntervalNumber)
A number between 1 and 96, where 1 is the most recently completed 15-minute interval and 96 is the least
recently completed 15-minutes interval (assuming that all 96 intervals are valid).
Errored Seconds (dsx1intervaless)
The number of errored Seconds encountered by a DS1 interface in one of the previous 96, individual 15minute, intervals.
Severely Errored Seconds (dsx1IntervalSESs)
The number of severely errored seconds encountered by a DS1 interface in one of the previous 96, individual
15-minute, intervals.
Severely Errored Frame Seconds (dsx1IntervalSEFSs)
The number of severely errored framing seconds encountered by a DS1 interface in one of the previous 96,
individual 15-minute, intervals.
Unavailable Seconds (dsx1IntervalUASs)
The number of unavailable seconds encountered by a DS1 interface in one of the previous 96, individual 15minute, intervals.
Near End Line Statistics—History
267
Access Server Administrators’ Reference Guide
22 • T1/E1 Link
Controlled Slip Seconds (dsx1IntervalCSSs)
The number of controlled slip seconds encountered by a DS1 interface in one of the previous 96, individual
15-minute, intervals.
Path Code Violations (dsx1IntervalPCVs)
The number of path coding violations encountered by a DS1 interface in one of the previous 96, individual
15-minute, intervals.
Line Errored Seconds (dsx1IntervalLESs)
The number of line errored seconds encountered by a DS1 interface in one of the previous 96, individual 15minute, intervals.
Bursty ErroredSeconds (dsx1IntervalBESs)
The number of bursty errored seconds (BESs) encountered by a DS1 interface in one of the previous 96, individual 15-minute, intervals.
Degraded Minutes (dsx1IntervalDMs)
The number of degraded minutes (DMs) encountered by a DS1 interface in one of the previous 96, individual
15-minute, intervals.
Line Code Violations (dsx1IntervalLCVs)
The number of line code violations (LCVs) encountered by a DS1 interface in the current 15-minute interval.
Near End Line Statistics—Totals
Click on Near End Line Statistics—Totals to display the total statistics of errors that occurred during the previous 24-hour period (see figure 111).
Figure 111. Totals of Near End Performance window
Errored Seconds (dsx1TotalESs)
The number of errored seconds encountered by a DS1 interface in the previous 24-hour interval.
Near End Line Statistics—Totals
268
Access Server Administrators’ Reference Guide
22 • T1/E1 Link
Severely Errored Seconds (dsx1TotalSESs)
The number of severely errored seconds encountered by a DS1 interface in the previous 24-hour interval.
Severely Errored Frame Seconds (dsx1TotalSEFSs)
The number of severely errored framing seconds encountered by a DS1 interface in the previous 24-hour
interval.
Unavailable Seconds (dsx1TotalUASs)
The number of unavailable seconds encountered by a DS1 interface in the previous 24-hour interval.
Controlled Slip Seconds (dsx1TotalCSSs)
The number of controlled slip seconds encountered by a DS1 interface in the previous 24-hour interval.
Path Code Violations (dsx1TotalPCVs)
The number of path coding violations encountered by a DS1 interface in the previous 24-hour interval.
Line Errored Seconds (dsx1TotalLESs)
The number of line errored seconds encountered by a DS1 interface in the previous 24-hour interval.
Bursty ErroredSeconds (dsx1TotalBESs)
The number of bursty errored seconds (BESs) encountered by a DS1 interface in the previous 24-hour
interval.
Degraded Minutes (dsx1TotalDMs)
The number of degraded minutes (DMs) encountered by a DS1 interface in the previous 24-hour interval.
Line Code Violations (dsx1TotalLCVs)
The number of line code violations (LCVs) encountered by a DS1 interface in the previous 15-minute interval.
Near End Line Statistics—Totals
269
Access Server Administrators’ Reference Guide
22 • T1/E1 Link
Far End Line Statistics—Current
Click on Near End Line Statistics—Current to display far-end statistics for the current 15-minute interval (96
previous intervals will be shown unless the remote access server has been reinitialized in the last 24 hours). See
figure 112).
Figure 112. Current Far End Performance window
Time Elapsed (dsx1FarEndTimeElapsed)
The number of seconds that have elapsed since the beginning of the far-end current error-measurement period.
Errored Seconds (dsx1FarEndCurrentESs)
The number of far-end errored seconds encountered by a DS1 interface in the current 15-minute interval.
Severely Errored Seconds (dsx1FarEnd CurrentSESs)
The number of far-end severely errored seconds encountered by a DS1 interface in the current 15-minute
interval.
Severely Errored Frame Seconds (dsx1FarEndCurrentSEFSs)
The number of far-end severely errored framing seconds encountered by a DS1 interface in the current 15minute interval.
Unavailable Seconds (dsx1FarEndCurrentUASs)
The number of far-end unavailable seconds encountered by a DS1 interface in the current 15-minute interval.
Controlled Slip Seconds (dsx1FarEndCurrentCSSs)
The number of far-end controlled slip seconds encountered by a DS1 interface in the current 15-minute
interval.
Line Errored Seconds (dsx1FarEndCurrentLESs)
The number of far-end line errored seconds encountered by a DS1 interface in the current 15-minute interval
Far End Line Statistics—Current
270
Access Server Administrators’ Reference Guide
22 • T1/E1 Link
Path Code Violations (dsx1FarEndCurrentPCVs)
The number of far-end path coding violations reported via the far-end block error count encountered by a
DS1 interface in the current 15-minute interval.
Bursty Errored Seconds (dsx1FarEndCurrentBESs)
The number of far-end bursty errored seconds (BESs) encountered by a DS1 interface in the current 15minute interval.
Degraded Minutes (dsx1FarEndCurrentDMs)
The number of far-end degraded minutes (DMs) encountered by a DS1 interface in the current 15-minute
interval.
Far End Line Statistics—History
Click on Far End Line Statistics—History to display far-end statistics for previously completed 15-minute
intervals (see figure 113).
Figure 113. History of Far End Performance window
Far End Interval (dsx1FarEndIntervalNumber)
A number between 1 and 96, where 1 is the most recently completed 15-minute interval and 96 is the least
recently completed 15-minutes interval (assuming that all 96 intervals are valid).
Errored Seconds (dsx1FarEndIntervalESs)
The number of far-end errored seconds encountered by a DS1 interface in one of the previous 96, individual
15-minute, intervals.
Far End Line Statistics—History
271
Access Server Administrators’ Reference Guide
22 • T1/E1 Link
Severely Errored Seconds (dsx1FarEndIntervalSESs)
The number of far-end severely errored seconds encountered by a DS1 interface in one of the previous 96,
individual 15-minute, intervals.
Severely Errored Frame Seconds (dsx1FarEndIntervalSEFSs)
The number of far-end severely errored framing seconds encountered by a DS1 interface in one of the previous
96, individual 15-minute, intervals.
Unavailable Seconds (dsx1FarEndIntervalUASs)
The number of far-end unavailable seconds encountered by a DS1 interface in one of the previous 96, individual 15-minute, intervals.
Controlled Slip Seconds (dsx1FarEndIntervalCSSs)
The number of far-end controlled slip seconds encountered by a DS1 interface in one of the previous 96, individual 15-minute, intervals.
Path Code Violations (dsx1FarEndIntervalPCVs)
The number of far-end path coding violations encountered by a DS1 interface in one of the previous 96, individual 15-minute, intervals.
Line Errored Seconds (dsx1FarEndIntervalLESs)
The number of far-end line errored seconds encountered by a DS1 interface in one of the previous 96, individual 15-minute, intervals.
Bursty Errored Seconds (dsx1FarEndIntervalBESs)
The number of far-end bursty errored seconds (BESs) encountered by a DS1 interface in one of the previous
96, individual 15-minute, intervals.
Degraded Minutes (dsx1FarEndIntervalDMs)
The number of far-end degraded minutes (DMs) encountered by a DS1 interface in one of the previous 96,
individual 15-minute, intervals.
Line Code Violations (dsx1FarEndIntervalLCVs)
The number of far-end line code violations (LCVs) encountered by a DS1 interface in the current 15-minute
interval.
Far End Line Statistics—History
272
Access Server Administrators’ Reference Guide
22 • T1/E1 Link
Far End Line Statistics—Totals
Click on Far End Line Statistics—Totals to display the total statistics of errors that occurred during the previous 24-hour period (see figure 114).
Figure 114. Far End Performance window
Errored Seconds (dsx1FarEndTotalESs)
The number of far-end errored seconds encountered by a DS1 interface in the previous 24-hour interval.
Severely Errored Seconds (dsx1FarEndTotalSESs)
The number of far-end severely errored seconds encountered by a DS1 interface in the previous 24-hour
interval.
Severely Errored Frame Seconds (dsx1FarEndTotalSEFSs)
The number of far-end severely errored framing seconds encountered by a DS1 interface in the previous 24hour interval.
Unavailable Seconds (dsx1FarEndTotalUASs)
The number of far-end unavailable seconds encountered by a DS1 interface in the previous 24-hour in-24hour interval.
Controlled Slip Seconds (dsx1FarEndTotalCSSs)
The number of far-end controlled slip seconds encountered by a DS1 interface in the previous 24-hour
interval.
Line Errored Seconds (dsx1FarEndTotalLESs)
The number of far-end line errored seconds encountered by a DS1 interface in the previous 24-hour interval.
Path Code Violations (dsx1FarEndTotalPCVs)
The number of far-end path coding violations reported via the far-end block error count encountered by a
DS1 interface in the previous 24-hour interval.
Far End Line Statistics—Totals
273
Access Server Administrators’ Reference Guide
22 • T1/E1 Link
Bursty Errored Seconds (dsx1FarEndTotalBESs)
The number of far-end bursty errored seconds (BESs) encountered by a DS1 interface in the previous 24-hour
interval.
Degraded Minutes (dsx1FarEndTotalDMs)
The number of far-end degraded minutes (DMs) encountered by a DS1 interface in the previous 24-hour
interval.
Using Non-Facility Associated Signaling (NFAS)
NFAS allows PRIs to be fully utilized by increasing the number of data channels. Now PRIs can have 24 Bchannels for data rather than the traditional 23 B-channels for data and a D-channel for signaling.
The telephone company can configure a group of PRIs to share a single D-channel. In that group of PRIs, one
PRI will contain a D-channel and 23 B-channels. The other PRIs in the NFAS group will have 24 B-channels.
The request for an in-bound call now contains an interface identifier that indicates for which PRI in the NFAS
group the call is destined.
The NFAS group cannot span multiple remote access server units. Each RAS must have at least one PRI configured with a D-channel.
Configuring NFAS
NFAS only impacts the configuration of the signaling settings. The line interface settings do not change with
an NFAS implementation.
Example 1
The RAS hosts 2 NFAS groups, each containing 2 PRIs. WAN 1 will have the PRI with the D channel. WAN
2 will have the second PRI for that group. WANs 3 and 4 will contain the second NFAS group.
Signal setting for each WAN port
WAN 1
WAN 2
WAN 3
WAN 4
Switch Type
att(2)**
nfsSlave(7)
att(2)**
nfsSlave(7)
Interface ID
0
1
0
1
Primary WAN
1
1
3
3
** The switch type for the primary WAN is set to the flavor of ISDN the switch is configured for. This does not
change for an NFAS implementation.
* The Interface ID must match what the central office has designated. The PRI with the D-channel must be
configure with an ID of 0. Typically, the other PRIs have interface IDs which are numbered sequentially but
the IDs can be any number up to 31.
Far End Line Statistics—Totals
274
Access Server Administrators’ Reference Guide
22 • T1/E1 Link
Example 2
The RAS hosts 1 NFAS group containing 3 PRIs
Signal setting for each WAN port
WAN 1
WAN 2
WAN 3
WAN 4
Switch Type
Nil (0)
nfsSlave(7)
nfsSlave(7)
Turned off
Interface ID
0
1
2
Primary WAN
1
1
1
Far End Line Statistics—Totals
275
Chapter 23 Sync PPP
Introduction ........................................................................................................................................................278
WAN Circuit CONFIGURATION window ......................................................................................................278
Line Status—Channel Assignment ................................................................................................................278
Desired Function (slotfunction) ..............................................................................................................279
Current State (ChannelState) ..................................................................................................................279
PPP configuration .........................................................................................................................................279
PPP Main Window .......................................................................................................................................279
PPP ID (pppIndex) .................................................................................................................................279
User (pppAuthenticationUsername) ........................................................................................................279
State (pppActState) .................................................................................................................................280
Ip Address (pppServiceIpAddress) ...........................................................................................................280
Ip Mask (pppServiceIpMask) ..................................................................................................................280
Default Settings ............................................................................................................................................280
Authentication Technique (pppDefaultAuthenticationTechnique) .........................................................281
Authentication Side (pppDefaultAuthenticationSide) .............................................................................281
Authentication Username (pppDefaultAuthenticationUsername) ...........................................................281
Authentication Password (pppDefaultAuthenticationPassword) ..............................................................281
MRU (pppDefaultInitialMRU) ..............................................................................................................281
Link Compression (pppDefaultLinkCompression) ..................................................................................281
Allow Magic Number Negotiation(pppDefaultMagicNumber) ...............................................................281
Compression (pppDefaultIpCompression) ..............................................................................................282
PPP Link Window ........................................................................................................................................282
HDLC Statistics on Link ..............................................................................................................................282
Link (frDlcmiIfIndex) .............................................................................................................................282
Status (framerelStatus) ............................................................................................................................282
TRANSMIT(framerelTxOctets) .............................................................................................................282
RECEIVE (framerelRxOctets) ................................................................................................................283
No Buffers Available (framerelRxNoBufferAvailable) ..............................................................................283
Data Overflow (framerelRxDataOverflow) ..............................................................................................283
Message Ends (framerelRxMessageEnds) .................................................................................................283
Packets Too Long (framerelRxPacketTooLong) ......................................................................................283
Overflow (framerelRxOverflow) ..............................................................................................................283
Aborts (framerelRxAbort) ........................................................................................................................283
Bad CRCs (framerelRxBadCrc) ...............................................................................................................283
Invalid Frames (framerelRxInvalidFrame) ...............................................................................................283
Tx Underruns (framerelTxUnderrun) .....................................................................................................283
LINK Resets (framerelResets) ..................................................................................................................283
Link Configuration .......................................................................................................................................283
PPP protocol (pppDesiredFunction) .......................................................................................................283
Authentication Technique (pppAuthenticationTechnique) .....................................................................283
276
Access Server Administrators’ Reference Guide
23 • Sync PPP
Authentication Side (pppAuthenticationSide) .........................................................................................284
Authentication Username (pppAuthenticationUsername) .......................................................................284
Authentication Password (pppAuthenticationPassword) ..........................................................................284
Security Level (pppAccessLevel) ..............................................................................................................284
MRU (pppInitialMRU) ..........................................................................................................................284
IP Address (pppServiceIpAddress) ...........................................................................................................284
IP Mask (pppServiceIpMask) ..................................................................................................................284
IP Compression (pppIpCompression) .....................................................................................................284
IP Force Next Hop (pppForceNextHop) ................................................................................................284
Link Compression (pppLinkCompression) .............................................................................................285
Allow Magic Number Negotiation (pppMagicNumber) .........................................................................285
PPP Statistics ................................................................................................................................................285
Bad Address (pppStatBadAddresses) ........................................................................................................285
Bad Controls (pppStatBadControls) .......................................................................................................285
Packets Too Long (pppStatPacketTooLongs) ..........................................................................................285
LCP Statistics ................................................................................................................................................285
Local MRU (pppStatLocalMRU) ............................................................................................................285
Remote MRU(pppStatRemoteMRU) .....................................................................................................285
Local Multilink MRRU(pppStatLcpLocalMRRU) ..................................................................................285
Remote Multilink MRRU (pppStatLcpRemoteMRRU) .........................................................................285
LCP Authentication(pppStatLcpAuth) ....................................................................................................286
ACC Map (pppStatLocalToPeerACCMap) .............................................................................................286
Peer-Local ACC Map (pppStatPeerToLocalACCMap) ...........................................................................286
Local-Remote PPP Protocol Comprsn(pppStatLocalToRemoteProtComp) ............................................286
Remote-Local PPP Protocol Comprsn (pppStatRemoteToLocalProtComp) ...........................................286
Local-Remote AC Comprsn(pppStatLocalToRemoteACComp) .............................................................286
Remote-Local AC Comprsn (pppStatRemoteToLocalACComp) ............................................................287
Transmit Frame Check Seq. Size (pppStatTransmitFcsSize) ....................................................................287
Receive Frame Check Seq. Size (pppStatReceiveFcsSize) .........................................................................287
IP ..................................................................................................................................................................287
Operational Status (pppIpOperStatus) ....................................................................................................287
Local-Remote VJ Protocol Comprsn (pppIpLocalToRemoteCompProt) ................................................287
Remote-Local VJ Protocol Comprsn (pppIpRemoteToLocalCompProt) ................................................287
Remote Max Slot ID (pppIpRemoteMaxSlotId) .....................................................................................288
Local Max Slot ID (pppIpLocalMaxSlotId) .............................................................................................288
Data ..............................................................................................................................................................288
Octets Sent (pppActSentOctets) ..............................................................................................................288
Octets Received (pppActReceivedOctets) ................................................................................................288
Packets Sent (pppActSentDataFrames) ....................................................................................................288
Packets Received (pppActReceivedDataFrames) ......................................................................................288
Modify Link Configuration Window ......................................................................................................289
277
Access Server Administrators’ Reference Guide
23 • Sync PPP
Introduction
Point-to-point protocol (PPP) is a widely used data link layer protocol for connecting remote devices in pointto-point configuration. Mainly used in dial-up applications and in network core applications, PPP is used for
multiplexed transport over a point-to-point link, it operates on all full-duplex media, and is a symmetric peerto-peer protocol, which consists of the following major components:
• A standard method to encapsulate datagrams over serial links.
• A link control protocol (LCP) to establish, configure, and test the data-link connection.
• A family of network control protocols (NCPs) to establish and configure different network layer protocols.
In addition to offering PPP for the dial-up links, the remote access server also provides PPP connections on the
WAN side via E1 or T1 uplinks.
WAN Circuit CONFIGURATION window
In order to configure PPP on a T1/E1 WAN link go to the WAN Configuration page for the WAN circuit you
wish to configure. The Signal Mode on this configuration page must be set to none(1) for Sync PPP.
Figure 115. WAN Circuit Configuration for PPP
Line Status—Channel Assignment
To set channels for PPP within a WAN link, go to the WAN Circuit Configuration Link page for the corresponding WAN port, and click on the Channel Assignment hyperlink.
The Desired function for each channel which is going to use Sync PPP must be set for ppp(5). The PPP button
at the top of the page may be used to set all channels on this WAN circuit to ppp(5). Once the channels are set
to PPP, the PPP negotiation phase will begin. Only one PPP link can be established per WAN link. The bandwidth will be the number of channels using PPP times 64 kbps. For example, if 12 channels are set for ppp(5),
the bandwidth will be 12 x 64 kbps or 768 kbps.
Introduction
278
Access Server Administrators’ Reference Guide
23 • Sync PPP
Desired Function (slotfunction)
ppp(5)—channel is set for synchronous PPP
Current State (ChannelState)
ppp(7)—Sync PPP connection is up on this channel
Figure 116. Channel assignment showing PPP config
PPP configuration
Once the WAN Link has been set for PPP, proceed to configure the PPP parameters.
PPP Main Window
Clicking on the PPP link on the left pane of the screen shows the PPP main window. This window shows the
status of all PPP links and provides links for configuration each link and the default parameters.
Figure 117. The PPP main window
PPP ID (pppIndex)
This field provides a unique identifier for each active PPP link. This is a read only variable and is for display
purposes only.
User (pppAuthenticationUsername)
If authentication is used, this field shows the username used during authentication.
WAN Circuit CONFIGURATION window
279
Access Server Administrators’ Reference Guide
23 • Sync PPP
State (pppActState)
This is the current state of the PPP negotiation process.
•
restarting(1)—the link is currently restarting due to a configuration change or line error
•
connecting(2)—the link is currently connecting
•
lcpNegotiate(3)—PPP LCP negotiation is in progress
•
authenticating(4)—Either local or remote side is authenticating the user if enabled
•
pppUp(5)—the PPP link is up
•
disconnecting(6)—the link is currently disconnecting
•
dead(7)—the link is currently dead
•
onlineBcp(8)—BCP has been negotiated and data can be passed across the link
•
onlineIpcp(9)—IPCP has been negotiated and both sides have agreed on IP addresses and data can be
passed across the link
Ip Address (pppServiceIpAddress)
The IP address assigned and negotiated for this interface. The default IP address is 192.168.200.1 and should
be changed to match your network.
Ip Mask (pppServiceIpMask)
The IP net mask configured for this link.
Default Settings
Clicking on the Default Details… or Modify default… links on the PPP main window brings up the default
settings window. These are the default settings each PPP link will take when first initialized. Settings for individual links can be changed (this is described in a later section).
Figure 118. Default settings window
WAN Circuit CONFIGURATION window
280
Access Server Administrators’ Reference Guide
23 • Sync PPP
Authentication Technique (pppDefaultAuthenticationTechnique)
Technique to be used for authenticating
•
none(0)—no authentication will be used
•
pap(3)—password authentication protocol will be used
•
chap(4)—challenge handshake authentication protocol will be used
•
chapORpap(5)—chap will be negotiated first, if that fails, pap will be attempted
Authentication Side (pppDefaultAuthenticationSide)
This is the side of the link which will be authenticating
•
local(1)—local server will be authenticating. Remote needs to log into local server.
•
remote(2)—remote server will be authentication. Local needs to log into remote server.
Authentication Username (pppDefaultAuthenticationUsername)
This is the username that will be sent to the remote side if the remote machine is authenticating. If the local
server is authenticating, the username that the remote sends will be compared to this username. Maximum size
is 40 characters.
Authentication Password (pppDefaultAuthenticationPassword)
This is the password that will be sent to the remote side if the remote machine is authenticating. If the local
server is authenticating, the password that the remote sends will be compared to this username. Maximum size
is 40 characters.
MRU (pppDefaultInitialMRU)
This is the initial maximum received unit that will be negotiated for the link. This could possibly be changed
during PPP negotiations.
Link Compression (pppDefaultLinkCompression)
This object enables the PPP link layer address and protocol field compression. When enabled the PPP negotiations will DESIRE link compression but may disable the compression due the other end of the link not accepting link compression. When disabled the PPP negotiations will FORCE no compression on the PPP link.
•
enabled(1)—enable link compression
•
disabled(2)—disable link compression
Allow Magic Number Negotiation(pppDefaultMagicNumber)
Determines if magic number negotiation should be done
•
enabled(1)—enable magic number negotiation
•
disabled(2)—disable magic number negotiation
WAN Circuit CONFIGURATION window
281
Access Server Administrators’ Reference Guide
23 • Sync PPP
Compression (pppDefaultIpCompression)
If none(1) then the local node will not attempt to negotiate any IP Compression option. Otherwise, the local
node will attempt to negotiate compression mode indicated by the enumerated value. Changing this object
will have effect when the link is next restarted.
•
none(1)—do not negotiate Ip compression negotiated
•
vj-tcp(2)—van-jacobson TCP/IP header compression will be negotiated per RFC 1332.
PPP Link Window
Clicking on the IP address link on the main page will bring up the PPP Link Window. This gives a status of the
current link.
Figure 119. PPP Link Window
HDLC Statistics on Link
The RAS will report statistics for the HDLC link as described in the following sections.
Link (frDlcmiIfIndex)
The HDLC link management number
Status (framerelStatus)
The status of the HDLC link. If HDLC management has been established for this link the status will be UP.
TRANSMIT(framerelTxOctets)
Transmit rate in bits per second.
WAN Circuit CONFIGURATION window
282
Access Server Administrators’ Reference Guide
23 • Sync PPP
RECEIVE (framerelRxOctets)
Receive rate in bits per second.
No Buffers Available (framerelRxNoBufferAvailable)
The number of packets received when no receive buffers were available.
Data Overflow (framerelRxDataOverflow)
The number of packets received with overflow indicated by the hardware.
Message Ends (framerelRxMessageEnds)
The number of packets received with message-correct endings. This value increases each time a valid packet is
received.
Packets Too Long (framerelRxPacketTooLong)
The number of packets received that were too long.
Overflow (framerelRxOverflow)
The number of packets received with overflow indicated by software.
Aborts (framerelRxAbort)
The number of packets received that were aborted.
Bad CRCs (framerelRxBadCrc)
The number of packets received with bad CRC values.
Invalid Frames (framerelRxInvalidFrame)
The number of packets received with invalid frames.
Tx Underruns (framerelTxUnderrun)
The number of times the transmit buffer was not replenished in time to be sent out on the line.
LINK Resets (framerelResets)
Number of times the link was reset.
Link Configuration
PPP protocol (pppDesiredFunction)
This is the actual desired kind of ppp protocol
•
ppp(1)—point-to-point protocol
•
ppp-bcp(2)—bridge control protocol
Authentication Technique (pppAuthenticationTechnique)
The login technique used for authentication.
•
none(0)—No authentication will be used
WAN Circuit CONFIGURATION window
283
Access Server Administrators’ Reference Guide
•
pap(3)—password authentication protocol will be used
•
chap(4)—challenge handshake authentication protocol will be used
•
chapORpap(5)—chap will be negotiated first, if that fails, pap will be attempted
23 • Sync PPP
Authentication Side (pppAuthenticationSide)
Side of the link which will be authenticating
•
local(1)—local server will be authenticating. Remote needs to log into local server.
•
remote(2)—remote server will be authentication. Local needs to log into remote server.
Authentication Username (pppAuthenticationUsername)
This is the username that will be sent to the remote side if the remote machine is authenticating. If the local
server is authenticating, the username that the remote sends will be compared to this username. Maximum size
is 40 characters.
Authentication Password (pppAuthenticationPassword)
This is the password that will be sent to the remote side if the remote machine is authenticating. If the local
server is authenticating, the password that the remote sends will be compared to this username. Maximum size
is 40 characters.
Security Level (pppAccessLevel)
The security level given to this call.
•
passthru(1)—allows no access in the configuration screens
•
monitor(2)—allows read-only access to the configuration screens
•
change(3)—allows full read and write access to the configuration screens
MRU (pppInitialMRU)
Initial setting for Maximum Receive Unit (MRU), used for the PPP negotiation
IP Address (pppServiceIpAddress)
This object defines the IP address which will be used for the PPP link
IP Mask (pppServiceIpMask)
This object defines the IP mask, which will be used for the PPP link
IP Compression (pppIpCompression)
This object defines the IP compression for the link
IP Force Next Hop (pppForceNextHop)
This object defines the IP address of the interface, which should be the next hop for the packets—fast routing
WAN Circuit CONFIGURATION window
284
Access Server Administrators’ Reference Guide
23 • Sync PPP
Link Compression (pppLinkCompression)
This object enables the PPP link layer address and protocol field compression. When enabled the PPP negotiations will DESIRE link compression but may disable the compression due the other end of the link not accepting link compression. When disabled the PPP negotiations will FORCE no compression on the PPP link.
•
enabled(1)—enable link compression
•
disabled(2)—disable link compression
Allow Magic Number Negotiation (pppMagicNumber)
Determines if magic number negotiation should be done
•
enabled(1)—enable magic number negotiation
•
disabled(2)—disable magic number negotiation
PPP Statistics
This portion of the Dial In User Statistics window shows PPP statistics (as 32-bit variables) of the current user
selected.
Bad Address (pppStatBadAddresses)
The number of packets received with an incorrect address field.
Bad Controls (pppStatBadControls)
The number of packets received on this link with an incorrect control field.
Packets Too Long (pppStatPacketTooLongs)
The number of packets received that have been discarded because their length exceeded the maximum receive
unit (MRU).
LCP Statistics
This portion of the Dial In User Statistics window shows LCP statistics of the current user selected.
Local MRU (pppStatLocalMRU)
The current value of the MRU for the local PPP entity. This value is the MRU that the remote entity is using
when sending packets to the local PPP entity. This setting becomes active when the link is in the up—able to
pass packets—operational state
Remote MRU(pppStatRemoteMRU)
The current value of the MRU for the remote PPP entity. This value is the MRU that the local entity is using
when sending packets to the remote PPP entity. This setting becomes active when the link is in the up—able to
pass packets—operational state.
Local Multilink MRRU(pppStatLcpLocalMRRU)
Multilink maximum receive reconstruction unit for the local device.
Remote Multilink MRRU (pppStatLcpRemoteMRRU)
Multilink maximum receive reconstruction unit for the remote device.
WAN Circuit CONFIGURATION window
285
Access Server Administrators’ Reference Guide
23 • Sync PPP
LCP Authentication(pppStatLcpAuth)
Authentication type used. The following options are available:
•
none(1)
•
pap(2)
•
chap(3)
•
MSChap(4)—not currently implemented
•
tacacs(5)—not currently implemented
•
edp(6)
•
ShivaPap(7)—not currently implemented
ACC Map (pppStatLocalToPeerACCMap)
The current value of the ACC Map used for sending packets from the local server to the remote unit. The local
unit sends this character map to the remote unit to ensure that the data being transferred is interpreted correctly. This setting becomes active when the link is in the up—able to pass packets—operational State.
Peer-Local ACC Map (pppStatPeerToLocalACCMap)
The current value of the ACC Map used by the remote unit when transmitting packets to the local unit. The
remote unit sends this character map to the local unit to ensure that the data being transferred is interpreted
correctly. The local unit combines its ACC Map with the map received from the remote unit. This setting
becomes active when the link is in the up—able to pass packets—operational state.
Local-Remote PPP Protocol Comprsn(pppStatLocalToRemoteProtComp)
Indicates whether the local PPP entity will use protocol compression when transmitting packets to the remote
PPP entity. This setting becomes active when the link is in the up—able to pass packets—operational state.
These are the available options:
•
disabled(0)—PPP compression is disabled
•
enabled(1)—PPP compression is enabled
Remote-Local PPP Protocol Comprsn (pppStatRemoteToLocalProtComp)
Indicates whether the remote PPP entity will use protocol compression when transmitting packets to the local
PPP entity. This setting becomes active when the link is in the up—able to pass packets—operational state.
These are the available options:
•
disabled(0)—PPP compression is disabled
•
enabled(1)—PPP compression is enabled
Local-Remote AC Comprsn(pppStatLocalToRemoteACComp)
Indicates whether the local PPP entity will use address and control compression (ACC) when transmitting
packets to the remote PPP entity. This setting becomes active when the link is in the up—able to pass packets
—operational state. These are the available options:
•
disabled(0)—ACC is disabled
WAN Circuit CONFIGURATION window
286
Access Server Administrators’ Reference Guide
•
23 • Sync PPP
enabled(1)—ACC is enabled
Remote-Local AC Comprsn (pppStatRemoteToLocalACComp)
Indicates whether the remote PPP entity will use address and control compression (ACC) when transmitting
packets to the local PPP entity. This setting becomes active when the link is in the up—able to pass packets—
operational state. These are the available options:
•
disabled(0)—ACC is disabled
•
enabled(1)—ACC is enabled
Transmit Frame Check Seq. Size (pppStatTransmitFcsSize)
The size of the Frame Check Sequence (FCS) in bits that the local node will generate when sending packets to
the remote node. This setting becomes active when the link is in the up—able to pass packets—operational
state. The values are from 0 to 128.
Receive Frame Check Seq. Size (pppStatReceiveFcsSize)
The size (in bits) of the frame check sequence (FCS) that the remote node will generate when sending packets
to the local node. This setting becomes active when the link is in the up—able to pass packets—operational
state The values are from 0 to 128.
IP
This portion of the statistics window shows operational status and type of compression used.
Operational Status (pppIpOperStatus)
The current operational state of the interface. These are the available options:
•
up(1)—able to pass packets
•
down(2)—unable to pass packets
•
testing(3)—in test mode and unable to pass packets
Local-Remote VJ Protocol Comprsn (pppIpLocalToRemoteCompProt)
The current operational state of the interface. These are the available options:
•
up(1)—able to pass packets
•
down(2)—unable to pass packets
•
testing(3)—in test mode and unable to pass packets
Remote-Local VJ Protocol Comprsn (pppIpRemoteToLocalCompProt)
The IP compression protocol that the remote IP entity uses when sending packets to the local IP entity. The
available settings are:
•
none(1)—no compression
•
vjTCP(2)—enabled
WAN Circuit CONFIGURATION window
287
Access Server Administrators’ Reference Guide
23 • Sync PPP
Remote Max Slot ID (pppIpRemoteMaxSlotId)
The Max-Slot-Id access server parameter that the remote node has announced and that is in use on the link. If
vjTCP header compression is not in use on the link, the value of this object will be 0. The range is from
0 to 255.
Local Max Slot ID (pppIpLocalMaxSlotId)
The Max-Slot-Id access server parameter that the local node has announced and that is in use on the link. If
vjTCP header compression is not in use on the link, the value of this object will be 0. The range is from
0 to 255.
Data
This portion of the User Statistics window describes the amount of PPP data sent and received by this user.
Octets Sent (pppActSentOctets)
The number of octets (bytes) sent during this call.
Octets Received (pppActReceivedOctets)
The number of octets (bytes) received during this call.
Packets Sent (pppActSentDataFrames)
The number of packets sent to the user during this call. Version 6 nomenclature for a packet is Ipv6 header
plus payload.
Packets Received (pppActReceivedDataFrames)
The number of packets received by the user during this call. Version 6 nomenclature for a packet is Ipv6 header
plus payload.
WAN Circuit CONFIGURATION window
288
Access Server Administrators’ Reference Guide
23 • Sync PPP
Modify Link Configuration Window
Clicking on the Modify… link in the PPP link window will allow configuration of the individual link settings.
Figure 120. Link Configuration
Refer to section “Default Settings” on page 280 for a description of the following options:
• PPP protocol (pppDesiredFunction)
• Authentication Technique (pppAuthenticationTechnique)
• Authentication Side (pppAuthenticationSide)
• Authentication Username (pppAuthenticationUsername)
• Authentication Password (pppAuthenticationPassword)
• MRU (pppInitialMRU)
• IP Address (pppServiceIpAddress)
• IP Mask (pppServiceIpMask)
• IP Compression (pppIpCompression)
• IP Force Next Hop (pppForceNextHop)
• Link Compression (pppLinkCompression)
• Allow Magic Number Negotiation (pppMagicNumber)
WAN Circuit CONFIGURATION window
289
Chapter 24 Layer 2 Tunneling Protocol (L2TP)
Introduction ........................................................................................................................................................291
L2TP Configuration............................................................................................................................................291
Static Authentication ....................................................................................................................................291
RADIUS Authentication ...............................................................................................................................292
Configuration Example .................................................................................................................................293
Cisco Configuration ................................................................................................................................293
290
Access Server Administrators’ Reference Guide
24 • Layer 2 Tunneling Protocol (L2TP)
Introduction
This chapter explains the operation of the L2TP feature on the Patton Electronics Remote Access Servers. This
feature has been introduced into the Patton RAS line with the 3.8.4 software release.
The L2TP Software supports the following features:
• Shared Tunnel Support
If multiple clients requests an L2TP Tunnel to the same LNS, they will use the same tunnel
• Multiple Tunnel Support
If a client requests a connection to a new L2TP Tunnel then a new tunnel will be established.
• Keep Alive Messages
• Full Challenge and Challenge Response check for each tunnel authentication request
• Hostname verification supported when configured for authentication-ID support
• Packet sequence checking and support
• No AVP Hiding supported
• CPU Idle Time available to the web interface on the Home Page
• LNS IP Address displayed on the dialin-all web interface page
• Tunnel Id displayed on the dialin-all web interface page.
L2TP provides a means of "backhauling" the PPP connection from the local RAS device, which will provide
the physical work on terminating the phone call, and the Access Server which will authenticate the call. The
RAS will be acting a LAC (L2TP Access Concentrator) in this application. A seperate device, typically a Cisco
router, will be acting as the LNS (L2TP Network Server).
L2TP Configuration
The Patton Electronics' Remote Access Server can be configured to initiate an L2TP tunnel using either Static
Authentication or RADIUS Authentication. The following information defines the configuration and the features which are available.
Static Authentication
The user has the ability to initiate an L2TP tunnel for a dialed in user based on a staticly configured username.
This is done by configuring the service for "VPN" and defining the IP Address of the LNS as the Service IP.
It is important to note that when configuring the device using static authentication neither the hostname verification or password protection is enabled on the link.
Introduction
291
Access Server Administrators’ Reference Guide
24 • Layer 2 Tunneling Protocol (L2TP)
RADIUS Authentication
Figure 121. L2TP RADIUS Authentication
When RADIUS Authentication is used, the following RADIUS attributes are used to configure the L2TP
Tunnel. The following information defines the RADIUS attributes which are supported, and example usage
from a RADIUS file, as well as a description of their operation:
--RadTunnelType, RADIUS Attribute: 64
example>> Tunnel-Type = 3,
The Tunnel-Type defines the type of tunnel used for this call. A value of "3" indicates L2TP as defined in
RFC 28668
--RadTunnelPassword, RADIUS Attribute: 69
example>> Tunnel-Password = "tunnel_pass",
This parameter defines the password which will be used to authenticate the tunnel. If no password is supplied by the RADIUS server the tunnel will not use authentication on the tunnel link. Note that this is not
the password for the dialin user, or the PPP link, this will only be used to authenticate the tunnel.
RadServerEndpoint, RADIUS Attribute: 67
example>> Tunnel-Server-Endpoint = "192.168.200.15",
This is the IP address of the LNS. To define a different LNS server for a specific dialin user simply use a
new IP address. Multiple calls which will be sent through the same tunnel (same IP address) will always go
through the currently established tunnel (i.e. we do not create a new tunnel per call). we will establish a
new tunnel if a new remote LNS is defined by this parameter
RadTunnelClientID, RADIUS Attribute: 90
example>> Tunnel-Client-Auth-ID = "patton_lac",
If defined, this will be used as the "hostname" parameter supplied from the LAC to the LNS when the tunnel is being established. The cisco devices provide a command "terminate from" under L2TP. If this cisco
L2TP Configuration
292
Access Server Administrators’ Reference Guide
24 • Layer 2 Tunneling Protocol (L2TP)
command is used then the value used (cisco> terminate from patton_lac) would need to match the hostname provided by the RAS device.
If this variable is not configured in the RADIUS server, then the RAS box will use the "Box Name" as the
hostname. This is configured on the RAS device under "System->Modify-> Box Name"
RadTunnelServerID, RADIUS Attribute: 91
example>>Tunnel-Server-Auth-ID = "cisco_lns"
The LNS will supply a hostname to the LAC during tunnel establishment.
• If this variable is defined in the RADIUS server then the RAS box will verify the name supplied by the LNS
against this value.
• If this variable is not in the configuration on the RADIUS server then the RAS will accept any name supplied by the LNS.
Configuration Example
The following information defines a Cisco configuration which was used during the testing of this feature.
Cisco Configuration
The following example shows the steps used to configure out local cisco for use as a L2TP LNS. Notes are
defined in brackets such as [note].
Cisco Config (LNS)
Router(config)#vpdn enable
Router(config)#vpdn-group 1
Router(config-vpdn)#
Router(config-vpdn)#accept-dialin
Router(config-vpdn-acc-in)#
Router(config-vpdn-acc-in)#protocol l2tp
Router(config-vpdn-acc-in)#virtual-template 99
Router(config-vpdn-acc-in)#exit
Router(config-vpdn)#terminate-from hostname patton_ras
[The value used here will need to match the Tunnel-Client-Auth-ID defined in the RADIUS server, or the RAS's "Box
Name"]
Router(config-vpdn)#
Router(config-vpdn)#local name cisco_lns
[This is the name that the cisco LNS will supply to the LAC as its' hostname. If you would like the RAS to
validate this name then the same value should be used in the RADIUS Tunnel-Server-Auth-ID]
Router(config-vpdn)#exit
Router(config)#interface Virtual-Template 99
Router(config-if)#
Router(config-if)#ip unnumbered FastEthernet 0/0
Router(config-if)#no ip directed-broadcast
Router(config-if)#peer default ip address pool default
[You must also define the default pool with the IP Address range that you would like to supply to the dialin
users]
L2TP Configuration
293
Access Server Administrators’ Reference Guide
24 • Layer 2 Tunneling Protocol (L2TP)
Router(config-if)#ppp authentication chap
Router(config-if)#exit
Router(config)#vpdn-group 1
Router(config-vpdn)#l2tp tunnel authentication
[This will enable the use of tunnel authentication]
Router(config-vpdn)#l2tp tunnel password tpass
[This will define the password for the tunnel authentication -- this needs to match the value set in TunnelPassword. If Tunnel-Password is not define in the RADIUS server then the RAS will use "tpass"]
Router(config)#username cisco_lns password upass_cisco
Router(config)#username patton_ras password upass_patton
[You will need to define the username and password for the dialin users. This can be defined in the local
database or through any other means supported by cisco dialin (RADIUS, TACAS, etc)]
Router(config)#
L2TP Configuration
294
Chapter 25 Contacting Patton
Chapter contents
Introduction ........................................................................................................................................................296
Patton Electronics Company contact information ...............................................................................................296
295
Access Server Administrators’ Reference Guide
25 • Contacting Patton
Introduction
The About link displays Patton Electronics Company contact information (see “Patton Electronics Company
contact information”). Click on About under the Configuration Menu to display the About main window (see
figure 122).
Figure 122. About window
Patton Electronics Company contact information
Patton Electronics Company
7622 Rickenbacker Drive
Gaithersburg, Maryland 20879
U.S.A.
Phone: +1 (301) 975-1000
Fax: +1 (301) 869-9293
E-mail: [email protected]
[email protected]
WWW: www.patton.com
Introduction
296
Chapter 26 License
Chapter contents
Introduction ........................................................................................................................................................298
End User License Agreement ...............................................................................................................................298
1. Definitions: ...............................................................................................................................................298
2. Title: .........................................................................................................................................................299
3. Term: ........................................................................................................................................................299
4. Grant of License: .......................................................................................................................................299
5. Warranty: .................................................................................................................................................299
6. Termination: .............................................................................................................................................299
297
Access Server Administrators’ Reference Guide
26 • License
Introduction
The License link presents the End User License Agreement for the access server software. Click on License
under the Configuration Menu to display the License main window (see figure 123).
Figure 123. License window
By opening the access server, operating the Designated Equipment or downloading the Program(s) electronically, the End User agrees to the conditions in the “End User License Agreement” below.
End User License Agreement
By opening this package, operating the Designated Equipment or downloading the Program(s) electronically,
the End User agrees to the following conditions:
1. Definitions:
A) “Effective Date” shall mean the earliest date of purchase or download of a product containing the Patton
Electronics Company Program(s) or the Program(s) themselves.
B) “Program(s)” shall mean all software, software documentation, source code, object code, or executable code.
C) “End User” shall mean the person or organization which has valid title to the Designated Equipment.
D) “Designated Equipment” shall mean the hardware on which the Program(s) have been designed and provided to operate by
Introduction
298
Access Server Administrators’ Reference Guide
26 • License
2. Title:
Title to the Program(s), all copies of the Program(s), all patent rights, copyrights, trade secrets and proprietary
information in the Program(s), worldwide, remains with Patton Electronics Company or its licensors.
3. Term:
The term of this Agreement is from the Effective Date until title of the Designated Equipment is transferred by
End User or unless the license is terminated earlier as defined in “6. Termination:” below.
4. Grant of License:
A) During the term of this Agreement, Patton Electronics Company grants a personal, non-transferable, nonassignable and non-exclusive license to the End User to use the Program(s) only with the Designated Equipment at a site owned or leased by the End User.
B) The End User may copy licensed Program(s) as necessary for backup purposes only for use with the Designated Equipment that was first purchased or used or its temporary or permanent replacement.
C) The End User is prohibited from disassembling; decompiling, reverse-engineering or otherwise attempting
to discover or disclose the Program(s), source code, methods or concepts embodied in the Program(s) or having
the same done by another party.
D) Should End User transfer title of the Designated Equipment to a third party after entering into this license
agreement, End User is obligated to inform the third party in writing that a separate End User License Agreement from Patton Electronics Company is required to operate the Designated Equipment.
5. Warranty:
The Program(s) are provided “as is” without warranty of any kind. Patton Electronics Company and its licensors disclaim all warranties, either express or implied, including but not limited to the implied warranties of
merchantability, fitness for a particular purpose or non-infringement. In no event shall Patton Electronics
Company or its licensors be liable for any damages whatsoever (including, without limitation, damages for loss
of business profits, business interruption, loss of business information, or other pecuniary loss) arising out of
the use of or inability to use the Program(s), even if Patton Electronics Company has been advised of the possibility of such damages. Because some states do not allow the exclusion or limitation of liability for consequential or incidental damages, the above limitation may not apply to you.
If the Program(s) are acquired by or on behalf of a unit or agency of the United States Government, the Government agrees that such Program(s) are “commercial computer software” or “computer software documentation” and that, absent a written agreement to the contrary, the Government’s rights with respect to such
Program(s) are limited by the terms of this Agreement, pursuant to Federal Acquisition Regulations 12.212(a)
and/or DEARS 227.7202-1(a) and/or sub-paragraphs (a) through (d) of the “Commercial Computer Software—Restricted Rights” clause at 48 C.F.R. 52.227-19 of the Federal Acquisition Regulations as applicable.
6. Termination:
A) The End User may terminate this agreement by returning the Designated Equipment and destroying all
copies of the licensed Program(s).
B) Patton Electronics Company may terminate this Agreement should End User violate any of the provisions
of “4. Grant of License:” above.
C) Upon termination for A or B above or the end of the Term, End User is required to destroy all copies of the
licensed Program(s)
End User License Agreement
299
Appendix A Supported RADIUS Attributes
Chapter contents
Access-Accept Attributes......................................................................................................................................301
Access-Request Attributes ....................................................................................................................................301
Access-Challenge Attributes.................................................................................................................................302
Accounting-Start Attributes.................................................................................................................................302
Accounting-Stop Attributes .................................................................................................................................303
300
Access Server Administrators’ Reference Guide
A • Supported RADIUS Attributes
Access-Accept Attributes
Username
1
Service-Type
6
Framed-Protocol
7
Framed-IP-Address
8
Framed-Netmask
9
Framed-Route
10
Filter-Id
11
Framed-MTU
12
Framed-Compression
13
Login-IP-Host
14
Login-Service
15
Login-Port
16
Reply-Message
18
Callback-Number
19
State
24
Class
25
Session-Timeout
27
Idle-Timeout
28
Termination-Action
29
Port-Limit
62
Primary-DNS(Ascend Compatibility)
135
Secondary-DNS(Ascend Compatibility)
136
Assign-DNS(Ascend Compatiblity)
137
Force-Next-Hop
209
MS-CHAP Success VSA
MS-CHAP Domain VSA
Access-Request Attributes
Access-Accept Attributes
User-Password
2
CHAP-Password
3
NAS-IP-Address
4
NAS-Port
5
Service-Type
6
Framed-Protocol
7
State
24
Called-Station-Id
30
Calling-Station-Id
31
NAS-Identifier
32
301
Access Server Administrators’ Reference Guide
A • Supported RADIUS Attributes
CHAP-Challenge
60
NAS-Port-Type
61
MS-CHAP Challenge
MS-CHAP Response
MS-CHAP CPW2
MS-CHAP Nt-Enc-Password
MS-CHAP Lm-Enc-Password
MS-CHAP Challenge
MS-CHAP2 Response
MS-CHAP2 CPW
MS-CHAP Nt-Enc-Password
Access-Challenge Attributes
State
24
Session-Timeout
27
Idle-Timeout
28
Accounting-Start Attributes
Access-Challenge Attributes
User-Name
1
NAS-IP-Address
4
NAS-Port
5
Service-Type
6
Framed-Protocol
7
Framed-IP-Address
8
Class
25
Called-Station-Id
30
Calling-Station-Id
31
NAS-Identifier
32
Account-Status-Type
40
Account-Delay-Time
41
Account-Session-Id
44
Account-Authentic
45
Account-Multiple-Session-Id
50
NAS-Port-Type
61
Data-Rate(RX)
197
Xmit-Rate(TX)
255
302
Access Server Administrators’ Reference Guide
A • Supported RADIUS Attributes
Accounting-Stop Attributes
Accounting-Stop Attributes
User-Name
1
NAS-IP-Address
4
NAS-Port
5
Service-Type
6
Framed-Protocol
7
Framed-IP-Address
8
Class
25
Called-Station-Id
30
Calling-Station-Id
31
NAS-Identifier
32
Account-Status-Type
40
Account-Delay-Time
41
Account-Input-Octets
42
Account-Output-Octets
43
Account-Session-Id
44
Account-Authentic
45
Account-Session-Time
46
Account-Input-Packets
47
Account-Output-Packets
48
Account-Terminate-Cause
49
Account-Multiple-Session-Id
50
NAS-Port-Type
61
Data-Rate(RX)
197
Xmit-Rate(TX)
255
303
Appendix B MIB trees
Chapter contents
Model 2960 MIB Tree Structure.........................................................................................................................305
304
Access Server Administrators’ Reference Guide
B • MIB trees
Model 2960 MIB Tree Structure
Model 2960 MIB Tree Structure
305
Appendix C Technical Reference
Chapter contents
Introduction ........................................................................................................................................................307
Configuring a RADIUS server.............................................................................................................................307
What Is RADIUS? ........................................................................................................................................307
RADIUS Client/Server Architecture .......................................................................................................307
RADIUS Services ....................................................................................................................................308
RADIUS Authentication Procedure ........................................................................................................309
RADIUS Standards .................................................................................................................................309
RADIUS—Where Can I Get It? .............................................................................................................310
RADIUS Resources .................................................................................................................................310
Configuring RADIUS ...................................................................................................................................311
Overview .................................................................................................................................................311
Configuring RADIUS Authentication .....................................................................................................311
On your radius server ........................................................................................................................ 311
On your Patton RAS ......................................................................................................................... 311
Using SNMP with the Access Server....................................................................................................................313
Finding the SNMP Name .............................................................................................................................313
Finding the section of the MIB tree in which the SNMP parameter resides ..................................................314
Finding the branch where the SNMP parameter resides ................................................................................314
Configuring Non-Facility Associated Signaling (NFAS) ......................................................................................316
Configuring NFAS .......................................................................................................................................316
Configuring Frame Relay ....................................................................................................................................317
Line Configuration .......................................................................................................................................317
WAN Channel Assignment main screen .......................................................................................................318
Configuring Frame Relay link parameters .....................................................................................................319
Configuring PVCs ........................................................................................................................................319
Configuring Permanent Virtual Circuits .................................................................................................320
Configuring IP routing with a Frame Relay Link ....................................................................................321
Adding a route .................................................................................................................................. 321
Link Status and the IP Forwarding ..........................................................................................................322
Configuring DNIS ..............................................................................................................................................323
Setting up IP address pools by configuring DNIS Ip Pools ...........................................................................323
Setting up a DNIS user profile ......................................................................................................................323
Setting up a DNIS group ..............................................................................................................................323
Configuring a leased line/dedicated line connection ............................................................................................324
Configuring the RAS ....................................................................................................................................324
Configuring the remote end using Microsoft Windows ................................................................................325
306
Access Server Administrators’ Reference Guide
C • Technical Reference
Introduction
This appendix contains the following information:
• “Configuring a RADIUS server” on page 307
• “Using SNMP with the Access Server” on page 313
• “Configuring Non-Facility Associated Signaling (NFAS)” on page 316.
• “Configuring Frame Relay” on page 317
• “Configuring DNIS” on page 323
• “Configuring a leased line/dedicated line connection” on page 324
Configuring a RADIUS server
This section covers the basics of the RADIUS protocol. It defines key terms and provides an overview of
RADIUS services and procedures. It gives a concise history of the relevant standards, cites those which Patton
supports, and lists selected sources for RADIUS software—both available for free and available for purchase.
Finally, online resources for more information are provided.
What Is RADIUS?
Remote Authentication Dial-In User Service (RADIUS) is a data-communications protocol designed to provide security management and statistics collection in remote computing environments, especially for distributed networks with dial-in users. A central database, the RADIUS Server, maintains network security data
(such as user profiles) and statistics (such as bytes transmitted and received). Centrally stored security data is
more secure, easier to manage, and scales more smoothly than data scattered throughout the network on multiple devices.
RADIUS Client/Server Architecture
RADIUS operates on the client/server model. A RADIUS Authentication Server provides security services and
stores security data. A RADIUS Accounting Server collects and stores statistical data. Most often a single
machine provides both functions, however the two RADIUS servers may reside on separate machines. Network managers may configure a RADIUS Client to use RADIUS security services, RADIUS accounting services, or both.
Figure 124. RADIUS diagram
Introduction
307
Access Server Administrators’ Reference Guide
C • Technical Reference
A RADIUS client consists of a Network Access Server (NAS)—such as your Patton RAS—which provides one or
more remote users with access to network resources. A single RADIUS Server can serve hundreds of RADIUS clients and up to tens of thousand of end users. Fault tolerance and redundancy concerns can be addressed by configuring a RADIUS client to use one or more alternate RADIUS servers. A NAS (your Patton RAS) can access a
local RADIUS Server on the connected LAN, or a remote RADIUS Server via WAN connections.
RADIUS Services
AAA. RADIUS provides three network services, known as authentication, authorization, and accounting, or
AAA. These services give network managers an easy way to:
• Identify remote users, and control which users can access the network (authentication)
• Define what each user can do by controlling access to network resources (authorization)
• Track what resources each user consumes in order to bill them for services (accounting)
RADIUS login procedures combine authentication and authorization services to provide security functions.
Authentication is essentially a login procedure involving a username and password: the process by which the network validates a dial-in user’s identity—distinguishing a legitimate user from a malicious or mischievous hacker.
RADIUS supports multiple authentication protocols including password authentication protocol (PAP) and challenge handshake authentication protocol (CHAP) (RFC 1994), MS-CHAP V1 (RFC 2433), and MS-CHAP V2
(RFC 2759), as well as Unix login. PAP and CHAP are specified within the point-to-point protocol (PPP) authentication procedures (RFC 1661). To prevent interception by snoopers on the network, RADIUS encrypts user
passwords for transmission between client and server.
A RADIUS authentication server will respond to requests from known clients and discard requests from
unknown clients. Before authenticating any users, the NAS (your Patton RAS) must validate its own identity
by authenticating with the RADIUS server using a common shared secret.
The shared secret is a text string configured on both the RADIUS client and server, and is never sent across the
network in its pure original form. During authentication, the RADIUS server sends a random number to the
NAS, which is combined with the shared secret using a hash-code algorithm (RSA Message Digest Algorithm
MD5), and then sent back to the RADIUS server. The RADIUS server will decode the received message for
validation against its own copy of the shared secret. The RAS will disconnect users that fail to authenticate with
the RADIUS server.
Authorization is the process of restricting and enabling what each user can do. RADIUS servers are responsible
for knowing which services and privileges a given user may legitimately access (for example, PPP, SLIP, Telnet,
rlogin), and returning that information to the communications server when the user successfully authenticates.
Accounting is the process of collecting and reporting statistics. The RADIUS accounting server collects and
stores the statistics sent by RADIUS clients and responds to client queries for statistics. These data include user
login times and durations, packets sent/received, bytes sent/received, and so on, and may be used for billing,
traffic and performance analysis, and troubleshooting.
Configuring a RADIUS server
308
Access Server Administrators’ Reference Guide
C • Technical Reference
RADIUS Authentication Procedure
The procedure for RADIUS authentication and authorization is outlined in figure 125:
Figure 125. RADIUS authentication and authorization procedure
1. User dials into the RAS and establishes a connection.
2. The RAS prompts for user ID and password (PAP) or challenge (CHAP, MS-CHAP V1 and MS-CHAP
V2).
3. User responds with user ID and password (PAP) or challenge response (CHAP, MS-CHAP V1 and MSCHAP V2).
4. RAS forwards an authentication request packet to the RADIUS server, containing user identification,
encrypted password, and RAS identification.
5. RADIUS server validates the user and sends the RAS an authentication acknowledgement packet containing user configuration and one of the following
– Specifying what network services and privileges the RAS should provide to the user (Access-accept), or
– Denying the Authentication Request (Access-reject).
RADIUS Standards
RADIUS was initially developed in January 1977 by Lucent Technologies on recommendation from the Internet Engineering Task Force (IETF). The second generation IETF Standards for RADIUS (RFC 2138) and
RADIUS Accounting (RFC 2139) were published in April 1977. The second set of RFCs changed the assigned
UDP port number for RADIUS from 1645 (conflicting with “datametrics” service) to 1812, and changed the
assigned UDP port number for RADIUS accounting from 1646 (conflicting with “sa-msg-port” service) to
1813. The April 1977 standards have been widely implemented and remain extensively deployed in public and
private networks.
In June 2000, IETF published a third revision of the RADIUS standards, RFC2865 and RFC2866. RFC 5865
defined congestion control mechanisms to solve performance problems sometimes encountered when the earlier standard is deployed in large-scale networks. RFC2866 defined additional accounting features.
Patton remote access servers (RAS) support the April 1977 standards for RADIUS (RFC2138) and RADIUS
Accounting (RFC2139). The RADIUS attributes Patton RAS supports are listed in Appendix A of the Access
Server Administrator’s Reference Guide, available online at http://www.patton.com/manuals/AccessServer_Admin-D_lo-res.pdf
Configuring a RADIUS server
309
Access Server Administrators’ Reference Guide
C • Technical Reference
RADIUS—Where Can I Get It?
RADIUS available for free
Microsoft’s RADIUS implementation for WindowsNT is called IAS and comes included with the WindowsNT operating system. Another freeware option is WinRADIUS, available at
http://www.itconsult2000.com/en/product/WinRadius.html. A few of the many freeware implementations of RADIUS for
UNIX are available on the Internet at the links below:
Product
URL
FreeRADIUS
http://www.freeradius.org/
Cistron
http://www.radius.cistron.nl/
GNU RADIUS
http://www.gnu.org/software/radius/radius.html
Vovida
RADIUS
http://www.vovida.org/protocols/downloads/radius/
RADIUS available for purchase
A few of the many commercial implementations of RADIUS are available for purchase at the links below:
Product
Vendor
URL
Steel-Belted RADIUS
Funk Software
http://www.funk.com/sbrframe.html
RadiusNT
IEA Software
http://www.emerald.iea.com/radiusnt/index.html
Lucent Navis RADIUS
Lucent Navis
http://www.lucentradius.com/
VOP RADIUS
Vircom
http://www.vircom.com/solutions/vopradius/
Advanced Instruments
http://ntradius.ai.com
PrimeData
http://billnet.net
Internet Transaction Services
http://www.itrans.com
NTRadius
BillNet
NTX Access
RADIUS Resources
RADIUS Standards Specifications
http://www.ietf.org/rfc/rfc2138.txt (Authentication, April 1977)
http://www.ietf.org/rfc/rfc2139.txt (Accounting, April 1977)
http://www.ietf.org/rfc/rfc2865.txt (Authentication, June 2000)
http://www.ietf.org/rfc/rfc2866.txt (Accounting, June 2000)
PPP Standard Specification
http://www.faqs.org/rfcs/rfc1331.html
Lucent White Paper
http://portmasters.com/marketing/whitepapers/radius_paper.html
Cisco: How Does RADIUS WORK?
http://www.cisco.com/warp/public/707/32.html
Microsoft: RADIUS Security and Best Practices
http://www.microsoft.com/technet/treeview/default.asp?url=/technet/itsolutions/network/maintain/security/radiusec.asp
Configuring a RADIUS server
310
Access Server Administrators’ Reference Guide
C • Technical Reference
Intel: RADIUS Overview
http://support.intel.com/support/si/library/bi0407.htm
Configuring RADIUS
This section describes how to configure your Patton RAS for RADIUS authentication and accounting.
Overview
You may configure your Patton RAS to use RADIUS Athentication, RADIUS Accounting, or both. Before
authenticating any users, your Patton RAS must first authenticate with the RADIUS server to validate its identity.
Configuring RADIUS authentication comprises the following:
• Configuring RAS authentication on the RADIUS server and on the RAS
• Configuring user authentication and authorization on the RAS
Configuring your RAS for RADIUS Accounting is completed on a single management page.
Configuring RADIUS Authentication
On your radius server. In the following procedure you will learn your RAIDUS server’s IP address and UDP
port numbers, and add your RAS to your server’s list of known RADIUS clients. The following information
provides an overview of the necessary steps. For detailed operating procedures for your specific RADIUS server
please consult the user documentation.
1. Collect the following information from your RADIUS server:
– What is the IP Address of your RADIUS Server?
– Which UDP port numbers does your RADIUS server use for
RADIUS (1645 or 1812)?
RADIUS accounting services (1646 or 1813)?
2. Defining your RAS as a known client: An example client list from a Cistron RADIUS server is shown
below.
IP Address
Secret
friendly name
192.168.200.1
my_red_ras1_shared_secret
my_red_ras1
192.168.200.2
my_red_ras2_shared_secret
my_red_ras2
Add the IP address, shared secret and friendly name for your RAS to the list of known clients at your
RADIUS server. Record the shared secret and friendly name for use in the next procedure.
On your Patton RAS. In the following procedure you will configure your RAS with the information collected
previously.
1. From your RAS Configuration Menu, click the second link, Authentication, then click the Modify… hyperlink to edit the configurable parameter fields, shown below.
Configuring a RADIUS server
311
Access Server Administrators’ Reference Guide
C • Technical Reference
Figure 126. Authentication window
2. On the Authentication page, define values for the parameters as follows:
– Validation: Select staticThenRadius(4) or radiusUsers(2).
Note
We recommend you select staticThenRadius then add a static user to the RAS’s
user database. This will provide you an alternate login method so you can still
manage your RAS if RADIUS authentication should fail.
– Host Address: Enter the IP address of your RADIUS server.
– Secondary Host Address: Enter the IP address of your fallback RADIUS server, if you have one. Otherwise, leave blank.
– Host Port: Enter the UDP Port number your RADIUS server uses to receive authentication requests
(typically 1645 or 1812).
Note
The primary and secondary RADIUS server will use the same port number.
– Timeout: 2 is the default value; leave it alone unless you know better.
– Retries: 3 is the default value; leave it alone unless you know better
– Secret: Enter the secret from your RAS client profile on your RADIUS server.
– NAS Identifier: Optional. You may enter the IP address or ‘friendly name’ of your RAS as defined in
your RADIUS server’s client list.
Configuring a RADIUS server
312
Access Server Administrators’ Reference Guide
Note
C • Technical Reference
Depending on how you define NAS-Identifier, Authentication Request
packets sent to the RADIUS server will contain the NAS-Identifier attribute
or the NAS-IP Address.
If you define this parameter, your RAS will insert the value into the NAS-Identifier attribute field in
Authentication Request packets sent to the RADIUS server
If you leave the field blank, your RAS will insert its IP address as the value in the NAS-IP-Address
attribute field in Authentication Request packets sent to the RADIUS server.
Note
Your RAS is now configured for RADIUS Authentication, but not yet configured for RADIUS Accounting.
Using SNMP with the Access Server
SNMP is used to configure and monitor the access server. There are numerous third-party software applications available that are capable of using SNMP to control the access server.
To interact with the access server, these network management applications need:
• A community string which determines their level of access to the access server
• An object identifier which identifies the specific parameter the application wants to view or modify
SNMP has two levels of access:
• Read-only, for which the community string is the user password
• Read/write, for which the community string is the superuser password
Object identifiers (OIDs) comprise a series of integers separated by dots that identify a specific parameter (for
example, 1.3.6.1.4.1.1768.5.25).
The series of integers are built by traversing down a tree structure (see figure 128 on page 315). As a decision is
made at each branch of the tree structure, a new integer (identifying the branch chosen) is added to the object
identifier. When the last branch is selected—taking you to the desired parameter—the OID is completed.
The following sections give an example of building an OID. In the example, a customer wants to monitor the
number of active calls to find out if the access server becomes full during peak hours.
Finding the SNMP Name
The Access Server Guide gives the SNMP name for each parameter that appears on the web interface.
The total number of active calls can be found on the dial-in screen. The description for that parameter gives
the following information:
Figure 127. Parameter format
Using SNMP with the Access Server
313
Access Server Administrators’ Reference Guide
C • Technical Reference
Finding the section of the MIB tree in which the SNMP parameter resides
Refer to figure 128 on page 315 and look at the Model 2960 MIB tree. There two sections in the tree:
• The Internet standards section, identified by the shaded box surrounding it. In this section are MIBs (Management Information Base) that deal with Internet standards such as SNMP, IP, ICMP, Frame-Relay, and
Ethernet. It contains parameters that could potentially be on any machine that implements these features.
• The private Patton MIB—In this section are MIB variables that are specific to Patton products. This section
is further divided into:
– Those variables valid for a group of products
– Those variables valid for a Model 29XX/31XX Series: m3120 node
Active Calls is a product specific parameter.
Now, the OID can start to be built up. Choose the nodes that will take you to the private Patton MIB (these
nodes are shaded red in figure 128 on page 315). All private Patton MIB variables will begin with this series
(1.3.6.1.4.1.1768).
Finding the branch where the SNMP parameter resides
On the SNMP web page are links to the Patton MIB definitions. Most of the MIBs are common to all Patton
access server products, therefore the parameter is likely to be found in the Enterprise MIB. Click on Enterprise
MIB and open the file. Search for the SNMP name diActive that maps to Active Calls. The following entry is
listed:
diActive OBJECT-TYPE
SYNTAX
INTEGER
ACCESS
read-write
STATUS
mandatory
DESCRIPTION "The total number of active calls."
::= { calldialin 25 }
The entry includes the name, the type, the access available, and the description of the parameter. The last line
gives another part of the OID. There the diActive parameter is identified as parameter 25 under the calldialin
branch. Looking at the MIB tree, the calldialin node is labeled as branch 5 (shaded green in figure 128 on
page 315).
Note
For the purpose of this example, figure 128 on page 315 shows parameter
identifier 25 (diActive). Normally, a MIB tree shows only branches and
nodes, it will not show the myriad of parameters that come under each node.
Therefore, while you can use the MIB diagrams in B, “MIB trees” on page
304 to map out the OID through the Enterprise node level, you will need to
refer to section “Using SNMP with the Access Server” on page 313 for help
in determining where the parameter you are interested in resides.
The calldialin node is immediately under the Patton branch, therefore the OID is 1.3.6.1.4.1.1768.5.25, as
shown in figure 128 on page 315. This new OID is used by the network management software to query the
RAS for the total number of active calls.
Using SNMP with the Access Server
314
Access Server Administrators’ Reference Guide
C • Technical Reference
Figure 128. MIB tree for Model 2960 access server
Using SNMP with the Access Server
315
Access Server Administrators’ Reference Guide
C • Technical Reference
Configuring Non-Facility Associated Signaling (NFAS)
NFAS allows PRIs to be fully utilized by increasing the number of data channels. Now PRIs can have 24 Bchannels for data rather than the traditional 23 B-channels for data and a D-channel for signaling.
The telephone company can configure a group of PRIs to share a single D-channel. In that group of PRIs, one
PRI will contain a D-channel and 23 B-channels. The other PRIs in the NFAS group will have 24 B-channels.
The request for an in-bound call now contains an interface identifier that indicates for which PRI in the NFAS
group the call is destined.
The NFAS group cannot span multiple remote access server units. Each RAS must have at least one PRI configured with a D-channel.
Configuring NFAS
NFAS only impacts the configuration of the signaling settings. The line interface settings do not change with
an NFAS implementation.
Example 1
The RAS hosts 2 NFAS groups, each containing 2 PRIs. WAN 1 will have the PRI with the D channel. WAN
2 will have the second PRI for that group. WANs 3 and 4 will contain the second NFAS group.
Signal setting for each WAN port
WAN 1
WAN 2
WAN 3
WAN 4
Switch Type
att(2)**
nfsSlave(7)
att(2)**
nfsSlave(7)
Interface ID
0
1
0
1
Primary WAN
1
1
3
3
** The switch type for the primary WAN is set to the flavor of ISDN the switch is configured for. This does not
change for an NFAS implementation.
* The Interface ID must match what the central office has designated. The PRI with the D-channel must be
configure with an ID of 0. Typically, the other PRIs have interface IDs which are numbered sequentially but
the IDs can be any number up to 31.
Example 2
The RAS hosts 1 NFAS group containing 3 PRIs
Signal setting for each WAN port
WAN 1
WAN 2
WAN 3
WAN 4
Switch Type
Nil (0)
nfsSlave(7)
nfsSlave(7)
Turned off
Interface ID
0
1
2
Primary WAN
1
1
1
Configuring Non-Facility Associated Signaling (NFAS)
316
Access Server Administrators’ Reference Guide
C • Technical Reference
Configuring Frame Relay
Frame Relay is a high-speed datalink communications technology that is used in hundreds of networks
throughout the world to connect LAN, SNA, Internet, and voice applications. Within the network, Frame
Relay uses a simple form of packet switching that provides high throughput and reliability. (For more information, refer to the Frame-Relay MIB: 1315 Management Base for Frame Relay DTEs.)
The access server offers IP-in-Frame Relay, or RFC-1490 Multi-protocol encapsulation. Because the access
server has a built-on router, the access server can route IP traffic to multiple locations over multiple virtual
channels. Using a T1 or E1 WAN link the access server can function as a network-to-network interface (NNI)
switch or as a user-to-network interface (UNI). Most applications will be as an UNI.
A Frame Relay network consists of endpoints (the access server), frame relay access equipment (bridges, routers, hosts, frame relay access devices) and network devices (switches, network routers, T1/E1 multiplexers).
The most popular application is to use the access server as a POP-in-a-box with a Frame Relay IP connection
to the Internet backbone.
The most common configuration is setting up the access server as a DCE and connecting to a provider’s Frame
switch via a T1/E1 line. In this application, the access server will establish a point-to-point link via one or more
DLCI’s or virtual channels. Each DLCI is a pipe with an associated far-end IP address. You may then modify
the access server’s routing table and enter routes to use the Frame Relay link as the next-hop.
A Frame Relay link is configured as follows:
• Configuring the WAN link for Frame Relay
• Selecting the correct Frame Link configuration parameters (LMI)
• Assigning an IP address to the DLCI.
• Assigning next-hop routes to the new DLCI.
Line Configuration
The first stage in setting up a Frame Relay WAN link is configuring a T1 or E1 line for Frame Relay service.
Note
You can have some channels as a Frame Relay link on the same WAN link
that you are also using for dial-up calls. Each channel that is set to Frame
Relay will reduce the number of simultaneous calls. You also must arrange
with your provider to allow both Frame Relay and cir-cuit-switched calls on
the same WAN link. In this case, you do not need to set up the line configuration as it was already done when you installed the T1 for dial-up.
1. Click on T1/E1 Link under the Configuration Menu to display the T1/E1 Link Activity main window (see
figure 102 on page 252).
2. Verify which port the T1/E1 cable is connected into on the access server—that port number corresponds
to the Link: x (where x is the same number as the port number) portion of the T1/E1 Link Activity main
window. Click on Configuration in the appropriate Link: x section (for example, if the T1/E1 cable was connected to port 2, you would click on Configuration in the Link: 2 section).
3. Click on Modify.
Configuring Frame Relay
317
Access Server Administrators’ Reference Guide
C • Technical Reference
The following settings must match the line configuration provided by the local telephone company. For more
information on setting up your T1/E1, see the Model 29xx Series RAS User Manual available online at
www.patton.com/manuals/29xx.pdf.
4. Click on the Line Type drop-down menu and choose one of the following options:
– For a T1 line, select dsx1ESF(2) (Extended SuperFrame DS1) or dsx1D4(3) (A&T D4 format DS1).
– For an E1 line, choose dsx1E1(4) or dsx1E1-CRC(5).
5. Click on the Line Coding drop-down menu and choose one of the following options:
– For T1: If you selected dsx1D4(3) line type, select dsx1AMI(5) line coding. If you selected dsx1ESF(2)
line type, choose dsx1B8ZS(2) line coding.
– For E1: Select dsx1AMI(5) or dsx1HDB3(3). Most installations will use HDB3.
6. Click on the Line Build Out drop-down menu and choose one of the following options:
– For T1: Select t1pulse0dB(2).
– For E1, select e1pulse(1).
7. Click Submit.
8. Select none for Signalling Protocol.
9. Click Submit.
At this point, the access server’s front panel LEDs should now be showing signs that the line is active. If the phone
company line is not connected to the access server, the error indicator will glow red for that line/connection.
WAN Channel Assignment main screen
The next stage in configuring a Frame Relay link is to set the number of 64-kbps channels on the T1/E1 that
will carry the data. Each channel is 64 kbps in speed and must correspond to the same channels that your provider is using. Usually your provider will start from channel 1. For example: a 256-kbps link could be divided
into 64-kbps channels numbered 1, 2, 3, and 4.
To set the channel assignment:
1. Click on T1/E1 Link under the Configuration Menu to display the T1/E1 Link Activity main window (see
figure 102 on page 252).
2. Click on Channel Assignment in the appropriate Link: x section (for example, if the T1/E1 cable was connected to port 2, you would click on Channel Assignment in the Link: 2 section).
3. Click on the appropriate channel’s drop-down menu and select frameRelay(3).
4. Repeat step 3 to configure remaining channels.
5. Click Submit.
The link should now be activated on your access server. The next stages will configure Frame Relay and IP
routing.
Configuring Frame Relay
318
Access Server Administrators’ Reference Guide
C • Technical Reference
Configuring Frame Relay link parameters
Click on Frame Relay under the Configuration Menu to display the Frame Relay main window (see figure 70 on
page 172).
Click on Modify to display the DLMI window.
Figure 129. DLMI window
Each Frame Relay instance with the access server is known as the data link management interface or DLMI. The
access server software currently supports one Frame Relay Link, or DLMI, on each of the T1/E1 WAN ports.
Frame Relay has a set of protocols responsible for maintaining the link. This is known as the management link
interface or LMI. The management protocol link must agree with your service provider. In most cases, the signaling setting may be the only variable you will need to change.
The common link management, or signaling, protocols are:
• LMI. Frame Relay Forum Implementation agreement. Uses DLCI = 1023 for management
• Annex D. ANSI T1.617 Uses DLCI = 0 for management
• Annex A. ITU Q.933 Uses DLCI = 0 for management
Do the following to change the signaling method:
1. Click on the Signaling drop-down menu and select ansiT1-617-D(3).
2. Click Submit.
Configuring PVCs
The Frame Relay link is now configured and should be available. The final stage will be to configure PVCs and
IP routing so traffic can be routed to the new link(s).
Configuring Frame Relay
319
Access Server Administrators’ Reference Guide
C • Technical Reference
Configuring Permanent Virtual Circuits
The data link connection identifier (DLCI) provides each PVC with a unique identifier at both the access server
and the Frame Relay switch. Within each link (DLMI) there can be multiple permanent virtual circuits (PVC).
Each of these PVCs are point-to-point links to remote locations, and define the data path between the access
server and the Frame Relay network.
Within each DLMI are one or more DLCIs. This is the identification of a PVC within the Frame Relay link.
There will be at least one PVC automatically installed. This is the management DLCI or LMI. This DLCI,
often DLCI 0, is the communication channel between the access server and the Frame Relay network switch.
This management channel communicates configuration and health information of the Frame Relay link. If
you connection is properly configured, you will automatically see a listing of the valid DLCIs on your link.
1. From the main Frame Relay window (see figure 70 on page 172), select DLCI to configure the PVCs.
Figure 130. DLMI—Configuration View window
An example Frame Relay connection with the management DLCI and one PVC with the DLCI of 100 is
shown in figure 130. DLCI 100 has been configured by the Frame Relay service provider as the data link
the provider will use for transporting your data
2. To configure a DLCI you will need the IP address of the far-end router and the DLCI number if the DLCI
did not automatically appear. If the DLCI automatically appeared, enter the IP address of the far-end
router in the IP address field. Often, this will be the Ethernet address or loopback address for that router.
3. Select Submit.
If the DLCI did not automatically appear, do the following:
1. Under the DLCI entry, type the DLCI number given to you by your provider. Your DLCI identification
must match that provided by your service provider or the frame relay link will not function properly.
2. Under the IP Address entry, type the IP address of the far-end router. This will be the next-hop router for
this DLCI. Often, this will be the Ethernet address or loopback address for that router.
3. Click on Submit Query.
Configuring Frame Relay
320
Access Server Administrators’ Reference Guide
C • Technical Reference
Configuring IP routing with a Frame Relay Link
As each properly configured DLCI will have an IP address representing the next hop on that link, the access
server can use a Frame Relay link to access many remote networks. The IP address of the Frame Relay link is
unnumbered and specifies the next hop to another router. As such, it is a single-host route with a mask of
255.255.255.255. By using the access server’s routing table, you can apply any number of network routes to
use the Frame Relay link. You can even use a PVC as the default gateway (0.0.0.0).
Do the following to access the IP routing table in the access server:
1. Click on IP under the Configuration Menu to display the IP window (see figure 75 on page 187).
2. Click on Routing Info.
When the Frame Relay link (DLMI) and a DLCI is in the UP state, its IP address and interface, will appear in
the IP Routing table. The IP address of the PVC will not appear in the IP routing table if the Frame Relay link
is down, or the DLCI is not configured or inactive.
Figure 131. IP routing with Frame Relay example
In figure 131, the Frame Relay link shows the address of 192.168.1.3. As IP routing dictates the best fit for any
forwarding decisions, any destination with this address will automatically be sent across the Frame Relay link.
A network route using the Frame Relay link as its next hop is also shown in figure 131. The destination of
192.168.1.0 255.255.255.255 specifies the gateway, or next-hop, of 192.168.1.3. With this entry, any IP
packet with the destination address in the range of 192.168.1.1- 192.168.1.254 will automatically be sent
down the Frame Relay link to the device with the IP address of 192.168.1.3.
Adding a route. To add a route, do the following:
1. To access the IP routing table in the access server, click on IP under the Configuration Menu to display the
IP window (see figure 75 on page 187).
2. Click on Routing Info.
Note
To add a network route, use the second set of entry items which allow for a
destination, mask and gateway:
Configuring Frame Relay
321
Access Server Administrators’ Reference Guide
C • Technical Reference
2. Type in the Destination network (see figure 132). This number must correspond to the mask specified.
(For example, if you wish to forward a C class address you would leave the last octet as 0.)
Figure 132. Adding a route
3. Type in the Mask to define the network. This must correspond to the destination network. (For example,
if you wish to forward a C-class address you would specify the mask as 255.255.255.0.)
4. Type in the next-hop gateway.
5. Click Add Route.
6. The route will now appear in the routing table. To use the frame relay as the default gateway, enter the
next-hop gateway of the frame relay link in the gateway field of the first set of entry items. Click Add Route.
Link Status and the IP Forwarding
If the Frame Relay link is down, the address will automatically be removed from the routing table. If there are
any routes which specify this IP address as the next-hop, the routing table will show the state of noPath(3) (see
figure 133).
Figure 133. Link status and IP forwarding
When the Frame Relay Link returns to the UP state, the IP route for the link will be re-added and used to forward IP packets. Any routes that specify this IP address as the next-hop will automatically return to the active
state.
Configuring Frame Relay
322
Access Server Administrators’ Reference Guide
C • Technical Reference
Configuring DNIS
DNIS (Dialed Number Identification Service) is a telephone service that identifies for the the receiver of the
call the number that the caller dialed. DNIS works by passing the touch-tone digits (dual-tone multi-frequency
of MF digits) to the destination where a special facility can read and display them or make them available for
use by the terminating device.
The RAS uses its ability to capture DNIS information to provide the customer the ability to set up parameters for
their dial-in clients based on the phone number that has been dialed or which physical WAN port they have dialed
into. If none of the specified conditions are met then the default conditions of the RAS will be applied to the user.
In its current implementation the following parameters can be configured based on DNIS:
• Authentication: can select traditional authentication or no validation
• IP Address Pool
• Data over voice bearer services
Setting up IP address pools by configuring DNIS Ip Pools
Note
This section is optional. If you are not going to set up IP address pools, refer
to section “Setting up a DNIS user profile”.
If IP address pools are to be assigned based on DNIS or WAN port, configure your DNIS Ip Pools (see
figure 35 on page 86) as follows:
1. Enter an ID number to identify the IP address pool
2. Enter the IP address range.
3. Click on the Submit Query button.
Setting up a DNIS user profile
Set up a DNIS user profile (see figure 33 on page 81) to be applied based on DNIS or WAN port as follows:
1. Enter an ID number to identify the specific DNIS profile.
2. Enter the ID for the IP address pool if you wish to apply a specific set of IP addresses to these users. Use 0
if you wish the users to use the default IP address pool or a static IP address from RADIUS.
3. Set the authentication type.
4. Enable data over voice bearer services if desired. This allows either 64k or 56k ISDN calls.
5. If you wish to redirect the users to a remote host or service on a remote host then enter the remote host’s IP
address and port the application is listening at. For example, telnet listens on port 23.
6. Click on the Submit Query button.
Setting up a DNIS group
Set up a DNIS group (see figure 31 on page 77) as follows:
1. Enter an ID number to identify the specific DNIS profile.
Configuring DNIS
323
Access Server Administrators’ Reference Guide
C • Technical Reference
2. If you wish to apply the parameters specified in steps 1 and 2 based on WAN port then enter the appropriate WAN port. Enter 0 if you want to apply the parameters based on number dialed only.
3. Enter the number dialed—this is not optional. Multiple phone numbers can be entered separated by semicolons (;).
Note
The number dialed in the phone number received by the RAS from the
switch. Check the Telco link on the Dial-in main window to verify the phone
numbers sent by the switch.
Configuring a leased line/dedicated line connection
The remote access server can connect to a remote modem for dedicated modem access.
Configuring the RAS
1. Configure the Line Interface Settings as usual for the T1/E1.
2. Configure the Signalling Settings using none(1) for Signal Mode. No other settings are necessary.
Figure 134. Signalling Settings window
3. Configure Channel Assignment for the T1/E1 setting each timeslot for which you want a dedicated connection to leasedLine(4).
Figure 135. WAN Circuit Channel Assignment window
4. Set Maximum V8 failures under Dialin->Modify Defaults in the Modem Configuration section. This will
configure the number of times the modem on the remote access server will attempt to dial out before stop-
Configuring a leased line/dedicated line connection
324
Access Server Administrators’ Reference Guide
C • Technical Reference
ping and beginning a new call. It is recommended to leave this value at the default unless directed to
change by technical support
Configuring the remote end using Microsoft Windows
1. After installing the modem driver, uncheck Wait for dial tone before dialing under the General tab of the
modem properties.
Figure 136. Modem properties window
2. Uncheck Use dialing rules in the DUN Connection under the General tab.
3. Set the phone number to 1. This phone number is required to make the dial-up connect work as it is provided by windows. The phone number is not used for the dedicated line.
Configuring a leased line/dedicated line connection
325
Access Server Administrators’ Reference Guide
C • Technical Reference
Figure 137. Leased Line Properties window—General tab
4. Under the Options tab: set Redial attempts to a high number.
5. Set Time between redial attempts to 3.
6. Disable the idle timer
7. Check the box Redial if line is dropped.
Figure 138. Leased Line Properties window—Options tab
Configuring a leased line/dedicated line connection
326