1
DX-80TM
Hard Drive
Voice Mail
Installation and
Supervisor Guide
DX-80 H ARD DRIVE VOICE MAIL INSTALLATION AND SUPERVISOR GUIDE 09/01
Every effort has been made to assure the accuracy of the information in this document. The
manufacturer assumes no responsibility, express or implied, for errors or omissions in, or the misuse or
the interpretation of, the information contained herein. This document does not purport to cover all
details or variations in equipment or to provide for every possible contingency to be met in conjunction
with installation, operation, programming, compatibility, or maintenance.
Information in product documentation is subject to change without notice and does not represent a
commitment on the part of Comdial®. No part of Comdial® manuals may be reproduced or
transmitted in any form or by any means, electronic or mechanical, including photocopying, for any
purpose other than the purchaser's personal use, without the written permission of Comdial®. Products
mentioned in this documentation that are not manufactured by Comdial® may be trademarks or
registered trademarks of their respective manufacturers.
© Copyright Comdial®, 2001.
All rights reserved.
DX-80 H ARD DRIVE VOICE MAIL INSTALLATION AND SUPERVISOR GUIDE 09/01
Table of Contents
1. System Overview ................................................................................................. 1
1.1 What Does the DX-80 Hard Drive Voice Mail Do?....................................................1
1.1.1 What is an Automated Attendant?.....................................................................1
1.1.2 What is Voice Mail? .........................................................................................2
1.2 Understanding the DX-80 Hard Drive Voice Mail Product Design ..............................3
Differences between the DX-80 Hard Drive Voice Mail and an External
Small Office VP System ........................................................................................4
2. System Setup Instructions................................................................................ 6
2.1 Available System Setup Techniques..........................................................................6
2.2 Preparing for System Setup ......................................................................................7
Typical Setup ........................................................................................................8
2.3 Collecting Necessary Customer Information..............................................................8
2.4 Setting Up the System by Attaching a Laptop.......................................................... 15
2.4.1 Installing Serial Administration Software on the Laptop................................... 15
2.4.2 Connecting the Laptop to the DX-80 Hard Drive Voice Mail ............................ 16
2.4.3 Setting up the System..................................................................................... 19
2.4.4 Specifying System Information ....................................................................... 19
2.4.4.1 Accessing System Information Screens ......................................................20
2.4.4.2 Setting Up the General Information Screen ................................................20
2.4.4.3 Setting Up the Line Information Screen .....................................................21
2.4.4.4 Setting Up the Business Hours Screen........................................................21
2.4.4.5 Setting Up the Call Transfer Screen...........................................................22
2.4.4.6 Setting Up the Class of Service Screen.......................................................22
2.4.5 Specifying Box Information............................................................................ 29
2.4.5.1 What Is a Box?.........................................................................................29
2.4.5.2 Understanding Routing Box 800, 801, and 821...........................................29
2.4.5.3 Accessing Box Information Screens...........................................................30
2.4.5.4 Reviewing Routing Box 800, 801, and 821 and Setting Up Single-Digit
Call Routing ........................................................................................................32
2.4.5.5 Setting Up Prototype Mailbox 9994 ...........................................................33
2.4.5.6 Creating Subscriber Mailboxes ..................................................................35
i
DX-80 H ARD DRIVE VOICE MAIL INSTALLATION AND SUPERVISOR GUIDE 09/01
2.4.5.7 Customizing Subscriber Mailboxes............................................................36
2.4.5.8 Customizing the System Supervisor Mailbox..............................................44
2.4.5.9 Recording Routing Box Greetings..............................................................45
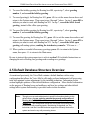
2.5 Default Database Structure Overview ..................................................................... 47
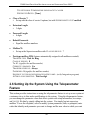
2.6 Setting Up the System Using the Teleparameter Feature .......................................... 49
2.6.1 Using the Teleparameter Feature to Set up a New System ................................ 50
2.6.1.1 Adjusting System Information...................................................................50
2.6.1.3 Adjusting Routing Box Information...........................................................51
2.6.1.4 Creating and Adjusting Mailbox Box Information.......................................52
2.6.1.5 Creating Other Box Types and Adjusting Information .................................53
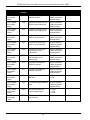
2.6.2 Teleparameter Value Tables ........................................................................... 53
2.6.3 Using the Teleparameter Feature to Adjust the System Setup............................ 85
3. System Supervisor Instructions ....................................................................86
3.1 Working with Mailboxes........................................................................................ 86
3.1.1 Adding, Deleting, or Modifying a Mailbox ...................................................... 86
3.2 Working with Routing Boxes ................................................................................. 91
3.2.1 Understanding the Routing Box Setup ............................................................. 91
3.2.2 Recording Routing Box Greetings or Changing Currently Active Greetings ....... 93
3.2.3 Changing the Single-Digit Call Routing........................................................... 95
3.3 General System Maintenance ................................................................................. 97
3.3.1 Enabling or Disabling a Port........................................................................... 97
3.3.2 Recording a Broadcast Message for All Mailboxes........................................... 99
3.3.3 Transferring a Caller to a Mailbox’s Voice Mail............................................. 100
3.3.4 Troubleshooting System Problems ................................................................ 100
ii
DX-80 H ARD DRIVE VOICE MAIL INSTALLATION AND SUPERVISOR GUIDE 09/01
1. System Overview
1.1 What Does the DX-80 Hard Drive Voice Mail Do?
In its simplest form, the Hard Drive Voice Mail acts like a telephone receptionist. The
system answers incoming calls and transfers them to the appropriate extension. If the called
extension is not available (busy or no answer), the system offers to take a message or try an
alternative extension.
Voice Mail functionality includes:
•
•
Automated attendant features
Voice mail features
These two functions work together to provide smooth call coverage for your application.
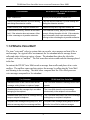
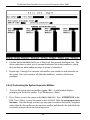
1.1.1 What is an Automated Attendant?
The Voice Mail automated attendant features perform the tasks of a live attendant. The
following table illustrates how.
Live Attendant
DX-80 Hard Drive Voice Mail Automated
Attendant
Answers an incoming call by lifting telephone.
Answers an incoming call by going “off-hook.”
Greets the caller with "Welcome to [XYZ
Company]."
Greets the caller by playing a pre-recorded
greeting, "Welcome to [XYZ Company]."
Asks to whom the caller wishes to speak.
Plays a pre-recorded greeting that prompts the
caller to either dial the extension of the party they
are trying to reach or choose from a list of voiced
options to route their call to a specific department or
group.
Listens to the caller's response.
Listens to the digits dialed by the caller.
1
DX-80 H ARD DRIVE VOICE MAIL INSTALLATION AND SUPERVISOR GUIDE 09/01
Live Attendant
DX-80 Hard Drive Voice Mail Automated
Attendant
Says "Please hold."
Plays a pre-record phrase "Please hold..."
Calls the required extension, by hook-flashing
and dialing the extension number.
Calls the required extension, by hook-flashing and
dialing the extension number.
Listens for busy tone, ring tone, answer, etc.
Listens for busy tone, ring tone, answer, etc.
If the extension is busy, offers to let the caller
hold. If the extension does not answer, offers
to take a message or try another extension.
If the extension is busy, plays a pre-recorded
prompt, offering the option to hold. If the extension
does not answer, plays a pre-recorded prompt
offering to take a message or try another extension.
1.1.2 What is Voice Mail?
The term “voice mail” refers to systems that can record a voice message and treat it like a
mail message. In a typical office environment, the live attendant takes a message from a
caller and writes it down on a piece of paper. The attendant then places the slip in the
recipient’s in-box or “mailbox.” The box owner then retrieves and reads the message placed
in the box.
In contrast, the DX-80 Voice Mail records a message from a caller and places it in a voice
mailbox. The mailbox owner can later retrieve the message by calling into the Voice Mail
and listening to the recording. The table below compares how the Voice Mail processes
voice messages compared to a live attendant.
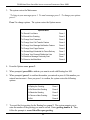
Live Attendant
DX-80 Hard Drive Voice Mail
Attendant listens as the caller dictates his/her
message, writing it down on a piece of paper.
The Voice Mail records the message as the caller
speaks.
Attendant places the message slip in a mailbox
belonging to the recipient.
The Voice Mail stores the voice message
electronically in the recipient’s voice mailbox.
Attendant dials code to turn on message waiting
lamp on recipient's telephone.
The Voice Mail dials code to turn on the message
waiting lamp on recipient's telephone.
Recipient sees message waiting lamp is on, and
retrieves message slips from message mailbox.
Recipient sees message waiting lamp is on and
dials the Voice Mail to retrieve messages.
2
DX-80 H ARD DRIVE VOICE MAIL INSTALLATION AND SUPERVISOR GUIDE 09/01
Live Attendant
DX-80 Hard Drive Voice Mail
Recipient reads messages left on message slips.
The Voice Mail plays messages recorded by
callers in the voice mailbox.
1.2 Understanding the DX-80 Hard Drive Voice Mail
Product Design
The Voice Mail is designed using the Box concept. A box contains a set of instructions that
tell the program what to do with a call it is handling. By setting up the system to send calls to
different boxes created on the system, you can have it effectively process calls—including
playing certain prompts or greetings to callers, collecting information and messages from
callers, and routing calls to certain extensions based on digits dialed by callers.
The Voice Mail product uses the same software base as other Voice Mail system products,
but it is limited in the number of boxes (100 mailboxes) you can set up on the system. These
limitations effectively position the Voice Mail as a product for smaller businesses needing a
simple, reliable voice mail system without all the advanced features of a larger, more
expensive system.
The Routing boxes are used to answer incoming calls, play a listing of options to callers, and
route the call to a specific mailbox based on the digits dialed by the caller. The mailboxes
transfer calls to their associated extensions and store messages for system subscribers, and
they can be set up to forward calls to another phone or extension number, deliver messages to
another phone or pager, play one of 9 pre-recorded greetings to callers, screen calls, queue
calls when the extension is busy, or record call conversations.
Note:
The Voice Mail supports up to 100 boxes, including ACD, Group, Question,
and Account Number boxes. These boxes provide more advanced
functionality that may be port-intensive and therefore inappropriate for Voice
Mail applications.
3
DX-80 H ARD DRIVE VOICE MAIL INSTALLATION AND SUPERVISOR GUIDE 09/01
Differences between the DX-80 Hard Drive Voice Mail and an External Small
Office VP System
There are several key differences between the DX-80 Hard Drive Voice Mail and an external
Small Office system:
1. The on-screen display showing the number of messages per mailbox is not available on
the DX-80 Hard Drive Voice Mail.
2. The DX-80 has built-in UCD capability. A UCD group can be set up, and calls can be
routed to the UCD group without any involvement from the Voice Mail. This is
completely separate and distinct from the ACD provided on Voice Mail.
When a call is sent to a DX-80 UCD group and all agents are busy, the DX-80 will queue
the call, waiting for an agent to become available. When an agent becomes available, the
DX-80 will send the call to that agent, causing his/her phone to ring. The Voice Mail is
not involved at all. (In fact, there does not have to be a Voice Mail on the system.)
When the DX-80 queues a call while waiting for an agent to become available, the DX80 can play its music-on-hold to the caller, but this is limited and cannot be modified.
However, the DX-80 can conference in a voice mail port to the queued call. The DX-80
rings the voice mail port, sends the Voice Mail some digits to specify which UCD queue
the call is in, and lets the Voice Mail play voice messages to the caller while the call is in
the DX-80 UCD queue.
The DX-80 will allow the Voice Mail to remain connected to the call until it sees that a
DX-80 UCD agent has become available. As soon as an agent becomes available, the
DX-80 will disconnect the Voice Mail and send the call to the agent. The Voice Mail
will see that the call has disconnected and will return the voice mail port to idle.
During the time the Voice Mail is connected to the call, the caller will hear voice
messages, and can respond by pressing digits. The Voice Mail implements this by
sending the call to a Routing box, which plays the Routing box greeting, waits for digits,
and moves to other boxes in the normal manner.
The simplest example would be a case in which the Voice Mail just provides music on
hold. In this case, the Routing box greeting would just be a short piece of music. The
field labeled “If no digits dialed” would send the call back to this same Routing box. The
“Destination for digit x” for all digits would be set to send the call back to this Routing
box. This would cause the Voice Mail to keep playing the greeting (music) over and
over.
4
DX-80 H ARD DRIVE VOICE MAIL INSTALLATION AND SUPERVISOR GUIDE 09/01
Another example would be a case in which you want to allow the caller to hear
information about different products while he/she is on hold. The Routing box greeting
could be recorded as “While you are holding, to hear about our spring products, press 1,
to hear about our summer products, press 2,” etc. The Routing box could route the call to
another Routing box, depending on what the caller enters. This new Routing box could
offer another menu, a product description, or other information as appropriate.
Finally, to handle the case in which the caller decides not to continue in the DX-80 UCD
queue and wants the auto-attendant features to route the call, the caller can tell the Voice
Mail this by pressing 7. The Voice Mail determines how to handle the call using this
logic: "If the Voice Mail is handling a call in a Routing box and the call came from the
DX-80 as a UCD call, and the caller dials 7 and the “Destination for digit 7” is not set to
a valid box number, then the Voice Mail will signal (by a double hookflash) to the DX-80
that the DX-80 should remove the call from the UCD queue and relinquish control of the
call to the Voice Mail.
The Routing boxes for each UCD group are defined in TRANS.TXT file. By default,
they are:
UCD group 1 overflow announcement 1 = 3101
UCD group 1 overflow announcement 2 = 3201
UCD group 1 reroute announcement = 3301
UCD group 2 overflow announcement 1 = 3102
UCD group 2 overflow announcement 2 = 3202
UCD group 2 reroute announcement = 3302
This continues for groups 3 through 5.
3.
It is not possible to enable the optional features (Fax, Telemarketing, or Talking
Classifieds) on the DX-80 Hard Drive Voice Mail.
4. Serial numbers on the DX-80 Hard Drive Voice Mail are 10 characters long and begin
with 3. They may contain letters as well as numbers.
5. Since the integration parameters for the DX-80 are pre-set on the Hard Drive Voice Mail
before it leaves the factory, no First Time Setup procedure is necessary.
5
DX-80 H ARD DRIVE VOICE MAIL INSTALLATION AND SUPERVISOR GUIDE 09/01
2. System Setup Instructions
The Voice Mail card contains a default database with a setup configuration that allows the
Voice Mail to efficiently perform fundamental call processing tasks with minimal system
adjustments by the installing technician. This default database configuration includes 2 predefined classes of service (0 and 7), 1 supervisor mailbox (mailbox 70), and 3 Routing
boxes—800, 801, 821. Information provided in this document explain how these pre-set
defaults function on the Voice Mail.
As you proceed through these setup instructions, you may decide to make adjustments to
specific information relating to the default setup. You may even decide to set up the other 2
available Routing boxes to perform additional call routing tasks. As you make any changes,
keep in mind that we urge you to maintain the initial general configuration of Routing boxes
800, 801, and 821, class of service 7, and supervisor mailbox 70. This configuration allows
the Voice Mail to perform fundamental call processing tasks efficiently. Maintaining it helps
both you, the technician, and Voice Mail technical support to efficiently service the system
and resolve any call processing issues. For these reasons we urge you not to deviate from this
general system setup default configuration.
Note:
Section 2.5 provides an overview of the default database setup shipped on
the Voice Mail.
2.1 Available System Setup Techniques
There are two techniques you can use to set up Voice Mail:
•
Attach a laptop to the Voice Mail card and use the program’s screen interface to complete
System Information and Box Setup screens
•
Call into the Voice Mail and use the Teleparameter feature to enter parameter codes and
corresponding values to set up system and box information
This document provides instructions for using either system setup technique.
6
DX-80 H ARD DRIVE VOICE MAIL INSTALLATION AND SUPERVISOR GUIDE 09/01
Technicians who have experience setting up Corporate Office or Small Office systems may
prefer to use the Teleparameter feature to quickly make modifications and get the Voice Mail
up and running at the customer’s site. Be advised, however, that since this technique
involves inputting codes that represent system parameters and corresponding values to which
parameters are to be set, it is a bit more difficult to use effectively if you are unfamiliar with
setting up Corporate Office or Small Office. For this reason, we recommend that technicians
unfamiliar with Corporate Office, Small Office, or DX-80 Hard Drive Voice Mail attach a
laptop to the Voice Mail and use the instructions provided here to complete all necessary
system setup steps through the screen interface.
Note:
If you choose to set up the system using the Teleparameter feature, be sure
to first review section 2.6 so you clearly understand the setup of the default
database included on the Voice Mail.
2.2 Preparing for System Setup
To install, set up, and maintain a DX-80 Hard Drive Voice Mail voice processing system, you
need the following equipment:
Equipment Needed
•
DX-80 Hard Drive Voice Mail card
If you choose to set up the system by connecting a laptop to the Voice Mail card, you need
the following additional equipment:
•
Laptop computer
•
Straight through serial cable
•
Serial Administration or KeyLink communications software (provided with all
Voice Mail cards)
This additional equipment is necessary because the Voice Mail does not have a keyboard and
monitor. To set up the system using a laptop, you must use a Straight through serial cable to
attach the laptop PC to the Voice Mail card. So that the laptop computer can communicate
with the Voice Mail, you must install Serial Administration or KeyLink communication
7
DX-80 H ARD DRIVE VOICE MAIL INSTALLATION AND SUPERVISOR GUIDE 09/01
software, provided with the Voice Mail, onto the laptop PC. The Serial Administration or
KeyLink installation procedure is provided in this document.
Once the system is set up and tested, the system supervisor on-site can maintain the day-today aspects of the system (adding, deleting, modifying mailboxes; modifying greetings and
call routing; etc.) by simply calling into the system using a telephone. No special
Teleparameter modification instructions or laptop computers are necessary for regular daily
maintenance of the Voice Mail.
Typical Setup
For typical automated attendant service, the phone system is programmed so that incoming
calls are routed via the phone system to ring the Voice Mail. The Voice Mail answers the call
and asks the caller to enter the required extension (or mailbox) number. The caller enters the
number, and the Voice Mail transfers the call, just as a live attendant would.
2.3 Collecting Necessary Customer Information
While setting up the Voice Mail, you may need to adjust default settings for the customer’s
regular business open hours and business closed hours. You also need to set up Routing
boxes to handle incoming calls and set up mailboxes for subscribers who will be using the
system. The following worksheets are provided to help the installing technician collect this
information from the system supervisor.
8
DX-80 H ARD DRIVE VOICE MAIL INSTALLATION AND SUPERVISOR GUIDE 09/01
Business Hours Worksheet
(System Supervisor Completes)
On the lines corresponding to each day of the week, write in
24-hour format (for example 8:00 PM is 20:00) the normal
hours the company opens and closes for business. If the
business is open 24 hours on a particular day, enter 0:00 as the
DAY SERVICE BEGINS time and 24:00 as the DAY SERVICE
ENDS time. If the business is closed the entire day on a
particular day, enter 0:00 on both lines.
Indicate, if appropriate, any
hour(s) during which the business
closes during the day, for lunch or
any other reason.
Specify the time of day
the automated attendant
should start answering
calls with a “good
evening” greeting.
9
DX-80 H ARD DRIVE VOICE MAIL INSTALLATION AND SUPERVISOR GUIDE 09/01
Subscriber Mailbox Information Worksheet
(System Supervisor Completes)
x
Photocopy this page, then complete the form for each subscriber who is to have a mailbox.
Subscriber Data
First name:
Last name:
Extension number:
Should the system announce
the caller’s name to the
subscriber upon transfer?
Should all conversations be
recorded?
Paging Data
(complete only if subscriber is to use the feature)
Pager number
Pager type (circle one)
Paging schedule (circle one)
Auto Message Forward and
Message Delivery Data
TONE
Always
Message delivery schedule 1:
When should delivery be
active? (circle one):
During office open hours
Schedule*: A
B
During closed hours
C D
(complete only if subscriber is to use these features)
Auto forward new messages:
Auto forward new messages
schedule (circle one):
DIGITAL
To box:________
Always
After ______hours
During office open hours
Schedule*: A
B
During closed hours
C D
Number to call:___________________________________
Always
During office open hours
Schedule*: A
B
Continued on back
10
During closed hours
C D
DX-80 H ARD DRIVE VOICE MAIL INSTALLATION AND SUPERVISOR GUIDE 09/01
Message delivery schedule 2:
When should delivery be
active? (circle one):
Message delivery schedule 3:
When should delivery be
active? (circle one):
Message delivery schedule 4:
When should delivery be
active? (circle one):
Message delivery schedule 5:
When should delivery be
active?
(circle one):
Number to call:___________________________________
Always
During office open hours
Schedule*: A
B
During closed hours
C D
Number to call:___________________________________
Always
During office open hours
Schedule*: A
B
During closed hours
C D
Number to call:___________________________________
Always
During office open hours
Schedule*: A
B
During closed hours
C D
Number to call:___________________________________
Always
During office open hours
Schedule*: A
B
During closed hours
C D
*If specifying a particular schedule, complete a subscriber schedule worksheet for the
individual.
11
DX-80 H ARD DRIVE VOICE MAIL INSTALLATION AND SUPERVISOR GUIDE 09/01
Subscriber Schedule Worksheet
(System Supervisor Completes)
Photocopy this page, then complete the form for each subscriber who is using the Paging,
Auto Message Forwarding, or Message Delivery out-calling features according to a particular
schedule, as indicated on his/her Subscriber Mailbox Information sheet.
You can designate up to 4 different schedules below, then apply one schedule to each outcalling feature the subscriber will be using. Enter information for 1 to 4 schedules below in
24-hour format (for example 8:00 PM is 20:00). You do not need to complete the BOX
NUMBER field.
12
DX-80 H ARD DRIVE VOICE MAIL INSTALLATION AND SUPERVISOR GUIDE 09/01
Routing Worksheet (System Supervisor Completes)
Refer to section 3.2 to familiarize yourself with the function of Routing boxes. This section
also provides a sample of greetings that are typically recorded in the 3 Routing boxes preconfigured on the Voice Mail. After reviewing this information, complete this worksheet to
indicate the wording for the greetings you want this Voice Mail to voice.
Note that you should indicate in your greeting any single-digit call routing options you want
to provide to callers (“…Press 2 for Sales…”) and identify the extension to which a caller
pressing that single-digit number should be transferred.
Office Open Greeting:
Single digit routing paths:
Office Closed Greeting:
Single digit routing paths:
Continued on back
13
DX-80 H ARD DRIVE VOICE MAIL INSTALLATION AND SUPERVISOR GUIDE 09/01
Office Holiday Greeting:
Single digit routing paths:
14
DX-80 H ARD DRIVE VOICE MAIL INSTALLATION AND SUPERVISOR GUIDE 09/01
2.4 Setting Up the System by Attaching a Laptop
Use the information in this section to complete all necessary system setup steps by attaching a
laptop computer to the Voice Mail card and using the Voice Mail’s screen interface to
complete System Information and Box Setup screens.
2.4.1 Installing Serial Administration Software on the Laptop
Serial administration features allow the Voice Mail (referred to as a host PC) to communicate
with a laptop PC (referred to as a remote PC) through a Straight through cable.
Serial Administration / KeyLink host software is pre-installed on the Voice Mail before it is
shipped to you. The procedures detailed below outline the steps you follow to install the
KeyLink or serial administration remote software on a laptop PC. Be sure to follow the
proper procedure for your laptop’s operating environment.
To install KeyLink for DOS on a DOS-based remote PC:
1. Insert the KeyLink installation diskette into the diskette drive on the PC.
2. At the prompt for the laptop’s hard drive (typically C:\ or D:\), type A:INSTALL then
press <Enter>.
3. Follow the prompts to install the Remote software and enter the requested information.
When you are prompted to indicate the directory in which you want to install KeyLink
files, accept the default directory \REMOTE. Accept program default setup selections
whenever possible.
When all the necessary files have been copied, a message displays indicating that the
installation is complete.
To install serial administration software on a Windows-based remote PC:
Note:
The Windows-based PC must be running Windows 95, 98, 2000 or Windows NT.
1. Insert the first Serial Administration installation diskette (#1) into the diskette drive on
the PC.
15
DX-80 H ARD DRIVE VOICE MAIL INSTALLATION AND SUPERVISOR GUIDE 09/01
2. From the Start button, choose Programs, then Windows Explorer.
3. On the All Folders side of the Exploring screen, select the diskette drive (typically A:).
4. Double-click on SETUP.EXE from the right side of the Exploring screen.
5. Follow the prompts to install the remote software. When prompted to indicate the
directory in which you want to install Serial Administration files, accept the default
directory. Accept program default setup selections whenever possible.
6. When prompted, remove installation diskette #1 and insert diskette #2. Press OK. If the
operating system on the laptop is Windows NT, after you remove diskette #1, you will
receive an error message asking you to re-insert the disk. Instead, insert diskette #2, press
the Retry button on the error message, and then select the Continue button.
7. When prompted, remove installation diskette #2 and insert diskette #3. Press OK. If the
operating system on the laptop is Windows NT or Windows 2000, after you remove
diskette #2, you will receive an error message asking you to re-insert the disk. Instead,
insert diskette #3, press the Retry button on the error message box, and then select the
Continue button.
8. When the Setup Complete screen appears, press Finish. A Serial Administration icon
displays on the desktop.
2.4.2 Connecting the Laptop to the DX-80 Hard Drive Voice
Mail
You connect the Voice Mail card to the laptop computer using a Straight through serial cable.
NOTE: Before connecting the Straight through cable between the Voice Mail and
the laptop, connect power to the Voice Mail and allow it to power up for 3
minutes or more. After 3 minutes, connect the Straight through cable
between the laptop and the Voice Mail, then attempt to establish
communication using the procedure provided below.
When you install KeyLink or serial administration software on the laptop computer, the
program defaults to using the COM 1 port on the laptop. Therefore, unless you change this
16
DX-80 H ARD DRIVE VOICE MAIL INSTALLATION AND SUPERVISOR GUIDE 09/01
default, you should connect one end of the Straight through serial cable to the laptop’s COM
1 port. Connect the other end of the cable to the COM port on the Voice Mail card.
Establishing a Communication Link Between a DOS-based Laptop and DX-80 Hard
Drive Voice Mail:
1. To access the Voice Mail program screens from a DOS-based remote PC, change to the
\REMOTE directory then type REMOTE and press <Enter>.
2. A screen displays while the program loads and initializes communications. KeyLink then
detects the baud rate set up on the host PC and establishes a compatible connection. This
detection takes several moments.
Once KeyLink establishes a connection between the two systems, the screen refreshes
with a display that shows the host (Voice Mail). The keyboard and monitor of the remote
computer now effectively control the Voice Mail.
NOTE: If a connection cannot be established between the host (Voice Mail) and the
remote PC, verify you specified the appropriate COM port settings during
KeyLink installation. Also verify you are using a Straight through cable.
To break the connection between the remote PC and the host (Voice Mail), press <CtrlBreak> on the remote PC’s keyboard. The KeyLink program ends its communication
with the Voice Mail, and the remote PC’s screen refreshes. To re-establish
communication, repeat steps 1-2.
Note:
If you type EDIT to invoke a DOS editor on the Voice Mail, you will invoke a
special editor pre-installed on the card. This editor was developed
specifically for use with a Straight through cable.
Note:
For additional information on transferring files between the Voice Mail and
the attached PC, contact technical support.
17
DX-80 H ARD DRIVE VOICE MAIL INSTALLATION AND SUPERVISOR GUIDE 09/01
Establishing a Communication Link Between a Windows-based Laptop and DX-80
Hard Drive Voice Mail:
1. From the remote PC Windows desktop, click on the Serial Administration icon. The
serial administration program loads and the SERIAL ADMINISTRATOR screen displays.
2. From the File pull-down menu, select the CONFIGURE PORTS option. The CONFIGURE
SERIAL CONNECTION screen displays.
3. Verify that the COM PORT field indicates the port to which the Straight through cable is
attached on the remote PC. Also confirm that other COM port information is specified
correctly and corresponds with the information in the USE REMOTE DBA line in the host
VM .CFG file. Select the OK button. You return to the SERIAL ADMINISTRATOR screen.
From the SERIAL ADMINISTRATOR screen you can work with the Voice Mail host two ways:
•
Use Serial Administration / KeyLink to view and work with the Voice Mail’s DOS
screen interface.
•
Through a Windows interface to the Voice Mail. The windows interface will allow you to
control much but not all of the Voice Mail functionality. You will need to use Serial
Administration / KeyLink to select options or program components that are not available
through the Windows interface.
To use Serial Administration / KeyLink to view and work with the Voice Mail’s DOS screen
interface, from the Serial Administration / KeyLink pull-down menu, select the REMOTE
CONTROL option. Once Serial Administration / KeyLink establishes a connection between the
two systems, the screen refreshes with a display that shows the host (Voice Mail). The
keyboard and monitor of the remote computer now effectively control the Voice Mail. The
screens you view show the setup and functionality of the Voice Mail, and the keystrokes you
make affect the functionality of that system.
To use a Windows interface to the DOS-based system, from the File menu, select the
CONNECT option. Once a connection is established between the systems, the Boxes, System,
Diagnostics, and Help pull-down menus are activated on the SERIAL ADMINISTRATOR screen.
Using options available on these Windows-based menus, you can modify the system and box
setup structure on the Voice Mail. For information on using specific options, select options
from the Help pull-down menu.
To break the connection between the remote PC and the host (Voice Mail), select the Exit
option from the File pull-down menu.
18
DX-80 H ARD DRIVE VOICE MAIL INSTALLATION AND SUPERVISOR GUIDE 09/01
Note:
If a connection cannot be established between the host (Voice Mail) and the
remote PC, verify that you specified the appropriate COM port settings
during Serial Administration / KeyLink installation. Also verify that you are
using a Straight through cable.
Note:
It is important to note that the Windows interface to the Voice Mail is based
on a version of VP system software, and for this reason, the Windows
interface Help menu contains the information provided with VP systems.
Note:
Some Serial Administrator windows will not fit screens using a resolution of
less than 800 x 600.
2.4.3 Setting up the System
Because the integration parameters are pre-set before the Voice Mail leaves the factory, once
you access the Voice Mail using a laptop computer, you are ready to begin customizing the
system. Customizing the system involves:
•
•
Specifying System Information
Specifying Routing Box and Mailbox Information
2.4.4 Specifying System Information
System Information screens contain system setup information that applies system-wide, to all
boxes set up on the system. There are six System Information screens:
•
•
•
•
•
•
General Information Screen
Line Information Screen
Business Hours Screen
Call Transfer Screen
Class of Service Screen(s)
Other Customizations Screen
Before you set up Routing boxes and mailboxes, it is best to ensure all System Information
screens are properly completed.
19
DX-80 H ARD DRIVE VOICE MAIL INSTALLATION AND SUPERVISOR GUIDE 09/01
Note:
Because the default information on System Information screens is set so the
Voice Mail is operational with as few changes as possible, the procedures
provided in this document for entering data on System Information screens
do not go into detail about all the screen entries. Instead, the procedures
guide you through accessing and reviewing pertinent fields on certain
screens, so you can verify that default data is properly set and modify it if
absolutely necessary.
Note that you can access online help at any time by pressing <F1>.
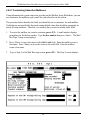
2.4.4.1 Accessing System Information Screens
1. From the Line Status screen, press <F10>. The Main menu displays, and you are
prompted to enter a system password.
2. At the prompt to enter the system password, press <Enter>. (The default Customer level
password is blank. The default Technician level password is 1234.)
3. From the Main Menu, select SYSTEM INFORMATION. The System Information menu
displays.
2.4.4.2 Setting Up the General Information Screen
1. From the System Information menu, select GENERAL. The General Information setup
screen displays.
2. Press <Enter> to move the cursor to the AUTOMATICALLY EXIT TO DOS AT field. Enter
the time at which the Voice Mail should exit to DOS to perform its auditing functions.
The default setting is 3:00 AM .
3. To save the information and exit the screen, press <F10>. The System Information
menu displays.
20
DX-80 H ARD DRIVE VOICE MAIL INSTALLATION AND SUPERVISOR GUIDE 09/01
2.4.4.3 Setting Up the Line Information Screen
1. From the System Information menu, select LINE INFORMATION. The Line Information
setup screen displays. Each row on this screen corresponds to one line connected to the
Voice Mail.
2. Press <Enter> to move the cursor to the Initial Box field under Day Service for line 1.
Verify that 800 displays in this field, indicating that calls received during Day Service
hours are to go to Routing box 800.
3. Press <Enter> to move the cursor to Initial Box field under Night Service for line 1.
Verify that 801 displays in this field, indicating that calls received after the day service
hours are to go to Routing box 801.
4. Press <Enter> to move the cursor to the Initial Box field under Lunch Service for line 1.
Verify that 800 displays in this field, indicating that calls received during Lunch Service
are also to go to Routing box 800.
5. Press <Enter> to move the cursor to the OUTGOING ALLOWED field for line 1. Verify
this field is set to No.
6. Repeat steps 3 through 5 for each line on the screen. For the last line, however, be sure to
verify that Yes in the OUTGOING ALLOWED field.
7. To save the information and exit the screen, press <F10>. The System Information
menu displays.
2.4.4.4 Setting Up the Business Hours Screen
1. From the System Information menu, select BUSINESS HOURS . The Business Hours setup
screen displays.
2. For each day of the week, enter the office opening time in the DAY SERVICE BEGINS
field and the office closing time in the DAY SERVICE ENDS field. The default is an office
open time of 8:00 AM and office closing time of 17:00 (5:00 PM ). If you want calls to be
handled in the same way day and night, enter 00:00 in the DAY SERVICE BEGINS field,
and 24:00 in the DAY SERVICE ENDS field. Refer to the Business Hours Worksheet
completed by the system supervisor for specific information.
21
DX-80 H ARD DRIVE VOICE MAIL INSTALLATION AND SUPERVISOR GUIDE 09/01
3. To save the information and exit the screen, press <F10>. The System Information
menu displays.
2.4.4.5 Setting Up the Call Transfer Screen
1. From the System Information menu, select CALL TRANSFER. The Call Transfer setup
screen displays.
2. The fields in the top half of the screen list the sequences that the Voice Mail is to dial to
transfer calls (the “!” signifies hook-flash and the comma signifies pause for one second).
Typically, these settings are appropriate for most telephone systems without any
modification. If you know the actual sequences required by the telephone system, and
they are different from those shown, make the changes as necessary.
3. To save the information and exit the screen, press <F10>. The System Information
menu displays.
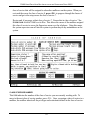
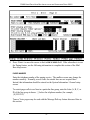
2.4.4.6 Setting Up the Class of Service Screen
Each mailbox on the system is assigned a class of service. The class of service assigned to
the box dictates which Voice Mail features the mailbox owner has access to and how he/she
can use those features.
There are 8 classes of services (0 through 7) that can be set up then applied to mailboxes on
the Voice Mail. Two of them are pre-configured on the system. Class of service 0 is
assigned by default to the prototype mailbox 9994, which serves as a template for every
mailbox that you create on the system. Class of service 7 is assigned supervisor mailbox
privileges. This class of service is assigned to mailbox 70, which is also pre-configured on
the system. Mailbox 70, therefore, serves as the supervisor mailbox. By calling into the
system and accessing the supervisor mailbox, the system supervisor can make necessary dayto-day modifications to the voice processing system, such as adding mailboxes, changing
Routing box greetings, etc. See section 3 for details.
1. From the System Information menu, select CLASS OF SERVICE. The Class of Service
setup screen displays.
2. Use the information provided below to review and, if necessary, adjust the fields on two
different Class of Service screens. First, review class of service 0, which functions as the
22
DX-80 H ARD DRIVE VOICE MAIL INSTALLATION AND SUPERVISOR GUIDE 09/01
class of service that will be assigned to subscriber mailboxes on the system. When you
reviewed the screen for class of service 0, press <F6> to progress through the classes of
service and go to the setup screen for class of service 7.
Review and, if necessary, adjust class of service 7. Ensure that in class of service 7 the
SUPERVISOR STATUS ? field is set to Yes. This allows the owner of the mailbox assigned
this class of service to access the Supervisor menu over the telephone. Using this menu,
the system supervisor can call into the system to perform day-to-day maintenance on the
system.
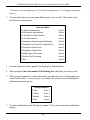
CLASS OF SERVICE NUMBER
This field indicates the number of the class of service you are currently working with. To
move to the next class of service number, press <F6>. Once you assign a class of service to a
mailbox, the mailbox inherits all the privileges and restrictions defined in the class of service.
23
DX-80 H ARD DRIVE VOICE MAIL INSTALLATION AND SUPERVISOR GUIDE 09/01
CLASS OF SERVICE NAME
Use this field to give the class of service a meaningful name. This helps remind you of the
purpose for the class of service. Sample names include Supervisors, Subscribers, etc.
MAXIMUM NUMBER OF GREETINGS
A mailbox can have up to 10 pre-recorded personal greetings. The mailbox owner may
record these greetings, store them in the mailbox, then choose the greeting that is to be active
at any specific time. You may want to offer use of all 10 greetings to users or restrict them to
fewer greetings. Use this field to define how many personal greetings users with this class of
service should be allowed to record. If you set the field to 0, then callers who route to a
mailbox belonging to this class of service always hear the pre-recorded system prompt, "That
extension is not available..." The default setting is 10.
Note that in class of service 7, this field must be set to allow at least 2 greetings. Class of
service 7 is assigned to mailbox 70, the supervisor mailbox that controls the Routing boxes
on the system. Because you will be setting up these Routing boxes with at least 2 greetings,
this parameter must be set to at least 2 in the supervisor mailbox class of service.
MAXIMUM GREETING LENGTH
When a mailbox owner calls in to re-record his/her personal greeting, the Voice Mail limits
the length of the new greeting to the value entered in this field. The default setting is 60.
MAXIMUM NUMBER OF MESSAGES
The Voice Mail can hold up to 200 messages per mailbox. However, you may want to
restrict some mailboxes to a lower limit (to conserve disk space). Use this field to define the
maximum number of messages that can be stored in mailboxes assigned this class of service.
Once the limit is reached for a particular mailbox, callers attempting to leave more messages
in the mailbox are told that the box is full. The default setting is 200.
MAXIMUM MESSAGE LENGTH
The value in this field defines the maximum length of a message (in seconds) that a caller can
leave for mailboxes belonging to this class of service. The default setting is 60.
AUTOMATICALLY DELETE OLD MESSAGES FROM SYSTEM AFTER X DAYS
The Voice Mail deletes messages saved as Old from mailboxes belonging to this class of
service after the number of days you specify. An old message is one the mailbox owner has
24
DX-80 H ARD DRIVE VOICE MAIL INSTALLATION AND SUPERVISOR GUIDE 09/01
listened to, but has not yet deleted. If you enter 0 in this field, an old message is deleted at
midnight on the day the message became old. If you enter 1 in this field, an old message is
deleted at midnight on the day following the day the message became old.
To disable deletion of Old messages, enter 99 in this field. However, do this with caution,
since accumulating messages may create disk storage problems. The default setting is 30.
AUTOMATICALLY DELETE NEW MESSAGES AFTER X DAYS
Note:
Use this parameter with caution. Improper use may cause important
messages to be lost.
The Voice Mail deletes new messages from mailboxes belonging to this class of service after
the number of days you specify. A new message is one the mailbox owner has not yet
listened to. If you enter 0 in this field, a new message is deleted at midnight on the day the
message was received. If you enter 1 in this field, a new message is deleted at midnight on
the day following the day the message was received.
To disable the deletion of new messages, retain the default setting of 99 in this field. This is
the default operating mode. If you enter a number other than 99 in this field, remember that
messages are deleted whether or not the mailbox owner has listened to them.
SUPERVISOR STATUS
This field defines whether mailboxes belonging to this class of service should have supervisor
privileges. A supervisor can perform certain actions not available to regular mailbox owners.
For example, a supervisor can add a mailbox or delete a mailbox by calling in from any
telephone. Additional information on supervisor functions is provided in section 3. The
default setting in class of service 0 is No, in class of service 7 is Yes.
ACCESS TO GROUP BOXES
By setting this field to Yes, you allow subscribers assigned this class of service to access any
Group boxes set up on the system. (The default setting is Yes.)
DIAL-OUT ALLOWED
This field indicates whether the owner of a mailbox belonging to this class of service is
allowed to place outgoing calls from the mailbox. The default setting is No.
25
DX-80 H ARD DRIVE VOICE MAIL INSTALLATION AND SUPERVISOR GUIDE 09/01
ACCESS TO P. A.
When a caller is listening to a mailbox owner's greeting, one of the features the Voice Mail
offers is the option to have the call announced over the P.A. system. Use this field to allow
or deny access to the P.A. feature for callers to mailboxes belonging to this class of service.
The default setting is Yes.
PLAY MENU AFTER GREETING
If an extension is busy or does not answer, the Voice Mail plays the mailbox owner's personal
greeting. After playing the greeting, it can announce the options available to the caller (for
example, "If you would like to leave a message, press 1. To try another extension, press 3, or
to speak with an operator, press 0."). If the mailbox owners do not record these options as
part of their greetings, set this field to Yes so that the Voice Mail plays the menu. If you
want to allow each mailbox owner to decide which options to offer, set this field to No and
instruct each mailbox owner to include the options in his/her personal greeting. The default
setting is No.
ALLOWED TO RECEIVE FAXMAIL
Voice Mail users should retain the default setting No in this field.
OPERATOR BOX (DAY) (NIGHT)
When a caller is listening to a mailbox greeting, one of the options is to dial zero to reach an
operator. Use these fields to indicate the mailbox to which the call should be routed if the
caller indicates that he/she wishes to speak with an operator. The default setting is 888.
WHEN EXITING OPEN MAILBOX, GO TO BOX
When a mailbox owner has logged in to his/her box, has concluded listening to messages,
changing options, etc., and has selected to exit from the Main menu, this field tells the Voice
Mail where to send the call. Voice Mail users should retain the default setting in this field as
821.
MAX LINES ALLOWED TO HOLD FOR ONE BOX
You can limit the number of lines that can simultaneously hold for a mailbox belonging to
this class of service. For example, if you set this number to 3, and lines 1, 3, and 6 are
holding for a mailbox, then subsequent callers are not offered the option to hold. Instead,
they hear the personal greeting recorded for the box, so they can leave a message, try another
extension, etc. The default setting is 2.
26
DX-80 H ARD DRIVE VOICE MAIL INSTALLATION AND SUPERVISOR GUIDE 09/01
Note:
If you want to disable the Call Queuing feature for the class of service, set
this field to 0.
DIGITS ALLOWED WHILE HOLDING
While a caller is in the queue holding for an extension, he/she can press a digit to leave the
queue and process the call differently. By default, the options open to the caller are the same
as those available when the caller hears the personal greeting ("If you would like to leave a
message, press 1. To try another extension, press 3, or to speak with an operator, press 0.").
If you want to restrict the caller to fewer choices while in the queue, use this field to specify
which digits are allowed. All other digits are ignored by the Voice Mail while the caller is in
the queue. For example, if you enter 13 in this field, the only options available to the caller
are:
1 To leave a message
3 To try another extension
WHILE IN QUEUE, SAY POSITION IN LINE
While a caller is in the queue, holding for an extension, the Voice Mail can keep him/her
informed on the progress of the call. If you set this field to Yes, the Voice Mail announces to
the caller:
"That extension is still busy. You are number [x] in line. If you would prefer to leave
a message, press 1, or to speak with an operator, press 0."
If you select No in this field, the Voice Mail voices:
"That extension is still busy. If you would prefer to leave a message, press 1, or to
speak with an operator, press 0."
The default setting is No.
TRY EXTENSION X TIMES , BEFORE GOING BACK TO CALLER
This parameter applies only if the MAX LINES ALLOWED TO HOLD field is greater than 0. If
the caller chooses to hold, the Voice Mail plays a series of hold prompts to the caller (these
are typically music or commercials). At the end of each hold prompt, the Voice Mail tries the
extension again. If it is busy, then the next hold prompt is played to the caller.
27
DX-80 H ARD DRIVE VOICE MAIL INSTALLATION AND SUPERVISOR GUIDE 09/01
After the defined number of hold prompts have been played, the Voice Mail goes back to the
caller and offers the options to remain on hold, try another extension etc. This field allows
you to specify the number of hold prompts that should be played before the Voice Mail offers
these options to the caller.
As shipped, the Voice Mail has only one hold prompt recorded (system prompt #146).
Therefore, if you enter 3 in this field, a caller queued to a busy station hears this same prompt
three times before being offered the options again. If you record the second hold prompt
(#147), then the caller hears prompt # 146, #147, then #146 again before being offered the
options. You may record up to 100 different hold prompts, which are played in sequence.
(Remember: At the end of each hold prompt, the Voice Mail tries the extension again).
After the Voice Mail plays the highest number hold prompt recorded, it returns to the lowest
number after the next try. The default setting is 3.
Note:
The time between tries to a busy extension is determined by the length of
each hold prompt recorded. The prompt supplied with the Voice Mail (#146)
is approximately 30 seconds.
RESTRICTED NUMBERS
When a mailbox owner calls in to change his/her call-transfer number, pager number, or
message notification number, you may want to prevent him/her from changing it to certain
numbers, such as long-distance numbers.
These fields allow you to define digit sequences that are to be blocked. The Voice Mail looks
at each of these Digits fields to determine if any of them match the number entered by the
mailbox owner. If the number entered by the caller begins with the digits specified in the
Digits field, the Voice Mail defines the number entered as a match.
For example, if you enter the digits 1900 in one of the Digits fields, the Voice Mail considers
1-900-555-1212, 1-900-123-4567, 1-900-111-2222 to be matches. Telephone number 1-901555-1212 would not be considered a match.
If you enter the digit 0 in one of the digits fields, the Voice Mail considers all numbers
beginning with 0 to be matches. This would include calls to the operator (0), calls to the longdistance operator (00), international calls (011), and any operator-assisted call (0 followed by
telephone number).
28
DX-80 H ARD DRIVE VOICE MAIL INSTALLATION AND SUPERVISOR GUIDE 09/01
If the caller enters a number that matches one of the digit strings you enter here, the Voice
Mail informs the mailbox owner that the number is not acceptable and retains the current set
up.
Once you review and adjust all fields on both Class of Service setup screen 0 and Class of
Service setup screen 7, press <F10> to save the information and exit. The System
Information menu displays.
You have now reviewed the necessary entries on the System Information screens. To return
to the Line Information screen, press <F10>.
2.4.5 Specifying Box Information
2.4.5.1 What Is a Box?
When the Voice Mail answers a call, it processes it by sending it to a box. Each box performs
a specific function (for example, playing a menu to the caller and waiting for a response). It
then passes the call to another box, which in turn performs its specific function, etc.
Depending on the configuration purchased, the Voice Mail provides 100 Boxes. Routing
boxes are used to answer incoming calls, play a listing of option to callers, and route the call
to a specific mailbox based on the digits dialed by the caller. The mailboxes transfer calls to
their associated extensions and store messages for system subscribers, and they can be set up
to forward calls to another phone or extension number, deliver messages to another phone or
pager, play one of 9 pre-recorded greetings to callers, screen calls, queue calls when the
extension is busy, or record call conversations.
2.4.5.2 Understanding Routing Box 800, 801, and 821
According to the entries specified on the Line Information screen, the Voice Mail will route
all incoming calls to Routing box 800. This box answers calls during the day and lunch
service hours and plays a greeting to callers. After day/lunch service hours, the system routes
calls to Routing box 801. Typically, companies offer more extensive call routing options to
callers during day/lunch service hours than during closed hours. Often, for example, singledigit call routing (“…Press 2 for Sales…”) is not offered during closed hours. Therefore, the
29
DX-80 H ARD DRIVE VOICE MAIL INSTALLATION AND SUPERVISOR GUIDE 09/01
greeting voiced by and options available in Routing box 801 are often different than those in
Routing box 800.
So that the system supervisor can alter the system to voice a generic holiday greeting on
holidays the office is closed, you will set up both Routing box 800 and 801 to include a
holiday greeting alternative. Therefore, procedures in this document guide you through
recording two greetings in both boxes 800 and 801: an office open greeting and a holiday
greeting in box 800, and an office closed greeting and a holiday greeting in box 801. (Keep
in mind that holidays last 24 hours, therefore calls received on a holiday may be processed by
either box 800 or 801, depending on when the call is received. For this reason, a holiday
greeting must be recorded in both box 800 and 801). Sample greetings for these boxes are
provided in section 3.2.
Routing Box 821 is designed by default to take over and route calls once they have passed
through Routing box 800 or 801. A call may go to Routing box 821, for example, after the
caller leaves a voice message in a subscriber’s mailbox. Routing box 821 offers callers a
menu similar to Routing box 800, but box 821 is pre-configured so if a caller does not enter
an extension or select a menu option, the call is disconnected. In Routing box 800 and 801,
callers who do not enter an extension or select an option are transferred to the operator. This
is a safety measure designed to assist callers who use rotary phones or are too slow to respond
to system prompts. By disconnecting non-responsive callers in box 821, the system simply
assumes that the caller knew how to select menu options in box 800 or 801, and therefore,
since no option was selected in box 821, the caller hung up.
Because we recommend you record two greetings in both Routing box 800 and 801, you will
not use the GREETING RECORDED field on the Routing Box setup screens. This field allows
you to record only one greeting for the Routing box. Instead you will record all necessary
greetings by following the steps in the section 2.4.5.9, which you will complete after you
review and set up the Routing boxes and mailboxes.
2.4.5.3 Accessing Box Information Screens
1. From the Line Status screen, press <F10>. The Main menu displays and you are
prompted to enter a system password.
2. At the prompt to enter the system password, press <Enter>.
3. From the Main Menu, select BOX INFORMATION. The Box Information menu displays.
You should review the setup for the following boxes:
30
DX-80 H ARD DRIVE VOICE MAIL INSTALLATION AND SUPERVISOR GUIDE 09/01
•
Routing Box 800
•
Routing Box 801
•
Routing Box 821
•
Prototype Mailbox 9994
•
Supervisor mailbox 70
After you review and, if necessary, adjust prototype mailbox 9994, you use it to set up
subscriber mailboxes. You then make necessary adjustments to these mailboxes to customize
them for system subscribers. This section details the steps you must follow to set up all
necessary boxes and make the required adjustments.
The following procedures identify screen setup entries necessary for the Voice Mail to
effectively process calls. Fields that are not specifically discussed contain default values that
should be appropriate in nearly all setup situations.
31
DX-80 H ARD DRIVE VOICE MAIL INSTALLATION AND SUPERVISOR GUIDE 09/01
2.4.5.4 Reviewing Routing Box 800, 801, and 821 and Setting Up Single-Digit
Call Routing
1. From the Box Information menu, select ROUTING BOX. The Routing Box setup screen
displays.
2. Press <F4> to access the box selection screen. A small window displays prompting you
for the box number. Type 800 then press <Enter>.
3. Press <Enter> to move the cursor moves to the OWNER field. So that more than one
greeting can be recorded and stored for use with this Routing box, this box should be
identified as being owned by the supervisor mailbox, mailbox 70. By specifying a
mailbox owner for this Routing box, the box takes on certain “mailbox” attributes, which
include being allowed to house the same number of greetings as the mailbox owner’s
mailbox. (You specified this number when you set up class of service 7.)
4. Press <Enter> to move the cursor to the DESTINATION FOR DIGIT fields. If you are
setting up the system to provide single-digit call routing options to callers, complete these
fields. Refer to the Routing Worksheet completed by the system supervisor for specific
information on entries for these fields. Do not modify the DESTINATION FOR DIGIT *
and # fields.
32
DX-80 H ARD DRIVE VOICE MAIL INSTALLATION AND SUPERVISOR GUIDE 09/01
5. Repeat steps 2 through 5 to set up Routing box 821. In step 2, type 821 (instead of 800)
to access box 821. In the DESTINATION FOR DIGITS field, we recommend you make the
same entries as you did on the setup screen for box 800.
6. Repeat steps 2 through 5 to set up Routing box 801. In step 2, type 801 (instead of 800)
to access box 801. In the DESTINATION FOR DIGITS field, you may decide to modify or
simply not include the single-digit dialing options, since this box will control how calls
are routed when the office is closed. If you choose to use the same single-digit dialing
options, simply re-enter them here.
7. To save all setup entries and exit the Routing Box setup screen, press <F10>. The Box
Information menu displays.
2.4.5.5 Setting Up Prototype Mailbox 9994
You need to create a mailbox for each subscriber who will use the system to record messages.
Since most of the setup information will be the same for every mailbox you need, you should
review the system’s prototype mailbox, which is used as the mailbox setup model. The
prototype mailbox is box number 9994. Every time you select to create a new mailbox, the
system does so by making a copy of mailbox 9994.
1. From the Box Information menu, select MAIL BOX. The Mail Box setup screen displays
with the Page Number menu.
2. Press <F4> to access the box selection screen. A small window displays prompting you
for the box number. Type 9994 then press <Enter>.
3. Press <Enter> to move the cursor to the TRANSFER TYPE field. When a call is routed to
the mailbox, the first action taken is to transfer the call to the number specified in the TO :
field. The Voice Mail offers several options as to how the call can be transferred. When
you move the cursor to this field, the various options are presented in a menu.
All transfer type options are described below. Use this information to select a transfer
type. Note that in almost all system setups, you should select the Blind transfer type so
the system can function most efficiently. The default setting is Blind.
33
DX-80 H ARD DRIVE VOICE MAIL INSTALLATION AND SUPERVISOR GUIDE 09/01
NO TRANSFER
The Voice Mail does not transfer the call. Instead, it plays the mailbox owner’s personal
greeting (if one has been recorded) or a system default greeting. The caller then has
several available options before recording a message.
BLIND
The Voice Mail transfers the call by dialing the number, then dropping out of the call. It
transfers the call without monitoring to check whether the called party is busy, answers,
etc. The final outcome of the call is the total responsibility of telephone system. If the
DX-80 has been programmed for transfer-recall capabilities, then when the telephone
system transfer-recall timer expires, the call is returned to the Voice Mail. (The Voice
Mail cannot perform call queuing when using Blind call transfers.)
WAIT FOR RING
This is a combination of the Wait For Answer and Blind transfer types. If the called party
is busy, the calling party is offered the same options as with the Wait For Answer transfer
type. If ringing is detected on the line, the Voice Mail executes a Blind transfer and
drops out of the call. (The Voice Mail can perform call queuing if the extension is busy.)
WAIT FOR ANSWER
This transfer type is not available at this time. If your application requires call queuing,
use Wait for Ring.
SCREEN
This transfer type functions exactly the same way as with the Wait For Answer transfer
type until the called party answers. Once the called party answers, the Voice Mail plays a
system prompt offering the called party several options:
•
Press 1 to accept the call. The parties are connected.
•
Press 2 to have the Voice Mail voice the mailbox owner’s currently active greeting to
the called party.
•
Press 3 to send the calling party to the destination selected in the IF CALLER
CHOOSES OTHER OPTIONS field on Page 2 of the mailbox’s Mailbox setup screens.
34
DX-80 H ARD DRIVE VOICE MAIL INSTALLATION AND SUPERVISOR GUIDE 09/01
•
Press 4 plus a greeting number (0 through 9) to play the selected greeting to the
caller, provided that the greeting has been recorded.
•
Press 5 plus any valid box number to send the calling party to that box, where the call
is treated as would any other call to that box.
•
Press 6 to accept the call. The parties are connected, but the Voice Mail remains
connected to the call and records the conversation. The recording is stored as a
message in the called party’s mailbox (provided the host telephone system allows
conferencing on voice mail ports).
(With the Screen transfer type option, the Voice Mail can perform call queuing if the
extension is busy.)
2.4.5.6 Creating Subscriber Mailboxes
Once you set up Prototype mailbox 9994, you can now efficiently set up all the mailboxes
that will be used by subscribers on the system.
1. From the Box Information menu, select MAIL BOX. The Mail Box setup screen displays.
2. To add a new mailbox, press <F2>.
3. A small window displays prompting you for the box number. Enter the number of the
first mailbox you want to create, then press <Enter>.
Note:
Enter as the mailbox number the same number as the extension to which
the mailbox will transfer calls. Also, note that the default password for each
mailbox is the same as the box number.
4. The Voice Mail creates the new mailbox by making a copy of the Prototype mailbox.
The new mailbox is displayed on the screen.
5. Repeat steps 3 through 5 for each subscriber mailbox you want to create.
6. Once you create all necessary mailboxes, continue with the next procedure, below.
35
DX-80 H ARD DRIVE VOICE MAIL INSTALLATION AND SUPERVISOR GUIDE 09/01
2.4.5.7 Customizing Subscriber Mailboxes
Using information the system supervisor provides on the Mailbox Setup Worksheets, you can
now customize the mailboxes you created for each subscriber on the system.
The procedure below identifies the fields you should be sure to customize for each mailbox.
Fields that are not specifically discussed contain default values that should be appropriate in
nearly all setup situations. Therefore, it is unlikely that you need to modify these fields.
1. To access the mailbox you want to customize, press <F4>. A small window displays
prompting you for the box number. Type the box number then press <Enter>. The Mail
Box Page 1 setup screen displays.
2. Press <Enter> to move the cursor to the FIRST NAME field. Enter the mailbox owner’s
first name. Press <Enter> to move the cursor to the LAST field. Enter the mailbox
owner’s last name.
3. To go to Page 2 of the Mail Box setup screen, press <F9>. The Page 2 screen displays.
36
DX-80 H ARD DRIVE VOICE MAIL INSTALLATION AND SUPERVISOR GUIDE 09/01
4. Press <Enter> to move the cursor to the PAGER NUMBER field. If the subscriber is to use
the Paging feature, use the following information to complete this section of the Mail
Box setup screen.
PAGER NUMBER
Enter the telephone number of the paging service. The mailbox owner may change the
number remotely. Normally, access codes for outside lines are not required here.
Instead, that information should be entered on the System Information / General setup
screen.
To restrict pager calls to use lines in a particular line group, enter the letter (A, B, C, or
D) of the line group in braces { } before the telephone number (for example,
{A}5551212).
Tone or Voice pagers may be used with the Message Delivery feature discussed later in
this section.
37
DX-80 H ARD DRIVE VOICE MAIL INSTALLATION AND SUPERVISOR GUIDE 09/01
The pager number you enter can contain the digits 0 through 9, star (*), pound (#), and
the following special characters:
Character
Use
P
Use pulse (also known as ‘rotary’) dialing.
T
Use tone dialing (the default).
,
Short pause (duration can be changed in Technical Information
screen. Default is one second).
%
Medium pause (equal in length to 4 commas).
L
Long pause (equal in length to 8 commas).
!
Hookflash.
N
No progress tones (must be last character). The Voice Mail
ignores all call progress tones during the course of the call. When
it has finished dialing, the system immediately assumes that the
pager system has answered.
[]
Enclosing the number in brackets prevents the mailbox owner from
being able to call in and change the number.
{}
Specifies a line group is to be used (for example, {A}555-1212
indicates “choose any line in line group A, and dial the number
555-1212”).
any other
character
Can be used for punctuation and is ignored.
PAGER TYPE
The Voice Mail supports both Tone and Digital pagers in this section of the mailbox
programming. Specify here which type of pager the mailbox owner has (Digital, Tone or
None).
When a caller asks the Voice Mail to page a mailbox owner, the Voice Mail looks for a
free line on which to call the paging service. If no lines are free to make the call, the
Voice Mail queues the request and re-tries every 10 seconds for approximately 10
minutes.
38
DX-80 H ARD DRIVE VOICE MAIL INSTALLATION AND SUPERVISOR GUIDE 09/01
NUMBER OF TIMES TO CALL
The Voice Mail calls the pager the number of times you specify in this field. Repetitive
paging may be useful if the pager is turned off periodically or is out of pager range.
Note:
This field is used to tell the Voice Mail how many successful calls it should
make to the paging service. Do not confuse this with the pager-retry feature. If
the Voice Mail calls the pager number and does not hear it ring and answer,
then it automatically re-tries the call at 10-second intervals, for a pre-defined
number of times.
MINUTES BETWEEN CALLS
If you enter a number greater than 1 in the TIMES TO CALL field, this field instructs the
Voice Mail how long it should wait between re-calls.
Note:
This field tells the Voice Mail how long to wait between successful calls to the
paging service. Do not confuse this with the pager-retry feature.
CALL SCHEDULE
The Pager notification feature follows a time schedule. The options are:
Schedule
ALWAYS
DAY SERVICE
NIGHT SERVICE
SCHEDULE A, B, C, or D
Result
Pager notification is available at all times.
Pager notification is available only during day/lunch service, as
defined in the System Information / Business Hours screen.
Pager notification is available only during non-day/lunch service,
as defined in the System Information / Business Hours screen.
Pager notification is available only during the schedule defined
on Page 3 of the Mail Box setup screen for this mailbox.
39
DX-80 H ARD DRIVE VOICE MAIL INSTALLATION AND SUPERVISOR GUIDE 09/01
ENABLED
Set this field to Yes to indicate that the pager feature for this mailbox is currently on. Set
the field to No to indicate that the pager feature is off. The mailbox owner can also
toggle this field on and off by calling into the system. If this field is set to No, it
overrides the call schedule set in the previous field.
5. Press <Enter> to move the cursor to the first MESSAGE DELIVERY field. If the subscriber
is to use the Message Delivery feature, use the following information to complete this
section of the Mail Box setup screen.
CALL
Enter the telephone number the Voice Mail should call to inform the mailbox owner that
there are new messages in his/her mailbox.
The number can contain the DTMF digits 0 - 9, * and #, plus any of the following special
characters:
Character
Use
P
Use pulse (also known as ‘rotary’) dialing.
T
Use tone dialing (the default).
,
Short pause (duration can be changed in Technical Information screen.
Default is 1 second).
%
Medium pause (equal in length to 4 commas).
L
Long pause (equal in length to 8 commas).
!
Hookflash.
[]
Enclosing the number in brackets prevents the mailbox owner from being
able to call in and change the number.
{}
Specifies a line group is to be used (for example, {A}555-1212 indicates
“choose any line in line group A, and dial the number 555-1212”).
H
Hang up immediately after dialing the number (must be last character).
M
Answering machine. This must be the last character in the telephone
number. It tells the Voice Mail that the number being called has an
answering machine attached. When the Voice Mail calls the number, it
announces that there are messages, as usual. If the Voice Mail has not
40
DX-80 H ARD DRIVE VOICE MAIL INSTALLATION AND SUPERVISOR GUIDE 09/01
Character
Use
received a DTMF digit (1 for Yes, anything else for No), by the end of the
announcement cycle(s), it assumes that it is talking to an answering
machine, and proceeds to play each new message in turn.
V
Voice pager. This must be the last character in the telephone number.
Details of voice pager programming are found later in this section.
I
Internal (must be the first character). Overrides the INTERNAL parameter (in
the configuration file VM.CFG) and treats this number as an internal call
regardless of the number of digits. The Voice Mail does not dial the
sequence specified in the General Information / Digits To Get A Line On
External Call field.
E
External (must be the first character). Overrides the INTERNAL parameter
(in the configuration file VM.CFG) and treats this number as an external call
regardless of the number of digits. The Voice Mail dials the sequence
specified in the General Information / Digits To Get A Line On External Call
field.
N
No progress tones (must be the last character). The Voice Mail ignores all
call progress tones during the course of the call.
any other
character
Can be used for punctuation and is ignored.
The owner of a mailbox can call in and remotely change the first Message Notification
number, but cannot use or modify special characters.
REPEAT
Enter the number of successful calls to each telephone number. A successful call is
generally defined as one where the Voice Mail has seized an available line port, dialed
the number, and detected an answer. If the call is not successful (for example, the called
number was busy) the Voice Mail automatically re-tries every few seconds up to twenty
times.
INTERVAL
If the Repeat field contains a number greater than 1 or there are additional Call number
sequences, enter the interval (in minutes) between calls to this number and/or the interval
before proceeding to the next Call number sequence.
41
DX-80 H ARD DRIVE VOICE MAIL INSTALLATION AND SUPERVISOR GUIDE 09/01
SCHEDULE
Select when the Voice Mail should call this number. The options are:
Schedule
Result
ALWAYS
The number is called any time a new message is left in the
mailbox.
DAY SERVICE
The number is called only during day/lunch service, as
defined in the System Information / Business Hours screen.
NIGHT SERVICE
The number is called only during non-day/lunch service, as
defined in the System Information / Business Hours screen.
SCHEDULE A, B, C, or D
The number is called only during the schedule defined on
Page 3 of the Mail Box setup screen for this mailbox.
RUN THIS SEQUENCE N TIMES
Once the Voice Mail has called every number listed, it considers that it has run the
sequence one time. It will then check the value in this field. If this field is set to a number
higher than 1, the Voice Mail starts again and repeats the sequence the specified number
of times.
CURRENTLY ENABLED?
This field identifies which messages the Voice Mail is to deliver:
DISABLED
URGENT MSGS ONLY
ALL MESSAGES
The Voice Mail does not deliver messages.
The Voice Mail delivers only messages marked urgent, but
does not call to deliver non-urgent messages.
The Voice Mail calls every time a message is deposited
into the mailbox.
Setting this field to DISABLED overrides the SCHEDULE field.
The owner of a mailbox can call in remotely and turn his/her Message Delivery feature
on or off, or change the first number to be called. The other telephone numbers, if in use,
cannot be changed remotely.
6. To go to Page 3 of the Mail Box setup screen, press <F9>. The Page 3 screen displays.
42
DX-80 H ARD DRIVE VOICE MAIL INSTALLATION AND SUPERVISOR GUIDE 09/01
7. Press <Enter> to move the cursor to the first SCHEDULE A field. If the subscriber is to
use the Pager or Message Delivery feature according to a particular schedule, use the
following information to complete the Mail Box Page 3 setup screen.
START
Enter the time at which this schedule should begin on this day. The time should be
entered in 24-hour format (for example, enter 20:00 for 8:00 PM ).
END
Enter the time at which this schedule should end on this day. The time should be entered
in 24-hour format (for example, enter 20:00 for 8:00 PM ).
Note:
If you want the schedule to be active all day, enter 00:00 as the START
time and 24:00 as the END time.
3. To go to Page 4 of the Mail Box setup screen, press <F9>. The Page 4 screen displays.
43
DX-80 H ARD DRIVE VOICE MAIL INSTALLATION AND SUPERVISOR GUIDE 09/01
4. Confirm that the ENABLED field is set to Yes for all four personal distribution lists. This
allows subscribers to create up to 4 personal distribution lists in their mailboxes, which
they can then use when sending messages to groups of subscribers.
5. Repeat steps 1 through 9 to customize each mailbox you created for each subscriber on
the system. Once you customize all subscriber mailboxes, continue with the next
procedure.
2.4.5.8 Customizing the System Supervisor Mailbox
1. To access the system supervisor mailbox, press <F4>. A small window displays
prompting you for the box number. Type 70 then press <Enter>.
2. Press <Enter> to move the cursor to the FIRST NAME field. Type SUPERVISOR in this
field. Press <Enter> to move the cursor to the LAST field. Enter the system supervisor’s
last name . Note that though you may type any name or words in these fields, using these
entries identifies this mailbox as the supervisor mailbox and identifies the individual who
is currently acting as the on-site system supervisor.
44
DX-80 H ARD DRIVE VOICE MAIL INSTALLATION AND SUPERVISOR GUIDE 09/01
3. Press <Enter> to move the cursor to the CLASS OF SERVICE field. Verify that 7 is entered
in this field. This entry assigns class of service 7, which has supervisor privileges, to this
mailbox.
4. To go to Page 2 of the Mail Box setup screen, press <F9>. The Page 2 screen displays.
5. To complete the supervisor mailbox setup, repeat steps 4 through 9 of the previous
procedure.
6. To save all mailbox customizations and exit the Mail Box setup screen, press <F10>.
The Box Information menu displays.
2.4.5.9 Recording Routing Box Greetings
As described in section 2.4.5.2, the following procedure guides you through recording two
greetings in both Routing boxes 800 and 801: an office open greeting and a holiday greeting
in box 800, and an office closed greeting and a holiday greeting in box 801. Sample
greetings for these boxes and for box 821 are provided in section 3.2.
Note:
When you record Routing box greetings, you must include instructions that
identify any single-digit call routing options available to the caller.
1. From a telephone, call into voice mail and log into supervisor mailbox 70. Note that the
default password for the mailbox is the same as the mailbox number, 70.
2. The Voice Mail tutorial session starts. Complete the tutorial. When prompted to record
the name and greeting, you may elect to identify this as the supervisor mailbox. When
changing the password, be sure to inform the system supervisor of the number you select.
When you complete the tutorial, press <*> to prevent it from voicing the next time the
box is accessed.
45
DX-80 H ARD DRIVE VOICE MAIL INSTALLATION AND SUPERVISOR GUIDE 09/01
3. The system voices the Main menu:
“To listen to your messages press 1. To send a message press 2. To change your options
press 3.”
Press 3 to change options. The system voices the Options menu:
Options Menu
To Record Your Name
Press 1
To Record Your Greeting
Press 2
To Change Your Password
Press 3
To Change Your Call-Transfer Feature
Press 4
To Change Your Message Notification Feature
Press 5
To Change Your Pager Feature
Press 6
To Review Msgs Scheduled for Future Delivery
Press 7
To Change Your Personal Distribution Lists
Press 8
To Retrieve a Message Previously Sent
Press *
To Return to the Main Menu
Press #
4. From the Options menu, press 2.
5. When prompted, press 800 to indicate you want to work with Routing box 800.
6. When prompted, press 1 to confirm the number you entered or press # if the number you
entered was incorrect. Once you press 1 to confirm, the system voices the following
options:
To Replay the Greeting
Press 1
To Re-Record the Greeting
Press 2
To Delete the Greeting
Press 3
To Choose a New Greeting
Press 5
To Exit
Press #
7. To record the first greeting for the Routing box, press 2. The system prompts you to
enter the number of the greeting you want to record. Enter greeting number 0. Then,
follow the prompts to record the office open greeting.
46
DX-80 H ARD DRIVE VOICE MAIL INSTALLATION AND SUPERVISOR GUIDE 09/01
8. To record the holiday greeting for Routing box 800, repeat step 7, select greeting
number 1, and record the holiday greeting.
9. To record greeting(s) for Routing box 801, press <#> to exit the menu shown above and
return to the Options menu. Then repeat steps 4 through 7 above. In step 5, press 801 to
indicate you want to work with Routing box 801. In step 7, record the office closed
greeting , instead of the office open greeting.
10. To record the holiday greeting for Routing box 801, repeat step 7, select greeting
number 1, and record the holiday greeting.
11. To record the greeting for Routing box 821, press <#> to exit the menu shown above and
return to the Options menu. Then repeat steps 4 through 7 above. In step 5, press 821 to
indicate you want to work with Routing box 821. In step 7, record the office open
greeting call routing options, omitting the introductory remarks “Welcome to …”
12. When you have recorded all necessary greetings, press <#> to return to the Options
menu, then press <#> to return to the Main menu.
Be sure to instruct the system supervisor to refer to section 3.2 for detailed instructions on
changing the active Routing box greetings and recording new greetings.
2.5 Default Database Structure Overview
As mentioned previously, the Voice Mail contains a default database with a setup
configuration that allows the Voice Mail to efficiently perform fundamental call processing
tasks with minimal system adjustments by the installing technician. Information in this
section highlights portions of this default database configuration. More detailed information
on the purpose of Routing boxes and mailboxes and how box settings and other default
settings affect system functionality is provided earlier in this document.
Note:
Though you may make adjustments to specific information relating to this
default setup, you are urged to maintain the general configuration of
Routing boxes 800, 801, and 821, class of service 7, and supervisor
mailbox 70. This configuration allows the Voice Mail to efficiently perform
fundamental call processing tasks. Maintaining it helps both you, the
technician, and the Voice Mail technical support to efficiently service the
system and resolve any call processing issues.
47
DX-80 H ARD DRIVE VOICE MAIL INSTALLATION AND SUPERVISOR GUIDE 09/01
•
Technician Password:
∗ 1234
•
Business Hours (specified on System Information / Business Hours screen):
∗ 8:00 AM - 5:00 PM
•
Routing Box 800:
∗ Answers all incoming calls during day/lunch hours (specified on System Information
/ Business Hours screen)
∗ Owned by mailbox 70
•
Routing Box 801:
∗ Answers all incoming calls during non-day/lunch hours (specified on System
Information / Business Hours screen)
∗ Owned by mailbox 70
•
Routing Box 821:
∗ Routes calls that have already passed through Routing box 800 or 801
∗ Owned by mailbox 70
•
Class of Service 0:
∗ Set up with the following parameter settings (for information on specific parameter
fields, refer to section 2.4.4.6):
MAXIMUM NUMBER OF GREETINGS: 10
MAXIMUM NUMBER OF MESSAGES : 200
MAXIMUM GREETING LENGTH (SECS): 60
MAXIMUM MESSAGE LENGTH (SECS) 60
AUTO -DELETE OLD MESSAGES AFTER 30 DAYS.
AUTO DELETE NEW MESSAGES AFTER 99 DAYS.
SUPERVISOR STATUS? No
ACCESS TO GROUP-BOXES? Yes
DIAL-OUT ALLOWED ? No
ACCESS TO P.A.? Yes
P LAY MENU AFTER GREETING ? No
ALLOWED TO RECEIVE FAXMAIL? No
OPERATOR BOX (DAY): 888 (NIGHT): 888
WHEN EXITING OPEN MAILBOX, GO TO BOX: 821
MAX LINES ALLOWED TO HOLD FOR ONE BOX : 2
WHILE IN QUEUE, SAY POSITION IN LINE? No
48
DX-80 H ARD DRIVE VOICE MAIL INSTALLATION AND SUPERVISOR GUIDE 09/01
TRY EXTENSION 3 TIMES BEFORE GOING BACK TO CALLER
RESTRICTED DIGITS: [None]
•
Class of Service 7:
∗ Set up with the class of service 0 options, but with SUPERVISOR STATUS? enabled.
•
Extension Length:
∗ 3 digits
•
Password Length:
∗ 4 digits
•
Default Passwords :
∗ Equal the mailbox numbers
•
Mailbox 70:
∗ Set up as the Supervisor mailbox with CLASS OF SERVICE: 7
•
Prototype mailbox 9994 (features automatically assigned to all mailboxes created):
TRANSFER TYPE: Wait for Ring
CLASS OF SERVICE: 0
To: X (signifies the mailbox number)
CURRENTLY ENABLED : Yes
TRANSFER SCHEDULE : Always
P ASSWORD: X (signifies the mailbox number)
SEQUENCE TO TURN ON /OFF MESSAGE WAITING LAMP: (set by Integration program)
AFTER PLAYING GREETING: Wait for digit
2.6 Setting Up the System Using the Teleparameter
Feature
This section provides instructions on using the teleparameter feature to set up a new system at
a customer site or to later make modifications to the system. Using the teleparameter feature,
you can change the parameter values that affect system-wide setup information, box setups,
and VM .CFG file data by simply calling into the system. You simply log into supervisor
mailbox 70 over the telephone, select to modify system parameters, then, as prompted, enter
codes that identify each parameter you want to change and the new value to which you want
49
DX-80 H ARD DRIVE VOICE MAIL INSTALLATION AND SUPERVISOR GUIDE 09/01
to set the parameter. The screen illustrations and parameter value table provided in this
section indicate the parameters and their associated codes.
Technicians who have experience setting up Corporate Office or Small Office systems may
prefer to use the Teleparameter feature to quickly make modifications and get the Voice Mail
up and running at the customer’s site. Be advised, however, that since this technique
involves inputting codes that represent system parameters and corresponding values to which
parameters are to be set, it is a bit more difficult to use effectively if you are unfamiliar with
setting up Corporate Office or Small Office systems. For this reason, we recommend that
technicians unfamiliar with Corporate Office, Small Office, or DX-80 Hard Drive Voice Mail
attach a laptop to the Voice Mail and use the instructions provided in the previous sections to
complete all necessary system setup steps.
Note:
If you choose to set up the system using the Teleparameter feature, be sure
to first review this section so you clearly understand the setup of the default
database included on the Voice Mail.
2.6.1 Using the Teleparameter Feature to Set up a New
System
2.6.1.1 Adjusting System Information
The Voice Mail voice processing software is pre-installed on the Voice Mail card before it is
shipped to you; however, you may need to customize certain fields on the System
Information screens. To do so, use the following procedure:
1. From a telephone, call into the extension associated with the second voice mail port
and log into supervisor mailbox 70. Note that the default password for the mailbox is
the same as the mailbox number, 70.
2. The Voice Mail tutorial session starts. Complete the tutorial. When prompted to record
the name and greeting, you may elect to identify this as the supervisor mailbox. When
changing the password, be sure to inform the system supervisor of the number you select.
When you complete the tutorial, press <*> to prevent it from voicing the next time the
box is accessed.
50
DX-80 H ARD DRIVE VOICE MAIL INSTALLATION AND SUPERVISOR GUIDE 09/01
3. The system voices the Main menu:
“To listen to your messages press 1. To send a message press 2. To change your options
press 3.”
4. To access the Supervisor menu, press 6 (this option is not voiced). The system voices
the Supervisor menu options:
Supervisor Menu
For Mailbox Administration
Press 1
For Routing Box Administration
Press 2
For Question Box Administration
Press 3
For Port Administration
Press 4
To Change the System Broadcast Message
Press 5
To Change the Voice Mail Day / Night Service
Press 6
To Change the System Time
Press 7
To Change the System Date
Press 8
To Modify System Parameters
Press 9
5. From the Supervisors menu, press 9 to modify system parameters. The system prompts
you to enter the Technician password. By default, this password is 1234.
6. At the prompt, enter the number of the parameter you want to change, then, as prompted,
the value to which you want to change the parameter. Parameter information is provided
in a comprehensive table shown in section 2.6.2.
When you complete all modifications, press # to return to the Supervisor’s menu.
Note:
Refer to section 2.6.2 for information on values you can specify for certain
parameters and for information on adjusting parameters in the VM.CFG file.
2.6.1.3 Adjusting Routing Box Information
As indicated in section 2.4.5.2, you need to adjust Routing Boxes 800, 801, and 821 to
include any single-digit call routing options you want to provide to callers. You must also
51
DX-80 H ARD DRIVE VOICE MAIL INSTALLATION AND SUPERVISOR GUIDE 09/01
record the necessary greetings for these boxes. Sample Routing box greetings are provided in
section 3.2.1.
To record Routing box greetings, follow the procedure provided in section 3.2.2.
To modify single-digit call routing, you can follow the procedure in section 3.2.3 or you can
use the Teleparameter feature. To use the Teleparameter feature, follow steps 1 through 4 in
the previous procedure, referring to the parameter numbers provided in section 2.6.2.
Note:
If you enter a parameter number for a parameter that affects a particular
box, the system prompts you to enter the Item number. The Item number
identifies the particular box in which you want to change the parameter. At
the Item number prompt, enter the number of the box.
Note:
Refer to section 2.6.2 for information on values you can specify for certain
parameters and for information on adjusting parameters in the VM.CFG file.
2.6.1.4 Creating and Adjusting Mailbox Box Information
To create mailboxes on the system, follow the procedure in section 3.1.1. Once you create
mailboxes, you can make detailed modifications to the box setups using the Teleparameter
feature. To use the Teleparameter feature to adjust mailbox information in boxes you have
created on the system, follow steps 1 through 4 in the procedure in section 2.6.1.2. For
specific parameters you can adjust, refer to section 2.6.2.
Note:
If you enter a parameter number for a parameter that affects a particular
box, the system prompts you to enter the Item number. The Item number
identifies the particular box in which you want to change the parameter. At
the Item number prompt, enter the number of the box.
Note:
Refer to section 2.6.2 for information on values you can specify for certain
parameters and for information on adjusting parameters in the VM.CFG file.
52
DX-80 H ARD DRIVE VOICE MAIL INSTALLATION AND SUPERVISOR GUIDE 09/01
2.6.1.5 Creating Other Box Types and Adjusting Information
To create other types of boxes, you must first follow the procedures presented earlier in this
document to connect a laptop computer to the Voice Mail card and access Box Information
setup screens. Once you create the boxes using this technique, you can make detailed
modifications to the box setups using the Teleparameter feature. To use the Teleparameter
feature to adjust information in boxes already created on the system, follow steps 1 through 4
in the procedure in section 2.6.1.2. For specific parameters you can adjust, refer to section
2.6.2.
Note:
If you enter a parameter number for a parameter that affects a particular
box, the system prompts you to enter the Item number. The Item number
identifies the particular box in which you want to change the parameter. At
the Item number prompt, enter the number of the box.
Note:
Refer to section 2.6.2 for information on values you can specify for certain
parameters and for information on adjusting parameters in the VM.CFG file.
2.6.2 Teleparameter Value Tables
The following table identifies all parameters you can adjust using the teleparameter feature
and the entries you can make to indicate specific values for each parameter. Refer to
information after this table for additional entries you can make in some fields.
Task
Param.
Number
Description
Acceptable Values
Notes:
Account
Number Box
Setup
2700
Minimum number of digits
required for valid entry
determination
1-9
A prompt for the
Item number refers
to the box number.
Enter the box
number.
Account
Number Box
Setup
2701
Maximum number of digits
required for valid entry
determination
1 - 30
A prompt for the
Item number refers
to the box number.
Enter the box
number.
53
DX-80 H ARD DRIVE VOICE MAIL INSTALLATION AND SUPERVISOR GUIDE 09/01
Task
Param.
Number
Description
Account
Number Box
Setup
2702
Number of seconds to wait
before determining all digits
are entered
0-9
A prompt for the
Item number refers
to the box number.
Enter the box
number.
Account
Number Box
Setup
2703
Action to take after
maximum retry attempts if
invalid account number is
entered
0 = Return
1 = Say ‘Goodbye’
2 = Go to another box
3 = Hang up
A prompt for the
Item number refers
to the box number.
Enter the box
number.
Account
Number Box
Setup
2704
Box associated with
parameter 2703
(Valid mailbox
number)
A prompt for the
Item number refers
to the box number.
Enter the box
number.
Account
Number Box
Setup
2705
Retry attempts to allow if
invalid account number
entered
0-9
A prompt for the
Item number refers
to the box number.
Enter the box
number.
Account
Number Box
Setup
2706
Number of mailbox that
owns the Account Number
box
(Valid mailbox
number)
A prompt for the
Item number refers
to the box number.
Enter the box
number.
Account
Number Box
Setup
2707
Action to take if account
number was previously
collected during call
0 = Use the existing
account number
A prompt for the
Item number refers
to the box number.
Enter the box
number.
Account
Number Box
Setup
2708
Repeat number entered for
confirmation?
1 = Yes
0 = No
A prompt for the
Item number refers
to the box number.
Enter the box
number.
Account
Number Box
Setup
2001
Action to take if valid
account number is entered
0 = Return
1 = Say ‘Goodbye’
2 = Go to another box
3 = Hang up
A prompt for the
Item number refers
to the box number.
Enter the box
number.
Account
Number Box
Setup
2002
Box associated with
parameter number 2001
(Valid box number)
A prompt for the
Item number refers
to the box number.
Enter the box
number.
54
Acceptable Values
1 = Ask for a new
account number
Notes:
DX-80 H ARD DRIVE VOICE MAIL INSTALLATION AND SUPERVISOR GUIDE 09/01
Task
Param.
Number
Description
Acceptable Values
ACD Box Setup
2520
Number of mailbox that
owns the ACD box
(Valid mailbox
number)
A prompt for the
Item number refers
to the box number.
Enter the box
number.
ACD Box Setup
2521
Action to take when trying
extension
1 = Always transfer
A prompt for the
Item number refers
to the box number.
Enter the box
number.
ACD Box Setup
2522
Criteria by which hunt is
started
0 = Start hunting from
first agent in group
A prompt for the
Item number refers
to the box number.
Enter the box
number.
1 = Start hunting from
previous agent
Notes:
ACD Box Setup
2523
Number of announcements
after which caller is offered
other options
0 - 99
A prompt for the
Item number refers
to the box number.
Enter the box
number.
ACD Box Setup
2524
Rings permitted before no
answer determination
0 - 99
A prompt for the
Item number refers
to the box number.
Enter the box
number.
ACD Box Setup
2525
Box default operator during
day service
(Valid mailbox
number)
A prompt for the
Item number refers
to the box number.
Enter the box
number.
ACD Box Setup
2526
Box default operator during
night service
(Valid mailbox
number)
A prompt for the
Item number refers
to the box number.
Enter the box
number.
ACD Box Setup
2527
Action to take if all
extensions are busy
0 = Queue the call
1 = Go to another box
A prompt for the
Item number refers
to the box number.
Enter the box
number.
ACD Box Setup
2528
Box associated with
parameter 2527
(Valid box number)
A prompt for the
Item number refers
to the box number.
Enter the box
number.
55
DX-80 H ARD DRIVE VOICE MAIL INSTALLATION AND SUPERVISOR GUIDE 09/01
Task
Param.
Number
Description
Acceptable Values
Notes:
ACD Box Setup
2529
Action to take if caller elects
not to remain in queue
0 = Return
1 = Say ‘Goodbye’
2 = Go to another box
3 = Hang up
A prompt for the
Item number refers
to the box number.
Enter the box
number.
ACD Box Setup
2530
Box associated with
parameter 2529
(Valid box number)
A prompt for the
Item number refers
to the box number.
Enter the box
number.
ACD Box Setup
2531
If call is queued, state
position in line?
1 = Yes
0 = No
A prompt for the
Item number refers
to the box number.
Enter the box
number.
ACD Box Setup
2501 to
2512
ACD rotation box members
(Valid mailbox
numbers)
A prompt for the
Item number refers
to the box number.
Enter the box
number.
Business Hours
Setup
5042
Hour day service begins
00-24
A prompt for the
Item number refers
to the day of the
week. Enter 0
(Sunday) through
6 (Saturday).
Business Hours
Setup
5043
(With parameter 5042)
Minute day service begins
00 - 59
A prompt for the
Item number refers
to the day of the
week. Enter 0
(Sunday) through
6 (Saturday).
Business Hours
Setup
5044
Hour day service ends
00 - 24
A prompt for the
Item number refers
to the day of the
week. Enter 0
(Sunday) through
6 (Saturday).
Business Hours
Setup
5045
(With parameter 5044)
Minute day service ends
00 - 59
A prompt for the
Item number refers
to the day of the
week. Enter 0
(Sunday) through
6 (Saturday).
56
DX-80 H ARD DRIVE VOICE MAIL INSTALLATION AND SUPERVISOR GUIDE 09/01
Task
Param.
Number
Description
Business Hours
Setup
5046
Hour lunch service begins
00 - 24
A prompt for the
Item number refers
to the day of the
week. Enter 0
(Sunday) through
6 (Saturday).
Business Hours
Setup
5047
(With parameter 5046)
Minute lunch service begins
00 - 59
A prompt for the
Item number refers
to the day of the
week. Enter 0
(Sunday) through
6 (Saturday).
Business Hours
Setup
5048
Hour lunch service ends
00 - 24
A prompt for the
Item number refers
to the day of the
week. Enter 0
(Sunday) through
6 (Saturday).
Business Hours
Setup
5049
(With parameter 5048)
Minute lunch service ends
00 - 59
A prompt for the
Item number refers
to the day of the
week. Enter 0
(Sunday) through
6 (Saturday).
Business Hours
Setup
5067
Hour at which greeting is to
change to good evening
00 - 24
A prompt for the
Item number refers
to the day of the
week. Enter 0
(Sunday) through
6 (Saturday).
Business Hours
Setup
5068
(With parameter 5067)
Minute at which greeting is
to change to good evening
00 - 59
A prompt for the
Item number refers
to the day of the
week. Enter 0
(Sunday) through
6 (Saturday).
Call Transfer
Information
Setup
5000
Sequence to initiate an
internal transfer
(Refer to technical
bulletin and phone
documentation)
Call Transfer
Information
Setup
5001
Sequence to initiate an
external transfer
(Refer to technical
bulletin and phone
documentation)
Call Transfer
Information
Setup
5002
Sequence to complete an
internal transfer
(Refer to technical
bulletin and phone
documentation)
57
Acceptable Values
Notes:
DX-80 H ARD DRIVE VOICE MAIL INSTALLATION AND SUPERVISOR GUIDE 09/01
Task
Param.
Number
Description
Acceptable Values
Call Transfer
Information
Setup
5003
Sequence to complete an
external transfer
(Refer to technical
bulletin and phone
documentation)
Call Transfer
Information
Setup
5004
Sequence to return from no
answer on an internal call
(Refer to technical
bulletin and phone
documentation)
Call Transfer
Information
Setup
5005
Sequence to return from no
answer on an external call
(Refer to technical
bulletin and phone
documentation)
Call Transfer
Information
Setup
5006
Sequence to return from
busy on an internal call
(Refer to technical
bulletin and phone
documentation)
Call Transfer
Information
Setup
5007
Sequence to return from
busy on an external call
(Refer to technical
bulletin and phone
documentation)
Call Transfer
Information
Setup
5008
Sequence to return from
call screening on an
internal call
(Refer to technical
bulletin and phone
documentation)
Call Transfer
Information
Setup
5009
Sequence to return from
call screening on an
external call
(Refer to technical
bulletin and phone
documentation)
Call Transfer
Information
Setup
5010
Sequence to transfer an
internal 3-way call
(Refer to technical
bulletin and phone
documentation)
Call Transfer
Information
Setup
5011
Sequence to transfer an
external 3-way call
(Refer to technical
bulletin and phone
documentation)
Call Transfer
Information
Setup
5014
Should Voice Mail detect
dial tone?
1 = Yes
0 = No
Call Transfer
Information
Setup
5023
Confirmation digits meaning
‘Yes’
(Refer to technical
bulletin and phone
documentation)
Call Transfer
Information
Setup
5054
Should Voice Mail use
transfer bypass digit?
0 = None
1 = First
2 = Last
Call Transfer
Information
Setup
5055
Maximum time for 3-way
call (minutes)
0 - 30
58
Notes:
DX-80 H ARD DRIVE VOICE MAIL INSTALLATION AND SUPERVISOR GUIDE 09/01
Task
Param.
Number
Description
Class of
Service Setup
7000
Number of days after which
Old messages are autodeleted
0 - 99
A prompt for the
Item number refers
to the Class of
Service number.
Enter 0 - 7.
Class of
Service Setup
7001
Number of days after which
New messages are autodeleted
0 - 99
A prompt for the
Item number refers
to the Class of
Service number.
Enter 0 - 7.
Class of
Service Setup
7002
Maximum message length
(seconds) for a message
0 - 999
A prompt for the
Item number refers
to the Class of
Service number.
Enter 0 - 7.
Class of
Service Setup
7003
Maximum number of
messages allowed in
mailbox
0 - 200
A prompt for the
Item number refers
to the Class of
Service number.
Enter 0 - 7.
Class of
Service Setup
7004
Maximum greeting length
(seconds)
0 - 999
A prompt for the
Item number refers
to the Class of
Service number.
Enter 0 - 7.
Class of
Service Setup
7005
Maximum number of
personal greetings allowed
0 - 10
A prompt for the
Item number refers
to the Class of
Service number.
Enter 0 - 7.
Class of
Service Setup
7006
Play menu after greeting to
callers?
1 = Yes
0 = No
A prompt for the
Item number refers
to the Class of
Service number.
Enter 0 - 7.
Class of
Service Setup
7007
Maximum lines allowed to
hold for mailbox
0 - 32
A prompt for the
Item number refers
to the Class of
Service number.
Enter 0 - 7.
Class of
Service Setup
7008
Number of times to try
extension before returning
to queued caller
0 - 99
A prompt for the
Item number refers
to the Class of
Service number.
Enter 0 - 7.
59
Acceptable Values
Notes:
DX-80 H ARD DRIVE VOICE MAIL INSTALLATION AND SUPERVISOR GUIDE 09/01
Task
Param.
Number
Description
Acceptable Values
Notes:
Class of
Service Setup
7009
Say position in line to calls
in queue?
1 = Yes
0 = No
A prompt for the
Item number refers
to the Class of
Service number.
Enter 0 - 7.
Class of
Service Setup
7010
Access to Group boxes
allowed?
1 = Yes
0 = No
A prompt for the
Item number refers
to the Class of
Service number.
Enter 0 - 7.
Class of
Service Setup
7011
Supervisor status allowed?
1 = Yes
0 = No
A prompt for the
Item number refers
to the Class of
Service number.
Enter 0 - 7.
Class of
Service Setup
7012
Caller access to P.A.
system allowed?
1 = Yes
0 = No
A prompt for the
Item number refers
to the Class of
Service number.
Enter 0 - 7.
Class of
Service Setup
7013
Dial-out allowed?
1 = Yes
0 = No
A prompt for the
Item number refers
to the Class of
Service number.
Enter 0 - 7.
Class of
Service Setup
7014
Faxmail receipt allowed?
1 = Yes
0 = No
A prompt for the
Item number refers
to the Class of
Service number.
Enter 0 - 7.
Class of
Service Setup
7015
Default operator box during
day service hours
(Valid mailbox
number)
A prompt for the
Item number refers
to the Class of
Service number.
Enter 0 - 7.
Class of
Service Setup
7016
Default operator box during
night service hours
(Valid mailbox
number)
A prompt for the
Item number refers
to the Class of
Service number.
Enter 0 - 7.
Class of
Service Setup
7017
When exiting open mailbox,
go to box #
(Valid box number)
A prompt for the
Item number refers
to the Class of
Service number.
Enter 0 - 7.
60
DX-80 H ARD DRIVE VOICE MAIL INSTALLATION AND SUPERVISOR GUIDE 09/01
Task
Param.
Number
Class of
Service Setup
7018
Class of
Service Setup
7020 to
7029
Directory Box
Setup
Description
Acceptable Values
Notes:
Digits callers can press
while holding
1 - 9, #
A prompt for the
Item number refers
to the Class of
Service number.
Enter 0 - 7.
Restricted outcalling
numbers
(Any digits)
A prompt for the
Item number refers
to the Class of
Service number.
Enter 0 - 7.
2001
Action to take if no digits
are dialed
0 = Return
1 = Say ‘Goodbye’
2 = Go to another box
3 = Hang up
A prompt for the
Item number refers
to the box number.
Enter the box
number.
Directory Box
Setup
2002
Box associated with
parameter 2001
(Valid box number)
A prompt for the
Item number refers
to the box number.
Enter the box
number.
Directory Box
Setup
2600
Number of time to play
greeting
1-3
A prompt for the
Item number refers
to the box number.
Enter the box
number.
Directory Box
Setup
2601
Box associated with
parameter 2602
(Valid box number)
A prompt for the
Item number refers
to the box number.
Enter the box
number.
Directory Box
Setup
2602
Action to take if requested
name is not found
0 = Return
1 = Say ‘Goodbye’
2 = Go to another box
3 = Hang up
A prompt for the
Item number refers
to the box number.
Enter the box
number.
Directory Box
Setup
2603
Say box number before
transferring call?
1 = Yes
0 = No
A prompt for the
Item number refers
to the box number.
Enter the box
number.
Directory Box
Setup
2604
Allow callers to hear
complete directory listing?
1 = Yes
0 = No
A prompt for the
Item number refers
to the box number.
Enter the box
number.
61
DX-80 H ARD DRIVE VOICE MAIL INSTALLATION AND SUPERVISOR GUIDE 09/01
Task
Param.
Number
Description
Acceptable Values
Notes:
Directory Box
Setup
2605
Maximum number of digits
to collect from callers
1-9
General
Information
Setup
5017
Fast-forwarded / rewind
seconds
0 - 10
General
Information
Setup
5024
Technician password
Up to 10 digits
General
Information
Setup
5025
Customer password
Up to 10 digits
General
Information
Setup
5027
Digits needed to get line for
external call
(Refer to technical
bulletin and phone
documentation)
General
Information
Setup
5053
Store call log to:
0 = None
1 = File
2 = Printer
General
Information
Setup
5056
(With parameter 5057)
Maximum number of
minutes call can last before
being rerouted
0 - 30
General
Information
Setup
5057
(With parameter 5056) Box
to which calls are re-routed
(Valid box number)
General
Information
Setup
5065
Exit to DOS hour
00-23
General
Information
Setup
5066
Exit to DOS minutes
00-59
Group Box
Setup
2800
Maximum length of a
message (seconds) that
can be sent to this box
10 - 999
A prompt for the
Item number refers
to the box number.
Enter the box
number.
Group Box
Setup
2801 to
2850
Group box members
(Valid box numbers)
A prompt for the
Item number refers
to the box number.
Enter the box
number.
62
A prompt for the
Item number refers
to the box number.
Enter the box
number.
DX-80 H ARD DRIVE VOICE MAIL INSTALLATION AND SUPERVISOR GUIDE 09/01
Task
Param.
Number
Description
Holiday
Schedule Setup
5050
(With parameter 5051)
Holiday month
00-12
A prompt for the
Item number refers
to the holiday
number. Enter 1
through 20.
Holiday
Schedule Setup
5051
(With parameter 5050)
Holiday date
01-31
A prompt for the
Item number refers
to the holiday
number. Enter 1
through 20.
Holiday
Schedule Setup
5052
Box to which calls are
routed during holiday
(Valid box number)
A prompt for the
Item number refers
to the holiday
number. Enter 1
through 20.
Line Information
Setup
1000
Box to which calls on this
line are routed during day
service hours
(Valid box number)
A prompt for the
Item number refers
to the line number.
Enter the line
number.
Line Information
Setup
1001
Box to which calls on this
line are routed during night
service hours
(Valid box number)
A prompt for the
Item number refers
to the line number.
Enter the line
number.
Line Information
Setup
1002
Box to which calls on this
line are routed during lunch
service hours
(Valid box number)
A prompt for the
Item number refers
to the line number.
Enter the line
number.
Line Information
Setup
1003
Rings before call is
answered during day
service hours
1 - 99
A prompt for the
Item number refers
to the line number.
Enter the line
number.
Line Information
Setup
1004
Rings before call is
answered during night
service hours
1 - 99
A prompt for the
Item number refers
to the line number.
Enter the line
number.
Line Information
Setup
1005
Rings before call is
answered during lunch
service hours
1 - 99
A prompt for the
Item number refers
to the line number.
Enter the line
number.
63
Acceptable Values
Notes:
DX-80 H ARD DRIVE VOICE MAIL INSTALLATION AND SUPERVISOR GUIDE 09/01
Task
Param.
Number
Description
Line Information
Setup
1006
Outgoing calls allowed on
this line?
1 = Yes
0 = No
A prompt for the
Item number refers
to the line number.
Enter the line
number.
Line Information
Setup
1007
Line belongs to Line Group
A?
1 = Yes
0 = No
A prompt for the
Item number refers
to the line number.
Enter the line
number.
Line Information
Setup
1008
Line belongs to Line Group
B?
1 = Yes
0 = No
A prompt for the
Item number refers
to the line number.
Enter the line
number.
Line Information
Setup
1009
Line belongs to Line Group
C?
1 = Yes
0 = No
A prompt for the
Item number refers
to the line number.
Enter the line
number.
Line Information
Setup
1010
Line belongs to Line Group
D?
1 = Yes
0 = No
A prompt for the
Item number refers
to the line number.
Enter the line
number.
Mailbox Setup
2000
Mailbox owner’s last name
(Digits that will allow
the Dial-by-Name
directory feature
access this mailbox)
A prompt for the
Item number refers
to the box number.
Enter the box
number.
Mailbox Setup
2001
Action to be taken after
caller leaves message
0 = Return
1 = Say ‘Goodbye’
2 = Go to another box
3 = Hang up
A prompt for the
Item number refers
to the box number.
Enter the box
number.
Mailbox Setup
2002
Box associated with
parameter 2001
(Valid box number)
A prompt for the
Item number refers
to the box number.
Enter the box
number.
Mailbox Setup
2100
Mailbox password
(Up to maximum
digits specified during
setup)
A prompt for the
Item number refers
to the box number.
Enter the box
number.
64
Acceptable Values
Notes:
DX-80 H ARD DRIVE VOICE MAIL INSTALLATION AND SUPERVISOR GUIDE 09/01
Task
Param.
Number
Description
Acceptable Values
Notes:
Mailbox Setup
2101
Sequence to turn on
message waiting lamp
(See technical
bulletin or phone
documentation)
A prompt for the
Item number refers
to the box number.
Enter the box
number.
Mailbox Setup
2102
Sequence to turn off
message waiting lamp
(See technical
bulletin or phone
documentation)
A prompt for the
Item number refers
to the box number.
Enter the box
number.
Mailbox Setup
2110
Box associated with
parameter 2111
(Valid box number)
A prompt for the
Item number refers
to the box number.
Enter the box
number.
Mailbox Setup
2111
Action to be taken if caller
chooses “other options”
0 = Return
1 = Say ‘Goodbye’
2 = Go to another box
3 = Hang up
A prompt for the
Item number refers
to the box number.
Enter the box
number.
Mailbox Setup
2112
Mailbox has access to only
Hotel guest privileges?
1 = Yes
0 = No
A prompt for the
Item number refers
to the box number.
Enter the box
number.
You can modify
only one personal
distribution list for
the mailbox using
the Teleparameter
feature
Mailbox Setup
2113
Class of service assigned
to mailbox
0-7
A prompt for the
Item number refers
to the box number.
Enter the box
number.
Mailbox Setup
2114
Mailbox to which this
mailbox is a client, if this is
a restricted mailbox
(Valid mailbox
number)
A prompt for the
Item number refers
to the box number.
Enter the box
number.
Mailbox Setup
2115
Language in which greeting
is to play if call is via D.I.D
0-9
A prompt for the
Item number refers
to the box number.
Enter the box
number.
65
DX-80 H ARD DRIVE VOICE MAIL INSTALLATION AND SUPERVISOR GUIDE 09/01
Task
Param.
Number
Description
Acceptable Values
Notes:
Mailbox Setup
2120
Type of transfer
0 = None
1 = Blind
2 = Wait for answer
3 = Screen
4 = Wait for ring
A prompt for the
Item number refers
to the box number.
Enter the box
number.
Mailbox Setup
2121
Caller’s name voiced upon
pickup?
0 = No
1 = Yes
A prompt for the
Item number refers
to the box number.
Enter the box
number.
Mailbox Setup
2122
Number of rings within
which called party must
answer before system
determines a no answer
condition
Number of rings
A prompt for the
Item number refers
to the box number.
Enter the box
number.
Mailbox Setup
2123
Call transfer schedule
0 = Always
1 = Day only
2 = Night only
3 = Schedule A
4 = Schedule B
5 = Schedule C
6 = Schedule D
A prompt for the
Item number refers
to the box number.
Enter the box
number.
Mailbox Setup
2124
3-way calling used
0 = Always
1 = Day only
2 = Night only
3 = Schedule A
4 = Schedule B
5 = Schedule C
6 = Schedule D
A prompt for the
Item number refers
to the box number.
Enter the box
number.
Mailbox Setup
2125
Record conversation?
1 = Yes
0 = No
A prompt for the
Item number refers
to the box number.
Enter the box
number.
Mailbox Setup
2126
Transfer destination
Extension number
A prompt for the
Item number refers
to the box number.
Enter the box
number.
Mailbox Setup
2130
(With parameter 2134)
Type of pager
0 = None
A prompt for the
Item number refers
to the box number.
Enter the box
number.
1 = Tone-only pager
(no display)
2 = Display pager
66
DX-80 H ARD DRIVE VOICE MAIL INSTALLATION AND SUPERVISOR GUIDE 09/01
Task
Param.
Number
Description
Acceptable Values
Notes:
Mailbox Setup
2131
(With parameter 2134)
Minutes between calls to
pager
00 - 20
A prompt for the
Item number refers
to the box number.
Enter the box
number.
Mailbox Setup
2132
(With parameter 2134)
Number of times to call
pager
00 - 99
A prompt for the
Item number refers
to the box number.
Enter the box
number.
Mailbox Setup
2133
(With parameter 2134)
Schedule during which calls
should be sent to pager
0 = Always
1 = Day only
2 = Night only
3 = Schedule A
4 = Schedule B
5 = Schedule C
6 = Schedule D
A prompt for the
Item number refers
to the box number.
Enter the box
number.
Mailbox Setup
2134
Mailbox owner’s pager
number
(Pager number)
A prompt for the
Item number refers
to the box number.
Enter the box
number.
Mailbox Setup
2141
Action to be taken after
personal greeting is played
0 = Wait for a digit
A prompt for the
Item number refers
to the box number.
Enter the box
number.
1 = Begin recording a
message
2 = Page the mailbox
owner
3 = Record a
message, then page
the mailbox owner
Mailbox Setup
2142
Hours after which
messages are to be autoforwarded
0 - 999
A prompt for the
Item number refers
to the box number.
Enter the box
number.
Mailbox Setup
2143
(With parameter 2142) Box
to which new messages are
to be auto-forwarded
(Valid mailbox
number)
A prompt for the
Item number refers
to the box number.
Enter the box
number.
67
DX-80 H ARD DRIVE VOICE MAIL INSTALLATION AND SUPERVISOR GUIDE 09/01
Task
Param.
Number
Description
Acceptable Values
Notes:
Mailbox Setup
2144
(With parameters 2142 and
2143) Schedule during
which auto-forwarding is to
be active
0 = Always
1 = Day only
2 = Night only
3 = Schedule A
4 = Schedule B
5 = Schedule C
6 = Schedule D
A prompt for the
Item number refers
to the box number.
Enter the box
number.
Mailbox Setup
2151
(With parameter 2155)
Number of times to run the
message delivery cycle.
0 - 99
A prompt for the
Item number refers
to the box number.
Enter the box
number.
You can modify
only one message
delivery set up for
the mailbox using
the Teleparameter
feature.
Mailbox Setup
2152
(With parameter 2155)
Number of times number is
to be called
0 - 99
A prompt for the
Item number refers
to the box number.
Enter the box
number.
You can modify
only one message
delivery set up for
the mailbox using
the Teleparameter
feature.
Mailbox Setup
2153
(With parameter 2155)
Minutes in between calls to
number
2 - 99
A prompt for the
Item number refers
to the box number.
Enter the box
number.
You can modify
only one message
delivery set up for
the mailbox using
the Teleparameter
feature.
68
DX-80 H ARD DRIVE VOICE MAIL INSTALLATION AND SUPERVISOR GUIDE 09/01
Task
Mailbox Setup
Mailbox Setup
Param.
Number
2154
2155
Description
(With parameter 2155)
Schedule during which
message delivery is active
Number to call for message
delivery
Acceptable Values
Notes:
0 = Always
1 = Day only
2 = Night only
3 = Schedule A
4 = Schedule B
5 = Schedule C
6 = Schedule D
A prompt for the
Item number refers
to the box number.
Enter the box
number.
(Phone or beeper
number)
A prompt for the
Item number refers
to the box number.
Enter the box
number.
You can modify
only one message
delivery set up for
the mailbox using
the Teleparameter
feature.
You can modify
only one message
delivery set up for
the mailbox using
the Teleparameter
feature.
Mailbox Setup
2159
Personal distribution list 1
enabled for mailbox?
1 = Yes
0 = No
A prompt for the
Item number refers
to the box number.
Enter the box
number.
You can modify
only one personal
distribution list for
the mailbox using
the Teleparameter
feature.
Mailbox Setup
2160 to
2179
Personal distribution list 1
members
(Valid mailbox
numbers)
A prompt for the
Item number refers
to the box number.
Enter the box
number.
You can modify
only one personal
distribution list for
the mailbox using
the Teleparameter
feature.
69
DX-80 H ARD DRIVE VOICE MAIL INSTALLATION AND SUPERVISOR GUIDE 09/01
Task
Param.
Number
Description
Acceptable Values
Other
Customizations
Setup
5018
Maximum box length caller
can dial
2-4
Other
Customizations
Setup
5019
Seconds of initial pause
before main greeting is
played
0 - 10
Other
Customizations
Setup
5020
When Voice Mail should
play time and date
0 = When caller asks
1 = Before each
message
2 = After each
message
Other
Customizations
Setup
5021
Play called party’s name
when call is answered?
1 = Yes
0 = No
Other
Customizations
Setup
5022
Announce call when call is
answered?
1 = Yes
0 = No
Other
Customizations
Setup
5076 to
5079
Custom field (use under
direction of technical
support)
---
Other
Customizations
Setup
5086 to
5089
Debug field (use under
direction of technical
support)
---
Notes:
Question Box
Setup
2001
Action to take after
questions are answered
0 = Return
1 = Say ‘Goodbye’
2 = Go to another box
3 = Hang up
A prompt for the
Item number refers
to the box number.
Enter the box
number.
Question Box
Setup
2002
Box associated with
parameter 2404
(Valid box number)
A prompt for the
Item number refers
to the box number.
Enter the box
number.
Question Box
Setup
2400
Number of mailbox that
owns the Question box
(Valid mailbox
number)
A prompt for the
Item number refers
to the box number.
Enter the box
number.
Question Box
Setup
2401
Replay digit answers for
verification?
1 = Yes
0 = No
A prompt for the
Item number refers
to the box number.
Enter the box
number.
70
DX-80 H ARD DRIVE VOICE MAIL INSTALLATION AND SUPERVISOR GUIDE 09/01
Task
Param.
Number
Description
Acceptable Values
Notes:
Question Box
Setup
2402
Voice answers? (versus
digit)
1 = Yes
0 = No
A prompt for the
Item number refers
to the box number.
Enter the box
number.
Question Box
Setup
2403
Trigger owner mailbox
notification of answers in
this box?
1 = Yes
0 = No
A prompt for the
Item number refers
to the box number.
Enter the box
number.
Question Box
Setup
2404
Digits caller can press to
exit this box
0 - 9, *, #
A prompt for the
Item number refers
to the box number.
Enter the box
number.
Question Box
Setup
2410
Answer type for Question
10
0 = Voice
1 = Digits
A prompt for the
Item number refers
to the box number.
Enter the box
number.
Question Box
Setup
2411
Answer type for Question 1
0 = Voice
1 = Digits
A prompt for the
Item number refers
to the box number.
Enter the box
number.
Question Box
Setup
2412
Answer type for Question 2
0 = Voice
1 = Digits
A prompt for the
Item number refers
to the box number.
Enter the box
number.
Question Box
Setup
2413
Answer type for Question 3
0 = Voice
1 = Digits
A prompt for the
Item number refers
to the box number.
Enter the box
number.
Question Box
Setup
2414
Answer type for Question 4
0 = Voice
1 = Digits
A prompt for the
Item number refers
to the box number.
Enter the box
number.
Question Box
Setup
2415
Answer type for Question 5
0 = Voice
1 = Digits
A prompt for the
Item number refers
to the box number.
Enter the box
number.
71
DX-80 H ARD DRIVE VOICE MAIL INSTALLATION AND SUPERVISOR GUIDE 09/01
Task
Param.
Number
Description
Question Box
Setup
2416
Answer type for Question 6
0 = Voice
1 = Digits
A prompt for the
Item number refers
to the box number.
Enter the box
number.
Question Box
Setup
2417
Answer type for Question 7
0 = Voice
1 = Digits
A prompt for the
Item number refers
to the box number.
Enter the box
number.
Question Box
Setup
2418
Answer type for Question 8
0 = Voice
1 = Digits
A prompt for the
Item number refers
to the box number.
Enter the box
number.
Question Box
Setup
2419
Answer type for Question 9
0 = Voice
1 = Digits
A prompt for the
Item number refers
to the box number.
Enter the box
number.
Question Box
Setup
2420
If the answer type is digits,
minimum number of digits
that must be entered for
valid answer to question 10.
1 - 999
A prompt for the
Item number refers
to the box number.
Enter the box
number.
Question Box
Setup
2421
If the answer type is digits,
minimum number of digits
that must be entered for
valid answer to question 1.
1 - 999
A prompt for the
Item number refers
to the box number.
Enter the box
number.
Question Box
Setup
2422
If the answer type is digits,
minimum number of digits
that must be entered for
valid answer to question 2.
1 - 999
A prompt for the
Item number refers
to the box number.
Enter the box
number.
Question Box
Setup
2423
If the answer type is digits,
minimum number of digits
that must be entered for
valid answer to question 3.
1 - 999
A prompt for the
Item number refers
to the box number.
Enter the box
number.
Question Box
Setup
2424
If the answer type is digits,
minimum number of digits
that must be entered for
valid answer to question 4.
1 - 999
A prompt for the
Item number refers
to the box number.
Enter the box
number.
72
Acceptable Values
Notes:
DX-80 H ARD DRIVE VOICE MAIL INSTALLATION AND SUPERVISOR GUIDE 09/01
Task
Param.
Number
Description
Acceptable Values
Notes:
Question Box
Setup
2425
If the answer type is digits,
minimum number of digits
that must be entered for
valid answer to question 5.
1 - 999
A prompt for the
Item number refers
to the box number.
Enter the box
number.
Question Box
Setup
2426
If the answer type is digits,
minimum number of digits
that must be entered for
valid answer to question 6.
1 - 999
A prompt for the
Item number refers
to the box number.
Enter the box
number.
Question Box
Setup
2427
If the answer type is digits,
minimum number of digits
that must be entered for
valid answer to question 7.
1 - 999
A prompt for the
Item number refers
to the box number.
Enter the box
number.
Question Box
Setup
2428
If the answer type is digits,
minimum number of digits
that must be entered for
valid answer to question 8.
1 - 999
A prompt for the
Item number refers
to the box number.
Enter the box
number.
Question Box
Setup
2429
If the answer type is digits,
minimum number of digits
that must be entered for
valid answer to question 9.
1 - 999
A prompt for the
Item number refers
to the box number.
Enter the box
number.
Question Box
Setup
2430
If the answer type is digits,
maximum number of digits
that can be entered for valid
answer to question 10.
1 - 999
A prompt for the
Item number refers
to the box number.
Enter the box
number.
Question Box
Setup
2431
If the answer type is digits,
maximum number of digits
that can be entered for valid
answer to question 1.
1 - 999
A prompt for the
Item number refers
to the box number.
Enter the box
number.
Question Box
Setup
2432
If the answer type is digits,
maximum number of digits
that can be entered for valid
answer to question 2.
1 - 999
A prompt for the
Item number refers
to the box number.
Enter the box
number.
Question Box
Setup
2433
If the answer type is digits,
maximum number of digits
that can be entered for valid
answer to question 3.
1 - 999
A prompt for the
Item number refers
to the box number.
Enter the box
number.
73
DX-80 H ARD DRIVE VOICE MAIL INSTALLATION AND SUPERVISOR GUIDE 09/01
Task
Param.
Number
Description
Question Box
Setup
2434
If the answer type is digits,
maximum number of digits
that can be entered for valid
answer to question 4.
1 - 999
A prompt for the
Item number refers
to the box number.
Enter the box
number.
Question Box
Setup
2435
If the answer type is digits,
maximum number of digits
that can be entered for valid
answer to question 5.
1 - 999
A prompt for the
Item number refers
to the box number.
Enter the box
number.
Question Box
Setup
2436
If the answer type is digits,
maximum number of digits
that can be entered for valid
answer to question 6.
1 - 999
A prompt for the
Item number refers
to the box number.
Enter the box
number.
Question Box
Setup
2437
If the answer type is digits,
maximum number of digits
that can be entered for valid
answer to question 7.
1 - 999
A prompt for the
Item number refers
to the box number.
Enter the box
number.
Question Box
Setup
2438
If the answer type is digits,
maximum number of digits
that can be entered for valid
answer to question 8.
1 - 999
A prompt for the
Item number refers
to the box number.
Enter the box
number.
Question Box
Setup
2439
If the answer type is digits,
maximum number of digits
that can be entered for valid
answer to question 9.
1 - 999
A prompt for the
Item number refers
to the box number.
Enter the box
number.
Question Box
Setup
2440
Number of seconds of
silence before Voice Mail
determines caller has
finished entering digits or
speaking the answer for
question 10.
1 - 99
A prompt for the
Item number refers
to the box number.
Enter the box
number.
Question Box
Setup
2441
Number of seconds of
silence before Voice Mail
determines caller has
finished entering digits or
speaking the answer for
question 1.
1 - 99
A prompt for the
Item number refers
to the box number.
Enter the box
number.
74
Acceptable Values
Notes:
DX-80 H ARD DRIVE VOICE MAIL INSTALLATION AND SUPERVISOR GUIDE 09/01
Task
Param.
Number
Description
Acceptable Values
Notes:
Question Box
Setup
2442
Number of seconds of
silence before Voice Mail
determines caller has
finished entering digits or
speaking the answer for
question 2.
1 - 99
A prompt for the
Item number refers
to the box number.
Enter the box
number.
Question Box
Setup
2443
Number of seconds of
silence before Voice Mail
determines caller has
finished entering digits or
speaking the answer for
question 3.
1 - 99
A prompt for the
Item number refers
to the box number.
Enter the box
number.
Question Box
Setup
2444
Number of seconds of
silence before Voice Mail
determines caller has
finished entering digits or
speaking the answer for
question 4.
1 - 99
A prompt for the
Item number refers
to the box number.
Enter the box
number.
Question Box
Setup
2445
Number of seconds of
silence before Voice Mail
determines caller has
finished entering digits or
speaking the answer for
question 5.
1 - 99
A prompt for the
Item number refers
to the box number.
Enter the box
number.
Question Box
Setup
2446
Number of seconds of
silence before Voice Mail
determines caller has
finished entering digits or
speaking the answer for
question 6.
1 - 99
A prompt for the
Item number refers
to the box number.
Enter the box
number.
Question Box
Setup
2447
Number of seconds of
silence before Voice Mail
determines caller has
finished entering digits or
speaking the answer for
question 7.
1 - 99
A prompt for the
Item number refers
to the box number.
Enter the box
number.
Question Box
Setup
2448
Number of seconds of
silence before Voice Mail
determines caller has
finished entering digits or
speaking the answer for
question 8.
1 - 99
A prompt for the
Item number refers
to the box number.
Enter the box
number.
75
DX-80 H ARD DRIVE VOICE MAIL INSTALLATION AND SUPERVISOR GUIDE 09/01
Task
Param.
Number
Description
Acceptable Values
Notes:
Question Box
Setup
2449
Number of seconds of
silence before Voice Mail
determines caller has
finished entering digits or
speaking the answer for
question 9.
1 - 99
Routing Box
Setup
2001
Action to take if no digits
dialed
0 = Return
1 = Say ‘Goodbye’
2 = Go to another box
3 = Hang up
Routing Box
Setup
2002
Box associated with
parameter 2001
(Valid box number)
Routing Box
Setup
2300
Single-digit dialing
destination for digit 0
(Valid box number)
A prompt for the
Item number refers
to the box number.
Enter the box
number.
Routing Box
Setup
2301
Single-digit dialing
destination for digit 1
(Valid box number)
A prompt for the
Item number refers
to the box number.
Enter the box
number.
Routing Box
Setup
2302
Single-digit dialing
destination for digit 2
(Valid box number)
A prompt for the
Item number refers
to the box number.
Enter the box
number.
Routing Box
Setup
2303
Single-digit dialing
destination for digit 3
(Valid box number)
A prompt for the
Item number refers
to the box number.
Enter the box
number.
Routing Box
Setup
2304
Single-digit dialing
destination for digit 4
(Valid box number)
A prompt for the
Item number refers
to the box number.
Enter the box
number.
Routing Box
Setup
2305
Single-digit dialing
destination for digit 5
(Valid box number)
A prompt for the
Item number refers
to the box number.
Enter the box
number.
76
A prompt for the
Item number refers
to the box number.
Enter the box
number.
DX-80 H ARD DRIVE VOICE MAIL INSTALLATION AND SUPERVISOR GUIDE 09/01
Task
Param.
Number
Description
Acceptable Values
Notes:
Routing Box
Setup
2306
Single-digit dialing
destination for digit 6
(Valid box number)
A prompt for the
Item number refers
to the box number.
Enter the box
number.
Routing Box
Setup
2307
Single-digit dialing
destination for digit 7
(Valid box number)
A prompt for the
Item number refers
to the box number.
Enter the box
number.
Routing Box
Setup
2308
Single-digit dialing
destination for digit 8
(Valid box number)
A prompt for the
Item number refers
to the box number.
Enter the box
number.
Routing Box
Setup
2309
Single-digit dialing
destination for digit 9
(Valid box number)
A prompt for the
Item number refers
to the box number.
Enter the box
number.
Routing Box
Setup
2310
Single-digit dialing
destination for *
(Valid box number)
A prompt for the
Item number refers
to the box number.
Enter the box
number.
Routing Box
Setup
2311
Single-digit dialing
destination for #
(Valid box number)
A prompt for the
Item number refers
to the box number.
Enter the box
number.
Routing Box
Setup
2312
Single-digit dialing
destination for non-DTMF
digit (voice)
(Valid box number)
A prompt for the
Item number refers
to the box number.
Enter the box
number.
Routing Box
Setup
2313
Number of mailbox that
owns the Routing box
(Valid box number)
Routing Box
Setup
2314
Box to which calls are
transferred if invalid digits
dialed
(Valid box number)
Routing Box
Setup
2315
Number of times to play
greeting
1-3
77
A prompt for the
Item number refers
to the box number.
Enter the box
number.
DX-80 H ARD DRIVE VOICE MAIL INSTALLATION AND SUPERVISOR GUIDE 09/01
Task
Param.
Number
Description
Acceptable Values
Notes:
Routing Box
Setup
2316
Seconds to wait for a digit
0-9
Routing Box
Setup
2317
Basis used to route call
0 = Digits dialed
1 = Day of week
2 = Sequence
number
3 = Database lookup
4 = Day or Night
service
A prompt for the
Item number refers
to the box number.
Enter the box
number.
Routing Box
Setup
2318
When digits received, wait
for more digits?
1 = Yes
0 = No
A prompt for the
Item number refers
to the box number.
Enter the box
number.
Technical
Information
Setup
5012
Hookflash length
(milliseconds)
100 - 5000
Technical
Information
Setup
5013
Pause length (milliseconds)
10 - 5000
Technical
Information
Setup
5015
Seconds of silence before
Voice Mail ends recording
0 - 99
Technical
Information
Setup
5016
Seconds of non-silence
before Voice Mail ends
recording
0 - 99
Technical
Information
Setup
5026
Disconnect digit sequence
(Refer to technical
bulletin and phone
documentation)
Technical
Information
Setup
5063
Hour at which system
automatically updates MWI
00 - 23
Technical
Information
Setup
5064
(With parameter 5063)
Minute at which system
automatically updates MWI
00 - 59
VM.CFG Setup
9001
transbypass=
See the Installation
Manual.
VM.CFG Setup
9003
dtmfon=
See the Installation
Manual.
VM.CFG Setup
9004
ignorenonsilence
See the Installation
Manual.
VM.CFG Setup
9007
internal=
See the Installation
Manual.
78
DX-80 H ARD DRIVE VOICE MAIL INSTALLATION AND SUPERVISOR GUIDE 09/01
Task
Param.
Number
Description
VM.CFG Setup
9011
pagetime=
See the Installation
Manual.
VM.CFG Setup
9012
pagerretry=
See the Installation
Manual.
VM.CFG Setup
9014
maxpasswordlength=
See the Installation
Manual.
VM.CFG Setup
9015
greetsil=
See the Installation
Manual.
VM.CFG Setup
9017
notifyreps=
See the Installation
Manual.
VM.CFG Setup
9019
interdigit=
See the Installation
Manual.
VM.CFG Setup
9023
detectpulse
See the Installation
Manual.
VM.CFG Setup
9025
auditdatabase
See the Installation
Manual.
VM.CFG Setup
9026
responsetime=
See the Installation
Manual.
VM.CFG Setup
9099
pa.init=
See the Installation
Manual.
VM.CFG Setup
9100
pa.cancel=
See the Installation
Manual.
VM.CFG Setup
9101
tutorialreps=
See the Installation
Manual.
VM.CFG Setup
9102
pa.repeats=
See the Installation
Manual.
VM.CFG Setup
9103
novideomemory
See the Installation
Manual.
VM.CFG Setup
9104
offhookdelay=
See the Installation
Manual.
VM.CFG Setup
9105
hardwareint=
See the Installation
Manual.
VM.CFG Setup
9106
ringon=
See the Installation
Manual.
VM.CFG Setup
9107
minimummessage=
See the Installation
Manual.
VM.CFG Setup
9108
maxinactive=
See the Installation
Manual.
VM.CFG Setup
9109
maxlockup=
See the Installation
Manual.
79
Acceptable Values
Notes:
DX-80 H ARD DRIVE VOICE MAIL INSTALLATION AND SUPERVISOR GUIDE 09/01
Task
Param.
Number
Description
VM.CFG Setup
9118
languages=
See the Installation
Manual.
VM.CFG Setup
9120
dtmfsendon=
See the Installation
Manual.
VM.CFG Setup
9121
dtmfsendoff=
See the Installation
Manual.
VM.CFG Setup
9122
pa.busy=
See the Installation
Manual.
VM.CFG Setup
9123
lunchoperatorisday
See the Installation
Manual.
VM.CFG Setup
9124
samplingrate=
See the Installation
Manual.
VM.CFG Setup
9125
databaseline=
See the Installation
Manual.
VM.CFG Setup
9126
ignoredisconnects
See the Installation
Manual.
VM.CFG Setup
9127
nonametransfer
See the Installation
Manual.
VM.CFG Setup
9135
norecordbeep
See the Installation
Manual.
VM.CFG Setup
9144
repeatmw=
See the Installation
Manual.
VM.CFG Setup
9146
deleteafterfwd
See the Installation
Manual.
VM.CFG Setup
9150
remotepause=
See the Installation
Manual.
VM.CFG Setup
9160
ringreset=
See the Installation
Manual.
VM.CFG Setup
9161
notifyrings=
See the Installation
Manual.
VM.CFG Setup
9162
assumepageconfirm
See the Installation
Manual.
VM.CFG Setup
9163
assumehold=
See the Installation
Manual.
VM.CFG Setup
9165
externalfax
See the Installation
Manual.
VM.CFG Setup
9166
faxtimeout=
See the Installation
Manual.
VM.CFG Setup
9167
nopcbeep
See the Installation
Manual.
80
Acceptable Values
Notes:
DX-80 H ARD DRIVE VOICE MAIL INSTALLATION AND SUPERVISOR GUIDE 09/01
Task
Param.
Number
Description
VM.CFG Setup
9174
cdspeed=
See the Installation
Manual.
VM.CFG Setup
9182
ignoreinitialdisconnect
See the Installation
Manual.
VM.CFG Setup
9190
lineaccessontransfer
See the Installation
Manual.
VM.CFG Setup
9192
24hourclockdisplay
See the Installation
Manual.
VM.CFG Setup
9203
linesconnected=
See the Installation
Manual.
VM.CFG Setup
9206
qboxposconfirm
See the Installation
Manual.
VM.CFG Setup
9207
qboxdataprint
See the Installation
Manual.
VM.CFG Setup
9208
qboxarchive
See the Installation
Manual.
VM.CFG Setup
9209
pagerprefix=
See the Installation
Manual.
VM.CFG Setup
9210
pagerappend=
See the Installation
Manual.
VM.CFG Setup
9214
omitgroupsender
See the Installation
Manual.
VM.CFG Setup
9216
pagertrail=
See the Installation
Manual.
VM.CFG Setup
9218
longhookflash=
See the Installation
Manual.
VM.CFG Setup
9219
cp.dialtone=
See the Installation
Manual.
VM.CFG Setup
9220
cp.busy=
See the Installation
Manual.
VM.CFG Setup
9221
cp.invalid=
See the Installation
Manual.
VM.CFG Setup
9222
cp.dnd=
See the Installation
Manual.
VM.CFG Setup
9223
cp.ans=
See the Installation
Manual.
VM.CFG Setup
9224
cp.initring=
See the Installation
Manual.
VM.CFG Setup
9225
cp.interring=
See the Installation
Manual.
81
Acceptable Values
Notes:
DX-80 H ARD DRIVE VOICE MAIL INSTALLATION AND SUPERVISOR GUIDE 09/01
Task
Param.
Number
Description
VM.CFG Setup
9226
cp.noans=
See the Installation
Manual.
VM.CFG Setup
9227
onhookdtmf
See the Installation
Manual.
VM.CFG Setup
9229
answerack=
See the Installation
Manual.
VM.CFG Setup
9232
senddisconnect=
See the Installation
Manual.
VM.CFG Setup
9256
playbackdelay=
See the Installation
Manual.
VM.CFG Setup
9273
cp.disconnect=
See the Installation
Manual.
VM.CFG Setup
9282
qboxdataprinteject
See the Installation
Manual.
VM.CFG Setup
9283
qboxuseconfirmnumbers
See the Installation
Manual.
VM.CFG Setup
9289
qboxhideacctnumbers
See the Installation
Manual.
VM.CFG Setup
9291
keepmessagesnew
See the Installation
Manual.
VM.CFG Setup
9295
pooledring=
See the Installation
Manual.
VM.CFG Setup
9296
mboxdefaultdigit=
See the Installation
Manual.
VM.CFG Setup
9301
greeting.noanswer=
See the Installation
Manual.
VM.CFG Setup
9302
greeting.busy=
See the Installation
Manual.
VM.CFG Setup
9303
greeting.dnd=
See the Installation
Manual.
VM.CFG Setup
9337
noaccountinlog
See the Installation
Manual.
VM.CFG Setup
9339
greeting.night=
See the Installation
Manual.
VM.CFG Setup
9340
faxpause=
See the Installation
Manual.
VM.CFG Setup
9342
samecallfaxok
See the Installation
Manual.
VM.CFG Setup
9343
mwonreps=
See the Installation
Manual.
82
Acceptable Values
Notes:
DX-80 H ARD DRIVE VOICE MAIL INSTALLATION AND SUPERVISOR GUIDE 09/01
Task
Param.
Number
Description
VM.CFG Setup
9344
mwoffreps=
See the Installation
Manual.
VM.CFG Setup
9346
faxprefix=
See the Installation
Manual.
VM.CFG Setup
9349
faxgeneraldelivery=
See the Installation
Manual.
VM.CFG Setup
9351
initialpauseidp=
See the Installation
Manual.
VM.CFG Setup
9352
directoryidp=
See the Installation
Manual.
VM.CFG Setup
9353
messagepausetime=
See the Installation
Manual.
VM.CFG Setup
9354
sharefaxports
See the Installation
Manual.
VM.CFG Setup
9359
flowcontrol=
See the Installation
Manual.
VM.CFG Setup
9360
fastacdtransfer
See the Installation
Manual.
VM.CFG Setup
9361
pmsviatextfiles
See the Installation
Manual.
VM.CFG Setup
9364
serviceobservecode=
See the Installation
Manual.
VM.CFG Setup
9365
acdpause=
See the Installation
Manual.
VM.CFG Setup
9383
wakeuprings=
See the Installation
Manual.
VM.CFG Setup
9384
ivrpromptlanguage=
See the Installation
Manual.
VM.CFG Setup
9388
volume=
See the Installation
Manual.
VM.CFG Setup
9389
noserialmwrefresh
See the Installation
Manual.
VM.CFG Setup
9390
basiccptones
See the Installation
Manual.
VM.CFG Setup
9392
extrarotarytime=
See the Installation
Manual.
VM.CFG Setup
9393
transferring=
See the Installation
Manual.
VM.CFG Setup
9394
dialtonefrequency=
See the Installation
Manual.
83
Acceptable Values
Notes:
DX-80 H ARD DRIVE VOICE MAIL INSTALLATION AND SUPERVISOR GUIDE 09/01
Task
Param.
Number
Description
Acceptable Values
Notes:
VM.CFG Setup
9395
dialtone2frequency=
See the Installation
Manual.
Serial Number
4000
Voices the system’s serial
number.
—
NUMLINES.TXT
4001
Adjusts the code number
authorizing the number of
ports allowed.
(Code supplied by
Sales / Tech.
Support)
Code found on
invoice.
SWITCHES.TXT
4002
Adjusts the code number
authorizing the software for
system features.
(Code supplied by
Sales / Tech.
Support)
Code found on
invoice.
LOGINS.TXT
4003
Adjusts the code number
that controls the number of
VCM logins allowed.
(Code supplied by
Sales / Tech.
Support)
Code found on
invoice.
PBXLINK.TXT
4004
Adjusts the code number
authorizing the software for
certain phone systemrelated features.
(Code supplied by
Sales / Tech.
Support)
Code found on
invoice.
The following table identifies additional values you can specify to indicate special characters
or information in some fields:
Values
Indicate
***1
A
***2
B
***3
C
***4
D
***5
E
***6
F
***7
X
***8
Pause
***9
Hookflash
***0
Clears the field entry
84
DX-80 H ARD DRIVE VOICE MAIL INSTALLATION AND SUPERVISOR GUIDE 09/01
2.6.3 Using the Teleparameter Feature to Adjust the System
Setup
You can use the Teleparameter feature to adjust the system setup at any time. It is not
necessary to bring down the system to make modifications. To use the Teleparameter feature
to adjust information, follow steps 1 through 4 in the procedure in section 2.6.1. For specific
parameters you can adjust, refer to section 2.6.1.
Note:
If you enter a parameter number for a parameter that affects a particular
box, the system prompts you to enter the Item number. The Item number
identifies the particular box in which you want to change the parameter. At
the Item number prompt, enter the number of the box.
Be advised that many day-to-day modifications that must be made to the system (adding
mailboxes, changing system greetings, making call routing modifications) can be done by
calling into the supervisor mailbox and selecting options from the Supervisor menu. By
using Supervisor menu options, you do not need to refer to specific parameter numbers and
values. For information on day-to-day modifications that can be made using Supervisor
menu options (and not the Teleparameter feature), refer to section 3.
85
DX-80 H ARD DRIVE VOICE MAIL INSTALLATION AND SUPERVISOR GUIDE 09/01
3. System Supervisor Instructions
The procedures provided in this section indicate how a system supervisor can make changes
to the system setup by calling into the system using a telephone. Each of these procedures
can also be performed by accessing the Voice Mail software screens through a serial
connection to a laptop PC. For procedures on making modifications through the screen
interface, refer to procedures earlier in this document.
3.1 Working with Mailboxes
3.1.1 Adding, Deleting, or Modifying a Mailbox
1. From a telephone, call into voice mail and log into the supervisor mailbox 70. The
system voices the Main menu:
“To listen to your messages press 1. To send a message press 2. To change your options
press 3.”
2. To access the Supervisor menu, press 6 (this option is not voiced). The system voices
the Supervisor menu options:
Supervisor Menu
For Mailbox Administration
For Routing Box Administration
Press 1
Press 2
For Question Box Administration
Press 3
For Port Administration
To Change the System Broadcast Message
Press 4
Press 5
To Change the Voice Mail Day / Night Service
Press 6
To Change the System Time
To Change the System Date
Press 7
Press 8
To Modify System Parameters
Press 9
To Perform First-Time Setup
To Exit
Press 0
Press #
86
DX-80 H ARD DRIVE VOICE MAIL INSTALLATION AND SUPERVISOR GUIDE 09/01
3. From the Supervisors menu, press 1 for Mailbox Administration.
4. When prompted, enter the number of the mailbox you want to add, modify, or delete.
The system voices the number back to you.
5. When prompted, press 1 to confirm the number you entered or press # if the number you
entered was incorrect. Once you press 1 to confirm, the system voices the Mailbox menu
options:
Mailbox Menu
To Add
Press 1
To Delete
Press 2
To Modify
Press 3
To Suspend
Press 4
To Restore
Press 5
To Reset
Press 6
To Exit
Press #
6. To add a new the mailbox to the system, press 1. The system adds the new mailbox to
the mailbox database. All default settings in the mailbox are set to the default parameters
settings specified in prototype mailbox 9994. The default password for the mailbox is the
same as the mailbox number.
To delete the mailbox from the system, press 2. The system deletes the mailbox from the
mailbox database.
87
DX-80 H ARD DRIVE VOICE MAIL INSTALLATION AND SUPERVISOR GUIDE 09/01
To modify the mailbox on the system, press 3. The system voices the Options menu:
Options Menu
To Record Your Name
Press 1
To Record Your Greeting
Press 2
To Change Your Password
Press 3
To Change Your Call-Transfer Feature
Press 4
To Change Your Message Notification Feature
Press 5
To Change Your Pager Feature
Press 6
To Review Msgs Scheduled for Future Delivery
Press 7
To Change your Personal Distribution Lists
Press 8
To Retrieve a Message Previously Sent
Press *
To Return to the Main Menu
Press #
7. To record the mailbox owner’s name, press 1. (Note that each mailbox owner can also
log into the mailbox and complete this task—this does not need to be performed by a
system supervisor.)
8. Once you record the name, the system voices the following prompts:
To Replay
Press 1
To Re-Record
Press 2
To Delete
Press 3
To Exit
Press #
Follow the prompts to complete the procedure.
9. To record a personal greeting for the mailbox, press 2. You can record up to 10 personal
greetings for the mailbox (0 through 9). (Note that each mailbox owner can also log into
the mailbox and complete this task—this does not need to be performed by a system
supervisor.)
88
DX-80 H ARD DRIVE VOICE MAIL INSTALLATION AND SUPERVISOR GUIDE 09/01
10. Once you record a greeting, the system voices the following prompts:
To Replay the Greeting
Press 1
To Re-Record the Greeting
Press 2
To Delete the Greeting
Press 3
To Choose a New Greeting
Press 5
To Exit
Press #
Follow the prompts to complete the procedure.
11. To change the mailbox password, press 3. Note that to change the password, you must
first enter the current password when prompted by the system. By default, the mailbox
password is the same as the mailbox number. (Also note that each mailbox owner can
log into the mailbox and complete this task—this does not need to be performed by a
system supervisor.)
Once you enter a new mailbox password and confirm the entry as prompted, the system
voices a prompt informing you that the new password will be in effect the next time the
mailbox is accessed.
12. To change the call transfer feature, press 4. (Note that each mailbox owner can also log
into the mailbox and complete this task—this does not need to be performed by a system
supervisor.)
13. The system voices a prompt identifying the current call transfer set up, then voices the
call transfer options:
Press 1 if you would like to change the number
Press * to turn this feature on or off, or
Press # if you are satisfied
Follow the prompts to complete the procedure.
14. To change the message notification feature, press 5. (Note that each mailbox owner can
also log into the mailbox and complete this task—this does not need to be performed by a
system supervisor.)
89
DX-80 H ARD DRIVE VOICE MAIL INSTALLATION AND SUPERVISOR GUIDE 09/01
15. The system voices a prompt identifying the current message notification setup, then
voices the notification options:
Press 1 if you would like to change the number
Press * to turn this feature on or off, or
Press # if you are satisfied
Follow the prompts to complete the procedure.
16. To change the pager feature, press 6. (Note that each mailbox owner can also log into
the mailbox and complete this task—this does not need to be performed by a system
supervisor.)
17. The system voices a prompt identifying the current pager set up, then voices the paging
options:
Press 1 if you would like to change the number
Press * to turn this feature on or off, or
Press # if you are satisfied
Follow the prompts to complete the procedure.
18. To review messages scheduled for future delivery, press 7. (Note that each mailbox
owner can also log into the mailbox and complete this task—this does not need to be
performed by a system supervisor.)
19. The system voices a prompt identifying any message scheduled for future delivery, then
voices the options:
To Listen to the Message
Press 1
To Hear the Next Message (scheduled for future delivery)
Press 2
To Cancel the Message
Press 4
To Exit
Press #
Follow the prompts to complete the procedure.
90
DX-80 H ARD DRIVE VOICE MAIL INSTALLATION AND SUPERVISOR GUIDE 09/01
3.2 Working with Routing Boxes
3.2.1 Understanding the Routing Box Setup
The Voice Mail is pre-configured with 3 Routing boxes to process calls. Routing box 800
answers calls during office open business hours (specified as “day service” hours during set
up), box 801 answers calls after day service hours, and box 821 routes calls after they have
already passed through box 800 or 801.
During set up, the following greetings were recorded in Routing boxes 800, 801, and 821:
Box
Greeting Number
Information Voiced by Greeting
800
Greeting 0
Office Open greeting and call routing options
800
Greeting 1
Holiday greeting and call routing options
801
Greeting 0
Office Closed greeting and call routing options
801
Greeting 1
Holiday greeting and call routing options
821
Greeting 0
Call routing options
Typically, companies offer more extensive call routing options to callers during open hours
than during closed hours. Often, single-digit call routing (for example, “…Press 2 for
Sales…”) is not offered during office closed hours, therefore the prompts and call routing
options differ between box 800 and 801.
To accommodate the fact that a holiday lasts a full 24 hours, and thus holiday calls are
answered by both box 800 and 801 throughout those 24 hours, a holiday greeting is provided
in both box 800 and 801.
Box 800, Greeting 0 Example:
“Welcome to [Company]. If you know the extension number of the person to whom you want
to speak, dial it now. For a directory, press star. Or press zero for the operator.”
91
DX-80 H ARD DRIVE VOICE MAIL INSTALLATION AND SUPERVISOR GUIDE 09/01
Note:
If the system is set up to provide callers single-digit call routing options
(“…Press 2 for Sales…”), those options are also voiced to callers during this
greeting.
Box 800, Greeting 1 Example:
“[Company] is closed today for the holiday. To leave a message for a specific individual,
dial the party’s extension now. For a directory, press star. If you would like to leave your
message with the operator, press zero now.”
Box 801, Greeting 0 Example:
“[Company] is presently closed. To leave a message for a specific individual, dial the
party’s extension now. For a directory, press star. If you would like to leave your message
with the operator, press zero now.”
Box 801, Greeting 1 Example:
“[Company] is closed today for the holiday. To leave a message for a specific individual,
dial the party’s extension now. For a directory, press star. If you would like to leave your
message with the operator, press zero now.”
Box 821, Greeting 0 Example:
“If you know the extension number of the person to whom you want to speak, dial it now. For
a directory, press star. Or press zero for the operator.”
Note:
If the system is set up to provide callers single-digit call routing options
(“…Press 2 for Sales…”), those options are also voiced to callers during this
greeting.
92
DX-80 H ARD DRIVE VOICE MAIL INSTALLATION AND SUPERVISOR GUIDE 09/01
Other Greetings
Up to 10 different greetings can be recorded and stored in each Routing box. Procedures for
recording additional greetings and changing the currently active greeting in each box are
provided later in this section. The chart below is provided for you to note any additional
greetings set up on the system:
Box
Greeting
Number
Greeting
3.2.2 Recording Routing Box Greetings or Changing Currently
Active Greetings
1. From a telephone, call into voice mail and log into the supervisor mailbox 70. The
system voices the Main menu:
“To listen to your messages press 1. To send a message press 2. To change your options
press 3.”
93
DX-80 H ARD DRIVE VOICE MAIL INSTALLATION AND SUPERVISOR GUIDE 09/01
2. Press 3 to change options. The system voices the Options menu:
Options Menu
To Record Your Name
Press 1
To Record Your Greeting
Press 2
To Change Your Password
Press 3
To Change Your Call-Transfer Feature
Press 4
To Change Your Message Notification Feature
Press 5
To Change Your Pager Feature
Press 6
To Review Msgs scheduled for Future Delivery
Press 7
To Change Your Personal Distribution Lists
Press 8
To Retrieve a Message Previously Sent
Press *
To Return to the Main Menu
Press #
3. From the Options menu, press 2.
4. When prompted, enter the number of the Routing box whose greeting you want to
change. (Note that to change a Routing box greeting, you must be logged into the
mailbox that is the designated owner of the Routing box, as specified on the Routing
box’s setup screen. By default, Supervisor mailbox 70 is the owner of Routing boxes
800, 801, and 821.)
5. When prompted, press 1 to confirm the number you entered or press # if the number you
entered was incorrect. Once you press 1 to confirm, the system voices the following
options, which relate to the currently active greeting:
To Replay the Greeting
Press 1
To Re-Record the Greeting
Press 2
To Delete the Greeting
Press 3
To Choose a New Greeting
Press 5
To Exit
Press #
6. If you intend to re-record the greeting, first press 1 to replay it. By replaying the greeting
you can 1) ensure you are re-recording the greeting you intended to modify, and 2) note
all the call routing options that are currently provided in the greeting so you can restate
the appropriate call routing options in the new greeting you record (for example,
94
DX-80 H ARD DRIVE VOICE MAIL INSTALLATION AND SUPERVISOR GUIDE 09/01
“…Press 2 for Sales…”). Note that you can modify the single-digit call routing options
by following the procedure provided later in this section.
7. To re-record the greeting, press 2. The system prompts you to enter the number of the
greeting you want to re-record. Enter the greeting number (0 through 9). Then, follow
the prompts to complete the procedure.
8. To choose a new greeting to play as the currently active greeting, press 5. The system
prompts you to enter the number of the greeting you would like to activate or to press star
for the currently active greeting. If you press *, the system voices the currently active
greeting number and greeting, then re-voices the options:
To Replay the Greeting
Press 1
To Re-Record the Greeting
Press 2
To Delete the Greeting
Press 3
To Choose a New Greeting
Press 5
To Exit
Press #
9. Once you press 5 and enter a new greeting number, the system voices a confirmation
prompt stating the greeting number and voicing the now-active greeting.
3.2.3 Changing the Single-Digit Call Routing
The Voice Mail can be set up to voice greetings to callers that include single-digit call routing
options, such as, “Press 2 for Sales…” On a system set up this way, a call is transferred to a
certain mailbox when the caller presses 2 during or after the greeting. You can control the
digit(s) callers can dial and the route their calls will subsequently take using the following
procedure.
Note that if you use the following procedure to change the single-digit call routing set up, you
must update the Routing box greeting to relay new instructions to the caller. Use the
procedure in section 3.2.2 to update the greeting as necessary.
1. From a telephone, call into voice mail and log into the supervisor mailbox 70. The
system voices the Main menu:
95
DX-80 H ARD DRIVE VOICE MAIL INSTALLATION AND SUPERVISOR GUIDE 09/01
“To listen to your messages press 1. To send a message press 2. To change your options
press 3.”
2. To access the Supervisor menu, press 6 (this option is not voiced). The system voices
the Supervisor menu options:
Supervisor Menu
For Mailbox Administration
Press 1
For Routing Box Administration
Press 2
For Question Box Administration
Press 3
For Port Administration
Press 4
To Change the System Broadcast Message
Press 5
To Change the Voice Mail Day / Night Service
Press 6
To Change the System Time
Press 7
To Change the System Date
Press 8
To Modify System Parameters
Press 9
To Perform First-Time Setup
Press 0
To Exit
Press #
3. From the Supervisors menu, press 2 for Routing box Administration.
4. When prompted, enter the number of the Routing box with which you want to work.
5. When prompted, press 1 to confirm the number you entered or press # if the number you
entered was incorrect. Once you press 1 to confirm, the system voices the Routing Box
administration menu options:
Routing Box Menu
To Add
Press 1
To Delete
Press 2
To Modify
Press 3
To Exit
Press #
6. To make modifications to the Routing box, press 3. The system voices the modification
options:
96
DX-80 H ARD DRIVE VOICE MAIL INSTALLATION AND SUPERVISOR GUIDE 09/01
To Change the Greeting Press 1
To Change the Routing
Press 2
To Exit
Press #
7. To change the routing structure, press 2. The system voices the prompt, “For digits zero
through nine, please enter the digit, or press * for special routing options.”
8. Press the digit for which you want to modify the call routing. The system voices a
prompt identifying the current call routing set up for the digit.
9. When prompted, press 1 to change the routing for the digit. Then, when prompted, enter
the number of the box to which you now want callers who press the digit to route. The
system voices a prompt stating the new call routing structure.
Note that you can make special call routing refinements by pressing * in step 8 above.
The system voices the following special routing options:
To Change the Destination for the Star Digit
Press *
To Change the Destination for the Pound Digit
Press #
To Change the No Digits Destination
Press 1
To Change the Invalid Digit Destination
Press 2
To Change the Voice Detected Destination
Press 3
Once you access this menu, be advised that you must not press # to exit it, since the # key
invokes a change to the destination for the pound key. If you want to return to the
previous menu, simply make no entry when you hear the special routing options prompt.
3.3 General System Maintenance
3.3.1 Enabling or Disabling a Port
1. From a telephone, call into voice mail and log into the supervisor mailbox 70. The
system voices the Main menu:
97
DX-80 H ARD DRIVE VOICE MAIL INSTALLATION AND SUPERVISOR GUIDE 09/01
“To listen to your messages press 1. To send a message press 2. To change your options
press 3.”
2. To access the Supervisor menu, press 6 (this option is not voiced). The system voices
the Supervisor menu options:
Supervisor Menu
For Mailbox Administration
Press 1
For Routing Box Administration
Press 2
For Question Box Administration
Press 3
For Port Administration
Press 4
To Change the System Broadcast Message
Press 5
To Change the Voice Mail Day / Night Service
Press 6
To Change the System Time
Press 7
To Change the System Date
Press 8
To Modify System Parameters
Press 9
To Perform First-Time Setup
Press 0
To Exit
Press #
3. From the Supervisors menu, press 4 for Port Administration.
4. When prompted, enter the number of the line with which you want to work.
5. When prompted, press 1 to confirm the number you entered or press # if the number you
entered was incorrect. Once you press 1 to confirm, the system voices the port
administration options:
To Disable a Port
Press 1
To Enable a Port
Press 2
To Exit
Press #
6. To shut down a port, press 1 to disable it. If you disable a port, all calls using that port
are immediately terminated.
7. To enable a port that is currently shut down, press 2.
98
DX-80 H ARD DRIVE VOICE MAIL INSTALLATION AND SUPERVISOR GUIDE 09/01
3.3.2 Recording a Broadcast Message for All Mailboxes
A broadcast message is automatically sent to every mailbox on the system. The message is
played to the mailbox owners the first time they log into their mailbox following the
recording of the broadcast message. A broadcast message does not activate any message
waiting lights or indicators on subscriber telephones and does not add to the message count of
new or old messages in subscriber mailboxes.
1. From a telephone, call into voice mail and log into the supervisor mailbox 70. The
system voices the Main menu:
“To listen to your messages press 1. To send a message press 2. To change your options
press 3.”
2. To access the Supervisor menu, press 6 (this option is not voiced). The system voices
the Supervisor menu options:
Supervisor Menu
For Mailbox Administration
Press 1
For Routing Box Administration
Press 2
For Question Box Administration
Press 3
For Port Administration
Press 4
To Change the System Broadcast Message
Press 5
To Change the Voice Mail Day / Night Service
Press 6
To Change the System Time
Press 7
To Change the System Date
Press 8
To Modify System Parameters
Press 9
To Perform First-Time Setup
Press 0
To Exit
Press #
99
DX-80 H ARD DRIVE VOICE MAIL INSTALLATION AND SUPERVISOR GUIDE 09/01
3. From the Supervisors menu, press 5 for System Broadcast Message. The system voices
the following options:
To Hear the Current Broadcast Message
Press 1
To Re-record the Broadcast Message
Press 2
To Delete the Broadcast Message
Press 3
To Exit
Press #
4. To record a broadcast message, press 2. Follow the prompts to complete the procedure.
3.3.3 Transferring a Caller to a Mailbox’s Voice Mail
Use the following procedure to transfer a caller directly to a mailbox, without having the
system attempt to ring the mailbox’s associated extension.
1. Press the TRANSFER key on the telephone.
2. Dial the number for voice mail or press the voice mail hotkey.
3. Dial the number of the mailbox to which you want to transfer the call.
4. To divert the call directly to the mailbox’s voice mail, press *.
5. Hang up the telephone.
3.3.4 Troubleshooting System Problems
Follow these guidelines to effectively report problems you may encounter:
Gather as much detail concerning the situation as possible:
•
Time and date the problem occurred.
•
Box and extension number(s) affected.
100
DX-80 H ARD DRIVE VOICE MAIL INSTALLATION AND SUPERVISOR GUIDE 09/01
•
Action immediately preceding problem.
•
Action taken since problem occurred.
Attempt to duplicate the problem:
•
Note the actions taken that apparently invoke the problem.
•
Recall any recently made system set up changes that may be contributing to or
causing the problem.
•
Attempt to duplicate the problem. If you cannot duplicate the problem, it may be
have been attributed to user error.
101
DX-80 H ARD DRIVE VOICE MAIL INSTALLATION AND SUPERVISOR GUIDE 09/01
102