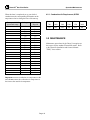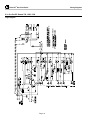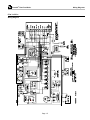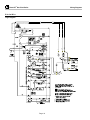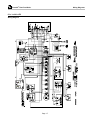
1
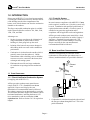
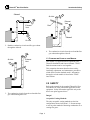
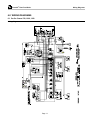
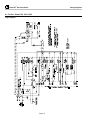
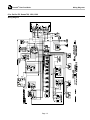
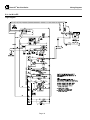
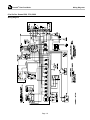
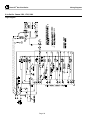
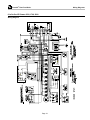
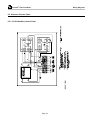
DVSCM-02 PATTERSON-KELLEY THERMIFIC® DIRECT VENT/SEALED COMBUSTION GAS-FIRED BOILER Supplement to the standard Installation and Owner's Manual (TBIG - Latest Edition) C.S.A Design-Certified Complies with ANSI Z21.13/CSA 4.9 Gas-Fired Low Pressure Steam and Hot Water Boilers ASME Code, Section IV Certified by Patterson-Kelley C.S.A Design-Certified Complies with ANSI Z21.13/CSA 4.9 Gas-Fired Low Pressure Steam and Hot Water Boilers Installation Date: _______________________ 100 Burson Street, P.O. Box 458, East Stroudsburg, PA 18301 Telephone: (877) 728-5351, Facsimile: (570) 476-7247 www.pkboilers.com Patterson-Kelley P.O. Box 458, 100 Burson Street East Stroudsburg, PA 18301 Telephone: (570) 421-7500, Facsimile: (570) 476-7247 DIRECT VENT/ SEALED COMBUSTION DIRECT VENT/ SEALED COMBUSTION DIRECT VENT/ SEALED COMBUSTION DIRECT VENT/ SEALED COMBUSTION DIRECT VENT/ SEALED COMBUSTION DIRECT VENT/ SEALED COMBUSTION DIRECT VENT/ SEALED COMBUSTION DIRECT VENT/ SEALED COMBUSTION DIRECT VENT/ ® Thermific Gas-Fired Boiler Table of Contents 1.0 INTRODUCTION..................................1 6.1c Lo-Hi-Lo IRI .................................... 17 6.1d On-Off Series 1500, 1700, 2000 ..... 19 6.1e On-Off IRI Series 1500, 1700, 2000 21 6.2 Auxiliary Control Panel...................... 23 6.2.1 On-Off Auxiliary Control Panel .... 23 1.1 Code Compliance................................1 1.1.1 Direct Vent/Sealed Combustion System ..............................................1 1.1.2 Fresh Air System...........................1 1.2 Basic Inlet/Vent Configurations ...........1 1.3 Purpose and Scope of this Manual......2 2.0 SAFETY ...............................................2 3.0 INSTALLATION....................................3 3.1 Components Provided.........................3 3.2 Combustion Air Inlet System ...............3 3.2.1 System Design - Pressure Drop ....3 3.2.2 Inlet Duct.......................................3 3.2.3 Air Inlet Termination ......................3 3.2.4 Inlet Duct Assembly at the Boiler...4 3.2.5 Inlet Damper and Auxiliary Control Panel (optional) .................................5 3.3 Exhaust Venting System .....................5 3.3.1 System Design - Materials, Length, Size, and Construction ......................5 3.3.2 Flue Gas Outlet Duct.....................5 3.3.3 Exhaust Vent Connection at the Boiler.................................................6 3.3.4 Flue Gas Termination....................6 3.4.5 Equivalent Length of Fittings .........7 3.4 Clearances..........................................7 3.4.1 Sidewall Installations .....................7 3.4.2 Rooftop Installations......................8 3.4.3 Minimum Clearance for Boiler Connections ......................................8 4.0 OPERATION ........................................9 4.1 Sequence of Operation .......................9 4.2 Combustion Operating Conditions.......9 4.2.1 Combustion Air Requirement, SCFM............................................10 5.0 MAINTENANCE .................................10 6.0 WIRING DIAGRAMS..........................11 6.1 On-Off Series 700, 1000, 1200.........11 6.1a On-Off IRI Series 700, 1000, 1200 .13 6.1b Lo-Hi Lo ..........................................15 ! WARNING Improper use may result in fire or injury. Read instructions/safety manual before installing, operating or servicing boiler. c 1998 HCS, Inc. 800-748-0241 Reorder No. 6020-V2WHPK WARNING! It is essential to read, understand, and follow the recommendations of this manual before installing, operating, or servicing this equipment. Failure to do so could result in fire or explosion and serious injury, death, and/or property damage. The same features which permit this boiler to achieve high-efficiency performance make it unlike most other boilers of this general size, so it is important to understand how this boiler operates. Do not store or use gasoline or other flammable vapors or liquids in the vicinity of this or any other appliance. WARNING! Installation and service must be performed by a qualified installer, service agency, or gas supplier. What to do if you smell gas: Do not try to light any appliance. Do not touch any electrical switch. Do not use any phone in your building. Immediately call your gas supplier from a neighbor's phone. Follow the gas supplier's instructions. If you cannot reach your gas supplier call the fire department. ® Thermific Gas-Fired Boiler Introduction 1.0 INTRODUCTION Direct vent (ANSI Z21.13) is a closed system method of ducting the combustion air directly from the outside of the building into the inlet compartment of the burner, and a sealed exhaust vent from the combustion chamber to the outdoors. The direct vent/sealed combustion option is available on the Thermific® boilers on Series 700, 1000, 1200, 1500, 1700, and 2000. Savings in energy costs due to the elimination of using conditioned air (heated and/or cooled building air) from going back up the stack. • Isolation of the burner from pressure changes in the building which can cause erratic combustion performance. In some instances compliance with ANSI Z21.13 may not be required, in which case a "fresh air system" may be used. Consultation with qualified professionals is required to determine whether a "fresh air system" is suitable for any particular application and in compliance with all applicable codes and regulations. All flue gas outlet (exhaust vent) material for a fresh air system must be certified for use with a Category I Appliance. (Standard B-vent is approved.) The exhaust vent may be run horizontally or vertically. Proper vent sizing by the vent manufacturer's recommendation must be followed. Advantages are: • 1.1.2 Fresh Air System (ducted combustion air system) 1.2 BASIC INLET/VENT CONFIGURATIONS • Combustion air is taken from the outside which is generally more clean than indoor air. Halide contaminants within a building, such as chlorides, can cause excessive corrosion in the burner, heat exchanger and venting system. • Eliminates the need for two large combustion air/ventilation air openings into the mechanical space. Four basic configurations are allowable for the combustion air inlet and flue gas exhaust vent, as follows; installation details are provided in Section 3. Exhaust Vent Roof 1.1 CODE COMPLIANCE Sidewall 1.1.1 Direct Vent/Sealed Combustion System (complying with ANSI Z21.13) All flue gas outlet (exhaust vent) material must comply with UL-1738. (Standard B-vent is not approved.) Proper vent sizing by the vent manufacturer's recommendation must be followed. The exhaust vent may be run horizontally or vertically. The maximum allowable length of the exhaust vent for horizontal installations, including the boot tee/135º (not a standard tee) and the termination is 100 equivalent feet. Refer to Section 3.4.5 for equivalent lengths. Page 1 Air Inlet 1. Combustion air inlet duct through the sidewall and the flue gas exhaust through the roof. This is the preferred method. ® Thermific Gas-Fired Boiler Introduction/Safety Sidewall Air Inlet Roof Exhaust Vent Exhaust Vent Sidewall Air Inlet 2. Both the combustion air inlet and flue gas exhaust through the sidewall. 4. The combustion air inlet from the roof and the flue gas exhaust through the sidewall. Air Inlet 1.3 PURPOSE AND SCOPE OF THIS MANUAL Exhaust Vent This manual is a supplement and companion to the Thermific Installation and Owner's Manual. "TBIG." Both documents must be used together. This companion document describes those safety, installation, adjustment, and maintenance procedures which differ from the standard model. Information that applies to both models is found in the "TBIG" latest edition. Roof 2.0 SAFETY 3. The combustion air inlet from the roof and the flue gas exhaust through the roof. Refer to the manual for the standard Thermific® GasFired Boiler for safety information applicable to this equipment. Safety information applicable only to the direct vent option appears below. Danger! Acceptable Venting Methods: The only acceptable venting methods are the four configurations shown in Section 1.2. Do not attempt to use any other method of obtaining combustion air or venting flue gases. Page 2 ® Thermific Gas-Fired Boiler Installation Do not manifold two (2) or more units into a common sidewall vent system without provisions for additional forced draft. 3.0 INSTALLATION 3.1 COMPONENTS PROVIDED The direct vent/sealed combustion option is shipped with the following items shipped loose for field installation: 3.2.2.2 PVC Duct Proper sealing of the tubing is necessary to prevent flow of combustion air from conditioned space. Custom 6 inch diameter to 12 inch diameter transition duct with extension, for attachment to the combustion air inlet on the boiler. A 12" inlet damper assembly with actuator and limit switch mounted to the damper shaft. Auxiliary Control Panel to operate the inlet damper assembly. silicone sealant, or equivalent, must be used on each circumferential and horizontal joint before joining together. At least 24 hours must be allowed for cure of this sealant and proper bond. Cure time can be reduced through the application of heat (See instructions provided with the sealant). After the cure period, each joint must be wrapped with an aluminum tape which is faced on the contact side with an adhesive. The installation must follow the vent manufacturer's instructions in all respects including proper joining and sealing of the tubing and fittings. Clearances to combustible materials and installation of firestops must conform to applicable codes. 3.2.3 Air Inlet Termination The inlet damper assembly and control panel will prevent the flow of cold air through the boiler during the off cycle and prevent freeze up and "off cycle" losses. The use of these two items is optional. Centering Support Plate Outside Plate Cover Plate Fastener Sealant Recommended Termination (refer to text). 3.2 COMBUSTION AIR INLET SYSTEM Note: 3.2.1 System Design - Pressure Drop Sealant The air inlet duct system shall be designed for a maximum pressure drop of 0.05" W.C. taking into account the equivalent length of all fittings. Refer to Section 3.4.5 for equivalent length of fittings. 12" Min. Field Provided Inlet Screen The boiler combustion air inlet duct must be fitted with a termination device meeting the requirements of ANSI Z21.13. There are four recommended sidewall terminations: 3.2.2 Inlet Duct Materials shall be single wall galvanized duct (minimum thickness 26 gauge) or PVC duct tubing (0.187 inch wall thickness) only. No substitutions. • • • • 3.2.2.1 Single Wall Galvanized Duct Proper sealing of the tubing is necessary to prevent flow of combustion air from conditioned space. If single wall galvanized tubing is used, GE RTV 102 Page 3 Double wall B vent 90 degree elbow, or Two double wall B vent 45 degree elbows, or Schedule 40 PVC 90 degree elbow, or Properly engineered intake louver screen. ® Thermific Gas-Fired Boiler Installation Whichever material is used, the termination must point down and must be backed by a metal plate secured to the wall. Transition Duct Damper Round Important: The chosen inlet termination must be included in the calculation of the maximum allowable equivalent length. See Section 3.4.5 for equivalent lengths. Correct rain cap, unrestricted. Damper Housing Typical incorrect rain cap. (Sidewall installation shown.) If the combustion air inlet duct is routed through the roof, the termination must be either the same type as described for a sidewall installation or a rain cap. The rain cap must be unrestrictive type similar to the illustration below. 3.2.4 Inlet Duct Assembly at the Boiler The boiler is equipped with a special collar attached to the air inlet opening on the back of the unit (at the blower housing on Series 700, 1000, and 1200; at the back of the cabinet on Series 1500, 1700 and 2000.). A separate box of accessories is sent with the boiler. 1. Attach the 6 inch diameter end of the custom transition duct and the extension to the collar using a minimum of 4 sheet metal screws spaced approximately at 90 degree intervals. This joint must then be wrapped with an aluminum tape backed on the contact side with an adhesive. Do not use "duct tape." Important: do not insulate the transition duct or extension. Roof Transition Duct Refer to Section 3.2 for instructions for installing and wiring the auxiliary control panel; it is required if the optional inlet damper is used. Round Damper 3.2.4.1 Sealing PVC Duct Tubing to the Inlet Duct Apply a 3/4" wide x 1/8" thick gasket to the outside surface edge of the entire circumference of the transition duct (or extension). A closed cell foam rubber gasket with pressure sensitive adhesive works very well. Insert 3/4" of the transition duct into the PVC duct tubing so that the gasket lines up with the edge of the PVC tubing. Lay an approximate 3/8" wide bead of GE RTV-102 silicone sealant, or equivalent, along the gap between the gasket and inside wall of the tubing. Allow the silicone sealant to cure for 24 hours. The cure time can be shortened o 90 Elbow Damper Housing (Roof installation shown.) Page 4 ® Thermific Gas-Fired Boiler Installation with the application of heat. Refer to the manufacturer's instructions. Wrap the joint with aluminum tape which is backed with an adhesive on the contact side. 1. Terminals for the damper actuator: DO = Damper Open (CW) DC = Damper Closed (CCW) DN = Neutral/Common 2. Terminals for the limit (end) switch 3.2.5 Inlet Damper and Auxiliary Control Panel (optional) SI = N.O. (Normally Open) S2 = Common Note: The inlet damper assembly and control panel will prevent the flow of cold air through the boiler during the off cycle and prevent freeze up. These two items are optional in all installations. 3.3 EXHAUST VENTING SYSTEM 3.3.1 System Design - Materials, Length, Size, and Construction Refer to Section 4.1 for a description of the control sequence applicable to the inlet damper. The flue gas outlet (exhaust vent) must be designed to comply with UL 1738 and ULC-636. (Refer to Section 1.1.2 for situations where alternate compliance may be permitted.) The exhaust vent can be run horizontally or vertically. The damper must be field installed into a section of horizontal or vertical inlet ductwork. Orient the damper such that the arrow points towards the boiler. 3.2.5.1 Field Wiring to Auxiliary Control Panel The auxiliary control panel controls the inlet damper (if used). The auxiliary control panel does not have to be mounted on or near the boiler; it can be remotely mounted. Use 16GA MTW Wire for all field wiring. See Section 6 for the logic and wiring diagrams of this auxiliary control panel and the sealed combustion boilers. There are five (5) field run wires between the boiler and its auxiliary control panel; three (3) for main power supply and two (2) wires for boiler interconnect. 1. The main power supply (G/H/N) must come from the same boiler that the damper is connected to. 2. Remove the blue jumper wire in the terminal block on the boiler when wiring. There are also five (5) field run wires between the auxiliary control panel and the inlet damper assembly; three (3) to the damper actuator and two (2) to the limit switch. Page 5 The vent must be sized according to the vent manufacture's recommendations. Consult the vent supplier for correct sizing and structural support requirements. Vent diameter is dictated by the length and height of horizontal and vertical portions of the vent installation and materials of construction. Design calculations should be based on a negative 0.03 W.C. with a stack temperature of 325º F (gross) and a CO2 level of 7.6%; (these values are to be used for vent sizing calculations.) The maximum allowable length of the vent duct, including the boot tee/135º tee (not a standard tee) and the termination is 100 equivalent feet. See Section 3.4.5 for the equivalent length of the fittings. 3.3.2 Flue Gas Outlet Duct The installation must follow the vent manufacturer's instructions in all respects including proper joining and sealing of the tubing and fittings, clearances to combustible materials and installation of firestops. ® Thermific Gas-Fired Boiler Installation 3.3.3 Exhaust Vent Connection at the Boiler from the outlet of the boot tee/ 135º tee to the inlet of the elbow. In addition, for sidewall venting, it is very important to provide a downward pitch of at least 1/4 inch per foot of run from the termination at the wall toward the boiler for proper drainage of the condensate and for buoyancy assist of the flue gas. Furthermore, do not locate sidewall terminations over area of pedestrian or vehicular traffic due to potential condensate drippage and ice build-up. See Section 3.4 Clearances for more information. Pitch toward boiler 1/4" per foot min. 6' Min. Boot Tee/ o 135 Tee Trap Loop When joining the double wall tubing and fittings, it is important to orient the male end of the section toward the boiler. The female end is positioned away from the boiler towards the vent terminal. Follow the vent manufacturer's instructions for proper installation. 3.3.4 Flue Gas Termination 3" Min. Condensate Drain Centering Support Plate To sewer trap or condensate pump. Outside Plate Cover Plate Fastener Sealant At the outlet of the boiler, an adjustable or fixed length (minimum 2 feet for clearance from inlet duct; maximum 3 feet for proper lift) section may be utilized. This section must be secured to the outlet collar by a minimum of 4 sheet metal screws spaced at approximately 90 degree intervals. Even though the unit is classified as a Category I boiler (Non-pressurized-non condensing), there are certain abnormal conditions which may cause condensation in the flue vent. Therefore, it is recommended that a tee cover with a drain be provided at the bottom of the boot tee/135º tee. For proper disposal of the condensate, corrosion resistant tubing or plastic tubing should be connected to the drain nipple. Before connecting the tubing to the tee cover nipple, the trap loop must be primed by pouring a small quantity of water into the drain line. The condensate drain line can be routed to a sewer drain trap or pump. Consult the vent manufacturer's instructions for proper installation of drain line. In transitioning from horizontal to vertical, a double wall boot tee/135º tee must be installed (not a standard tee). If the flue gas exhaust is to be routed through the sidewall, a minimum vertical rise of 6 feet is required Page 6 Recommended termination (refer to text). Sealant 12" Min. The exhaust vent termination must be a P-K recommended device. There are four approved sidewall terminations: 90º elbow pointing down, or Two 45º elbows pointing down, or 45º elbow pointing down, or Standard tee pointing up/down. Important: The equivalent length of the chosen termination must be included in the calculation of the maximum allowable equivalent length. See Section 3.4.5 for equivalent lengths. ® Thermific Gas-Fired Boiler Installation Whichever termination is chosen, it must be double wall vent certified under UL 1738, or ULC-636. When installing a sidewall exhaust system the termination must be backed by a metal plate secured to the wall as shown in the figure. Correct rain cap, unrestricted. unrestrictive type similar to the figure above. Elbows are also acceptable. 3.4.5 Equivalent Length of Fittings Fitting Description 90º Elbow 45º Elbow Rain Cap Boot Tee/135º Tee Standard Tee Used as a Vent Termination Typical incorrect rain cap. If the exhaust vent is routed through the roof, the termination must be either the same type as described for a sidewall installation or a rain cap. The preferred method to terminate the exhaust vent is with a rain cap to minimize the drippage of condensate onto the roof and ice build-up. The rain cap should be an Equivalent Length 10 feet 5 feet 10 feet 10 feet 10 feet 3.4 CLEARANCES In addition to any clearance requirements in Sections 3.1 and 3.3 the following clearances must be maintained for inlet and vent components. 3.4.1 Sidewall Installations Flue Gas Outlet Flue Gas Outlet Combustion Air Intake 2' to snow line Page 7 ® Thermific Gas-Fired Boiler Installation If the air inlet and/or exhaust vent terminal are through the sidewall, clearances from other exhaust/inlet, windows, doors, building openings, snow line, etc must be as shown in the figure above. There must be either 5' vertical separation or 10' horizontal separation between the flue gas outlet and the combustion air inlet. Clearances which must be maintained when both inlet and exhaust are through the roof are shown in the figures above. 3.4.3 Minimum Clearance for Boiler Connections The bottom of the flue gas outlet must be located at least 12 inches above finish grade or snow line, but must be at least 7 feet above finish grade when located adjacent to a public walkway. It must also have a minimum clearance of 4 feet horizontally from, and in no case above or below, (unless a 4 foot horizontal distance is maintained,) electric meters, gas meters, regulators and relief equipment. There are special considerations needed when installing the air inlet and exhaust duct systems because of the orientation of these connections on the boilers. 3.4.3.1 Series 700, 1000, 1200 Air Inlet 3.4.2 Rooftop Installations Round 10' min. Damper Combustion Air Inlet 4' min. Flue Gas Outlet 4' min. above snow line 26" Min.* * Dimension shown above is based on 12" round ductwork. 10' min. Vent Combustion Air Inlet o 90 Elbow 4' min. Flue Gas Outlet 4' min. above snow line Page 8 A minimum clearance of 26 inches is required on the left side of the boiler to permit the connection of the air inlet duct to the boiler. ® Thermific Gas-Fired Boiler Installation/Operation normally closed contacts on the time delay relay and energizes the coil on the relay in the Auxiliary Control Panel. The relay will in turn energize the damper actuator to open the damper. When the damper is in the full open position, the limit switch will close and supply power to the contactor for the blower motor. 3.4.3.2 Series 1500, 1700, 2000 Air Inlet Round Exhaust Vent Damper o 90 Elbow During this time (about 20 seconds), the air switch will indicate low air flow with the "LowAir" indicator. This indicator will remain on until sufficient air flow is sensed. If the air flow switch is not closed in 120 seconds, the time delay relay will open its normally closed contacts. This will turn off the blower motor and close the inlet damper. The "Low Air" indicator will remain illuminated and the boiler will not operate. Transition Duct 27" Min.* 31" * Boot Tee/ o 135 Tee 24" To Drain 44" Min. * * Dimension shown above is based on 12" round ductwork. A minimum of 44 inches is required behind the boiler to fit the inlet and exhaust connections. The figure above suggests a duct arrangement using standard duct pieces that will maintain this minimum clearance of 44 inches. 4.0 OPERATION 4.1 SEQUENCE OF OPERATION This sequence applies if the optional inlet damper assembly and auxiliary control panel are used. If not the standard Thermific® control sequence applies. (Replaces step #6 of the Sequence of Operation in the Installation and Owner's Manual. "TBIG.") 6. The programmer first energizes Terminal 4 which supplies power to the airflow switch and initiates the adjustable 120 sec. timer on the time delay relay. Terminal 4 also supplies power through the Page 9 4.2 COMBUSTION OPERATING CONDITIONS The combustion air characteristic of the burner in this boiler is factory set at a condition of utilizing approximately 50% excess air at room temperature (70ºF). Therefore, when taking combustion air from the outdoors in a direct vent system, adjustment of the combustion air damper linkage should not be made until the carbon dioxide or oxygen reading is referred to this condition. The density of cold outdoor air will be greater than warm air taken from inside the building. Thus, the combustion air blower with outdoor air will deliver a higher air density flow to the burner. A boiler can be subjected to varying combustion air temperatures. You must put some thought into the air/fuel adjustments to prevent hard start and/or light off rumbling problems. Due to a wide range of operating conditions, Patterson-Kelley developed a guide for different conditions. P-K recommends that the service technician observe the combustion air temperature range. Identify the temperature operating conditions of your boiler. The operational range setting for O2 is 6.0% to 8.0%. Insert your 100º F operating temperature range in the chart below. Start with the Minimum Temperature at the top of the chart; insert temperatures using 5º F increments. ® Thermific Gas-Fired Boiler Operation/Maintenance 4.2.1 Combustion Air Requirement, SCFM When the chart is completed, set up your boiler's combustion to the corresponding information at the temperature relative during the time of the start up. Enter your 100º F operational range. % Oxygen 8 7.9 7.8 7.7 7.6 7.5 7.4 7.3 7.2 7.1 7.0 6.9 6.8 6.7 6.6 6.5 6.4 6.3 6.2 6.1 6 % Carbon Dioxide 7.2 7.3 7.4 7.4 7.5 7.5 7.6 7.6 7.7 7.7 7.8 7.8 7.9 8 8 8.1 8.1 8.2 8.2 8.3 8.3 Series Series Series Series Series Series 700 1000 1200 1500 1700 2000 170 251 291 364 413 501 5.0 MAINTENANCE Maintenance procedures for the Direct Vent option are the same as for the standard Thermific® model. Refer to the Thermific Installation and Owner's Manual. "TBIG," latest edition. Important: measure combustion air temperature at the unit; do not assume the combustion air temperature is the same as the outside air temperature. Page 10 ® Thermific Gas-Fired Boiler Wiring Diagrams 6.0 WIRING DIAGRAMS 6.1 ON-OFF SERIES 700, 1000, 1200 Wiring Diagram Page 11 ® Thermific Gas-Fired Boiler Wiring Diagrams 6.1 ON-OFF SERIES 700, 1000, 1200 Logic Diagram Page 12 ® Thermific Gas-Fired Boiler Wiring Diagrams 6.1A ON-OFF IRI SERIES 700, 1000, 1200 Wiring Diagram Page 13 ® Thermific Gas-Fired Boiler Wiring Diagrams 6.1A ON-OFF IRI SERIES 700, 1000, 1200 Logic Diagram Page 14 ® Thermific Gas-Fired Boiler Wiring Diagrams 6.1B LO-HI LO Wiring Diagram Page 15 ® Thermific Gas-Fired Boiler Wiring Diagrams 6.1B LO-HI LO Logic Diagram Page 16 ® Thermific Gas-Fired Boiler Wiring Diagrams 6.1C LO-HI-LO IRI Wiring Diagram Page 17 ® Thermific Gas-Fired Boiler Wiring Diagrams 6.1C LO-HI-LO IRI Logic Diagram Page 18 ® Thermific Gas-Fired Boiler Wiring Diagrams 6.1D ON-OFF SERIES 1500, 1700, 2000 Wiring Diagram Page 19 ® Thermific Gas-Fired Boiler Wiring Diagrams 6.1D ON-OFF SERIES 1500, 1700, 2000 Logic Diagram Page 20 ® Thermific Gas-Fired Boiler Wiring Diagrams 6.1E ON-OFF IRI SERIES 1500, 1700, 2000 Wiring Diagram Page 21 ® Thermific Gas-Fired Boiler Wiring Diagrams 6.1E ON-OFF IRI SERIES 1500, 1700, 2000 Logic Diagram Page 22 ® Thermific Gas-Fired Boiler Wiring Diagrams 6.2 AUXILIARY CONTROL PANEL 6.2.1 On-Off Auxiliary Control Panel Page 23 Page 24