1
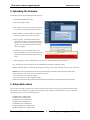
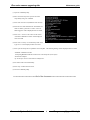
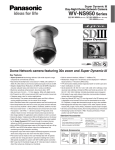
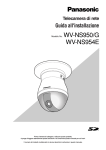
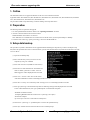
i-Pro series camera upgrade guide
Maintenance guide
1. Outline
This manual describes how to upgrade the firmware of the i-Pro series cameras listed below.
Applicable models: WV-NP240 series, WV-NP1000 series,WV-NS202 series, WV-NF284 series, WV-NW484 series,WV-NS950
series, WV-NW960 series, WV-NF302 series, WV-NP304 series.
The procedure includes "setup data backup", "firmware loading" and "setup data restore".
2. Preparation
The following items are required for the upgrade.
1. PC with specified hardware/software: Refer to the "Operating instructions" for detail.
2. Network connection between the PC and the camera:
Default IP address of the camera: 192.168.0.10.
Note: When there is a communication error between the PC and the camera, try fixed speed 10Mbps or 100Mbps.
3. Firmware of the camera (e.g. "np244_xxxxx.img"), which is in the BIG-WEB site.
3. Setup data backup
This procedure is optional as the firmware can be upgraded without initializing the setup data. If you wish to backup the setup
data, follow the procedure below. Prior to the FTP transfer, open the Setup menu/Network setup/Network tab and then set the FTP
access to "allow".
(1) Open the command prompt.
(2) Move to the directory where you wish to save the
setup data by using "cd" command.
(3) Enter "FTP 192.168.0.10 (IP address of the camera)".
(4) Enter the User Name and Password. The default User
Name is "admin", password is "12345". "230 User
admin logged in" will be displayed when successful.
(5) Enter "cd C:" to move to the C drive of the camera.
"250 CWD command successful" will be displayed when successful.
(6) Enter "bin" or "binary" to set FTP binary mode. "200 Type set to I." will be displayed when successful.
(7) Enter "get system.cfg" to download the setup data. The following message will be displayed when successful.
In case of WV-NP1000 series, Enter "get np1000setup.dat" to download the setup data.
200 PORT command successful.
150 Opening BINARY mode data connection for ' system.cfg' (xxxxx bytes).
226 Transfer complete.
ftp: xxxxx bytes received in x.xxSeconds xxx.xxKbytes/sec.
(8) Check if the " system.cfg" or "np1000setup.dat" is saved in the specified directory.
(9) Enter "bye" to finish the FTP session and then close the command prompt.
Panasonic System Solutions
1
i-Pro_camera_UpgradeGuide_A
i-Pro series camera upgrade guide
Maintenance guide
4. Uploading the firmware
The firmware upload is performed through the browser GUI.
(1) Open the Setup/Maintenance menu
(2) Open the Upgrade tab menu
(3) Click "Browse" and navigate to the correct firmware
(e.g. "np244_xxxxx.img") and select the firmware.
(4) Select whether you wish to initialize the setup data
during the upgrade process by the radio button.
(5) Click "Upgrade". Confirmation message will be
displayed. Click "OK" to start loading the firmware.
When "Do not reset the settings after completing the
upgrade. " was selected, the confirmation message
will not be displayed.
(6) "Upload in progress" is displayed. It takes 2 to 4
minutes depending on the camera model. When completed, the browser GUI automatically displays live
image.
(7) After the upgrade, check the updated firmware version on the "Setup menu/Maintenance/Upgrade tab".
Note: The following network settings will not be initialized during the firmware upgrade procedure.
On/Off for DHCP, IP address, subnet mask, default, gateway, HTTP port, line speed, bandwidth control (bit rate), time & date
Caution ++++++++++++++++++++++++++++++++++++++++++++++++++++++++++++++++++++++++++
• When upgrading, connect the PC in the same subnet as the camera.
• Do not turn off the power during the upgrade.
• Do not operate the browser GUI during the upgrade.
+++++++++++++++++++++++++++++++++++++++++++++++++++++++++++++++++++++++++++++++++
5. Setup data restore
This procedure is optional. Setup data can be restored as follows. This can also be used to copy setup data from another camera
(same model). Prior to loading the setup data, change the file name from "system.cfg" to the file name respective to the camera
model as shown below (except for WV-NP1000 series).
WV-NP240 series: np244setup.dat
WV-NS202 series: ns202setup.dat
WV-NS202A series: ns202asetup.dat
WV-NF284 series: nf284setup.dat
WV-NW484 series: nw484setup.dat
WV-NS950/NW960 series: ns950setup.dat
WV-NF302/NP304 series: nf302setup.dat
Panasonic System Solutions
2
i-Pro_camera_UpgradeGuide_A
i-Pro series camera upgrade guide
Maintenance guide
(1) Open the command prompt.
(2) Move to the directory where you have saved the
setup data by using "cd" command.
(3) Enter "FTP 192.168.0.10 (IP address of the camera)".
(4) Enter the User Name and Password. The default User
Name is "admin", password is "12345". "230 User
admin logged in" will be displayed when successful.
(5) Enter "cd C:" to move to the C drive of the camera.
"250 CWD command successful" will be displayed
when successful.
(6) Enter "bin" or "binary" to set FTP binary mode. "200
Type set to I." will be displayed when successful.
(7) Enter "put xxxxxsetup.dat" to upload the saved setup data. The following message will be displayed when successful.
200 PORT command successful.
150 Opening BINARY mode data connection for 'xxxxxsetup.dat' (xxxxx bytes).
226 Transfer complete.
ftp: xxxxx bytes sent in x.xxSeconds xxx.xxKbytes/sec.
(8) The camera will restart automatically.
(8) Enter "bye" to finish the FTP session.
(9) Close the command prompt.
+++++++++++++++++++++++++++++End
Panasonic System Solutions
of the document+++++++++++++++++++++++++++++++++
3
i-Pro_camera_UpgradeGuide_A