1
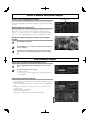
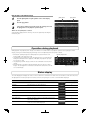
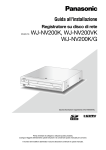
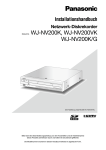
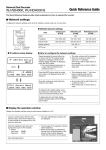
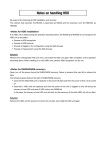
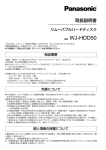
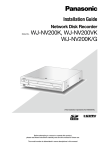
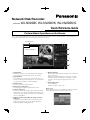
Network Disk Recorder
Model No.
WJ-NV200K, WJ-NV200VK, WJ-NV200K/G
Quick Reference Guide
Perform Basic Operations on the Screen
The recorder is operated with the mouse (accessory) connected to the front of the recorder. To perform operations, either click buttons on
the operation window displayed on the main monitor or turn the mouse wheel.
Image display area
Date & time
display
q
w
Camera title
e
<Image of Camera 1>
r
t
y
i
q [Setup] button
Displays the setup menu. The login window will be displayed
for users who are not authorized to perform the operation.
w [Logout] button
It is possible to log out from the recorder from this menu. To
prevent operation by unauthorized persons, it is recommended
to log out before leaving the recorder unattended.
e Operation panel
☞ "Select a camera and switch images"
r Date & time operation panel
☞ "Play image recorded at a designated date & time"
t Camera control panel
Contains the buttons for operating cameras with the panning/
tilting function. These allow panning/tilting and zooming of the
camera, moving the camera to a preset position, and adjusting
the focus and brightness.
y Playback operation panel (While live images are being
displayed)
Selects the storage media from which to play back copied
image data. This panel is also used to perform playback of
images. (☞ "Operation during playback")
u
u [Wide view] button
Camera images will be displayed in wide view on a multiscreen
(3-/6-/9-/16-screen).
While images are being displayed on a full screen, u will be
changed to the [Ctrl screen] button. For playback or camera
operations, click the [Ctrl screen] button to return to this
screen.
i Status display panel
☞ "Status display"
☞ "When an alarm or error occurs"
How to log in
During logout, w becomes the [Login] button. When the login window is displayed, enter the user name and password.
Select a camera and switch images
Select a camera and display live images
Camera number panel
Click a camera number panel. While displaying on a multiscreen, double-clicking the
image in the image display area will switch to display of the clicked camera images on
a 1-screen.
Display images on a multiscreen
Click the "Multiscreen select" button corresponding to the number of screens to
display. If the 4-screen is selected, each click of the button will switch between
camera 1 to 4, 5 to 8, 9 to 12 and 13 to 16. Clicking the camera number panel will
switch to a 4-screen displaying the images of 4 cameras, including the selected one.
Change the multiscreen pattern and the camera display
position
1
2
3
Click the [Wide view] button.
Click the Multiscreen select button corresponding to the number of
screens to display.
Camera number panel
To change the camera display position, drag & drop the camera
number panel to the desired display position in the image display
area.
Multiscreen select
buttons
Play recorded images
Play images recorded at a designated date & time
1
2
Click the [D]/[C] button in the [Playback] box to set the desired
time.
Click the desired date on the calendar.
➜ Playback will start.
* Unless you wish to change the date, set the playback time and click
the [Play] button.
Playback by designating a timeline
• The playback time of recorded images can be changed by dragging the playback
slider on the timeline.
• To skip to the designated point, set the "Jump interval" and click the [A]/[B] buttons.
• To display the desired time zones on the timeline, mark the checkboxes of the
respective items.
Schedule: Schedule recorded time zone
Event: Event recorded time zone
VMD: Time zone within which motion was detected in an image
Playback slider
Timeline
Play images selected from logs
1
2
3
[Alarm] button
[Error] button
Click the [Alarm] button or [Error] button on the status display
panel.
Click the [Log] button.
Select the line with the desired date & time by clicking it, and click
the [Play] button on the playback operation panel.
<When an error (alarm) has occurred>
A remedy will be displayed in the "Error log". Resolve the problem by following the
instructions given.
Operation during playback
During playback, the playback panel changes as shown below. It contains buttons for playback operations such as playing recorded
images, pausing, fast forward and playing next image. Refer to the Operating Instructions (PDF) for details.
• Clicking the capturing image button while playback is paused will save a still
image (JPEG) on the SD memory card.
• The playback status display area shows the playback status of recorded images.
During fast forward/fast reverse playback, it will display the playback speed (x2,
x4, x8, x16, x32, x48)
• The playback speed will change each time the fast forward/fast reverse button is
clicked.
• Clicking the [Go to last] button will make playback skip to the latest recorded
images. The starting point is around 30 seconds before the date & time of the latest recorded images.
Capturing image button
Playback status display area
Status display
The status display panel displays the statuses of the recorder. In the event that the recorder enters several statuses at the same time, these
are displayed in their order of priority. If both statuses have the same priority, the one that occurred last will be displayed.
Status
Description
Example
Priority
Live
Live images are being displayed.
5 (Low)
Playback
Recorded images are being displayed.
5
Copying
Data is being copied. Copying progress is displayed in %.
4
Formatting SD
SD memory card is being formatted.
4
Finalizing DVD
The DVD disc is being finalized to eject.
4
Formatting HDD
HDD is being automatically formatted.
3
In the alarm state
Indicates an alarm occurrence. Detailed information of the
alarm will be displayed.
2
In the error state
Indicates that an error has occurred. A detailed description
of the error content will be displayed.
1 (High)
When an alarm or error occurs
When an alarm or an error occurs, the recorder performs alarm or error actions in accordance with the previously made settings.
Cancel the alarm/error action
1
2
When an alarm or error occurs, click the [Alarm] button or [Error]
button on the status display panel.
[Alarm] button
[Error] button
Click the [Reset] button.
The buzzer can be stopped by pressing the [BUZZER STOP] button on the recorder’s
front panel.
About face matching alarm
When a facial image is found to match previously registered facial features, the face
alarm button turns red and the name of the person associated with the registered
facial features is displayed. Clicking the face alarm button will display the buttons
related to face matching.
[Alarm] button
Copy recorded images on an SD memory card or a DVD disc
1
Insert an SD memory card or a DVD disc (DVD-drive-equipped
models only) into the recorder.
* When using an unformatted SD memory card, format it using this
recorder.
Refer to the Operating Instructions (PDF) for how to format a SD memory
card.
SDHC/SD memory card slot
2
3
Click the [Copy] button.
4
5
6
After checking the remaining capacity of the storage medium and
the volume of data to copy, click the [Copy] button.
DVD drive
Specify the details for copying the recorded images.
Camera selection: Select the number of the camera whose images are to
be copied
Copy drive: Select "SD" or “DVD”.
Date & Time range: Set the start point and end point of the recorded
data.
Click the [OK] button in the copy start "Confirmation" window.
When copying on a DVD disc, it is necessary to complete copying
by removing the disc.
* If data is once copied on a DVD disc, no more copy will be possible
after ejection.
The copied images can be played on the recorder or on a PC using the dedicated
viewer software. The viewer software will automatically be copied on the storage
medium on which recorded images are copied.
To play back on this recorder, select the storage medium for copying under "Disk/
medium", select the line with the desired playback date & time from the displayed
copied data list, and click the [Play] button.
Nd0811-2022
3TR006578EDA
Printed in China