1
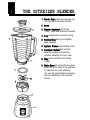
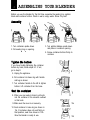
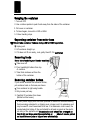
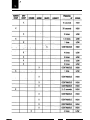
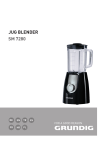
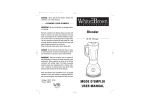
IMPORTANT SAFEGUARDS
When you use electrical appliances, you should always follow basic safety rules.
They include the following:
1. Read ail instructions.
2. To avoid risk of shock, do not put motor base in water or other liquid.
3. Supervise children closely when they use or are nearby appliances.
4. Always use unit on a clean, flat, hard, dry surface. There should be no material
such as a tablecloth or plastic between unit and surface.
5. Unplug appliance:
! when not in use
! before putting on or taking off parts
! before cleaning
6. Don’t touch moving parts.
7. Keep hands and utensils out of container while blending to reduce the risk of:
! the possibility of severe personal injury
! damage to the blender
If scraping is necessary, turn the unit OFF and use a rubber spatula only.
6. Do not use appliance:
! with a damaged cord or plug
! after the unit fails to work correctly
! after you drop or damage unit in any way
Return to nearest Sunbeam-Oster Household Products Authorized Independent
Service Center for safety check, adjustment or repair.
9. Blades are sharp. Handle them carefully
10. To reduce the risk of injury:
! don’t leave agitator blades exposed
always assemble blades to container before putting on base
11. Always put cover on container before operating blender.
12. Never put boiling liquids in blender container.
13. When blending hot liquids, remove feeder cap from the two-piece cover to
allow steam to escape.
14. Do not blend hot liquids in “Mini-Blend” jars.
15. Do not use outdoors.
16.Do not let cord:
! hang over edge of table or counter
! touch hot surfaces
17. Never leave appliance unattended while it is running.
16. You risk personal injury if you use attachments, containers, including canning
or ordinary jars, or parts other than those recommended by Oster.
SAVE THESE INSTRUCTIONS
This unit is for household use only.
The maximum rating marked on the unit is based on the attachment that draws
the greatest load. Other attachments may draw less power.
This appliance has a polarized plug (one blade is wider than the other). To reduce the risk of
electric shock, this plug will fit in a polarized outlet only one way. If the plug does not fit fully
in tbe outlet, reverse the plug. lf it still does not fit, contact a qualified electrician. “Do not
modify the plug in any way”. Refer to par. 40.35.
HOW TO USE THIS BOOK
Congratulations! The Contemporary Classics Osterizer blender represents a tradition that we’re proud to have bear our name. This classic design is a symbol of
excellence and quality. We’re sure you’ll enjoy its versatility and ease of use which
will save you time and energy in food preparation.
Caution
This symbol has been placed in specific areas of the User Guide portion of
this book. Its purpose is to easily identify instructions that require your
special attention.
O u r best to you
This book, as well as your new Contemporary Classics Osterizer blender, comes
to you with our best wishes. We hope that you enjoy using both for many years
to come.
Your friends at Oster
THE OSTERIZER BLENDER
1. Feeder Cap doubles as measuring cup.
Lets you add foods while blending.
2. Cover.
3. Blender Containerholds 5 cups
(1.25L). Helps user estimate measures.
4. Lug contacts stop to prevent turning.
5. Sealing Ringseals jar and agitator
blade assembly.
6. Agitator Bladescreate blending action.
7. Container Bottomholds container
assembly together and positions
container assembly on motor base.
6. Stop keeps container from turning
in base.
9. Motor Basehas a powerful two-speed
motor that is the heart of the appliance.
To maximize this unit’s efficiency,
only use the recommended processing
amounts identified in the instruction
manual.
6
7
9
ASSEMBLING YOUR BLENDER
Before you use the blender for the first time, separate the sealing ring, agitator
blade and container bottom. Wash in warm, soapy water. Rinse. Dry well.
Assembly
1. Turn container upside down.
2. Put sealing ring on opening.
3. Turn agitator blades upside down
and place in container opening.
4. Screw container bottom firmly to
container.
Tighten the bottom
If you have trouble tightening the container
bottom by hand, follow steps 5-7. If not,
go to step 8.
5. Unplug the appliance.
8
6. Put container into base ring with handle
and lug as shown.
7. Turn container handle to the left to tighten
bottom. Lift container from the base.
Seat the container
8. When you are ready to blend, put foods
into the container in the amounts outlined
in this book.
9. Make sure the cover is on securely.
10. Seat container in base ring as shown in
10a. If container does not seat firmly in
that position, seat it as shown in 10b.
Now the blender is ready to use.
10a
10b
CARING FOR YOUR BLENDER
Cleaning
Do not wash any blender partsexcept for glassblender container in an automatic
dishasher.
1. Unplug unit.
2. Carefully remove the agitator blades, sealing ring and container bottom.
3. Wash in warm, soapy water.
4. Wash cover and container.
5. Rinse.
5. Dry well.
7. Wipe base with soft, damp cloth.
Storing
Never put blendercontainerin a microwave oven. Never store foods in your
blendercontainer.
1. Put agitator blades, sealing ring and container bottom back together.
Upkeep
Check parts as you put them back together.
Blades
1. Turn as shown being careful of sharp blade edges.
2. Blades should turn freely.
3. If blades are stuck or hard to turn,
do not use the blender.
Glass container
1. If your blender container is chipped or cracked, it could break during use.
Do not use blender.
Service
Only send your appliance to a Sunbeam-Oster Household Products Authorized
Independent Service Center if repairs are ever needed.
Use only replacement parts from Oster.
HOW TO USE YOUR BLENDER
!
1. Plug in motor base.
2. Check recipe for recommended speed.
3. Rest hand on container cover.
4. Select proper speed.
Never leave blender whileit is operating. If container turns while motor is
ON, immediately switch unit OFF and repeat steps 5-7 under “Assembling
Your Blender!’
The Osterizer blender, a 2-speed unit
LOW - this speed setting is used for chopping and processing small quantities of
medium- or soft-textured foods to a smooth mixture.
To chop foods, turn the switch to the LOW setting for 2 seconds (counting
“1001.. .1002”). Turn to OFF and let blades come to a stop. Repeat for the number
of times given in the recipe. This technique can also be used in the HIGH setting for
chopping harder-textured foods.
To process continuously for mixing light loads, leave the switch in the LOW
position until the desired consistency is achieved.
HIGH - this speed setting is used for chopping hard-textured foods and processing
smooth mixtures.
In the OFF position, the appliance stops operating.
For additional food processing information, refer to chart on pages 12-15.
Scraping the container
1. Turn unit OFF.
2. Use a rubber spatula to push foods away from the sides of the container.
3. Put cover on container.
4. To blend again, turn unit to LOW or HIGH.
5. Follow blending steps.
Separating container from motor base
Never take container frombase during LOW or HIGH operation.
1. Unplug unit.
2. Lift container straight up.
3. If it does not lift out easily, rock gently then lift. Do not twist.
Removing foods
Never store foods in your blender container.
1. Take cover off.
2. Pour liquids/light batters from top
of container.
3. Take thick mixtures out from the
bottom of the container.
Removing container bottom
If you cannot unscrew the container bottom,
put container back on the base, as shown.
1. Turn container to right using handle.
2. Only loosen part way.
3. Carefully lift container from base.
(Bottom will be loose.)
A short power supply cord has been provided to reduce the hazards resulting
from becoming entangled in or tripping over a longer cord. An extension cord
may be used if care is exercised in its use. If an extension cord is used, the
marked electrical rating of the cord should be at least as great as the electrical rating of the appliance and the extension cord should be arranged so
that it will not drape over the countertop or
where it can be pulled
on by children or pets or tripped over accidentally.
TECHNIQUES.
Use this guide to he/p you learn the processing techniques of your new
Contemporary Classics Osterizer blender:
S P E E D ACTION
LOW
ON/OFF
Process 1 time
PROCEDURE
Turn to LOW for a 2-second count.
Process 2 times
Repeat as above waiting until agitator blades
stop before processing again.
LOW
CONTINUOUS RUN
Leave in LOW position until desired consistency
is achieved.
HIGH
ON/OFF
Process 1 time
HIGH
Turn to HIGH for a 2-second count and return
switch to OFF.
Process 2 times
Repeat as above.
CONTINUOUS RUN
Turn to HIGH until food reaches desired
smoothness and return switch to OFF.
Water chop(ON/OFF action)
Cover 2-4 cups (500mL-1L) fruits or vegetables, cut in l-inch (2.5cm) pieces, with
cold water. Cover. Process at LOW until food reaches desired texture. If needed,
drain water from food using a strainer.
Dry Chop (ON/OFF action)
Place up to 1 cup (250mL) of food, cut in l-inch (2.5cm) pieces, into container.
Cover and process at LOW until pieces are desired size.
Crumb (ON/OFF or CONTINUOUS RUN action)
Tear a slice of bread into 8 pieces. Put in container. Cover and process at LOW or
HIGH depending on desired texture.
Create cookie crumbs using the same process. Simply break cookies into container.
Cover and process. (See page 12 for more information.)
Grind (CONTINUOUS RUNaction)
Place up to 1 cup (250mL) of grain nuts, spices or coffee beans in glass blender
container. Cover. Process at HIGH until food reaches the “grind” you desire.
Grate (CONTINUOUS RUN action) .
Cover container. Turn to HIGH. With blender running, remove feeder cap. Drop up
to 1 cup (250mL) of l-inch (2.5cm) cubes of hard cheese, boneless cooked meat
or coconut meat into container. Turn unit OFF. Check and repeat if needed.
Liquefy (CONTINUOUS RUN action)
Place l-inch (2.5cm) pieces of fruit or vegetables in container with up to 1 cup
(250mL) water.Cover. Turn to HIGH until you can no longer see pieces of food.
If you want chilled juice, remove feeder cap and add 3-4 ice cubes one at a time.
Process at HIGH until cubes are dissolved. You may strain the fibers from the juice
if you wish. To do so, use a fine strainer.
Reconstitute (CONTINUOUS RUN action! ,
Put water for frozen juice concentrate or condensed soup into container. Add frozen
concentrate or soup. Cover. Process at LOW just until well mixed. The same technique may be used with dry milk.
TIPS:
Here are some helpful tips from the Oster experts, developed especially for you.,
Liquids
Put liquids called for in recipes into the container first, unless the recipe
says otherwise.
Ice Cubes
Add ice cubes only when you have at least 1 cup (25OmL) of liquid in the
container. Add one at a time through feeder cap while motor is running.
Always use highest speed.
Removing cover
Don’t remove the cover while blending. Food may spatter ‘if you do. instead,
open the feeder cap to add foods.
Hot foods
Open the feeder cap when you’re working
with hot foods to vent steam. Tilt feeder
cap away from you. Keep hands and other
exposed skin away from the cover opening ,
to prevent possible burns.
When you work with hot liquids, remove
feeder cap and start blending at low speed.
Then move to faster speed. Do not add liquid
over the 4-CUP (1L) level.
.
,
Motor labors
increase speed if motor labors while blending. This prevents motor wear.
Overblending
Don’t overblend. The blender works in seconds, not minutes. Stop and check food
before blending again.
Gravy or saucelumps
Pour gravy or sauce into a measuring cup. Then put l/2 cup (125mL) back into
the blender container. Cover, Turn unit to HIGH and remove feeder cap. Gradually,
add the rest of the gravy or sauce. Blend until smooth.
Giblet gravy
Cook the giblets in water or broth. Cool to room temperature. Cut giblets in l-inch
(2.5cm) pieces. Put in blender container. Cover with cooled cooking liquid. Cover
container. Process 2 times at LOW. (If giblet pieces are still too large, process 1 or
2 additional times.)
Makingbutter
Pour 1 cup (250mL) sweet or sour heavy cream into blender container. Cover and
process at HIGH until butter forms.Tum unit OFF. Pour through a sieve to drain.
Put butter into small bowl. Press with a spatula to take out rest of liquid. Add salt
as you knead the butter. If you want herb butter, add 1 tablespoon (15mL) dried
herbs (parsley, tarragon, savory or a garlic clove) per cup (250mL) of cream.
FOODS FOR PROCESSING
FDDD
Apples
Apple juice
FINISHED
QUANTITY
RAW,
QUANTITY
2 cups (500mL)
3 cups (750mL)
l-inch (2.5cm) pieces
3/4cup (200mL)
1
l-inch (2.5cm) oieces
(25OrnL)
1 medium plus
cups (375mL) 1 cup. (250mL)
liquid”
Bread
-coarse
cup (125mL)
1 slice
-regular
cup (125mL)
1 slice
-fine
cup (125mL)
1 slice
Cabbages
-red andwhite
Carrots
Celery
;
SPECIAL
INSTRUCTIONS
peeled; cored,
cut in eighths
tom in eighths
torn in eighths
I
torn in eighths
3 cups (750mL)
l-inch (2.5cm) pieces’
2 cups (500mL)
2 cups (500mL)
l-inch (2.5cm) pieces
1 cup (250ml)
1 cup (250m
cups (375mL)
cup (2OOmL)
l-inch (2..5cm) pieces
1 cup (250mL)
Cheese
-Cheddar
1 cup (250mL)
1 c u p (25OmL) l-inch (2.5cm) pieces
-SWISS
1 cup (25OmL)
1 cup (250mL)
l-inch (2.5cm) pieces
1 cup (250mL)
l-inch (2.5cm) pieces
-hard/
Cranberries (fresh)
1 CUP (250mL)
cup (200mL)
1 cup (250mL)
coconut
1 cup (25OmL)
1 cup (25OmL)
Coffee beans
1 cup (250mL)
1 cup (250mL)
Cookies
-chocolate wafers I
-vanilla wafers
-coconut (small)
cup (125mL)
I
10
l-inch (2.5m) pieces
I
break into pieces
cup (125mL)
16
break into pieces
cup (125mL)
8
break into pieces
1 cup (250mL)
Note: Since foods vary in size, consistency, and age, you may need to ado or subtract a
processing time from the number stated in this chart to obtain the results you desire.
SPEED
LOW
LOW
HIGH
LOW
HIGH
LOW
LOW
LOW
LOW
HIGH
LOW
HIGH
LOW
HIGH
LOW
LOW
LOW
HIGH
LOW
LOW
FOODS FOR PROCESSING
RAW
QUANTITY
FlNlSHED
QUANTITY
FOOD
cup (125mL)
process with 1/2 cup
(125mL) flour
2 cups (500ML)
process with 3 cups
(750mL) water
2
l-inch (2.5cm) pieces
3 cups (750mL)
l-inch (2.5cm) pieces
1 cup (250ML)
1-inch (2.5cm) pieces
I 1 cup (250mL)
I l-inch (2.5m) pieces
scant cup
(125ml)
Dried fruit
2 cups (500mL)
-hard-cooked
I
Green peppers
3/4 cup (200ML)
I
cups (375mL)
cup (150mL)
Meal, boneless,
cooked
I 1 cup (250ml)
Nuts
-almonds
1 cup (250mL)
-peanuts
1 cup (250mL)
1 cup (250mL)
I
1 cup (250mL)
1 cup (250rnL)
Oats (meal)
cups
Onions
1 cup (250mL)
(325mL) 1 cup (250mL)
cups (375mL) 3 cups (750mL)
or
lemon pad
cup (50mL)
peel of 1 lemon:
or orange
cup (125mL)
Peppercorns
cup (125mL)
cup (125mL)
Poppyseed
Potatoes
cups (300mL)
2 cups (500ML)
Rice, raw
Whole spices
-Ginger root
s
I
1 cup (250mL)
1 cup (250mL)
-walnuts
SPEClAL
INSTRUCTIONS
I
1 cup (250mL)
flour
I
cup (50mL)
I
1 T. (15mL)
Wheatberries
cups (300ml.)
Zwieback
cup (125mL)
l-inch (2.5cm) pieces
freeie in thin
strips first
1 cup (250mL)
Turn OFF and scrape
3 cups (750mL)
l-inch (2.5cm) pieces
1 cup (250nlL)
2-3 pieces
3
,
1 cup (250mL)
, 6
I
I ‘l-inch (2.5cm) pieces
break with nutcracker
break into container
Note: Since foods vary in size, consistency, and age, you may need to add or subtract a
processing tune from the number stated in this chart to obtain the results you desire.
WARRANTY
3-year limited warranty
Our Contemporary Classics blender is warranted for three years from date
of purchase to be free of mechanical and electrical defects in material
and workmanship. The manufacturer’s obligation hereunder is limited to
repairing such products during the warranty period,, provided the product
is sent prepaid to a Sunbeam-Oster Household Products Authorized
Independent Service Center.
This warranty does not cover (a) normal wear of parts, (b) blender
containers, (c) glassware breakage, or (d) damage resulting from any of
the following: negligent use or misuse of the product, use on improper
voltage or current, use contrary to operating instructions, or disassembly,
repair or alteration by any person other than an Authorized Service Center.
Return of the Owner Registration Card is not required for warranty
coverage. This warranty gives you specific legal riihts, and you may
also have other rights which vary from state to state.
SUNBEAM-OSTER HOUSEHOLD PRODUCTS
117 Central Industrial Row
Purvis,MS 39475
ACCESSORIES
These accessories and replacement parts can be purchased at retail outlets or at
Sunbeam-Oster Authorized Independent Service Centers. Only use the accessory
model numbers listed below for this unit.
Food Processor Accessory
Replace your food processor
accessory or add another for
busy days.
5900-06
“Blend ‘N Store”
Perma-GlasContainers
30-ounce (950mL) cold- and break-.
resistant Perma-Glas” (plastic)
container. Blend and then store
reconstituted frozen orange juice,
salad dressings or pancake batters.
927-91
StainlessSteel Blender
Container with Cover
5-cup (1.25L) rust- and stain-resistant
container. Seamless. Marked for
measuring. Molded fingertips.
927-09
5-CUP (1.251) Perma-Glas
Blender Container
Made of cold- and break-resistant
plastic.
9 2 7 - 2 5
5-cup (1.25L)
Glass Blender Container
927-35
Ice Crusher Accessory
Crush ice instantly for the buffet or
bar. Continuous feed operation.
5940-08
Mini-Blend Jars
Blend and store small portions with
1 cup (250mL) Perma-Glas’” jars
made of cold- and break-resistant
plastic. Set of 2 with covers.
927-13
Sealing Ring (2 Each)
939-58
Agitator Blade Unit
with Sealing Ring
939-59
Container Bottom
939-60