1
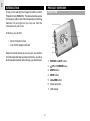
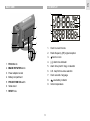
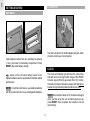
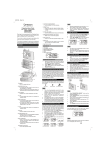
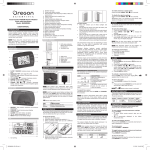
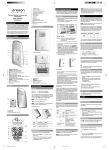
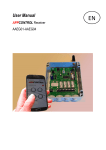
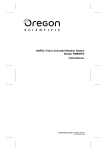
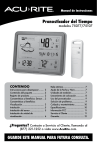
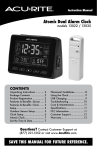
The Projector Function ........................................... 6
Adjusting the Projector ...................................... 7
Choosing Your Time Zone ..................................... 7
Atomic Projection Clock
(RM622PA)
Indoor Temperature ................................................ 7
USER MANUAL
Safety and Care ....................................................... 7
Resetting the Unit ................................................... 7
Warnings .................................................................. 8
Troubleshooting ...................................................... 8
CONTENTS
Specifications .......................................................... 8
Introduction ............................................................. 2
Main Unit Dimensions ....................................... 8
Product Overview ................................................... 2
Temperature ..................................................... 8
Front View ......................................................... 2
Clock ................................................................. 9
Back View ......................................................... 3
Power ................................................................ 9
LCD Display ...................................................... 3
About Oregon Scientific ......................................... 9
Getting Started ........................................................ 4
FCC Statement ...................................................... 10
Batteries ............................................................ 4
AC Adaptor ....................................................... 4
Clock ........................................................................ 4
Activating / Deactivating the RF Signal ............. 5
Setting the Clock Manually .................................... 5
The Alarm Function ................................................ 6
Displaying the Alarm Time ................................ 6
Setting / Activating the Alarm Time ................... 6
1
EN
The Snooze Function .............................................. 6
EN
INTRODUCTION
PRODUCT OVERVIEW
Thank you for selecting the Oregon ScientificTM Atomic
Projection Clock (RM622PA). This device bundles precise
time keeping, alarm, and indoor temperature monitoring
features into a single tool you can use from the
convenience of your home.
FRONT VIEW
In this box, you will find:
• Atomic Projection Clock
• 3.0V AC/DC adaptor with jack
Keep this manual handy as you use your new product.
It contains practical step-by-step instructions, as well as
technical specifications and warnings you should know.
1. SNOOZE / LIGHT button
2.
UP and
DOWN keys
3. MODE button
4. ZONE button
5.
ALARM button
6. Swivel projection
7. LCD display
2
EN
BACK VIEW
LCD DISPLAY
1
6
7
2
8
4
3
4
1
9
5
5
2
3
6
7
1.
Clock hour and minute
2.
Radio frequency (RF) signal reception
3.
1. FOCUS knob
2. IMAGE ROTATION knob
3. Power adaptor socket
4. Battery compartment
((.)) Alarm time indicator
5.
Alarm time (month / day) or calendar
6.
U.S. map for time-zone selection
7.
Clock seconds / language
8.
5. PROJECTION ON switch
9.
6. Table stand
7. RESET hole
3
Alarm on icon
4.
Low battery indicator
Indoor temperature
EN
AC ADAPTOR
GETTING STARTED
BATTERIES
The main unit has a 3.0V AC/DC adaptor with jack, which
provides continuous clock projection.
Insert batteries before first use, matching the polarity
(+ and -) as shown in the battery compartment. Press
RESET after each battery change.
CLOCK
The clock automatically synchronizes the current time
and date when it is brought within range of the WWVB60 radio signal (60 kHz) generated from Fort Collins,
Colorado. For more information, please visit: http://www.
boulder.nist.gov/timefreq/stations/radioclocks.htm.
shows on the LCD when battery power is low.
Replace batteries as soon as possible to maintain optimal
performance.
NOTE For optimal performance, use alkaline batteries
with this product and do not use rechargeable batteries.
NOTE Initial reception takes 2-10 minutes and begins
when you first set up the unit, and also whenever you
press RESET. Once complete, the reception icon will
stop blinking.
4
To activate the RF signal, press and hold for 2
seconds.
2. To deactivate the RF clock reception, press and hold
ZONE for 2 seconds.
1.
NOTE The RF signal icon
2.
3.
appears on the LCD when
4.
it is activated and disappears when it is deactivated. If
the clock cannot recive any signal reception, appears
5.
instead of . See section on "Troubleshooting" for more
information.
SETTING THE CLOCK MANUALLY
NOTE When adjusting the date on the second line of the
LCD, the corresponding day-of-the-week shown on the
LCD’s top line will change automatically.
The 12-hour clock automatically sets itself to the U.S.
Atomic Clock - it never needs adjusting for Daylight
Saving Time. The top line of the clock display shows
hours, minutes and seconds / day-of-the-week. To toggle
between seconds and day-of-the-week display, press
MODE. The second line shows calendar (month and
date) / alarm time and indoor temperature.
NOTE The time is shown only in 12 hr AM/PM format. 24
hr format is not available in this unit.
NOTE During anytime you are in the middle of adjusting
a clock setting manually and is left idle for 1 minute, the
clock automatically saves the current setting chosen.
To adjust the clock settings manually without automatic
RF synchronization, remember to deactivate the radio
reception first.
Each of clock settings can be adjusted in the following
order: hour, minute, year, month, date, and language (E,
S, F).
Press and hold MODE for 2 seconds. The first
clock setting, the hour setting, begins flashing.
Press or to adjust the hour values. To choose
the values more quickly, press and hold or
continuously.
To confirm and save the desired hour value, press
MODE. The next clock setting, the minute setting,
automatically begins flashing.
Repeat steps 2 and 3 to adjust the clock minute
values and the other clock settings accordingly.
After adjusting the hour and minute, you may decide
to skip adjusting the minute, year and month, and go
directly to adjust the date settings. To skip any
setting, press MODE to navigate through the items
until you reach the desired setting.
5
EN
1.
ACTIVATING / DEACTIVATING THE RF SIGNAL
EN
When the Snooze function is enabled, the Snooze
period will last 8 minutes before the alarm sounds again.
will flash coninuously on the LCD.
THE ALARM FUNCTION
DISPLAYING THE ALARM TIME
By default, the second line of the unit's LCD screen
displays current month and date. To display the alarm
time instead, press once. To show the month and date
again, press MODE.
NOTE Pressing SNOOZE / LIGHT turns on the green
LED backlight that lasts for 5 seconds before automatically
turning off. The backlight does not turn on when any of
the other buttons are pressed.
SETTING / ACTIVATING THE ALARM TIME
1. Press and hold
flash.
NOTE The Snooze function will disable if the button is
pressed. The alarm time will remain activated and will
ring the following day at the same time unless you press
again to turn off the alarm.
for 2 seconds. The alarm hour will
2. Use or to set the hour. To choose the setting
more quickly, press and hold or continuously.
3. Press to confirm and save the desired hour setting.
The minutes will automatically flash.
THE PROJECTOR FUNCTION
4. Repeat steps 2 and 3 to set the minutes setting. The
alarm time has now been set and is automatically
activated. The alarm bell icon appears to the left of
the alarm time.
5. To deactivate the alarm, press the
longer displays .
The projector displays the time via a bright red projection
light onto a wall, ceiling, or just about any surface for
easy and convenient viewing in a darkened room. The
time projected is shown as a single line (HH:MM) in
12-hour AM/PM format.
. The LCD no
1.
NOTE The alarm will automatically stop ringing after 2
minute. But after 8 minutes, the alarm will sound once
more unless is pressed.
2.
THE SNOOZE FUNCTION
While the alarm is ringing, press the SNOOZE / LIGHT
to stop the alarm sound and activate the Snooze function.
3.
6
To activate the projection light, press SNOOZE /
LIGHT. The projector will project the time for 5
seconds before automatically turning off.
To activate continuous projection, slide the
PROJECTION ON / OFF switch to ON. Note that
this function will not work unless the AC/DC adaptor
is used.
To deactivate continuous projection, slide the
PROJECTION ON switch to OFF.
setting. The time will automatically adjust accordingly.
INDOOR TEMPERATURE
The Atomic Projection Clock monitors and displays
indoor temperature. The indoor temperature is shown in
Fahrenheit (°F) only. The unit is capable of measuring
temperatures within the +23°F to +122°F (-5°C to
+50°C) range.
ADJUSTING THE PROJECTOR
The RM622PA allows you to adjust the projector so that
you are able to view the projection image with more
clarity and convenience.
•
•
•
The projector head can vertically swivel 180º so that
you may view the time from different positions.
The IMAGE ROTATION knob allows you to orient
the projected image (continuously from 0º to 330º
clockwise / counterclockwise) so that you can read
the time more conveniently.
If the projected image is out of focus, use the imagefocusing knob to adjust accordingly until the
projection is in focus.
RESETTING THE UNIT
The RESET hole is located in the main unit battery
compartment. Press RESET when you change the
batteries and whenever performance is not behaving as
expected (for example, unable to establish radio
frequency link). The clock will reset to its original default
values.
CHOOSING YOUR TIME ZONE
SAFETY AND CARE
The top right of the RM622PA’s LCD screen shows a
U.S. map with 4 time zones: P (Pacific), M (Mountain), C
(Central) or E (Eastern). Choosing your specific time
zone makes it convenient to take the projection clock
with you and use anywhere during your travels in the
country.
Clean the product with a slightly damp cloth and alcoholfree, mild detergent. Avoid dropping the product or
placing it in a high-traffic location.
To choose your time zone, simply press ZONE repeatedly
to toggle between the 4 zones and stop at the desired
7
EN
NOTE If the unit is being run on batteries, the
PROJECTION ON / OFF switch does not need to be on.
If you press SNOOZE / LIGHT, the projection light will
turn on anyway.
EN
TROUBLESHOOTING
WARNINGS
This product is designed to give you years of service if
handled properly. Oregon Scientific will not be responsible
for any deviations in the usage of the device from those
specified in the user instructions or any unapproved
alterations or repairs of the product. Observe the following
guidelines:
•
•
•
•
•
•
•
PROBLEM SYMPTOM
Never immerse the product in water. This can cause
electrical shock and damage the product.
Do not subject the main unit to extreme force, shock,
or fluctuations in temperature or humidity.
Do not tamper with the internal components.
Do not mix new and old batteries or batteries of
different types.
Do not use rechargeable batteries with this product.
Remove the batteries if storing this product for a long
period of time.
Do not scratch the LCD display.
REMEDY
Calendar
Illegible month / Change language
date
Clock
Cannot adjust
clock
Disable atomic clock
Cannot autosynchronize
date and time
1. Adjust batteries
2. Press RESET
3. Manually activate
clock feature
Temp
Shows "LLL" or Temperature is out-of"HHH"
range
SPECIFICATIONS
MAIN UNIT DIMENSIONS
Length x Width x Height:
5.27 x 2.04 x 3.23 in
(134 x 52 x 82 mm)
NOTE The technical specifications of this product and
contents of this user manual are subject to change
without notice. Images not drawn to scale.
Weight:
TEMPERATURE
Unit:
Indoor Range:
8
5.71 oz (162 g)
without battery
°F
+23°F to +122°F
(-5°C to +50°C)
Resolution:
CLOCK
RF Clock:
Auto or manual (disabled)
Clock display:
HH:MM:SS
Hour format:
12hr AM/PM
Calendar:
MM/DD; weekday in
3 languages
(English, Spanish, French)
Alarm:
POWER
Main unit batteries:
Visit our website (www.oregonscientific.com) to learn
more about Oregon Scientific products such as digital
cameras; MP3 players; children's electronic learning
products and games; projection clocks; health and fitness
gear; weather stations; and digital and conference
phones. The website also includes contact information
for our customer care department in case you need to
reach us, as well as frequently asked questions and
customer downloads.
We hope you will find all the information you need on our
website, however if you'd like to contact the Oregon
Scientific Customer Care department directly, please
visit www2.oregonscientific.com/service/support OR call
949-608-2848 in the US. For international enquiries,
please visit www2.oregonscientific.com/about/
international/default.asp.
Single alarm with
2-minute crescendo
2 x AA (UM-3) 1.5V
9
EN
ABOUT OREGON SCIENTIFIC
0.2°F (0.1°C)
EN
•
•
FCC STATEMENT
This device complies with Part 15 of the FCC Rules.
Operation is subject to the following two conditions: (1)
This device may not cause harmful interference, and (2)
This device must accept any interference received,
including interference that may cause undesired
operation.
•
•
WARNING Changes or modifications to this unit not
expressly approved by the party responsible for
compliance could void the user's authority to operate the
equipment.
NOTE This equipment has been tested and found to
comply with the limits for a Class B digital device,
pursuant to Part 15 of the FCC Rules. These limits are
designed to provide reasonable protection against
harmful interference in a residential installation.
This equipment generates, uses and can radiate radio
frequency energy and, if not installed and used in
accordance with the instructions, may cause harmful
interference to radio communications.
However, there is no guarantee that interference will not
occur in a particular installation. If this equipment does
cause harmful interference to radio or television reception,
which can be determined by turning the equipment off
and on, the user is encouraged to try to correct the
interference by one or more of the following measures:
10
Reorient or relocate the receiving antenna.
Increase the separation between the equipment
and receiver.
Connect the equipment into an outlet on a circuit
different from that to which the receiver is connected.
Consult the dealer or an experienced radio / TV
technician for help.
EN
© 2004 Oregon Scientific. All rights reserved.
P/N: 086-003592-018
11
EN
Atomic Projection Clock
Model: RM622PA
User Manual
12