1
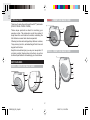
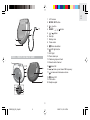
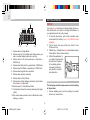
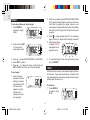
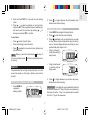
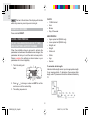
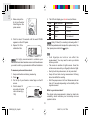
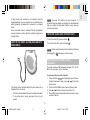
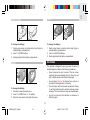
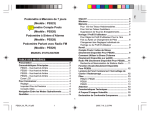
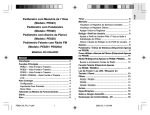
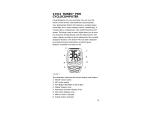
(Model: PE823)
Pedometer With Pulse Meter
(Model: PE826)
Pedometer With Panic Alarm
(Model: PE828)
Talking Pedometer With FM Radio
(Model: PE829)
USER MANUAL
CONTENTS
Introduction ...............................................................
Key Features .............................................................
PE823 – Front and Back View .................................
PE826 – Front and Back View .................................
PE828 – Front and Back View .................................
PE829 – Front and Back View .................................
LCD ............................................................................
Getting Started ..........................................................
Set Up ......................................................................
Important for Accuracy .............................................
Useful Tips ...............................................................
Switching Between Operation Modes .....................
2
2
2
2
2
3
4
4
4
4
5
5
1
PE82X_M_EN_V2.p65
1
2005.7.19, 12:16 PM
EN
Daily ........................................................................... 5
Target ......................................................................... 6
Timer .......................................................................... 6
Memory ...................................................................... 7
View Total Weekly Records ..................................... 7
View Daily Records .................................................. 7
Clear All Records ..................................................... 8
Clock / User Profile ................................................... 8
To Set the User Profile for 1st Time Use or After
a Battery Change ..................................................... 8
Change Individual Clock or User Profile Settings .... 9
Alarm .......................................................................... 9
Pulse Meter / Stress Index (Available in PE826 Only) . 9
How to Use Panic Alarm (Available in PE828 Only) ... 11
FM Radio (Available in PE829 Only) ....................... 11
Scanning and Storing Radio Channels ................... 11
Talk Function (Available in PE829 Only) ............... 12
Backlight / LED Light / Keypad Lock / Reset ....... 12
Batteries .................................................................. 12
PE823 / PE826 ...................................................... 13
PE828 .................................................................... 13
PE829 .................................................................... 13
Warnings .................................................................. 13
Specifications ......................................................... 14
About Oregon Scientific ......................................... 15
EC-Declaration of Conformity ............................... 15
Pedometer With 7-Day Memory
EN
PE826 – FRONT AND BACK VIEW
INTRODUCTION
TM
Thank you for selecting an Oregon Scientific
(PE823 / PE826 / PE828 / PE829).
pedometer
These unique products are ideal for monitoring your
exercise routine. The pedometer counts the number of
steps taken from one location to another, calculating the
total distance covered and calories expended.
Other key functions include target step / distance / calories,
7-day memory function, estimated target finish time and
keypad lock function.
Keep this manual handy as you use your new product. It
contains practical step-by-step instructions as well as
technical specifications and warnings you should know.
PE828 – FRONT AND BACK VIEW
KEY FEATURES
PE823 – FRONT AND BACK VIEW
2
PE82X_M_EN_V2.p65
2
2005.7.19, 12:16 PM
EN
1. LCD screen
2. MODE / SET button
/ button
3.
4. RESET / /
/
button
/
button
5.
6. Belt clip
7. Battery door
8. Pulse meter
9.
Pulse rate button
10.
LED light button
11. LED light
12. Panic alarm pin
13. Fastening clip and chord
14. Selects radio channel
PE829 – FRONT AND BACK VIEW
15.
16.
Radio ON
/
Scan up and down FM frequency
17.
Increase and decrease volume
18. Radio OFF
19. Talk button
20. Earphone jack
3
PE82X_M_EN_V2.p65
3
2005.7.19, 12:16 PM
EN
LCD
GETTING STARTED
SET UP
You must set up the device (as shown below) when you
first activate the unit, reset it or change the batteries, or
your pedometer will not work properly.
1. To activate the device, pull out the insulation tape
underneath the battery cover. (For PE828, insert
batteries.)
2. Set the clock and user profile (see Clock / User
Profile section).
3. PE826 only – Calibrate the stress index baseline (see
Pulse Meter / Stress Index section).
4. Attach the pedometer to
your belt or training attire
at waist level. Secure it
at horizontal position.
Improper positioning
may result in incorrect
data collection.
1. Shows when in Target Mode
2. Shows when in Timer Mode and flashes when you
are in another display and timer is running
3. Shows when Auto Announcement is activated –
PE829 only
4. Shows when talk function is operational – PE829 only
5. Shows when FM Radio is operational – PE829 only
6. Shows when keypad lock is enabled
7. Shows when alarm is activated
8. Shows when in Timer Mode
9. Shows value of step, distance and calorie, clock / alarm
time, timer and user profile
10. Shows when in 7-day Memory Mode
11. Colored bar shows the memory weekday and target
status
12. Dot matrix shows various icons to indicate the mode /
display you are in
IMPORTANT FOR ACCURACY
The following conditions may cause incorrect reading
of steps taken:
1. Uneven walking pace, such as walking in crowded
areas or on uneven floor.
4
PE82X_M_EN_V2.p65
4
2005.7.19, 12:17 PM
EN
2. Frequent up and down movements, such as standing
up and/or sitting down; running, jumping, or ascending/
descending stairs or steep slopes.
DAILY
To view the step, distance and calorie display:
1. Press MODE to
navigate to Daily
Mode.
USEFUL TIPS
When changing settings you can:
•
•
Press and hold /
to speed through the setting
options.
Press SET to bypass or confirm a setting and move
on to the next one.
2. Press
to switch between the 3 displays;
STEP
During setting mode, if a key is not pressed within
30 seconds, there will be a beep sound and the screen
will return back to the previous mode.
SWITCHING BETWEEN OPERATION MODES
DISTANCE
Press MODE to switch between the 6 operation
modes:
• Daily
• Target
• Timer
• 7-day Memory
• User Profile
• Clock
The modes are described in the sections that follow.
CALORIE
5
PE82X_M_EN_V2.p65
5
2005.7.19, 12:17 PM
EN
1. Press MODE to
navigate to Target
Mode.
2. While you are walking, the ESTIMATED FINISH TIME
(EFT) will periodically appear to advise you how long
it will take to complete your target, based on your
current pace. The target bar at the bottom of the display
will move from left to right (start to finish) to show your
progress.
2. Press and hold SET
for 2 seconds to
enter setting mode.
3. Press
to toggle between the EFT and remaining
steps, distance or calories left until target is reached.
4. When target walk is
complete, FINISH
will appear and a
beep will sound.
TARGET
To set step, distance or calorie target:
3. Press / to select STEP, DISTANCE or CALORIES.
4. Press SET to confirm.
to change the value of each digit, and
5. Press /
SET to confirm and move on to the next setting.
5. To reset the target for the next user session, press
and hold RESET.
TIMER
When the timer is running, it will measure steps, distance
and calories. These measurements are not linked to the
daily measurements and are only related to the time spent
walking while the timer is on.
To use target:
1. Once the target
has been set, start
walking to activate
the pedometer. The
GO! screen will
appear to confirm
that the unit is
starting to monitor
your progress.
To set timer:
1. Press MODE to
navigate to Timer
Mode.
6
PE82X_M_EN_V2.p65
6
2005.7.19, 12:17 PM
EN
2. Press and hold SET for 2 seconds to enter setting
mode.
/
to select countdown or count-up timer
3. Press
and press SET. If the countdown timer is selected you
will need to set the hr:min:sec by pressing /
to
change a value and SET to confirm.
to toggle between the total weekly step,
2. Press
distance and calorie display.
VIEW DAILY RECORDS
1. Press MODE to navigate to Memory Mode.
2. Press
to enter the daily record display.
3. Press
repeatedly until you reach the day you wish
to view. When you have selected the day you wish to
view a 1-second display will show to advise you if you
reached that days target or not:
• Target achieved =
smiley face and high
beep sound.
To use timer:
•
•
Press to start / stop the timer.
Press and hold to reset the timer.
•
Press
repeatedly to view timer step, distance and
calories values.
When you are in the timer display
you are in another mode,
is running.
will show. If
will flash to indicate the timer
•
MEMORY
The pedometer has a 7-day memory function. You can
view total weekly or daily step, distance and calorie
records.
Target not achieved
= sad face and low
beep sound.
to toggle between your chosen days step,
4. Press
distance and calorie display.
VIEW TOTAL WEEKLY RECORDS
1. Press MODE to
navigate to
Memory Mode.
IMPORTANT At midnight all accumulated daily data will
be stored for a period of 7 days. Therefore, once a memory
has been stored for 7 days it is replaced with new data
from the 1st day of the new week.
7
PE82X_M_EN_V2.p65
7
2005.7.19, 12:17 PM
EN
CLOCK
• 12/24hr format
• Hour
• Minute
• Day of the week
The bar at the bottom of the display will indicate
which day’s memory record you are looking at.
CLEAR ALL RECORDS
Press and hold RESET.
USER PROFILE
• Upper pulse limit (PE826 only)
• Lower pulse limit (PE826 only)
• Weight unit
• Weight
• Stride unit
• Stride
• Age
• Gender
CLOCK / USER PROFILE
TO SET THE USER PROFILE FOR 1ST TIME
USE OR AFTER A BATTERY CHANGE
When the installation tape is removed to activate the
pedometer and whenever the batteries are changed, the
pedometer will ask you to set the clock and user profile.
Please complete the settings as shown below or your
pedometer will not work properly.
1. The first setting will
flash.
To calculate stride length:
Individual stride length varies. Input an appropriate length
for an average stride. To determine the average stride
length, walk 10 paces and divide the distance traveled by
10.
2. Press /
to change a value and SET to confirm
and move on to the next setting.
3. The setting sequence is:
8
PE82X_M_EN_V2.p65
8
2005.7.19, 12:17 PM
If after the initial setting of the clock / user profile (as
detailed in previous section), you wish to change the clock
time or edit one of the user profile settings, simply:
PULSE METER / STRESS INDEX (AVAILABLE
IN PE826 ONLY)
1. Press MODE to navigate to Clock or User Profile
Mode.
to scroll to the setting
2. Profile Mode only; use /
you wish to change.
3. Press and hold SET to enter setting mode.
4. Press / to change a value and SET to confirm.
For first-time use, or after replacing a battery or
resetting the unit, user must calibrate stress index
baseline, otherwise no valid reading can be obtained.
ALARM
The index is highly individual, so you need to calibrate
your personal baseline before you use this function to
monitor your stress status.
When in the Clock Mode, press
Clock and Alarm Mode.
To calibrate your stress index baseline:
to toggle between the
Make sure you relax for 2 to 3 minutes before you start
the calibration:
To set the alarm:
1. Press
1. Press MODE to navigate to Clock Mode.
to enter Pulse Mode.
2. Press to enter
calibration setting.
2. Press to switch
to Alarm Mode.
3. Press and hold SET to start calibration.
3. Press and hold SET to enter the setting mode.
to change a value and SET to confirm
4. Press /
and move on to the next setting.
9
PE82X_M_EN_V2.p65
9
2005.7.19, 12:17 PM
EN
5. The setting sequence is:
• Hour
• Minute
• On / Off
To stop the alarm sound, press any key
CHANGE INDIVIDUAL CLOCK OR USER
PROFILE SETTINGS
EN
4. Relax and put the
tip of your thumb or
index finger on the
pulse sensor.
5. The LCD will display your stress level as follows:
ICON
5. Wait for about 10 seconds until the word FINISH
appears on the LCD panel.
6. Repeat 3-5 if the
calibration fails.
BAR COLOR
MEANING
Green
Relaxed
Yellow
Normal
Red
Not relaxed
Retry if failed (if no reading is showing within 1
minute the pedometer will escape from pulse mode). You
again.
then press pulse rate button
TIPS
•
It’s highly recommended to calibrate your
individual stress index baseline once a month or whenever
you want to refer to your parameter in different situations.
•
To measure pulse and stress level:
•
•
1. Keep calm before and during measuring.
2. Press .
3. Put the tip of your thumb or index finger on the IR
sensor.
4. Wait for about 10
seconds until pulse
rate is shown (e.g.
100).
•
Cold fingertips and cold air can affect the
measurement. You may need to warm your hands
before you start.
The sensor is sensitive to light sources. Cover the
entire sensor area with your fingertip to block all light.
Gently touch the pulse sensor; do not press hard.
Keep still and calm during measurement. Moving
about can affect the reading.
Wait the proper amount of time: Measurements can
take 6-12 seconds depending on the stability of the
signals received.
What is your stress index?
The stress index measurement is based on heart rate
variability, which indicates your involuntary nervous
system’s status.
10
PE82X_M_EN_V2.p65
10
2005.7.19, 12:17 PM
EN
A large heart rate variation is an indication that the
parasympathetic nervous system has a predominance,
which generally corresponds to someone in a relaxed
state.
One new 12V battery can last for approx. 15
minutes if the panic alarm is activated. It is recommended
that you quickly test the alarm function every time you
use the pedometer.
As for a smaller value, it indicates that the sympathetic
nervous system is active, which is related to physical or
mental stress.
FM RADIO (AVAILABLE IN PE829 ONLY)
To turn the radio ON, press and hold
HOW TO USE PANIC ALARM (AVAILABLE IN
PE828 ONLY)
To turn the radio OFF, press and hold
.
.
When using the radio, make sure the earphones
are plugged in (
will appear on the screen).
SCANNING AND STORING RADIO
CHANNELS
The radio receives FM frequency between 87.5 to 108
MHz. You can store up to 5 channels.
To scan and store a radio channel:
1. Press and hold
/
to activate auto-scan. When a
channel has been found, press
/
to fine-tune
the channel.
2. Press and hold CH to enter channel-storing mode.
/
to select a channel number (1-5).
3. Use
4. Press CH to store. Repeat the whole process to store
another channel.
The alarm will be activated when the panic alarm pin is
detached from its socket.
•
•
Pull the chord and detach the pin to activate the alarm.
To stop the alarm, simply reconnect the pin to its
socket.
11
PE82X_M_EN_V2.p65
11
2005.7.19, 12:17 PM
EN
To change the volume level, press
.
•
Pacer ON / OFF. If ON is selected you will need to set
the pacer frequency which ranges from 45 to 180
beeps per minute. This function helps you maintain
the pace of your walk / run, as each beep represents
one step.
• Languages available – English, French and Spanish
OR English, Italian and German.
The radio function will be paused when the auto-talk
broadcast is happening or when you press TALK.
To listen to a stored channel, press CH.
Prolonged use of the FM Radio will significantly
reduce battery life.
TALK FUNCTION (AVAILABLE IN PE829
ONLY)
The talk function is available for DAILY / TARGET / TIMER
/ MEMORY and CLOCK modes. It will broadcast
information related to the current LCD screen, for example
on Daily Mode you will hear: “Today, you have walked
XXXXX steps, XX.XX kilometers/miles and burned
XXXX.X calories.
BACKLIGHT / LED LIGHT / KEYPAD LOCK /
RESET
To turn the backlight ON for 3 seconds, press
To turn the LED light ON, press . When you release the
button the light will turn OFF (PE828 only).
Broadcasts can be announced automatically at predefined intervals (as detailed in the setting sequence
below), or manually by pressing TALK.
To turn the keypad lock ON / OFF, press and hold
appears when the talk function is broadcasting.
.
To reset the unit, remove and then re-insert the batteries.
To set up the talk function:
BATTERIES
1. Press and hold TALK to enter setting mode.
2. Press /
to change a setting and press TALK to
confirm and move on to the next one.
3. The setting sequence is:
• Auto-talk ON / OFF. If ON is selected you will need to
set the broadcast interval time to 5, 10 or 15 mins.
appears on the screen when this function is activated.
appears when the battery is low and needs replacing.
Protect the environment by taking exhausted
batteries to authorized disposal stations.
12
PE82X_M_EN_V2.p65
.
12
2005.7.19, 12:17 PM
EN
PE823 / PE826
PE829
To change the battery:
To change the battery:
1. Gently press down on button with a blunt stylus to
release battery compartment.
2. Insert 1 x CR2032 battery.
3. Gently push back the battery compartment.
1. Gently press down on button with a blunt stylus to
release battery compartment.
2. Insert 2 x CR2032 batteries.
3. Gently push back the battery compartment.
PE828
WARNINGS
This product is designed to give you years of service if
handled properly. Observe the following guidelines:
•
•
•
To change the battery:
1. Unscrew to open the back cover.
2. Insert 1 x CR2032 and 1 x 12V battery.
3. Place the cover back and tighten the screw.
•
Never immerse the unit in water. This can cause
electrical shock and damage the unit. Clean the unit
with a slightly damp cloth and mild detergent.
Do not subject the unit to extreme force, shock, or
fluctuations in temperature or humidity.
Do not tamper with the internal components. Doing
so will terminate the unit’s warranty and may cause
damage. The unit contains no user-serviceable parts.
Do not mix new and old batteries or batteries of
different types.
13
PE82X_M_EN_V2.p65
13
2005.7.19, 12:17 PM
EN
•
•
Do not use rechargeable batteries with this product.
Remove the batteries if storing this product for a long
period of time.
• Do not scratch the LCD display.
The contents of this user manual and technical
specifications are subject to change without further notice.
Images not drawn to scale.
Dimensions – without clip (W x H x D) and weight
SPECIFICATIONS
TYPE
PE823
2.1 x 1.9 x 1.0 inches
(52 x 47 x 25 mm)
33 g (1.16 ounces)
PE826
2.4 x 2.2 x 1.0 inches
(60.3 x 54.9 x 24 mm)
38 g (1.34 ounces)
PE828
2.3 x 2.5 x 1.0 inches
(58.7 x 62.4 x 25 mm)
61 g (2.15 ounces)
PE829
2.4 x 2.1 x 1.0 inches
(61.4 x 53.5 x 26 mm)
60 g (2.12 ounces)
Batteries
PE823
1 x CR2032 3V
PE826
1 x CR2032 3V
PE828
1 x CR2032 3V
1 x 12V
PE829
2 x CR2032 3V
DESCRIPTION
Step counter
0 to 99,999 steps
Target step range
100 to 99,900 steps
Timer range
0 to 99hrs:59mins:59secs
Distance traveled
0 to 999.99miles (0 to 999.99km)
Stride distance
11 to 60 inches (28 to 152 cm)
Calorie display
0.1 to 9999.9 kcal
Body weight range 64lbs to 340lbs (29 to 154kg)
Pulse range
30 – 240 bpm
Operating temp.
14 to 104.0°F (-10 to 40°C)
Storage temp.
-4 to 140°F (-20 to 60°C)
14
PE82X_M_EN_V2.p65
14
2005.7.19, 12:17 PM
EN
ABOUT OREGON SCIENTIFIC
EC-DECLARATION OF CONFORMITY
Visit our website (www.oregonscientific.com) to learn more
about Oregon Scientific products such as digital cameras;
MP3 players; children’s electronic learning products and
games; projection clocks; health and fitness gear; weather
stations; and digital and conference phones. The website
also includes contact information for our Customer Care
department in case you need to reach us, as well as
frequently asked questions and customer downloads.
Hereby, Oregon Scientific, declares that this pedometer
model PE823 / PE826 / PE828 / PE829 is in compliance
with the essential requirements and other relevant
provisions of EMC directive 89 / 336 / CE and LVD directive
73 / 23 / EC.
A copy of the signed and dated Declaration of Conformity
is available on request via our Oregon Scientific Customer
Service
We hope you will find all the information you need on our
website, however if you’re in the US and would like to
contact the Oregon Scientific Customer Care department
directly, please visit:
COUNTRIES RTTE APPROVAL COMPLIED
www2.oregonscientific.com/service/support
All EC countries, Switzerland CH
OR
and Norway
Call 1-800-853-8883.
For international inquiries, please visit:
www2.oregonscientific.com/about/international
15
PE82X_M_EN_V2.p65
15
2005.7.19, 12:17 PM
N