1
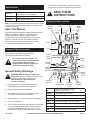
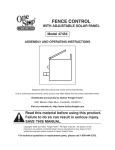
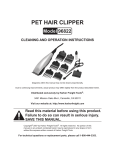
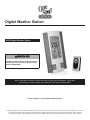
Digital Weather Station
68354 Digital Weather Station
Read this material before using this product.
Failure to do so can result in serious injury.
SAVE THIS MANUAL.
When unpacking, make sure that the product is intact and undamaged. If any parts
are missing or broken, please call 1-800-444-3353 as soon as possible.
Visit our website at: http://www.harborfreight.com
Copyright© 2011 by Harbor Freight Tools®. All rights reserved. No portion of this manual or any artwork contained herein may be reproduced in any shape
or form without the express written consent of Harbor Freight Tools. Diagrams within this manual may not be drawn proportionally. Due to continuing
improvements, actual product may differ slightly from the product described herein. Tools required for assembly and service may not be included.
and caution are factors which cannot be built into
this product, but must be supplied by the operator.
Specifications
Batteries
4 “AAA” (Not included)
2 for Station / 2 for Transmitter
Channels
3 Receiving Channels
Mounting
Wall and Stand Mounting
Note: This equipment has been tested and found to comply
with the limits for a Class B digital device, pursuant to part
15 of the FCC Rules.
Save This Manual
Keep this manual for the safety warnings and precautions,
assembly, operating, inspection, maintenance and
cleaning procedures. Write the product’s serial
number in the back of the manual near the assembly
diagram (or month and year of purchase if product
has no number). Keep this manual and the receipt
in a safe and dry place for future reference.
Important Safety Information
In this manual, on the labeling, and all other
information provided with this product:
This is the safety alert symbol. It is
used to alert you to potential personal
injury hazards. Obey all safety
messages that follow this symbol to
avoid possible injury or death.
General Safety Warnings
WARNING Read all safety warnings and
instructions. Failure to follow the warnings and
instructions may result in serious injury.
Save all warnings and instructions
for future reference.
SAVE THESE
INSTRUCTIONS.
Display and Key Functions
Power
Indicator
Date
Day
Moon
Phase
Snooze
Alarm
Time
Indoor
Temp
Trend
Indoor
Temp
Current
Weather
Indoor
Humidity
Indoor
Comfort
Indicator
Channel
Indicator
1. Position batteries in proper polarity and do not
install batteries of different types or polarity.
Outdoor
Temp
Trend
Outdoor
Temperature
Outdoor
Reception
Icon
Outdoor
Humidity
2. Properly dispose of all used batteries.
UP
Press for 3 seconds to change
Year and Day of Week
3. This product is not a toy. Keep Weather Station
and Transmitter out of reach of children.
DOWN
Adjust data in any set mode
MODE
Press for 3 seconds to enter setting mode
4. Inspect before use; do not use if parts are damaged.
MAX/MIN
Switch between temp and humidity
5. Use as intended only.
ALM
Enter alarm setting / Turn on/off alarm
6. The warnings, precautions, and instructions discussed
in this instruction manual cannot cover all possible
conditions and situations that may occur. It must
be understood by the operator that common sense
ALERT
Set temp alert / Turn on/off temp alert
CH
Switch between Transmitter channels
SNZ
Activate snooze function on alarm
SKU 68354
For technical questions, please call 1-800-444-3353.
Page 2
Transmitter will have the temperature displayed
with the number 1 against it and so on).
Setup Instructions
Read the ENTIRE IMPORTANT SAFETY
INFORMATION section at the beginning
of this manual including all text
under subheadings therein before
set up or use of this product.
Installing Batteries
1. NOTE: Install the Weather Station’s batteries first.
2. Open the Weather station’s battery compartment cover.
3. Install two “AAA” batteries, making sure to follow
polarity marked on the inside of the compartment.
4. Close battery compartment cover.
5. NOTE: Once batteries are in place, the LCD will
light up briefly and a short beep will sound. Then the
indoor temperature and humidity will automatically
display. If the indoor temperature is not displayed
after a few seconds, remove the batteries and wait
for at least 10 seconds before reinserting them.
6. Within three minutes of activating the Weather
Station, insert the Transmitter’s batteries.
7. Open the Transmitter’s battery compartment cover.
8. Install two “AAA” batteries, making sure to follow
polarity marked on the inside of the compartment.
9. Close battery compartment cover.
10. NOTE: When battery power is low, the
battery icon will appear on the Weather
Station/Transmitter’s LCD display.
Testing Weather Station/
Transmitter Connection
1. After inserting batteries into Transmitter, the
Weather Station will start receiving readings from
the Transmitter. The outdoor temperature should be
displayed. If this does not happen within 15 minutes,
the batteries will need to be removed from both
units and reset, following the above instructions.
2. NOTE: The Weather Station can take up to 3
remote transmitters. Follow the above steps for
each extra Transmitter, making sure to leave
10 seconds in between the reception of the last
Transmitter and the set-up of the next Transmitter.
The Weather Station will number the
Transmitters in the order of set-up (the first
SKU 68354
3. When all Transmitters are set up, a testing
period will follow, during which the display
switches between all received Transmitters at
random. Press any key to stop this process.
4. The display will show the temperature for the first
Transmitter. The process also stops automatically
if no keys are pressed for a few minutes.
5. Once the remote temperature has been received
and displayed on the Weather Station, the time code
reception is automatically started. This will take about
7 minutes in good weather conditions.
NOTE: This 7-minute time period is an excellent
opportunity to install the Transmitter(s) in
suitable location(s) outdoors. To ensure
sufficient 433 MHz transmission, do not install
Transmitter(s) more than 100 meters from where
the Weather Station will be positioned.
6. If after 10 minutes the time code has not been
received, use the MODE key to manually enter a time
initially. The clock will automatically attempt each
hour to receive the time. When this is successful,
the received time will override the manually set time.
The date is also updated with the received time.
7. If the Weather Station cannot receive the time code
signal (perhaps because of weather disturbances
or transmitting distance), the time can be manually
set. The clock will then work as a normal clock.
Channel Settings
1. Once the batteries are inserted (and BEFORE
replacing Transmitter battery cover), use the
Channel Key on the back of the Transmitter
to select the channel. (If there is more than 1
Transmitter, please choose a different channel.
2. Once all settings have been made, close
the Transmitter battery compartment cover
and use the mounting hole to mount the
Transmitter on an outdoor wall or window.
3. NOTE: The max. open distance between the
Weather Station and the Transmitter is 328 ft. (100
meters). Do not install the Transmitter at a distance
greater than 328 ft. Otherwise, the Weather Station
will not a receive a proper transmitter signal.
4. Keep out of direct rain and direct sun to prevent
inaccurate readings. Air conditioning or indoor heat
can effect the signal, leading to incorrect readings.
For technical questions, please call 1-800-444-3353.
Page 3
entering the outdoor temp alarm setting, the max.
outdoor temp and the “up” arrow will flash.
Operating Instructions
Read the ENTIRE IMPORTANT SAFETY
INFORMATION section at the beginning
of this manual including all text
under subheadings therein before
set up or use of this product.
Time, Date and Language Setting
1. After turning on Weather Station, press and hold
the MODE key for three seconds. The Station will
beep and the setting to be changed will flash.
2. Press UP/DOWN key to adjust the year
setting. Press MODE to confirm setting.
3. The order of setting is year / month / day / language
/ hour / minute / then exit. NOTE: The seven
options for languages are German, English,
Italian, French, Dutch, Spanish and Danish.
4. Once the date is set, the Week will automatically be set.
5. Press and hold the UP key for three seconds to
change the Year and Day of Week display.
6. If you are in the process of setting but do
not operate the device for 8 seconds, the
display will return to normal mode.
Alarm Setting
1. Press the ALM key for three seconds. A
beep will be heard. Then press UP/DOWN
to adjust the alarm’s time setting.
2. Press ALM again to confirm the setting. The alarm bell
icon will appear/disappear when the alarm turns on/off.
Snooze
1. While the alarm is on, press the SNZ key to activate
snooze function. The snooze function will last for
five minutes and can be repeated for five times.
2. Press ALM to deactivate the snooze function.
Outdoor Temp Alarm Settings
1. Press ALERT once. The temperature
alert will turn on (or off) and the direction
arrows will appear (or disappear).
3. Use the UP/DOWN keys to set the max. temperature
alert. When finished, press ALERT to confirm setting.
4. Follow the same steps to set the
minimum temperature alert setting.
5. Press ALERT again to exit.
6. NOTE: If you do not press ALERT or another
key for 8 seconds while in this mode, the system
will exit back to the standard time mode.
7. If you wish to readjust the max or min. temperature
alert, press the UP or DOWN key. The setting
will begin to flash, allowing for readjustment.
8. Note the following:
a. The indoor temperature range is
-14 to 158° F (-10° to 70° C).
b. The outdoor temperature range is
-40 to 158° F (-40° to 70° C).
c. For the temperature alert setting, the
lowest alarm temperature should be
1 less from the highest temperature.
d. The humidity detecting range is 20%~95%.
However, if the temperature goes below -40° F,
the display will show LL%. Should the humidity
go below 20%, the display will show LL%. If the
humidity is higher than 95%, it will show HH%.
e. When the temperature alarm beeps in
the current channel, the temperature and
alarm signs will flash. When set in another
channel, only the alarm symbol will flash.
f. When the outdoor temperature alarm
beeps, the temperature and alarm
symbols will flash simultaneously.
g. Once the alert sounds, press any key to stop
the alert. The press ALERT to turn off the alert.
The alert symbol will disappear from display.
h. If the temperature alert and alarm go off
at the same time, turn off the alarm first.
Then deactivate the temperature alert.
i. The temperature alert will beep every second
and last for five seconds. Then it will stop for
about a minute (55 seconds). It sound again
until pressing any key or until the temperature
goes up. Once the temperature goes up,
the beeping will stop automatically.
2. Press ALERT again for two seconds. The max.
indoor temp and the “up” arrow will flash. Press
CH to select the channel you need to set. When
SKU 68354
For technical questions, please call 1-800-444-3353.
Page 4
Thermometer and Hygrometer
Transmitter Setup
1. Once the device is turned on, the display will
show the current temperature and humidity.
1. NOTE: The outdoor, waterproof Transmitter
checks the current temperature and humidity
and every 60 seconds sends the information
to the main Weather Station receiver.
2. Press DOWN to change the temperature unit.
3. The device will check the temperature every
hour and compare it to the previous hour.
The results are shown in the temp trend box.
There is one for indoors and one for outdoors.
a. If the temperature has increased,
an arrow that curves up will show.
b. If there is no change in temperature,
a straight arrow will show.
c. If the temperature has decreased,
an arrow that curves down will show.
4. If the device does not receive a signal from
the outdoor transmitter within a hour’s time,
the display will show “--.-”. Once it receives
a signal, it will renew the outdoor display.
2. NOTE: The Transmitter’s working temperature
is between -4° F to 158° F (20° C to 70° C).
If the Transmitter’s temperature becomes
either lower or higher than these ranges,
the Transmitter will stop working.
3. NOTE: The Transmitter’s humidity range is
between 20% to 95%. If the humidity is lower
than 20%, the display will continue to show
“20%”. If the humidity is higher than 95%, it will
continue to show “95%” in the LCD display.
4. See below for the Transmitter’s display icons:
Transmit
Signal
Current
Temperature
Channel
Selection
5. The indoor humidity are summarized by the
Comfort Indicator.
a. If the humidity is lower than 40% (too dry),
then a “comfortable” icon (non-smiling
face) will appear on the display.
b. If the humidity is more than 70% (too humid),
then an “uncomfortable” icon (frowning face)
will appear on the display.
c. If the temperature is between 20-28° C and the
humidity is between 40% to 70%, then it will
show a “very comfortable icon” (smiling face).
d. If the temperature is outside 20-28° C
and the humidity is between 40% to
70%, nothing will be shown.
6. The weather forecasts have four display icons:
Sunny (sun display), Slightly Cloudy (sun/
cloud display), Cloudy (clouds only display)
and Rainy (clouds with rain display).
Battery Power
Indicator
Current
Humidity
5. To mount the Transmitter, attach the Transmitter’s
holder to a wall or place it on a table.
6. NOTE: Do not mount Transmitter where it will come
into contact with a piece of metal or a highly polished
surface. Doing so can decrease the transmitting range.
7. Use the double-sided tape (not included) to
mount the holder to a smooth surface that
does not allow for screw mounting.
8. The holder can also be mounted to the wall using
screws. NOTE: Verify mounting location is free of any
hidden wires. Once this is done, follow these steps:
a. Use a pen to mark the location of the
mounting holes on the wall.
b. Drill mounting holes in the points marked on the wall.
c. Screw Transmitter holder into wall and
then slide Transmitter into holder.
SKU 68354
For technical questions, please call 1-800-444-3353.
Page 5
Maintenance and Servicing
Procedures not specifically explained
in this manual must be performed
only by a qualified technician.
Cleaning, Maintenance,
and Lubrication
Checking Reception
1. BEFORE EACH USE, inspect the general condition
of the tool. Check for loose hardware, misalignment
or binding of moving parts, cracked or broken
parts, damaged electrical wiring, and any other
condition that may affect its safe operation.
1. If the temperature data is not sent three minutes
after setup, please check the following:
2. AFTER USE, wipe external surfaces with clean cloth.
Do not immerse in water.
a. The Weather Station and Transmitter are at
least 1.5 to 2 yards away from any sources of
interference, such as computer monitors or TV sets.
3. Do not use cleaning agents to clean the plastic parts of
the tool. Use only a mild detergent or a damp cloth.
b. The Transmitter has not been placed on
or close to a metal window frame.
c. Electrical products such as headphones or
speakers should not be operating on the same
signal (433 MHz) as the Weather Station. And.
2. Make sure that your neighbors are not using any
electrical devices operating on a similar frequency.
SKU 68354
For technical questions, please call 1-800-444-3353.
Page 6
3491 Mission Oaks Blvd. • PO Box 6009 • Camarillo, CA 93011 • (800) 444-3353
SKU 68354
For technical questions, please call 1-800-444-3353.
Page 7