1
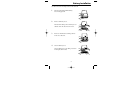
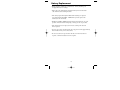
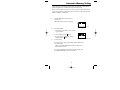
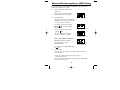
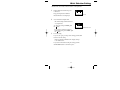
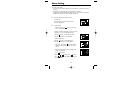
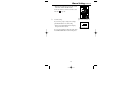
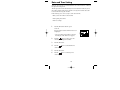
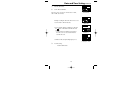
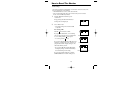
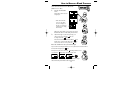
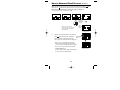
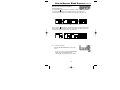
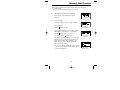
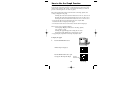
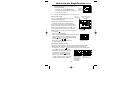
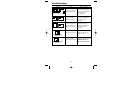
Instruction Manual
Wrist Blood Pressure Monitor
with Advanced Positioning
Sensor (APS)
Model HEM-637
Thank you for purchasing the
Omron Wrist Blood Pressure Monitor with APS.
Contents
Introduction ……………………………………………………………………… 3
Know Your Unit ……………………………………………………………… 4, 5
Suggestions Before Measuring Blood Pressure ………………………………… 6
Initial Set-Up
Battery Installation / Replacement ……………………………………… 7, 8
Automatic Memory Setting ………………………………………………… 9
Advanced Positioning Sensor (APS) Setting ……………………………… 10
Wrist Selection Setting …………………………………………………… 11
Alarm Setting ………………………………………………………… 12, 13
Date and Time Setting ………………………………………………… 14, 15
How to Reset this Monitor ………………………………………………… 16
Correct Usage
How to Apply the Wrist Cuff
…………………………………………… 17
How to Wrap the Wrist Cuff ……………………………………………… 18
How to Measure Blood Pressure ……………………………………… 19-21
How to Use the Memory Function ………………………………………… 22
Memory Reset Function …………………………………………………… 23
How to Use the Graph Function ……………………………………… 24, 25
Troubleshooting
……………………………………………………………… 26
Care and Maintenance ………………………………………………………… 27
Caution ………………………………………………………………………… 28
Specifications…………………………………………………………………… 29
Warranty ……………………………………………………………………… 30
Notes …………………………………………………………………………… 31
2
Introduction
Thank you for purchasing the Omron HEM-637 Wrist Blood Pressure Monitor
with Advanced Positioning Sensor (APS). This remarkable instrument is ideal
for people who frequently monitor their own blood pressure because it’s so
compact and easy to use. There is no tricky arm cuff, just a small, pre-formed
wrist cuff that is easy to apply. With the push of a button the Omron Wrist
Monitor measures your blood pressure and pulse and displays the reading
on a clear digital panel. Perfect for quick, easy readings at home, at work,
and while traveling.
The Omron Wrist Monitor uses the oscillometric method of blood pressure
measurement. This means the monitor detects your blood’s movement through
the artery in your wrist and converts the movements into a digital reading.
An oscillometric monitor does not need a stethoscope so the monitor is simple
to use and measurements are easy to obtain.
Clinical research has proven a direct relationship between blood pressure
in the wrist and blood pressure in the arm. Changes in wrist blood pressure
reflect changes in arm blood pressure because the arteries in the wrist
and the arm connect. Frequently measuring the blood pressure in your
wrist will provide you and your doctor with an accurate indication
of changes in your true blood pressure.
Please read this instruction manual thoroughly before
operating the Omron Wrist Blood Pressure Monitor with
Advanced Positioning Sensor (APS) to assure proper use.
For specific information on your own blood pressure,
CONTACT YOUR PHYSICIAN.
3
Know Your Unit
Main unit
Wrist Cuff
Wrap the wrist cuff
over your wrist snugly.
Battery Cover
Insert the batteries.
Two AAA Alkaline
batteries (LR03)
Carrying Case
IntelliSense™ Technology Is An Assurance of Accuracy
Blood pressure changes throughout the day. IntelliSense technology was developed
by Omron which enables your blood pressure monitor to inflate and deflate at the
optimum level for each individual. This helps ensure accurate measurement,
and is particularly useful for people with certain arrythmia or heart disorders.
Advanced Positioning Sensor (APS) Ensures a Reliable Measurement
Correct cuff positioning is critical when monitoring blood pressure. The Omron
Wrist (APS) Blood Pressure Monitor has a unique positioning sensor that
confirms the cuff is level with the user’s heart. This helps ensure that each
reading is accurate and reliable.
4
Know Your Unit
Diastolic Blood
Pressure Display
Systolic Blood
Pressure Display
Date/Time
Display
MEMORY button
Push this button to see
the measured values
stored in the monitor.
Mark
GRAPH button
Push this button to see
the graph.
Displayed when the
stored measurement
values are called out.
Pulse Display
button
Push to move the displayed
item forward. Push to move
the displayed item backward.
In the Selection Screen, push SET button
Push this button
either button for selection.
to set various items
on the monitor such
as time setting.
5
START/STOP button
Push this button to measure
blood pressure. You can also
push this button to stop
measurement or turn off the
power. Push this button in
the Setting Screen to lock
the setting.
Suggestions Before Measuring
Blood Pressure
1.
2.
Avoid eating, smoking and exercising for at least
30 minutes before taking measurement. Also rest
for at least 10 to 15 minutes before taking a reading.
Stress raises blood pressure. Avoid taking
measurements during stressful times.
3.
The cuff can be applied to your left
or right wrist.
4.
Measurements should be taken in a quiet place
and you should be in a relaxed, seated position.
5.
Remain still and do not talk during
the measurements.
6.
Keep a record of you blood pressure and pulse for you doctor.
Remember, a single measurement does not provide an accurate indication
of your true blood pressure. You need to take and record several readings
over a period of time. Try to measure your blood pressure at the same
time each day for consistency.
7.
Wait 2-3 minutes between measurements. Waiting allows the engorged blood
vessels to return to normal. You may require more rest time between readings
depending on your individual physiological characteristics.
6
Battery Installation
Use this monitor after inserting batteries in the main unit.
1.
Place the main unit with the Battery
Cover facing upward.
2.
Remove the Battery Cover.
Push down the indent portion of Battery Cover
and slide it into the direction of the arrow.
3.
Insert two AAA Batteries with the polarities
in the correct direction.
4.
Close the Battery Cover.
Close the Battery Cover by sliding it as shown
in the Figure until it clicks.
7
Battery Replacement
• High performance alkaline dry cell batteries (2 “AAA”) should be good
for approximately 300 readings.
• Battery life varies with ambient temperature. Battery life is shorter under
cold conditions such as during the winter.
• If the battery replacement symbol blinks while measuring or if pressure
is not applied when the START / STOP button is pressed, replace both
batteries (use the same brand).
• Holding the START / STOP button down may shorten battery life. To avoid
pressure on the button when transporting or storing, use the case provided.
• If the batteries have been replaced or removed, resetting of the date and
time is required.
• If you are not going to use this monitor for a long period of time (approximately
three months or more), remove the batteries.
• Do not use batteries not specified for this unit, worn and new batteries
together, or different brands of batteries together.
8
Automatic Memory Setting
The monitor stores the measured values and the date and time of measurement,
which is helpful for the continuous blood pressure management.
However, if more than one person is expected to use this monitor, the measured
values of more than one person will be stored. In that case, setting the Automatic
Memory to OFF is recommended.
1.
Push the SET button while the power
is turned off.
Automatic Memory Screen is displayed.
Automatic Memory Screen
2.
Select ON or OFF.
• The monitor is set to ON (to store) at time
of your purchase.
To set it to OFF, push the button.
• If you want to set to ON after setting it
to OFF, push the button.
3.
Automatic Memory OFF Screen
Lock the setting.
If you are going to change other settings, push the SET button
to lock the setting.
• When you push the SET button, the display changes to the
Position Sensor Screen.
If you want to finish operation after locking the setting, push
the START/STOP button to turn off the power.
9
Advanced Positioning Sensor (APS) Setting
Set the (APS) function to ON or OFF and set SIGNAL of the position sensor
to ON (beeps) or OFF (does not beep).
1.
Push the SET button while the power
is turned off.
Keep pressing the SET button until the
Position Sensor Screen is displayed.
2.
Select ON or OFF.
Position Sensor Screen
• The Position Sensor is set to ON and the
SIGNAL is set to ON (to beep) at the time
of your purchase of the monitor.
For setting the Position Sensor to OFF
Push the button to set the Position
Sensor to OFF.
Position Sensor OFF Screen
• To set it to ON after setting it OFF,
push the button.
• There is no SIGNAL setting when
the Position Sensor is set to OFF.
Position Sensor ON
and SIGNAL ON Screen
How to set the SIGNAL to OFF when
the Position Sensor is set to ON
Push the SET button to make
SIGNAL ON flash.
3.
Position Sensor ON and
SIGNAL OFF Screen
To set the monitor to SIGNAL OFF, push
the button.
Lock the setting.
If you are also going to change other settings, push the SET button
to lock the setting.
• When you push the SET button, the display changes
to Measurement Screen.
If you want to finish after locking the setting, push the START/STOP
button to turn off the power.
10
Wrist Selection Setting
Measurement can be made on the left wrist or on the right wrist.
1.
Push the SET button while the power
is turned off.
Keep pressing the button until the
Measurement Screen is displayed.
2.
Measuring (Wrist) Screen
Select Left Wrist or Right Wrist.
• The initial setting is LEFT at the time
of your purchase.
To change the setting to RIGHT, push
the button.
• If you want to change the setting to
LEFT after having set to RIGHT, push
the button.
3.
Measuring (Wrist) Right Wrist Screen
Lock the setting.
If you are also going to change other settings, push the SET
button to lock the setting.
• When you push the SET button, the display changes
to an Alarm Screen.
If you want to finish after locking the setting, push the
START/STOP button to turn off the power.
11
Alarm Setting
You can set the alarm to go off twice a day at a specified time in the
morning and evening.
• You can stop the alarm by pushing any of the buttons of this blood pressure
monitor.
• Alarm will stop automatically after sounding for 2 minutes.
• Alarm will not sound when this monitor is in use, such as for measurement,
the Memory Call Screen, and the Graph Call Screen.
1.
Push the SET button while the power
is turned off.
Keep pressing the button until the Alarm
Screen is displayed.
2.
Alarm Screen
Set the Alarm.
• The initial setting is
(not to go off) at the
time of your purchase.
Example of Alarm setting (If you want to set the
alarm to go off at 6:30 A.M. and 8 P.M.)
Push the button to set the Hour to AM 6.
Push the SET button to lock the Hour.
• Minute will flash.
Push the button to set the Minute to 30.
Push the SET button to lock the Minute.
• Each time you push the button, the display
changes in the regressive order, such as 59
and 58.
• If you keep pressing the button, Minute will
change fast forward.
• The
mark flashes.
Push either or to change from
(not to go
off) to
(to go off), then push the SET button
to lock the setting.
12
Alarm Setting
Continued
• Once the first alarm time is locked, the second
alarm time of Hour and PM 8 flashes.
In the same manner, set the hour for the second
time and
(to go off).
3.
Screen of setting the alarm to
go off at 6:30 A.M. and 8 P.M.
Lock the setting.
If you are also going to change other settings,
push the SET button to lock the setting.
• When you push the SET button, the display
changes to the Time Screen.
If you want to finish by locking the setting, push
the START/STOP button to turn off the power.
13
Screen of indicating that
the alarm is sounding
Date and Time Setting
Setting the date and time is recommended before use of the monitor for continuous
blood pressure management
This blood pressure monitor automatically stores 90 measurement values. If you use
the monitor without setting the date and time correctly, the measured values will
be stored with the wrong date and time.
In the following cases, it is necessary to set the date and time:
• When you use the monitor for the first time
• After replacing the batteries
• After reset settings
1.
Push the SET button while the power
is turn off.
Keep pressing the button until the Time Screen
is displayed.
• The year in Gregorian calendar is shown in
flash display as the Time Screen appears.
2.
Push the
button to set the year to the
current year in Gregorian calendar.
3.
Push the SET button.
4.
Push the
button to set the Month to the
current month.
5.
Push the SET button.
6.
Push the
button to set the Day to the
current day.
14
Time Screen
Date and Time Setting
7.
Push the SET button.
8.
Set the Hour and Minute.
The hour can be set between 12 A.M. and 11 A.M.,
and 12 P.M. and 11 P.M..
Example of setting the time at the time tone for 8 A.M.
1. Set the hour to AM 8 in advance.
2. Set the minute display to flashing 59, and push
the button on the instant when the time tone
is heard.
• At the moment you push the arrow button,
the time is set to 00 seconds and matches
with the time tone.
3. Minute is indicated by flashing display of 00.
9.
Lock the setting.
• Push the SET button.
15
Continued
Flashing Screen
of Hour AM 12
Flashing Screen
of Hour AM 8
Flashing Screen
of Minute 59
Screen of 8 A.M.
on January 25, 2002
How to Reset This Monitor
Reset Settings
Any change made in the Setting Mode is cancelled to restore the state at the
time of your purchase of the monitor.
• After initialization, be sure to set the date and time.
• The stored measurement values are not deleted. If you want to delete
them, execute All Memory Erasure.
1.
Push the SET button while the power
is turned off.
Keep pressing the button until the Reset
Settings Screen is displayed.
2.
Select YES or NO.
• The initial setting of the monitor is NO
at any time.
Reset Settings Screen
For selecting YES
Push the button and select YES.
If you push the SET button, a screen asking
Are You Sure is displayed for reconfirmation.
To set to YES, push the button again.
Reset Settings YES Screen
• To cancel, push the button.
If you select YES and push the SET button, all
settings are resumed to the state at the time of
your purchase and the display changes to the
Automatic Memory Screen.
• If you select NO and push the SET button,
the display changes to Automatic Memory
Screen under the present setting.
If you want to finish setting here, push the
START/STOP button to turn off the power.
16
Are You Sure YES Screen
Automatic Memory ON Screen
How to Apply the Wrist Cuff
How to wrap the wrist cuff is one of the most important points for
correct measurement. Wrap the cuff snugly on your wrist.
• This monitor is preset to measure on your left hand when you
purchased it. If you desire to measure on your right hand, change
the mode to Right Hand measurement in setting.
• Wrap the wrist cuff over your skin.
• Please be careful not to catch the cuff of your shirt.
How to wrap the wrist cuff correctly (on left wrist)
1.
Place the wrist cuff over your left wrist with
your left thumb facing upward.
• Cover the wrist cuff by leaving clearance
of 1/2 inch (the clearance almost equal to the
width of an index finger) between the edge
of the wrist cuff and the bottom of the palm
as shown in the Figure to the right.
Check if the wrist cuff completely covers your
wrist as shown in the Figure to the right.
17
How to Wrap the Wrist Cuff
2.
Pull the wrist cuff upward holding the edge of the wrist
cuff so that it can be wrapped snugly.
1
• If the wrist cuff is not wrapped snugly, correct
measurement may not be possible.
2
Lightly press the velcro part with your finger so that
it is fastened tightly.
• If the velcro part is not tightly fastened, the wrist cuff will
become loose during measurement and the measurement may
be impossible.
• Those having a slender wrist (wrist circumference of less
than 5 3/4 inches) may feel the wrist cuff move if the velcro
is not wrapped snugly. In that case, do not wrap the wrist
cuff any tighter, it will not affect the measurement.
• Fold and fasten the extra portion of wrist cuff as shown
to the right. Even if the extra portion of wrist cuff
is not fastened, it will not affect the measurement.
You can also measure your blood pressure on your right wrist.
Wrap the wrist cuff as shown in the Figure to the right.
• Change the Measurement to Right Hand in the Setting Mode.
18
How to Measure Blood Pressure
(This measurement example describes the situation
where the Position Sensor is set to ON and the
SIGNAL is set to ON.)
1.
Push the START/STOP
button.
The Position Sensor Screen
is displayed.
• If the date and time
is not set, the Time
Screen is displayed.
Be sure to set the date
and time before using
this monitor
Time Screen
Hold your elbow firmly to avoid body movement.
Remain still and do not talk during measurement.
2.
Adjust the height of your wrist by using your
elbow as the axis so that the mark can
be aligned with the mark.
The wrist movement is indicated with the mark.
Slowly move your wrist up and down so that the
wrist comes to the level of your heart ( mark).
Please be careful not to raise your wrist too high.
If your wrist is raised higher than the level of your heart, the monitor will let
it know with the display of a mark.
Slowly lower your wrist so that the mark aligns with the level
of your heart ( mark) using your elbow as the axis.
When the wrist reaches the proper position, the monitor beeps
and automatically starts inflation and measurement.
19
How to Measure Blood Pressure
Continued
When the wrist reaches the level of your heart, the monitor beeps and the mark
changes to the mark instantly. Hold your wrist at that position and do not
make any movements until the measurement results are displayed.
• Be careful not to raise your wrist too high.
Mark Inflation Start Screen
Indicating
Inflation in
Progress
Pulse
Rate
Mark
When your wrist reaches the
proper position, the monitor beeps
and automatically starts inflation
and measurement.
3.
When the measurement finishes, the deflation
mark flashes and the wrist cuff deflates.
Inflation in
Progress Screen
Deflation
Mark
The measurement results (blood pressure
values, pulse rate, date and time) are displayed.
Deflation Start Screen
• If the velcro opens during measurement,
wrap the wrist cuff snugly again, fasten the
velcro securely, and start measurement again.
• If you want to stop measurement, push the
START/STOP button.
After the monitor stops inflation and deflates,
the power turns off automatically.
20
Measurement Results
Display Screen
How to Measure Blood Pressure
Continued
How to see the measurement results in
enlarged characters
If you push the button while the measurement results are displayed,
the results will be displayed in enlarged characters repeatedly in the
order of systolic blood pressure, diastolic blood pressure, and pulse rate.
If you push the button while the measurement results are displayed, the results
will be displayed in enlarged characters repeatedly in the order of pulse rate,
diastolic blood pressure, and systolic blood pressure.
4.
To stop measurement
Push the START/STOP button to turn off the
power.
• Even if you forget to push the START/STOP
button, the power will turn itself off
automatically in approximately two minutes.
21
How to Use The Memory Function
This monitor has a memory function to store up to 90 measurement results.
When you push the MEMORY button, the monitor displays the measured values
together with the date and time.
For the 91st measurement and onward, the measured values are deleted
from the oldest one.
To delete all the stored data, use the Setting Mode.
If the monitor is set to OFF in the Setting Mode, the monitor does not store
the measured values.
• The measured values are retained in memory even after the batteries are
removed for battery replacement.
1.
Push the MEMORY button.
The latest measured values that are stored in
memory are displayed with the mark.
2.
Check the memory.
Each time you push the button, the latest
measured values are displayed. If you push the
button, the screen moves backward
to the previous one.
• If you push the button while the latest
measured values are being displayed, the
oldest measured values are displayed.
• If you push the GRAPH button during the
memory display, you can see the measured
values of one week (including the called out
measured values) in graph display. If you
push the MEMORY button again,
the screen returns to the memory display.
3.
Date and
Time of
Measurement
Push the START/STOP button to turn off the power.
22
Memory Reset Function
Deletes all the measurement values stored in this monitor. Do not delete them
in a normal situation.
• Please note, deleted measured values cannot be restored.
1.
Push the SET button while the power is turned off.
Keep pressing the button until Delete Data Screen
is displayed.
2.
All Memory
Erasure Screen
Select YES or NO.
• The initial setting of the monitor is NO at any time.
For selecting YES
Push the
All Memory
Erasure YES Screen
button to set to YES.
If you push the SET button, a screen asking "ARE
YOU SURE?" is displayed for reconfirmation.
Push the button again to set to YES.
• To cancel, push the
button to NO.
If you select YES in Are You Sure Screen following
Delete Data Screen and push the SET button, the
display changes to Data Deleted (Blank) Screen.
All the data in memory is deleted, and then the
power will be turned off.
• If you select NO and push the SET button, the data
in memory are not deleted and the display changes
to Reset Settings Screen.
23
Are You Sure
YES Screen
Data Deleted
(Blank) Screen
How to Use the Graph Function
This monitor has a function to display the stored measurement results as a graph.
If you measure your blood pressure in a certain time frame for three times a day
in the morning, daytime, and evening, you will learn the trending of your blood
pressure values and pulse rate in a week at a glance.
One of the measurement results in each time frame of morning, daytime, and
evening is displayed in the graph.
Morning data: The last measurement made between 12 A.M. and 9:59 A.M.
Daytime data: The last measurement made between 10 A.M and 5:59 P.M.
Evening data: The last measurement made between 6 P.M. and 11:59 P.M.
• If you measure three times in the morning time zone, only the third
measurement values are displayed in the graph.
• If no measured value exists in a time frame, a blank column is displayed.
There are three types of graphical displays.
All data graph: Displays all the data for morning, daytime,
and evening in a week.
Morning data graph: Displays the morning data in a week.
Evening data graph: Displays the evening data in a week.
• No graph display is provided for showing only daytime data.
To display the graph
1.
Push the GRAPH CALL button.
All Data Graph is displayed.
All Data Graph
Push the GRAPH CALL button again
to display the Morning Data Graph.
24
Morning
Data Mark
Morning
Data Graph
How to Use the Graph Function
Continued
Push the GRAPH button again to display the
Evening Data Graph.
• Each time you push the GRAPH button,
All, Morning, and Evening data are displayed
in that order repeatedly.
2.
Night
Data
Mark
Night Data Graph
Push the START/STOP button to turn off the power.
How to see the graph
How to see the graph is explained by using the
example of All Data Graph.
Blood Pressure Values
Date of
(systolic/diastolic)
Measurement
(mmHg)
When you push the GRAPH button, the latest
measurement results appear in flashing display.
In the example shown to the right, measurement is
made at 10:40 p.m. on January 31. The graph shows
that the systolic blood pressure is 140 mmHg (top of
the vertical bar), the diastolic blood pressure is 95
mmHg (bottom of the vertical bar), and the pulse rate
is 90 a minute ( ).
• The data in flashing display:
When you push the MEMORY button during the graph
display, the details of data in flashing display appear
with the mark. You can also change the flashing
position by pushing or button.
When you push the GRAPH button again,
the graph display appears.
Month/Days
of a Week
Pulse
Rate
Detail Screen of Data
in Flashing Display
For the people with hypertension:
Display of the graph when the systolic blood pressure is higher than 170 mmHg
• If the systolic blood pressure values that are higher than 170 mmHg are
measured twice, a symbol (meaning that the systolic pressure is higher than
170 mmHg) is displayed on the graph.
• If the systolic blood pressure values that
are higher than 170 mmHg are stored
three times, the symbol disappears
and the screen automatically changes
Graph Display
Display screen
Screen of
to display the hypertension type graph
where the systolic
Hypertension Type
blood pressure
(capable of displaying 210 mmHg).
values higher than
170 mmHg are
measured twice
25
Troubleshooting
Error
Cause
You moved your wrist
during measurement.
After several seconds
You moved your arm
or body, or talked
during measurement.
Measure your blood
pressure again without
moving your arm
or body.
You moved your arm
or body extensively
during measurement.
Measure your blood
pressure again without
moving your arm
or body.
Batteries are worn out.
Replace both batteries
with new ones.
Trouble caused by
abnormality in function.
Please contact the nearest
OMRON Healthcare,
Inc. Customer Service.
After several seconds
After several seconds
How to correct
Measure your blood
pressure again without
moving your wrist until
the measurement
is completed.
Battery replacement
mark flashes.
Only E and numerals
are displayed.
26
Care and Maintenance
To keep your digital wrist blood pressure monitor in the best condition and protect
the unit from damage follow the directions listed below:
• Clean the monitor with a soft dry cloth. Do not use any abrasive or volatile cleaners.
• Do not attempt to clean the wrist cuff.
• Never immerse the monitor or any components in water.
• Store the monitor in a safe and dry location. Do not subject the monitor
to extreme hot or cold temperatures, humidity and direct sunlight.
• Avoid subjecting the monitor to strong shocks such as dropping on the floor.
• Remove the batteries if the unit will not be used for an extended period of time.
• Use the unit consistent with the instruction provided in this manual.
• Never inflate the unit over 299mmHg or attempt to disassemble the monitor.
• Use only authorized parts and accessories.
27
FCC Caution
Caution:
Changes or modifications not expressly approved by Omron Healthcare,
Inc. could void the user’s authority to operate this product.
Note:
POTENTIAL FOR RADIO/TELEVISION INTERFERENCE (for U.S.A. only)
This product has been tested and found to comply with the limits for a Class B digital
device, pursuant to part 15 of the FCC rules.
These limits are designed to provide reasonable protection against harmful interference
in a residential installation. The product generates, uses, and can radiate radio frequency
energy and, if not installed and used in accordance with the instructions, may cause harmful
interference to radio communications. However, there is no guarantee that interference will
not occur in a particular installation. If the product does cause harmful interference to radio
or television reception, which can be determined by turning the product on and off, the user
is encouraged to try to correct the interference by one or more of the following measure:
• Reorient or relocate the receiving antenna
• Increase the separation between the product and the receiver.
• Connect the product into an outlet on a circuit different from that to which the receiver.
• Consult the dealer or an experienced radio/TV technician for help.
POTENTIAL FOR RADIO/TELEVISION INTERFERENCE (for Canada only)
This digital apparatus does not exceed the Class B limits for radio emissions from digital
apparatus as set out in the interference-causing equipment standard entitled “Digital
Apparatus”, ICES-003 of the canadian Department of Communications.
Cet appareil numerique respecte les linites de bruits radioelectriques applicables aux
appareils numeriques de Classe B prescrites dans la norme sur le materiel brouileur:
“Appareils Numeriques.” NMB-003 edictee par le ministre des communications.
28
Specifications
Name:
OMRON Wrist Blood Pressure Monitor
with Advanced Positioning Sensor (APS)
Model:
HEM-637
Display:
Digital display
Measurement:
Oscillometric method
Measurement Range:
Pressure; 0 to 299 mmHg, Pulse rate; 40 to 180 /min.
Accuracy:
Pressure; within +/-3 mmHg, Pulse rate; within
+/-5% of reading
Inflation:
Automatic inflation with pump
Deflation:
Automatic rapid deflation
Pressure Detection:
Electrostatic capacity semi-conductor pressure sensor
Power Supply:
Two AAA batteries
Battery Life:
Approximately 300 times of measurement when using
alkaline batteries (In case of the monitor is used three
times a day inflating to 170 mmHg at the room
temperature of 72°F)
Operating Temperature
and Humidity :
+50° to +104°F, 30 to 85% RH
Storage Temperature
and Humidity :
-4° to +140°F, 10 to 95% RH
Measurable
Circumference of Wrist :
5 1/4'' to 8 1/2''
Weight of Main Unit :
Approximately 5 1/2 oz (not including batteries)
External Dimensions :
3'' (W) x 2 1/2'' (H) x 1 1/2'' (D) (not including
the wrist cuff)
Electric Shock Protection :
Internal power supply appliance type B
Accessories :
Two AAA alkaline batteries, Carrying case,
Illustrated Instruction Manual
Note: These specifications, to improve performance, are subject to change without notice.
29
Limited Five Year Warranty
Your Omron HEM-637 Wrist Blood Pressure Monitor with Advanced Positioning
Sensor (APS) is warranted to be free from manufacturing defects for a period
of five years under normal use. The five year warranty excludes the monitor
cuff. The cuff is warranted for a one year period. This warranty extends only
to the original retail purchaser.
Should repair be needed within the warranty period, ship the unit prepaid
to Omron Healthcare, Inc., 300 Lakeview Parkway, Vernon Hills, IL 60061,
Attn: Service Dept., together with $5.00 for return shipping and insurance.
Be sure to include the model number of your unit, your name and address
and your phone number on any correspondence.
We will either repair or replace (at our option) free of charge any parts
necessary to correct defects in the materials or workmanship.
The above warranty is complete and exclusive. The warrantor expressly
disclaims liability for incidental, special, or consequential damages of any nature.
(Some states do not allow the exclusion or limitation of incidental or consequential
damages, so the above warranty may not apply to you.)
Any implied warranties arising by the operation of law shall be limited in duration
to the term of this warranty. (Some states do not allow limitations on how long
an implied warranty lasts, so the above limitation may not apply to you.)
This warranty gives you specific legal rights and you may have other rights which
vary from state to state. As a condition to operation of your warranty, the enclosed
registration card must be completed and sent to us within 10 days from the
date of purchase.
FOR CUSTOMER SERVICE CALL TOLL FREE:
1-800-634-4350
30
Notes
31
Manufactured by OMRON
Distributed by:
OMRON HEALTHCARE, INC.
300 Lakeview Parkway
Vernon Hills, Illinois 60061
www.omronhealthcare.com
Copyright © 2003 OMRON HEALTHCARE, INC.
637INST Rev A