1
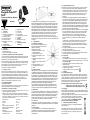
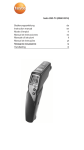
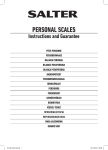
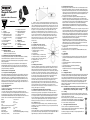
Omegaette Pocket PP™
OS-PP
Non-Contact Infrared Thermometer
INSTRUCTION
SHEET
M3846/0902
2.2. Making a measurement
2.3. Minimum and maximum
temperature indication
2.4. Changeover °C/°F
2.5. Back-light
2.6. Measurement inaccuracies
2.7. Fault finding
3.
Maintenance
3.1. Changing the batteries
3.2. Cleaning
4.
Fastening the Infra-Red
Thermometer
Contents
1.
General
1.1. Equipment supplied
1.2. Additional note for newly
purchased thermometer
1.3 Description of measuring
principle
1.4 Technical information
1.4.1 Technical data
1.4.2.Notes on technical data
2.
Operation
2.1. Display and operator controls
1.
General
1.1. Equipment supplied
• Infra-Red Thermometer base unit
• 4 button cells (already fitted in unit)
1.2. Additional note for newly purchased thermometer
The newly purchased thermometer comes with 4 x LR44 alkaline cells already
inserted inside the battery compartment. For the first time using the
thermometer, gently remove the insulated piece by slowly pulling it out from the
battery compartment.
Test the thermometer by pressing the operating button, the LCD display and
back light will light up briefly. If it is not the case, remove the cells. Wait for 30
seconds, and reinsert the cells again. Make sure the cells are at the positive (+)
pole up into the battery compartment.
Your thermometer is now operational!
1.3. Description of measuring principle
When making a temperature measurement, the surface radiation of the object to
be measured is evaluated using the principle of radiation thermometry. This is a
purely passive process, i.e. no radiation is transmitted, but instead, use is only
made of the natural electromagnetic radiation energy (heat radiation) that every
body above a temperature of absolute zero (-273°C) has. The temperature can
be determined very accurately from this radiation energy if the emission factor of
the object being measured is known.
1.4. Technical information
1.4.1.Technical data
The important technical data are summarized in the adjacent table.
1.4.2.Notes on technical data
1. Accuracy: The larger of the two values given is applicable in each case.
2. Distance to measuring spot size: The parameter D:S characterizes the size of
the measuring spot in proportion to the distance between the object to be
measured and the Infra-Red Thermometer. For example, with a ratio of 6:1 and a
distance of 60 cm, the monitoring area will have a diameter of 10 cm.
Range
Resolution
Accuracy
Unit
Distance to measuring spot size D:S
Ambient temperature range
Emission factor
Power supply
Baftery life approx.
Dimensions (L x W x H)
-20°C to 300°C
0.1°C
±2% or ±2°C
°C or °F
6:1
0°C to 40°C
0.95
4 x LR44 button cells
2000 measurements (depending on the usage)
56 x 23 x 102 mm
3.
Emission factor: The physical quantity known as the emission factor
describes to what extent the infrared heat radiation that is emitted from an
object is determined by Its own temperature. Accordingly, a value of 1 tells
us that the infrared heat radiation from the object is based only on its own
temperature. A value of less than 1 means that the radiation emitted from
the object is not only deter mined by its own temperature but also by
reflections from neighboring bodies or due to the transmission, i.e. the
diathermancy, of the object. The emission factor thus has an effect on the
result of the measurement. The Infra-Red Thermometer works with an
emission factor of 0.95, i.e. the measuring unit assumes that the object
being monitored has a factor of 0.95. If this is not the case, there will be
inaccuracies in the measurement (see Section 2.5 “Measuring
inaccuracies").
2.
Operation
2.1. Display and operator controls
All the functions of the measuring unit are
controlled and monitored using the
operating button 7 and the back-lit display.
1 Temperature display - currently
measured value
2 Hold indicator
3 Temperature display - minimum value
4 Temperature display - maximum value
5 Battery symbol - (low battery indicator)
6 Temperature units - °C or °F
7 Operating button
8 Lens
2.2. Making a measurement
The unit is switched on by pressing the operating button. The display will
show horizontal bars until the first measurement is available. The current
temperature will then be displayed in the upper main part of the display.
The button must be pressed for the duration of the measurement, where by
the display of the measured value will be continuously updated. The lens
must be focussed on the object while the measurement is being made. At
the same time, the object being measured must be larger than the area
monitored by the Infra-Red Thermometer (see 2.5. “Measuring
inaccuracies”). The measurement will be finished by releasing the button.
The “Hold” indication signals that measuring has stopped. The last
measurement will be shown in the upper main part of the display. The
display back light will go out 8 seconds after the button has been released.
The unit will switch itself off automatically 30 seconds after the last
measurement. It will be necessary to replace the batteries as soon as the
battery symbol appears in the display.
2.3. Minimum and maximum temperature indication
The minimum and maximum value memories are cleared at the start of a
measurement by pressing the operating button. The temperature will be
measured and the minimum and maximum temperatures will be determined
for as long as the button is pressed. The minimum temperature is shown in
the lower left hand part of the display and the maximum temperature can be
seen in the lower right hand part. These values each apply to the current
measuring cycle and are cleared as soon as the button is pressed again.
2.4. Changeover °C/°F
The units for the temperature display can be switched between degrees
Centigrade (°C) and degrees Fahrenheit (°F) by pressing the button briefly
twice (double click).
2.5. Back-light
The LCD back-light is constantly switched ON when the Operating button is
pressed. When releasing the Operating button, the back-light will be ON for
approximately 8 seconds before automatically switching OFF.
2.6. Measurement inaccuracies
The following points should be observed in order to avoid measurement errors:
1. It must be ensured that the object to be measured completely fills the InfraRed Thermometer monitoring area. Errors can occur when measuring small
objects, as the non-contact thermometer also monitors the temperature of the
surroundings as well as the object to be measured. The temperature of the
whole of the monitoring area is determined.
2. The principle of measurement requires the ambient temperature to be
determined. This takes place at 1-minute intervals or each time the unit is
switched on. Changes in the ambient temperature, which can occur when the
user holds the unit in his hand, are not monitored within this time period and
therefore neither of them are taken into account when determining the
indicated temperature. A gradual warming of the unit (the lens) between
ambient temperature measurements can, for example, lead to the indicated
temperature slowly falling.
3. If the emission factor for the object does not correspond to the preset value of
0.95, the temperature will not be calculated correctly. Most surfaces have an
emission factor in the range of 0.8 to 0.99. In general, the darker and more
matt the surface is, the larger its emission factor. If the factor is greater than
0.95, the temperature indicated will be greater than the actual temperature of
the object being measured. If the factor is less than 0.95, the temperature
indicated will be less than the surface temperature.
Polished metals have a very low emission factor and are therefore not
suitable for measuring with a non-contact thermometer. On the other hand,
affixing adhesive tape to or painting the surface will increase the emission
factor and reduce the inaccuracy of the measurement.
4. It is not possible to take measurements through transparent materials (glass,
plexiglass etc.).
5. It is not possible to measure air temperatures.
6. Measurement errors can occur due to air contaminated with dust, steam,
smoke, etc.
2.7. Fault finding
• Display shows -.• The operating button has not been pressed for long enough. This must be
pressed for at least the duration of one measurement, i.e. for at least 1.5
seconds.
• Display shows Err.1
• The ambient temperature is outside the permitted range.
• Display shows 1.
• The measured value is outside the permitted range.
• Battery symbol illuminates.
The batteries are flat. See 3.1 Changing the batteries.
3.
Maintenance
3.1. Changing the batteries
If the battery symbol appears in the display, the batteries must be changed. The
four button cells are accessible after opening the battery compartment at the
rear of the unit. The used batteries must be removed from the battery holders
and replaced by new button cells of the same type. Only LR44 type batteries
may be used. Care must be taken to ensure that the polarity is correct when
inserting. The plus terminal of all four batteries should point upwards. The
batteries must be checked to see that they are properly seated before closing
the battery compartment.
Note: Used batteries should not be disposed of in the household
waste. Old batteries and batteries that no longer work can be
handed in to the local collection point free of charge.
3.2. Cleaning
Clean the unit using only a dry cloth. If the unit is very dirty, the cloth may be
slightly dampened. Do not use cleaners containing solvents. Make sure that no
moisture enters the interior of the unit.
When cleaning the lens, loose particles must be removed using
compressed air. Any remaining dirt can then be removed with a soft
brush or with a cotton-wool bud moistened with water. CAUTION!
Do not use cleaners containing solvents.
4.
Fastening the lnfra-Red Thermometer
The carry necklace is supplied with the thermometer.
To fasten, simply insert the clip of the necklace into the buckle end
of the thermometer until it clicks into place.
To unfasten, simply press both sides of the clip and pull until it can
be removed from the buckle.
WARRANTY/DISCLAIMER
OMEGAnet ® On-Line Service
www.omega.com
Internet e-mail
[email protected]
Servicing North America:
USA:
ISO 9001 Certified
Canada:
One Omega Drive, Box 4047
Stamford CT 06907-0047
Tel: (203) 359-1660
FAX: (203) 359-7700
e-mail: [email protected]
976 Bergar
Laval (Quebec) H7L 5A1
Tel: (514) 856-6928
e-mail: [email protected]
FAX: (514) 856-6886
For immediate technical or application assistance:
USA and Canada: Sales Service: 1-800-826-6342 / 1-800-TC-OMEGA®
Customer Service: 1-800-622-2378 / 1-800-622-BEST®
Engineering Service: 1-800-872-9436 / 1-800-USA-WHEN®
TELEX: 996404 EASYLINK: 62968934 CABLE: OMEGA
Mexico:
En Espan˜ol: (001) 203-359-7803
e-mail: [email protected]
FAX: (001) 203-359-7807
[email protected]
Servicing Europe:
Benelux:
Postbus 8034, 1180 LA Amstelveen, The Netherlands
Tel: +31 (0)20 3472121
FAX: +31 (0)20 6434643
Toll Free in Benelux: 0800 0993344
e-mail: [email protected]
Czech Republic:
Rudé armády 1868, 733 01 Karviná 8
Tel: +420 (0)59 6311899
FAX: +420 (0)59 6311114
Toll Free: 0800-1-66342
e-mail: [email protected]
France:
11, rue Jacques Cartier, 78280 Guyancourt, France
Tel: +33 (0)1 61 37 29 00
FAX: +33 (0)1 30 57 54 27
Toll Free in France: 0800 466 342
e-mail: [email protected]
Germany/Austria: Daimlerstrasse 26, D-75392 Deckenpfronn, Germany
Tel:+ 49 (0)7056 9398-0
FAX: +49 (0)7056 9398-29
Toll Free in Germany: 0800 639 7678
e-mail: [email protected]
United Kingdom: One Omega Drive, River Bend Technology Centre
ISO 9002 Certified
Northbank, Irlam, Manchester
M44 5BD United Kingdom
Tel: +44 (0)161 777 6611
FAX: +44 (0)161 777 6622
Toll Free in United Kingdom: 0800-488-488
e-mail: [email protected]
It is the policy of OMEGA to comply with all worldwide safety and EMC/EMI
regulations that apply. OMEGA is constantly pursuing certification of its
products to the European New Approach Directives. OMEGA will add the CE
mark to every appropriate device upon certification.
The information contained in this document is believed to be correct, but
OMEGA Engineering, Inc. accepts no liability for any errors it contains, and
reserves the right to alter specifications without notice.
WARNING: These products are not designed for use in, and should not be
used for, patient-connected applications.
OMEGA ENGINEERING, INC. warrants this unit to be free of defects in materials
and workmanship for a period of 13 months from date of purchase. OMEGA’s
WARRANTY adds an additional one (1) month grace period to the normal one
(1) year product warranty to cover handling and shipping time. This ensures
that OMEGA’s customers receive maximum coverage on each product.
If the unit malfunctions, it must be returned to the factory for evaluation.
OMEGA’s Customer Service Department will issue an Authorized Return (AR)
number immediately upon phone or written request. Upon examination by
OMEGA, if the unit is found to be defective, it will be repaired or replaced at no
charge. OMEGA’s WARRANTY does not apply to defects resulting from any
action of the purchaser, including but not limited to mishandling, improper interfacing, operation outside of design limits, improper repair, or unauthorized modification. This WARRANTY is VOID if the unit shows evidence of having been
tampered with or shows evidence of having been damaged as a result of excessive corrosion; or current, heat, moisture or vibration; improper specification;
misapplication; misuse or other operating conditions outside of OMEGA’s control. Components which wear are not warranted, including but not limited to contact points, fuses, and triacs.
OMEGA is pleased to offer suggestions on the use of its various products.
However, OMEGA neither assumes responsibility for any omissions or errors
nor assumes liability for any damages that result from the use of its products
in accordance with information provided by OMEGA, either verbal or written.
OMEGA warrants only that the parts manufactured by it will be as specified
and free of defects. OMEGA MAKES NO OTHER WARRANTIES OR REPRESENTATIONS OF ANY KIND WHATSOEVER, EXPRESS OR IMPLIED, EXCEPT
THAT OF TITLE, AND ALL IMPLIED WARRANTIES INCLUDING ANY WARRANTY OF MERCHANTABILITY AND FITNESS FOR A PARTICULAR PURPOSE
ARE HEREBY DISCLAIMED. LIMITATION OF LIABILITY: The remedies of purchaser set forth herein are exclusive, and the total liability of OMEGA with
respect to this order, whether based on contract, warranty, negligence,
indemnification, strict liability or otherwise, shall not exceed the purchase
price of the component upon which liability is based. In no event shall
OMEGA be liable for consequential, incidental or special damages.
CONDITIONS: Equipment sold by OMEGA is not intended to be used, nor shall it
be used: (1) as a “Basic Component” under 10 CFR 21 (NRC), used in or with any
nuclear installation or activity; or (2) in medical applications or used on humans.
Should any Product(s) be used in or with any nuclear installation or activity,
medical application, used on humans, or misused in any way, OMEGA assumes
no responsibility as set forth in our basic WARRANTY / DISCLAIMER language,
and, additionally, purchaser will indemnify OMEGA and hold OMEGA harmless
from any liability or damage whatsoever arising out of the use of the Product(s) in
such a manner.
RETURN REQUESTS / INQUIRIES
Direct all warranty and repair requests/inquiries to the OMEGA Customer
Service Department. BEFORE RETURNING ANY PRODUCT(S) TO OMEGA,
PURCHASER MUST OBTAIN AN AUTHORIZED RETURN (AR) NUMBER FROM
OMEGA’S CUSTOMER SERVICE DEPARTMENT (IN ORDER TO AVOID
PROCESSING DELAYS). The assigned AR number should then be marked on
the outside of the return package and on any correspondence.
The purchaser is responsible for shipping charges, freight, insurance and proper
packaging to prevent breakage in transit.
FOR WARRANTY RETURNS, please
have the following information
available BEFORE contacting OMEGA:
1. Purchase Order number under
which the product was
PURCHASED,
2. Model and serial number of the
product under warranty, and
3. Repair instructions and/or specific
problems relative to the product.
FOR NON-WARRANTY REPAIRS,
consult OMEGA for current repair
charges. Have the following information
available BEFORE contacting OMEGA:
1. Purchase Order number to cover the
COST of the repair,
2. Model and serial number of the
product, and
3. Repair instructions and/or specific
problems relative to the product.
OMEGA’s policy is to make running changes, not model changes, whenever an
improvement is possible. This affords our customers the latest in technology
and engineering.
OMEGA is a registered trademark of OMEGA ENGINEERING, INC.
© Copyright 2002 OMEGA ENGINEERING, INC. All rights reserved. This document may not be copied, photocopied, reproduced, translated, or reduced to
any electronic medium or machine-readable form, in whole or in part, without
the prior written consent of OMEGA ENGINEERING, INC.
Where Do I Find Everything I Need for
Process Measurement and Control?
OMEGA…Of Course!
Shop online at www.omega.com
TEMPERATURE
Thermocouple, RTD & Thermistor Probes,
Connectors, Panels & Assemblies
Wire: Thermocouple, RTD & Thermistor
Calibrators & Ice Point References
Recorders, Controllers & Process Monitors
Infrared Pyrometers
PRESSURE, STRAIN AND FORCE
Transducers & Strain Gages
Load Cells & Pressure Gages
Displacement Transducers
Instrumentation & Accessories
FLOW/LEVEL
Rotameters, Gas Mass Flowmeters & Flow Computers
Air Velocity Indicators
Turbine/Paddlewheel Systems
Totalizers & Batch Controllers
pH/CONDUCTIVITY
pH Electrodes, Testers & Accessories
Benchtop/Laboratory Meters
Controllers, Calibrators, Simulators & Pumps
Industrial pH & Conductivity Equipment
DATA ACQUISITION
Data Acquisition & Engineering Software
Communications-Based Acquisition Systems
Plug-in Cards for Apple, IBM & Compatibles
Datalogging Systems
Recorders, Printers & Plotters
HEATERS
Heating Cable
Cartridge & Strip Heaters
Immersion & Band Heaters
Flexible Heaters
Laboratory Heaters
ENVIRONMENTAL
MONITORING AND CONTROL
Metering & Control Instrumentation
Refractometers
Pumps & Tubing
Air, Soil & Water Monitors
Industrial Water & Wastewater Treatment
pH, Conductivity & Dissolved Oxygen Instruments
M03846/0902
Omegaette Pocket PP™
OS-PP
Thermometre Infra-Rouge A Distance
Mode d'emploi
M3846/0902
Table des matières.
1.
Généralités
1.1. Matériel fourni
1.2. Remarque complementaire pour
le nouveau thermometre
1.3. Principe des relevés
1.4. Informations techniques
1.4.1. Données techniques
1.4.2. Remarques sur les données
techniques
2.
Fonctionnement
2.1. Affichage at commandes
2.2.
2.3.
2.4.
2.5.
2.6
2.7
3.
3.1.
3.2.
4.
Effectuer un relevé
Mini et maxi
Choixt °C/°F
Rétro-éclairage
Inexactitudes dans les relevés
Defectuosité
Entretien
Remplacement des piles
Nettoyage
Attache du Thermomètre
Infra-Rouge
1.
Généralités
1.1. Matériel fourni
• Thermomètre infra-rouge
• 4 piles bouton (déjà installées dans I’appareil)
1.2. Remarque complementalre pour le nouveau thermometre
Ce nouveau thermomètre est équipé de 4 piles bouton alcalines déjà an place dans
le logement. Lors de la première utilisation du thermomètre, tirer doucement sur la
bande isolante pour la sortir du logement des piles.
Tester le thermomètre an appuyant sur la commande de fonctionnement; I’affichage
LCD et le rétro-éclairage s’allumeront brièvement. Dans le cas contralre, retiner les
piles at attendre 30 secondes avant de les remettre an place. S’assurer que les
piles sont installées avec le pôle positif (+) tourné vers le haut.
Le thermomètre est maintenant opérationnel!
1.3. Principe des relevés
Quand un relevé de température est effectué, to radiation de la surface de I’objet
mesuré est évaluée an vertu du principe dit de << thermomètrie de radiation >>. Ce
processus est purement passif: aucune radiation n’est transmise at seule l’énergie
de a radiation électromagnétique naturelle (irradiation de chaleur) qua possède tout
corps au-dessus de la température du zéro absolu (-273°C) est utilisée. La
température peut ainsi être déterminée très précisément à partir de l’énergie de
radiation si le facteur d’émission de I’objet mesuré est connu.
1.4. Informations techniques
1.4.1. Données techniques
Les données techniques importantes sont résumées sur ci-dessous at doivent être
comprises par l’utilisateur pour un bon usage de I’appareil.
1.4.2. Remarques sur les données technique
1. Precision: Le degré de précision affiché sera de plus ou moins 2% ou de 2°C par
rapport à la température de l’objet mesuré.
2. Distance au point de relevé: Le paramètre D:S caractérise la taille du point de
relevé (S) par rapport à la distance (D) entre l’objet à mesurer et le thermomètre
infra-rouge. Par example, avec un rapport de 6:1 et à une distance de 60 cm, la
zone de relevé a un diamètre de 10 cm.
Plage de mesures
Resolution
Précision
Unité
Distance à la taille du point de relevé
Température ambiante d’utilisation
Facteur d’émission
Alimentation
Durée approximative de la pile
Dimensions (L x I x H)
-20°C à 300°C
0,1°C
2% ou ± 2°C
°C ou °F
6:1
0°C à 40°C
0,95
4 piles bouton LR44
2000 relevés
56 x 23 x 102 mmA
3. Facteur d’émission: La quantité physique connue en tant qua facteur
d’émission décrit dans quelle mesure la radiation de chaleur infra-rouge émise
par un objet est déterminée par sa propre température. En conséquence, une
valour 1 signifie qua la radiation de chaleur infra-rouge émise par I’objet n’est
basée qua sur sa propre température. Une veleur inférieure â 1 signifie qua la
radiation émise par l’objet est déterminée par sa propre température mais aussi
par les réflexions de corps voisins ou qu’elle est causée par la transmission,
c’est-â-dire la diathermie de I’objet. Le facteur d’émission a donc un effet sur le
résultat du relevé. Le Thermomètre Infra-rouge fonctionne avec un facteur
d’émission de 0,95, c'est-â-dire que l’unité de relevé suppose que l’objet
considéré a un facteur de 0.95. Si ce n’est pas Ie cas, Ie relevé sera inexact et
devra au besoin être corrigé par un calcul (voir la section 2.5 “Inexactitudes dans
les relevés”).
2.
Fonctionnement
2.1. Affichage et commandes
Toutes les fonctions de I’appareil pour la prise
des relevés sent contrôlées at supervisées à
I’aide de la commande 7.
L’affichage est rétro-éclairé
1 Affichage de la température - valeur
mesurée actuellement
2 Indicateur de mise en aftente
3 Affichage de la température - valeur
minimum
4 Affichage de la température - valeur
maximum
5 Symbols des piles - (indicateur de piles
faibles)
6 Unités de température - °C ou °F
7 Commande de fonctionnement
8 Lentille
2.2. Effectuer un relevé
L’appareil est mis sous tension an appuyant sur la commando de fonctionnement.
(7) L’affichage présents des barres horizontales jusqu’à ce qua le premier relevé
soit disponible. La température relevée s’affiche alors dans le haut de l’affichage
(1). ll faut appuyer sur la commande (7) pendant toute la durée du relevé, ce qui
permet d’actualiser continûment I’affichage de la valeur relevée. L’objet mesuré
doit étre plus grand que la zone contrôlée par le Thermomètre Infra-rouge (voir 2,5
“Inexactitudes dans les relevés”). Le relevé est figé dès qua la pression sur la
commande steppe. L’indicateur “Hold” signale qua le relevé a été arrêté. Le
dernier relevé s’affichera dans la partie supérieure de I’affichage.
Le rétro-éclairage s’éteint 8 secondes après qua la commande ait été lâchée.
L’appareil s’éteint automatiquement 30 secondes après le demier relevé. ll est
nécessaire de remplacer les piles dès I’affichage du symbole de batterie faible.
2.3. Mini et maxi
Les relevés minimum et maximum stockés en mémoire sont annulés au début
de chaque relevé dés qua I’on appuie sur la commande de fonctionnement. ll y a
alors relevé de la température ainsi qua les minima et maxima. La température
minimum est indiquée an bas à gauche (3) de I’affichage et la température
maximum en bas â droite (4). Chacune de ces valeurs s’applique au cycle de
revelés actuel et s’efface dès qua Ia commande est réactivée.
2.4. Choix °C/°F
La température peut étre affichée an degrés centigrades (°C) ou Fahrenheit (°F).
Ce changement s’effectue an appuyant briévement deux fois sur la commande
(double-clic).
2.5. Rétro-éclairage
Le rétro-éclairage du LCD est constamment allumé quand on appuie sur
Commande de fonctionnement. ll reste allumé pendant 8 secondes environ
quand on lâche la Commande de foretionnement, avant de s’éteindre
automatiquement.
2.6. Inexactitudes dans les relevés
Veillez bien à observer les points suivants afin d’éviter les erreurs de relevés:
1. Assurez-vous qua I’objet à mesurer remplit complétement la zone de
contrôle du Thermomètre Infra-rouge. Des erreurs peuvent as produire lors
du contrôle de petits objets car le thermométre << sans-contact >> peut
relever la température de l’environnement en même temps que celle de
l’objet à mesurer. La température de toute la zone de relevé est ainsi
déterminée.
2. Le principe de relevé implique de déterminer la température ambiante. Ce
qui est fait par intervalles d’une minute ou chaque fois qua I’appareil est mis
sous tension. Les changements de température ambiante qui peuvent se
produire quand l’utilisateur tient I’appareil à la main, ne sent pas relevés
durant cette période at aucun d’eux n’est donc pris an compte quand on
détermine la température indiquée. Un réchauffement progressif de l’appareil
(Ia lentille) entre les relevés de la température ambiante peut, par example,
faire lentement tomber la température indiquée.
3. Si le facteur d’émission de l’objet ne correspond pas à la valeur programmée
de 0,95, Ia température n’est alors pas calculée correctement. La plupart
des surfaces ont un facteur d’émission d’un rayon de 0,8 à 0,98. D’une
fagon générale, plus Ia surface est sombre et mate, plus le facteur
d’émission est important. Une correction arithmétique de la température
relevé peut étre faite si I’on connaît le facteur d’émission de I’objet à
mesurer.
Les métaux polis ont un très faible facteur d’émission et ne conviennent
donc pas pour des relevés avec un thermométre << sans-contact >>.
Cependant, on pout fixer un morceau de ruban adhésif sur la surface ou
peindre cattle dernière pour augmenter le facteur d’émission et réduire les
inexactitudes du relevé.
4. ll n’est pas possible d’effectuer des relevés à travers des matériaux
transparents (verre, plexiglas, etc.
5. ll n’est pas possible de relever la température de I’air.
6. Des erreurs de relevés peuvent se produire quand l’air ambient est pollué
par de la poussiére, de la vapeur, des fumées, etc.
2.7. Défectuosité
• L’affichage indique -.--- La commande de fonctionnement n’a pas été activée assez longtemps. La
maintenir appuyée pendant au moins Ia durée d’un relevé, soit 1.5 seconde.
• L’affichage indique Err.1
--- La température ambiante est en-dehors des limites permses.
• L’affichage inclique 1.
--- La valeur relevée est en-dehors des limites permises.
• Le symbole des piles s’allume
Les piles sont vides. Voir 3.1 pour les remplacer.
3.
Entretien
3.1. Remplacement des piles
Si le symbole des piles s’affiche, il faut changer lea piles. Pour accéder aux
quatre piles boutons, ouvrir le logement au dos de I’appareil. Retirer lea piles
usagées du support et les remplacer par des neuves de même type. N’utiliser
que des piles LR44 et s’assurer qua les polarités sont correctes. La borne +
des quatre piles doit étre tournée vers le haut. S’assurer également que les
piles sont bien an place avant de reformer Ie logernent.
Rernarque: Ne pas jeter de piles utilisées dans les ordures
ménagères. Déposer toutes piles usagées ou qui ne
sont plus utilisées dans un dépôt autorisé à cet effet.
3.2. Nettoyage
Nettoyer I’appareil avec un chiffon sec. S’iI est très sale, humidifier légèrenent
le chiffon. Ne pas utiliser de produits contenant des dissolvants. S’assurer que
l’appareil est à I’abri de toute humidité.
Pour nettoyer la lentille infra-rouge: commencer par évacuer les particules en
suspens an soufflant dessus (ou an utilisant I’air comprimé).
Retirer ensuite les saletés résiduelles avec une brosse souple
ou un coton-tige humidifié d’eau. ATTENTION ! No jamals
utiliser de produits contenant des dissolvants.
4.
Attache du Thermomètre Infra-Rouge
Le thermomètre est fourni avec: une lanière permettant de le
porter autour du cou.
Pour I’attacher, insérer Ie clip de to lanière dans la boucle du
thermornètre jusqu’à ce qu’il se mette en place avec un déclic.
Pour le détacher, appuyer sur les deux côtés du clip pour le
retirer de la boucle.
Omegaette Pocket PP™
OS-PP
Contactloze Infrarode Thermometer
Handleiding
M3846/0902
2.2. Een meting verrichten
Inhoud
2.3. Uitslag van minimum en
1.
Algemeen
maximum temperatuur
1.1. Meegeleverde apparatuur
2.4. Kiezen tussen °C/°F
1.2. Aanvullende informatie over uw
2.5. Verlichting
nieuwe thermometer
2.6. Onnauwkeurige metingen
1 3. Beschrijving van meetmethode
2.7. Problemen oplossen
1.4. Technische informatie
3.
Onderhoud
1.4.1 Technische gagevens
3.1. Batterijen wisselen
1.4.2.Opmerkingen over technische
3.2. Schoonmaken
gegevens
4.
Bevestigen van de Infrarode
2.
Bediening
Thermometer
2.1. Scherm an controleknoppen
1.
Algemeen
1.1. Meegeleverde apparatuur
• Infra-rode thermometer basistoestel
• 4 knoopcelbatterijen (reeds in toestel)
1.2. Aanvullende informatie over uw nieuwe thermometer
Uw nieuwe thermometer is voorzien van 4 x LR44 alkaline celbatterijen die al in
het batterijenoompartiment zijn geplaatst. Voordat u de thermometer in gebruik
neemt, dient u eerst het isolatiemateriaal te verwijderen door dit voorzichtig uit
het batterijencompartiment te trekken.
Test de thermometer door op de aan/uit-toets te drukken, waardoor de LCdisplay an de achterverlichting kortstondig oplichten. Wanneer dit niet gebeurt,
verwijdert u de batterijen. Wacht 30 seconden en plaats do batterijen terug. Zorg
er hierbij voor, dat batterijen met de positieve (+) pool naar boven in het
batterijencompartiment worden gelegd.
Uw thermometer is nu klaar voor gebruikf
1.3. Beschrijving van meetmethode
Bij het verrichten van een temperatuurmeting wordt de oppervIaktestraling van het
te meten voorwerp bepaald volgens de principes van de thermometrie. Dit is een
geheel passief proces, d.w.z. er komt geen straling vrij an -in plaats daarvan- wordt
enkel gebruikt gemaakt van de natuurlijke electromagnetische radiatie (hittestraling)
die elk voorwerp met een temperatuur van boven nul (-273°C) uitstraalt. De
temperatuur kan aan de hand van daze stralingsenergie zeer nauwkeurig afgeleid
worden als de emissiecoëfficiënt van het to meten voorwerp bekend is.
1.4. Technische informatie
1.4.1.Technische gegevens
De belangrijke technische gegevens zijn samengevat in onderstaande tabel.
1.4.2.Opmerkingen over technische gegevens
1. Nauwkeurigheid: de hoogste van de twee gegeven waarden is steeds
van toepassing.
2. Afstand tot te meten punt: do parameter A: M drukt de verhouding uit
tussen de grootte van het meetvlak en de afstand tussen het te meten
voorwerp en de infrarode thermometer. Bijvoorbeeld, met een ratio van
6:1 en een afstand van 60 cm, heeft het meetvlak een diameter van 10 cm.
Bereik
-20°C to 300°C
Resolutie
0.1°C
Nauwkeurigheid
±2% or ±2°C
Maateenheid
°C or °F
Verhouding afstand an meetvlak A:M
6:1
Bereik omgevingstemperatuur
0°C to 40°C
Emissiecoëfficiënt
0,95
Stroomtoevoer
4 x LR44 knoopcelbatterjen
Geschatte levensduur batterij
2000 metingen
(afhankelijk van het gebruik)
Afmetingen
56 x 23 x 102 mm
3.
Emissiecoëfficiënt: de fysieke quantiteit bekend als de emissiecoëfficiënt
drukt uit tot op welke hoogte de infrarode hittestraling die door een voorwerp
wordt uitgestraald bepaald wordt door zijn eigen temperatuur. Zo betekent een
waarde van 1 dat de infrafode hittestaling van het voorwerp enkel gebaseerd is
op zijn eigen temperatuur. Een waarde van minder dan I betekent dat de straling
die door het voorwerp wordt uitgezonden niet enkel bepaald wordt door de eigen
temperatuur, maar ook door invloed van belendende voorwerpen, of door
transmissie, d.w.z. de diathermane vermogen van het voorwerp. De
emissiecoëfficiënt is aldus van invioed op de meetuitslag. Do infrarode
thermometer werkt met een emissle-coëfficiënt van 0,95, d.w.z. de maateenheid
neernt aan dat het voorwerp dat gemeten wordt een factor heeft van 0,95. Indien
dit niet het geval is zullen de metingen onnauwkeurigheden zijn (zie hoofdstuk
2,5 “Onnauwkeurige metingen”).
2.
Bediening
2.1. Scherm en controleknoppen
Alle functies van het meettoestel worden
bediend en gecontroleerd via bedieningsknop
7 an hat verlichte scherm.
1 Uitslag temperatuur - huidige waarde
2 “Hold”-indicator
3 Uitslag temperatuur - minimum waarde
4 Uitslag temperatuur - maximum waarde
5 Batterij-symbool - (melding batterij leeg)
6 Maateenheid temperatuur - °C of °F
7 Bedieningsknop
8 Lens
2.2. Een meting verrichten
Hat toestel wordt aangeschakeld door op de
bediedingsknop to drukken. Op het scherm
verschijnen horizontale strepen totdat de eerste uitslag beschikbaar is.
Vervolgens wordt de huidige temperatuur op het bovenste deel van het scherm
vertoond. De knop dient tijdens de meting ingedrukt: worden gehouden;
gedurende deze tijd wordt de uitslag van de gemeten waarde voortdurend
geactualiseerd. Terwijl de meting wordt verricht moet de lens op het voorwerp
worden gericht. Bovendien dient het voorwerp dat gemeten wordt groter te zijn
dan het gebied dat gecontroleerd wordt door de infrarode thermometer (zie 2.5.
“Onnauwkeurige metingen”). De meting wordt beëindigd door de knop los te
laten. De melding “Hold” signaleert dat het meten beëindigd is. De laatste
meetuitslag wordt nu vertoond op het bovenste deel van het scherm.
Het schermverlichting gaat 8 seconden na het loslaten van de knop, ult. Het
toestel schakelt zichzelf 30 seconden na de laatst verrichtte meting automatisch
uit. Zodra het batterij-symbool op het scherm verschijnt dienen de batterijen
vervangen te worden.
2.3. Uitslag van minimum en maximum temperatuur
De geheugenplaatsen van de minimum en maximum waarden worden bij
aanvang van een meting gewist door op de bedieningsknop te drukken. Zolang
de knop ingdrukt wordt gehouden wordt de temperatuur gemeten en de
minimum en maximum temperaturen bepaald. De minimum temperatuur wordt
op linksonder op het scherm vertoond, en de maximum temperatuur
rechtsonder. Beide waarder gelden voor de huidige meetcyclus en worden
gewist zodra de knop opnieuw wordt ingedrukt.
2.4. Kiezen tussen °C/°F
De toestellen voor de temperatuuruitslag kunnen ingesteld worden op graden
Celsius (°C) of graden Fahrenheit (°F) door de knop tweernaal kort in te drukken
(dubbelklik).
2.6. Verfichting
De schermverlichting staal constant op AAN wanneer de Bedieningsknop is
ingedrukt. Nadat de Bedieningsknop is losgelaten blijft de verlichting nog
ongeveer 9 seconden AAN alvorens automatisch UIT to schakelen.
2.6. Onnauwkeurige metingen
Let op de volgendle punten om meeffouten te vermijden:
1. Zorg ervoor dat het te meten voorwerp het meelvlak van de infrarode
thermometer volledig vult. Als metingen worden verricht op kleine voorwerpen
kunnen fouten optreden omdat de contactvrije thermometer zowel de
temperatuur van de omgeving alsmede het voorwerp meet. De temperatuur
wordt bepaald en afgeleid van het gehele meetvlak.
2. De meetmethode vereist dat de omgevingstemperatuur bepaald wordt. Dit
gebeurt in intervallen van 1 minuut en elke keer als het toestel aangschakeld
wordt. Veranderingen in de omgevingstemperatuur, die kunnen voorkomen
als de gebruiker het toestel in de hand neemt, worden in daze periode niet
geregistreerd en daarom wordt met geen van beiden rekening gehouden bij
het bepalen van de aangegeven temperatuur. Een geleidelijke verwarming
van het toestel (de lens) tussen metingen van de omgevingstemperatuur kan
er bijvoorbeeld toe leiden dat de aangegeven temperatuur langzaam dealt.
3. Als de emissiecoëfficiënt van het voorwerp niet correspondeert met de
standaardwaarde van 0,95 zal de temperatuur niet correct berekend worden.
De meeste oppervlakken hebben een emissiecoëificiënt tussen 0,8 en 0,98. In
het algemeen geldt dat hoe donkerder en matter het opperviak is des te groter
de emissie-coëifficiënt zal zijn. Als de coëfficiënt hoger is dan 0,95 zal de
vertoonde temperatuur hoger zijn dan de feitelijke temperatuur van het
gemeten voorwerp. Als coëfficiënt lager is dan 0,95 zal de vertoonde
temperatuur lager zijn dan de oppervlaketemperatuur.
Gepolijste metalen hebben een zeer lage emissiecoëfficiënt an zijn derhalve
niet geschikt gemeten te worden met een contactloze thermometer. Anderzijds
stijgt de ennissiecoëifficiënt door plakband op het opperviak te plakken of het
to verven, zodat de onnauwkeurigheld van de meting vermindert.
4. Hat is niet mogelijk metingen te verrichten door transparent materiaal (glas,
plexiglas, enz.).
5. Hat is niet mogelijk de luchternperatuur to meten.
6. Meetfouten zijn mogelijk bij lucht die vervuild is met stof, stoom, rook, etc.
2.7. Problemen oplossen
• Scherm vertoont -.De bedieningsknop is niet long genoeg ingedrukt. Deze dient tenminste
zolang als de duur van een meting worden ingedrukt, d.w.z. 1.5 seconde.
• Scherm vertoont Err.1
De omgevingstemperatuur ligt buiten toegestane bereik.
• Scherm vertoont I.
De gemeten waarde ligt buiten het toegestane bereik.
• Batterij-symbool verschijnt.
De batterijen zijn leeg. Zie 3.1 Batterijen wisselen.
3.
Onderhoud
3.1. Batterijen wisselen
Als het batterij-symbool op het scherm verschijnt is het tijd de batterijen to
vervangen. De vier knoopcelbatterijen bevinden zich in het batterijvak aan de
achterkant van het toestel. Verwijder de gebruikte batterijen uit de houders en
vervang ze door nieuwe knoopcelbatterijen van hetzelfde type. Er mogen enkel
LR44 type batterijen gebruikt worden. Zorg er bij het inbrengen voor dat de
polariteit correct is. De pluspool van alle vier batterijen dient naar boven to liggen.
Contoleer of de batterijen juist zijn ingebracht alvorens het batterijvak to sluiten.
Let op: Gooi gebruikte batterijen niet wag met het hulsvuil. Oude
batterijen an batterijen die niet meer worken kunnen
kosteloos ingeleverd worden bij verzamelpunten voor klein
chemisch afval.
3.2. Schoonmaken
Maak het toestel enkel schoon met een droog doekje. Als het toestel erg vies is
mag het doekje enigszins gevochtigd worden. Gebruik geen schoonmaakmiddelen
die chemische stoffen bevatten. Zorg ervoor dat er geen vocht in het binnenste van
het toestel komt. Bij het schoonmaken van de lens dienen stofdeeltjes verwijderd te
worden met perslucht. Eventueel resterend vuil kan dan verwijderd worden met een
zacht borsteltje of met een katoenen wattipje dat bevochtigd is met water.
VOORZICHTIG! Gebruik geen schoonmaakmiddelen die chernische
oplossingen bevatten.
4.
Bevestigen van de Infrarode Thermometer
Hat draagsnoer wordt bij de thermometer meegeleverd.
Om to bevestigen gewoon het houdertje van hat draagsnoer in de
gesp van de thermometer duwen totdat deze vast klikt.
Om los te maken gewoon beide zijden van het houdertje indrukken en
trekken totdat het uit de gesp komt.