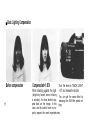
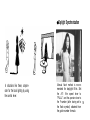
1
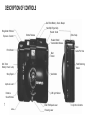
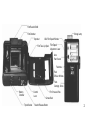
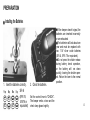
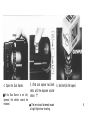
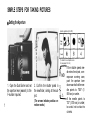
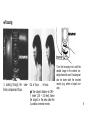
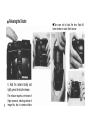
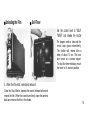
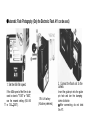
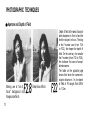
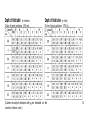
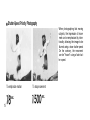
INSTRUCTIONS
DESCRIPTION OF CONTROLS
Self-Timer/Battery Check Beeper
Non-Slip Finger Grip
Rewind Crank
Rangefinder Window
Exposure Counter
Shutter Release
(Side View)
Rewind Knob/
Camera Back Release
Film Winder
Dust
Barrier
Self-Timer/
Battery Check Lamp
Strap Eyelet
Flash
Guide Pin Hole
Flash Retaining
Socket
Viewfinder
Aperture Lever
Distance
Scale Window
1
CdS Light Sensor
ASA Film Speed Lever
Lens
Focusing Lever
X-Synchro Contacts
Film Rewind Shaft
Film Chamber
Charge Lamp
Sprocket
ASA Film Speed Window
Film Take-Up Spool
Film Speed
Adjustment Lever
Auto
Flash Sensor
Flashtube
Flash
Diffuser Window
Flash
Clamping Screw
Battery
Chamber
Control
Lever
Tripod Socket
Film Pressure Plate
Camera Back
Rewind Release Button
2
TABLE OF CONTENTS
The Olympus XA is an aperture priority auto-exposure
rangefinder camera setting new
standards for function and feel,
appearance and performance.
Please read the following pages
carefully and your new camera
will provide maximum performance and satisfaction.
3
DESCRIPTION OF CONTROLS . . . . . . . . . . . . . . Page 1•2
PREPARATION
Installing the Batteries . . . . . . . . . . . . . . . . . . . . . 4
Loading the Film . . . . . . . . . . . . . . . . . . . . . . . 5•6
SIMPLE STEPS FOR TAKING PICTURES
Setting the Aperture . . . . . . . . . . . . . . . . . . . . . . 7
Focusing . . . . . . . . . . . . . . . . . . . . . . . . . . . . 8
Releasing the Shutter . . . . . . . . . . . . . . . . . . . . . 9
Unloading the Film . . . . . . . . . . . . . . . . . . . . . . 10
Self-Timer . . . . . . . . . . . . . . . . . . . . . . . . . . . . 10
Automatic Flash Photography . . . . . . . . . . . . . . 11•12
PHOTOGRAPHIC TECHNIQUES
Aperture and Depth of Field . . . . . . . . . . . . . . . 13•14
Shutter-Speed Priority Photography . . . . . . . . . . . 15-16
Backlighting Compensation . . . . . . . . . . . . . . . . . . 17
Daylight Synchronization . . . . . . . . . . . . . . . . . . 18
HELPFUL HINTS . . . . . . . . . . . . . . . . . . . . . . . . . . 19
CARE AND STORAGE . . . . . . . . . . . . . . . . . . . . . . . 20
MAIN SPECIFICATIONS . . . . . . . . . . . . . . . . . . . . . . . . . . 21•22
PREPARATION
Installing the Batteries
1. Insert the batteries correctly.
SR 44
(EPX-76,
MS-76 or
equivalent)
2. Check the batteries.
Set the control lever to "CHECK".
The beeper emits a tone and the
check lamp glows brightly.
If the beeper doesn't signal, the
batteries are inserted incorrectly
or are exhausted.
The batteries will last about one
year and must be replaced with
two 1.5V silver oxide batteries
(SR 44, EPX-76 or equivalent).
Do not press the shutter release
during battery check operation,
or the battery will run down
quickly, leaving the shutter opened. Return the lever to the normal
position.
4
Loading the Film
1. Open the camera back and insert the film cartridge. (Dust Barrier is in closed position.)
5
Never load the film in direct sunlight.
2. Attach the film end to the
take-up spool.
The film end must not stick out
of the slot excessively.
3. Start winding the film and close
the camera back.
Film perforations must engage
with sprocket teeth and the film
must be drawn flat.
4. Open the Dust Barrier.
If the Dust Barrier is not fully
opened, the
released.
shutter
cannot
5. Wind and expose two blank
shots until the exposure counter
shows "1".
6. Set the ASA film speed.
be
The lens should be aimed toward
a bright light when shooting.
6
SIMPLE STEPS FOR TAKING PICTURES
Setting the Aperture
Aperture guideline (ASA 100)
(To make full use of aperture control, see pages 13 & 14.)
If the shutter speed nee-
1. Open the Dust Barrier and set
the aperture lever ( mark) to the
F-number required.
7
2. Confirm the shutter speed in
the viewfinder, aiming at the subject.
(The arrows indicate parallax correction marks.)
dle enters the striped, overexposure warning zone,
push the aperture lever
downward so that the needle points to "500" (1/
500 sec) or under.
If the needle points to
"30" (1/30 sec) or under,
be careful not to shake the
camera.
Focusing
3. Looking through the viewfinder, compose and focus.
Out of focus
In focus
Turn the focusing lever until the
double image in the central rectangle fuses into one. Focusing can
also be done with the knurled
mount (e.g. when a tripod is in
use).
If the subject distance is 0.85 ~
1 meter (2.8 ~ 3.3 feet), frame
the subject in the area under the
2 parallax correction marks.
8
Releasing the Shutter
4. Hold the camera steady and
lightly press the shutter release.
9
The release requires a minimum of
finger pressure, reducing chance of
image blur due to camera shake.
Take care not to block the lens, flash diffuser window or auto flash sensor.
Unloading the Film
Self-Timer
Set the control lever to "SELF
TIMER" and release the shutter.
The beeper emits a tone and the
check lamp glows intermittently.
The shutter will release after a
delay of about 12 sec. The lever
also serves as a camera support.
To stop the timer midway, return
the lever to its normal position.
5. When the film ends, rewind and remove it.
Close the Dust Barrier, depress the rewind release button and
rewind the film. When the crank turns freely, open the camera
back and remove the film in the shade.
10
Automatic Flash Photography (Only the Electronic Flash A11 can be used.)
2. Connect the flash unit to the
camera.
1. Set the ASA film speed.
If the ASA speed of the film to be
used is close to "100" or "400",
use the nearest setting. (ASA 80
11 or 125 "100").
1.5V AA battery
(Alkaline preferred)
Insert the guide pin into the guide
pin hole and turn the clamping
screw clockwise.
After connecting, do not twist
the A11.
Maximum
distance
working
2.5m (8.2
ft.) at ASA 100, 5m
(16.4 ft.) at ASA
400.
3. Set the aperture lever to"Flash". 4. When the charge lamp glows,
you are ready to fire.
The charge lamp pops up and the
A11 turns on automatically.
The flash setting has been designed to require a stronger pressure
than the aperture setting.
Do not move the lever once it
has been set for auto flash, or in-
correct flash exposure may result.
5. At the end of flash
photography, fully
depress the charge
lamp to turn the
flash unit off.
12
PHOTOGRAPHIC TECHNIQUES
Aperture and Depth of Field
Depth of field is the area of acceptable sharpness in front of and behind the subject in focus. The larger the F-number used (from F2.8
to F22), the deeper the depth of
field. On the contrary, the smaller
the F-number (from F22 to F2.8),
the shallower this zone of acceptable sharpness.
The table on the opposite page
shows that when the camera-tosubject distance is 1m, the depth
Making use of "out of
focus" background or
foreground effects
13
Deep-focus effects
of field at F4 ranges from 0.91m
to 1.12m.
Depth of field table
(in meters)
Circle of least confusion 1/30 mm.
(Camera-to-subject distances with
camera's distance scale.)
Depth of field table (in feet)
Circle of least confusion 1/760 in.
are indicated on the
14
Shutter-Speed Priority Photography
When photographing fast moving
subjects, the impression of movement can be emphasized by intentionally allowing the image to be
blurred using a stow shutter speed.
On the contrary, the movement
can be "frozen" using a fast shutter speed.
To emphasize motion
15
To stop movement
An aperture-priority auto-exposure camera, the XA lets you select
the aperture freely, then automatically sets the right shutter speed
for correct exposure. The shutter
scale is visible in the viewfinder, so
you can pick exactly the speed and
aperture you like.
Move the aperture lever until the
needle points to the shutter speed
required.
If the shutter speed needle enters the striped zone, push the
aperture lever downward so that
the needle points to "500" or under.
If the needle points to "30" or
under, hold the camera steady or
support with a tripod; or use a
faster shutter speed by pushing
the lever upward; or use autoflash. 16
Back Lighting Compensation
Before compensation
17
Compensated +1.5EV
Turn the lever to "BACK LIGHT
When shooting against the light
+1.5" and release the shutter.
(bright sky, beach, snow, or facing
You can get the same effect by
a window), the face tends to apreducing the ASA film speed setpear dark on the image. In this
ting.
case, use the control lever to properly expose the most important area.
Daylight Synchronization
In situations like these, compensate for the back lighting by using
the control lever.
Manual
flash
method
is recom-
mended for daylight fill-in. Set
the A11 film speed lever to
"FULL" and the aperture lever to
the F-number (after having set to 18
the flash symbol) obtained from
the guide number formula.
HELPFUL HINTS
Dust Barrier
Opening the Dust Barrier fully switches the
power ON, and all camera functions are ready
to shoot. Closing the Dust Barrier switches
the power OFF, and all camera functions are
locked.
Foolproof electronic circuit
With the Dust Barrier closed and camera func-
tions locked, the foolproof electronic circuit
nonetheless allows the camera back to be
opened for film loading, unlocking all relat19 ed functions.
Electronic feather-touch shutter release
The release (pressure conductive polymer)
responds to very light pressure. Pressing with
a stroke as you normally do with other cameras is not needed.
Treat the camera with care!
Do not exert stronger pressure on moving
parts than
needed
(Dust Barrier, levers,
knobs). When attaching a tripod, care should
be taken not to tighten the screw excessively
and not to rotate the camera on the screw.
Filters cannot be used with the XA.
CARE AND STORAGE
At the completion of photography, completely close the Dust Barrier to prevent battery drain and dust.
Do not drop or hit the camera. Cameras
that have been submerged in water are generally irreparable.
Do not touch the lens, viewfinder and rangefinder window. If touched, wipe the surface
lightly with a clean, soft cotton cloth. Fingerprints, if not wiped off immediately, will
eventually be unremovable.
Never leave the camera near radios, TV sets,
or magnets.
Store the camera in a dry, well-ventilated
place.
Never store the camera where temperatures
exceed 50°C (122°F) or below -20°C (-4°
F). When you use the camera in temperatures
under -10°C (14°F), it may sometimes fail
to operate properly. To avoid this, warm the
camera before use.
Have all repairs performed by an authorized
OLYMPUS Service Center. You may send it
directly or through the store where your
camera was purchased.
20
MAIN SPECIFICATIONS (OLYMPUS XA)
Camera type: 35mm rangefinder electronic lens-shutter camera.
Shutter
release:
Electromagnetic
feather
touch
Film format: 35mm standard cassette (24 x 36mm).
Lens: F. Zuiko 35mm F2.8, 6 elements in 5 groups.
Shutter: Electronic between-lens shutter.
Self-timer: Electronic self-timer with 12 second delay.
Viewfinder: Bright frame finder, 0.55x.
Flash
shutter release.
Blinking LED and electronic beeper (Piezoelectric
Ceramic Vibrator) during self-timer operation.
mounting:
Exclusive
automatic
Electronic
Shutter speed readout and over-exposure warning
Flash A11 attaches to (or detaches from) the cam-
zone visible in finder.
Focusing: Double-image coupled rangefinder, 0.85m
(2.8 ft.) ~ infinity.
era in seconds.
Setting camera's aperture lever to flash symbol
switches the A11 on, and sets the XA for autoflash.
Exposure control: Aperture-priority automatic ex-
Lens/finder cover: Sliding Dust Barrier. When opened,
posure. Automatic shutter speed range 10 sec. to
1/500 sec. Backlighting compensation + 1.5EV.
Film speed range: ASA 25 ~ 800.
Aperture range: F2.8 ~ F22.
Film advance: Rear winding thumbwheel.
Exposure counter: Progressive type with automatic
reset.
21 Film rewind: Crank type with rewind release button.
power is switched on and shutter release unlocks.
When closed, power is switched off and shutter
release locks.
Power source: Two 1.5V silver oxide batteries
SR 44 (Eveready EPX-76 or equivalent).
Dimensions: 102 (W) x 64.5 (H) x 40 (D) mm (4" x
2.54" x 1.6").
Weight: 225 grams or 7.9 oz. (less batteries).
MAIN SPECIFICATIONS (ELECTRONIC FLASH A11)
Unit type: Automatic electronic flash unit exclusively
for use with Olympus X A and XA2.
Connection to camera: Fitted onto left-hand edge of
Guide number: 10 (ASA 100, meters) or 33 (ASA
Power switch: The flash unit is activated by setting
100, feet).
Applicable ASA film speeds: ASA 100 and 400.
Flash modes: Normal auto (XA, X A 2 ) and manual
mode ( X A only) with switch lever.
F stop for auto flash: F4
Angle of coverage: Picture area of 35mm focal-length
lens. ( X A and XA2 utilize 35mm Zuiko lens.)
Number of flashes: Approx. 150 with AA 'penlight'
alkaline battery.
Recycling time: Approx. 7 sec with AA alkaline battery.
XA ( X A 2 ) .
camera's lever to flash symbol, popping up the
charge lamp and initiating electrical charge. The
flash unit turns off when the charge lamp is
pressed down.
Power source: One 1.5V AA 'penlight' battery (including Ni-Cd battery).
Dimensions: 60 ( H ) x 36 ( W ) * x 33 (D) mm (2.4" x
1.4" x 1.3").
* Measured from interface.
Weight: 65 grams or 2.3 oz. (less battery).
Max. working distance: 2.5m (8.2 ft.) at ASA 100,
5m (16.4 ft.) at ASA 400.
22
OLYMPUS OPTICAL CO., LTD
San-Ei Building, 22-2, Nishi Shinjuku 1-chome, Shinjuku-ku, Tokyo, Japan. Tel. 03-3340-2211
OLYMPUS CAMERA CORPORATION
Crossways Park, Woodbury, New York, 11797, U.S.A. Tel. 516-364-3000
OLYMPUS OPTICAL CO. (EUROPA) GMBH
Postfach 104908, Wendenstrasse 14-16, 20097 Hamburg, Germany. Tel. 040-237730
OLYMPUS OPTICAL CO. (U.K.) LTD.
2-8 Honduras Street, London EC1Y OTX, United Kingdom. Tel. 0171-253-2772
Printed in Japan IELEE22 © 0382·37MS