1
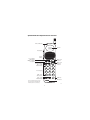
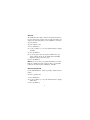
Part No. 212122-A
April 2002
4655 Great America Parkway
Santa Clara, CA 95054
Using Meridian 1
Features on Symbol’s
NetVision Portable
Telephone
*212122-A*
Copyright © 2002 Nortel Networks
All rights reserved. April 2002.
The information in this document is subject to change without notice. The
statements, configurations, technical data, and recommendations in this document
are believed to be accurate and reliable, but are presented without express or implied
warranty. Users must take full responsibility for their applications of any products
specified in this document. The information in this document is proprietary to
Nortel Networks Inc.
Trademarks
Nortel Networks, the Nortel Networks logo, the Globemark, and Meridian 1 are
trademarks of Nortel Networks.
Symbol and NetVision are trademarks of Symbol Technologies, Inc.
The asterisk after a name denotes a trademarked item.
Statement of Conditions
In the interest of improving internal design, operational function, and/or reliability,
Nortel Networks Inc. reserves the right to make changes to the products described in
this document without notice.
Nortel Networks Inc. does not assume any liability that may occur due to the use or
application of the product(s) or circuit layout(s) described herein.
Symbol NetVision Telephone feature overview
LED call indicator
Speaker
Headset jack
FCT − displays
feature menu
MENU − displays
user options
Volume
buttons
MENU
FCT
RCL
NAME
NAME − displays
list of user names
RCL − recalls
dialed numbers
1
SND
SND − turns
on phone
END
END − turns
off phone,
ends call
2
ABC
3
DEF
4
GHI
5
JKL
6
MNO
7
PQRS
8
TUV
9
WXYZ
<
0
OPR
#
>
Phone keypad
STO − stores
data in phone
CLR − clears
individual digits
CLR
STO
HOLD
HOLD key*
Microphone
*Note: The HOLD key does not place
the call on hold. On this handset the
HOLD key functions as a mute key.
10179EB
1
Overview
The Symbol* wireless handset is a Voice-over-IP (VoIP) portable
telephone that provides on-site wireless voice communication
capability. The handset works with the Nortel Networks
Meridian 1 ITG Line Card.
The Symbol handset converts analog voice into compressed
digital packets that are sent by TCP/IP protocol (supports
IEEE 802.11 protocols) over standard data networks.
For information on the features of the Symbol wireless handset,
refer to the Symbol NetVision* telephone User Guide.
NetVision quick start call basics
A handset user guide is supplied with your Symbol NetVision
handset, and describes in detail how to use the buttons on the
handset.
Powering up the handset
Press the SND key.
A Nortel Networks banner will appear on the display followed by
the message: UserLogin Not Ready. If configured in Personal
mode, the handset will automatically register with the
Meridian 1. If registration is successful, the display will show
your user name followed by the caption Ready.
If your administrator has provisioned RF update on the
NetVision handsets, you may see additional messages as files are
dynamically downloaded to your handset.
2
Logging out
1
Press the FCT key.
2
Use the scroll keys (*<, >#) or the Volume buttons to display
Logout.
3
Press the SND key.
This action will remove the handset from the list of managed
endpoints on the system and calls will no longer be directed to
the handset.
Note: If DHCP is being used to dynamically allocate IP
addresses to the handsets, a logout is required before a new IP
address can be assigned by the DHCP server. See your
administrator for details.
Logging in
1
Press the FCT key.
2
Use the scroll keys (*<, >#) or the Volume buttons to display
either Logon Name or Logon Ext.
3
Depending upon your selection in step 2, use the scroll keys
(*<, >#) or the Volume buttons to display your user name, or
use the dial pad to enter your extension (DN).
4
Press the SND key.
The handset will attempt to register with the Meridian 1. If
registration is successful, the display will show your user name
followed by the caption Ready.
3
Making a call
Following a successful login,
1
Use the dial pad to enter the digits.
The digits are displayed on the handset as they are entered.
2
Press the SND key.
Note: Alternatively, you may use the NAME key to display a list
of numbers that have been provisioned on your system, or use the
RCL key to display a list of Speed dial numbers or recently
dialed numbers. See the NetVision Phone Quick Reference
Guide for details on the operation of these features.
Answering a call
Press the SND key while the handset is ringing.
Note: Alternatively, the handset may be configured to answer on
any key press or to auto-answer. See the NetVision Phone Quick
Reference Guide for details on the operation of these features.
Releasing a call
While on an active call, press the END key.
The handset display will change from Active to Ready.
4
Meridian 1 features
The Symbol NetVision telephones provide access to many of the
most popular Meridian 1* features. All of the features described
in this guide must be configured for your telephone by your
administrator. These features are only available if provisioned on
the Meridian 1 or Succession CSE 1000 system. A feature that
has not been provisioned may appear on your telephone, but will
cause no operational change.
Transfer
Use the Transfer feature to redirect a call to a third party.
To use the Transfer feature:
1
Press the FCT key.
2
Use the scroll keys (*<, >#) or the Volume buttons to display
Transfer.
3
Press the SND key.
4
Use the keypad to enter the telephone number of the person
that you want to transfer the call to.
5
Press the SND key.
6
When you hear the ring, or a person answers, press the SND
key again to complete the transfer
Note: Press the END key at any time to cancel and return to the
original call.
5
Conference
You can set up a conference call for up to six people, including
yourself. Contact your administrator to determine the maximum
number of people your Meridian 1 system allows on a conference
call.
To set up a conference call:
1
Press the FCT key while you are on a call.
2
Use the scroll keys (*<, >#) or the Volume buttons to display
Conference.
3
Press the SND key.
4
Use the keypad to enter the telephone number of the person
that you want to add to the call.
5
When the person you are calling answers, press the SND key.
Note: Press the END key at any time to cancel and return to the
original call.
Note: Repeat steps 1 through 5 to add additional people to your
conference call.
6
Make Set Busy
The Make Set Busy feature causes your telephone to appear busy
to all incoming calls, and, if configured by your administrator,
directs incoming calls to your voice mailbox. You can activate
this feature while you are on a call, and your telephone will enter
busy state once you end the call.
Note: The Call Forward feature takes precedence over this
feature.
To activate Make Set Busy:
1
Press the FCT key.
2
Use the scroll keys (*<, >#) or the Volume buttons to display
SetBusy.
3
Press the SND key.
Your telephone displays Set Busy to indicate that the feature
is active.
Note: If you activate this feature while you are on a call, the
telephone display will be blank until you hang up.
To cancel Make Set Busy and return to normal operation:
1
Press the FCT key.
2
Use the scroll keys (*<, >#) or the Volume buttons to display
SetBusy.
3
Press the SND key.
Note: The Call Forward feature takes precedence over this
feature.
7
Call Forward
The Call Forward feature allows you to direct your calls to ring at
another extension. You cannot forward calls while your
telephone is ringing.
To activate Call Forward:
1
Press the FCT key.
2
Use the scroll keys (*<, >#) or the Volume buttons to display
CallFwd.
3
Press the SND key.
4
Use the keypad to enter the telephone number were you want
to forward your calls. To reinstate Call Forward to the same
number you entered the last time you used this feature, skip
this step and go directly to step 6.
5
Press the SND key to store the number.
6
Press the SND key.
Your telephone displays CFWD to indicate that the Call
Forward feature is active.
To cancel Call Forward:
1
Press the FCT key.
2
Use the scroll keys (*<, >#) or the Volume buttons to display
Call Fwd.
3
Press the SND key.
Your telephone momentarily displays CFWD Cancelled to
indicate that the Call Forward feature is no longer active.
Note: Activation of the Call Forward feature does not limit the
ability to place outgoing calls from your telephone.
8
Call Park
The Call Park feature allows a call to be held temporarily and to
be retrieved from any telephone. You can park an incoming call
and page the called party. When you use Call Park, you do not tie
up your extension.
To park a telephone call:
1
Press the FCT key.
2
Use the scroll keys (*<, >#) or the Volume buttons to display
CallPark.
3
Press the SND key.
4
Use the keypad to enter the telephone number where you
want to park the call. To use the default System Park DN,
skip this step and go directly to step 5.
5
Press the SND key.
Note: If you do not retrieve the parked call within a preset time
limit, the call will return to the telephone where you originally
parked the call. The telephone will display Call Park.
Retrieve a parked call
Use the Call Park Retrieve feature to pick up a call that you have
parked.
To retrieve a parked call:
1
Press the FCT key.
2
Use the scroll keys (*<, >#) or the Volume buttons to display
CPRetrieve.
3
Press the SND key.
9
Ring Again
Use the Ring Again feature when you dial an extension and
receive a busy tone or no answer. The Ring Again feature notifies
you when the person you dialed has ended their call or when they
have used their telephone.
To activate Ring Again:
1
Without ending the call, press the FCT key.
2
Use the scroll keys (*<, >#) or the Volume buttons to display
RingAgain.
3
Press the SND key.
To call the Ring Again party after your telephone alerts you with
a tone and displays Ring Again to Answer? :
1
Press the FCT key.
2
Use the scroll keys (*<, >#) or the Volume buttons to display
RingAgain.
3
Press the SND key.
The party you are calling hears a ringing tone, and your
display is updated with the Call Party Name for the party you
are calling.
Note: You cannot activate this feature while you are in the
process of establishing a conference call.
10
System Speed Call
The System Speed Call feature allows you to make a call by
dialing Speed Call codes which may override your telephone’s
class of service restrictions. The System Speed Call feature is set
up on the Meridian 1 system by your administrator. It is a speed
dial number that is common to many users; therefore, it is stored
on the system and not on your individual telephone
To use System Speed Call:
1
Press the FCT key.
2
Use the scroll keys (*<, >#) or the Volume buttons to display
SpeedCall.
3
Press the SND key.
4
Use the keypad to enter the speed dial code for the telephone
number you want to call.
5
Press the SND key.
The Meridian 1 system dials the number.
11
Group Call
The Group Call feature automatically calls members of a
predefined group, one at a time, until they all have answered. Ask
your administrator for details on how to create a conference call
group.
To place a Group Call:
1
Press the FCT key.
2
Use the scroll keys (*<, >#) or the Volume buttons to display
GroupCall.
3
Press the SND key.
The Meridian 1 system immediately originates calls to all of
the numbers in the group. When the first member of the
group answers, the ring back tone stops. As subsequent
members of the group answer their telephones, they are
added to the call.
Overhead Paging
The Overhead Paging feature allows you to access your public
address system to make announcements.
To connect to the paging system:
1
Press the FCT key.
2
Use the scroll keys (*<, >#) or the Volume buttons to display
Paging.
3
Press the SND key.
4
Speak into the telephone to make your announcement.
5
Press the END key.
12
Call Pickup
The Call Pickup feature allows you to pick up a call that is
ringing at another extension in your pickup group.
To pick up a call:
1
Press the FCT key.
2
Use the scroll keys (*<, >#) or the Volume buttons to display
CallPickup.
3
Press the SND key.
The incoming call is routed to your extension.
Multiple Appearance Directory Number with optional
Privacy Override
The Privacy Override feature allows a second telephone with the
same extension number as your portable telephone to be on a call
at the same time. This feature is valuable if you want your
portable telephone to be twinned to a desktop telephone. This
feature must be activated on the Meridian 1 system by your
administrator.
To join an established call on another extension:
1
Press the FCT key.
2
Use the scroll keys (*<, >#) or the Volume buttons to display
PrivOvride.
3
Press the SND key.
13
Retrieve voice mail messages
Your telephone provides you with an indication that a message
has been left on your voice messaging system.
To retrieve voice mail messages:
1
When your telephone displays Voice Mail, use the keypad
to enter the extension used to access your voice messaging
system.
2
Press the SND key.
The Meridian 1 system connects you to your voice mail
system.
14
Shortcut method
If configured by your administrator, your telephone has the
ability to access the Meridian 1 features described in this guide
using a shortcut method.
To access features using the shortcut method:
1
Press the FCT key.
2
Without scrolling, press the keypad key that corresponds to
the number that appears next to the feature in the telephone’s
list of features.
Please use Table 1 to note the number assigned to each of the
Meridian 1 features on your telephone.
Table 1 Meridian 1 feature key assignments
Key
Feature
Transfer
Conference
Make Set Busy
Call Forward
Call Park
Ring Again
System Speed Call
Group Call
Overhead Paging
Call Pickup
Call Park Retrieve
Privacy Override
15
16