1
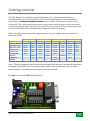
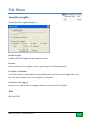
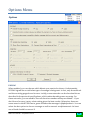
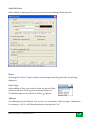
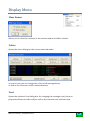
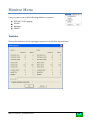
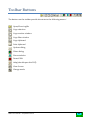
PDW − Paging Decoder for Windows Index Page Introduction 3 Getting Started - Decoding via the serial port (FSK slicer or RS232 interface) - Decoding via the soundcard - How to set up a custom configuration - Discriminator tap 4 5 5 6 6 Paging Message Format 7 ACARS Message Format 8 Mobitex Message Format 10 File Menu - Open/Close Logfile - Exit 11 11 11 Edit Menu 12 Interface Menu - Setup - Volume 13 13 14 Options Menu - Options - General options - SMTP (Email) Filters Menu - Filter List - Filter Options Display Menu - Clear Screen - Colors - Font - Screen Options - Scrollback - Systemtray Monitor Menu - Statistics 15 15 17 19 Character Set Menu 31 Signal Indicator 31 Key Shortcuts 31 Toolbar buttons 32 PDW v3.1 Manual – September 2010 20 20 25 27 27 27 27 28 29 29 30 30 2 Introduction Combined with a suitable receiver, preferably with a discriminator-tap, PDW can be used for off-air decoding of POCSAG, FLEX, ACARS, MOBITEX or ERMES signals. PDW offers the following options : Decoding of the following modes : - POCSAG baud rates 512, 1200 and 2400 - FLEX baud rates 1600, 3200 and 6400 - ERMES 6250 baud - ACARS (Aircraft Communications Addressing and Reporting System) - Mobitex 8000 baud Serial port input for 2- and 4-level FSK Soundcard input for 2-level FSK only Logging of : - All (monitored) messages - Filtered messages - Up to three separate filter files per filter Real time filtering (unlimited number of filters) Command file to activate an external program Signal indicator Statistics overview PDW v3.1 Manual – September 2010 3 Getting started The first thing to do is build (or purchase) either a 2 or 4-level serial interface, as described on http://www.discriminator.nl. If you are planning to use the soundcard input then you will need a cable to connect your receiver to the line-in socket of your soundcard. This cable should have a mono plug at one end which goes to your receiver and a stereo plug at the other end to connect to your soundcard. The mono plug should be wired to both the left and right audio channels of the stereo plug. Before deciding which method of signal input to use, you might want to consult the following table : Soundcard Signal type POCSAG 512 POCSAG 1200 POCSAG 2400 FLEX 1600 FLEX 3200 FLEX 6400 ACARS MOBITEX ERMES Disc-tap 100% 100% 100% 100% 75% 50% - No tap 100% 90% 75% 50% 25% 100% 75% - 2-level FSK slicer 4-level FSK slicer Disc-tap 100% 100% 100% 100% 75% 50% 100% - Disc-tap 100% 100% 100% 100% 100% 100% 75% 100% No tap 100% 90% 75% 50% 25% 100% - No tap 100% 90% 75% 50% 25% 100% - 2-level RS232 Disc-tap 100% 100% 100% 100% 75% 50% 100% - No tap 100% 90% 75% 50% 25% - Note : The percentages in above table are estimated indications of successfully decoded messages. Especially when not using a discriminator-tap, results may vary since the audio quality of the default audio output varies per receiver. Example of a serial (RS232) interface : PDW v3.1 Manual – September 2010 4 Decoding via the serial port When using a serial interface, connect it to one of your computers serial ports. Run PDW and go to the Interface menu and select Setup. Then select the serial port you have connected it to. Plug the earphone connector of your interface into your receivers’ earphone (or discriminator-tap) socket. Switch on your receiver and turn up the volume to about a quarter. Now select the type of signal you want to decode from the Monitor menu (POCSAG/FLEX/ACARS/MOBITEX/ERMES) and tune into any random white noise. The signal indicator on the far right of the toolbar should now begin to move. If it doesn’t, try increasing your receivers volume. Once the indicator is moving, tune in to a signal as selected in the Monitor menu and messages should start to appear. If you don’t get any results after a few minutes, try different volume levels. Using an FSK 2 or 4-level slicer When using Windows 95 or 98, the driver Comprt.vxd should be loaded automatically. For newer operating systems (like XP, Vista) you will need to manually install the driver which can be found in the xp_driver.zip archive. Using an RS232 interface For this type of interface, no additional drivers are needed. In the Interface Setup dialog box you need to select the type of network (mode) you want to monitor. More info on the new RS232 interfaces can be found on this website : http://www.discriminator.nl/rs232/index-en.html Decoding via the soundcard After making the cable to connect your receiver to your computers line-in socket, follow these instructions : 1. Run PDW and select Setup in the Interface Menu. 2. Select the soundcard check box and also the configuration type : 3. 4. 5. 6. Discriminator / Earphone (default) / Speaker Out / Tape/Rec Out Go back to the Interface menu and select Volume. Then go to the Options menu and select Properties/Recording and select Line-in. Close the Volume control. Switch your radio on and turn up to volume to about a quarter, also set the squelch adjustment to its lowest. When using a discriminator tap, the volume and squelch settings are not important. Select the type of signal you want to decode from the Monitor menu (POCSAG/FLEX/MOBITEX/ACARS) Tune into any random white noise. The signal indicator on the far right of the toolbar should start to move. If it doesn’t, try increasing your receivers volume. PDW v3.1 Manual – September 2010 5 7. Once the indicator is moving, tune in to a signal as selected in the Monitor menu and messages should start to appear. If you get nothing after a few minutes, try different volume levels. 8. If you’ve managed to get some messages to appear but can’t seem to get good decoding results, then try all the configurations in the Interface Setup dialog box. 9. If you still don’t get good decoding results, it might be worth to try the instructions for setting up a custom configuration on the next page. How to set up a custom configuration If you are reading this section, then you probably don’t get good decoding results using default settings. Try these instructions : 1. Select the Custom configuration from the Interface Setup dialog box, then click the 2. 3. 4. 5. 6. 7. “Set Custom” button. Change the “Threshold” setting for 1200 baud to 1. Click OK to accept the change. Try different volume levels until you get the best results. (Note: at this point, only POCSAG 1200 will be affected) If you still don’t get good results, then increase the 1200 threshold setting to 2 and try the above instructions again. Once you have tried all the 1200 threshold settings and have found which one works best, then repeat all the instructions above again for the other baud rates, depending on the mode and baud rate you are planning to decode. If the decoding results still aren’t satisfying, then try all instructions above again for “Centering” and “Resync” settings. NOTE: The custom configuration has no effect on ACARS signals. Discriminator tap If you have tried all instructions to improve decoding results for either the serial port interface or the soundcard and still get poor results, no matter what you do, then your only option is a discriminator tap. This involves opening your receiver and follow the instructions as described on http://www.discriminator.nl. A discriminator tap always works, when done correctly. Another advantage of a discriminator tap is that the settings of volume and squelch don’t matter anymore. PDW v3.1 Manual – September 2010 6 Paging Message Format PDW consists of two window panes, the upper pane which is the main message pane and the lower pane which is used for displaying filtered messages. Both panes have the same message format as follows : Address | Time | Date | Mode | Type | Bitrate | Message 1234567 14:13:33 17-08-09 POCSAG-1 ALPHA 1200 Please call ASAP 7654321 15:14:13 17-08-09 POCSAG-2 NUMERIC 512 0845-123456 1234567 14:13:33 17-08-09 FLEX-A ALPHA 1600 Please call ASAP 7654321 15:14:13 17-08-09 FLEX-B StNUM 3200 0845-123456 1234567 14:13:33 17-08-09 ERMES-2 ALPHA 6250 Please call ASAP Address The address field can be either seven or nine digits long and uniquely identifies the pager for which the message is being sent. You can filter out addresses into the filter pane, see Options menu Filters. Time/Date Displays the current time and date based on your computers system time. On some FLEX networks you can use the so-called network FlexTIME, see Options Flex. Mode This field shows the mode (POCSAG, FLEX or ERMES) and either the function number (1-4) or the phase letter (A-D). Bitrate The bitrate (speed) of the current paging signal. Message The message type can be one of the following : POCSAG : Alphanumeric / Numeric / Tone-Only FLEX : Alphanumeric / Numeric / Tone-Only / Binary / Secure ERMES : Alphanumeric / Numeric / Tone-Only / Transparent The message types (as well as faulty characters and filtered keywords) are indicated by their own colors and can be configured in the Display Colors dialog box. PDW v3.1 Manual – September 2010 7 ACARS Message Format PDW consists of two window panes, the upper pane which is the main message pane and the lower pane which is used for displaying filtered messages. Both panes have the same message format as follows : Air.Reg | Time | Date | Msg.No | DBI | Mode | D-ABIK 17:52:07 26-02-10 F18A 4 R Mode R | Message Message Label : Aircraft Reg : Aircraft Type : Flight Number : Airline : Ground Station: DOWNLINK NAK => _•...NO INFORMATION TO TRANSMIT (Up/Downlink) OE-LBF Country: AUSTRIA A321-211 1458 [Wien] OS458C *AUA* Austrian Airlines Brussels (BRU) Aircraft Reg. The 7-digit aircraft registration. Time/Date Displays the current time and date based on your computers system time. Msg.No. Displays the 4 digit message sequence number (hexadecimal notation) which indicates the time in minutes and seconds past the hour that the message was sent. DBI Displays the Downlink Block Identifier, which is used for indicating the retransmission of previously sent messages. Mode Displays the Ground System Interface Configuration. Message Label Displays the 2 character message label followed by the meaning of the label. This label indicates the type of message sent. You can add or change labels in the “label.df” database file. Country The aircraft registrations prefix indicates the country of origin. Countries can be added or changed in the database file “country.df”. PDW v3.1 Manual – September 2010 8 Aircraft Type Displays the type of aircraft based on the aircraft registration and whether the aircraft type is found in the database file “aircraft.df”. You can edit this file to change or add new aircraft registrations. Flight Number Displays the 6 digit flight number. Airline Displays the airline carrier, which is derived from the first two characters of the flight number. Ground Station Shows the ground station with which the aircraft is making contact. DOWNLINK Indicates whether the message was a downlink message. This field can also display UPLINK and GROUND-TO-GROUND. NAK Technical Acknowledgement NAK = Not Acknowledged ACK = Acknowledged PDW v3.1 Manual – September 2010 9 Mobitex Message Format PDW consists of two window panes, the upper pane which is the main message pane and the lower pane which is used for displaying filtered messages. Both panes have the same message format as follows : MAN | Time | Date | Sender | Type | Bitrate | Message 1234567 14:13:33 17-08-09 2345678 DATA 8000 ASS 1=fG02tj:'i 7654321 15:14:13 17-08-09 8765432 HPDATA 8000 B+&(AB+&6 '@D03 B MAN The MAN field shows the seven digits Mobitex Access Number and uniquely identifies the Mobitex radio modem for which the message is being sent. You can filter out MAN’s into the filter pane, see Options menu Filters. Time/Date Displays the current time and date based on your computers system time. Sender The Sender field identifies the seven digits sending MAN. Type The Type field identifies the type of message being sent, this can be TEXT, DATA, HPDATA or STATUS. Bitrate The bitrate (speed), which for Mobitex is always 8000. Message The decoded messages contain raw 8-bits data. Most messages look like a random string. The data is not necessarily encrypted, but is sent efficiently as Mobitex is charged per byte. The end user application determines the meaning of the data; this can vary from user to user. Mobitex offers a transparent channel. PDW v3.1 Manual – September 2010 10 File Menu Open/Close Logfile Opens the PDW Logfile dialog box : Enable Logfile Enables the PDW Logfile and the options below. Browse Lets you browse for a logfile, or you can just type in a filename directly. Use date as filename Lets PDW use the current date for the logfile name, and starts a new logfile each new day. The date format can be set in Options General. Columns to be logged Allows you to select which message columns to be shown in the logfile. Exit Will exit PDW. PDW v3.1 Manual – September 2010 11 Edit Menu Copy Selection Copies the current selection to the clipboard. Copy Monitor Window Copies all messages in the upper (monitor) window to the clipboard. Copy Filter Window Copies all messages in the lower (filter) window to the clipboard. Save If one of the three options above has been selected, the content of the clipboard can be saved to a text file. Selecting this option will open a Save File dialog box. Print If one of the first three options above has been selected, the content of the clipboard can sent to the printer. PDW v3.1 Manual – September 2010 12 Interface Menu Setup Serial Port This check box lets you select the serial port for signal input. Slicer / RS232 Lets you select the type of interface you are using. Mode When using an RS232 interface, you need to select the type of network you want to monitor, which can be : - Pocsag (512/1200/2400bps) - Flex (only 1600bps - 2-level) - Mobitex (8000bps) 2 or 4-level FSK When using a serial (slicer) interface, select the type of interface. PDW v3.1 Manual – September 2010 13 Port This option will be enabled in Windows 95/98/ME and lets you select the serial port you are using. Address / IRQ This option will be enabled in Windows 95/98/ME and allows you to enter the custom serial port address and IRQ. Soundcard This check box lets you select the soundcard for signal input. Configuration This drop down list lets you choose different audio input configurations. See Getting Started Decoding via the Soundcard for how to use this option. Set Custom When selected in “Configuration”, this allows you to set up a custom configuration. For more info, see : How to set up a custom configuration. Soundcard If your computer has more than one soundcard, you can select one of them. When only one soundcard is present, this option is disabled. Sample rate This drop down list lets you choose different input sample rates. You should only change this value if you think your soundcard does not support the default 44100 sample rate or if your computer has a slow processor. Volume Opens the Windows volume control. PDW v3.1 Manual – September 2010 14 Options Menu Options POCSAG When enabled, you can choose which bitrate you want to be shown. Unfortunately, POCSAG signals do not tell what type of message is being sent. In fact, only the network and the receiving pager know for sure. Luckily, some networks use the function bits as described in the protocol specifications, which makes decoding more accurate. On these networks, you can enable “Decode function numbers always as default”. If you don’t know for sure, just try what setting gives the best results. Otherwise, there are some cases in which PDW has to guess whether the message is (alpha)numeric. You can select the last option to show a message as well as numeric as alphanumeric. At least one of both should be correct PDW v3.1 Manual – September 2010 15 FLEX When enabled, you can choose which bitrate you want to be shown. Unlike POCSAG, FLEX does provide type information, so no guessing is necessary. Some networks use dynamical groupcalls, in which so-called “short instructions” are being sent to the pagers which make the groupcall more efficient. You can choose whether to show these instructions and to convert them into a normal message. FLEX networks offer the ability to provide time/date information by sending FlexTIME. If detected, this option will be enabled and you can use this time information to correct your system time. MOBITEX The bitsync can be set to Base or Mobile, depending on the type of signal you are monitoring (uplink or downlink). The bitrate has been locked to 8000bps and for best decoding results you need to enter the Frame Sync (Network ID) of the network you are monitoring. To obtain this information, you will have to start with “Check Frame Sync” unchecked and see what appears in the caption as in the image above. Since Mobitex offers transparent messaging, lots of unreadable data is being decoded. You can suppress short messages by entering a minimum number of characters. On some networks you might need to select Bit Scrambler and Ramnet, you’ll have to try what gives the best results. You can enable/disable various message types like TEXT, DATA and HPDATA and choose whether to show the HPID, Sweep Frames (Base Station Information) and Controlling Messages (Verbose). Optional, the file “base-ids.txt” can be used to label BaseID’s (see caption above). ACARS Select whether you want to enable parity checking for ACARS signals. You can use this to prevent any garbage messages from being displayed. Optional information in title bar When enabled, additional information will be displayed in the title bar (caption), like FLEX/ERMES cycles and frames, and rejected/blocked messages. PDW v3.1 Manual – September 2010 16 General Options Block duplicate messages Some messages are sent more than once, even by default on some networks. To hide these “duplicate messages”, you can use this option in three ways : Previous address+message is the same (no timer) Previous message is the same (no timer) Previous address(+function)+message is the same The first option compares the current capcode and message with the previous. The second only checks the message text. Due to some internal difficulties this option is not possible when using FlexGroupMode. The last option compares the address (and when monitoring pocsag, also the function number) as well as the message text. This last option also enables a timer (1-9 minutes). If a message is repeated within this period, it will be blocked. Log to ‘blocked.txt’ Messages which are blocked with the previous option can be logged to a separate file; blocked.txt. This can be usefull to determine whether the correct messages are being blocked and you don’t miss any messages. Convert ‘»’ character to linefeed On some networks, a message can contain linefeeds. By default, a linefeed will be shown as ‘»’. If you’d rather see the linefeed, enable this option. PDW v3.1 Manual – September 2010 17 Separate/group messages with empty line By default, there is no spacing between messages. By enabling this option, an empty line will be added between messages with a different text. If the text is the same as the previous message, no empty line will appear. In this way, messages with the same text will be ‘grouped’. Numeric/Tone messages will be ignored by this option, they will always be showed without empty lines. Date format (logfile name) Lets you select the date format for the logfile name : 050324.log 05mar24.log Date format (on screen / in logfiles) Lets you select the date format to be shown on the screen / in logfiles : DD-MM-YY (default) MM-DD-YY YY-MM-DD Confirm Exit If you want to exit PDW, a confirmation can be asked. Path for logfiles Lets you select the path where the logfiles will be saved. The browse button lets you select a path, the default button restores the default path (..\PDW\Logfiles). PDW v3.1 Manual – September 2010 18 SMTP (Email) PDW offers the ability of sending out emails, containing message information. You can select whether you want to send all messages, or specific (filtered) messages. You can set a custom SMTP port number, which by default is 25. Fill in the host name, to which address(es) you want to send the emails. Multiple addresses can be separated with ; or , in between. Select which messages items you want to be emailed and if they have to be placed in the body and/or the subject field. Note: SMTP is a complex protocol. PDW only supports “basic” SMTP. If PDW has to support all possible servers like a real SMTP-client, it would become more an email program than a real time paging decoder. So if it doesn’t work, sorry… PDW v3.1 Manual – September 2010 19 Filters Menu Filter List Will open the Filters Dialog. Filters are a means of separating pager messages into the filter message pane. This is done by matching the pager address to one of your filter addresses or through matching a word or phrase within a paged message to a word or phrase of one of your filters. After defining some filters, the dialog can look like this : The caption tells you the number of filters and which one is currently selected. You can add, edit, remove and find specific filters. Right clicking with your mouse will open the context menu as shown at the right. PDW v3.1 Manual – September 2010 20 Add/Edit Filter When adding or editing a filter, more or less the same dialog will be opened : Reject Checking the “Reject” option will prevent messages matching this filter from being displayed. Filter Type When adding a filter, you need to select the type of filter, which can be one of the types in this drop down box : The default type can be defined in Filters Options. Address The address(es) to be filtered. You can use ? as a wildcard to filter a range of addresses. For example, 12????? will filter all addresses starting with “12”. PDW v3.1 Manual – September 2010 21 Function number This drop down box will be shown when adding/editing a POCSAG filter. You can select whether you want to filter a specific function number, or all function numbers (default). Audio When filtering a message, PDW can play a sound which gives you an audible alert. You can select one of the default sounds or use the so-called capcode.wav in which the WAV file can have the same name as the filtered capcode and/or text. When filtering 1234567, PDW will look for 1234567.wav. If not found, the default sound will be played. When filtering 1234567 in combination with the text “fire”, PDW will look for 1234567-fire.wav. If not found, 1234567.wav, if not found, the default sound will play. When you have defined lots of WAV files, PDW may want to play one, when the previous WAV file is still playing. To decide whether to abort the currently playing WAV file, PDW will use priorities which can override a currently playing WAV file. These priorities are : 0. 1. 2. 3. 4. 5. 6. 7. 8. 9. Complete capcode.wav Capcode.wav with 1 wildcard (like 000000X.wav) Capcode.wav with 2 wildcards (like 00000XX.wav) Capcode.wav with 3 wildcards (like 0000XXX.wav) Capcode.wav with 4 wildcards (like 000XXXX.wav) Capcode.wav with 5 wildcards (like 00XXXXX.wav) Capcode.wav with 6 wildcards (like 0XXXXXX.wav) Capcode.wav with 7 wildcards (like XXXXXXX.wav) SoundX.wav (filtered) Monitor-only.wav If the priorities are equal, the file sizes will decide whether the playing file will be stopped. A larger file gets a higher priority and will override a smaller file. Color When defined a label, and enabled “Show Filter Label”, you can also define its color. Text This control lets you enter a word or phrase to be matched by the filter. Text matching is not case sensitive, so the word/phrase can be in lower or upper case. This word or phrase can be anywhere in the message. You can enter up to 10 strings for one single filter, separated with a ‘&’, like “Call&Jones&ASAP”. PDW v3.1 Manual – September 2010 22 Match EXACT message When selected, messages will only be filtered if the filter text matches the message exactly. When filtering “Jones”, a message like “Call Mr. Jones” will not be filtered. RX / TX MAN This option appears instead of Match EXACT when adding/editing a Mobitex filter. It allows you to filter only the RX (receiving) MAN, the TX (sending) MAN, or both MAN’s. Label Lets you enter a filter description, which can be shown below the filtered message. Show Filter Label Shows the filter label together with the filtered message. If disabled, it will only be visible in the filters list Monitor Only Filters the message, but doesn’t show it in the lower window pane. Can be useful to show labels only in the upper window pane and to play certain filter sounds without the message being shown in the filter pane. Enable filter command file Enable the filter command file for this filter. The command file itself can be configured in the Filter Options dialog. Send email If “selected filters only” is selected in the SMTP dialog, you can enable emailing for this filter when triggered. Hitcounter The hitcounter keeps track of the number of times this filter has been triggered, as well as the time and date of the last hit. If necessary, you can reset the hitcounter, so it will start counting over again. PDW v3.1 Manual – September 2010 23 Enable separate filter file When enabled, lets you enter up to three separate filter files for this filter. Might be useful if you want to combine related addresses in the same logfile. Browse / Clear Lets you browse for a logfile, or you can just type in a filename directly. When you have selected a logfile, the button changes into “Clear”, which allows you to remove the logfile. Apply Saves changes without closing the dialog. +/Jumps to the next or previous filter. Sort by address/label Sorts the selected filters by address or label. Reset hitcounters Resets the hitcounters of all selected filters. Check for duplicate filters Opens a dialog which allows you to find and remove identical filters. Find Opens a small Find dialog in which you can enter a (partial) address, text or label and PDW will start searching when typing. After closing the dialog, the last search string will be remembered and you can use (SHIFT) F3 to find the next (or previous) filter. PDW v3.1 Manual – September 2010 24 Filter Options Will open the Filter Options dialog : Enable Filter File output Enables the filtered logfile(s) and the options below. Browse Lets you browse for a filter file, or you can just type in a filename directly. Use date as filename Lets PDW use the current date for the filter file name, and starts a new filter file each new day. The date format can be set in Options General. Columns to be logged Allows you to select which message columns to be shown in the filter file. Show descriptions You can select if PDW has to show labels also in the monitor window (and logfile) and whether the labels has to be written on a new line (only in the logfile). PDW v3.1 Manual – September 2010 25 Command file The command file lets you run an external program file (with optional arguments) when you receive a filter match and the filter has the “Enable filter command file” enabled. This program file can be any executable file or a “.BAT” or “.COM” file. “Browse” lets you browse for a filename, or you can just type in a filename directly. In the “arguments” control you can enter the arguments to be passed to the command file. These can be anything you like or any of these special character sequences : %1 %2 %3 %4 %5 %6 %7 %8 Address Time Date Mode Type Bitrate Message Label For example : “%1” “%2” “%3” “%7” will expand to something like : 1234567 15:21:44 01-02-10 This is a TEST message Show Tone Only / Numeric / Binary / Hex If you don’t want to see certain message types, you can simply disable them. Show filtered messages only in filter window / logfile(s) Select this option if you don’t want to see filtered messages in the upper (monitor) window or the monitored logfile. Filter Beep / WAV files Allows you to enable or disable the filter sounds (or only for filtered messages). Default filter type Sets the default filter type for the Add Filter dialog. Show CMD/DESC/SEP etc in filter dialog Shows additional information in the filters dialog. PDW v3.1 Manual – September 2010 26 Display Menu Clear Screen Allows you to clear the contents of the monitor and/or the filter window. Colors Opens the colors dialog for the current selected mode : As you can see you can change the colors of all message items, as well as for characters which contain biterrors. Font Opens the windows Font dialog box for changing the message font (only nonproportional fonts are allowed), as well as the character size and font style. PDW v3.1 Manual – September 2010 27 Screen Options In this dialog you can configure the screen layout : You can define which columns to want to be shown and also in which order. Some FLEX networks use so-called “dynamic group messaging”, for those networks you can enable the “Flex Group Mode”, which will show something like this : If enabled, you can select whether you want to log in the same (or the old) layout and if you want to combine consecutive individual messages into a group : PDW v3.1 Manual – September 2010 28 Scrollback This dialog box lets you set the number of lines you can scroll back in either of the two message panes, the scrolling speed of the mousewheel and the pane sizes. Systemtray PDW can be minimized to the system tray and run in background and can manually or automatically be restored on specific events : PDW v3.1 Manual – September 2010 29 Monitor Menu Lets you select one of the following modes to monitor : POCSAG / FLEX paging ACARS Mobitex ERMES Statistics Shows the statistics of the messages received over the last day and hour : PDW v3.1 Manual – September 2010 30 Character Set Menu Lets you select a character set. Default will use basic ASCII. A few custom character sets are offered, like Hebrew, German, Skyper and Swedish. You can add new character sets to PDW by editing the database file “language.df”. New character sets will automatically be displayed in the Character Set menu after restarting PDW. Signal Indicator 100% The signal indicator is located on the far right of the toolbar. Unfortunately, it’s impossible to show the real signal strength, it just starts moving when random noise is detected and fully moves to the right when the current selected mode is decoded. Below the signal indicator the RX-Quality is shown. In fact, this is the “decoding quality”, but this value is highly dependant on signal quality. Key Shortcuts ALT-L ALT-S ALT-V CTRL-C CTRL-U CTRL-L CTRL-S CTRL-D CTRL-O CTRL-F CTRL-X F1 F7 F11 Open/Close Logfile Show Statistics Open Volume control Copy selection Copy upper (monitor) window Copy lower (filter) window Interface Setup Clear Display Options Filters dialog Exit Opens this manual (if placed in the main PDW folder) Opens LogBrowser (if placed in Logfiles folder) Switch pane sizes PDW v3.1 Manual – September 2010 31 Toolbar Buttons The buttons on the toolbar provide shortcuts to the following menus : Open/Close Logfile Copy selection Copy monitor window Copy filter window Copy clipboard Print clipboard Options dialog Filters dialog Show statistics Pause PDW Help (should open this PDF) Clear Screen Change mode PDW v3.1 Manual – September 2010 32 Credits Most of the credit goes to Jason Petty. He started the PDW project but unfortunately was unable to continue this wonderful software. I’d like to thank : Rutger Heunks - Flex Group Messaging, and more Andreas Verhoeven - Lots of stuff Herman Withaar - Win2k driver, and more All my beta testers - For testing, and testing PDW v3.1 Manual – September 2010 33 Donations At first, I didn’t want to charge anything for PDW, as it is 100% hobby and I only took over an existing piece of software. I don’t exactly remember, but before I took over PDW wasn’t freeware. I made it freeware, but over the years, I really spend lots of time in several changes, new functions and (minor) bug fixes. Some people kept persisting on donations, so I made a PayPal account, especially for this. PayPal If you have a PayPal account, mine is : [email protected] , which is also my primary email address which can be used for any questions regarding PDW or LogBrowser. IBAN IBAN/SEPA : NL19INGB0006374227 BIC/SWIFT : INGBNL2A The red numbers is the account number which can be used directly in Holland. PDW v3.1 Manual – September 2010 34