1
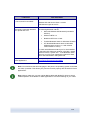
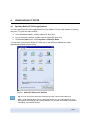
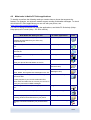
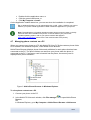
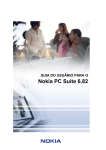
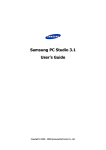
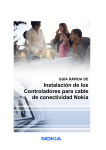
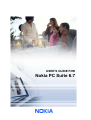
USER’S GUIDE FOR
Nokia PC Suite 6.7
Contents
1. Introduction ....................................................................................................................... 1
1.1
1.2
1.3
1.4
Nokia PC Suite applications .........................................................................................................1
Phone models you can use with Nokia PC Suite .........................................................................2
Getting started ..............................................................................................................................2
Must haves ...................................................................................................................................2
2. Installing Nokia PC Suite .................................................................................................. 4
2.1
2.2
2.3
2.4
2.5
2.6
Before installation .........................................................................................................................4
Installing Nokia PC Suite from a CD-ROM ...................................................................................4
Installing Nokia PC Suite from the Web .......................................................................................5
Uninstalling Nokia PC Suite..........................................................................................................5
Changing the language used in Nokia PC Suite ..........................................................................6
Installing drivers............................................................................................................................6
2.6.1 Updating infrared modem driver ...........................................................................................7
2.6.2 Installing Nokia Bluetooth modem driver..............................................................................7
3. Connecting your phone and a PC.................................................................................... 9
3.1
3.2
3.3
3.4
Selecting a connection type..........................................................................................................9
Connecting your phone to a PC via cable ..................................................................................10
Connecting your phone to a PC via infrared...............................................................................11
Connecting your phone to a PC via Bluetooth ...........................................................................11
3.4.1 Pairing devices for Bluetooth connection ...........................................................................11
4. Using Nokia PC Suite...................................................................................................... 13
4.1 Opening Nokia PC Suite applications.........................................................................................13
4.2 Main tasks in Nokia PC Suite applications .................................................................................14
4.3 Backing up phone contents to a PC ...........................................................................................15
4.4 Synchronizing data between your phone and a PC ...................................................................15
4.5 Connecting to the Internet using your phone..............................................................................17
4.6 Installing applications to your phone from a PC .........................................................................18
4.7 Managing phone contents on a PC ............................................................................................19
4.8 Transferring files between your phone and a PC .......................................................................20
4.9 Adding contacts to your phone from a PC..................................................................................20
4.10 Sending text messages from a PC ...........................................................................................21
4.11 Viewing multimedia files on a PC .............................................................................................21
4.12 Storing images from your phone to a PC .................................................................................22
4.13 Transferring music from a CD to your phone ...........................................................................22
4.13.1 Ripping and transferring CD tracks to the phone automatically...................................23
4.14 Creating wallpaper images to your phone ................................................................................23
5. Terms and abbreviations................................................................................................ 25
6. Safety Notes .................................................................................................................... 25
INDEX .................................................................................................................................... 26
1.
INTRODUCTION
With Nokia PC Suite you can edit, store, and synchronize your Nokia mobile phone data with
a Microsoft Windows based PC system.
This guide provides instructions on how to install Nokia PC Suite, connect your phone to the
PC, and start using Nokia PC Suite applications. For more information about Nokia PC Suite,
see:
•
Nokia PC Suite help which contains more detailed instructions on using Nokia PC
Suite. To open, click Help or press F1 in Nokia PC Suite applications.
•
Tutorial for Nokia PC Suite 6.7 which contains step-by-step demos of Nokia PC
Suite applications. To open, click Help > PC Suite tutorial in the Nokia PC Suite main
window.
•
Nokia PC Suite FAQ Search which contains Nokia PC Suite troubleshooting
information. To find the information, go to the Nokia PC Suite Web pages at
www.nokia.com/pcsuite and browse to Support > FAQ Search.
You can find instructions on how to use your Nokia mobile phone in the phone’s user's guide.
All references to a PC in this guide apply equally to a laptop computer.
Note: Read the Note texts marked like this one carefully, as they often contain
information that may help you to avoid potential problems.
1.1 Nokia PC Suite applications
Nokia PC Suite consists of the following applications:
Backup
Content Copier
Synchronize
Nokia PC Sync
Connect to the Internet
One Touch Access
Install applications
Nokia Application Installer
File manager
Nokia Phone Browser
Contacts
Nokia Contacts Editor
Messages
Nokia Text Message Editor
View multimedia
Nokia Multimedia Player
Store images
Image Store
Transfer music
Nokia Audio Manager
Create wallpapers
Nokia Image Converter
Manage Connections
Nokia Connection Manager
1/26
For information on the tasks that you can perform with these applications, see section 4,
Using Nokia PC Suite in this guide.
Note: Nokia Multimedia Player, Image Store, Nokia Audio Manager, and Nokia Image
Converter are not included in Nokia PC Suite Starter Edition.
1.2 Phone models you can use with Nokia PC Suite
Nokia PC Suite can be used with compatible Nokia mobile phones. Certain features can only
be used with phone models that support those features. For example, not all phone models
support sending multimedia messages.
To check which versions of Nokia PC Suite, Nokia PC Suite applications, and connection
types your phone model supports, see www.nokia.com/pcsuite/compatibility.
1.3 Getting started
To use Nokia PC Suite you need a compatible Nokia mobile phone and a PC. Before you
can start using PC Suite you need to do the following:
1. Install Nokia PC Suite.
See section 2, Installing Nokia PC Suite.
2. Select connection type(s) you want to use (cable, infrared, Bluetooth).
See section 3, Connecting your phone and a PC.
3. Install modem drivers if you want to use your phone to connect to the Internet.
See section 2.6, Installing drivers.
4. Connect your phone to a PC.
See section 3, Connecting your phone and a PC.
1.4 Must haves
To do this
You must have
To install and run Nokia PC Suite
Windows 2000 or Windows XP (Professional or Home
Edition)
At least 250 MB of free disk space
Administrator rights to the PC
To connect your phone to a PC
At least one of the following connection sets
•
USB connection cable (DKU-2, DKE-2, or CA53) and a compatible port on your PC
•
Serial connection cable CA-42 and a
compatible port on your PC
•
Infrared (IrDA) port on your PC
•
Bluetooth wireless technology equipment and
software
2/26
To do this
You must have
To install drivers for DKU-2, DKE- Windows 2000 with Service Pack 3 or later, or
2, CA-53, and CA-42 cables
Windows XP with Service Pack 1 or later
Administrator rights to the PC
To create a Bluetooth wireless
technology connection between
your phone and a PC
Bluetooth wireless technology equipment with one of
the following Bluetooth stacks:
•
Microsoft Windows XP Bluetooth (included in
XP SP2)
•
Widcomm BTW 1.4
•
Broadcom BTW 3.0 or later
•
Toshiba Bluetooth Stack for Windows XP/2000
•
IVT BlueSoleil Bluetooth stack for Windows
XP/2000 (driver version 1.6.1 with release
version 05222 or newer)
To check which Bluetooth stack your PC has installed:
in the Nokia PC Suite main window, click Help > About
Nokia PC Suite > System info… If the Bluetooth stack
found on your PC is not supported by Nokia PC Suite,
this is also mentioned in the system info.
To perform tasks with Nokia PC
Suite applications
A compatible phone. For more information, see
www.nokia.com/pcsuite/compatibility
Note: You should use the same language in the phone, the operating system, and Nokia
PC Suite, if possible. This allows your phone to function properly with all Nokia PC Suite
applications.
Note: Always make sure you use original Nokia cables with Nokia PC Suite to secure
reliable operation of the Nokia PC Suite applications. Check the labeling on your cable.
3/26
2.
INSTALLING NOKIA PC SUITE
You can install Nokia PC suite from a CD-ROM, or from the Nokia PC Suite Web page at
www.nokia.com/pcsuite. Note that you need administrator rights to your PC to be able to
install software to it.
To establish a connection between your phone and the PC you also need to have drivers
installed on your PC. Most drivers are installed automatically when you install Nokia PC Suite
or when you connect your phone to the PC with the Get Connected wizard. For detailed
information see section 2.6, Installing drivers in this guide.
Tip: If you are connected to the Internet, Nokia PC Suite displays a notification when
there is a new Nokia PC Suite release available to be downloaded.
2.1 Before installation
If you have an earlier version of Nokia PC Suite (5.x or 6.x) installed on your PC, the earlier
version will be automatically replaced during the installation. If for some reason you need to
uninstall the older version manually, the installation program prompts you to do so.
If you want to use a Bluetooth connection, you need to install Bluetooth wireless technology
software on your PC before you install Nokia PC Suite. For more information on Bluetooth
software you can use with Nokia PC Suite, see section 1.4, Must haves in this guide.
If you are upgrading, for example, from Nokia PC Suite 6.41 or earlier to Nokia PC Suite 6.7,
synchronize your phone with the existing Nokia PC Suite before upgrading, to avoid
duplicate calendar appointments. When you have installed Nokia PC Suite 6.7, rerun
synchronization.
2.2 Installing Nokia PC Suite from a CD-ROM
You can install Nokia PC Suite from a CD-ROM if your phone’s sales package contains one.
1. To start the installation, insert the CD-ROM into your PC’s CD-ROM drive and click the
installation option.
2. Select the language, and click OK. The installation program starts.
3. Follow the instructions on the screen, and note the following:
• You must read and accept the Licence agreement before continuing.
• If you have an older version of Nokia PC Suite installed on your PC, you are
informed it will be uninstalled.
• You may be asked to restart the computer during the installation.
4. When the installation is complete, the Get Connected wizard opens automatically and
you can select the connection types you want to use.
5. Depending on your phone model, you may need to install the PC Suite support
application for SMS and MMS messaging. The Get Connected wizard informs you of
the installation. Note that you must complete the installation on your phone’s user
interface.
4/26
2.3 Installing Nokia PC Suite from the Web
1. Open a Web browser and go to www.nokia.com/pcsuite > Download. The download
assistant opens.
2. If you need help to determine which PC Suite version is suitable for your phone model,
you can use the download assistant.
3. Select your phone model and click Continue. If there are two versions available for
your phone, you are asked to select your PC operating system.
4. Select the language to be downloaded from the drop-down list and click Download.
5. Save the file on your PC. Click Continue and follow the instructions on the last screen
of the download assistant.
6. On your PC browse to the downloaded file Nokia_PC_Suite_67_xx.msi (where xx
stands for the language) and click it. The installation program starts.
7. Follow the instructions on the screen, and note the following:
• You must read and accept the License agreement before continuing.
• If you have an older version of Nokia PC Suite installed on your PC, you are
informed it will be uninstalled.
• You may be asked to restart the computer during the installation.
8. When the installation is complete, the Get Connected wizard opens automatically and
you can set up the connection types that you want to use.
9. Depending on your phone model, you may need to install the PC Suite support
application for SMS and MMS messaging. The Get Connected wizard informs you of
the installation. Note that you must complete the installation on your phone’s user
interface.
2.4 Uninstalling Nokia PC Suite
1. Select Start > Programs > Nokia PC Suite > Uninstall Nokia PC Suite.
2. Follow the instructions on the screen until the program files are removed.
OR
1. Select Start > Settings > Control Panel.
2. Double-click Add/Remove Programs.
3. From the list of Currently Installed Programs, select Nokia PC Suite.
4. Click Change/Remove. If you click Change, you need to click Remove in the window
that opens.
5. Follow the instructions on the screen until the program files are removed.
Note: When you uninstall Nokia PC Suite, the drivers which were installed with Nokia PC
Suite will be also uninstalled. The drivers will not be uninstalled if you have updated the
Nokia Connectivity Cable Drivers separately after installing Nokia PC Suite.
5/26
2.5 Changing the language used in Nokia PC Suite
If you have a Nokia PC Suite installed and you want to change the language Nokia PC Suite
applications use, do one of the following:
•
To install the same version of Nokia PC Suite in another language: uninstall Nokia PC
Suite and then select to reinstall it in the new language from the CD-ROM or from the
Nokia PC Suite Web pages.
•
To install a newer version of Nokia PC Suite in another language: select to install the
Nokia PC Suite in the new language. The old version of Nokia PC Suite and language
are automatically replaced during the installation.
Note: You should use the same language in the phone, the operating system, and Nokia
PC Suite, if possible. This allows your phone to function properly with all Nokia PC Suite
applications.
2.6 Installing drivers
Most drivers are installed automatically when Nokia PC Suite is installed and when you
connect your phone to the PC in the Get Connected wizard.
You need to have the following drivers installed on your PC:
•
Connectivity drivers so that you can connect your phone and the PC to use Nokia PC
Suite applications.
•
Modem drivers if you want to use your phone as a modem when there is no wired
network available. By using your phone as a modem you can connect to network
services such as the Internet, for example, with the Nokia PC Suite’s One Touch
Access application. If you do not want to use your phone as a modem, you do not
need to install modem drivers.
The following table shows the required drivers, and if they are installed automatically or if you
need to install them manually after installing Nokia PC Suite.
Connection type Connectivity drivers needed Modem drivers needed to use
to connect the phone and PC
the phone as a modem
USB cable DKU-2,
DKE-2, CA-53
Cable drivers and modem drivers are automatically installed with
Nokia PC Suite.
Serial cable CA-42
Infrared
Installed automatically.
Nokia infrared modem is installed
automatically when you connect
your phone to the PC via infrared.
If you are using Windows XP SP1,
you must update the Nokia xxxx
IrDA driver (xxxx is the model
number of the phone) when you
have installed Nokia PC Suite.
6/26
Connection type Connectivity drivers needed Modem drivers needed to use
to connect the phone and PC
the phone as a modem
Bluetooth wireless
technology
Installed automatically.
Install the Nokia xxxx Bluetooth
modem (xxxx is the model number
of the phone) when you have
installed Nokia PC Suite.
If you have Windows XP SP2
Bluetooth, the Bluetooth modem is
already installed and you do not
need to install it.
2.6.1 Updating infrared modem driver
Nokia infrared modem is installed automatically when you connect your phone to the PC via
infrared.
If you are using Windows XP SP1, you must update the infrared modem driver to be able to
use your phone as a modem. Note that you do not need to update the driver if you only want
to use the infrared connection with Nokia PC Suite.
To update the infrared driver (for Windows XP SP1 only)
1. Connect your phone to a PC via infrared.
2. In Windows Start menu, click Control Panel > Phone and Modem Options.
3. From Phone and Modem Options, select the Modems tab.
4. In the Modems tab, select Standard Modem over IR link, and click Properties.
5. In the Standard Modem over IR link Properties dialog box select the Driver tab, and
select Update Driver.
6. The Hardware Update wizard opens. Select Install from a list or specific location
(Advanced). Click Next.
7. In the next dialog choose your search and installation options: select Don’t search. I
will choose the driver to install. Click Next.
8. Clear the Show compatible hardware checkbox.
9. From the Manufacturer list, select Nokia, and from the Models list, select the modem
that you want to add. Click Next.
10. If you want to proceed with the update, click Yes in Update Driver Warning. Your
modem becomes visible in the list of installed modems.
11. Click OK to close the Phone and Modem Options window.
2.6.2 Installing Nokia Bluetooth modem driver
To use your phone to connect to the Internet, you need to have a Bluetooth modem installed
on your PC.
7/26
When a Bluetooth stack is installed on your PC, a standard modem driver is usually installed
automatically with the stack. Additionally, if you have Windows XP SP2 Bluetooth, the
Bluetooth modem driver is already installed. To check if you have a standard modem
installed, go to Control Panel > Phone and Modem Options.
If you have a standard modem driver you can use it instead of adding a Nokia Bluetooth
modem driver for your phone model. However, with the Nokia modem driver you can fully
utilize the data transfer capabilities of your phone.
Each Nokia phone model uses a different modem so you need to install a Nokia Bluetooth
modem driver for each phone model that you want to use as a modem via a Bluetooth
connection. You do not need to retrieve the drivers separately; the Bluetooth modem driver
.inf files are copied to your PC when you install Nokia PC Suite. In this way when you want to
install a modem driver, the file is shown in the installation window.
If for some reason you cannot find the modem file for your phone, you can download it from
your phone model’s Web pages in www.nokia.com/nokiaxxxx (where xxxx is the model
number of the phone), see link for support pages.
To install a Nokia Bluetooth modem driver
1. Activate Bluetooth in your phone and connect your phone to the PC.
2. Go to your Bluetooth software on the PC and activate the Dial-Up Networking profile.
3. In Windows Start menu, click Control Panel > Phone and Modem Options.
4. From Phone and Modem Options, select the Modems tab. Click Add…
5. In the Install New Modem dialog select Don’t detect my modem; I will select it from
a list. Click Next.
6. From the Manufacturer list, select Nokia, and from the Models list, select the modem
you want to add. Click Next.
7. Select the Selected ports option.
8. On the list, select the COM (connection) port on which you want to install the modem.
If there is already a Bluetooth modem installed, select the same COM port. Click Next.
9. Read the note in the next dialog and click either Continue anyway to proceed with the
update or STOP Installation to terminate it.
10. If you proceeded with the installation, your modem becomes visible in the list of
installed modems.
11. Click OK and the Phone and Modem Options window closes.
Note: If you use a Bluetooth stack other than the Microsoft BT stack, note that the Nokia
modem and the Bluetooth modem must be installed to the same serial port. To check
this, go to the Bluetooth wireless technology software on your PC and right-click the dialup networking service for your phone to access the Bluetooth properties page. Check
that the Nokia modem has been installed to the correct port. If not, reinstall it.
8/26
3.
CONNECTING YOUR PHONE AND A PC
You need to connect your phone to a PC to be able to:
•
Transfer information between Nokia PC Suite applications and the phone. For
example, to synchronize calendar appointments or transfer images with Nokia PC
Suite.
•
Use your phone as a modem to connect your PC to network services such as the
Internet.
3.1 Selecting a connection type
You can connect the phone and a PC via a USB or serial cable, Infrared (IrDA), or Bluetooth
wireless technology. When Nokia PC Suite installation is finished, the Get Connected wizard
opens automatically and guides you in configuring the connection type you want to use.
The connection types you can select in Get Connected depend on what connection types
your phone model and the PC support. To check which connection types your phone
supports, see www.nokia.com/pcsuite/compatibility, or your phone’s user’s guide.
Connection type
USB cables DKU-2,
DKE-2, CA-53
Details
USB cable is a fast and reliable data transfer method between a
phone and a PC.
With some phone models, a USB cable can be used either for Nokia
PC Suite connection or for transferring data between a phone’s
memory card and a PC. When you connect your phone to the PC
via USB cable, do not select the file transfer option in your phone if
you want to use Nokia PC Suite with your phone.
You can have several USB cable connections, or even serial and
USB connections simultaneously.
If you did not receive a cable with your phone, you can buy one from
your Nokia retailer.
Serial cable CA-42
A serial cable is a reliable connection method between a phone and
a PC.
You can have only one serial cable connection established at a
time.
If you did not receive a cable with your phone, you can buy one from
your Nokia retailer.
Infrared
Infrared connects your phone wirelessly to your PC within a short
range. The preferable distance between the two devices is one
metre (about three feet) at most.
9/26
Connection type
Bluetooth
Details
Bluetooth wireless technology connects your phone wirelessly to
your PC within a short range. The phone and the PC must be within
a 10-metre (about 30 feet) radius of each other.
If you later want to start using connection types other than the one you selected the first time
you started using Nokia PC Suite, you can do this in the Get Connected wizard. You can
start the wizard from the Get Connected button at the bottom of the Nokia PC Suite main
window.
Note: Some phone models (for example, Nokia Communicators) have an optional
security setting called autolock period, which determines a time-out period after which
the device will be locked if it is in standby mode. Before you can establish a connection
between your phone and Nokia PC Suite you need to open a locked device by entering a
lock code.
Connection status
You can see the connection status between your phone and the PC at the bottom of the
Nokia PC Suite main window:
Connected
Disconnected
Connected but the phone is in an incorrect USB mode for PC Suite
If your phone gets disconnected, you can reconnect it to the PC in the Get Connected
wizard. You can start the wizard from the Get Connected button at the bottom of the Nokia
PC Suite main window.
3.2 Connecting your phone to a PC via cable
1. In Get Connected, select Cable connection as the connection type.
2. Connect the cable to the PC when Get Connected prompts you to do so, and then
connect the other end of the cable to the phone.
3. The first time you use a cable connection you have to wait until Get Connected
finishes installing the required drivers.
Note: When you connect your phone to the PC via USB cable, make sure you have the
default or the PC Suite mode selected in your phone if you want to use Nokia PC Suite
with your phone.
Note: For a CA-42 cable the COM port is normally selected automatically. If not, you can
configure it manually. The CA-42 cable is connected to the USB connector of your PC
and Windows recognizes it as USB. However, in Nokia Connection Manager you have to
select the Serial cable connection type and click Configure… to set the COM port. You
only need to make this configuration once, before you use the connection for the first
time.
10/26
3.3 Connecting your phone to a PC via infrared
1. Activate the IR port of your phone. For instructions, see your phone’s user’s guide.
2. Place the phone and the PC so that the IR ports of the two devices point at each
other.
3. The connection is created automatically. If the PC detects more than one phone, you
are asked to select a phone in a Phone Selector dialog.
3.4 Connecting your phone to a PC via Bluetooth
1. Make your phone visible to other Bluetooth devices and activate the Bluetooth
connection of your phone. For instructions see your phone’s user’s guide.
2. When you activate Bluetooth for the first time you are asked to give a name to your
phone. The name is used whenever you pair your phone with a PC.
3. If you use a Bluetooth adapter, make sure it is plugged into the PC.
4. In Get Connected, select a Bluetooth stack from the list. To check what Bluetooth
stacks you can use with Nokia PC Suite, see section 1.4 Must haves in this guide. To
check which Bluetooth stacks have been installed on your PC, go to the Nokia PC
Suite main window and click Help > About Nokia PC Suite... > System info.… If a
Bluetooth stack found on your PC is not supported by Nokia PC Suite, this is
mentioned in the system info.
5. In Get Connected, follow the instructions to pair your phone with the PC.
3.4.1 Pairing devices for Bluetooth connection
To use Bluetooth as the connection type, you need to pair your phone and the PC. Pairing
means that you code two Bluetooth devices to communicate so they can exchange data. You
only need to pair the devices once, before you use the connection for the first time.
Follow the instructions in Get Connected and note:
•
If you use the passcode generated by Get Connected, enter the passcode on the
phone when requested. Alternatively, you can create your own passcode (1-16
characters, numeric) and enter the same passcode first on the PC and then on the
phone when requested. This passcode is used only once and you do not need to
memorize it.
•
You need to authorize the connection between your Nokia phone and your PC. Select
Yes when you see a connection request on the phone’s display.
•
You can set your PC as authorized, which means that individual connections between
your phone and your PC do not need a separate authorization. On your phone, go to
the Paired devices view, find your PC, and edit the PC to be authorized or trusted,
depending on the term used in your phone.
11/26
Note: If you are using Microsoft Windows XP Bluetooth, you can pair your phone with the
PC in Get Connected wizard and the pairing is valid also for Nokia PC Suite’s One Touch
Access application. When using other Bluetooth stacks, you have to do the pairing for
One Touch Access with the stack’s own pairing wizard.
12/26
4.
USING NOKIA PC SUITE
4.1 Opening Nokia PC Suite applications
You can open Nokia PC Suite applications from the Nokia PC Suite main window by clicking
the icons. To open the main window:
a. In the Windows taskbar, click the Nokia PC Suite icon.
b. In your computer desktop, double-click the Nokia PC Suite icon.
c. In Windows Start menu, click Programs > Nokia PC Suite.
You can also right-click the Nokia PC Suite icon in the Windows taskbar and open
applications directly from the menu.
Figure 1. Nokia PC Suite main window
Tip: You can access the Nokia PC Suite help from the main window Help menu.
Help > Order Settings takes you to a Web page where you can order settings for your
Nokia phone's messaging and browsing features, for example, WAP/GPRS, multimedia
messaging, and Internet settings.
13/26
4.2 Main tasks in Nokia PC Suite applications
To be able to perform the following tasks you need to have a phone that supports the
feature. For example, not all phone models support sending multimedia messages. To check
which Nokia PC Suite applications you can use with your phone, see
www.nokia.com/pcsuite/compatibility.
For more in-depth instructions on using the applications, see Nokia PC Suite help (Help >
Help topics) and Tutorial (Help > PC Suite tutorial).
With Nokia PC Suite you can
Back up personal data from your phone to a PC.
In which application
Icon
Content Copier
Restore personal data from your PC to any
supported phone.
Synchronize personal data between a phone and a
PC.
Nokia PC Sync
Use your phone as a modem to connect your PC to
the Internet.
One Touch Access
Install games and other programs from the PC to
your phone.
Nokia Application Installer
Transfer files between the phone and the PC.
Nokia Phone Browser
View your phone files and folders on the PC.
Create, view, delete, or edit contacts on the PC.
Nokia Phone Browser
(Contacts view)
Send text messages from your PC.
Nokia Phone Browser
(Messages view)
View, delete, and organize text messages on the PC.
Open images, video clips, multimedia messages,
and audio files.
Nokia Multimedia Player
Create playlists of your favorite multimedia files.
Save video and audio files in a format you can use in
both your phone and in MMS messages.
Store images and video clips from your phone on a
PC.
Image Store
Transfer music from a CD to your phone.
Nokia Audio Manager
Create wallpaper, portrait, and MMS images from
existing photos and transfer them to your phone.
Nokia Image Converter
Manage connections between your phone and the
PC.
Nokia Connection Manager
14/26
Note: Nokia Multimedia Player, Image Store, Nokia Audio Manager, and Nokia Image
Converter are not included in Nokia PC Suite Starter Edition.
4.3 Backing up phone contents to a PC
With Content Copier you can back up your phone's contents to a PC. You can then restore
the contents to the same phone from which the backup was originally made, or to another
Nokia phone model. This way you can also use Content Copier to transfer data from one
Nokia phone model to another.
Note: You should back up your phone's contents regularly to help avoid losing important
data.
Copyright protections may prevent some images, ringing tones, and other content from
being copied, modified, transferred, or forwarded.
Some content can only be restored to the same phone model from which it was originally
backed up depending on what type of data the target phone supports.
To make a backup of phone contents and restore it to a phone
1. In Nokia PC Suite main window, click Backup
to open Content Copier.
2. If you have more than one phone connected, click Select Phone and select the phone
you want to back up.
3. Click Settings to choose if you want to back up phone memory, memory card
contents, or both.
4. Click Back Up to make the backup. Making the backup may take several minutes
depending on the connection type you use and the amount of data in your phone. The
backup files .nfb and .nfc are saved on your PC.
5. When you want to restore the data to the same or another phone, connect the phone
to the PC, open Content Copier, and click Restore. Note that data copied from a
memory card can only be restored to a memory card.
The Content Copier main window shows in the Status area when the latest backup was
made and from which phone it was made. When you want to restore the data to the same or
another phone, connect the phone to the PC and click Restore.
4.4 Synchronizing data between your phone and a PC
With Nokia PC Sync you can synchronize contacts, calendar items, notes, to-do items, and
e-mails between a Nokia mobile phone and a PC personal information manager (PIM).
Synchronizing means that the information on both your phone and PC is similar. Note that
not all phone models support, for example, synchronizing e-mails.
You can synchronize a compatible Nokia phone with the following PC PIM applications:
•
Microsoft Outlook 2000/2002/2003
•
Microsoft Outlook Express (Windows Address Book)
15/26
•
Lotus Notes 5.0/6.x
•
Lotus Organizer 5.0/6.0
The Nokia PC Sync icon is displayed on the Windows taskbar when Nokia PC Sync is active:
•
•
shows that the phone is connected. You can click the icon to open PC Sync, or
right-click the icon to access the Nokia PC Sync menu commands,
shows that the phone is not connected.
To create the first synchronization task
1. To open PC Sync, in Nokia PC Suite main window, click Synchronize
.
2. When you open Nokia PC Sync for the first time, the Settings wizard opens
automatically. Follow the instructions on the screen to set, for example:
• PIM application with which you want to synchronize the phone,
• Information to be included in the synchronization,
• Settings for synchronizing Calendar/To-do items,
• Settings for synchronizing contacts,
• Settings for synchronizing e-mails, and
• Settings for automatic synchronization and conflict resolution
For more information on the settings, see the Nokia PC Suite help.
To create a new synchronization task
1. In the Nokia PC Suite main window, click Synchronize
, to open PC Sync.
2. Click Settings.
3. Click Create new settings.
4. Select what information you want to synchronize: Calendar/To-do items, Contact
items, Notes Items, and Email items.
5. Based on what you want to synchronize, the tabs in the Settings window are either
active or inactive. Fill in the active tabs.
6. Click OK to finish creating a new synchronization task.
For more information on the settings, see the Nokia PC Suite help.
Note: As a default Nokia PC Sync has not been set to start automatically when you open
your PC. To make PC Sync start automatically when you open your PC:
1. Click Synchronize on the Nokia PC Suite main window.
2. Right-click the Nokia PC Sync icon on the Windows taskbar.
3. Select Enable on Startup.
16/26
4.5 Connecting to the Internet using your phone
With Nokia PC Suite’s One Touch Access application you can use your phone as a modem
to create a network connection to the Internet. Connection can be established via cable,
infrared, or Bluetooth wireless technology.
To use your phone as a modem, you must have the following:
•
A phone that supports packet data.
•
Appropriate data communications software installed on your PC.
•
A subscription to the appropriate network services from your home service provider or
Internet service provider.
•
The appropriate modem drivers installed on your PC. See section 2.6, Installing
drivers in this guide.
Note: If you are using Microsoft Windows XP Bluetooth, you can pair your phone with a
PC in PC Suite’s Get Connected wizard and the pairing is valid also for One Touch
Access. When using other Bluetooth stacks, you have to use the stack’s own pairing
wizard.
If you use a Bluetooth stack other than the Microsoft BT stack, note that the Nokia
modem and the Bluetooth modem must be installed to the same serial port. To check
this, go to the Bluetooth wireless technology software on your PC and right-click the dialup networking service for your phone to access the Bluetooth properties page. Check
that the Nokia modem has been installed to the correct port. If not, reinstall it.
Note: When started, One Touch Access detects the connected phone and automatically
uses it as a modem. If your phone is connected to a PC with a Bluetooth wireless
technology connection, One Touch Access does not recognize it automatically unless
you have used a Bluetooth modem the previous time you used one Touch Access, and
no other connected modem is available.
To connect to the Internet
1. Connect your phone to the PC.
2. If you are using a CA-42 serial cable or infrared for connection between Nokia PC
Suite and your phone, the connection types need to be deselected so that you can use
the connection type for the modem. One Touch Access automatically deselects the
connection types when creating a connection, and reselects them when the modem is
disconnected.
3. In the Nokia PC Suite main window, click Connect to the Internet
to open One
Touch Access. It will automatically connect to the Internet after 10 seconds.
OR
Click Settings to select the modem you want to use and your network operator from a
list of operators, and then click Connect to establish the Internet connection.
4. When you no longer need the connection, click Disconnect to close the Internet
connection.
17/26
Note: If your phone does not support packet data you can access the Internet by
creating a dial-up connection. See the instructions for using your phone as a modem in
the Nokia PC Suite help.
If you use some other manufacturer's dial-up networking solution and a serial cable or
infrared to create the connection, you need to deselect and reselect the connection types
manually in Nokia Connection Manager.
To deselect connection types
If One Touch Access cannot connect to the Internet, deselect the connection type manually
in Nokia Connection Manager and try again. To do so:
1. In the Nokia PC Suite main window, click Manage connections
Connection Manager.
to open Nokia
2. From the list of connection types, deselect the connection type.
3. Click OK to close Nokia Connection Manager.
4.6 Installing applications to your phone from a PC
With Nokia Application Installer you can install Symbian and Java™ applications such as
calendars or games from a PC to your phone. The file types you can install with Application
Installer are .SIS, .SISX, or .JAD and .JAR. You can download applications to your PC, for
example, from Nokia Web pages or other service providers' pages. You can also install
applications that you have created yourself.
For more information on what kind of applications can be installed in your phone, see your
phone's user’s guide.
Note: Nokia does not warrant for applications from non-Nokia sites. If you choose to
download applications from them, you should take the same precautions, for security or
content, as you would with any site.
To install an application in the phone
1. Download the .SIS, .SISX, or .JAR and .JAD files for the application you want to
install. The .JAD and .JAR files must both be saved in the same folder on your PC.
2. Connect your phone to the PC.
3. In the Nokia PC Suite main window, click Install applications
Application Installer.
to open Nokia
4. In Nokia Application Installer, browse in the My Computer list to the folder where you
have saved the files. With applications that use .JAR and JAD files you only need to
select the .JAR file to install. Nokia Application Installer finds the .JAD file
automatically if the two have been saved in the same folder.
5. In My Phone list select phone memory or memory card as the location where you
want to install the application. Note that you are not able to select the memory card
with all phone models even if one is inserted in your phone.
6. To install the application in the phone:
18/26
• Double-click the application name, or
• Click the green Install arrow, or
• Click My Computer > Install.
On the Application Installer status bar, you can see when the installation is completed.
Tip: In Windows Explorer you can also double-click a .JAR, .SIS or .SISX file you want to
install to your phone. Nokia Application Installer installs the application to your phone.
Note: The applications in Symbian operating system phones cannot be seen on the My
Phone list even when installed in the phone. To check whether your phone uses
Symbian operating system, refer to your phone model’s Web pages in
www.nokia.com/nokiaxxxx (where xxxx is the model number of the phone).
4.7 Managing phone contents on a PC
When you connect your phone to a PC with Nokia PC Suite, PC Suite creates a phone folder
to be viewed in the Windows Explorer, under Nokia Phone Browser.
Nokia Phone Browser displays phone folders and subfolders for each phone that has been
connected to the PC. The phone folders are read from your phone when the phone is
connected to the PC. If a memory card is inserted into the phone, the memory card is
displayed as a phone subfolder.
Figure 2. Nokia Phone Browser in Windows Explorer
To view phone contents on a PC
1. Connect your phone to the PC.
2. In the Nokia PC Suite main window, click File manager
to open Nokia Phone
Browser,
OR
in Windows Explorer, go to My Computer > Nokia Phone Browser > Nokia xxxx
19/26
where xxxx is the model number of the phone. If you have given your phone a familiar
name such as “My phone”, the folder will have that name.
3. Select the phone folder you want to view.
4. You can now view and open files on your PC.
Tip: To refresh the phone contents, view select View > Refresh or click F5.
4.8 Transferring files between your phone and a PC
With Nokia Phone Browser you can transfer files and folders between your phone and a PC
in Windows Explorer in the same way you would copy and transfer any files or folders on
your PC.
Note: Copying files from a PC to the phone may take a while, depending on the size of
the files and the connection type you use. Do not disconnect the phone before the files
have been copied.
With a USB cable (DKU-2, DKE-2, or CA-53) connection, you can transfer large files
such as music files between your phone and a PC more quickly than with other
connection types.
Note: Nokia Phone Browser in Nokia PC Suite release 6.7 no longer contains offline
folders for your phone. If you have had Nokia PC Suite previously installed and you
upgrade to Nokia PC Suite version 6.7, folders such as MyMessages and their contents
are moved to your C-drive.
To copy files/folders between a phone and a PC
1. Connect your phone to the PC.
to open Nokia Phone
2. In the Nokia PC Suite main window, click File manager
Browser,
OR
in Windows Explorer, go to My Computer > Nokia Phone Browser > Nokia xxxx
where xxxx is the model number of the phone. If you have given your phone a familiar
name such as “my phone” the folder will have that name.
3. Copy the file or folder that you want to move.
4. Select the folder to which you want to copy the file or folder, and paste.
Tip: You can also drag and drop files and folders between your phone and a PC.
4.9 Adding contacts to your phone from a PC
With Nokia Contacts Editor you can open, edit, save, and print phone contacts on your PC,
as well as update new and changed contacts to your phone.
20/26
To create a new contact to your phone
1. Connect your phone to the PC.
2. In Nokia PC Suite Main window, click Contacts
your phone’s Contacts folder visible.
. Nokia Phone Browser opens with
3. In Nokia Phone Browser select the Contacts folder and click Contact > New
Contact.
4. Add details to the contact.
5. Click Save.
6. For Do you want to update your contacts to the phone now?
• If you click Yes the contact is added to your phone and on the PC.
• If you click No the contact is not added to the phone contacts, it is added only to
the contacts folder on the PC.
4.10 Sending text messages from a PC
With Nokia Text Message Editor you can receive and send text messages from your PC, and
create folders for storing text messages.
To send a text message
1. Connect your phone to the PC.
2. In Nokia PC Suite Main window, click Messages
. Nokia Phone Browser opens
with your phone’s messages folders visible and the messages are updated.
3. In Nokia Phone Browser click Message > New Text Message.
4. Write the phone number to the To… field, or click To… to select recipients for the
message. The recipients are shown from the Nokia Phone Browser Contacts folder.
5. Write the message and click File > Send.
4.11 Viewing multimedia files on a PC
With Nokia Multimedia Player you can play multimedia files stored on the PC, or straight from
your phone when it is connected to the PC. You can create playlists of, for example, photos
or video clips you have taken with your camera, and watch them one after another. You can
also save video and audio files in a format that allows you to use them in a mobile phone or
attach them to an MMS message.
To use playlists to view your favourite files
1. In the Nokia PC Suite main window, click View multimedia
Multimedia Player.
to open Nokia
21/26
2. The first time you open Multimedia Player it opens with an empty playlist. To add files
to the playlist, click the Add files to playlist icon. You can also drag files to the
playlist from Windows Explorer.
3. Click File > Save Playlist. Name the playlist and click Save. The file is saved with an
.npl extension.
4. Click View > Options to set viewing options. You can, for example, set the playback
to start automatically, and set the delay time between showing files in the slideshow.
5. Click File > Open and select the playlist to be viewed. If you cannot see the .npl file, in
Files of Type, select Playlist or All supported formats.
4.12 Storing images from your phone to a PC
With Image Store you can store on your PC photos and video clips you have taken with your
phone’s camera.
1. Connect your phone to the PC.
2. In the Nokia PC Suite main window, click Store images
to open Image Store.
3. If you have not used Image Store earlier, the Settings wizard opens automatically
when your phone is connected to the PC and you open Image Store. Before you can
store images, you have to select file types to be stored, the target folder for storage,
and the operations that take place when the files have been stored.
4. Click Store Now. The files are stored in the folder you defined.
To change the settings later, click Settings in the Image Store main window. In Settings you
can define, for example, that new images and videos are stored to your PC automatically
every time you connect your phone to the PC. For more information on the settings, see the
Nokia PC Suite help.
4.13 Transferring music from a CD to your phone
With Nokia Audio Manager you can transfer music tracks from a music CD to your phone.
You first rip music from a CD to a PC, and then transfer the tracks from Audio Manager to
your phone. With Nokia Audio Manager you can also play AAC, MP3, and MP4 music tracks.
Note: With a USB cable (DKU-2, DKE-2, or CA-53) connection, you can transfer large
files such as music files between your phone and a PC more quickly than with other
connection types.
Copyright protections may prevent some music from being ripped and transferred.
If your phone is not supported by Nokia Audio Manager, the title bar will inform you of
this.
To transfer music from a CD to your phone
1. Insert a music CD in your PC’s CD drive.
2. In the Nokia PC Suite main window, click Transfer Music
Manager.
to open Nokia Audio
22/26
3. Click CD Player and select the tracks you want to transfer to your phone.
4. Click Save tracks. The files are saved to your PC in .aac file format.
5. Click Music Studio and you can see the saved tracks. You can also click Add… to
add more tracks saved earlier on your PC hard disk.
6. Select a track and click Edit > Track or Playlist to change the track and artist names.
7. Connect your phone to the PC. Nokia Audio Manager automatically detects the phone
and the Mobile Phone pane shows the music tracks stored earlier on this phone.
8. In the Mobile Phone pane, right-click the phone or memory card folder to where you
want to transfer the music, and select Create Folder. Name the folder, for example,
Music, or by the artist name.
9. Highlight the phone folder to where you want to transfer music.
10. In Music Studio select the tracks you want to transfer to the phone and click Transfer
to phone. When the transfer is completed, the files will appear in the list.
The music tracks are now saved in your phone and you can listen to them on your phone.
Tip: You may want to save the music on the memory card (if you have a memory card in
your phone) to save space in the phone memory.
You can search your hard disks and CD drives for supported music files and import them
into the Music Studio. To do this, click Search in Music Studio.
You can also drag and drop music files to Music Studio from Windows Explorer.
If your phone supports playing music tracks in MP4 or M4A format, you can use eAAC+
encoding for ripping music from a CD. To do this, go to Options > Preferences >
Recording Quality, and for Encoding format select .m4a (eAAC+ audio encoder). With
eAAC+ encoding, the compression ratio is higher than with AAC encoding and you can save
more music to your phone’s memory or to a memory card. Refer to your phone’s user’s guide
for more information on the supported formats.
4.13.1 Ripping and transferring CD tracks to the phone automatically
You can set Nokia Audio Manager to transfer music tracks automatically from a CD into your
connected phone whenever you insert a CD into the PC’s CD drive. To do this, go to
Options > Preferences > Miscellaneous, and select Rip and transfer CD tracks to
phone. Music tracks are transferred into a default music folder on your phone. Depending on
the phone model, the folder can be on a memory card or in the phone memory. Note that in
automatic transfer, the current music folder contents are overwritten.
4.14 Creating wallpaper images to your phone
With Nokia Image Converter you can edit an existing photo to fit your phone, and then
transfer the image to your phone to be used as wallpaper, a portrait image, or an image to be
sent as an MMS message.
For information on what image types you can use with your phone model and formats to be
used with image types, see your phone's user's guide.
23/26
To edit and transfer an image
1. Connect your phone to the PC.
2. In the Nokia PC Suite main window, click Create wallpapers
Converter.
to open Nokia Image
3. Click File > Open to open a photo for editing. Click Next.
4. In the Preferences page select a destination phone if you have more than one phone
connected. Click Next.
5. In the Cropping page you can cut a piece of the photo so that it can be used, for
example, as wallpaper. Click Next.
6. In the Effects page you can add effects to the picture. You can, for example, change
the coloring of the photo to black and white. Click Next.
7. In the Save page, click Update to phone. In the dialog which opens you can enter a
name for the image.
8. Click OK to transfer the image in the phone
9. In your phone, browse to the transferred file. If you created a wallpaper image, set it
as wallpaper. See the instructions in your phone’s user’s guide.
Tip: You can undo the changes you have made to the photo in Image Converter by Edit
> Undo, or by Ctrl+Z.
24/26
5.
TERMS AND ABBREVIATIONS
Term
Explanation
Bluetooth stack
A set of software needed to run Bluetooth on a PC.
Bluetooth wireless
technology
A technology that provides short-range radio links to allow mobile
computers, mobile phones, digital cameras, and other portable devices
to communicate with each other without cables. A Nokia mobile device
with Bluetooth wireless technology support allows the user to connect
wirelessly to another compatible Bluetooth device within a short range.
COM port
An input/output port through which data is transmitted and received
serially. The serial port is a socket on a PC. It is used to connect serial
devices (usually printers, modems, or mouses) to the computer and
communicate with these devices. Serial ports are assigned names such
as COM1 and COM2.
driver
A computer program that enables another program to communicate with
a hardware device.
packet data
A data transmission technique (for example GPRS) that transfers and
receives data in packets instead of using a continuous channel. Users
pay only for the volume of data sent and received.
PIM
Personal Information Manager such as Microsoft Outlook or Lotus
Notes. With a PIM application you can manage personal and business
information such as phone book, calendar, and note information.
ripping
Process of copying data from one media form to a hard disk. For
example, music from an audio CD to a PC.
SP
Service Pack. A software patch that is applied to an installed application.
Symbian
A smartphone operating system provided by a software licensing
company owned by major wireless industry companies.
6.
SAFETY NOTES
Important safety notes
All the safety instructions in the user's guides of your phone and computer also
apply when this product is used with the phone.
Remember to make backup copies of all important data to protect against
possible loss or alteration.
Only install and use applications and other software from sources that offer
adequate protection against harmful software.
25/26
INDEX
applications
installing to phone......................................19
Nokia PC Suite ................................1, 14, 15
Bluetooth wireless technology.................11, 27
connecting phone to PC ............................12
connectivity drivers ......................................7
modem drivers.............................................8
pairing ..................................................12, 18
stacks.................................... 3, 8, 12, 18, 27
CA-42 cable.........................................6, 10, 12
CA-53 cable...............................................6, 10
cables
connecting phone to PC ............................11
drivers ..........................................................6
COM port .........................................8, 9, 12, 27
connection
phone to PC...............................................10
selecting connection type ..........................10
status .........................................................11
to the Internet ............................................18
contacts, creating ..........................................22
copying files between phone and PC ............22
creating
contacts .....................................................22
synchronisation tasks ................................17
wallpapers .................................................25
DKE-2 cable ..............................................6, 10
DKU-2 cable ..............................................6, 10
File manager..................................................20
Image Store ...................................................23
images
editing ........................................................25
storing ........................................................23
transferring to PC ......................................23
transferring to phone .................................25
viewing.......................................................23
infrared...........................................................11
connecting phone to PC ............................12
connectivity drivers ......................................7
modem drivers.............................................7
installing
applications to phone.................................19
Bluetooth modem driver ..............................8
infrared modem driver .................................7
Nokia PC Suite
from CD-ROM..........................................4
from the Web ...........................................5
Internet, connecting to .................................. 18
language, changing......................................... 6
managing connections .................................. 19
memory card ........................................... 20, 25
MMS messages ................................ 15, 23, 25
modem drivers
Bluetooth..................................................... 8
cable ........................................................... 6
infrared........................................................ 7
music, transferring to phone ......................... 24
Nokia Application Installer ............................ 19
Nokia Audio Manager ................................... 24
Nokia Contacts Editor ................................... 22
Nokia Image Converter................................. 25
Nokia PC Suite
applications ..................................... 1, 14, 15
main window ............................................. 14
Starter Edition ............................................. 2
Nokia PC Sync.............................................. 17
Nokia Phone Browser ................................... 21
Nokia Text Message Editor........................... 22
One Touch Access.................................... 6, 18
pairing Bluetooth devices........................ 12, 18
phones
connecting to PC....................................... 10
supported features ...................................... 2
using as modem.................................... 6, 18
photos ............................................ See Images
PIM.......................................................... 17, 27
ripping ........................................................... 27
automatic .................................................. 25
music from CD .......................................... 24
storing images............................................... 23
Symbian ........................................................ 27
synchronising data ........................................ 17
system requirements....................................... 2
terms ............................................................. 27
text messages, sending ................................ 22
transferring
files............................................................ 21
images ...................................................... 25
music......................................................... 24
uninstalling Nokia PC Suite ............................ 5
video clips
storing ....................................................... 23
viewing ...................................................... 23
viewing multimedia........................................ 23
26/26
Legal Notice
Copyright © 1997-2005 Nokia. All rights reserved.
Reproduction, transfer, distribution or storage of part or all of the contents in this document in any form without the
prior written permission of Nokia is prohibited.
Nokia and Nokia Connecting People are registered trademarks of Nokia Corporation.
Java is a trademark of Sun Microsystems, Inc.
Bluetooth is a registered trademark of Bluetooth SIG, Inc.
This product is licensed under the MPEG-4 Visual Patent Portfolio License (i) for personal and noncommercial
use in connection with information which has been encoded in compliance with the MPEG-4 Visual Standard by a
consumer engaged in a personal and noncommercial activity and (ii) for use in connection with MPEG-4 video
provided by a licensed video provider. No license is granted or shall be implied for any other use. Additional
information, including that related to promotional, internal, and commercial uses, may be obtained from MPEG
LA, LLC. See <http://www.mpegla.com>.
Other product and company names mentioned herein may be trademarks or tradenames of their respective
owners.
The information in this guide was written for Nokia PC Suite 6.7. Nokia operates a policy of ongoing development.
Nokia reserves the right to make changes and improvements to any of the products described in this document
without prior notice.
Under no circumstances shall Nokia be responsible for any loss of data or income or any special, incidental,
consequential or indirect damages howsoever caused.
The contents of this document are provided "as is". Except as required by applicable law, no warranties of any
kind, either express or implied, including, but not limited to, the implied warranties of merchantability and fitness
for a particular purpose, are made in relation to the accuracy, reliability or contents of this document. Nokia
reserves the right to revise this document or withdraw it at any time without prior notice.