1
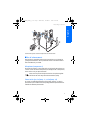
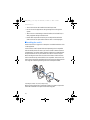
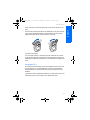
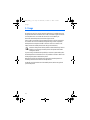
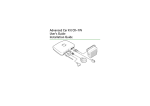
9236521_CK-10_1_en.fm Page 1 Wednesday, November 3, 2004
Car Kit CK-10
User Guide
5:18 PM
9236521_CK-10_1_en.fm Page 2 Wednesday, November 3, 2004
5:18 PM
DECLARATION OF CONFORMITY
We, NOKIA CORPORATION, declare under our sole responsibility that the product HF-7
is in conformity with the provisions of the following Council Directive: 1999/5/EC.
A copy of the Declaration of Conformity can be found at:
http://www.nokia.com/phones/declaration_of_conformity/
Copyright © Nokia Corporation 2004. All rights reserved.
Reproduction, transfer, distribution or storage of part or all of the contents of this
document in any form without the prior written permission of Nokia is prohibited.
Nokia, Nokia Connecting People and Pop-Port are trademarks or registered trademarks
of Nokia Corporation. Other products and company names mentioned herein may be
trademarks or tradenames of their respective owners.
Nokia operates a policy of continuous development. Nokia reserves the right to make
changes and improvements to any of the products described in this document without
prior notice.
Under no circumstances shall Nokia be responsible for any loss of data or income or any
special, incidental, consequential or indirect damages howsoever caused.
The contents of this document are provided "as is". Except as required by applicable law,
no warranties of any kind, either express or implied, including, but not limited to, the
implied warranties of merchantability and fitness for a particular purpose, are made in
relation to the accuracy, reliability or contents of this document. Nokia reserves the
right to revise this document or withdraw it at any time without prior notice.
The availability of particular products and services may vary by region. Please check
with the Nokia dealer nearest to you.
Export Controls
This device may contain commodities, technology or software subject to export laws
andregulations from the US and other countries. Diversion contrary to law is prohibited.
9234157
Issue 1
2
9236521_CK-10_1_en.fm Page 3 Wednesday, November 3, 2004
5:18 PM
For your safety
English
For your safety
Read these simple guidelines. Breaking the rules may be dangerous or illegal. Further
detailed information is given in this user's guide.
ROAD SAFETY COMES FIRST
Obey all local laws. Always keep your hands free to operate the vehicle while
driving. Your first consideration while driving should be road safety.
QUALIFIED INSTALLATION AND SERVICE
Only qualified personnel may install or repair this product.
FUSE REPLACEMENT
Replace a blown fuse with a fuse of the same type and size. Never use a fuse
with a higher rating!
ENHANCEMENTS
Use only approved enhancements. Do not connect incompatible products.
Care and maintenance
Your device is a product of superior design and craftmanship and should be treated with
care. The suggestions below will help you to protect any warranty coverage.
• Do not attempt to open the device other then instructed in this guide.
• Do not use harsh chemicals, cleaning solvents or strong detergents to clean the car
kit.
• Do not paint the car kit. Paint can clog the moving parts and prevent proper
operation.
All of the above suggestions apply equally to your car kit or any enhancement. If any
device is not working properly, take it to the nearest of authorized service facility for
service.
3
9236521_CK-10_1_en.fm Page 4 Wednesday, November 3, 2004
5:18 PM
Introduction
Introduction
Car kit installation in the cockpit
The Nokia CK-10 car kit was developed for installation in motor vehicles. You
can operate your mobile in the hands-free mode and charge the phone
battery.
The car kit is extremely compact, consisting of the hands-free unit and
microphone.
You can install the car kit quickly and easily. Simply connect the power cable,
the loudspeaker, and one of the lines from the system cable to the hands-free
unit.
4
9236521_CK-10_1_en.fm Page 5 Wednesday, November 3, 2004
5:18 PM
Getting started
English
1. Getting started
■ Overview
The following lists the car kit components (1-7) and optional enhancements
(8-12) that may be available to extend your car kit.
1. Hands-free unit HF-7 with built-in microphone
2. Mounting plate HH-8 to mount the hands-free unit
3. Loudspeaker SP-3
4. System cable CA-46 to connect a compatible phone holder to the handsfree unit
5. System cable CA-47 to connect a compatible mobile phone directly to the
hands-free unit
6. Power cable CA-60P to connect the hands-free unit to the 12-V car
battery
7. Washer HH-9 to mount antenna couplers AD-14, AXF-13L or AXF- 15S
8. Additional compatible microphone, e.g. microphone MP-2, for in-car
installation (optional)
9. Antenna coupler to connect an external antenna when using a phone
holder (optional)
10.Active mobile phone holder to connect a compatible mobile phone (sold
separately)
11. Passive mobile phone holder to install a compatible mobile phone (sold
separately)
12.GSM antenna (optional)
Keep all small parts out of reach of small children.
5
9236521_CK-10_1_en.fm Page 6 Wednesday, November 3, 2004
5:18 PM
Getting started
■ Configuration
The CK-10 car kit can be installed in various ways. The following figures give
examples of typical installation variants. Before you start the installation, ask
for professional advice on the configuration that would best suit your needs.
Car kit with passive phone holder
Car kit with active phone holder
6
9236521_CK-10_1_en.fm Page 7 Wednesday, November 3, 2004
5:18 PM
English
Getting started
Car kit with separate antenna coupler and external antenna
■ Use of enhancements
Ensure that only compatible products are connected to your car kit. Before
you begin the installation, ask for professional advice on the enhancements
that would best suit your needs.
Microphone (component 8)
The hands-free unit HF-7 comes with a built-in high-quality microphone. You
can also connect an external microphone (for example, an MP-2 microphone)
to the car kit to suit your particular needs.
Note: Use of any other microphone than the microphone supplied
with the CK-10 car kit may affect the transmission quality.
Phone holder (passive/comp. 11, active/comp. 10)
To connect a compatible mobile phone to the hands-free unit, you need a
phone holder (not included in the sales package). Different phone holders are
available for different phone models.
7
9236521_CK-10_1_en.fm Page 8 Wednesday, November 3, 2004
5:18 PM
Getting started
Antenna coupler (component 9)
You can install a separate antenna coupler (not included in the sales package)
to connect an external antenna. A range of antenna couplers may be available
for mobile phones and phone holders. An antenna coupler can improve invehicle reception of the mobile phone.
Please check the compatibility of couplers with the manufacturer.
GSM antenna (component 12)
A compatible GSM antenna (not included in the sales package) enables
optimized wireless connections. To use an external antenna, you need an
antenna coupler and/or compatible phone holder (sold separately).
Note: If you have installed an external antenna, remember that in
order to comply with RF exposure requirements for mobile
transmitting devices, a minimum distance of 20 cm (8 inches) must
be maintained between the antenna and all persons.
8
9236521_CK-10_1_en.fm Page 9 Wednesday, November 3, 2004
5:18 PM
Installation
English
2. Installation
■ Safety information
Follow these basic safety guidelines when installing the car kit.
• Note that the instructions in this installation guide are general guidelines
which apply for the installation of the Nokia CK-10 car kit in an
automobile. Due to the wide variety of car types and models available, this
guide cannot consider the individual technical requirements relevant for
any particular vehicle. Contact the vehicle manufacturer for further
detailed information about the vehicle in question.
• Make sure that the car ignition is off and disconnect the car battery before
beginning the installation. Ensure that it cannot be reconnected
inadvertently.
• Modern automotive systems include on-board computers where key
vehicle parameters are stored. Improper disconnection of the car battery
may cause loss of data, requiring extensive effort for re-initialization of
the system. If you have any concerns, contact your car dealer before any
installation work.
• The phone holder is to be fixed onto the hands-free unit in the cockpit area
where the display is clearly visible for the user but does not interfere with
the control or operation of the vehicle. The keypad should be within easy
reach of the user.
• All equipment must be mounted so that it does not interfere with the
operation of the vehicle. Make sure not to impact the steering or braking
systems or other key systems essential for proper operation of the car
when installing the car kit equipment. Make sure that deployment of the
airbag is not blocked or impaired in any way.
• Do not smoke when working on the car. Make sure that there is no source
of fire or flame nearby.
• RF signals may affect improperly installed or inadequately shielded
electronic systems in motor vehicles, for example, electronic fuel injection
systems, electronic antiskid braking systems, electronic speed control
systems, airbag systems. Should you note a fault or change in the
operation of such a system, contact your car dealer.
9
9236521_CK-10_1_en.fm Page 10 Wednesday, November 3, 2004
5:18 PM
Installation
• The car kit should not be installed in the head impact area.
• Do not wire car kit equipment to the high voltage lines of the ignition
system.
• Take care not to cause damage to electrical cables, fuel or brake lines, or
safety equipment during installation work.
• Ensure cables are placed so that they are not subjected to mechanical
wear and tear. Do not place cables under car seats or over sharp edges.
■ Installing the car kit
See the instructions on page 4 for an example of a suitable installation of the
car kit equipment.
You also need to install a phone holder (sold separately) that is compatible
with the mobile phone to be used. If you want to install an external antenna
(sold separately), you either need an antenna coupler that is compatible with
the phone holder in use or a phone holder with a built-in antenna coupler.
When installing the hands-free unit, ensure that it does not block the vents
and is mounted securely and as vibration-free as possible. To mount the unit,
attach the mounting plate supplied with the car kit and secure the hands-free
unit using the screw that goes through the unit and the phone holder.
Installing the hands-free unit (example only)
When mounting the antenna coupler AD-14, AXF-13L or AXF-15S, place the
washer HH-9 between the coupler and the mounting plate.
10
9236521_CK-10_1_en.fm Page 11 Wednesday, November 3, 2004
5:18 PM
Installation
Fix the mount for the phone holder on the dashboard or to any other location
in the cockpit area where the display is clearly visible for the user and the
keypad of the mobile phone is within easy reach of the user.
Installing the microphone
You can position the built-in microphone to point toward the user's mouth:
loosen the securing screw, and carefully turn the microphone opening in the
desired direction. While the microphone is in a suitable position, retighten the
screw.
Loudspeaker SP-3
To ensure good acoustic quality, mount the loudspeaker so that it points into
the user's direction. It is recommended that you mount the loudspeaker a
minimum distance of 1 metee (3 feet) away from the microphone to avoid
feedback.
If you want to use the loudspeaker installed in your vehicle with the car kit for
audio output, ask your service technician for professional advice.
11
English
Finally, insert the cover with the Nokia logo into the recess, and press it into
place.
9236521_CK-10_1_en.fm Page 12 Wednesday, November 3, 2004
5:18 PM
Installation
Connecting cables to hands-free unit HF-7
Power cable CA-60P
Plug the power cable into the corresponding port of the hands-free unit. The
wires in the cable harness are to be connected as shown in the wiring
diagram.
1. Connect the black wire to the vehicle ground (GND).
2. Connect the yellow wire to the MUTE connection of the car radio. When a
call is accepted, the car kit switches the yellow line (MUTE) to ground,
muting the car radio. When the call is ended, the yellow line is separated
from ground, and the car radio is unmuted.
If your car radio does not have a mute connection, this line may remain
unconnected. In this case, your car radio is not muted automatically during
a call.
An additional relay can be installed to switch the hands-free unit to the
loudspeakers of the car using the yellow line.
3. Connect the red wire to a suitable 12-V line controlled by the ignition key
using the 2-A fuse supplied (terminal 15, ignition sense cable, IGNS).
When you turn on the ignition of your car, you automatically switch on the
car kit. When the ignition is turned off, the car kit is deactivated. Note,
however, that this does not automatically turn the mobile phone in the
phone holder on or off, respectively.
12
9236521_CK-10_1_en.fm Page 13 Wednesday, November 3, 2004
5:18 PM
Some vehicles do not come with such a possibility. In this case the car kit
can be connected to the positive terminal of the 12-V car battery using the
2-A fuse supplied. If the car kit is installed in this way, it stays in service as
long as a compatible mobile phone remains in the phone holder.
Note: Replace a blown fuse with a fuse of the same type and size.
Never use a fuse with a higher rating.
System cables CA-46 and CA-47
Two system cables are provided for connection of the hands-free unit with a
compatible mobile phone, depending on whether the car kit is used with a
phone holder or connected directly to the mobile phone.
Connect the system cable CA-46 to active phone holders with a Pop-PortTM
connector and the system cable CA-47 to passive phone holders.
■ Functional test
After you have installed your car kit, it needs to be checked to ensure that it is
working properly. When testing the operation of the equipment, also check
that it is mounted so that it does not impair the driver during operation of the
vehicle.
13
English
Installation
9236521_CK-10_1_en.fm Page 14 Wednesday, November 3, 2004
5:18 PM
Usage
3. Usage
To switch your car kit on and off, turn the ignition key. If a mobile phone is in
the phone holder and connected to the car kit, the indicator light on the builtin microphone turns on to show that the car kit is active. When you
disconnect the mobile phone, the indicator light turns off.
If the car kit is connected to the car battery directly (i.e. without connection
to a suitable 12-V line controlled by the ignition key), insert a compatible
mobile phone into the phone holder to turn the car kit on. To switch it off,
simply remove the mobile phone (check the type of installation).
Note: For safety reasons and to prevent accidental draining of the car
battery, do not leave your mobile phone in the phone holder when
leaving the vehicle.
If you are using a holder with the possibility to connect a system cable, place
the mobile phone into the holder. If it is not possible to connect a cable to the
holder, plug the system cable into the phone.
Remove the phone from the holder to stop hands-free mode operation. If
necessary, disconnect the cable from the phone first.
For details on using the features of the mobile phone, see the user guide of
your mobile phone.
14