1
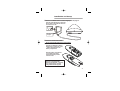
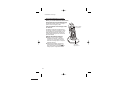
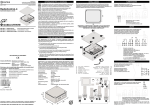
USER GUIDE DECT1905 OPTIONAL HANDSET TO SUIT MODELS DECT 1915, DECT1955 DIGITAL CORDLESS TELEPHONES WITH SMS MESSAGING AND FULL COLOUR THIS EQUIPMENT IS NOT DESIGNED FOR MAKING EMERGENCY TELEPHONE CALLS WHEN THE POWER FAILS. ALTERNATIVE ARRANGEMENTS SHOULD BE MADE FOR ACCESS TO DIAL EMERGENCY SERVICES. Ver. 1, Mar 05 Before operating this set, please read these instructions carefully. Important note — emergency calls The DECT 1905 must be registered to a base series (DECT 1915 or DECT1955) before use and is not designed for making emergency calls when the mains power fails. So you should make alternative arrangements for access to Emergency Services. (This means that you should also have a basic phone that does not need mains power, connected to your line so that you can make calls during a power failure.) If you need help … Visit our websites for information; Australia: www.uniden.com.au New Zealand: www.uniden.co.nz Unpacking your DECT1905 In the box are: ■ the cordless handset ■ two rechargeable batteries and a battery compartment cover for each handset ■ charger pod with separate mains power lead and adaptor Keep the packaging materials in a safe place in case you later need to transport the unit. Keep your sales (till) receipt, which is your guarantee. 2 Read these notes first Choosing a site for the charger pod The charger pod(s) should be placed on a level surface, in a position where: ■ the mains adapter plug will reach an easily accessible 240-V AC switched mains supply socket — never try to lengthen the mains power cable ■ it is not close to another telephone — this can cause radio interference ■ it is not close to a sink, bath or shower, or anywhere else where it might get wet ■ it is not close to other electrical equipment — fridges, washing machines, microwave ovens, fluorescent lights, TVs etc. 3 Radio signals between handset and base unit To use your handset and base unit together, you must be able to establish a radio link between them. Be aware that: ■ Any large metal object — like a refrigerator, a mirror or a filing cabinet — between the handset and the base unit may block the radio signal. ■ Other solid structures, like walls, may reduce the signal strength. Mains power connection IMPORTANT — The DECT 1905 charger pod must be used with the mains adapter supplied with the unit. Using any other adapter will invalidate any approval given to this apparatus. Installation and Set-up 1 Choose a suitable site for the charger pod. See page 3. Plug the mains adapter into a 240 V AC, 50 Hz mains socket, with the switch on the socket set to OFF See the note on page 3 2 3 Switch on at the mains socket Fit the rechargeable batteries in each handset A. Fit the two batteries as shown, making sure you match the + and – ends to the markings in the battery compartment B. Fit the battery compartment cover, sliding it into place and pressing firmly to make sure it is secure Battery safety DON’T use non-rechargeable batteries in the handset — they may burst, causing damage. Use the rechargeable batteries supplied. 4 Installation and set-up 4 Charge the batteries for 15 hours Before you use the handset for the first time, it’s important to charge the batteries fully. The handset ‘beeps’ when it’s correctly in position on the charging cradle. Leave the handset on the charging cradle for 15 hours. Battery charge level symbol The battery charge level symbol should increase by one bar every half hour when you’re charging an empty battery. If you think that the symbol isn’t showing the correct battery charge level, remove and refit the batteries. Keeping the batteries charged n When you don’t need to use the handset (for example, overnight or when you go out), replace it on the base unit or charger pod, to keep the batteries charged. n Whenever the battery charge level symbol shows ‘nearly empty’( ), place the handset on the base unit or charger pod to charge the batteries. 5 F The Charge light comes on. BASIC USE Before you start Electrical safety ■ DON’T let the base unit or charger pod get wet. Electrical equipment can cause serious injury if used while you are wet or standing in water. ■ If the base unit or charger pod ever falls into water, DON’T retrieve it until you have unplugged the power lead from the mains and the telephone line plug from the telephone socket (base unit only); then pull it out by the unplugged cables. ■ NEVER use your DECT 1905 outdoors during a thunderstorm — unplug the base unit from the telephone line and the mains socket when there are storms in your area. Damage caused by lightning is not covered by the guarantee. Interference If the sound quality gets worse as you move around while on a call, this is probably caused by interference between the handset and the base unit, perhaps because you are too near to another phone or other electrical equipment. Move to a different position to clear the interference. If you do not move, your call may be cut off. ! ‘Out of range’ warning Radio interference in the environment may occasionally cause a short break in the link between the handset and the base unit while you are on a call. The handset’s display may briefly show No Base Found until the link is restored. If you hear a warning tone during a call, and/or the sound in the earpiece becomes faint or distorted, you may be going out of range of the base unit. Move nearer to the base unit within 20 seconds, until the tone stops. Otherwise, your call may be cut off. 6 Handset registration ! You must register the DECT 1905 handset to a compatible base (DECT 1915 or DECT1955 series base) before use. To check whether a handset is already registered, make sure mains power to the base unit is switched on and the handset is within range. The handset’s display should show its name (default Handset )and number. If the display constantly shows No base found, you need to register the handset. Each handset can be registered to up to four base units, which have numbers 1 to 4. To re-register 1 or to register a new handset 7 find hs On the base unit, press and hold the FIND HS button until you hear Registration tone (repeated ‘beeps’) You now have 60 seconds to register the handset. 2 On the handset, press the right Soft button [Menu], then press the or button to scroll to Handset 3 Press the right Soft button [OK] 4 Press the or button to scroll to Register, then press the right Soft button [OK] u The display shows a list of base units. If any of these numbers has a tick next to it, the handset is already registered to that base unit. 5 Move the highlight to BASE: 1 then press the right Soft button [OK] u The display shows Base-PIN: 6 Key in the base unit’s PIN code (default 0000) If the base unit’s PIN code has been changed from 0000 (see your base unit's User Guide), you’ll need to know the current PIN code. Handset registration 7 Press the right Soft button [OK] u The display may flash Register for a few moments, while the handset searches for a base unit. It then shows a list of handset numbers for the base unit. 8 Key in a free handset number (optional) and press the right Soft button [OK] (If you don’t key in a number, the base will select one automatically.) u If registration is successful, the display returns to standby mode. To register to an extra base unit ◗ To de-register a handset Follow the steps as for re-registering, but at step 5, move the highlight to a free base unit number (one without a tick) You may need to do this in order to replace a faulty handset. Using any registered handset: 1 Press the right Soft button [Menu], then press the or button to scroll to Base 2 Press the right Soft button [OK], then press the or button to scroll to De-register 3 Press the right Soft button [OK] u The display shows Base-PIN: 4 Key in the base unit’s PIN code (default 0000) and press the right Soft button [OK] u The display shows a list of the handsets registered to the base unit. 5 Key in a handset number u The display shows De-register for a few moments. When the handset has been deregistered, the display goes back to standby mode. 8 Handset registration To select a base unit If your handset is registered to more than one base unit, it will automatically select the one with which it can best set up a radio link (usually the nearest one). Or you can select a base unit manually. You don’t need this function if you have only one base unit. 1 Press the right Soft button [Menu], then press the or button to scroll to Handset 2 Press the right Soft button [OK] 3 Press the or button to scroll to Select Base, then press the right Soft button [OK] u The display shows a list of base units. The currently selected base unit (or Best Base for automatic selection), has a tick next to it. 4 Move the highlight to the base unit number you want, or to Best Base, then press the right Soft button [OK] u The display may show No base found for a few moments, then it should return to standby mode. If it continues to show No base found, you’ll need to select a different base unit, or Best Base for automatic selection. ! 9 We recommend that you leave this setting at Best Base (the default) if you want your handset to work with more than one base unit. Handset registration To register to a different brand of base unit Your DECT 1905 handset(s) can be registered to any GAP-compatible base unit. But we do not guarantee that all features or display messages will be available using other manufacturers’ equipment. 1 Follow the instructions in the base unit’s User Guide to put the base unit into registration mode. 2 Follow the instructions to register the handset (Steps 2 to 5 on page 7). If you need to enter a PIN code for the base unit, refer to the base unit’s User Guide. If you have problems, visit our website at www.uniden.com.au www.uniden.co.nz 10 Warranty One Year Limited Warranty Important: Evidence of original purchase is required for warranty service. Warrantor: Uniden Australia Pty Limited. ABN 58001 865 498 Uniden New Zealand Limited ELEMENT OF WARRANTY: Uniden warrants to the original retail owner for the duration of this warranty, its DECT 1905 (herein after referred to as the Product), to be free from defects in materials and craftmanship with only the limitations or exclusions set out below. WARRANTY DURATION: This warranty to the original retail owner only, shall terminate and be of not further effect 12 months after the date of original retail sale. This warranty will be deemed invalid if the product is; (A) Damaged or not maintained as reasonable and necessary, (B) Modified, altered or used as part of any conversion kits, subassemblies, or any configurations not sold by Uniden, (C) Improperly installed, (D) Repaired by someone other than an authorised Uniden Repair Agent for a defect or malfunction covered by this warranty, (E) Used in conjunction with any equipment or parts or as part of a system not manufactured by Uniden. (F) Only available in the original country of sale. PARTS COVERED: This warranty covers for one (1) year, the DECT 1905 Unit and Handset only. All accessories (Cables etc.) are covered for 90 days only. STATEMENT OF REMEDY: In the event that the Product does not conform to this warranty at any time while this warranty is in effect, the warrantor at its discretion, will repair the defect or replace the product and return it to you without charge for parts or service. THIS WARRANTY DOES NOT COVER OR PROVIDE FOR THE REIMBURSEMENT OR PAYMENT OF INCIDENTAL OR CONSEQUENTIAL DAMAGES. THIS GUARANTEE IS IN ADDITION TO AND DOES NOT IN ANY WAY AFFECT YOUR RIGHTS UNDER THE CONSUMER GUARANTEE ACT. PROCEDURE FOR OBTAINING PERFORMANCE OR WARRANTY: In the event that the product does not conform to this warranty, the Product should be shipped or delivered, freight pre-paid, with evidence of original purchase (e.g. a copy of the sales docket), to the warrantor at: UNIDEN AUSTRALIA SERVICE DIVISION 345 Princes Highway, Rockdale NSW 2216 Fax (02) 9599 3278 UNIDEN NEW ZEALAND LIMITED SERVICE DIVISION 150 Harris Rd, East Tamaki, Auckland Fax (09) 274 4253 www.uniden.com.au www.uniden.co.nz Customers in other States should ship or deliver the Product freight pre-paid to their nearest Uniden Authorised Repair Centre (Contact Uniden for the nearest Warranty Agent to you). 11