1
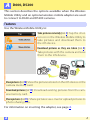
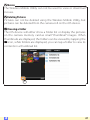
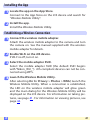
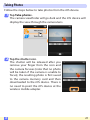
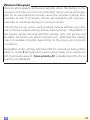
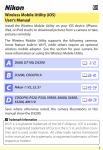
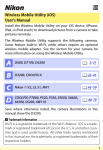
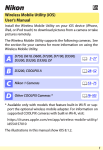
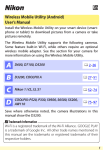
En
Wireless Mobile Utility (iOS)
User’s Manual
Install the Wireless Mobile Utility on your iOS device (iPhone,
iPad, or iPod touch) to download pictures from a camera or take
pictures remotely.
The Wireless Mobile Utility supports the following cameras.
Some feature built-in Wi-Fi, while others require an optional
wireless mobile adapter. See the section for your camera for
more information on using the Wireless Mobile Utility.
A
D600, D5200
0 2–19
B
D3200
0 20–37
C
Nikon 1: V2, J3, S1
0 38–53
D
COOLPIX: P520, S9500, S6500, S5200,
AW110
0 54–70
Save where otherwise noted, the camera illustrations in this
manual show the D3200.
A Trademark Information
Wi-Fi is a registered trademark of the Wi-Fi Alliance. App Store is a
trademark of Apple Inc. iOS is a trademark or registered trademark
of Cisco in the U. S. A. and other countries and is used under license.
All other trade names mentioned in this manual are the trademarks
or registered trademarks of their respective holders.
1
A
D600, D5200
This section describes the options available when the Wireless
Mobile Utility and an optional wireless mobile adapter are used
to connect to D600 and D5200 cameras.
Features
Use the Wireless Mobile Utility to:
Take pictures remotely (0 5): Tap the shutter icon in the Wireless Mobile Utility to
take pictures and download them to
the iOS device.
Download pictures as they are taken (0 8):
Take pictures with the camera and save
them to the iOS device.
View pictures (0 10): View the pictures stored on the iOS device or the
camera memory card.
Download pictures (0 13): Download existing pictures from the camera memory card.
Share pictures (0 15): Share pictures via e-mail or upload pictures to
photo-sharing sites.
For information on inserting the adapter, see page 4.
A
2
Notices
• No part of this manual may be reproduced, transmitted, transcribed, stored in a retrieval system, or translated into any language in any form without Nikon’s prior written permission.
• Nikon reserves the right to change the specifications of the hardware and software described in this manual at any time and
without prior notice. Nikon will not be held liable for damages
that may result from any mistakes that this manual may contain.
System Requirements
Before installing the Wireless Mobile Utility, confirm that your
iOS device meets the following system requirements:
OS
iOS 6.0
Wireless LAN 11b/g/n
D Using This Application for the First Time
Read the terms of use (0 19) before connecting.
D The Wireless Mobile Adapter
While the adapter is inserted, the camera exposure meters will not
turn off; monitor the camera battery level to ensure that the camera does not power off unexpectedly. In addition, some camera
menu items may be grayed out and unavailable and the camera
can not be used for playback or live view. Movie recording can
not be used.
A
3
Installing the App
1
Locate the app on the App Store.
Connect to the App Store on the iOS device and search for
“Wireless Mobile Utility”.
2
Install the app.
Install the Wireless Mobile Utility.
Establishing a Wireless Connection
1
Connect the wireless mobile adapter.
Attach the wireless mobile adapter to the camera and turn
the camera on. See the manual supplied with the wireless
mobile adapter for details.
2
Enable Wi-Fi on the iOS device.
If Wi-Fi is off, turn it on.
3
Select the mobile adapter SSID.
Select the mobile adapter SSID (the default SSID begins
with “Nikon_WU_”). iOS-compliant devices can not be connected using WPS.
4
Launch the Wireless Mobile Utility.
After selecting On for Privacy > Photos > WMU, launch the
Wireless Mobile Utility. When a connection is established,
the LED on the wireless mobile adapter will glow green
and the main dialog for the Wireless Mobile Utility will be
displayed on the iOS device. For information on taking pictures, see page 5. For information on viewing pictures, see
page 10.
A
4
Taking Photos
Take pictures remotely from the iOS device, or take pictures with
the camera and save them to the iOS device.
Remote Photography
Follow the steps below to take photos from the iOS device.
1
Tap Take photos.
The camera viewfinder will go dark and the iOS device will
display the view through the camera lens.
2
Focus.
In normal- and wide-area AF AF-area modes, tap the subject
in the display to focus (if subject-tracking AF is selected, the
camera will focus using wide-area AF).
A
5
3
Tap the shutter icon.
The shutter will be released after you
remove your finger from the icon; the
resulting photo is first saved to the camera memory card and then downloaded
to the iOS device. There is no need to
point the iOS device at the wireless mobile adapter.
D Remote Photography
Remote photography ends automatically when the battery in the
camera or iOS device runs low. Note that using remote photography for an extended period may cause the camera’s internal temperature to rise; if necessary, remote photography will end automatically to minimize damage to camera circuits.
The iOS device can not be used to adjust camera settings; use camera controls to adjust settings before starting Step 1. Regardless of
the release mode selected with the camera, only one picture will
be taken each time you tap the shutter icon. Note that the display
may not update smoothly depending on the device and network
conditions.
A shutter speed of “Time” is available in mode M. Choose a shutter
speed of A on the camera and select Shoot > WMU on the
iOS device (page 7), then tap the shutter icon to open the shutter.
Shooting ends when the icon is tapped again.
A
6
A The Remote Photography Display
Top: Return to the top display.
d: Display the following photographyrelated options.
• Shoot: Choose whether to take pictures using the iOS device (WMU) or
the camera (Camera).
• Live view: Turn the live view display
on or off.
• Download after shooting: Choose
whether pictures are automatically
downloaded to the iOS device. Available only when WMU is selected for
Shoot.
• Self-timer: If On is selected, the camera shutter will be released 2 s after
you tap the shutter icon. The timer
turns off automatically after the shutter is released.
Self-timer icon: Displayed when the selftimer is on.
Camera settings: Shutter speed, aperture,
etc. Not displayed when device is in
landscape orientation.
Thumbnail area: Downloaded pictures.
A
7
Downloading Photos as They Are Taken
Take photos with the camera and save them to the iOS device.
1
Tap Take photos.
2
Tap d.
3
Tap Camera.
A
8
4
Take photos.
Frame photos in the camera viewfinder and shoot. Photos
are downloaded to the iOS device after being saved to the
camera memory card.
A The Photo Capture Display
The photo capture display is shown below.
d: Display Shoot options and choose
whether to take pictures using the iOS
device (WMU) or the camera (Camera).
Top: Return to the top display.
Thumbnail area: Downloaded pictures.
A
9
Viewing Photos
Tap View photos to view the pictures stored on the iOS device.
You can also view the pictures on the camera memory card and
download selected images to the iOS device.
Viewing Pictures
View the pictures in camera memory or on the iOS device.
1
A
Tap View photos.
10
2
Choose a device.
Tap Pictures on camera to view the pictures on the camera
memory card, Camera roll to view the pictures stored in the
camera roll on the iOS device. The pictures will be displayed
as small “thumbnail” images (to return to the top display
and take pictures or choose a different device, tap Top in
the thumbnail list).
3
View pictures.
Tap a thumbnail to display the picture
full frame. You can then swipe left or
right to view additional pictures, or tap
a to view information about the current
image.
A
11
D Movies
The Wireless Mobile Utility can not be used to view or download
movies.
D Deleting Pictures
Pictures can not be deleted using the Wireless Mobile Utility, but
pictures can be deleted from the camera roll on the iOS device.
A Choosing a Folder
The iOS device will either show a folder list or display the pictures
on the camera memory card as small “thumbnail” images. When
thumbnails are displayed, the folders can be viewed by tapping the
f icon, while folders are displayed, you can tap a folder to view its
contents in a thumbnail list.
A
12
Downloading Existing Pictures
Download pictures to the camera roll on the iOS device.
1
Tap View photos.
2
Tap Pictures on camera.
Tap Pictures on camera to view the pictures on the camera.
D Dropped Connections
If the wireless connection is lost while a picture is being downloaded, the picture will not be saved to the iOS device (connection loss
may occur if, for example, the camera turns off during download).
Any pictures downloaded before the connection was interrupted
are unaffected.
A
13
3
Select pictures for download.
Tap Select and then
thumbnails to select or deselect. Selected pictures are
indicated by a check
mark.
Alternatively, you can select pictures by
tapping a picture in the thumbnail list
to display it full frame and then tapping
the check mark to select or deselect.
Swipe left or right to view additional
pictures or tap the folder name to return
to the thumbnail list.
4
Tap Download.
Tap Download to download the selected pictures to the
camera roll on the iOS device.
D Downloading Existing Pictures
Existing pictures are automatically resized to the standard size for
the iOS device. NEF (RAW) images are converted to JPEG format; if
the images were recorded using an NEF (RAW) + JPEG option, only
the JPEG copy will be downloaded. Exif data will be adapted to iOS
specifications.
A
14
Sharing Pictures
Before sharing pictures, connect to a network with Internet access.
1
Tap View photos.
2
Choose Camera roll or Latest downloads.
Tap Camera roll to view the pictures already downloaded
to the iOS camera roll, Latest downloads to view the most
recently downloaded photos (up to 12) at their original image quality and size.
A
15
3
View pictures.
Tap a thumbnail to view the picture full frame.
4
Tap b.
After displaying a picture you want to
share, tap b and choose from a list of
picture-sharing apps and functions (the
specific contents of the list vary from device to device).
A
16
Wireless Mobile Utility Options
The options listed below can be accessed
by tapping the c icon in the Wireless Mobile
Utility top display.
Connection Status
Option
Description
Camera
The model name and battery level for the camera currently connected.
Wireless Mobile
Adapter
View the wireless mobile adapter product name and
firmware version.
Settings
Option
Description
Synchronize clock Synchronize the camera clock with the iOS device.
Set camera clock Synchronize the camera clock with the iOS device.
Set
automatically
Thumbnails
A
If On is selected, the camera clock will automatically be
synchronized with the iOS device when a connection
is established.
Choose the size of the thumbnails in the playback display.
17
Option
Description
WMA settings
(Wireless Mobile Adjust network settings for the wireless mobile adapter.
Adapter settings)
SSID
Choose an SSID for the wireless mobile adapter. The
iOS device displays the SSID when you connect to the
network manually.
Authentication
Choose the authentication method used for connection
to the network.
Password
Enter a password. The password type is selected using
Advanced settings > Password entry: choose ASCII for an
8- to 63-character alphanumeric password, HEX for a
64-digit hexadecimal password.
Channel
Choose the wireless channel used by the network.
Auto power-off Choose the delay before the wireless mobile adapter
delay
enters sleep when there is no wireless connection.
Advanced
settings
• Password entry: Choose the password type.
• Sub-net mask: Enter a subnet mask.
• DHCP server IP address: Enter the wireless mobile adapter IP address.
• DHCP client IP address: Enter the iOS device IP address.
Restore factory
Restore default settings.
defaults
Battery Warning Level
Remote photography will end automatically when the camera
or iOS device battery reaches the selected level.
A
18
Help
Option
Description
Instructions
View instructions for using the Wireless Mobile Utility.
Support websites
Access the support site for the Wireless Mobile Utility.
App
View Wireless Mobile Utility version information.
Terms of Use
View the Wireless Mobile Utility terms of use.
A
19
B
D3200
This section describes the options available when the Wireless
Mobile Utility and an optional wireless mobile adapter are used
to connect to the D3200.
Features
Use the Wireless Mobile Utility to:
Take pictures remotely (0 23): Tap the shutter icon in the Wireless Mobile Utility to
take pictures and download them to
the iOS device.
Download pictures as they are taken (0 26):
Take pictures with the camera and save
them to the iOS device.
View pictures (0 28): View the pictures stored on the iOS device or the
camera memory card.
Download pictures (0 31): Download existing pictures from the camera memory card.
Share pictures (0 33): Share pictures via e-mail or upload pictures to
photo-sharing sites.
For information on inserting the adapter, see page 22.
B
20
Notices
• No part of this manual may be reproduced, transmitted, transcribed, stored in a retrieval system, or translated into any language in any form without Nikon’s prior written permission.
• Nikon reserves the right to change the specifications of the hardware and software described in this manual at any time and
without prior notice. Nikon will not be held liable for damages
that may result from any mistakes that this manual may contain.
System Requirements
Before installing the Wireless Mobile Utility, confirm that your
iOS device meets the following system requirements:
OS
iOS 6.0
Wireless LAN 11b/g/n
D Using This Application for the First Time
Read the terms of use (0 37) before connecting.
D The Wireless Mobile Adapter
While the adapter is inserted, the camera exposure meters will not
turn off; monitor the camera battery level to ensure that the camera does not power off unexpectedly. In addition, some camera
menu items may be grayed out and unavailable and the camera
can not be used for playback or live view. Movie recording can
not be used.
B
21
Installing the App
1
Locate the app on the App Store.
Connect to the App Store on the iOS device and search for
“Wireless Mobile Utility”.
2
Install the app.
Install the Wireless Mobile Utility.
Establishing a Wireless Connection
1
Connect the wireless mobile adapter.
Attach the wireless mobile adapter to the camera and turn
the camera on. See the manual supplied with the wireless
mobile adapter for details.
2
Enable Wi-Fi on the iOS device.
If Wi-Fi is off, turn it on.
3
Select the mobile adapter SSID.
Select the mobile adapter SSID (the default SSID begins
with “Nikon_WU_”). iOS-compliant devices can not be connected using WPS.
4
Launch the Wireless Mobile Utility.
After selecting On for Privacy > Photos > WMU, launch the
Wireless Mobile Utility. When a connection is established,
the LED on the wireless mobile adapter will glow green
and the main dialog for the Wireless Mobile Utility will be
displayed on the iOS device. For information on taking pictures, see page 23. For information on viewing pictures, see
page 28.
B
22
Taking Photos
Take pictures remotely from the iOS device, or take pictures with
the camera and save them to the iOS device.
Remote Photography
Follow the steps below to take photos from the iOS device.
1
Tap Take photos.
The camera viewfinder will go dark and the iOS device will
display the view through the camera lens.
2
Tap the shutter icon.
Tap the shutter icon to focus (if subjecttracking AF is selected, the camera will
focus using wide-area AF; note that
no photo will be taken if the camera
is unable to focus). The shutter will be
released after you remove your finger
from the icon; the resulting photo is
first saved to the camera memory card
and then downloaded to the iOS device.
There is no need to point the iOS device
at the wireless mobile adapter.
B
23
D Remote Photography
Remote photography ends automatically when the battery in the
camera or iOS device runs low. Note that using remote photography for an extended period may cause the camera’s internal temperature to rise; if necessary, remote photography will end automatically to minimize damage to camera circuits.
The iOS device can not be used to adjust camera settings; use camera controls to adjust settings before starting Step 1. Regardless of
the release mode selected with the camera, only one picture will
be taken each time you tap the shutter icon. Note that the display
may not update smoothly depending on the device and network
conditions.
If the camera mode dial is rotated to i or j, pictures will be taken in
mode P. Note that live view is not available when the camera is in
GUIDE mode and Auto or No flash is selected for Easy operation.
Select another option or rotate the mode dial to another setting.
B
24
A The Remote Photography Display
Top: Return to the top display.
d: Display the following photographyrelated options.
• Shoot: Choose whether to take pictures using the iOS device (WMU) or
the camera (Camera).
• Download after shooting: Choose
whether pictures are automatically
downloaded to the iOS device. Available only when WMU is selected for
Shoot.
• Self-timer: If On is selected, the camera shutter will be released 2 s after
you tap the shutter icon. The timer
turns off automatically after the shutter is released.
Self-timer icon: Displayed when the selftimer is on.
Camera settings: Shutter speed, aperture,
etc. Not displayed when device is in
landscape orientation.
Thumbnail area: Downloaded pictures.
B
25
Downloading Photos as They Are Taken
Take photos with the camera and save them to the iOS device.
1
Tap Take photos.
2
Tap d.
3
Tap Camera.
B
26
4
Take photos.
Frame photos in the camera viewfinder and shoot. Photos
are downloaded to the iOS device after being saved to the
camera memory card.
A The Photo Capture Display
The photo capture display is shown below.
d: Display Shoot options and choose
whether to take pictures using the iOS
device (WMU) or the camera (Camera).
Top: Return to the top display.
Thumbnail area: Downloaded pictures.
B
27
Viewing Photos
Tap View photos to view the pictures stored on the iOS device.
You can also view the pictures on the camera memory card and
download selected images to the iOS device.
Viewing Pictures
View the pictures in camera memory or on the iOS device.
1
B
Tap View photos.
28
2
Choose a device.
Tap Pictures on camera to view the pictures on the camera
memory card, Camera roll to view the pictures stored in the
camera roll on the iOS device. The pictures will be displayed
as small “thumbnail” images (to return to the top display
and take pictures or choose a different device, tap Top in
the thumbnail list).
3
View pictures.
Tap a thumbnail to display the picture
full frame. You can then swipe left or
right to view additional pictures, or tap
a to view information about the current
image.
B
29
D Movies
The Wireless Mobile Utility can not be used to view or download
movies.
D Deleting Pictures
Pictures can not be deleted using the Wireless Mobile Utility, but
pictures can be deleted from the camera roll on the iOS device.
A Choosing a Folder
The iOS device will either show a folder list or display the pictures
on the camera memory card as small “thumbnail” images. When
thumbnails are displayed, the folders can be viewed by tapping the
f icon, while folders are displayed, you can tap a folder to view its
contents in a thumbnail list.
B
30
Downloading Existing Pictures
Download pictures to the camera roll on the iOS device.
1
Tap View photos.
2
Tap Pictures on camera.
Tap Pictures on camera to view the pictures on the camera.
D Dropped Connections
If the wireless connection is lost while a picture is being downloaded, the picture will not be saved to the iOS device (connection loss
may occur if, for example, the camera turns off during download).
Any pictures downloaded before the connection was interrupted
are unaffected.
B
31
3
Select pictures for download.
Tap Select and then
thumbnails to select or deselect. Selected pictures are
indicated by a check
mark.
Alternatively, you can select pictures by
tapping a picture in the thumbnail list
to display it full frame and then tapping
the check mark to select or deselect.
Swipe left or right to view additional
pictures or tap the folder name to return
to the thumbnail list.
4
Tap Download.
Tap Download to download the selected pictures to the
camera roll on the iOS device
D Downloading Existing Pictures
Existing pictures are automatically resized to the standard size for
the iOS device. NEF (RAW) images are converted to JPEG format; if
the images were recorded using an NEF (RAW) + JPEG option, only
the JPEG copy will be downloaded. Exif data will be adapted to iOS
specifications.
B
32
Sharing Pictures
Before sharing pictures, connect to a network with Internet access.
1
Tap View photos.
2
Choose Camera roll or Latest downloads.
Tap Camera roll to view the pictures already downloaded
to the iOS camera roll, Latest downloads to view the most
recently downloaded photos (up to 12) at their original image quality and size.
B
33
3
View pictures.
Tap a thumbnail to view the picture full frame.
4
Tap b.
After displaying a picture you want to
share, tap b and choose from a list of
picture-sharing apps and functions (the
specific contents of the list vary from device to device).
B
34
Wireless Mobile Utility Options
The options listed below can be accessed
by tapping the c icon in the Wireless Mobile
Utility top display.
Connection Status
Option
Description
Camera
The model name and battery level for the camera currently connected.
Wireless Mobile
Adapter
View the wireless mobile adapter product name and
firmware version.
Settings
Option
Description
Synchronize clock Synchronize the camera clock with the iOS device.
Set camera clock Synchronize the camera clock with the iOS device.
Set
automatically
Thumbnails
B
If On is selected, the camera clock will automatically be
synchronized with the iOS device when a connection
is established.
Choose the size of the thumbnails in the playback display.
35
Option
Description
WMA settings
(Wireless Mobile Adjust network settings for the wireless mobile adapter.
Adapter settings)
SSID
Choose an SSID for the wireless mobile adapter. The
iOS device displays the SSID when you connect to the
network manually.
Authentication
Choose the authentication method used for connection
to the network.
Password
Enter a password. The password type is selected using
Advanced settings > Password entry: choose ASCII for an
8- to 63-character alphanumeric password, HEX for a
64-digit hexadecimal password.
Channel
Choose the wireless channel used by the network.
Auto power-off Choose the delay before the wireless mobile adapter
delay
enters sleep when there is no wireless connection.
Advanced
settings
• Password entry: Choose the password type.
• Sub-net mask: Enter a subnet mask.
• DHCP server IP address: Enter the wireless mobile adapter IP address.
• DHCP client IP address: Enter the iOS device IP address.
Restore factory
Restore default settings.
defaults
Battery Warning Level
Remote photography will end automatically when the camera
or iOS device battery reaches the selected level.
B
36
Help
Option
Description
Instructions
View instructions for using the Wireless Mobile Utility.
Support websites
Access the support site for the Wireless Mobile Utility.
App
View Wireless Mobile Utility version information.
Terms of Use
View the Wireless Mobile Utility terms of use.
B
37
C
Nikon 1: V2, J3, S1
This section describes the options available when the Wireless
Mobile Utility and an optional wireless mobile adapter are used
to connect to Nikon 1 V2, J3, and S1 cameras.
Features
Use the Wireless Mobile Utility to:
Take pictures remotely (0 41): Tap the shutter icon in the Wireless Mobile Utility to
take pictures and download them to
the iOS device.
View pictures (0 44): View the pictures stored on the iOS device or the
camera memory card.
Download pictures (0 47): Download existing pictures from the camera memory card.
Share pictures (0 49): Share pictures via e-mail or upload pictures to
photo-sharing sites.
For information on inserting the adapter, see page 40.
C
38
Notices
• No part of this manual may be reproduced, transmitted, transcribed, stored in a retrieval system, or translated into any language in any form without Nikon’s prior written permission.
• Nikon reserves the right to change the specifications of the hardware and software described in this manual at any time and
without prior notice. Nikon will not be held liable for damages
that may result from any mistakes that this manual may contain.
System Requirements
Before installing the Wireless Mobile Utility, confirm that your
iOS device meets the following system requirements:
OS
iOS 6.0
Wireless LAN 11b/g/n
D Using This Application for the First Time
Read the terms of use (0 53) before connecting.
D The Wireless Mobile Adapter
While the adapter is inserted, the camera exposure meters will not
turn off; monitor the camera battery level to ensure that the camera does not power off unexpectedly. In addition, some camera
menu items may be grayed out and unavailable and the camera
can not be used for playback or live view. Movie recording can
not be used.
C
39
Installing the App
1
Locate the app on the App Store.
Connect to the App Store on the iOS device and search for
“Wireless Mobile Utility”.
2
Install the app.
Install the Wireless Mobile Utility.
Establishing a Wireless Connection
1
Connect the wireless mobile adapter.
Attach the wireless mobile adapter to the camera and turn
the camera on. See the manual supplied with the wireless
mobile adapter for details.
2
Enable Wi-Fi on the iOS device.
If Wi-Fi is off, turn it on.
3
Select the mobile adapter SSID.
Select the mobile adapter SSID (the default SSID begins
with “Nikon_WU_”). iOS-compliant devices can not be connected using WPS.
4
Launch the Wireless Mobile Utility.
After selecting On for Privacy > Photos > WMU, launch the
Wireless Mobile Utility. When a connection is established,
the LED on the wireless mobile adapter will glow green
and the main dialog for the Wireless Mobile Utility will be
displayed on the iOS device. For information on taking pictures, see page 41. For information on viewing pictures, see
page 44.
C
40
Taking Photos
Follow the steps below to take photos from the iOS device.
1
Tap Take photos.
The camera viewfinder will go dark and the iOS device will
display the view through the camera lens.
2
Tap the shutter icon.
The shutter will be released after you
remove your finger from the icon and
the camera focuses (note that no photo
will be taken if the camera is unable to
focus); the resulting photo is first saved
to the camera memory card and then
downloaded to the iOS device. There is
no need to point the iOS device at the
wireless mobile adapter.
C
41
D Remote Photography
Remote photography ends automatically when the battery in the
camera or iOS device runs low. Note that using remote photography for an extended period may cause the camera’s internal temperature to rise; if necessary, remote photography will end automatically to minimize damage to camera circuits.
The iOS device can not be used to adjust camera settings; use camera controls to adjust settings before starting Step 1. Regardless of
the release mode selected with the camera, only one picture will
be taken each time you tap the shutter icon. Note that the display
may not update smoothly depending on the device and network
conditions.
Regardless of the settings selected with the camera, pictures will be
taken in mode P (programmed auto) using single-servo autofocus
(AF-S) and auto-area AF. Face-priority AF is disabled and the focus
point is not displayed.
C
42
A The Remote Photography Display
Top: Return to the top display.
d: Display the following photographyrelated options.
• Download after shooting: Choose
whether pictures are automatically
downloaded to the iOS device.
• Self-timer: If On is selected, the camera shutter will be released 2 s after
you tap the shutter icon. The timer
turns off automatically after the shutter is released.
Self-timer icon: Displayed when the selftimer is on.
Camera settings: Shutter speed, aperture,
etc. Not displayed when device is in
landscape orientation.
Thumbnail area: Downloaded pictures.
C
43
Viewing Photos
Tap View photos to view the pictures stored on the iOS device.
You can also view the pictures on the camera memory card and
download selected images to the iOS device.
Viewing Pictures
View the pictures in camera memory or on the iOS device.
1
C
Tap View photos.
44
2
Choose a device.
Tap Pictures on camera to view the pictures on the camera
memory card, Camera roll to view the pictures stored in the
camera roll on the iOS device. The pictures will be displayed
as small “thumbnail” images (to return to the top display
and take pictures or choose a different device, tap Top in
the thumbnail list).
3
View pictures.
Tap a thumbnail to display the picture
full frame. You can then swipe left or
right to view additional pictures, or tap
a to view information about the current
image.
C
45
D Movies
The Wireless Mobile Utility can not be used to view or download
movies.
D Deleting Pictures
Pictures can not be deleted using the Wireless Mobile Utility, but
pictures can be deleted from the camera roll on the iOS device.
A Choosing a Folder
The iOS device will either show a folder list or display the pictures
on the camera memory card as small “thumbnail” images. When
thumbnails are displayed, the folders can be viewed by tapping the
f icon, while folders are displayed, you can tap a folder to view its
contents in a thumbnail list.
C
46
Downloading Existing Pictures
Download pictures to the camera roll on the iOS device.
1
Tap View photos.
2
Tap Pictures on camera.
Tap Pictures on camera to view the pictures on the camera.
D Dropped Connections
If the wireless connection is lost while a picture is being downloaded, the picture will not be saved to the iOS device (connection loss
may occur if, for example, the camera turns off during download).
Any pictures downloaded before the connection was interrupted
are unaffected.
C
47
3
Select pictures for download.
Tap Select and then
thumbnails to select or deselect. Selected pictures are
indicated by a check
mark.
Alternatively, you can select pictures by
tapping a picture in the thumbnail list
to display it full frame and then tapping
the check mark to select or deselect.
Swipe left or right to view additional
pictures or tap the folder name to return
to the thumbnail list.
4
Tap Download.
Tap Download to download the selected pictures to the
camera roll on the iOS device.
D Downloading Existing Pictures
Existing pictures are automatically resized to the standard size for
the iOS device. NEF (RAW) images are converted to JPEG format; if
the images were recorded using an NEF (RAW) + JPEG option, only
the JPEG copy will be downloaded. Exif data will be adapted to iOS
specifications.
C
48
Sharing Pictures
Before sharing pictures, connect to a network with Internet access.
1
Tap View photos.
2
Choose Camera roll or Latest downloads.
Tap Camera roll to view the pictures already downloaded
to the iOS camera roll, Latest downloads to view the most
recently downloaded photos (up to 12) at their original image quality and size.
C
49
3
View pictures.
Tap a thumbnail to view the picture full frame.
4
Tap b.
After displaying a picture you want to
share, tap b and choose from a list of
picture-sharing apps and functions (the
specific contents of the list vary from device to device).
C
50
Wireless Mobile Utility Options
The options listed below can be accessed
by tapping the c icon in the Wireless Mobile
Utility top display.
Connection Status
Option
Description
Camera
The model name and battery level for the camera currently connected.
Wireless Mobile
Adapter
View the wireless mobile adapter product name and
firmware version.
Settings
Option
Description
Synchronize clock Synchronize the camera clock with the iOS device.
Set camera clock Synchronize the camera clock with the iOS device.
Set
automatically
Thumbnails
C
If On is selected, the camera clock will automatically be
synchronized with the iOS device when a connection
is established.
Choose the size of the thumbnails in the playback display.
51
Option
Description
WMA settings
(Wireless Mobile Adjust network settings for the wireless mobile adapter.
Adapter settings)
SSID
Choose an SSID for the wireless mobile adapter. The
iOS device displays the SSID when you connect to the
network manually.
Authentication
Choose the authentication method used for connection
to the network.
Password
Enter a password. The password type is selected using
Advanced settings > Password entry: choose ASCII for an
8- to 63-character alphanumeric password, HEX for a
64-digit hexadecimal password.
Channel
Choose the wireless channel used by the network.
Auto power-off Choose the delay before the wireless mobile adapter
delay
enters sleep when there is no wireless connection.
Advanced
settings
• Password entry: Choose the password type.
• Sub-net mask: Enter a subnet mask.
• DHCP server IP address: Enter the wireless mobile adapter IP address.
• DHCP client IP address: Enter the iOS device IP address.
Restore factory
Restore default settings.
defaults
Battery Warning Level
Remote photography will end automatically when the camera
or iOS device battery reaches the selected level.
C
52
Help
Option
Description
Instructions
View instructions for using the Wireless Mobile Utility.
Support websites
Access the support site for the Wireless Mobile Utility.
App
View Wireless Mobile Utility version information.
Terms of Use
View the Wireless Mobile Utility terms of use.
C
53
D
COOLPIX: P520, S9500, S6500, S5200, AW110
This section describes the options available when the Wireless Mobile Utility is used to connect to COOLPIX P520, S9500,
S6500, S5200, and AW110 cameras.
Features
Use the Wireless Mobile Utility to:
Take pictures remotely (0 58): Tap the shutter icon in the Wireless Mobile Utility to
take pictures and download them to
the iOS device.
View pictures (0 61): View the pictures stored on the iOS device or the
camera memory card.
Download pictures (0 64): Download existing pictures from the camera memory card.
Share pictures (0 66): Share pictures via e-mail or upload pictures to
photo-sharing sites.
Note that an optional wireless mobile adapter is required when
the app is used with cameras not equipped with built-in wireless; for information on inserting the adapter, see page 56.
D
54
Notices
• No part of this manual may be reproduced, transmitted, transcribed, stored in a retrieval system, or translated into any language in any form without Nikon’s prior written permission.
• Nikon reserves the right to change the specifications of the hardware and software described in this manual at any time and
without prior notice. Nikon will not be held liable for damages
that may result from any mistakes that this manual may contain.
System Requirements
Before installing the Wireless Mobile Utility, confirm that your
iOS device meets the following system requirements:
OS
iOS 6.0
Wireless LAN 11b/g/n
D Using This Application for the First Time
Read the terms of use (0 70) before connecting.
D
55
Installing the App
1
Locate the app on the App Store.
Connect to the App Store on the iOS device and search for
“Wireless Mobile Utility”.
2
Install the app.
Install the Wireless Mobile Utility.
Establishing a Wireless Connection
The following applies only to cameras without built-in Wi-Fi. For
information on cameras with built-in Wi-Fi, see the manual provided with the camera.
1
Connect the wireless mobile adapter.
Attach the wireless mobile adapter to the camera and turn
the camera on. See the manual supplied with the wireless
mobile adapter for details.
2
Enable Wi-Fi on the iOS device.
If Wi-Fi is off, turn it on.
3
Select the mobile adapter SSID.
Select the mobile adapter SSID (the default SSID begins
with “Nikon”). iOS-compliant devices can not be connected
using WPS.
4
Launch the Wireless Mobile Utility.
After selecting On for Privacy > Photos > WMU, launch the
Wireless Mobile Utility. When a connection is established,
the LED on the wireless mobile adapter will glow green
and the main dialog for the Wireless Mobile Utility will be
displayed on the iOS device. Take and view pictures as described on pages 58 and 61, respectively.
D
56
D The Wireless Mobile Adapter (for Cameras Without Built-in Wi-Fi)
While the adapter is inserted, the camera exposure meters will not
turn off; monitor the camera battery level to ensure that the camera does not power off unexpectedly. In addition, some camera
menu items may be grayed out and unavailable and the camera
can not be used for playback or live view. Movie recording can
not be used.
D
57
Taking Photos
Follow the steps below to take photos from the iOS device.
1
Tap Take photos.
The camera viewfinder will go dark and the iOS device will
display the view through the camera lens.
2
Tap the shutter icon.
The shutter will be released after you remove your finger from the icon and the
camera focuses; the resulting photo is
first saved to the camera memory card
and then downloaded to the iOS device.
There is no need to point the iOS device
at the wireless mobile adapter.
D
58
D Remote Photography
Remote photography ends automatically when the battery in the
camera or iOS device runs low. Note that using remote photography for an extended period may cause the camera’s internal temperature to rise; if necessary, remote photography will end automatically to minimize damage to camera circuits.
The iOS device can not be used to adjust camera settings; use camera controls to adjust settings before starting Step 1. Regardless of
the release mode selected with the camera, only one picture will
be taken each time you tap the shutter icon. Note that the display
may not update smoothly depending on the device and network
conditions.
Regardless of the settings selected with the camera, pictures will be
taken in C (auto) mode using target finding autofocus. The focus
point is not displayed.
D
59
A The Remote Photography Display
Top: Return to the top display.
d: Display the following photographyrelated options.
• Download after shooting: Choose
whether pictures are automatically
downloaded to the iOS device.
• Self-timer: If On is selected, the camera shutter will be released 2 s after
you tap the shutter icon. The timer
turns off automatically after the shutter is released.
Self-timer icon: Displayed when the selftimer is on.
Camera settings: Shutter speed, aperture,
etc. Not displayed when device is in
landscape orientation.
Optical zoom: Tap T to zoom in, W to zoom
out.
Thumbnail area: Downloaded pictures.
D
60
Viewing Photos
Tap View photos to view the pictures stored on the iOS device.
You can also view the pictures on the camera memory card and
download selected images to the iOS device.
Viewing Pictures
View the pictures in camera memory or on the iOS device.
1
D
Tap View photos.
61
2
Choose a device.
Tap Pictures on camera to view the pictures on the camera
memory card, Camera roll to view the pictures stored in the
camera roll on the iOS device. The pictures will be displayed
as small “thumbnail” images (to return to the top display
and take pictures or choose a different device, tap Top in
the thumbnail list).
3
View pictures.
Tap a thumbnail to display the picture
full frame. You can then swipe left or
right to view additional pictures, or tap
a to view information about the current
image.
D
62
D Movies
The Wireless Mobile Utility can not be used to view or download
movies.
D Deleting Pictures
Pictures can not be deleted using the Wireless Mobile Utility, but
pictures can be deleted from the camera roll on the iOS device.
A Choosing a Folder
The iOS device will either show a folder list or display the pictures
on the camera memory card as small “thumbnail” images. When
thumbnails are displayed, the folders can be viewed by tapping the
f icon, while folders are displayed, you can tap a folder to view its
contents in a thumbnail list.
D
63
Downloading Existing Pictures
Download pictures to the camera roll on the iOS device.
1
Tap View photos.
2
Tap Pictures on camera.
Tap Pictures on camera to view the pictures on the camera.
D Dropped Connections
If the wireless connection is lost while a picture is being downloaded, the picture will not be saved to the iOS device (connection loss
may occur if, for example, the camera turns off during download).
Any pictures downloaded before the connection was interrupted
are unaffected.
D
64
3
Select pictures for download.
Tap Select and then
thumbnails to select or deselect. Selected pictures are
indicated by a check
mark.
Alternatively, you can select pictures by
tapping a picture in the thumbnail list
to display it full frame and then tapping
the check mark to select or deselect.
Swipe left or right to view additional
pictures or tap the folder name to return
to the thumbnail list.
4
Tap Download.
Tap Download to download the selected pictures to the
camera roll on the iOS device.
D Downloading Existing Pictures
Existing pictures are automatically resized to the standard size for
the iOS device. NEF (RAW) images are converted to JPEG format; if
the images were recorded using an NEF (RAW) + JPEG option, only
the JPEG copy will be downloaded. 3D images are converted to 2D
JPEG images. Exif data will be adapted to iOS specifications.
D
65
Sharing Pictures
Before sharing pictures, connect to a network with Internet access.
1
Tap View photos.
2
Choose Camera roll or Latest downloads.
Tap Camera roll to view the pictures already downloaded
to the iOS camera roll, Latest downloads to view the most
recently downloaded photos (up to 12) at their original image quality and size (3D images are however converted to
2D JPEG images).
D
66
3
View pictures.
Tap a thumbnail to view the picture full frame.
4
Tap b.
After displaying a picture you want to
share, tap b and choose from a list of
picture-sharing apps and functions (the
specific contents of the list vary from device to device).
D
67
Wireless Mobile Utility Options
The options listed below can be accessed
by tapping the c icon in the Wireless Mobile
Utility top display.
Connection Status
Option
Description
Camera
The model name and battery level for the camera currently connected.
Wireless Mobile
Adapter
View the wireless mobile adapter product name and
firmware version. Not available with cameras that feature built-in Wi-Fi.
Settings
Option
Description
Synchronize clock Synchronize the camera clock with the iOS device.
Set camera clock Synchronize the camera clock with the iOS device.
Set
automatically
Thumbnails
D
If On is selected, the camera clock will automatically be
synchronized with the iOS device when a connection
is established.
Choose the size of the thumbnails in the playback display.
68
Option
Description
WMA settings
Adjust network settings for the wireless mobile adapter.
(Wireless Mobile
Not available with cameras that feature built-in Wi-Fi.
Adapter settings)
SSID
Choose an SSID for the wireless mobile adapter. The
iOS device displays the SSID when you connect to the
network manually.
Authentication
Choose the authentication method used for connection
to the network.
Password
Enter a password. The password type is selected using
Advanced settings > Password entry: choose ASCII for an
8- to 63-character alphanumeric password, HEX for a
64-digit hexadecimal password.
Channel
Choose the wireless channel used by the network.
Auto power-off Choose the delay before the wireless mobile adapter
delay
enters sleep when there is no wireless connection.
Advanced
settings
• Password entry: Choose the password type.
• Sub-net mask: Enter a subnet mask.
• DHCP server IP address: Enter the wireless mobile adapter IP address.
• DHCP client IP address: Enter the iOS device IP address.
Restore factory
Restore default settings.
defaults
Battery Warning Level
Remote photography will end automatically when the camera
or iOS device battery reaches the selected level.
D
69
Help
Option
Description
Instructions
View instructions for using the Wireless Mobile Utility.
Support websites
Access the support site for the Wireless Mobile Utility.
App
View Wireless Mobile Utility version information.
Terms of Use
View the Wireless Mobile Utility terms of use.
SB3A04(11)
6MWA3311-04
D
70