1
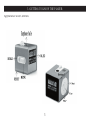
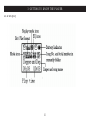
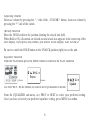
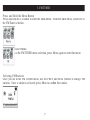
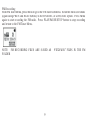
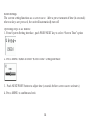
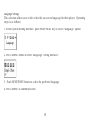
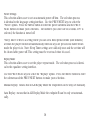
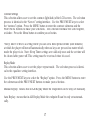
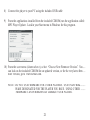
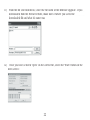
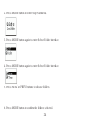
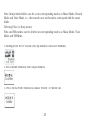
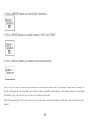
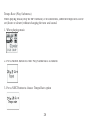
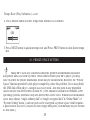
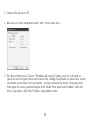
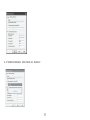
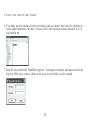
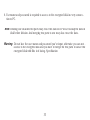
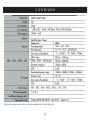
MA3 2 3 | Digital MP3 Player Instruction Manual THANK YOU Tha nk you for purcha s ing our Digita l MP 3 P la ye r. This unique ly de s igne d de vice combine s a n MP 3 P la ye r, voice re corde r; FM ra dio a nd re mova ble Fla s h Me mory drive a ll in one unit. You ca n move a nd s tore file s be twe e n compute rs a nd e njoy your MP 3 mus ic colle ction a nytime a nd a nywhe re . 1. FEATURE S UMMARY Firm wa re Up g ra d a b le Che ck our we bs ite ofte n for the la te s t drive r, firmwa re a nd s oftwa re upda te s : www.ne xta r.com Re m o va b le Dis k Us e this unit a s a re mova ble drive , s toring file s , mus ic or a nything you wa nt (drive rs re quire d for ope ra ting s ys te ms prior to Windows 2000) Bu ilt-in FM Ra d io a n d FM Ra d io Re c o rd in g Lis te n to FM s ta tions a nd s e t your fa vorite s ta tions by us ing Auto P re s e t or Ma nua l P re s e t. The pla ye r ca n s a ve 40 (20 for AM, 20 for FM) loca l s ta tions . You ca n a ls o re cord your fa vorite s ongs or progra ms dire ctly from the ra dio Vo ic e Re c o rd in g Re cord your voice with the built-in microphone a nd s a ve in WAV or ACT forma ts . P la yba ck your re cording a t a ny time . 1 S e ve n P re s e t Eq u a lize r Built-In e qua lize r ca n be s e t to Norma l, Rock, P op, Cla s s ica l, J a zz, S oft or Ba s s . Mu ltip le P la yb a c k Me n u s Unique A-B re pe a t function a nd Ra ndom P la y a llows us e rs a va rie ty of pla yba ck options High Resolution LCD High re s olution dis pla y with gra phica l me nus US B Co n n e c tio n Quick conne ction to US B port. Mu ltip le Fo rm a t S u p p o rt This unit s upports the popula r MP 3 forma t for the wide s t compa tibility of digita l file s . It a ls o s upports WMA, WMV, MP 1, MP 2 AS F a nd WAV for gre a te r compa tibility a nd compre s s ion options 2. INTRODUCTION Tha nk you for purcha s ing our MP 3 pla ye r. Be fore us ing the unit ple a s e re a d this ma nua l ca re fully to obta in the be s t pos s ible pe rforma nce from your pla ye r. Ke e p this ma nua l for future re fe re nce 2 3. GETTING TO KNOW THE P LAYER Ap p e a ra n c e a n d Co n tro ls 3 3. GETTING TO KNOW THE P LAYER LCD Dis p la y 4 4. BAS IC FUNCTIONS S ta rt u p /S h u td o wn S ta rt up or s hutdown pla ye r by pre s s ing a nd holding the “P LAY” button. En te rin g Me n u Me n u s Me nus : Ma in me nu (e nte re d by mome nta rily holding Me nu ke y whe n not pla ying), P la y s ubme nu (e nte re d by pre s s ing Me nu ke y while pla ying), a nd S top s ubme nu (e nte re d by pre s s ing Me nu ke y whe n not pla ying). Bro ws in g Tra c ks Brows e forwa rd (to the ne xt tra ck) by pre s s ing the NEXT button, a nd ba ckwa rd (pre vious s ong) by pre s s ing the P REV. Us in g th e Diffe re n t Fu n c tio n Me n u s P re s s a nd hold the Me nu button for 2 s e c. This will ta ke you to the Ma in Me nu. From he re , us e the P REV a nd NEXT buttons to move to the va rious me nus options . S e le ct the me nu option by a ga in pre s s ing the Me nu button. To e xit the me nus , pre s s the NEXT button until the EXIT option a ppe a rs . P re s s Me nu to e xit 5 Ad ju s tin g Vo lu m e De cre a s e volume by pre s s ing the “ - “ s ide of the - VOLUME + button. Incre a s e volume by pre s s ing the “+” s ide of the s witch. (HOLD) Fu n c tio n Move the HOLD s witch to the pos ition s howing the clos e d lock (le ft). Whe n Hold is ON, a ll controls a re locke d out a nd a lock icon a ppe a rs in the ce nte r top of the LCD dis pla y. If you pre s s a ny controls , you will s e e on the dis pla y: KEY LOCKED Be s ure to s witch the HOLD button to the UNLOCK pos ition (right) to us e the unit. Eq u a lize r Fu n c tio n From the P LAY me nu pre s s the MENU button to s witch to the P LAY s ubme nu Play Screen Play sub-menu Us e the P REV / NEXT buttons to s croll to the EQUALIZER s e le ction From the EQUALIZER s ub-me nu, us e P REV or NEXT to s e le ct your pre fe rre d s e tting. Once you ha ve s e le cte d your pre fe rre d e qua lize r s e tting, pre s s MENU to confirm. 6 5. FM TUNER P re s s a n d Ho ld th e Me n u Bu tto n P re s s a nd hold for 2 s e conds to e nte r the Ma in Me nu. From the ma in me nu, s croll ove r to the FM Tune r s e le ction En te rin g FM Tu n e r Me n u Once you a re a t the FM TUNER me nu s e le ction, pre s s Me nu a ga in to e nte r tha t me nu S e le c tin g FM S ta tio n s Once you a re in the FM TUNER me nu, us e the P REV a nd NEXT buttons to cha nge FM s ta tions . Once a s ta tion is s e le cte d, pre s s Me nu to confirm tha t s ta tion. 7 Auto Search Stations From the FM TUNER me nu, pre s s a nd hold Me nu button for 2 s e conds . You will e nte r the FM TUNER s ubme nu. Us e the P REV or NEXT button to s croll to the AUTO S EARCH s e le ction. P re s s Me nu button a ga in to s ta rt s ca nning. The unit will s ca n to the ne xt a va ila ble s ta tion Saving Stations From the FM TUNER menu, press and hold Menu button for 2 seconds. You will enter the FM TUNER submenu. Use the PREV or NEXT button to scroll to the SAVE STATION selection. Press the MENU button to save the current station. De le tin g S ta tio n s From the FM Tune r s ubme nu, s croll to the DELETE S TATION s e le ction a nd pre s s the MENU button to de le te the s ta tion Ma n u a l S ta tio n S c a n From the FM Tune r ma in me nu, pre s s the P LAY button to go to ma nua l s ca nning Me nu. P re s s P REV or NEXT to s ca n to the ne xt ra dio s ta tion ma nua lly. Re tu rn To Mu s ic Me n u Go to the FM TUNER s ubme nu, a nd s croll to the MUS IC s e le ction. P re s s the Me nu button to re turn to the mus ic Me nu. 8 FM Re c o rd in g From FM Tune r Me nu, pre s s Me nu to go to the FM Tune r s ubme nu. S croll the me nu s e le ctions (a ga in us ing P REV a nd NEXT buttons ) to the FINE REC or LONG REC option. P re s s Me nu a ga in to s ta rt re cording the FM ra dio. P re s s P LAY/PAUS E/S TOP button to s top re cording a nd re turn to the FM Tune r Me nu. NOTE: FM RECORDING FILES ARE S AVED AS FOLDER 9 “FXXX.WAV” FILES IN THE FM 6. BUTTON/CONTROL FUNCTIONS Mu s ic m o d e a n d Vo ic e m o d e Ke y P la y Me nu Ne xt P re v Vol+ Vol- Action S top s ta te P la y s ta te P la y s ubme nu S top S ubme nu P re s s a nd hold S hutdown S hutdown S hutdown S hutdown P re s s a nd re le a s e P la y S top Exit me nu Exit me nu P re s s a nd hold Ente r ma in me nu Ente r ma in me nu Ente r ma in me nu Ente r ma in me nu P re s s a nd re le a s e rm this Ente r/s top s ubme nu Ente r/pla y s ubme nu Confi option or e nte r Ne xt s ong Ne xt s ong Move s ubme nu a nd pla y it Brows e r forwa rd Fa s t forwa rd S kip forwa rd continuous ly continuous ly La s t s ong La s t s ong Move s ubme nu a nd pla y it Brows e r ba ckwa rd S kip ba ckwa rd Fa s t ba ckwa rd continuous ly continuous ly Incre a s e volume Incre a s e volume X by one s te p by one s te p Incre a s e volume Incre a s e volume X continuous ly continuous ly De cre a s e volume De cre a s e volume X by one s te p by one s te p De cre a s e volume De cre a s e volume X continuous ly continuous ly Dia l Hold Dia l Hold P re s s a nd re le a s e Hold P re s s a nd re le a s e Hold 10 Confirm this option or e nte r Move s ubme nu Fa s t forwa rd continuous ly Move s ubme nu Fa s t ba ckwa rd continuous ly X X X X Fo r FM Mo d e : Ope ra tion P LAY MENU V+ V- Action pre s s a nd hold P re s s P re s s a nd hold P re s s FM S ta tus FM S ubme nu P owe r off Whe n s ta tion e xis ts : ne xt s ta tion; Whe n without s ta tion: X Ente r ma in me nu P owe r off P re s s P re s s a nd hold P re s s P re s s a nd hold P re s s pre s s a nd hold P re s s P re s s a nd hold Incre a s e 100KHz gra dua lly or s top s e a rch Ente r ma in me nu Confirm curre nt option or e nte r ne xt s ubme nu S witch s ubme nu Incre a s e 100KHz s e a rch continuous ly Continuous forwa rd De cre a s e 100KHz gra dua lly or s top s e a rch S witch s ubme nu De cre a s e 100KHz s e a rch continuous ly Continuous ba ckwa rd Volume incre a s e X Volume incre a s e continuous ly X Volume de cre a s e X Volume de cre a s e continuous ly X Ente r ma in me nu 11 Exit the me nu 7. S YS TEM S ETTINGS System Settings A va rie ty of s ys te m s e ttings ca n be controlle d de pe nding upon your firmwa re ve rs ion. To e nte r the s ys te ms s e ttings me nu, pre s s the MENU button. Us e the P REV a nd/or NEXT buttons to s croll the S YS TEM icon. P re s s MENU a ga in to e nte r the s e ttings s ub-me nu. Be low a re the va rious s ys te m s e ttings : Ope ra tion De s cription Re cord Time S e ts re cord da te a nd time for re cordings S cre e n S e ts s cre e n s a ve r (bla nk s cre e n) La ngua ge S e le ct me nu la ngua ge P owe r Off S e t a utoma tic powe r-off time Re pla y S e t the re pla y mode function Contra s t Cha nge a nd s e t s cre e n contra s t (light/da rk) Online Mode S e t functions for “priva te dis k” mode Me mory Info Dis pla y tota l me mory a nd % us e d Firmwa re Re v Dis pla y curre nt firmwa re re vis ion Firmwa re Upgrd S e t functions to upda te firmwa re Exit Exit the s ys te m s e ttings me nu 12 Making Selections Us e the P REV or NEXT buttons to move to the de s ire d s ubme nu s e le ction. To a cce s s tha t s ubme nu, pre s s Me nu once the s e le ction is highlighte d. Record Time From the s ys te m s e tting, s e le ct the RECORD TIME s ub-me nu (us ing the P REV or NEXT buttons to s croll to the s e le ction). P re s s VOL+ or VOL- move the curs or to the s e ction you wa nt to s e t - in the forma t YYMM-DD. The n, us ing the NEXT/P REV buttons , a djus t the numbe rs to corre s pond to the corre ct da te . P re s s MENU to e xit this s ub-me nu 13 Screen Settings The s cre e n s e tting functions a s a s cre e n s a ve . Afte r a pre s e t a mount of time (in s e conds ) whe n no ke ys a re pre s s e d, the unit will a utoma tica lly turn off. Ope ra ting s te ps is a s follows : 1. From S ys te m S e tting inte rfa ce , pus h P REV/NEXT ke y to s e le ct “S cre e n Time ” option 2. P re s s MENU button to e nte r “S cre e n Time ” s e tting inte rfa ce : 3. P us h NEXT/P REV button to a djus t time (s e conds be fore s cre e n s a ve r a ctiva te s ) 4. P re s s MENU to confirm a nd e xit. 14 Language Settings This s e le ction a llows us e r to the s e le ct the on-s cre e n la ngua ge for the ir pla ye r. Ope ra ting s te ps is a s follows : 1. From S ys te m S e tting inte rfa ce , pus h P REV/NEXT ke y to s e le ct “La ngua ge ” option 2. P re s s MENU button to e nte r “La ngua ge ” s e tting inte rfa ce : 3. P us h NEXT/P REV button to s e le ct the pre fe rre d la ngua ge 4. P re s s MENU to confirm a nd e xit. 15 Power Settings This s e le ction a llows us e r to s e t a n a utoma tic powe r off time . The s e le ction proce s s is ide ntica l to the la ngua ge s e tting inte rfa ce . Us e the P REV/NEXT ke ys to s e le ct the “P owe r” option. P re s s the MENU button to e nte r the powe r s ubme nu a nd the P REV/ NEXT buttons to ma ke your s e le ctions . The numbe rs you s e le ct a re in s e conds . If “0” is s e le cte d, the function is turne d off. “S le e p Time r” re fe rs to a s e tting whe re you ca n s e t a fixe d pe riod of time (unit: minute s ) a t which the pla ye r will turn off a utoma tica lly whe n no ke ys a re pre s s e d no ma tte r which mode the pla ye r is in. Note : S le e p Time r s e ttings a re va lid only once a nd the s e t time will be cle a re d a fte r powe r off. This s e tting mus t be re s e t e a ch time it is us e d. Replay Mode This s e le ction a llows us e r to s e t the pla ye r re pe a t mode . The s e le ction proce s s is ide ntica l to the e qua lize r s e tting inte rfa ce . Us e the P REV/NEXT ke ys to s e le ct the “Re pla yr” option. P re s s the MENU button to e nte r the s ubme nu a nd the P REV/NEXT buttons to ma ke your s e le ctions . Ma nua l Re pla y: me a ns tha t in A-B Re pla y Mode the e ndpoint B ca n be only s e t ma nua lly. Auto Re pla y: me a ns tha t in A-B Re pla y Mode the e ndpoint B ca n be only s e t a utoma tica lly. 16 Contrast Settings This s e le ction a llows us e r to s e t the contra s t (light/da rk) of the LCD s cre e n. The s e le ction proce s s is ide ntica l to the “S cre e n” s e tting inte rfa ce . Us e the P REV/NEXT ke ys to s e le ct the “contra s t” option. P re s s the MENU button to e nte r the contra s t s ubme nu a nd the P REV/NEXT buttons to ma ke your s e le ctions . The s e le ction will ma ke the s cre e n lighte r, or da rke r. P re s s the Me nu button to confirm you s e le ction. “S le e p Time r” re fe rs to a s e tting whe re you ca n s e t a fixe d pe riod of time (unit: minute s ) a t which the pla ye r will turn off a utoma tica lly whe n no ke ys a re pre s s e d no ma tte r which mode the pla ye r is in. Note : S le e p Time r s e ttings a re va lid only once a nd the s e t time will be cle a re d a fte r powe r off. This s e tting mus t be re s e t e a ch time it is us e d. Replay Mode This s e le ction a llows us e r to s e t the pla ye r re pe a t mode . The s e le ction proce s s is ide ntica l to the e qua lize r s e tting inte rfa ce . Us e the P REV/NEXT ke ys to s e le ct the “Re pla yr” option. P re s s the MENU button to e nte r the s ubme nu a nd the P REV/NEXT buttons to ma ke your s e le ctions . Ma nua l Re pla y: me a ns tha t in A-B Re pla y Mode the e ndpoint B ca n be only s e t ma nua lly. Auto Re pla y: me a ns tha t in A-B Re pla y Mode the e ndpoint B ca n be only s e t a utoma tica lly. 17 Online Mode (Private Space Settings) The ope ra ting s te ps a re the s a me a s thos e for the Equa lize r s e ttings . S ome ope ra ting s ys te ms (thos e re le a s e d prior to Windows 2K S P 4) ca nnot s upport two drive r le tte rs on one US B dis k. Thus , if the “P riva te S pa ce ” function is on, choos e which dis k you a re going to us e , i.e ., “s ingle ordina ry dis k” or “s ingle e ncrypte d dis k” in orde r for a corre ct dis pla y of the s e le cte d dis k a fte r conne cting to your P C. The P riva te S pa ce functions a re e xpla ine d la te r in this ma nua l. Memory Settings The ope ra ting s te ps a re the s a me a s thos e for the Equa lize r s e ttings . This s e tting dis pla ys the tota l me mory ca pa city of the pla ye r, a nd the % of me mory curre ntly be ing us e d. Firmware Version The ope ra ting s te ps a re the s a me a s thos e for the Equa lize r s e ttings . This s e tting dis pla ys the curre nt ve rs ion of firmwa re ins ta lle d on the pla ye r. Firmware Upgrade This s ub-me nu ope ra tion will be e xpla ine d la te r in this ma nua l 18 8. UP GRADING FIRMWARE To Upgrade The Unit Firmware This unit s upports firmwa re upgra de s via downloa da ble file s a nd utilitie s ins ta lle d on your P C from the S oftwa re CDROM include d with this pla ye r. Ma ke s ure you ins ta ll the s e utilitie s be fore a tte mpting to upgra de your firmwa re . 1) P re s s MENU to e nte r the ma in me nu 2) P re s s the P REV or NEXT buttons to na viga te to the “S ys te m S e tting” s ubme nu 3) P re s s MENU a ga in to a cce s s the S ys te m S e tting s ubme nu. P re s s the P REV or ....... NEXT buttons to move to the Firmwa re s ubme nu 19 4) P re s s MENU to e nte r the Firmwa re Upgra de me nu 5) P re s s the P REV or NEXT buttons to na viga te to the “S ys te m S e tting” s ubme nu 6) P re s s MENU a ga in to a cce s s the S ys te m S e tting s ubme nu. P re s s the P REV or ....... NEXT buttons to move to the Firmwa re s ubme nu 7) P re s s MENU to e nte r the firmwa re upgra de mode 20 8) Conne ct the pla ye r to your P C us ing the include d US B ca ble 9) From the a pplica tions ins ta lle d from the include d CDROM, run the a pplica tion ca lle d: MP 3 P la ye r Upda te . Look in your S ta rt me nu in Windows for this progra m. 10) From the us e r me nu (s hown a bove ), s e le ct “Choos e Ne w Firmwa re Ve rs ion”. You .... ca n look on the include d CDROM for a n upda te d ve rs ion, or for the ve ry la te s t firm ... wa re ve rs ion, go to www.ne xta r.com. NOTE: DO NOT US E FIRMWARE FOR OTHER P LAYERS . US E ONLY FIRM.......... WARE DES IGNATED FOR THE P LAYER YOU HAVE. US ING OTHER ........ FIRMWARE CAN P ERMANENTLY DAMAGE YOUR P LAYER. 21 11) From the file s e le ction me nu, s e le ct the file na me of the firmwa re upgra de . If you .... downloa de d from the Ne xta r we bs ite , ma ke note of whe re you s a ve d the ................. downloa de d file a nd wha t it’s na me wa s 12) Once you ha ve s e le cte d “ope n” on the corre ct file , s e le ct the “S ta rt” button on the .. ne xt s cre e n: 22 13) If the upgra de proce s s is s ta rte d corre ctly, the pla ye r s cre e n will dis pla y: 9. OTHER S ETTINGS S e le c tin g Fo ld e rs Us e rs ca n s a ve file s in diffe re nt folde rs (folde rs s hould be cre a te d on P C in a dva nce ), to ma na ge a nd pla y file s a ccording to diffe re nt type s . The pla ye r s upports ide ntifica tion of 99 s ubdire ctorie s . 1. At S top inte rfa ce . (Curre nt e xa mple is a t Mus ic Mode , a nd folde rs ca n be s e le cte d a t both Re cord a nd Voice Mode .) 23 2. P re s s MODE button to e nte r S top S ubme nu. 3. P re s s MODE button a ga in to e nte r S e le ct Folde r inte rfa ce . 4. P re s s MODE button a ga in to e nte r S e le ct Folde r inte rfa ce . 5. P re s s NEXT or P REV buttons to choos e folde rs . 6. P re s s MODE button to confirm the folde rs s e le cte d. 24 Note : Inde pe nde nt folde rs ca n be s e t a t corre s ponding mode s a s Mus ic Mode , Re cord Mode a nd Voice Mode , i.e ., thre e mode s a re not bound to corre s pond with the s a me folde r. De le tin g File s (a t S to p m e n u ) File s a nd FM s ta tions ca n be de le te d a t corre s ponding mode s a s Mus ic Mode , Voice Mode a nd FM Mode . 1.S ta rting a t the S TOP s cre e n (No s top inte rfa ce e xis ts a t FM Mode ) 2.P re s s MODE button to e nte r s top s ubme nu 3. P re s s NEXT/P REV buttons to choos e “De le te ” or “De le te All”. 25 4. P re s s MODE button to e nte r De le te Inte rfa ce . 5. P re s s NEXT button to s witch be twe e n “NO” a nd “YES ”. 6. P re s s MODE button to confirm a nd de le tion s ta rts . Note 1: “De le te All” me a ns to de le te a ll the re le va nt file s a t curre nt mode in curre nt folde r. (For e xa mple , a t Mus ic Mode e xe cuting “De le te All”, a ll the mus ic file s in curre nt file s ma y be de le te d, while re corde d file s without cha nge .) The de le ting inte rfa ce is much s imple r a t FM Mode , going only to the 3rd s te p. It is the s a ve d s ta tions to be de le te d. Note 2: Whe n de le ting file s on P C, ple a s e ta ke ca re to e je ct the pla ye r s a fe ly be fore pulling out US B ca ble , othe rwis e file s ma y not be de le te d. 26 P la y Mo d e (P la y S u b m e n u ) Whe n pla ying mus ic a nd re corde d file s , diffe re nt pla y mode s ca n be s e le cte d. (s uch a s Re pe a t, s huffle , e tc. The firs t option in P la y S ubme nu is P la y Mode . The pla ye r will pla y file s a ccording to the mode s e le cte d. 27 Te m p o Ra te (P la y S u b m e n u ) Whe n pla ying mus ic(Only for MP 3 forma ts ) or re corde d file s , diffe re nt te mpo ra te ca n be s e t (fa s te r or s lowe r) without cha nging the tone a nd s ound. 1. Whe n pla ying mus ic 2. P re s s MODE button to e nte r P la y S ubme nu is a s follows : 3. P re s s NEXT button to choos e Te mpo Ra te option 28 Te m p o Ra te (P la y S u b m e n u ) - c o n t 4. P re s s MODE button to e nte r Te mpo Ra te inte rfa ce is a s follows : 5.P re s s NEXT button to quicke n te mpo ra te a nd P re s s P REV button to s low down te mpo ra te . 10. P RIVATE S PACE S ETTING Ma ny MP 3 us e rs a re conce rne d a bout the proble m of informa tion dis clos ure a nd priva te da ta a cce s s e d by othe rs . Whe n othe rs borrow your MP 3 pla ye r, you ma y ha ve to de le te the priva te informa tion, which ma y be inconve nie nt. Howe ve r, the “P riva te S pa ce ” function provide d by this pla ye r comple te ly s olve s this proble m. Us e rs ma y divide the US B dis k of this pla ye r - us ing its a cce s s ory tools - into two pa rts in a ny proportion (us e rs will s e e two drive r le tte rs on the ir P C ( S P 4 s hould be ins ta lle d on Windows 2000 ope ra ting s ys te ms , othe rwis e only one drive r le tte r ca n be s e e n. Without s uch ins ta lla tion, us e rs mus t choos e “s ingle ordina ry dis k” or “s ingle e ncrypte d dis k” in “Online Mode ” of “S ys te m S e tting” me nu.), a nd one pa rt ca n be e ncrypte d a s priva te s pa ce which re quire s a pa s s word to a cce s s to. (If us e rs do not e ncrypt both pa rts , US B me mory ma y be tre a te d a s two dis ks .) 29 1. Conne ct the pla ye r to P C. 2. Run the a cce s s ory ins ta lla tion tools “MP 3 P la ye r Dis k Tool”. 3. The firs t is forma t tool. Choos e “P a rtition a nd e ncrypt” option, a nd s e t a de s ire d ca ...... pa city for the e ncrypte d dis k, the n choos e the s e tting of us e rna me or pa s s word. Fill the us e rna me in the bla nk “Ne w us e rna me ”, a nd pa s s word in the bla nk “Ne w pa s s word”, .. the n input the s a me pa s s word a ga in in the bla nk “Ne w pa s s word Confirm”. Afte r the ... a bove ope ra tion, click “S ta rt” button, a nd pa rtition s ta rts . 30 4. P a rtition finis he s with hints a s follows : 31 5. P re s s “OK”, the n P C ma y re s ta rt. 6. Two dis ks ma y be dis pla ye d a fte r re s ta rting (only one drive r le tte r ma y be dis pla ye d ..... whe n unde r Windows 2K S P 4). Click to a cce s s the e ncrypte d dis k a nd the re is a e x ...... e xe cuta ble file 7. Run the e xe cuta ble file “Rdis kDe crypt.e xe ”, a nd input us e rna me a nd pa s s word in dia ... log box. If the y a re corre ct, dis k ca n be a cce s s e d a nd file s ca n be copie d. 32 8. Us e rna me a nd pa s s word is re quire d to a cce s s to the e ncrypte d dis k in e ve ry conne c- ... tion to P C. Note: Dividing one dis k into two pa rts ma y e ra s e the da ta in it. P le a s e ba ckup the da ta in dis k be fore divis ion. And me rging two pa rts to one ma y a ls o e ra s e the da ta . Warning: Do not los e the us e r na me a nd pa s s word you’ve input, othe rwis e you ca n not . a cce s s to the e ncrypte d dis k a nd you ha ve to me rge the two pa rts to ca nce l the e ncrypte d dis k with file s in it los ing. S pe cifica tion 33 11. TROUBLES HOOTING Tro u b le s h o o tin g In cases where your unit does not appear to be working, please review the following directions: No s ound is he a rd from he a dphone : - Che ck whe the r Volume is s e t “0” a nd conne ct the he a dphone plugs firmly. - Che ck whe the r the he a dphone plug is dirty. - Corrupte d MP 3 ma y ma ke a s ta tic nois e a nd the s ound ma y cut off. Ma ke s ure tha t the mus ic file s a re not corrupte d. Cha ra cte rs in OLCD a re corrupte d: - Che ck whe the r the right la ngua ge ha s be e n s e le cte d. FM Re ce ption is poor: - Adjus t the pos ition of the he a dphone a nd pla ye r. - Turn off the powe r of othe r e le ctric de vice s ne a r the pla ye r. The he a dphone ma y be us e d a s the a nte nna . Downloa d of mus ic file s fa ils : - Che ck whe the r US B ca ble is da ma ge d a nd is conne cte d prope rly. Che ck whe the r drive r is ins ta lle d corre ctly. 34 1) In ca s e s whe re your pla ye r ca nnot be turne d on a nd it ca nnot be found by your P C (whe n conne cte d), you ca n re cove r your pla ye r us ing the following ins tructions : a ) Ta ke out the ba tte ry firs t, pre s s a nd hold the pla y button of the pla ye r. b) conne ct to your P C, a nd run firmwa re downloa d progra m. 2) Your pla ye r will not turn on a ) Re pla ce the ba tte ry. b) Conne ct your pla ye r to your P C, a nd run the firmwa re downloa d progra m. 3) Unit turns on, but the s cre e n is bla nk a ) This ca n be ca us e d by importa nt s ys te m file s be ing corrupt or mis s ing. P le a s e re -run the s oftwa re from the include d CD, a nd the n run the firmwa re 35 IMP ORTANT P le a s e re a d the following ca re fully: 1) The drive rs on the CD a re jus t for Win98. Norma lly you do not ne e d to ins ta ll drive rs if you a re running Windows 2000 S P 3 or la te r. If your P C s till doe s not re cognize your pla ye r, ins ta ll the include d drive rs . 2) If you continue to ha ve proble ms , ins ta ll the drive r a nd the n run the firmwa re upgra de progra m 3) The following a re e xa mple s of s oftwa re proble ms tha t ca n occur: a ) If the wrong firmwa re wa s ins ta lle d (firmwa re for a diffe re nt pla ye r a ccide nta lly ins ta lle d on this unit) b) If you unplug your pla ye r during moving da ta (copy, pa s te e tc.) 4) In a ll ca s e s of unknown proble ms , a lwa ys be gin with re ins ta lling drive rs (if ne ce s s a ry) a nd run the firmwa re upda te progra m. 5) Do not us e 35xx s oftwa re to upda te 34xx s oftwa re , or us e 34xx s oftwa re to upda te 35xx. 6) Whe n you turn on the pla ye r, a nd it s huts off a ga in on it’s own; ple a s e che ck if the a uto powe r off ha s be e n s e t or if the ba tte rie s ne e d to be re pla ce d. 7) Note tha t whe n the ba tte rie s a re e xtre me ly low, da ta (s ongs ) ma y not be s a ve d prope rly. 36 12. S P ECIFICATIONS Specifications and appearance are subject to change and improvement without further notice. 37 P RECAUTIONS 1). 2). 3). 4). 5). When not using the player for an extended period of time, remove the batteries to avoid due to leakage Do not use the player in extremely hot, cold, dusty or damp environments. damage Make sure the HOLD key is in the unlock position before using the player (otherwise controls will not function). Avoid dropping or striking the unit .This may cause external and internal physical damage to the player. Replace battery with new one if: a ) The ba tte ry le ve l icon dis pla ys (An e mpty ba tte ry) b) The players powers off automatically and off again when restarted. c) No response when pressing keys with HOLD off and battery installed 6). To prevent damage from static shock, never use the player in very dry conditions. 7). 8). When player is being formatted or transferring a file, do not interrupt the connection. Otherwise, data may be corrupt of lost. When the player is used as a portable HD, please use only per instructions. Otherwise, permanent data loss could occur. This manual was correct and complete at the time of printing. However, specifications and updates can occur at any time without prior notice. 38 No part of this manual may be copied, republished, reproduced, transmitted or distributed in any way without prior written consent of Nextar, Inc. Any unauthorized distribution of this manual is expressly forbidden. Nextar is a registered trademark of Tofasco, Inc. Nextar may find it necessary to modify, amend or otherwise change or update this manual. We reserve the right to do this at any time, without any prior notice. All specifications and features are subject to change without notice. All screen shots shown are simulated and may not represent the actual screen on production units sold to consumers. For instruction manuals, updated drivers or other information, be sure to visit our website at: www.Nextar.com Or write us at: Nextar 1661 Fairplex Dr. LaVerne, CA USA 91750 Copyright © 2006 39