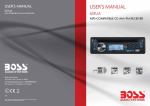
1
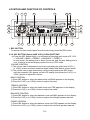
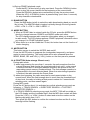
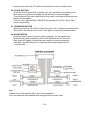
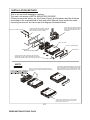
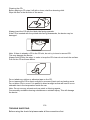
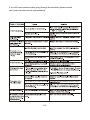
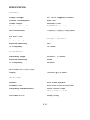
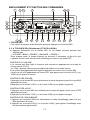
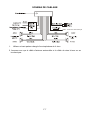
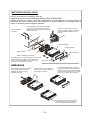
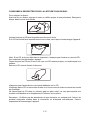
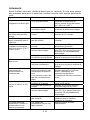
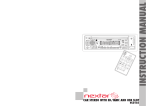
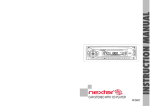
DEAR CUSTOMER:
Selecting fine audio equipment such as the unit you have just purchased is only the start
of your musical enjoyment. Now it is time to consider how you can maximize the fun and
excitement your equipment offers.
We hope you get the most out of your equipment by playing it at a safe level.
One that lets the sound come through loud and clear without annoying blare or distortion,
and, more important, without affecting your sensitive hearing.
Sound can be misled. Over time your hearing " comfort level " adapts to higher volumes
of sound. So what sounds " normal " can actually be loud and harmful to your hearing.
Guard against this by setting your equipment at a safe level BEFORE your hearing
adapts.
To establish a safe level:
Start your volume control at the lowest setting , then slowly increase the sound until you
can hear it comfortably and clearly, and without distortion we want you listening for a
lifetime.
Once you have established a comfortable sound level:
Set the dial and leave it there.
Taking a minute to do this now will help to prevent hearing damage or loss in the
future. After all, we want you listening for a lifetime.
ABOUT THIS MANUAL
This product features a number of sophisticated functions ensuring superior reception
and
operation. All are designed for the easiest possible use, but many are not
self-explanatory.
This operation manual is intended to help you benefit fully from their potential and to
maximize your listening enjoyment.
We recommend that you familiarize yourself with the functions and their operation by
reading through the manual before you begin using this product. In this operation manual,
the Basic Operation for each sound source is outlined at the beginning of its explanation,
covering simple operation for that source, such as merely playing music.
Remark:
In addition to normal audio CD, this unit can play CD-R and CD-R/W disc that contain
audio tracks as well; however, depending on the conditions of the recording equipment,
recording program or the CD-R as well as CD-R/W disc itself, some CD-R or CD-R/W
may not play.
When making music CD with CD-R or CD-R/W disc, too high recording speed may
result in poor signal quality and therefore, it is recommendable to select 24x or lower
speed for CD-R recording and 4x or lower speed for CD-R/W recording.
E1
LOCATION AND FUNCTION OF CONTROLS
1
2
6
24
7
11
8
EJECT
REL
9
3
SCN
BND
-
10
22
CLK
+
SEL
COMPACT
ST
23
LUD
DIGITAL AUDIO
5
4
1 TOP
2 INT
3 RPT
4 RDM
5
6
15
16
17
18
19
20
A.P
14
MU
MODE
12
13
1. REL BUTTON
To remove the front control panel from the main body, press the REL button.
2.3.4. SEL BUTTON (Select) AND V.UP(+)/V.DN(-)BUTTONS
a) Press the SEL button briefly, it is activated as selecting each mode of E. VOL.
-> VOLUME ->BASS ->TREBLE -> BALANCE -> FADER ->
In each mode, the waiting time is about 5 seconds, and the time waiting time is
over, it returns to the last display mode of tuner or CDP mode.
VOLUME CONTROL
1) The volume can be adjusted at any time by pressing the audio level V.UP(+)
or V.DN(-) button as select mode has been initially defaulted at volume mode.
2) The volume can be also obtained by continuously pressing the SEL button
until the character VOL appear on the LCD display, then press the V.UP(+) or
V.DN(-) button to adjust the volume.
BASS CONTROL
1) Press SEL button to select the bass mode until BAS appears on the display.
2) Press the V.UP(+) or V.DN(-) button to adjust the bass.
TREBLE CONTROL
1) Press SEL button to select the treble mode until TRE appears on the display.
2) Press the V.UP(+) or V.DN(-) button to adjust the treble.
BALANCE CONTROL
1) Press SEL button to select the balance mode until BAL appears on the display.
2) Press the V.UP(+) or V.DN(-) button to adjust the left/right speaker balance.
FADER CONTROL
1) Press SEL button to select the balance mode until FAD appears on the display.
2) Press the V.UP(+) or V.DN(-) button to adjust the front/rear speaker balance.
E2
21
b) When pressed longer 2 seconds, it is activated as cyclical mode of following
functions for user s selection.
-> BEEP (2nd/ALL/OFF) ->SEEK1/ 2 -> DSP(OFF/POP/ROCK/CLASSIC/
FLAT)-> VOL LAST/VOL ADJ mode.
After selecting the desired mode, press the V.UP(+) or V.DN(-) button shortly
to select one setup item of the desired mode.
BEEP 2ND, BEEP ALL, BEEP OFF MODE
The situation of beep sound is selected. The 3 mode is selected as also V.UP
(+) or V.DN(-) button.
- Beep 2nd mode:
The beep is only generated when an allotted double key is pressed long (1
second).
- Beep all mode:
The beep is generated when every key is pressed.
- Beep off mode:
The beep sound is disabled when a key is pressed.
SEEK 1/SEEK 2 mode:( Only available during radio operation)
SEEK 1: Press and hold the UP(^) or DOWN(v) button to seek up or down for
the strong signal stations. And the seek stops when received a strong
signal station.
SEEK 2: Press and hold the UP(^) or DOWN(v) button to seek up or down for
the strong signal stations. But the seek does not stop when received
a strong signal stations excepting release the UP(^) or DOWN(v)
button.
VOL LAST/VOL ADJ
VOL LAST: The radio switches on at the actual volume it had when it was last
switched off.
VOL ADJ: Pressing the V.UP(+) or V.DN(-) button you can pre-select a
constant switch on volume.
5. POWER ON/OFF
When the unit is power off, the unit comes to ON by pressing any button on the
front panel (except the OPEN key or the EJ key). It also can turn on the unit to
insert a disc into CD slot. When the unit is power on, press and hold the power
button for more than 0.5 seconds, the unit goes into power off mode.
6. LCD (Liquid Crystal Display)
7. CD SLOT
8. EJECT KEY
In the power on state, the loaded disc can be ejected by pressing the EJ key.
9. 10. TUNE, SEEK, TRACK, SKIP UP) / DOWN BUTTONS
a) During RADIO mode:
Press the UP(^) or DOWN(v) button shortly to manual tune up/down for the
desired radio station frequency with step by step.
Press and hold the UP(^) or DOWN(v)button for longer 0.5 seconds, to automatically tune up/down for the radio station frequency of strong signal.
E3
b) During CD/MP3 playback mode:
Press theUP(^) button briefly to play next track. Press the DOWN(v) button
once to play the current track from the beginning of the current track.
Press the DOWN(v) button twice continuously to play the previous track.
When the UP(^) or DOWN(v) button is pressed long (more than 1 seconds)
for skip forwards or backwards.
11. BAND BUTTON
Press the BND button briefly to select the radio broadcasting band you would
like to hear. The MW/FM band is toggled cyclically through the tuning bands
->FM 1-> FM 2 -> FM 3 -> MW 1->MW 2 ->.
12. MODE BUTTON
1) When a CD/MP3 disc is existed inside the CD slot, press the MODE button
shortly to change between CD/MP3 and RADIO mode each other.
The LCD display appears radio reception information when you change it
to radio mode; The LCD display appears CD/MP3 playback information when
you change it to CD/MP3 playback mode.
2) When there is no a disc inside the CD slot, the button has not the function of
mode changing.
13. MUTE BUTTON
This button serves to switch the MUTED state on/off.
Press the MUTE button to suppress the loudspeaker temporarily, and press
again to resume listening. The muted state will be also released when the
MODE, BAND, SEL and VOL(+), VOL(-) button on the front panel is pressed.
14. A.P BUTTON (Auto-storage /Preset scan)
During radio mode:
1) when long pressing for more than 1 seconds, the radio searches from the
current frequency and checks the signal strength level until 1 cycle search
is finished. And then 6 strongest stations frequency are preset to the corresponding preset memory numbered bank. The auto-storage operation is
implemented in the each selected band. When the auto-storage operation
is finished, the radio execute the Preset Scan
2) when short pressing, the radio searches for each preset station in the
current band. When the field strength level is more than the threshold level
of stop level, the radio is holding at that preset number for 5 seconds with
releasing mute, and than search again.
During MP3 mode:
Press the A.P button short, it is activated as cyclical selecting song mode as
following: -> TRACK SEARCH -> DIRECTORY SEARCH -> THE FIRST
CHARACTER SEARCH ->
1) In TRACK SEARCH selecting song mode, the MP3 T 000 will be visible on
the LCD display and the hundreds digit 0 that the MP3 disc contain will flash.
Press the V.UP(+) or V.DN(-) button to select and enter the number on the
flashing digit place from 1 to 9.
Then press the SEL button to confirm the entered number and the 0 on the
tens digit will be flashing.
E4
Press the V.UP(+) or V.DN(-) button to select and enter the number on the
flashing digit from 1 to 9.
Then press the SEL button to confirm the entered number and the 0 on the
units place digit will be flashing.
Press the V.UP(+) or V.DN(-) button to select and enter the number on the
flashing digit from 1 to 9.
After finishing enter all the number of the song serial number on the flashing
digit, press the SEL button to play the corresponding track.
2) In DIRECTORY SEARCH selecting song mode, the root folder will be visible
on the LCD will display. (If there is not a root folder in the current MP3 disc,
you will found a root named ROOT.)
Then press the V.UP(+) or V.DN(-) button to select a desired folder.
And then press the UP(^) or DOWN(v) button to select a desired track in the
folder. Finally press the SEL button to play the selected track.
3) In the FIRST CHARACTER SEARCH selecting song mode, the A--......, will
be visible on the LCD display. (If there are files names its first character are
A, the......is the first file name its first character is A by the order of A~Z and
0~9; otherwise, the ......is NONE.)
Press the V.UP(+) or V.DN(-) button to select files that the first character by
the order of A~Z and 0~9.
Then press the UP(^) or DOWN(v) button to select one file its first character
is the selected one. Finally press the SEL button to play the selected file.
15-20. PRESET STATION MEMORY AND TOP/ >||, INT, RPT, RDM BUTTONS
a) During radio mode:
When pressed short, these buttons select a preset station directly.
If the six buttons are pressed for more than 2 seconds, the station
currently being listened to is memorized into the selected preset button.
b) During CD/MP3 mode:
Press the TOP/>|| button briefly to interrupt the playback of the disc.
Press again to resume normal playback of the CD/MP3.
Press the TOP/>|| button and hold for approximately 0.5 seconds to play
the first track of the current disc.
Press the INT button to play the first 10 seconds part of each track.
Press again to stop scan, while the currently selected track will be played.
During MP3 mode, press the INT button and hold for more than 0.5 seconds
to play the first 10 seconds part of each track in current folder.
Press the RPT button to play the current track repeatedly.
Press again to cancel this function.
During MP3 mode, press the RPT button and hold for more than 0.5 seconds
to play the current folder repeatedly. Press again to cancel this function.
Press the RDM button to play all tracks on disc in random order.
Press again to cancel this function.
During MP3 mode, Press the RDM button and hold for more than 0.5 seconds to
play the track in random order in the current folder.
Press again to cancel this function.
c) During the normal playback of CDs in MP3 format:
Press the radio preset button 6 and 5 to move up and down10 tracks at a time.
E5
21.ST/MO BUTTON
In radio mode, press the ST briefly to select stereo or mono sound mode.
22. CLOCK BUTTON
Press the CLK button briefly to display time for 5 seconds on the display, and
then returns to its previous display unless the button is pressed again.
Then press the CLK button and hold for more than 1 seconds until the real time
flashes on the display.
Then you can adjust HOUR or MINUTE by pressing the V.UP(+) and V.DN(-)
button, respectively.
23. LOUDNESS BUTTON
When press shortly, the LOUD mode is turned on, its to enhance the bass sound
effect when the volume level is low. Press again to cancel the loudness effect.
24. SCAN BUTTON
Press the SCN button to scan the radio frequency. If a valid signal has
detected, the current frequency will be hold and blinked for 5 seconds,
then press SCN again to stop scan and remain the current frequency;
otherwise, the radio will go on to scan the other radio frequency fiver
seconds later.
Note:
1.Make sure use a speaker with 4 ohm load impedance.
2.Do not make the auto antenna wire and ground touch each other
.
E6
INSTALLATION METHOD
This is an anti-theft installation method.
The main unit wears a METAL MOUNTING SLEEVE.
Please connect the wiring, eg, the Power Supply, the Speakers and the Antenna
according to the requirements of this Instruction Manual, then install the metal
mounting sleeve into the car as per the diagram illustrated below.
To raise the anti-skip capability of the unit
please ensure the metal support strap is
connected firmly to the car chassis.
METAL SUPPORT STR AP
To properly fix the metal mounting
sleeve, bend the tabs of the sleeve
against the DASH BOARD with a
screwdriver.
UNIT CHASSIS
PLASTIC TRIM FR AME
DASHBOARD
FACEPLATE
METAL MOUNTING SLEEVE
To remove the CD player from the Cage insert the
supplied keys into the Left and Right side slots of the
chassis then pull the chassis out of the cage as shown.
NOTE
Remove the two screws that protect the CD
player during transportation before operating
the player.
To attach the removable faceplate, insert the right
side of the faceplate into the right side of the CD
player chassis first. Then push the left side of the
faceplate into the chassis until you hear it"click".
To draw the fr ont panel out of the chassis,
please press the R EL button to eject the
front panel from the unit.
E7
PRECAUTION OF DISC PLAY:
Cleaning the CD:
Before playing a CD, wipe it off with a clean, dust-free cleaning cloth.
Wipe the disc in the direction of the arrow.
Always insert the CD with the label side facing upwards.
If the CD is inserted with the printed side facing downwards, the device may be
damaged.
Note: If there is already a CD in the CD slot, do not try to insert a second CD.
This may damage the device.
Always hold CDs by the edge. In order to keep the CD clean do not touch the surface.
Pull out the CD as shown below.
Do not attach any sticker or adhesive tape on the CD.
Do not expose the CD to direct sunlight or sources of heat such as heating vents.
Do not leave CDs in a car if it is parked in direct sunlight as that will lead to a considerable rise in the temperature inside the car.
Note: Do not use any solvents such as petrol or thinning agents.
Commercially available cleaning substances or antistatic spray. This will damage
the device.
E8
TROUBLE SHOOTING
Before using the check list please make all the connections first.
If you still have questions after going through the checklist, please consult
your local customer service representative.
E9
SPECIFICATION
GENERAL
Supply Voltage
DC 14.4V. Negative Ground
Current Consumption
Max.15A
Power Output
40Watts X 4ch.
Number of channels
2 STEREO channels.
Unit Dimensions
178[W] X 165[D] X 50[H] mm.
FM SECTION
Frequency range
87.5MHz -107.9MHz
Effective sensitivity
3uV.
I.F Frequency
10.7MHz.
AM SECTION
Frequency range
530KHz - 1710KHz
Effective sensitivity
40dB.
I.F Frequency
450KHz
RCA LINE OUT (OPTION)
Output
1200mV @ CD MAX.
CD PLAYER
System
MP3 Audio System.
Suitable CDs
MP3/CD/CD-R/CD-RW Disc
Frequency characteristics
20Hz-100Hz ≤ 5dB
10KHz-20KHz ≤ 5dB.
S/N Ratio to CD
50dB [1KHz]
E 10
CHERS CLIENTS :
Votre choix d’un système audio de qualité, comme l’appareil que vous venez d’acheter,
constitue le premier pas pour apprécier vos sélections musicales. Il est temps à présent
d’examiner comment il vous est possible de profiter au maximum des possibilités et des
innovations que ce système vous offre. Nous vous souhaitons une utilisation en toute
sécurité de votre appareil. Que le son qu’il procure soit fort et clair sans aucun bruit
strident ou déformation et surtout sans danger pour votre ouie délicate. Le son peut être
trompeur. Au fil du temps, le « niveau de confort » de vos tympans s’adapte à des
volumes toujours plus élevés. Ce qui vous paraît « normal » peut en réalité être très fort et
nocif à votre ouie. Prémunissez-vous contre cet effet en réglant votre système sur un
niveau raisonnable AVANT que votre ouie ne change.
Pour établir un niveau raisonnable :
Réglez le volume au plus bas, et augmenter progressivement le son jusqu’à ce que vous
puissiez l’entendre de façon claire et confortable, sans déformation. Nous aimerions vous
permettre d’écouter pour la vie.
Une fois ce niveau raisonnable établi :
Réglez le bouton et n’y touchez plus.
Si vous consacrez seulement une minute à ce réglage, vous vous épargnerez une perte
auditive dans l’avenir. N’oubliez pas, nous aimerions vous permettre d’écouter pour la vie.
A PROPOS DE CE MANUEL
Ce produit possède un certain nombre de fonctions sophistiquées qui assurent une
meilleure réception et un fonctionnement sans pareil. Toutes ont été conçues pour être
faciles à utiliser, mais certaines requièrent des explications. Ce manuel d’utilisation est là
pour vous permettre de profiter de ces avantages et d’accroître votre plaisir musical.
Nous vous conseillons de vous familiariser avec ces fonctions et leur fonctionnement en
lisant au préalable le manuel. Dans ce manuel, nous décrivons le fonctionnement de
base de chaque source sonore en début d’explication.
Remarque :
En plus d’un CD audio normal, cet appareil peut également lire des disques CD-R et
CD-R/W contenant des pistes audio; cependant, selon les conditions du système
d’enregistrement, le programme d’enregistrement, ou les disques CD-R ou CD-R/W,
certains ne pourront peut-être pas être lus.
Lors d’enregistrement de CD de musique avec des disques CD-R ou CD-R/W, une
vitesse d’enregistrement trop élevée risque de donner une mauvaise qualité de signal, et
il est donc conseillé de sélectionner une vitesse de 24x ou moins lors d’un enregistrement
de CD-R, et une vitesse de 4x ou moins lors d’un enregistrement de CD-R/W.
F1
EMPLACEMENT ET FONCTION DES COMMANDES
1
2
6
24
7
11
8
EJECT
REL
9
3
SCN
BND
-
10
22
CLK
+
SEL
COMPACT
ST
21
23
LUD
DIGITAL AUDIO
5
4
1 TOP
2 INT
3 RPT
4 RDM
5
6
15
16
17
18
19
20
A.P
14
MU
MODE
12
13
1. TOUCHE REL
Pour retirer le panneau avant du boîtier principal, appuyez sur la touche REL.
2. 3. 4. TOUCHES SEL (Sélectionner) ET V.UP(+)/V.DN(-)
a) Appuyez brièvement sur la touche SEL, et les modes suivants peuvent être
sélectionnés
-> VOLUME ->BASS ->TREBLE -> BALANCE -> FADER ->
Dans chaque mode, le temps d’attente est d’environ 5 secondes, au bout de quoi
l’appareil revient à son dernier mode d’affichage du tuner ou en mode CDP.
CONTROLE DU VOLUME
1) Le volume peut être réglé à n’importe quel moment en appuyant sur la touche de
niveau sonore V.UP(+)
ou V.DN(-) puisque cette touche est réglée par défaut sur le mode volume.
2) Le volume peut également être réglé en appuyant en continu sur la touche SEL
jusqu’à ce que VOL apparaisse sur l’écran LCD, puis appuyez sur la touche V.UP(+) ou
V.DN(-) pour ajuster le volume.
CONTROLE DES GRAVES
1) Appuyez sur la touche SEL pour sélectionner le mode des graves jusqu’à ce que BAS
apparaisse à l’écran.
2) Appuyez sur la touche V.UP(+) ou la touche V.DN(-) pour ajuster les graves.
CONTROLE DES AIGUS
1) Appuyez sur la touche SEL pour sélectionner le mode des aigus jusqu’à ce que TRE
apparaisse à l’écran.
2) Appuyez sur la touche V.UP(+) ou la touche V.DN(-) pour ajuster les aigus.
CONTROLE DE L’EQUILIBRAGE
1) Appuyez sur la touche SEL pour sélectionner le mode d’équilibrage jusqu’à ce que
BAL apparaisse à l’écran.
2) Appuyez sur la touche V.UP(+) ou la touche V.DN(-) pour ajuster l’équilibrage entre
les haut-parleurs gauche/droit.
F2
CONTROLE DE L’EQUILIBREUR
1) Appuyez sur la touche SEL pour sélectionner le mode d’équilibrage jusqu’à ce que
FAD apparaisse à l’écran.
2) Appuyez sur la touche V.UP(+) ou la touche V.DN(-) pour ajuster l’équilibrage entre
les haut-parleurs avant/arrière.
b) Quand vous appuyez pendant plus de 2 secondes, le mode alterne de façon
cyclique entre les fonctions suivantes, que l’utilisateur doit sélectionner :
-> BEEP (2nd/ALL/OFF) ->SEEK1/ 2 -> DSP(OFF/POP/ROCK/CLASSIC/FLAT)->
VOL LAST/VOL ADJ mode.
Après avoir sélectionné le mode souhaité, appuyez brièvement sur la touche V.UP(+)
ou V.DN(-) pour sélectionner une option de réglage du mode en question.
BEEP 2ND, BEEP ALL, BEEP OFF MODE
L’option de son du bip est sélectionnée. Le mode 3 est sélectionné aussi par la touche
V.UP(+) ou V.DN(-).
- Mode Bip 2 (Beep 2nd) :
Le bip est généré uniquement lorsque vous appuyez sur la touche double
correspondante longtemps (1 seconde).
- Mode Bip tout (Beep all) :
Le bip est généré lorsque vous appuyez sur chaque touche.
- Mode bip éteint (Beep off) :
Le bip est désactivé quand vous appuyez sur une touche.
Mode Recherche 1/ Recherche 2 (SEEK 1/SEEK 2) : (Disponible seulement lorsque la
radio fonctionne)
SEEK 1 : Appuyez et maintenez la touche UP(^) ou DOWN(v) pour rechercher vers le
haut ou vers le bas les signaux forts. La recherche s’arrête lorsqu’un fort signal de
station est reçu.
SEEK 2 : Appuyez et maintenez la touche UP(^) ou DOWN(v) pour rechercher vers le
haut ou vers le bas les signaux forts des stations. Dans ce cas, la recherche ne s’arrête
pas lorsqu’un fort signal de station est reçu, sauf si vous relâchez la touche UP(^) ou
DOWN(v).
VOL LAST/VOL ADJ
DERNIER VOLUME (VOL LAST) : La radio se remet sur le volume programmé lorsque
l’appareil a été éteint.
AJUSTEMENT VOLUME (VOL ADJ) : Appuyez sur la touche V.UP(+) ou V.DN(-) pour
régler le volume sur un niveau constant.
5. MARCHE/ARRET (POWER ON/OFF)
Lorsque l’appareil est éteint, l’appareil s’allume (ON) en appuyant sur n’importe quelle
touche sur le panneau avant (sauf les touches OPEN ou EJ). La touche ON peut aussi
allumer l’appareil pour insérer un disque dans le logement à CD. Quand l’appareil est
allumé (ON), appuyez et maintenez la touche power pendant plus de 1 seconde et
l’appareil se met en mode OFF.
6. AFFICHEUR A CRISTAUX LIQUIDES (LCD)
7. LOGEMENT CD (CD SLOT)
F3
8. TOUCHE EJECTER (EJECT)
Lorsque l’appareil est allumé, le disque chargé peut être éjecté en appuyant sur la
touche EJ.
9. 10. TOUCHES SYNTONISATION, RECHERCHE, PISTE, EN HAUT/EN BAS (TUNE,
SEEK, TRACK, SKIP UP) / DOWN
a) En mode RADIO :
Appuyez brièvement sur la touche UP(^) ou DOWN(v) pour rechercher
manuellement la station de radio désirée.
Appuyez et maintenez la touche UP(^) ou DOWN(v) pendant plus de 0,5 seconde
pour rechercher automatiquement une station de radio ayant un fort signal.
b) En mode lecture CD/MP3 (playback) :
Appuyez brièvement sur la touche UP(^) pour lire la piste suivante. Appuyez une fois
sur la touche DOWN(v) pour lire la piste en cours à partir du début.
Appuyez deux fois en continu sur la touche DOWN(v) pour lire la piste précédente.
Lorsque vous appuyez longtemps (plus d’une seconde) sur la touche UP(^) ou
DOWN(v) pour avancer ou reculer.
11. TOUCHE BANDE (BAND)
Appuyez brièvement sur la touche BND pour sélectionner la bande de fréquence
radio que vous souhaitez entendre. La bande MW/FM alterne de façon cyclique
entre les bandes. ->FM 1-> FM 2 -> FM 3 -> MW 1->MW 2 ->.
12. TOUCHE MODE
1) Lorsqu’un disque CD/MP3 se trouve dans le logement du CD, appuyez brièvement
sur la touche MODE pour alterner ente le mode CD/MP3 et RADIO.
En mode radio, l’afficheur à cristaux liquides affiche des informations sur la bande et
la fréquence radio; en mode CD/MP3, l’afficheur à cristaux liquides affiche des
informations sur le CD ou les fichiers MP3.
2) Lorsqu’il n’y a pas de disque dans le logement du CD, la touche n’offre pas la
fonction permettant de changer de mode.
13. TOUCHE SOURDINE (MUTE)
Cette touche permet d’activer/ de désactiver (on/off) la sourdine.
Appuyez sur la touche MUTE pour supprimer temporairement le son des
haut-parleurs, et appuyez de nouveau sur la touche pour entendre à nouveau. Le
mode sourdine est également désactivé lorsque vous appuyez sur les touches
MODE, BAND, SEL et VOL(+), VOL(-) sur le panneau avant.
14. TOUCHE A.P (Auto-mémoire /Balayage préréglé)
En mode radio :
1) Lorsque vous appuyez longtemps pendant plus d’une seconde, la radio effectue
une recherche à partir de la fréquence en cours et vérifie l’intensité d’un signal
jusqu’au cycle de recherche suivant. Les fréquences des 6 stations de radio les
plus fortes sont préréglées sur les chiffres présélectionnés correspondants en
mémoire. L’opération d’auto-mémoire est effectuée dans chacune des bandes
sélectionnées. Lorsque l’opération d’auto-mémoire est terminée, la radio effectue
un balayage préréglé.
F4
2) Lorsque vous appuyez brièvement sur la touche, la radio recherche chaque station
préréglée sur la bande en cours. Lorsque l’intensité de la force de champ est
supérieure au niveau d’arrêt, la radio s’arrête à ce chiffre préréglé pendant 5
secondes, en désactivant la sourdine, et se remet à chercher.
En mode MP3 :
Appuyez brièvement sur la touche A.P pour activer le mode de sélection cyclique des
chansons ci-dessous :-> TRACK SEARCH -> DIRECTORY SEARCH -> THE FIRST
CHARACTER SEARCH ->
1) Dans le mode de sélection de chanson RECHERCHE PISTE (TRACK SEARCH),
le MP3 T 000 sera visible sur l’écran LCD et les chiffres des centaines du disque
MP3 clignoteront.
Appuyez sur la touche V.UP(+) ou V.DN(-) pour sélectionner et saisir le numéro sur
le chiffre clignotant de 1 à 9.
Puis appuyez sur la touche SEL pour confirmer le numéro saisi, et le 0 sur les
chiffres des dizaines clignotera.
Appuyez sur la touche V.UP(+) ou V.DN(-) pour sélectionner et saisir le numéro sur
le chiffre clignotant de 1 à 9.
Puis appuyez sur la touche SEL pour confirmer le numéro saisi et le 0 sur les chiffres
des unités clignotera.
Appuyez sur la touche V.UP(+) ou V.DN(-) pour sélectionner et saisir le numéro sur
le chiffre clignotant de 1 à 9.
Quand vous avez terminé, saisissez tous les chiffres de la chanson sur le chiffre
clignotant et appuyez sur la touche SEL pour lire la piste correspondante.
2) Dans le mode de sélection de chanson RECHERCHE REPERTOIRE
(DIRECTORY SEARCH), le dossier principal sera visible sur l’écran LCD. (s’il
n’existe pas de dossier principal dans le disque MP3 en cours, vous trouverez une
racine appelée ROOT).
Puis appuyez sur la touche V.UP(+) ou V.DN(-) pour sélectionner le dossier souhaité.
Appuyez ensuite sur la touche UP(^) ou DOWN(v) pour sélectionner la piste désirée
dans le dossier. Appuyez enfin sur la touche SEL pour lire la piste sélectionnée.
3) Dans le mode de sélection de chanson RECHERCHE PAR LA PREMIERE
LETTRE (FIRST CHARACTER SEARCH), le A-- sera visible sur l’écran LCD. (S’il
existe des fichiers qui commencent par la lettre A, les fichiers apparaîtront par ordre
alphabétique et numérique, sinon la mention NONE apparaîtra).
Appuyez sur la touche V.UP(+) ou V.DN(-) pour sélectionner les fichiers dans l’ordre
alphabétique de A à Z et numérique de 0 à 9.
Appuyez ensuite sur la touche UP(^) ou DOWN(v) pour sélectionner un fichier dont la
première lettre est celle sélectionnée. Appuyez enfin sur la touche SEL pour lire le
fichier sélectionné.
15-20. TOUCHES MEMOIRE STATION PREREGLEE (PRESET STATION MEMORY)
ET TOP/ , INT, RPT, RDM
a) En mode radio :
Lorsque vous appuyez brièvement, ces touches sélectionnent directement une
station préréglée. Si vous appuyez sur les six touches pendant plus de 2 secondes,
la station en cours est mémorisée dans la touche de préréglage.
b) En mode CD/MP3 :
Appuyez sur la touche TOP/ brièvement pour interrompre la lecture d’un disque.
Appuyez de nouveau sur la touche pour reprendre la lecture du CD/MP3.
F5
Appuyez et maintenez la touche TOP/ pendant approximativement 0,5 seconde pour
lire la première piste du disque en cours.
Appuyez sur la touche INT pour lire les 10 premières secondes de chaque piste.
Appuyez de nouveau sur la touche pour interrompre le balayage, et la piste
sélectionnée sera lue.
En mode MP3, appuyez et maintenez la touche INT pendant plus de 0,5 seconde
pour lire les 10 premières secondes de chaque piste du dossier en cours.
Appuyez sur la touche RPT pour lire la piste en cours à répétition.
Appuyez de nouveau sur la touche pour annuler cette fonction.
En mode MP3, appuyez et maintenez la touche RPT pendant plus de 0,5 seconde
pour lire le dossier en cours à répétition. Appuyez de nouveau sur la touche pour
annuler cette fonction.
Appuyez sur la touche RDM touche pour lire toutes les pistes sur le disque dans un
ordre aléatoire.
Appuyez de nouveau sur la touche pour annuler cette fonction.
En mode MP3, appuyez et maintenez la touche RDM pendant plus de 0,5 seconde
pour lire
la piste dans un ordre aléatoire dans le dossier en cours.
Appuyez de nouveau sur la touche pour annuler cette fonction.
c) En mode de lecture normale de CD en format MP3 :
Appuyez sur les touches de programmation radio 6 et 5 pour vous déplacer de 10
pistes à la fois.
21. TOUCHE ST/MO
En mode radio, appuyez brièvement sur la touche ST pour sélectionner un son
stéréo ou mono.
22. TOUCHE HORLOGE (CLOCK)
Appuyez brièvement sur la touche CLK pour afficher le temps pendant 5 secondes
à l’écran, puis retournez dans l’écran précédent sauf si vous appuyez de nouveau
sur la touche.
Ensuite, appuyez et maintenez la touche CLK pendant plus de 1 seconde jusqu’à
ce que le temps réel clignote à l’écran.
Vous pouvez ensuite régler l’heure (HOUR) ou les minutes (MINUTE) en appuyant
respectivement sur la touche V.UP(+) et V.DN(-).
23. TOUCHE LOUDNESS
Lorsque vous appuyez brièvement sur cette touche, le mode LOUD est activé, afin
de rehausser les graves lorsque le volume est faible. Appuyez de nouveau sur la
touche pour annuler l’effet loudness.
24. TOUCHE BALAYAGE (SCAN)
Appuyez sur la touche SCN pour balayer les fréquences radio. Si un signal est
détecté, la fréquence en cours sera maintenue et clignotera pendant 5 secondes.
Ensuite, appuyez de nouveau sur la touche SCN pour annuler le balayage et
conserver la fréquence en cours; sinon la radio passera à la fréquence suivante au
bout de cinq secondes.
F6
SCHEMA DE CABLAGE
Bleu - A ntenne automatique
1.
-
-
-
-
Utilisez un haut-parleur chargé d’une impédance de 4 ohm.
2. Assurez-vous que le câble d’antenne automobile et le câble de mise à terre ne se
touchent pas.
F7
METHODE D’INSTALLATION
Ceci est une méthode d’installation anti-vols.
L’appareil principal porte UN MANCHON METALLIQUE DE MONTAGE.
Veuillez raccorder les câbles, c’est-à-dire l’alimentation, les haut-parleurs et l’antenne selon les
indications du manuel d’instructions, puis installez le manchon métallique de montage dans la
voiture en suivant le schéma illustré ci-dessous.
Equerre métallique
de support
Afin d’augmenter la probabilité que l’appareil
ne saute pas, assurez-vous que l’équerre en
métal de support est fermement raccordée au
châssis du véhicule.
Afin de fixer correctement le manchon
métallique, repliez les pattes du manchon
contre le TABLEAU DE BORD avec un
tournevis.
Châssis de l’appareil
Bord en plastique
Tableau de bord
Plaque de devant
Manchon métallique de montage
Pour retirer le lecteur de CD du logement, insérez les clés
fournies dans les fentes latérales sur la gauche et la
droite du châssis, puis retirez sur le châssis de son
logement, comme le montre le schéma.
REMARQUE
Avant d’installer et de faire fonctionner
votre appareil, retirez le manchon
métallique de montage comme
l’illustrent les flèches.
Retirez les deux vis qui protègent le
lecteur de CD pendant le transport
avant d’utiliser l’appareil.
Pour fixer la plaque de devant, insérez le
côté droit de la plaque dans le côté droit du
châssis du lecteur de CD. Poussez ensuite
le côté gauche de la plaque dans le châssis
jusqu’à ce vous l’entendiez s’enclencher
Pour retirer le panneau avant du châssis,
veuillez appuyer sur la touche REL pour
éjecter le panneau avant de l’appareil.
F8
CONSIGNES A RESPECTER POUR LA LECTURE D’UN DISQUE :
Pour nettoyer le disque :
Avant de lire un disque, essuyez-le avec un chiffon propre et non pelucheux. Essuyez le
disque dans le sens de la flèche.
Insérez toujours le CD face étiquetée tournée vers le haut.
Si le CD est inséré face imprimé tourné vers le bas, ceci risque d’endommager l’appareil.
Note: Si un CD se trouve déjà dans le logement, n’essayez pas d’insérer un second CD.
Ceci risquerait d’endommager l’appareil.
Tenez toujours les CD par le bord. Afin que vos CD restent propres, ne touchez pas leur
surface.
Retirez le CD comme illustré ci-dessous.
N’apposez pas d’autocollant ou de bande adhésive sur le CD.
N’exposez pas le CD à une lumière directe ou à une source de chaleur comme les évents
de chauffage.
Ne laissez pas les CD dans un véhicule garé en plein soleil, car ceci provoquerait une
montée considérable de la température à l’intérieur de la voiture.
Remarque : N’utilisez pas de dissolvants de type benzène ou contenant de l’alcool, de
produits nettoyants vendus dans le commerce ou d’aérosols anti-statiques. Ceux-ci
risqueraient d’endommager l’appareil.
F9
DEPANNAGE
Avant d’utiliser cette liste, vérifiez d’abord tous les raccords. Si vous avez encore
des questions après avoir lu cette liste, veuillez consulter votre service après-vente
local.
Symptôme
Cause
Remède
Un fusible a sauté.
Si l’alimentation est correctement
raccordée à l’accessoire de
voiture, tournez la clef de contact
sur « ON » ou « OFF ».
Remplacez avec un autre fusible
en suivant le schéma de câblage.
Il y a déjà un CD dans le
lecteur.
Retirez le disque dans le lecteur et
remettez-en un nouveau.
Les vis de transport n’ont
pas été retirées.
Retirez les vis de transport avant
utilisation.
Le disque inséré est à
l’envers.
La surface du CD est très
sale ou endommagée.
Insérez le disque CD avec la face
étiquetée sur le dessus.
Nettoyez le CD ou essayez un
autre CD. Si ce dernier fonctionne,
le premier CD est probablement
endommagé.
Attendez un moment pour faire
baisser la température du véhicule.
Augmentez le volume.
Il n’y a pas de contact.
L’appareil ne s’allume pas.
Le CD ne peut pas être
chargé.
Les CD se chargent de
façon incomplète dans le
logement.
L’appareil ne fonctionne
pas correctement (EJECT,
LOAD, PLAY)
La température à l’intérieur
du véhicule est trop élevée.
Le volume est trop bas.
Pas de son.
Les touches de
fonctionnement ne
marchent pas.
Le son du lecteur de CD
saute.
L’appareil n’a pas été
raccordé correctement.
1. Le micro-ordinateur
intégré ne fonctionne pas
correctement à cause du
bruit.
2. Le panneau avant n’est
pas fixé correctement en
place.
L’angle d’installation est
supérieur à 30 degrés.
La surface de la route est
inégale.
La surface du CD est très
sale ou endommagée.
Pas de réception radio.
Le câble d’antenne n’est
pas raccordé.
En mode recherche
automatique, la radio ne
s’arrête pas sur une
station qui transmet.
Les signaux de
transmission sont de trop
faible intensité.
F 10
Vérifiez les raccords d’alimentation
et de terre en suivant le schéma de
câblage.
1. Allumez et éteignez l’appareil.
Ou bien, appuyez sur la touche
RESET (réinitialiser) pour
reprendre le programme.
2. Installez de nouveau le panneau
avant.
Ajuster l’angle d’installation à
moins de 30 degrés.
Attendez que la route devienne
plus plate avant de lire le CD.
Nettoyez le CD ou essayez un
autre CD. Si ce dernier fonctionne,
le premier CD est probablement
endommagé.
Insérez fermement le câble
d’antenne dans le manchon
d’antenne de l’appareil.
Réglez la station de radio
manuellement.
CARACTERISTIQUES
GENERAL
Alimentation
Mise à terre négative en CC de 14.4 V.
Consommation
Max.15 A
Puissance de sortie
40 Watts X 4 ch.
Nombre de voies
2 voies STEREO.
Dimensions de l’appareil
178[L] X 165[P] X 50[H] mm.
SECTION FM
Bande passante
87,5 MHz à 107,9 MHz
Sensibilité effective
3 uV.
Fréquence I.F
10.7 MHz.
AM SECTION
Bande passante
530 KHz à 1710 KHz
Sensibilité effective
40 dB.
I Fréquence I.F
450 KHz
SORTIE LIGNE RCA
(EN OPTION)
Sortie
1200 mV @ CD MAX.
LECTEUR CD
Système
Système audio MP3.
CD compatibles
Disques MP3/CD/CD-R/CD-RW
Caractéristiques de fréquence
20 Hz à 100 Hz <\5 dB
10 KHz à 20 KHz <\5 dB.
Rapport signal sur bruit
50 dB [1 KHz]
(lecteur CD)
F 11