1
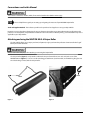
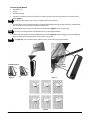
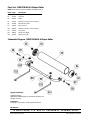
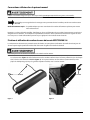
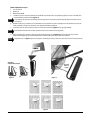
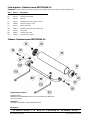
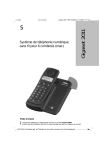
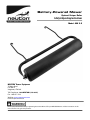
Battery-Powered Mower
Optional Striper Roller
Safety & Operating Instructions
Model: MA 5.6
NEUTON® Power Equipment
75 Meigs Road
P.O. Box 25
Vergennes, VT 05491
Toll-Free phone: 1-866-NEUTON1 (638-8661)
Fax: 1-802-877-1213
Web site: www.neutonpower.com
E-MAIL: [email protected]
Read and understand the Safety & Operating Instructions Manual for your NEUTON Mower and the instructions in this
manual before using the Striper Roller.
Conventions used in this Manual
This indicates a hazardous situation, which, if not avoided, could result in death or serious injury.
TIP
This is a helpful hint to guide you in setting up and getting the most out of your NEUTON Striper Roller.
Tools and Supplies Needed: This indicates you will need a special tool and supplies to set up your Striper Roller.
Neuton Inc. reserves the right to discontinue, change, and improve its products at any time without notice or obligation to the
purchaser. The descriptions and specifications contained in this manual were in effect at printing. Some illustrations may not be
applicable to your Striper Roller.
Attaching and using the NEUTON MA 5.6 Striper Roller
The Striper Roller allows you to stripe your lawn (roll patterns) to give your lawn that professional manicured look of a golf
fairway or baseball diamond!
Always remove the Safety Key before attaching or removing the Striper Roller.
The Striper Roller (Figure 1) easily attaches with Hooks into pre-formed Slots (one each side) at the rear of the
NEUTON Mower (Figure 2). You can use either the Bagger attachment (recommended) or the Mulching Plug (but not
the Side Discharge Chute) with the Striper Roller.
Hook
Hooks
Slot
Figure 1
2
Figure 2
www.neutonpower.com
Tool and Supplies Needed:
•
•
•
Bag of fine sand
Funnel
Hammer (optional)
1.
Install one (1) of the two (2) End Caps (found in a plastic bag stapled around a Hook Arm) in one end of the Striper
Roller (Figure 3).
The End Cap fits snugly so you may have to gently tap it in with a Hammer.
TIP
2.
Stand the Roller on the end with the End Cap installed and fill the Roller through the opposite hole in the Roller with
fine sand using a Funnel and then install the second End Cap.
3.
Insert the Hooks into the Slots provided at the rear of the Mower (Figure 2 on the previous page).
For ease of inserting the Hooks, hold the Roller Arms up against the Handlebars.
TIP
4.
After inserting the Hooks, lower the Striper Roller to the ground (Figure 4), attach the Bagger or insert the Mulching
Plug, and simply create the lawn pattern of your choice as you mow!
TIP
See Figure 5 for some examples of lawn patterns you can create with your new Striper Roller.
End Cap installed
Hooks
in Slots
Figure 3
Figure 4
Figure 5
NEUTON MA 5.6 Striper Roller - Safety & Operating Instructions
3
Parts List - NEUTON MA 5.6 Striper Roller
NOTE: Part numbers listed are available through Neuton Inc.
Ref#
E4
E5
E6
E7
E8
E9
E10
E11
E12
E13
Part#
238881
241011
238871
176321
241001
176411
240891
238891
240991
238901
Description
Cap, Side
Cap, End
Roller
Washer, Flat, D22 x d10.2 x t2mm
Rivet of Steel Tube
Nut, Connect
Washer, Flat, d8.7 x D16 x t0.5mm
Tube, Steel
Hook, Steel, Right
Hook, Steel, Left
Schematic Diagram - NEUTON MA 5.6 Striper Roller
Copyrights and Trademarks
©2009 Neuton Inc.
NEUTON and NEUTON logo are trademarks of Neuton Inc.
All rights reserved.
Documentation
Produced in Taiwan R.O.C. exclusively for Neuton Inc.
Neuton Inc.
75 MEIGS ROAD, P.O. BOX 25, VERGENNES, VERMONT 05491
www.neutonpower.com
©2009 Neuton Inc. 256341
Tondeuse Électrique Sans Fil
Option rouleau traceur de terrain
Instructions de sécurité et d’utilisation
Modèle : MA 5.6
NEUTON® Power Equipment
75 Meigs Road
P.O. Box 25
Vergennes, VT 05491
Téléphone sans frais : 1-866-NEUTON1 (638-8661)
Télécopie : 1-802-877-1213
Site Internet : www.neutonpower.com
COURRIEL : [email protected]
Veillez lire et à bien comprendre le manuel d’instructions de sécurité et d’utilisation de votre tondeuse NEUTON
avant d’utiliser le rouleau traceur de terrain.
Conventions utilisées dans le présent manuel
Indique une situation dangereuse qui, si elle n’est pas évitée, pourrait provoquer des blessures graves, voire mortelles.
CONSEIL
Conseil utile pour vous guider dans le montage et vous permettre de tirer le meilleur parti de votre rouleau traceur
NEUTON.
Outils et fournitures requis : Ce symbole indique que vous aurez besoin d’un outil et de fournitures spéciaux pour monter
votre rouleau traceur.
Neuton Inc. se réserve le droit de modifier, d’améliorer ou de cesser la fabrication de ses produits à tout moment sans préavis ni
obligation envers l’acheteur. Les descriptions et spécifications contenues dans le présent manuel étaient en vigueur lors de la
mise sous presse. Certaines illustrations peuvent ne pas s’appliquer à votre rouleau traceur de terrain.
Fixation et utilisation du rouleau traceur de terrain NEUTON MA 5.6
Le rouleau traceur de terrain vous permet de tracer des bandes sur votre pelouse (en fonction des motifs du rouleau) pour lui
donner l'aspect soigné et professionnel des allées d'un terrain de golf ou d'un terrain de baseball.
Retirez toujours la clé de sécurité avant de fixer ou de retirer le rouleau traceur.
Le rouleau traceur (Figure 1) se fixe facilement avec des crochets enfoncés dans les fentes préformées (une de chaque
côté) à l’arrière de la tondeuse NEUTON (Figure 2). Vous pouvez utiliser soit l’ensacheuse (recommandée) soit la
plaque de déchiquetage (mais pas la goulotte d’éjection latérale) avec le rouleau traceur.
Crochet
Crochets
Slot
Figure 1
2
Figure 2
www.neutonpower.com
Outils et fournitures requis :
•
•
•
5.
CONSEIL
6.
7.
Sac de sable fin
Entonnoir
Marteau (facultatif)
Installez un (1) des deux (2) capuchons d’extrémité (se trouvant dans le sac plastique agrafé à un bras à crochet) dans
une extrémité du rouleau traceur (Figure 3).
L’ajustement du capuchon d’extrémité étant assez précis, il vous faudra peut-être tapoter doucement dessus avec
un marteau.
Mettez le rouleau à la verticale sur une extrémité avec le capuchon en place et remplissez-le de sable fin par le trou de
l’autre extrémité à l’aide d’un entonnoir, puis mettez le deuxième capuchon.
Insérez les crochets dans les fentes prévues à l’arrière de la tondeuse (Figure 2 à la page précédente).
Pour faciliter l’insertion des crochets, maintenez les bras du rouleau contre le guidon.
CONSEIL
8.
Après avoir inséré les crochets, abaissez le rouleau traceur jusqu’au sol (Figure 4), fixez l’ensacheuse ou insérez la
plaque de déchiquetage, puis créez simplement le motif de votre choix en tondant votre pelouse!
CONSEIL
Reportez-vous à la Figure 5 pour des exemples de motifs que vous pouvez créer avec votre nouveau rouleau traceur.
SABLE
Capuchon
d’extrémmité installé
Crochets
dans les
fentes
Figure 4
Figure 3
Figure 5
Rouleau traceur NEUTON - Instructions de sécurité et d’utilisation
3
Liste de pièces – Rouleau traceur NEUTON MA 5.6
REMARQUE : Les pièces dont les numéros de référence sont indiqués peuvent être obtenues auprès de Neuton Inc.
Réf. nº
E4
E5
E6
E7
E8
E9
E10
E11
E12
E13
Pièce nº
238881
241011
238871
176321
241001
176411
240891
238891
240991
238901
Description
Capuchon, latéral
Capuchon, extrémité
Rouleau
Rondelle, plate, D22 x d10.2 x t2 mm
Rivet pour tube en acier
Écrou, connexion
Rondelle, plate, d8.7 x D16 x t0.5 mm
Tube, acier
Crochet, acier, droit
Crochet, acier, gauche
Schéma – Rouleau traceur NEUTON MA 5.6
Copyright et marques de commerce
©2009 Neuton Inc.
NEUTON et le logo NEUTON sont des marques de commerce de Neuton Inc.
Tous droits réservés
Documentation
Produced in Taiwan R.O.C. exclusively for Neuton Inc.
Neuton Inc.
75 MEIGS ROAD, P.O. BOX 25, VERGENNES, VERMONT 05491
www.neutonpower.com
©2009 Neuton Inc. 256341