1
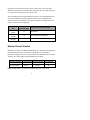
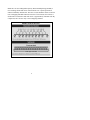
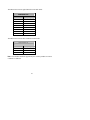
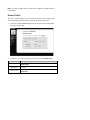
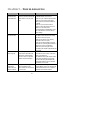
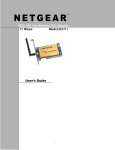
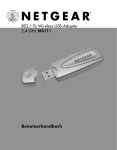
®
802.11a Wireless Access Point
54 Mbps
HE102
User’s Guide
© 2002 NETGEAR, Inc. All rights reserved.
Trademarks NETGEAR is a registered trademark of NETGEAR, Inc. Windows is a registered
trademark of Microsoft Corporation. Other brand and product names are trademarks or registered
trademarks of their respective holders. Information is subject to change without notice. All rights
reserved.
Statement of Conditions In the interest of improving internal design, operational function, and/or
reliability, NETGEAR reserves the right to make changes to the products described in this document
without notice. NETGEAR does not assume any liability that may occur due to the use or
application of the product(s) or circuit layout(s) described herein.
F C C W AR N I N G
This equipment has been tested and found to comply with the limits for a Class B digital device,
pursuant to Part 15 of the FCC Rules. These limits are designed to provide reasonable protection
against harmful interference in a residential installation. This equipment generates, uses, and can
radiate radio frequency energy and, if not installed and used in accordance with the instructions, may
cause harmful interference to radio communications. However, there is no guarantee that
interference will not occur in a particular installation. If this equipment does cause harmful
interference to radio or television reception, which can be determined by turning the equipment on
and off, the user is encouraged to try to correct the interference by on or more of the following
measures:
♦
♦
♦
♦
♦
Reorient or relocate the receiving antenna.
Increase the separation between the equipment and the receiver.
Connect the equipment into an outlet on a circuit different from that to which the receiver is
connected.
Consult the dealer or an experienced radio/TXV technician for help. Modifications made to the
product, unless expressly approved by NETGEAR, Inc., could void the user’s authority to
operate the equipment.
RF Exposure Requirements WARNING!! To ensure compliance with FCC RF exposure
requirements, the antenna used for this device must be installed to provide a separation
distance of at least 20 cm (8 in) from all persons and must not be co-located or operating in
conjunction with any other antenna or radio transmitter. Installers and end-users must follow
the installation instructions provided in this user guide.
Radio Frequency Interference Requirements This device is restricted to indoor use due to its
operation in the 5.15 to 5.25 GHz frequency range. FCC requires this product to be used indoors
for the frequency range 5.15 to 5.25 GHz to reduce the potential for harmful interference to cochannel Mobile Satellite systems. High power radars are allocated as primary users of the 5.25 to
5.35 GHz and 5.65 to 5.85 GHz bands. These radar stations can cause interference with and /or
damage this device.
Canadian Department of Communications Radio Interference Regulations This digital apparatus
(Model HE102 Wireless Access Point) does not exceed the Class B limits for radio-noise
emissions from digital apparatus as set out in the Radio Interference Regulations of the Canadian
Department of Communications.
CONTENTS
CHAPTER 1—INTRODUCTION ................................................................................................ 2
Benefits........................................................................................................................................ 2
Features ....................................................................................................................................... 3
Related NETGEAR 54 Mbps Wireless LAN Products ..................................................... 3
CHAPTER 2—WIRELESS NETWORK FUNDAMENTALS.............................................. 4
Wireless Network Configuration............................................................................................ 4
Ad-hoc Mode (Peer-to-Peer Workgroup)........................................................................ 4
Infrastructure Mode ........................................................................................................... 5
Service Set Identification (SSID).......................................................................................... 6
Authentication and WEP Encryption ................................................................................... 7
Wireless Channel Selection ..................................................................................................... 8
CHAPTER 3—INSTALLATION .............................................................................................. 11
Installation Overview .............................................................................................................. 11
Package Contents .................................................................................................................... 11
Hardware Description ............................................................................................................ 12
LED Indicators ........................................................................................................................ 13
System Requirements ............................................................................................................. 14
Determine the Configuration of your Wireless Network ................................................. 15
Wireless Access Point Installation ...................................................................................... 16
CHAPTER 4—ACCESS POINT CONFIGURATION ........................................................... 18
Access Point Setup ................................................................................................................. 19
Wireless LAN Setup ............................................................................................................... 20
TCP/IP Setup ........................................................................................................................... 22
Password ................................................................................................................................... 23
Security ..................................................................................................................................... 24
Access Control ......................................................................................................................... 25
Firmware Upgrade .................................................................................................................. 26
AP Status (Station List) ........................................................................................................ 26
CHAPTER 5—TROUBLESHOOTING .................................................................................... 27
APPENDIX A—GENERAL SPECIFICATIONS.................................................................. 28
CHAPTER 1—INTRODUCTION
Congratulations on your purchase of NETGEAR’s HE102 54 Mbps 802.11a
Wireless Access Point, which gives you the ultimate in office mobility. This
high-speed wireless device lets you quickly network multiple PCs and
notebooks together without laying any new cabling, and gives users the freedom
to roam throughout the workplace and stay connected to corporate resources, email, and the internet. It provides built-in capacity and flexibility for growing
networks so it’s easy to add new clients and/or move your entire network to a
new office site. Equipped with auto-sensing capability, it allows packet transfer
at up to 54 Mbps for maximum throughput, or speed reduction to the lower 6
Mbps speed for distance or for operating in a noisy environment.
Benefits
♦
Blazing fast speeds – up to 54 Mbps, 72 Mbps in turbo mode
♦
Seamlessly integrate into the existing 10 Mbps or 100 Mbps Fast Ethernet
LAN
♦
Ultra-reliable, standards-based IEEE 802.11a wireless local area networking
♦
Free from interference, it coexists with IEEE 802.11b and Bluetooth™
devices
2
Features
The key features of the HE102 Wireless Access Point are:
♦
Reliable IEEE 802.11a standards-based wireless technology.
♦
Interfaces directly to 10Mbps IEEE 802.3 Ethernet and IEEE802.3u Fast
Ethernet networks.
♦
Roaming support between access points.
♦
Up to 72 Mbps high-speed rate in Turbo mode. Wireless nodes negotiate to
operate in the optimal data transfer rate. In a noisy environment or when the
distance between the wireless nodes is far, the wireless nodes automatically
fall back to operate at the lowest transfer rate of 6 Mbps.
♦
Highest level of data encryption using 152-bit Shared Key data encryption
method. Lower level of data encryption or no data encryption is available to
simplify your network setup or to improve data transfer rate.
♦
Extensive coverage and available bandwidth with eight (8) non-overlapping
channels in the 5 GHz band (5.15 to 5.35 GHz).
Related NETGEAR 54 Mbps Wireless LAN Products
♦
HA501 802.11a Wireless CardBus Adapter
♦
HA301 802.11a Wireless PCI Adapter
♦
HR814 802.11a Cable/DSL Router
3
CHAPTER 2—WIRELESS NETWORK
FUNDAMENTALS
Wireless Network Configuration
Ad-hoc Mode (Peer-to-Peer Workgroup)
The Institute of Electrical and Electronics Engineers (IEEE) standard for
wireless LANs (WLANs), 802.11 offers two methods for configuring a wireless
network — ad-hoc and infrastructure. In an ad-hoc network, computers are
brought together as needed; thus, there is no structure or fixed points to the
network — each node can generally communicate with any other node. There is
no access point involved in this configuration. It enables you to quickly set up a
small wireless workgroup and allows workgroup members to exchange data or
share printers as supported by Microsoft Networking in the various Windows
operating systems. Some vendors also refer to ad-hoc networking as peer-topeer workgroup networking.
4
In this configuration, network packets are directly sent and received by the
intended transmitting and receiving stations. As long as the stations are within
range of one another, this is the easiest and least expensive way to set up a
wireless network.
To set up an ad-hoc workgroup operating with standard protocols, do the
following:
♦
Set all stations to connect in Ad-hoc mode (or Peer-to-Peer workgroup
mode).
♦
Set all stations to use the same network name (or SSID). Please refer to
page 6 for more information.
♦
Set all stations to use no WEP encryption key or an identical WEP
encryption key.
♦
Set all stations to use the same wireless channel for communication.
Infrastructure Mode
With a wireless access point, you can put the wireless LAN into the
infrastructure mode. It provides wireless connectivity to multiple wireless
network devices within a fixed range or area of coverage, interacting with a
wireless node via an antenna.
In the infrastructure mode, the wireless access point converts airwave data into
wired Ethernet data, acting as a bridge between the wired LAN and wireless
clients. Connecting multiple HE102 Wireless Access Points via a wired Ethernet
backbone can further extend the wireless network coverage. As a mobile
computing device moves out of the range of one access point, it moves into the
range of another. As a result, wireless clients can freely roam from one access
point domain to another and still maintain seamless network connection.
5
To set up an infrastructure network operating with standard protocols, do the
following:
♦
Set all wireless stations to connect in infrastructure mode
♦
Set all stations to use the same network name (or SSID).
♦
Set all wireless access points to use the same network name (or ESSID). For
more information, please refer to page 7.
♦
Set all stations to use no WEP encryption key or an identical WEP
encryption key as the one used in Access points.
♦
Set up wireless channels used by individual access points. (It is not
necessary to set channels on the stations as the stations will automatically
scan through all channels for the nearest access point.)
Service Set Identification (SSID)
The Service Set Identification (SSID) is a thirty-two alphanumeric character
(maximum) string identifying the wireless local area network. Some vendors
refer to the SSID as “network name”. In order for stations to communicate with
each other, all stations must be configured with the same SSID.
6
A wireless LAN consisting of nodes operating in ad-hoc configuration without
an access point is called a Basic Service Set (BSS). All nodes in a BSS must use
the same Basic Service Set ID (BSSID).
In an infrastructure configuration with access points, multiple BSS can be
configured to form an Extended Service Set (ESS). In this configuration, the
access points are configured with the same Extended Service Set ID (ESSID).
Wireless clients configured with the same ESSID can freely roam from one
access point domain to another and still maintain seamless connection to the
network
Authentication and WEP Encryption
The absence of a physical connection between nodes makes the wireless links
vulnerable to information theft. To provide a certain level of security, IEEE
802.11 standard has defined two types of authentication methods, Open System
and Shared Key. Open System authentication is a null algorithm. Shared Key
authentication is an algorithm where both the transmitting node and the
receiving node share an authentication key to perform a checksum on the
original message. By default, IEEE 802.11 wireless devices operate in an open
system network.
Wired Equivalent Privacy (WEP) data encryption is utilized when the wireless
nodes or access points are configured to operate in Shared Key authentication
mode. There are three shared key methods implemented in NETGEAR’s
802.11a solutions: the standard based 40-bit WEP data encryption and 128-bit
WEP data encryption plus the extended 152-bit WEP data encryption.
The forty-bit WEP data encryption method allows for a five-character (forty-bit)
input. Additionally, 24 factory-set bits are added to the forty-bit input to
generate a 64-bit encryption key. (The 24 factory-set bits are not user
configurable.) This encryption key will be used to encrypt/decrypt all data
7
transmitted via the wireless interface. Some vendors may refer to the 40-bit
WEP data encryption as 64-bit WEP data encryption since the actual encryption
key used in the encryption process is 64 bits wide.
The 128-bit WEP data encryption method consists of 104 configurable bits and
the 152-bit WEP data encryption method consists of 128 configurable bits
Similar to the forty-bit WEP data encryption method, the remaining 24 bits are
factory set and not user configurable.
Encryption Key
Size
64-bit
(24+40)
128-bit
(24+104)
152-bit
(24+1280)
# of
Hexadecimal Digits
Example of Hexadecimal Key Content
10
4C72F08AE1
26
4C72F08AE19D57A3FF6B260037
32
4C72F08AE19D57A3FF6B26003715DAC2
Wireless Channel Selection
IEEE 802.11a utilizes 300 MHz of bandwidth in the 5 GHz Unlicensed National
Information Infrastructure (U-NII) band. Though the lower 200 MHz is
physically contiguous, the FCC has divided the total 300 MHz into three distinct
domains, each with a different legal maximum power output.
U-NII Band
Frequency (GHz)
Max. Power Output
Low
Middle
High
5.15 – 5.25
5.25 – 5.35
5.725 – 5.825
50 mW
250 mW
1W
Note: The high band is not supported in HE102 Wireless Access Point.
8
IEEE 802.11a uses Orthogonal Frequency Division Multiplexing (OFDM), a
new encoding scheme that offers certain benefits over a spread spectrum in
channel availability and data rate. The 802.11a uses OFDM to define a total of 8
non-overlapping 200 MHz channels across the 2 lower bands; each of these is
divided into 52 subcarriers and each carrier is approximately 300 KHz wide. By
comparison, 802.11b uses only 3 non-overlapping channels.
IEEE 802.11a Channel Allocations
9
The HE102 user can use eight channels in non-turbo mode.
TURBO MODE: OFF
Channel
Frequency
36
5.18 GHz
40
5.20 GHz
44
5.22 GHz
48
5.24 GHz
52
5.26 GHz
56
5.28 GHz
60
5.30 GHz
64
5.32 GHz
The HE102 user can use three channels in turbo mode.
TURBO MODE: ON
Channel
Frequency
42
5.21 GHz
50
5.25 GHz
58
5.29 GHz
Note: The available channels supported by the wireless products in various
countries are different.
10
CHAPTER 3—INSTALLATION
Installation Overview
Please follow these instructions to successfully install your product. Estimated
setup time is 10 to 15 minutes.
1.
Determine the configuration of your wireless network.
2.
Install the access point and connect it to your Ethernet network using the
included Category 5 Ethernet cable.
3.
Configure that computer to work with the access point and restart the
computer.
4.
Configure the access point.
5.
Configure the computers with the wireless adapters and then restart them.
6.
Test the connection.
Package Contents
This product package should contain:
♦
HE102 54 Mbps 802.11a Wireless Access Point
♦
Power Adapter and Cord (3.3Vdc, 3.7A)
♦
HE102 User’s Guide
♦
Category 5 Ethernet Cable – 25 feet
♦
Support Information Card
♦
Warranty and Registration card
11
Please call the reseller or customer support in your area if there are any wrong,
missing, or damaged parts. You can refer to the Support Information Card for
the telephone number of customer support in your area. You should keep the
Support Information Card, along with the original packing materials, and use the
packing materials to repack the HE102 Wireless Access Point if you need to
return it for repair.
To qualify for product updates and product warranty registrations, we encourage
you to register on the NETGEAR Web page at: http://www.NETGEAR.com.
Hardware Description
The HE102 Wireless Access Point provides a bridge between Ethernet wired
LANs and 802.11a compatible wireless LAN networks. It provides connectivity
between 10/100 Mbps Fast Ethernet wired networks and radio-equipped
wireless notebook systems, desktop systems, print servers, and other devices.
The HE102 Wireless Access Point uses the IEEE 802.11a standard Orthogonal
Frequency Division Multiplexing (OFDM) radio modulation scheme to
accomplish up to 54 Mbps fast data transfer rate on the radio network. The
HE102 also provides up to 72 Mbps data transfer rate in turbo mode.
The HE102 Wireless Access Point supports these hardware functions:
♦
Built-in dual antenna assembly to support antenna diversity on both
transmit and receive
♦
Wired Equivalent Privacy (WEP) data encryption (64-bit/128-bit/152-bit)
accomplished on the fly
♦
WEB based management and configuration
♦
Firmware stored in flash to allow easy firmware upgrade from remote
locations
12
Additionally, the HE102 Wireless Access Point supports the following wireless
features:
♦
Distributed coordinated function (CSMA/CA, Back off procedure, ACK
procedure, retransmission of unacknowledged frames
♦
RTS/CTS handshake
♦
Duplicate detection and Recovery
♦
Beacon generation
♦
Fragmentation and reassembly
♦
Authentication Algorithm (Open System, Shared Key)
♦
Roaming among access points on the same subnet
LED Indicators
The HE102 Wireless Access Point provides three green status LEDs: Power,
Ethernet and Wireless.
Power
13
Ethernet
Wireless
LED
Power
STATUS
DESCRIPTION
Off
No Power
On
Power On
Blink
Off
Green On
Ethernet
(Lnk/Activity)
Green Blink
Amber On
Amber Blink
Off
WLAN
(Link/Activity)
Very Slow Blink
Indicates:
1. running self-test, or
2. loading software, or
3. system fault
Indicates no Ethernet link detected
100 Mbps Fast Ethernet link detected, no activity
Indicates data traffic on the 100 Mbps LAN
10 Mbps Ethernet link detected but no activity
Indicates data traffic on the 10 Mbps LAN
Indicates no wireless link
Looking for network association
Slow Blink
Associated with network but no activity
Fast Blink
Indicates the HE102 is transmitting or receiving
data through wireless links
System Requirements
Before installing the HE102, make sure of you meet the following requirements:
♦
A 10/100 Mbps Local Area Network device such as hub or switch.
♦
A Category 3 or 5 UTP Ethernet cable with RJ-45 connector
♦
An A/C Power outlet (100-240 V, 50-60 HZ)
♦
A Web browser for configuration: Microsoft I.E 5.0 or above or Netscape
Navigator 4.7 or later version
♦
One computer with TCP/IP protocol installed
14
Determine the Configuration of your Wireless Network
Before installing the HE102 Wireless Access Point, you should make sure that
your Ethernet network is up and working with a computer. You’ll be connecting
the access point to the Ethernet network so that computers with the 802.11a
Wireless Adapter will be able to communicate with computers on the Ethernet
network.
For each computer that you want to communicate with the access point, you
must have an IEEE 802.11a compatible wireless adapter installed in the
computer.
In order to set up the access point, you will need to determine the network
settings of your wireless network, as follows.
What is the SSID for your wireless network? ________________________________
The Service Set Identification (SS ID) identifies the wireless local area network.
The default Service Set Identification (SS ID) is “Wireless,” however, you may
customize it by using up to 32 alphanumeric characters. We recommend that
you write your customized SSID on the line above.
Note: In order for the HE102 Wireless Access Point to communicate with a
wireless adapter, both must be configured with the same SSID. For the access
point and wireless nodes to communicate with each other, all must be
configured with the same SSID.
Which wireless channel should you use? __________________________________
The HE102 Wireless Access Point will communicate with other 802.11a
wireless devices in the pre-selected channel. For more information on reviewing
the channel selections for your operations, please refer to the charts on page 10.
15
Note: Any access points configured to adjacent channels in the same vicinity
will not interfere with each other.
What is the WEP encryption key? _________________________________________
The absence of a physical connection between nodes makes the wireless links
vulnerable to information theft. To provide a certain level of security from
eavesdroppers and hackers, you can enable WEP encryption. The following
information is needed to determine the WEP encryption level.
The default WEP encryption key number is 1, and the default key size is 64 bits.
Please refer to page 7 for more details.
Note: The key number as well as the key value used by both the HE102 Wireless
Access Point and wireless nodes must be the same.
How to find the name of your Access Point:
The access point name, such as “netgear1d4b5,” represents a unique identifier
for each HE102. It is used when you need to access and configure the access
point from the Web browser of a computer. To find the name of your access
point, refer to the label on the bottom of the access point device. For more
information, refer to Chapter 4—Access Point Configuration on page 18.
Wireless Access Point Installation
Please follow these steps to successfully install the HE102 Wireless Access
Point.
1.
Position and mount the HE102 Wireless Access Point.
The best location is elevated, such as wall mounted or on the top of a
cubicle, and at the center of your wireless coverage area and must be within
line of sight of all the mobile devices.
16
2.
Connect the Ethernet Cable.
You may use the included category 5 UTP Ethernet cable to connect the
Ethernet port on the rear panel of HE102 Wireless Access Point to a 10
Base-T network hub, switch or router.
3.
Connect the Power Cable.
Connect the power cord of the HE102 Wireless Access Point power adapter
to the 3.3V DC power socket on the rear panel of the access point. Then,
plug the power adapter into an A/C power outlet.
Note: Use only the power adapter supplied with the HE102 Wireless Access
Point, otherwise the HE102 may be damaged.
4.
Check the setup.
The Power light should be lit. It might take a few seconds after the power is
applied to the access point for the power light to appear.
The Ethernet Link light should be on. If the connection is a 100 Mbps
connection, the light is green. If it is a 10 Mbps connection, the light is
amber. The Ethernet connection light also flashes to indicate that data has
been sent and received by the access point.
The Wireless Link light should be on and blinking. A slow blink indicates
that the access point is looking for wireless nodes, or that very little wireless
activity is taking place. A fast blink indicates that the access point is
receiving or transmitting wireless data.
17
CHAPTER 4—ACCESS POINT
CONFIGURATION
The HE102 Wireless Access Point can be configured remotely from either
Microsoft I.E or the Netscape web browser on your computer.
1.
Launch your web browser and enter the name of your access point in the
Address or Location box.
To find the name of your access point, refer to the labels on the bottom of
your access point. The access point name should be similar to this,
“netgear10d4b5,” where “10d4b5” is the last 6 digits of the MAC address
of the HE102. Your computer will automatically find the AP with the
specified access point name.
2.
NETGEAR’s HE102 Web Server home page will appear:
18
Note: You may access the HE102 Web Server home page, as displayed on
the previous page, by specifying either the IP address or the access point
name of the HE102 within the same subnet.
3.
If this is your first time displaying the HE102 Web Server home page, click
AP Setup to configure the access point. If you have already entered and
saved your AP password, select any menu option.
Access Point Setup
To setup your access point, complete the following:
1.
Choose the AP Setup option from the HE102 Web Server home page.
2.
The Enter Network Password window will be displayed. The first time you
see this window, you must enter the default user name “admin” with the
default password “1234”.
Note: Both the user name and password are case sensitive.
You may change the password at any time after this point by choosing
Password from the AP Setup menu.
3.
Click OK. The Wireless LAN Setup window will be displayed.
19
Wireless LAN Setup
To setup your wireless LAN, complete the following:
1.
Choose the Wireless LAN setup option from the AP Setup menu on the
HE102 Web Server home page.
2.
Specify your configuration settings. When you are done, click Apply and
then the Reboot AP button for the changes to take effect.
The Wireless LAN Setup screen lets you configure various wireless LAN
parameters. Please refer to the chart on the following page for specific
details.
20
Wireless LAN Configuration Parameters
CONFIGURATION
SSID (Service Set ID)
System Name
DESCRIPTION
Enter a 32-character (maximum) service set ID in this field; the
characters are case sensitive. When in infrastructure mode, this field
defines the service set ID (SSID). The SSID assigned to the wireless
node is required to match the access point SSID in order for the wireless
node to communicate with the access point.
Default: Wireless
The unique name represents the access point.
Default:
Channel/Frequency
Shows the current channel and frequency in use. The wireless channel
in use will be between 36 and 64 or 42, 48, 54 with turbo mode enabled.
Default: 52 (non-turbo), 42 (Turbo)
Turbo Mode
Enabling turbo mode allows the wireless node to transmit or receive at a
higher rate, up to 72 Mbps.
Default: Disable
Data Rate
Shows the available transmit data rate of the wireless network. The
possible data rates supported are: 54 Mbps, 48 Mbps, 36 Mbps, 24
Mbps, 18 Mbps, 12 Mbps, 9 Mbps, and 6 Mbps. It can go up to 72 Mbps
if the turbo mode is enabled.
Default: Best
Transmit Power
Set the transmit signal strength of the HE102. The options are
“full”, ”half”, “quarter”, “eighth”, “and “min”. Decrease the transmit power
if more than one AP is co-located using the same channel frequency.
Default: Full
Beacon Interval
Specifies the Beacon Interval value. Enter a value in between 20 to
1000.
Default: 100
DTIM
The Delivery Traffic Indication Message. Speechifies the data beacon
rate between 1 and 16384.
Default: 1
21
TCP/IP Setup
To set the TCP/IP settings, complete the following:
1.
Choose the TCP/IP setup option from the HE102 Web Server home page.
2.
Configure the TCP/IP parameters. When you are done, click Apply and
then the Reboot AP button for the changes to take effect.
CONFIGURATION
MAC Address
IP Address
Subnet mask
Default gateway
DHCP Client
DESCRIPTION
Displays the MAC address of the access point.
Specifies the IP address of the access point.
Default: 192.168.0.225
Specifies the subnet mask of the access point.
Default: 255.255.255.0
Specifies the default gateway access point IP address.
Default: 0.0.0.0
The access point will get the IP address, subnet mask and the default
gateway automatically from the DHCP server if the DHCP is enabled.
Default: Enable
22
Note: If the HE102 Wireless Access Point cannot locate a DHCP server upon
powering up, it will default to the IP address of 192.168.0.225.
Password
1.
To change the current password, choose the Password option from the AP
Setup menu in the HE102 Web Server home page. The default password is
“1234.”
2.
Change your password. Click Apply and then Reboot AP for the new
password to take effect.
23
Security
1.
To set security options, click Security from the AP Setup menu in the
HE102 Web Server home page.
2.
Select the security parameters, then click Apply and Reboot AP.
CONFIGURATION
DESCRIPTION
Specifies the Authentication type used: Open System or Shared Key.
If “Shared Key” is selected, you need to enable the WEP and enter at
Authentication Type
least one shared key.
Default: Open System
Enable or Disable the Wired Equivalent Privacy.
WEP
Default: Disable
Specifies the preferred share key entry from 1 to 4.
Default Shared Key
Default: 1
Specifies the shared key value in hexadecimal format based on the
Shared Key (1-4): key size selected: 64 bits, 128 bits, or 152 bits.
Default Key Size: 64 bits
24
Note: You must configure all the wireless devices with the same KEY values to
communicate.
Access Control
The Access Control window lets you control the network access privilege of the
stations through the HE102 Wireless Access Point. Follow these steps:
1. Choose the Access Control option from the AP Setup menu in the HE102
Web Server home page.
2.
Select the access control options, shown below, then select Reboot AP.
CONFIGURATION
Access Control
MAC Address
Access Control
DESCRIPTION
Specifies the state of the Access Control List: Disable or Enable.
Default: Disable
Specifies the MAC address for the station to be included in the Access
Control List.
Specifies the current state of each station, Allow or Deny.
Default: Allow
25
Firmware Upgrade
The Firmware Upgrade menu options will display the Firmware Upgrade
window so that you may upgrade your HE102 firmware.
Please check the NETGEAR support website: http://www.Netgear.com for the
latest firmware and upgrade procedure.
AP Status (Station List)
The Station List window displays the assigned ID, MAC address and the current
state of the access point and all the stations currently part of its Basic Service
Set (BBS).
♦
Choose the Station List option from the HE102 Web Server home page.
26
CHAPTER 5—TROUBLESHOOTING
PROBLEM
I cannot configure
the HE102 using
the Web Browser
No lights are lit on
the access point
The Ethernet light
doesn’t light up
I cannot get onto
the Ethernet
network from the
wireless network
CAUSE
There is a possible system
problem or you did not specify the
right IP address or access point
name.
SOLUTION
• Remove and then reconnect the power to
the HE102 Wireless Access Point.
• Make sure your computer and the HE102
Wireless Access Point are in the same
subnet if you don’t know the IP address of
the HE102.
• Make sure you have clear the Web
Browser’s cache and enter the correct IP
address or access point name.
• Push the Restore to Default button on the
back of the HE102 to restore the factory
default settings.
The access point has no power. • It takes a few seconds for the Power light to
be lit. Wait a minute and check the Power
light status on the access point.
• Make sure the power cord is properly
connected to the access point.
• Make sure the power adapter is properly
connected to a functioning power outlet. If in
a power strip, make it is powered on.
• Make sure you are using the correct
NETGEAR power adapter supplied with your
access point.
The Power light is lit, the Ethernet • The other side of the Ethernet cable is not
network cable is attached to the
connected to a hub or switch, or the hub or
Ethernet port, but the Ethernet
switch is not powered on.
light isn’t lit. There is a possible
• The Ethernet cable is bad. Replace it with
hardware connection problem.
the one that came with the access point.
• You have the wrong cable between the
router and the modem. Use the cable that
came with the access point.
You may not have configured the • Check the wireless configuration of the
wireless parameters of the
wireless adapters, and access point through
wireless nodes to be the same as its Web-based interface from a computer
the access point.
connected to the Ethernet network.
27
APPENDIX A—GENERAL SPECIFICATIONS
MODEL
Radio Data Rate
Frequency
Operating Range
Encryption
Network management
Maximum Clients
Standards
Power Adapter
Dimensions
Weight
Status LEDs
Electromagnetic
Compliance
Environmental
Specifications
Warranty
HE102 802.11A WIRELESS ACCESS POINT
Normal Mode: 6, 9, 12, 18, 24, 36, 48, 54 Mbps per channel
Turbo Mode: 12, 18, 24, 36, 48, 72 Mbps per channel
5.15 ~ 5.25 GHz (lower band) for US/Canada, Japan
5.25 ~ 5.35 GHz (middle band) for US/Canada
@6 Mbps
@54 Mbps
Outdoor environment
1200 ft.
100 ft.
Indoor environment
300 ft.
60 ft.
40-bit (also called 64-bit), 128-bit or 152-bit WEP data encryption
Web based configuration and status monitoring
Limited by the amount of wireless network traffic generated by each
node; typically 30 to 70 nodes.
IEEE 802.3 10Base-T, IEEE 802.3u 100BASE-TX, IEEE 802.11a
3.3Vdc, 3.7A
W: 7.38 in. (187.3 mm)
D: 4.88 in. (111 mm)
H: 1 in. (25.4 mm)
845 g (29.7 oz)
Power/Ethernet/Wireless
FCC Part 15 Class B and Class E
Operating temperature: 0 to 60° C
Operating humidity: 5-95%, noncondensing
Limited 5-year warranty
28
29