1
Front Cover
BMC Configuration
User's Guide
Chapter 1
Summary
Chapter 2
System Requirements
Chapter 3
Installation
Chapter 4
Functions
Chapter 5
Precautions for Use
Rev.1.01
© NEC Corporation 2011
1
BMC Configuration User's Guide
Contents
Front Cover ....................................................................................................................................................... 1
Contents............................................................................................................................................................. 2
Trademarks ........................................................................................................................................................ 3
External Libraries which this product uses........................................................................................................ 4
About this Document......................................................................................................................................... 5
Chapter1 Summary ....................................................................................................................................... 6
1.1
BMC Configuration Functions .......................................................................................................... 6
Chapter2 System Requirements .................................................................................................................... 7
2.1
Managed server ................................................................................................................................. 7
2.2
Server Management Driver ............................................................................................................... 8
Chapter3 Installation ..................................................................................................................................... 9
3.1
BMC Configuration Installation for Windows .................................................................................. 9
3.1.1
Check before installation ....................................................................................................... 9
3.1.2
Start installation menu ........................................................................................................... 9
3.1.3
Install BMC Configuration .................................................................................................. 10
3.2
BMC Configuration Uninstallation for Windows............................................................................ 12
3.2.1
Check before uninstallation ................................................................................................. 12
3.2.2
Uninstall BMC Configuration ............................................................................................. 12
3.3
BMC Configuration Installation for Linux...................................................................................... 13
3.3.1
Check before installation ..................................................................................................... 13
3.3.2
Copy and extract BMC Configuration installer ................................................................... 13
3.3.3
Install BMC Configuration .................................................................................................. 14
3.4
BMC Configuration Uninstallation for Linux ................................................................................. 15
3.4.1
Check before installation ..................................................................................................... 15
3.4.2
Uninstall BMC Configuration ............................................................................................. 15
Chapter4 Functions ..................................................................................................................................... 16
4.1
Start procedure................................................................................................................................. 16
4.1.1
On Windows ........................................................................................................................ 16
4.1.2
On Linux.............................................................................................................................. 16
4.1.3
On Off-line TOOL ............................................................................................................... 16
4.2
BMC Configuration Setting............................................................................................................. 18
4.3
Backup BMC Configuration............................................................................................................ 34
4.4
Restore BMC Configuration............................................................................................................ 35
4.5
System BIOS Settings ..................................................................................................................... 36
4.6
Clear BMC Configuration ............................................................................................................... 38
4.7
Reset BMC ...................................................................................................................................... 38
Chapter5 Precautions for Use...................................................................................................................... 39
5.1
BMC Configuration installation ...................................................................................................... 39
5.2
HTTP / HTTPS settings................................................................................................................... 39
5.3
Redirection setting........................................................................................................................... 39
5.4
PEF setting and SNMP Alert setting................................................................................................ 39
5.5
Alert form BMC .............................................................................................................................. 39
5.6
Alert Test ......................................................................................................................................... 39
5.7
ECO setting ..................................................................................................................................... 39
5.8
Management LAN setting ............................................................................................................... 40
2
BMC Configuration User's Guide
Trademarks
NEC ESMPRO and NEC EXPRESSBUILDER are trademarks of NEC Corporation.
Intel and Xeon are trademarks or registered trademarks of Intel Corporation or its subsidiaries in the United
States and other countries.
Microsoft, Windows, Windows Vista and Windows Server are registered trademarks or trademarks of
Microsoft Corporation in the United States and other countries.
Linux is the registered trademark of Linus Torvalds in the U.S. and other countries.
Red Hat is registered trademarks of Red Hat, Inc. and its subsidiaries in the United States and other countries.
MIRACLE LINUX is a registered trademark of MIRACLE LINUX CORPORATION.
Asianux is a registered trademark of MIRACLE LINUX CORPORATION in Japan.
Novell, Novell logo, and SUSE are registered trademarks of Novell, Inc. in the United States and other
countries.
AT is a registered trademark of International Business Machines Corporation in the United States and other
countries.
Adobe, Adobe logo, and Acrobat are trademarks of Adobe Systems Incorporated.
All other product, brand, or trade names used in this publication are the trademarks or registered trademarks
of their respective trademark owners.
Windows 2008 R2 stands for Microsoft® Windows Server® 2008 R2, Standard Edition operating system,
Microsoft® Windows Server® 2008 R2, Enterprise Edition operating system and Microsoft® Windows
Server® 2008 R2, Datacenter operating system. Windows 2008 stands for Microsoft® Windows Server®
2008 Standard Edition operating system, Microsoft® Windows Server® 2008 Enterprise Edition operating
system and Microsoft® Windows Server® 2008 Standard 32-Bit operating system and Microsoft® Windows
Server® 2008 Enterprise 32-Bit operating system and Microsoft® Windows Server® 2008 Datacenter
operating system. Windows Vista stands for Microsoft® Windows Vista® Business operating system and
Windows Vista® Enterprise operating system and Windows Vista® Ultimate. Windows Server 2003 x64 Editions
stands for Microsoft® Windows Server® 2003 R2, Standard x64 Edition Operating system and Microsoft®
Windows Server® 2003 R2, Enterprise x64 Edition operating system, or Microsoft® Windows Server®
2003 Standard x64 Edition operating system and Microsoft® Windows Server® 2003 Enterprise x64 Edition
operating system. Windows 2003 stands for Microsoft® Windows Server® 2003 operating system and
Microsoft® Windows Server® 2003 Standard Edition and Enterprise Edition. Windows XP x64 Edition
stands for Microsoft® Windows® XP Professional x64 Edition operating system. Windows XP stands for
Microsoft® Windows® XP Professional operating system and Microsoft® Windows® XP Home Edition
operating system. Windows 2000 stands for Microsoft® Windows® 2000 Server operating system and
Microsoft® Windows® 2000 Advanced Server operating system, and Microsoft® Windows® 2000
Professional operating system.
3
BMC Configuration User's Guide
External Libraries which this product uses
This product contains libraries ("External Libraries") provided by the third party suppliers ("Suppliers").
Please assume and agree these libraries' license documents and NOTICE files before using this product.
License documents and NOTICE files of "External Libraries" are stored in the following folders.
/bmc_config/doc/
If the "External Libraries" require to include their Source Code with this product, see the folder below.
/bmc_config/src/
The libraries listed below are "External Libraries." Notwithstanding any of the terms in the Agreement or any
other agreement you may have with NEC:
(a) "Suppliers" provide the libraries WITHOUT WARRANTIES OF ANY KIND and, such Suppliers
DISCLAIM ANY AND ALL EXPRESS AND IMPLIED WARRANTIES AND CONDITIONS
INCLUDING, BUT NOT LIMITED TO, THE WARRANTY OF TITLE, NON-INFRINGEMENT OR
INTERFERENCE AND THE IMPLIED WARRANTIES AND CONDITIONS OF
MERCHANTABILITY AND FITNESS FOR A PARTICULAR PURPOSE, WITH RESPECT TO
THE EXTERNAL LIBRARIES;
(b) In no event are the Suppliers liable for any direct, indirect, incidental, special, exemplary, punitive or
consequential damages, including but not limited to lost data, lost savings, and lost profits, with respect
to the External Libraries; and,
(c) NEC and the Suppliers are not liable to you, and will not defend, indemnify, or hold you harmless for
any claims arising from or related to the External Libraries.
The following are External Libraries and their Copyright.
libnewt, libslang : Copyright © Free Software Foundation, Inc.
json-c : Copyright © Metaparadigm Pte. Ltd.
Notes
(1) No part of this document may be reproduced in any form without the prior written permission of NEC
Corporation.
(2) The contents of this document may be revised without prior notice.
(3) The contents of this document shall not be copied or altered without the prior written permission of NEC
Corporation.
(4) All efforts have been made to ensure the accuracy of all information in this document. If you notice
any part unclear, incorrect, or omitted in the document, contact your authorized NEC sales
representative.
(5) NEC assumes no liability for damages arising from the use of this product, nor any liability for
incidental or consequential damages arising from the use of this document regardless of (4).
4
BMC Configuration User's Guide
About this Document
This document explains the complete procedures from installation of "BMC Configuration" to setup of
managed server.
Before attempting to operate BMC Configuration, read this document so as to gain an adequate
understanding of the contents.
Notes
This document is intended for persons who are familiar with the operating system's functions and operations
and the network's functions and setup. For operations and inquiries about the operating system, see its online
help information.
This document covers universal information about generally managed servers. The notes and restrictions on
use of each product as a managed server are explained in the user's guide provided with the managed server
and "ESMPRO Manager Ver.5 Setup guide".
Names used with screen images in this document are fictitious. They are unrelated to existing product names,
names of organizations, or individual names. The setting values on the screen images are shown as examples,
so setting values such as IP addresses on screen images are not guaranteed for operation.
In this document. "¥" expresses back slash.
About Symbols in This Document
The following explains three symbols that are used in this document:
IMPORTANT:
CHECK:
TIPS:
Points or particular notes you must follow when handling software of servers.
Points or notes you need to check when handling software or servers.
Useful information.
5
BMC Configuration User's Guide
Chapter1
Summary
BMC Configuration is software that works on the managed server. It configures BMC on the managed server.
1.1
BMC Configuration Functions
BMC Configuration
You can set Configuration Information to BMC on the managed server.
Backup BMC settings
You can output the settings of BMC Configuration on the managed server to a file.
Restore BMC settings
You can apply the BMC Configuration settings which are backed up in files to BMC on the managed
server.
System BIOS Settings
You can configure the System BIOS settings on the managed server.
The settings are effective by rebooting the server.
Initialize BMC Configuration
You can clear the BMC Configuration information to the ex-factory settings.
Reset BMC
You can restart BMC without system rebooting.
System Information (Version Information)
The versions of BMC Firmware, Boot Firmware, Sensor Data Information (SDR) and System BIOS can
be collected.
6
BMC Configuration User's Guide
Chapter2
2.1
System Requirements
Managed server
Install BMC Configuration on the server. BMC Configuration works on the following environment.
Hardware
It needs to be managed by NEC ESMPRO Manager (Ver.5.4 or later) and satisfy the following
conditions.
Managed Server
NEC Express 5800 series and iStorage series that integrates EXPRESSSCOPE Engine 3.
Memory
512MB or more
Availability of hard disk
100MB or more
Software
Operating system
Microsoft Windows Server 2003 R2, Standard Edition/Enterprise Edition
Microsoft Windows Server 2003 R2, Standard /Enterprise x64 Edition
Windows Server 2008 Standard/Enterprise Edition
Windows Server 2008 Standard/Enterprise/Datacenter x64 Edition
Windows Server 2008 R2, Standard/Enterprise/Datacenter
Red Hat Enterprise Linux Advanced Platform 5 (x86, x64)
Red Hat Enterprise Linux Server 5 (x86,x64)
Red Hat Enterprise Linux Server 6 (x86, x64)
SUSE Linux Enterprise Server 10 (SP3) (x86, x64)
IMPORTANT:
You can not install BMC Configuration in the following case.
-- Installation on guest OS virtual of machine.
The following packages are necessary to use BMC Configuration on Red Hat Enterprise
Linux Server 6(x64). If these are not installed, you need to install them from the install disc
of operating system.
-- glibc i686
-- nss-softokn-freebl i686
-- libxml i686
-- zlib i686
7
2.2
Server Management Driver
On Linux, OpenIPMI Driver must be started to use BMC Configuration.
CHECK:
Use the following command to confirm that OpenIPMI Driver has been installed on Linux.
rpm -qa | grep -i OpenIPMI
If the OpenIPMI Driver is stopped, you need to start OpenIPMI Driver. You can confirm
the status of OpenIPMI Driver by the following command.
/etc/init.d/ipmi status
If "not loaded" is displayed after executing the above command, please start OpenIPMI
Driver by the following command.
/etc/init.d/ipmi start
And you can start OpenIPMI Driver automatically at the system booting to execute the
following command and reboot the operation system.
chkconfig ipmi on
8
BMC Configuration User's Guide
Chapter3
3.1
Installation
BMC Configuration Installation for Windows
Explain the installation of BMC Configuration.
3.1.1
Check before installation
Check the followings:
-- See chapter 2.1 to check the system requirement of the managed server and BMC Configuration.
-- Login to Windows as Administrator.
3.1.2
Start installation menu
If you install BMC Configuration by using downloaded modules:
After unzipping the downloaded modules, please execute the following file. BMC Configuration installation
will be started.
¥bmc_config¥setup.exe
If you install BMC Configuration by using NEC EXPRESSBUILDER
You can install BMC Configuration as follows:
(1) Insert the NEC EXPRESSBUILDER DVD-ROM into the DVD drive on the managed server which
Windows has started. The menu will be displayed automatically.
(2) Click [Software Setup]-[BMC Configuration].
The BMC Configuration installation menu for Windows will appear. If the menu is not displayed, please
execute the following file. BMC Configuration installation will be started.
< DVD drive >¥"NEC EXPRESSBUILDER revision"¥win¥bmc_config¥setup.exe
TIPS:
Please refer to 5.1 BMC Configuration installation when you install it.
9
BMC Configuration User's Guide
3.1.3
Install BMC Configuration
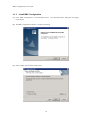
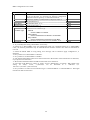
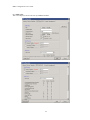
(1) Click "BMC Configuration" on the installation menu. . The "Download Files" dialog box will appear.
Click [Open].
(2) The BMC Configuration installer is started. Click [Next].
(3) Enter a folder name to install. Click [Next].
10
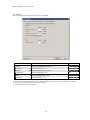
(4) Confirm the installation settings, and click [Next]. The installation is started.
After the installation is completed, BMC Configuration is available.
11
BMC Configuration User's Guide
3.2
BMC Configuration Uninstallation for Windows
Explain the uninstallation of BMC Configuration.
3.2.1
Check before uninstallation
Check the following:
-- Login to Windows as Administrator.
3.2.2 Uninstall BMC Configuration
Uninstall from the Windows menu [Control Panel] - [Add or Remove Programs]. Select [BMC
Configuration] and click [Change/Remove] button. You can uninstall it by displayed direction.
CHECK:
Close the dialog box of BMC Configuration if it has been opened, and then uninstall
BMC Configuration.
12
BMC Configuration User's Guide
3.3
BMC Configuration Installation for Linux
Explain the installation of BMC Configuration.
3.3.1
Check before installation
Check the followings:
-- See chapter 2.1 to check the system requirement of managed server and BMC Configuration.
-- Login to Linux as root user.
CHECK:
BMC Configuration installer exists on following directory:
If you install BMC Configuration by using downloaded modules:/bmc_config.
If you install BMC Configuration by using NEC EXPRESSBUILDER:
"EXPRESSBUILDER revision"/lnx/pp/bmc_config.
(ex. 001/lnx/pp/bmc_config)
3.3.2
Copy and extract BMC Configuration installer
Copy the BMC Configuration installer (all files in /bmc_config) into any directory on the managed server.
The following is an example to copy into /usr/local/bin:
(1) Copy the all installer files to /usr/local/bin.
It is shown example that files is copied from NEC EXPRESSBUILDER to /use/local/bin directory.
(The mount path is dependent on the OS. Specify the right path.)
cp -r /mnt/cdrom/001/lnx/pp/bmc_config /usr/local/bin
(2) Move to the directory containing the installer.
cd /usr/local/bin/bmc_config
(3) Extract the installer.
tar xzvf BMCConfiguration-N.NN-x.tgz
"N.NN" in the example file name means the version.
TIPS:
Please refer to 5.1 BMC Configuration installation when you install it.
13
BMC Configuration User's Guide
3.3.3
Install BMC Configuration
(1) Move to the directory that the installer was extracted.
cd /usr/local/bin/bmc_config/BMCConfiguration-N.NN-x
"N.NN" in the example directory name means the version.
(2) Execute the shell for the installation.
./BMCConfiguration-N.NN-x.sh
"N.NN" in the example file name means the version.
(3) A confirmation message of BMC Configuration installation is displayed. Input "yes" and "Enter" key.
BMC Configuration is installed under /opt/nec/BMC_Configuration directory. If you input "no", the
installation is not executed.
When the installation is completed, the following message is displayed.
"The installation of BMC Configuration is now completed."
After the installation is completed, BMC Configuration is available.
CHECK:
Don't delete the files that are used to install, because you will use them to uninstall.
14
BMC Configuration User's Guide
3.4
BMC Configuration Uninstallation for Linux
Explain the uninstallation of BMC Configuration.
3.4.1
Check before installation
Check the following:
-- Login to Linux as root user.
3.4.2
Uninstall BMC Configuration
(1) Move to the directory in which all installation files are copied.
cd /usr/local/bin/bmc_config/BMCConfiguration-N.NN-x
"N.NN" in the example directory name means the version.
(2) Execute the shell for uninstallation.
./BMCConfiguration-N.NN-x.sh
"N.NN" in the example file name means the version.
(3) A confirmation message of BMC Configuration uninstallation is displayed. Input "delete" and "Enter"
key.
When the uninstallation is completed, the following message is displayed.
"The uninstallation of BMC Configuration is now completed."
15
BMC Configuration User's Guide
Chapter4
4.1
4.1.1
Functions
Start procedure
On Windows
After the installation is completed, do the following operation to open the main dialog box of BMC
Configuration.
- Click "BMC Configuration" - "BMC Configuration" from [start] on Windows
The following screen shows example.
TIPS:
Refer to the following to see BMC Configuration help information.
Click "BMC Configuration" - "BMC Configuration Help"
from [start] on Windows.
4.1.2
On Linux
After the installation is completed, you can open the setting function of BMC Configuration as follows.
/opt/nec/BMC_Configuration/bmcconf
TIPS:
Refer to the following to see BMC Configuration help information.
Open the setting of BMC Configuration and press F12 key on the screen
displayed "[F12] help" at the bottom.
4.1.3
On Off-line TOOL
You can open the setting function of BMC Configuration in Off-line TOOL as follows.
(1) The following message is displayed on the bottom of POST screen.
16
BMC Configuration User's Guide
Press<F2> SETUP, <F3> Internal flash memory, <F4> ROM Utility, <F12> Network
(2) Press F4 key on this screen. If F4 key is entered, Keyboard type selection screen is displayed after POST
screen, and the Off-line TOOL menu is displayed after selecting keyboard type.
(3) Select BMC Configuration.
TIPS:
BMC Configuration in Off-line TOOL is integrated in the managed server by default.
Refer to the following to see BMC Configuration help information.
Start the tool and select Help menu, or press Home key or "?" key
on the screen displayed "[ Help:[Home or ?]]" at the bottom.
17
BMC Configuration User's Guide
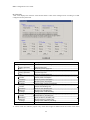
4.2
BMC Configuration Setting
This chapter explains all the BMC Configuration information items. Refer to set more detailed settings.
Explain the settings with the screen of BMC Configuration for Windows.
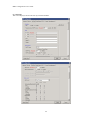
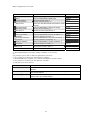
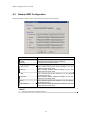
(1) Network
This screen displays and sets the network environment of BMC.
18
BMC Configuration User's Guide
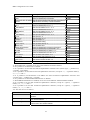
Item
Management LAN
Management
LAN
Connection Type
MAC Address
DHCP
IP Address
Subnet Mask
Description
Default Value
Management LAN setting
Set and display LAN port to communicate with BMC. You can
modify this setting only on BMC Configuration of Off-line
TOOL. *1 *2
Management LAN
: LAN port for BMC exclusive use.
Shared BMC LAN
: LAN port of System (OS) is shared and used.
Set and display the connection type of managed server. When
Management LAN is "Shared BMC LAN", you can modify this
setting only on BMC Configuration of Off-line TOOL
Auto Negotiation
: Connecting by suitable setting.
100Mbps Full
: Connecting by Full Duplex at speed of 100 Mbps.
100Mbps Half
: Connecting by Half Duplex at speed of 100 Mbps..
10Mbps Full
: Connecting by Full Duplex at speed of 10 Mbps.
10Mbps Half
: Connecting by Half Duplex at speed of 10 Mbps.
MAC Address is displayed.
Determine whether to dynamically obtain an IP address from a
DHCP server. If the item is set Enable and applied, BMC set the
value obtained from DHCP server on "IP Address", "Subnet
Mask" and "Default Gateway".
Set the BMC IP address of the managed server.*4
Set the Subnet Mask of the managed server. *3 *4
19
Management LAN
Auto Negotiation
Blade Server:
Enable
Other server:
Disable
192.168.1.1
255.255.255.0
BMC Configuration User's Guide
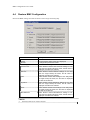
Item
Default Gateway
Dynamic DNS
DNS Server
Host Name
Domain Name
Access Limitation
Access
Limitation Type
IP Address
Description
Set the Default Gateway IP address of the managed server. *4
Default Value
0.0.0.0
If you set this item, it is necessary for applying configuration
information that the gateway is connected on network.
Determine whether to enable/disable of Dynamic DNS. *5
Disable
Set the DNS Server.
0.0.0.0
Set the Host Name. *6 *7
Blank
Set the Domain Name. *7
Access Limitation setting
Blank
Select the Access Limitation Type.
Allow All
: Access to BMC is not limited.
Allow Address
: Set the IP Address that is allowed to access BMC.
Deny Address
: Set the IP Address that is limited to access BMC.
Set the IP Address to allow or deny to access with BMC. *8 *9
Allow All
Blank
*1: If you modify this setting, "Reset BMC" is necessary.
*2: When set to "Shared BMC LAN", the management LAN port is disabled. When set to "Shared BMC
LAN", the network performance may be reduced because the data of both LANs must be transmitted or
received.
*3: When the Subnet Mask is wrong setting, error message, such as "Failed to apply configuration.", is
displayed.
*4: It is possible to set when DHCP is "Disable".
*5: It is possible to set when DHCP is "Enable".
*6: The length of Host Name must be less than 64 characters. Host Name will be truncated to 63 characters,
if you input over 63 characters.
*7: Host Name and Domain Name should be within total of 255 characters.
*8: The range of IP address to "Allow" or "Deny" access is delimited by ",(Comma)". With regard to the
setting of “Deny” access, "*(Asterisk)" can be described as a wild-card. (ex:
192.168.1.*,192.168.2.1,192.168.2.254)
*9: It is possible to set when Access Limitation Type is "Allowed Address" or "Denied Address". The length
must be less than 255 characters.
20
BMC Configuration User's Guide
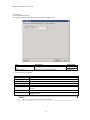
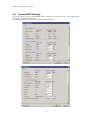
(2) Service
This screen displays and sets the list of the service of BMC.
Item
Description
Default Value
Web Server
HTTP
HTTP Port
HTTPS
HTTPS Port
SSH
SSH
SSH Port
Web Server setting
Select Enable/Disable of HTTP. *1
Set the HTTP Port. *2 *3
Select Enable/Disable of HTTPS.
Set the HTTPS Port. *2 *3
SSH setting
Select Enable/Disable of SSH.
Set the SSH Port. *2 *3
Enable
80
Enable
443
Enable
22
*1: If HTTP is set Enable, HTTPS is also set Enable automaticlly. You can not set HTTP alone to enable.
*2: It is possible to set when each port is set to enable.
*3: Each port number must not overlap.
21
BMC Configuration User's Guide
(3) Mail Alert
This screen displays and sets the alert by E-mail from BMC.
22
BMC Configuration User's Guide
Item
Description
Default Value
Mail Alert
Mail Alert setting
Alert
Response time of SMTP
server
Mail
Select Enable/Disable of Mail Alert.
Set the timeout period until when the connection to
SMTP server succeed by E-mail transmission.
Mail Header setting
Disable
30
To:1
Mail Address
To:2
Mail Address
To:3
Mail Address
From
Reply-To
Subject
SMTP Server
SMTP Server
SMTP Port
SMTP Authentication
CRAM-MD5
LOGIN
PLAIN
User Name
Password
Alert Level
Select Enable/Disable of To:1. *1
Set the mail address of To:1. *2 *3
Select Enable/Disable of To:2. *1
Set the mail address of To:2. *2 *3
Select Enable/Disable of To:3. *1
Set the mail address of To:3. *2 *3
Set the From. *3
Set the Reply-To. *3
Set the Subject. *4
SMTP Server setting
Set the SMTP Server. *5
Set the SMTP Port.
Select Enable/Disable of SMTP Authentication.
Select Enable/Disable of CRAM-MD5. *6 *7
Select Enable/Disable of LOGIN. *6 *7
Select Enable/Disable of PLAIN. *6 *7
Set the SMTP User Name. *6 *8
Set the SMTP User Password. *6 *9
Alert Level setting
Enable
Blank
Disable
Blank
Disable
Blank
Blank
Blank
Blank
Alert Level
Alert Test
Set the kind of event to alert. *10
Execute the alert test by E-mail.
0.0.0.0
25
Disable
Enable
Enable
Enable
Blank
Blank
Error/ Warning
*1: When Mail Alert is enabled, one or more of the addresses should be enabled.
*2: It is possible to set when To:X is "Enable".
*3: It is possible to set less than 255 half-size alphanumeric characters and "-(minus sign)", "_(underscore)",
".(period)", "@(at mark)".
*4: It is possible to set less than 63 half-size alphanumeric characters, except for "+", " "(quotation marks)",
"?", "=", "<" and ">".
*5: It is possible to set full domain or IP Address less than 255 half-size alphanumeric characters and
"-(minus sign)", "_(underscore)", ".(period)".
*6: It is possible to set when SMTP Authentication is "Enable".
*7: When SMTP Authentication is enabled, one or more of the authentic method should be enabled.
*8: It is possible to set less than 64 half-size alphanumeric characters, except for " (space)", " "(quotation
marks)", "?" , "=", "<" and ">".
*9: It is possible to set less than 19 half-size alphanumeric characters, except for " (space)", " "(quotation
marks)", "?" , "=", "<" and ">".
*10: The Alert Level is as follows:
Alert Level
Description
Error
When "Error" is detected in each sensor type, the alert is sent to the checked
address.
When "Error" or "Warning" is detected in each sensor type, the alert is sent to
the checked address.
When "Error", "Warning" or "Information" is detected in each sensor type, the
alert is sent to the checked address.
Error/ Warning
Error/ Warning/ Information
23
BMC Configuration User's Guide
Separate Setting
You can arbitrarily select the event and the address(To:X) to alert in each
sensor type.
24
BMC Configuration User's Guide
(4) SNMP Alert
This screen displays and sets the alert by SNMP from BMC.
25
BMC Configuration User's Guide
Item
Description
SNMP Alert
SNMP Alert setting
Alert*1
Computer Name
Community Name
Alert Process
Alert Acknowledge
Alert Retry Count
Alert Timeout
Alert Receiver
Primary IP Address
IP Address
Secondary IP Address
IP Address
Tertiary IP Address
IP Address
Alert Level
Alert Level
Alert Test
Default Value
Select Enable/Disable of SNMP Alert.
Set the Computer Name. *2
Set the Community Name. *2
Select One Alert Receiver/All Alert Receiver of Alert
Process.
Select Enable/Disable of Alert Acknowledge.
Set the count of Alert retry. *3
Set the seconds to alert timeout. *3
Alert Receiver setting.
Select Enable/Disable of Primary IP Address. *4
Set the IP Address of Primary. *5
Select Enable/Disable of Secondary IP Address. *4
Set the IP Address of Secondary. *5
Select Enable/Disable of Tertiary IP Address. *4
Set the IP Address of Tertiary. *5
Alert Level setting
Set the kind of event to alert. *6
Execute the alert test by SNMP.
Disable
Blank
public
One Alert Receiver
Enable
3
6
Enable
0.0.0.0
Disable
0.0.0.0
Disable
0.0.0.0
Error/ Warning
*1: When PEF(Platform Event Filter) setting is "Disable", it can not alert.
*2:
It is possible to set less than 16 half-size alphanumeric characters.
*3: It is possible to set when Alert Acknowledge is "Enable".
*4: When SNMP Alert is enabled, one or more of the addresses should be enable.
*5: It is possible to set when each Alert Receiver is"Enable".
*6: The Alert Level are as follows:
Alert Level
Description
Error
When "Error" is detected in each sensor type, the alert is sent to the checked
address.
When "Error" or "Warning" is detected in each sensor type, the alert is sent to
the checked address.
When "Error", "Warning" or "Information" is detected in each sensor type, the
alert is sent to the checked address.
You can arbitrarily select the event to alert in each sensor type.
Error/ Warning
Error/ Warning/ Information
Separate Setting
26
BMC Configuration User's Guide
(5) ECO
This screen displays and sets the items concerning the power consumption and the system load.
Item
Description
Default Value
Critical Power Cap Sensor(CPC)
*1
Power Cap value(Pc)
Select Enable/Disable of CPC.
Disable
Set the threshold. The range is from XXX to Maximum
Configuration of During Operation. *2 *3
Maximum
Configuration
of
During
Operation
2
Correction time limit
Exception Action
Non-Critical
Power
Cap
Sensor(NCPC)
Power Cap value(Pn)
Correction time limit
Set the time limit until the alert and the shutdown are
executed when power exceeds the threshold. *2 *4
Select Enable/Disable of whether execute shutdown or not
when power exceeds the time specified in Correction time
limit. *2
Select Enable/Disable of NCPC.
Set the threshold. The range
Configuration of Idle to YYY.*5 *6
is
from
Minimum
Set the time limit until the alert is executed when power
exceeds the threshold. *5 *7
27
Disable
Disable
The
larger
value
comparing
with
Power
Cap value(Pc)
-10
and
Minimum
Configuration
of Idle +10
10
BMC Configuration User's Guide
Item
Description
Default Value
Safe Power Capping
Safe
Power
Capping(Power Reading
Timeout)
ECO Info.
Safe Power Capping setting
Select Enable/Disable of the watch operation when the
power value can not be read from the power supply.
Disable
The reference value and the statistics value of the
managed server are displayed.
*1: In order to perform continuous operation of the managed server, the function controls the total power
consumption so as not to exceed the specified value. It is effective when you want to make full use of limited
electric power and when you don't want to consume excessive electric power.
*2: It is possible to set when CPC is "Enable".
*3: XXX is Minimum Configuration of Idle or "Power Cap value(Pn)".
*4: When the power exceeds "Power Cap value(Pc)" for more than the seconds of this value, the alert or
shutdown is executed.
*5: It is possible to set when NCPC is "Enable".
*6: YYY is Maximum Configuration of During Operation or "Power Cap value(Pc)".
*7: When the power exceeds "Power Cap value(Pn)" for more than the seconds of this value, the alert is
executed.
IMPORTANT:
The ECO screen is not displayed if the managed server does not support this function.
28
BMC Configuration User's Guide
(6) ECO Info
This screen displays the reference value and the statistics value of the managed server according to its HW
configuration and system load.
Item
Description
Maximum Configuration *1
An available maximum configuration in the model.
During Operation
Idle
Minimum Configuration *1
During Operation
Idle
Power
Current
Maximum
Minimum
Average
CPU Throttling *2
Current
Maximum
Minimum
Average
Memory Throttling *2 *3
Current
Maximum
Minimum
Average
Reset
At high system load.
When only power supply ON.
An available minimum configuration in the model.
At system high load.
When only power supply ON.
The power consumption of the managed server is displayed.
Present power consumption.
Maximum power consumption.
Minimum power consumption.
Average value of power consumption.
CPU throttling rate of the managed server is displayed.
Present CPU throttling rate.
Maximum CPU throttling rate.
Minimum CPU throttling rate.
Average value of CPU throttling.
Memory Throttling rate of the managed server is displayed.
Present Memory Throttling rate.
Maximum Memory Throttling rate.
Minimum Memory Throttling rate.
Average value of Memory Throttling.
The statistics values are reset.
*1: These values are reference purpose only. Each value might be different from the actual value which
29
BMC Configuration User's Guide
depends on your precise server configuration.
*2: Technology that decreases frequency or duty cycle of clock, and suppresses power consumption.
*3: It is not displayed when the system does not support this function.
30
BMC Configuration User's Guide
(7) Control
Control the managed server.
This setting is applied at the next booting time of the managed server.
Item
Description
One Time Boot Device
Default Value
One Time Boot Device setting
Boot Device *1
Select the Device used at next boot.
No Change
*1: The Boot Device as follows:
Boot Device
Description
No Change
PXE
HDD
CD/DVD
Remote FD
Remote CD/DVD
It follows the setting of System BIOS of the managed server.
PXE Boot is done.
It starts from the hard disk connected to the managed server.
It starts from the CD/DVD drive connected to the managed server.
It starts from the FD drive (media) connected by the remote media function.
It starts from the CD/DVD drive (media) connected by the remote media
function.
It starts from USB Memory connected by the remote media function.
It starts from the FD drive or the removable mass storage connected to the
managed server.
Remote USB Memory
FD
CHECK:
This setting item does not exist in Off-line TOOL.
31
BMC Configuration User's Guide
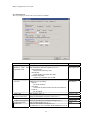
(8) Miscellaneous
This screen displays and sets the various functions of BMC.
Item
Description
SEL
Behavior when
repository is full
Default Value
SEL setting
SEL
Power Restore Delay
AC-Link
Delay Time
PEF
Platform Event Filter
Management Software
ESMPRO Management
Authentication Key
Redirection
Set the Behavior when SEL repository is full. *1
Stop logging SEL
: SEL is not recorded any more.
Clear all SEL
: Delete all SEL and record SEL newly.
Overwrite oldest SEL
: Old SEL is overwritten with new SEL.
Power Restore Delay setting
Select the AC-Link setting.
Stay Off
: DC is not turned on.
Last State
: It becomes the same as time when AC was turned off.
Power On
: DC on always.
Set the Delay Time. *3
PEF setting
Select Enable/Disable of Platform Event Filter. *4
Management Software setting
Select Enable/Disable of ESMPRO Management. *5
Set the Authentication Key. *6 *7
Select Enable/Disable of Redirection. *6
If Redirection is set to "Enable", BIOS Redirection Port in
32
Stop logging SEL
Last State *2
Minimum value
Enable
Current value
guest
Enable
BMC Configuration User's Guide
Item
Description
Default Value
Console Redirection Configuration of BIOS is set to "Serial
Port B".
*1: When this item is changed to/from "Overwrite oldest SEL", all log records in the SEL Repository are
cleared.
*2: When the "Standby Power Save" function of System BIOS is Enable, it is set to "Power On". And the
default value is changed to "Power On".
*3: It is not possible to set when AC-Link is "Stay Off". Delay time from turning on AC to turning on DC is
specified. It is possible to set up to 600(seconds). Minimum value is different according to the system.
*4: "Enable" and "Disable" of the report function from BMC are set. It makes SNMP Alert be impossible
when it sets to "Disable".
*5: When BMC can be managed directly from NEC ESMPRO Manager (Ver.5.4 or later), it must be set to
"Enable". If it sets to "Enable", Authentication Key also must be set.
*6: It is possible to set when NEC ESMPRO Management is set "Enable".
*7: It is Authentication key when managing from NEC ESMPRO Manager (Ver.5.4 or later). It is possible to
set less than 16 half-size alphanumeric characters.
CHECK:
Power Restore Delay settings do not exist in Off-line TOOL.
33
BMC Configuration User's Guide
4.3
Backup BMC Configuration
Back up the BMC settings to files. Select the back up target and click [OK].
Item
Description
File Locations
Folder
Browse
Backup Target
User Account
Set the location of backup files.
The preservation folder of the file is displayed.
It changes the preservation folder.
Select the backup target.
Select whether backup User Account settings or not, and
display the backup file name.
Select whether backup Network settings or not, and
display the backup file name.
Select whether backup Alert settings or not, and display
the backup file name.
Select whether backup Operation settings or not, and
display the backup file name.
Select whether backup ECO settings or not, and display
the backup file name.
Select whether backup Miscellaneous settings or not, and
display the backup file name.
Network
Alert
Operation
ECO
Miscellaneous
CHECK:
Off-line TOOL has no backup function.
34
BMC Configuration User's Guide
4.4
Restore BMC Configuration
Restore the BMC settings from files. Select the restore target and click [OK].
Item
Description
File Locations
Folder
Browse
Restore Target
User Account
Set the locations of files.
The preservation folder of the file is displayed.
It changes the preservation folder.
Select the restore target.
Select whether restore User Account settings or not.
Only when the target backup file exists, the file name is
displayed and able to be selected.
Select whether restore Network settings or not. Only
when the target backup file exists, the file name is
displayed and able to be selected.
Select whether restore Alert settings or not. Only when
the target backup file exists, the file name is displayed
and able to be selected.
Select whether restore Operation settings or not. Only
when the target backup file exists, the file name is
displayed and able to be selected.
Select whether restore ECO settings or not. Only when
the target backup file exists, the file name is displayed
and able to be selected.
Select whether restore Miscellaneous settings or not.
Only when the target backup file exists, the file name is
displayed and able to be selected.
Network
Alert
Operation
ECO
Miscellaneous
CHECK:
Off-line TOOL has no restore function.
35
BMC Configuration User's Guide
4.5
System BIOS Settings
This screen displays and sets System BIOS settings of the server. Please refer to the User's Guide of the
managed server for details of the item.
This setting is applied at the next booting time of the managed server.
36
BMC Configuration User's Guide
Item
Description
Default Value *1
Basic Configuration
Basic Configuration setting
POST Error Pause
Memory Error
CLI Setup
Standby Power Save
Serial Port A Configuration
Serial Port A
Serial A Base I/O
Select Enable/Disable of POST Error Pause.
Select Halt/Boot of Memory Error.
Select Enable/Disable of CLI Setup.
Select Enable/Disable of Standby Power Save.
Serial Port A Configuration setting
Select Enable/Disable of Serial Port A.
Select Base I/O Address of Serial Port A. It must be
different from Serial Port B.
Select IRQ of Serial Port A. It must be different from
Serial Port B.
Serial Port B Configuration setting
Select Enable/Disable of Serial Port B.
Select Base I/O Address of Serial Port B. It must be
different from Serial Port A.
Select IRQ of Serial Port B. It must be different from
Serial Port A.
Console Redirection Configuration setting
Serial A Interrupt
Serial Port B Configuration
Serial Port B
Serial B Base I/O
Serial B Interrupt
Console
Redirection
Configuration
BIOS Redirection Port
Terminal Type
Baud Rate
Data Bits
Stop Bits
Parity
Flow Control
Continue C.R. after POST
Select BIOS Redirection Port. You can not select
“Disable” Port.
Select Terminal Type.
Select Baud Rate.
Select Data Bits.
Select Stop Bits
Select Parity.
Select Flow Control.
Select Enable/Disable of Continue Console Redirection
after POST.
*1: The value might be different according to the system.
CHECK:
This setting item does not exist in Off-line TOOL.
37
Enable
Boot
Disable
Disable
Enable
3F8h
IRQ 4
Enable
2F8h
IRQ 3
Disabled
VT-100+
115200
8
1
None
Hardware
RTS/CTS
Enable
BMC Configuration User's Guide
4.6
Clear BMC Configuration
If you select "Clear BMC Configuration" on the starting screen, you can restore all of BMC Configuration
parameters except ECO to the default settings. It will take about one minute to restart BMC.
IMPORTANT:
This operation may cause data destruction.
This operation can not clear ECO settings.
CHECK:
This function is "BMC Initialization" in Off-line TOOL.
4.7
Reset BMC
If you select "Reset BMC" on the starting screen, you can reset BMC without rebooting system. BMC It will
take about one minute to restart BMC.
IMPORTANT:
Please use it when you can not operate the BMC functions correctly or if necessary.
This operation does not clear the configuration settings.
38
BMC Configuration User's Guide
Chapter5
5.1
Precautions for Use
BMC Configuration installation
-- BMC Configuration Installer (Windows & Linux) can not downgrade to the older version. If you want to
use the older version, uninstall the current version and then install older version.
Note: All the registered information will be deleted as the result of the uninstalling.
-- BMC Configuration (Windows) Installer may indicate a message that requests some disk if you upgrade
the BMC Configuration with the installer on CD-ROM/DVD-ROM. In this case, copy the installer on the
HDD and then upgrade.
5.2
HTTP / HTTPS settings
-- HTTP alone can not be set to "Enable". When HTTP is set to "Enable", HTTPS is also set to "Enable"
automatically.
5.3
Redirection setting
-- If Redirection of Management Software setting in Miscellaneous is applied to "Enable", the Value of after
rebooting of BIOS Redirection Port in BIOS Console Redirection Configuration is set to "Serial Port B".
5.4
PEF setting and SNMP Alert setting
-- If Platform Event Filter in Miscellaneous is applied to "Disable", SNMP Alert is set to "Disable". And if
SNMP Alert is applied to "Enable", Platform Event Filter is set to "Enable".
5.5
Alert form BMC
-- In the case that the item "Alert" on BMC Configuration is enabled, BMC will alert directly to the specified
alert receiver when the event specified in Alert Level is occurred. If NEC ESMPRO Manager (Ver.5.4 or
later) or NEC ESMPRO Manager Association Module is installed on the alert receiver, the SNMP alert
from BMC is registered on NEC ESMPRO AlertManager.
-- Sending the alert from BMC depends on exist of NEC ESMPRO Agent.
(1) In the case of NEC ESMPRO Agent has been installed on the managed server.
If OS does not run on the managed server, BMC send the alert when the specified event happens.
After OS runs and NEC ESMPRO Agent starts, BMC does not send the alert even if the event happens,
because NEC ESMPRO Agent sends the alert.
(2) In the case of NEC ESMPRO Agent has not been installed on the managed server.
BMC sends the alert whenever the specified event happens.
5.6
Alert Test
-- Please send a test alert after completing all the settings of the Alert Configuration. You may be unable to
use the alert function due to network environment and settings.
5.7
ECO setting
-- The electric power value might not necessarily reach even the value of Power Cap value. The electric
power control lowers the power consumption of the system by lowering the frequency of CPU/Memory.
When CPU/Memory Throttling value reaches 100%, the electric power value does not fall any more.
-- Power Capping function requires Intel® Xeon® Processor.
-- The following case, ECO settings are not supported and not displayed.
"Operating System is Windows Server 2003(R2)." and "NEC ESMPRO Agent is installed."
39
BMC Configuration User's Guide
5.8
Management LAN setting
-- When set to "Shared BMC LAN", the management LAN port is disabled.
-- When set to "Shared BMC LAN", the network performance may be reduced because the data of both
LANs must be transmitted or received.
40
BMC Configuration User's Guide
Revision History
1.00
1.01
2011/05/10
2011/06/24
Initial edition
Adds ECO setting Precautions.
Adds Management LAN setting Precautions.
Adds required packages by Red Hat Enterprise Linux Server 6 (x64).
Changes cover. Corrects writing errors.
41
BMC Configuration User's Guide
BMC Configuration User's Guide
© NEC Corporation 2011
42