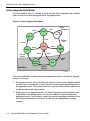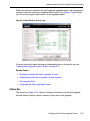
1
Express5800/320Fc:
Active Upgrade™ User’s Guide
NEC Corporation of America
456-01720-000
Notice
The information contained in this document is subject to change without notice.
UNLESS EXPRESSLY SET FORTH IN A WRITTEN AGREEMENT SIGNED BY AN AUTHORIZED REPRESENTATIVE
OF NEC, NEC MAKES NO WARRANTY OR REPRESENTATION OF ANY KIND WITH RESPECT TO THE
INFORMATION CONTAINED HEREIN, INCLUDING WARRANTY OF MERCHANTABILITY AND FITNESS FOR A
PURPOSE. NEC assumes no responsibility or obligation of any kind for any errors contained herein or in connection with
the furnishing, performance, or use of this document.
Software described in NEC (a) is the property of NEC and/or its licensees, (b) is furnished only under license, and (c) may
be copied or used only as expressly permitted under the terms of the license.
NEC documentation describes all supported features of the user interfaces and the application programming interfaces
(API) developed by NEC and/or its licensees. Any undocumented features of these interfaces are intended solely for use
by NEC personnel and are subject to change without warning.
This document is protected by copyright. All rights are reserved. No part of this document may be copied, reproduced, or
translated, either mechanically or electronically, without the prior written consent of NEC Corporation of America.
The NEC Corporation of America logo, Express5800/320Fc, and the Express5800/320Fc logo, are trademarks of NEC
Corporation of America. ActiveService Network and Active Upgrade are trademarks of Stratus Technologies Bermuda,
Ltd. All other trademarks and trade names are the property of their respective owners.
Manual Name: Express5800/320Fc: Active Upgrade™ User’s Guide
Part Number: 456-01720-000
Express5800/320Fc Software Release Number: 5.0.1391
Publication Date: August 2007
NEC Corporation of America
10850 Gold Center Drive, Suite 200
Rancho Cordova, CA 95670
© 2007 NEC Corporation of America. All rights reserved.
Contents
Preface
1. Overview
Features
Overview of the Active Upgrade Process
Aborting the Active Upgrade Process
Active Upgrade State Model
2. Preparing for the Active Upgrade Process
Software Upgrade Support
System Prerequisites
Recommendations
Managing Critical Applications During the Upgrade Process
Pre-Upgrade Tasks
Installing the Active Upgrade Software
Configuring Windows Firewall for the Active Upgrade Process
Configuring a UPS-Protected System for the Active
Upgrade Process
Installing Java Runtime Environment
Gathering Information
Copying Software Installation Packages to the System
Configuring Windows Automatic Updates
Starting and Exiting the Active Upgrade Console
Understanding the Active Upgrade Console Interface
Title Bar
N a v i g a t io n B a r
Main Window
Status Bar
3. Configuring the Active Upgrade Process
Creating and Managing Configuration Files
vii
1-1
1-1
1-2
1-6
1-8
2-1
2-1
2-2
2-5
2-6
2-7
2-9
2-10
2- 11
2-13
2-15
2-18
2-18
2-21
2-22
2-22
2-23
2-26
2-27
3-1
3-1
Contents
iii
Contents
Creating a Configuration File
3-2
Loading a Configuration File
3-3
Editing an Existing Configuration File
3-4
Performing an Upgrade with No Configuration File
3-4
Saving a Configuration File
3-5
Selecting Disks to Upgrade
3-5
Selecting Other Configurations to Include
3-7
Selecting Application Services to Control
3-9
Selecting Event Log Files to Back Up
3-10
Configuring Custom Actions
3-12
Programming Notes for Custom Actions
3-15
Starting and Stopping Applications
3-15
Using Active Upgrade Environment Variables
3-16
Generating Exit Values
3-17
Viewing Standard Output and Error Stream
3-17
Executing Visual Basic Scripts and Other Types of Executable Files
3-18
Providing a Description for a Configuration File
3-19
Displaying the Upgrade Summary
3-19
4. Performing the Upgrade
Performing a Readiness Check
Splitting the System
Managing Upgrade Tasks on the Upgrade Side
Connecting to the Desktop on the Upgrade Side
Running Software Installation Programs
Restarting the Upgrade Side
Managing Your Applications on the Production Side
Verifying the Upgrade Side Before Merging the System
Merging the System
Verifying the Upgrade Side Before Committing the Upgrade
4-17
Committing the Upgrade
Aborting the Upgrade
Finishing the Upgrade
Viewing Active Upgrade Process Status
Activity Log
Status Bar
5. Troubleshooting
Saving the Activity Log to a File
Verifying the Status of Application Services
iv
Express5800/320Fc: Active Upgrade™ User’s Guide
4-1
4-1
4-3
4-5
4-6
4-10
4-12
4-14
4-15
4-15
4-18
4-19
4-20
4-21
4-21
4-25
5-1
5-1
5-2
Contents
Verifying the Status of Installed Software
Verifying If RDR Disks Are Resynchronizing
General Problems and Solutions
Glossary
Index
5-3
5-5
5-6
Glossary-1
Index-1
Contents
v
Figures
Figures
Figure 1-1.
Figure 1-2.
Figure 1-3.
Figure 1-4.
Figure 1-5.
Figure 1-6.
Figure 2-1.
Figure 2-2.
Figure 2-3.
Figure 2-4.
Figure 2-5.
Figure 2-6.
Figure 2-7.
Figure 2-8.
Figure 2-9.
Figure 2-10.
Figure 4-1.
Figure 4-2.
Figure 4-3.
Figure 4-4.
Figure 4-5.
Figure 4-6.
Figure 4-7.
Figure 5-1.
Figure 5-2.
iv
Duplexed System
Splitting the System
Merged System
Committing the Upgrade
Aborting the Upgrade
Active Upgrade State Model
Windows Firewall Exceptions
Automatic Updates Control Panel
Automatic Updates Icon in System Tray
Active Upgrade console
Navigation Bar: Configuration
Navigation Bar: Active Upgrade
Navigation Bar: Links
Main Window: Configuring the Active Upgrade Process
Main Window: Activity Log
Status Bar
Links for Connecting to Upgrade Side
Remote Desktop Title Bar
Automatic Updates Icon in System Tray
Activity Log (in Active Upgrade Console)
Remote Activity Log
Activity Log Detail
Status Bar
Service Control Manager
Add or Remove Programs Control Panel
Express5800/320Fc: Active Upgrade™ User’s Guide
1-3
1-3
1-5
1-6
1-7
1-8
2-11
2-17
2-18
2-20
2-21
2-22
2-23
2-24
2-25
2-26
4-7
4-9
4-10
4-22
4-22
4-24
4-25
5-3
5-4
Tables
Table 2-1.
Table 3-1.
Table 3-2.
Table 3-3.
Table 3-4.
Table 3-5.
Table 4-1.
Table 4-2.
Table 4-3.
Table 4-4.
Table 4-5.
Table 4-6.
Table 5-1.
Table 5-2.
Table 5-3.
Active Upgrade Process Worksheet
Hard Disk Color Coding
Selection of Application Services
Control Types for Custom Actions
Timing for the Advanced Control Type
Environment Variables for Custom Actions
Activity Log Entries
Activity Log Entries
Status: Hardware State
Status: Upgrade State
Status: Operational State
Status: Partner State
Troubleshooting: Readiness Check
Troubleshooting: Custom Actions
Troubleshooting: Miscellaneous Problems
2-14
3-6
3-10
3-13
3-14
3-16
4-2
4-23
4-25
4-26
4-26
4-27
5-6
5-8
5-8
Tables
v
Tables
vi
Express5800/320Fc: Active Upgrade™ User’s Guide
Preface
Purpose of This Manual
The Express5800/320Fc: Active Upgrade™ User’s Guide describes the Active
Upgrade process, which allows you to upgrade system software and applications on
an Express5800/320Fc system while its critical applications remain online and
accessible to users.
The manual provides an overview of the Active Upgrade process, specifies the
requirements and procedures necessary to prepare the system for the upgrade
process, and explains how to configure and execute the upgrade process using the
Active Upgrade console. It also provides information about troubleshooting the Active
Upgrade process if a problem occurs.
NOTES
1. The information in this manual is also contained in the
Active Upgrade Help file, which is available in the
Active Upgrade console and in the Start menu of your
system in the Express5800/320Fc folder (after you
install the Active Upgrade software).
2. For the latest information about Active Upgrade
technology, including any issues that were discovered
after this release, see the Express5800/320Fc:
Active Upgrade User’s Guide online at
http://support.necam.com/servers/ft
Audience
This manual is intended for system administrators who will prepare for and execute an
Active Upgrade on an Express5800/320Fc system. It assumes that you are familiar
with administering Express5800/320Fc systems.
Notation Conventions
This document uses the notation conventions described in this section.
Warnings, Cautions, and Notes
Warnings, cautions, and notes provide special information and have the following
meanings:
Preface
vii
Preface
!
WA R N I N G
A warning indicates a situation where failure to take
or avoid a specified action could cause bodily harm or
loss of life.
!
CAUTION
A caution indicates a situation where failure to take or
avoid a specified action could damage a hardware device,
program, system, or data.
NOTE
A note provides important information about the operation
of a system.
Typographical Conventions
The following typographical conventions are used in Express5800/320Fc system
documents:
• The bold font emphasizes words in text or indicates text that you type, the name of
a screen object, or the name of a programming element. For example:
Before handling or replacing system components, make sure that you are
properly grounded by using a grounded wrist strap.
In the System Properties dialog box, click the Hardware tab.
Call the RegisterDeviceNotification function.
• The italic font introduces new terms and indicates programming and command-line
arguments that the user defines. For example:
Many hardware components are customer-replaceable units (CRUs), which
can be replaced on-site by system administrators with minimal training or tools.
copy filename1 filename2
Pass a pointer for the NotificationFilter parameter
• The monospace font indicates sample program code and output, including
message text. For example:
#include <iostream.h>
The operation completed successfully.
viii
Express5800/320Fc: Active Upgrade™ User’s Guide
Preface
Getting Help
If you have a technical question about Express5800/320Fc hardware or software, try
these online resources first:
• Online support from NEC Technical Support. You can find the latest technical
information about an Express5800/320Fc through online product support at the
NEC Technical Support Web site:
http://support.necam.com/servers/ft
• Online product support for Microsoft® products. Your primary source for
support is the computer manufacturer who provided your software, or an
authorized Microsoft Support Provider. You can also find the latest technical
information about Microsoft Windows® and other Microsoft products through online
product support at the Microsoft Help and Support Web site:
http://support.microsoft.com/
If you are unable to resolve your questions with the help available at these online sites,
and the Express5800/320Fc system is covered by a service agreement, please
contact NEC Technical Support (866-269-1239).
Notices
• All regulatory notices are provided in the site planning guide for your system.
Preface
ix
Preface
x
Express5800/320Fc: Active Upgrade™ User’s Guide
Chapter 1
Overview
1-
Active Upgrade™ technology allows you to upgrade system and application software
on an Express5800/320Fc system with minimal downtime.
Instead of taking your system offline to run upgrade procedures, you can use Active
Upgrade technology to split the system into two independently running systems, one
side of which you upgrade while the other side continues to run your applications
without interruption.
To learn more about Active Upgrade technology, see the following topics:
• “Features”
• “Overview of the Active Upgrade Process” on page 1-2
• “Active Upgrade State Model” on page 1-9
NOTE
For the latest information about Active Upgrade
technology, including any issues that were discovered
after this release, see the Express5800/320Fc: Active
Upgrade User’s Guide online at
http://support.necam.com/servers/ft
Features
Active Upgrade technology allows you to do the following:
• Install software updates with minimal disruption to your critical applications.
Your business-critical applications continue to run on one side of the system while
you install software on, and even restart, the other side. There is only a brief
disruption when you are finished installing updates, as your critical applications are
restarted on the upgraded software.
Overview
1-1
Overview of the Active Upgrade Process
• Test the latest software updates in your environment before making the updates
permanent.
After your critical applications are restarted on the upgraded software, you can
verify the success of your software updates in a production environment, with real
users and system load. If you want to keep the changes, there is no additional
downtime. Otherwise, as quickly as your system can restart, you can abort the
upgrade to go back to the original version of your software.
• Abort the upgrade process at any point, until you commit the changes.
If, for any reason, you are not satisfied with an upgrade, you can abort the upgrade
session to return the system to its original state. Nothing is permanent until you
choose to commit the changes. (Also, if you abort the upgrade early enough in the
process, before testing the software in your production environment, your critical
applications are not disrupted.)
Related Topics
• “Overview of the Active Upgrade Process”
• “Active Upgrade State Model” on page 1-8
• “Software Upgrade Support” on page 2-1
• “System Prerequisites” on page 2-2
Overview of the Active Upgrade Process
The Active Upgrade process involves the following basic steps:
1. You prepare your system to ensure it meets the prerequisites of the upgrade
process.
2. You use the Active Upgrade console to select the disks that are affected by the
software upgrade and to provide information about any applications or services
that require special handling during the upgrade process.
3. You run a readiness check in the Active Upgrade console to confirm that your
system meets the prerequisites for the upgrade process.
4. You start the upgrade process by initiating split mode, which divides the
fault-tolerant, duplexed system (Figure 1-1) into two independent, simplexed
systems (Figure 1-2) — a Production Side, which continues to run your
applications, and an Upgrade Side, on which you can run software installation
packages.
1-2
Express5800/320Fc: Active Upgrade™ User’s Guide
Overview of the Active Upgrade Process
Figure 1-1. Duplexed System
Internal Storage
Console
System
Duplexed System
Data
Mirror
System
Network
Data
External
Storage
duet001
Figure 1-2. Splitting the System
Console
Internal Storage
Production Side (Live)
System
Data
VTM
Duplexed System
Network
Remote
Connection
External
Storage
Mirror
Disabled
No
Connection
Upgrade Side (Isolated)
VTM
System
Software
Installation
duet002
Overview
1-3
Overview of the Active Upgrade Process
As shown in Figure 1-2, when you split the system, the Active Upgrade console
disables any Rapid Disk Resync (RDR) mirroring between the internal disks in
each CPU- I ⁄ O enclosure and isolates the Upgrade Side from system resources
such as the network, any user-specified application data disks, and any external
PCI resources. It also disables user-specified applications and services on the
Upgrade Side so they cannot restart if you restart the Upgrade Side.
Meanwhile, the Production Side retains access to system resources and continues
to run your applications uninterrupted.
5. After the system successfully enters split mode, you establish a remote connection
to the Upgrade Side of the system through the private network that exists between
the VTM adapters in each CPU- I ⁄ O enclosure. Using this remote connection, you
can perform any of the following upgrade tasks on the Upgrade Side:
• Run software installation programs (see “Software Upgrade Support” on
page 2-1 for restrictions).
• Restart the operating system, if necessary.
• Perform limited testing of the installed updates. (The Upgrade Side has no
access to the network or application data disks during this stage.)
You can also completely abort the upgrade from the Active Upgrade console, if
necessary.
6. When you are finished installing software on the Upgrade Side, you disconnect the
remote connection to the Upgrade Side and initiate the merge process.
When you merge the system, the Active Upgrade console stops your applications
on the Production Side and unmounts any application data disks to ensure that
pending disk updates are flushed to disk. It then merges system resources so that
the network and application data disks become available to the whole system
again. With the exception of the internal disks, all critical system resources return
to duplex mode (Figure 1-3).
1-4
Express5800/320Fc Active Upgrade™ User’s Guide
Overview of the Active Upgrade Process
Figure 1-3. Merged System
Internal Storage
Data
Console
Duplexed System
(Old System) (Current Data)
Mirror
Disabled
System
Network
External
Storage
(Upgraded)
(Old Data)
duet003
Finally, the system restarts your applications, including the Active Upgrade
console, from the Upgrade Side system disk. Depending on the complexity of your
applications and the upgrade you performed, your applications may be back up and
running in under a minute.
7. After the system is successfully merged, you can test your applications and verify
the success of your upgrades with full access to the system’s resources. If you
discover a problem, you can still abort the upgrade process and restore the system
to its previous state, because the original copy of your system disk (on the
Production Side) has not been overwritten yet.
8. When you are certain that the upgrades were successful, you can commit the
changes to make them permanent.
When you commit the changes, the Active Upgrade console resynchronizes the
RDR disks in your system by overwriting the original Production Side system disk
and stale Upgrade Side data disks with their partner disks, which are up-to-date
(Figure 1-4).
NOTE
Because the original version of your system disk is erased
during the commit process, you cannot abort an upgrade
session after initiating the commit process.
Overview
1-5
Overview of the Active Upgrade Process
Figure 1-4. Committing the Upgrade
Internal Storage
Data
Console
Duplexed System
(Old System) (Current Data)
Remirror
with RDR
System
Network
External
Storage
(Upgraded)
(Old Data)
duet004
When the RDR disk resychronization is finished, all critical system resources are
running in duplex mode, and the Active Upgrade process is complete. You do not
need to restart the system, and, because your application is already running on the
upgraded software, there is no additional downtime.
Related Topics
• “Aborting the Active Upgrade Process”
• “Active Upgrade State Model” on page 1-8
• “Software Upgrade Support” on page 2-1
• “System Prerequisites” on page 2-2
Aborting the Active Upgrade Process
Aborting the Active Upgrade process stops the current upgrade session and returns
your system to its original state. If necessary, you can abort an upgrade session at any
point up until you commit the upgrade.
If you abort the upgrade session while the system is in split mode, no downtime is
incurred. Your applications continue to run on the Production Side while the Active
Upgrade console restores the system to duplex mode.
1-6
Express5800/320Fc: Active Upgrade™ User’s Guide
Overview of the Active Upgrade Process
If you abort the upgrade session while the system is in merge mode, a short period of
downtime is incurred while the Active Upgrade console initiates a system restart. The
Active Upgrade console shuts down the Upgrade Side and restarts the system from the
Production Side, which automatically restarts your applications from the Production
Side. The period of downtime is only as long as it takes your system and applications
to restart.
In either case, the abort process uses RDR resynchronization to restore the internal
disks to their original state by overwriting the unwanted Upgrade Side system disk and
stale Upgrade Side data disks with their original partner disks (Figure 1-4).
Figure 1-5. Aborting the Upgrade
Internal Storage
System
Console
Duplexed System
Data
(Old System) (Current Data)
Remirror
with RDR
Network
External
Storage
(Upgraded)
(Old Data)
duet006
After you abort the upgrade process, you can start another upgrade session as soon
as the RDR disk resynchronization is complete.
Related Topics
• “Active Upgrade State Model” on page 1-8
• “Overview of the Active Upgrade Process” on page 1-2
• “Active Upgrade State Model” on page 1-8
• “Software Upgrade Support” on page 2-1
• “System Prerequisites” on page 2-2
Overview
1-7
Overview of the Active Upgrade Process
Active Upgrade State Model
The state model in Figure 1-6 shows all of the possible Active Upgrade states, and the
order in which they occur during the Active Upgrade process.
Figure 1-6. Active Upgrade State Model
Finish
Idle
Commit
Finish
Prepare
Split
Commit
Abort
Abort
Abort
Merge
Execute
Merge
Check
Readiness
Idle
Finish
Abort
Prepare
Split
Abort
Execute
Split
Prepare
Merge
Split Mode
Split
Prepare
Merge
duet005a
The state model helps to demonstrate the sequence of events in the Active Upgrade
process, as follows:
1. All upgrade sessions start in the Idle state, where you can run the readiness check
as many times as necessary to verify that your system meets the prerequisites of
the upgrade process. The system continues to run normally, and both sides of the
system continue to be synchronized.
2. When you start an upgrade session, the Active Upgrade console switches to the
PrepareSplit state, during which it runs a final readiness check and additional
background tasks. If the system is ready, the console immediately switches to the
Split state and proceeds to divide the system into two independently running
systems.
1-8
Express5800/320Fc: Active Upgrade™ User’s Guide
Overview of the Active Upgrade Process
NOTE
After the upgrade session leaves the Idle state, you must
complete the full upgrade process in sequence or abort
the process altogether. You cannot go back to a previous
state or skip states, and you cannot proceed to the next
state if the upgrade is in a Broken or Busy operational
state.
3. When you are done installing software on the Upgrade Side and you start the
merge process, the Active Upgrade console switches to the PrepareMerge state,
during which it runs additional readiness tests and background tasks. If the system
is ready, the console immediately switches to the Merge state and restarts your
applications on the Upgrade Side.
4. When you are satisfied that everything is working correctly and you start the
commit process, the Active Upgrade console switches to the Commit state, during
which it starts the resynchronization of your RDR disks. You can subsequently start
the finish process, during which the Active Upgrade console switches to the Finish
state, cleans up system resources, and then returns the system to the Idle state.
The upgrade session is complete.
If necessary, you can abort the upgrade process from the PrepareSplit, Split,
PrepareMerge, and Merge states. When you abort an upgrade session, the Active
Upgrade console switches to the Abort state, during which it restores your system to
its original configuration and starts the resynchronization of your RDR disks. You can
subsequently initiate the finish process, as you would after committing an upgrade.
Alternatively, you can retry any of the Active Upgrade states to recover the system from
a transient failure and move on to the next states without aborting the entire upgrade
session.
All of these Active Upgrade states are reported in the activity log and status bar of the
Active Upgrade console during the upgrade process. See “Understanding the Active
Upgrade Console Interface” on page 2-20 for more information.
Related Topics
• “Overview of the Active Upgrade Process” on page 1-2
• “Active Upgrade State Model” on page 1-9
• “Software Upgrade Support” on page 2-1
• “System Prerequisites” on page 2-2
Overview
1-9
Overview of the Active Upgrade Process
1-10
Express5800/320Fc: Active Upgrade™ User’s Guide
Chapter 2
Preparing for the Active Upgrade
Process
2-
Preparing for the Active Upgrade process involves the following tasks:
• Learning about the types of upgrades that the Active Upgrade process supports.
• Learning about the prerequisites and recommendations for your
Express5800/320Fc system.
• Learning how the Active Upgrade console can control your critical applications.
• Performing pre-upgrade tasks on your system, such as:
• Installing the Active Upgrade console.
• Configuring Windows Firewall for the Active Upgrade process.
• Configuring a UPS-protected system for the Active Upgrade process.
• Gathering information about your system.
• Copying any software installation packages to the system before the upgrade
starts.
• Configuring Microsoft Windows Automatic Updates.
• Starting the Active Upgrade console.
• Understanding the Active Upgrade console.
Software Upgrade Support
Active Upgrade technology currently supports the installation of high-priority updates
(also known as hotfixes) for the Microsoft Windows Server 2003 operating system. It
also supports the installation or upgrade of application software that meets the
following criteria:
• The application’s executable files, configuration files, and temporary files (for
example, cache files) reside on internal system disks that are mirrored with RDR.
• The application’s persistent data files reside on separate data disks, either internal
or external. (Data volumes that reside on the same physical disk as a system
volume are not supported.)
Preparing for the Active Upgrade Process
2-1
System Prerequisites
• The application’s installation or upgrade utility does not involve changes to files or
databases on the data disks while the system is in split mode. (For example, the
utility cannot create new databases or convert existing data records to be
compatible with the new version of the application). The Upgrade Side has no
access to the data disks while the system is split.
Active Upgrade technology does not support the following types of upgrades:
• Any upgrade that requires network connectivity during the upgrade process.
For example, you cannot use an installation program that downloads its installation
files from the Internet as the upgrade progresses. If possible, you must download
the complete installation package to the system prior to initiating split mode.
• BIOS, BMC, or VTM firmware updates, which you can already perform while the
system is duplexed and online. See the Express5800/320Fc: User Guide
for more information.
Related Topics
• Overview
• “System Prerequisites”
• “Recommendations” on page 2-5
• “Managing Critical Applications During the Upgrade Process” on page 2-6
• “Pre-Upgrade Tasks” on page 2-7
System Prerequisites
Active Upgrade technology is supported only on Express5800/320Fc
systems that:
• Are running in duplex mode prior to starting the upgrade process.
The CPU- I ⁄ O enclosures must be duplexed, and all critical resources in the
enclosures must be duplexed.
A critical resource is a device (such as a CPU, hard disk, or host bus adapter) that
is necessary to maintain fault tolerance. Non-fault-tolerant resources (such as tape
drives) connected to the system do not affect the Active Upgrade process.
• Contain teamed embedded Ethernet PCI adapters.
All embedded Ethernet PCI adapters must be teamed with the Intel PROSet utility,
and each Ethernet team must contain at least one Ethernet PCI adapter from each
CPU- I ⁄ O enclosure. Furthermore, at least one team of embedded Ethernet PCI
adapters must have an active network link in each CPU- I ⁄ O enclosure.
2-2
Express5800/320Fc: Active Upgrade™ User’s Guide
System Prerequisites
All ports on any dual-port adapter must be either teamed or not teamed. You cannot
have only one port on an adapter teamed.
You do not need to team non-embedded Ethernet PCI adapters for the Active
Upgrade process, but it is best to do so to ensure that the network connectivity
provided by these adapters continues to be available throughout the upgrade
process. The readiness check in Active Upgrade console displays a warning for
each unteamed Ethernet PCI adapter, but the warnings do not prevent you from
proceeding with the upgrade process.
NOTE
If you modify the configuration of your Ethernet PCI
adapters and Ethernet teams to meet these prerequisites,
it could impact network connectivity for the system. You
should schedule this work to minimize impact to your
critical applications.
See the Express5800/320Fc: User Guide for more information about
configuring Ethernet PCI adapters and Ethernet teams.
• Contain Virtual Technician Modules (VTMs).
The VTMs provide the connection between the Production Side and Upgrade Side
during the Active Upgrade process. Both VTMs must be configured properly and
connected to the same subnetwork, preferably on a dedicated maintenance
network.
• Can tolerate running in simplex mode for a brief period during the upgrade.
Because each side of the system runs in simplex mode during the upgrade, an
interruption on the side that is actively running your critical applications can result
in downtime.
!
CAUTION
You cannot restart the operating system on the Production
Side during an upgrade (though you can restart the
Upgrade Side as many times as necessary.) Also, it is
unsafe to pull an enclosure from a split-mode, simplexed
system because doing so terminates all processes
running on that enclosure.
Preparing for the Active Upgrade Process
2-3
System Prerequisites
• Can tolerate a potential decrease in performance during the upgrade.
For example, if your system contains teamed network adapters that are configured
for load balancing or link aggregation, there might be a decrease in network
performance when the system is split because the network adapters on the
Upgrade Side lose access to the network.
• Are running Express5800/320Fc System Software Release 5.0 or higher.
• Have been updated with the latest firmware to support Active Upgrade technology,
including required BMC and VTM updates.
Furthermore, the Active Upgrade process has the following storage requirements:
• All internal hard disks must be configured with RDR and must be duplexed
(synchronized) before the upgrade process starts.
• The operating system boot volume and all active Windows operating system
components must be located on internal RDR disks. This includes any volumes
that contain paging (virtual memory) files for the operating system.
• Any disk that contains software you want to upgrade cannot contain persistent
data files for your business-critical applications (those applications that continue to
run during the upgrade process). You must store your data files on separate data
disks, either internal or external. (Data volumes that reside on the same physical
disk as a system or paging volume are also not supported.)
• External storage devices are always considered data disks. You cannot upgrade
software on external storage devices, as these devices not available to the
Upgrade Side of the system while the system is in split mode.
Also see “Recommendations” on page 2-5 for more information.
Related Topics
• Overview
• “Software Upgrade Support” on page 2-1
• “Recommendations” on page 2-5
• “Managing Critical Applications During the Upgrade Process” on page 2-6
• “Pre-Upgrade Tasks” on page 2-7
2-4
Express5800/320Fc: Active Upgrade™ User’s Guide
Recommendations
Recommendations
When preparing your system for the Active Upgrade process, also consider the
following recommendations:
• If possible, assign static IP addresses for embedded Ethernet teams and VTM
adapters.
• If your system is protected by Windows Firewall, enable the exceptions for Active
Upgrade console and Remote Desktop as shown in “Configuring Windows Firewall
for the Active Upgrade Process” on page 2-10.
If Windows Firewall is running, and these exceptions are not enabled,
communication between the Production Side and Upgrade Side might fail during
the upgrade process.
• If your system is protected by an uninterruptible power supply (UPS), ensure that
the CPU- I ⁄ O enclosure with A-side power (CPU enclosure 0, I/O enclosure 10) is
marked as the Primary enclosure in ESMPro before starting the upgrade process.
This configuration provides better protection for your system should power fail
during an upgrade. See “Configuring a UPS-Protected System for the Active
Upgrade Process” on page 2-11 for more information.
• Use caution when applying hotfixes from any source. Applying updates
indiscriminately may introduce serious problems to your system.
• You should install all Microsoft Security hotfixes (identified by the prefix MS).
• Do not install other types of hotfixes, such as Microsoft patches that fix a
particular problem, before obtaining validation from NEC Corporation of
America.
Please refer to NEC Corporation of America's support website for infromation
pertaining to the application of Microsoft Windows patches, hotfixes, and
service packs. http://support.necam.com/servers/ft
Preparing for the Active Upgrade Process
2-5
Managing Critical Applications During the Upgrade Process
Related Topics
• Overview
• “Software Upgrade Support” on page 2-1
• “System Prerequisites” on page 2-2
• “Managing Critical Applications During the Upgrade Process” on page 2-6
• “Pre-Upgrade Tasks” on page 2-7
Managing Critical Applications During the Upgrade Process
The Active Upgrade console allows you to specify how business-critical applications
are started and stopped during the Active Upgrade process.
If your system runs business-critical applications, such as Microsoft Exchange Server
or SQL Server, these applications can run on only one side of the system—the
Production Side—when you split the system. They must be stopped on the other side—
the Upgrade Side—to prevent resource conflicts and to allow you to proceed with
upgrade tasks. Furthermore, when you merge the system, the same applications must
be stopped on the Production Side and restarted on the Upgrade Side, so you can test
the applications with the newly-upgraded system disk, and possibly commit the
upgrade.
Typically, critical applications are started and stopped automatically by the operating
system. For example, your application might be configured to start as a service in the
Services Control Manager, or as a startup item in the system registry. But these
resources control your applications only when the operating system itself is started or
stopped. In most cases, to minimize downtime, the Active Upgrade console executes
upgrade operations, like split and merge, without restarting the operating system.
Therefore, if you want your applications to start and stop at the appropriate times during
the upgrade process, you must configure the Active Upgrade console itself to control
the applications
Active Upgrade console provides two methods for controlling your critical applications
during the upgrade process. The method you use for each application depends on the
type of application you want to control:
• Application services
2-6
Express5800/320Fc: Active Upgrade™ User’s Guide
Pre-Upgrade Tasks
If your application runs as a standard service that already accounts for
interdependencies (with other services) and requires no special handling, you can
specify it on the Application Services page of the Active Upgrade console during
the configuration process. On the Application Services page, you can select each
service you want to manage from the list of services on your system, and, when
you start the upgrade process, the Active Upgrade console automatically starts and
stops these services at the appropriate times. See “Selecting Application Services
to Control” on page 3-9 for more information.
• Custom actions
If you have a custom application or integrated applications from several different
software vendors, and you have special executable files that start and stop these
applications, you can specify the executable files on the Custom Actions page of
the Active Upgrade console during the configuration process. Using the controls on
the Custom Actions page, you can specify when your executable files will run
during the upgrade process, and, if you have several files, you can specify the order
in which they will run. See “Configuring Custom Actions” on page 3-12 for more
information.
Related Topics
• “Software Upgrade Support” on page 2-1
• “Selecting Application Services to Control” on page 3-9
• “Configuring Custom Actions” on page 3-12
Pre-Upgrade Tasks
To prepare for upgrading the system, do the following:
1. Ensure that your system meets the requirements and recommendations discussed
in “Software Upgrade Support” on page 2-1, “System Prerequisites” on page 2-2,
and “Recommendations” on page 2-5.
2. If necessary, plan for the brief downtime associated with restarting your critical
applications while merging the system.
3. Run backups of the system.
Preparing for the Active Upgrade Process
2-7
Pre-Upgrade Tasks
4. Verify the integrity of all RDR disks, as follows:
a. In the RDR Utility click Logical Disk Information.
b. Right-click an RDR virtual disk.
c. Select Verify RDR Virtual Disk. A message appears stating that the operation
completed successfully, meaning that the command has been executed.
d. Repeat for each RDR disk.
5. If necessary, upgrade the BMC and VTM firmware to support Active Upgrade
technology.
6. If necessary, create a user account for yourself in the local Administrators group on
the system.
To install and run the Active Upgrade console, your user account must be in the
Administrators group. Furthermore, because the Upgrade Side of the system has
no access to the network while the system is in split mode, your administrator
account must be a local system account, not a domain account.
7. Install Java Runtime Environment as described in “Installing Java Runtime
Environment” on page 2-13
.
8. Install the Active Upgrade console as described in “Installing the Active Upgrade
Software” on page 2-9.
9. If necessary, enable access for Remote Desktop connections from the Production
Side to the Upgrade Side of the system while the system is in split mode, as follows:
a. Open the System control panel.
b. Click the Remote tab to display remote settings.
c. Under Remote Desktop, click the check box next to Allow users to remotely
connect to this computer to activate it.
d. Click OK or Apply to save the setting.
(You need to use either Remote Desktop or Remote KVM to connect to the
Upgrade Side to perform upgrade tasks. For more information, see “Connecting to
the Desktop on the Upgrade Side” on page 4-6.)
10. If applicable, enable the exceptions for Active Upgrade console and Remote
Desktop in Windows Firewall properties, as shown in “Configuring Windows
Firewall for the Active Upgrade Process” on page 2-10.
11. If applicable, ensure that the CPU- I ⁄ O enclosure with A-side, UPS-protected
power (CPU enclosure 0, I/O enclosure 10) is the primary, active enclosure, as
shown in “Configuring a UPS-Protected System for the Active Upgrade Process”
on page 2-11.
12. Gather information about your system using the worksheet in “Gathering
Information” on page 2-15.
13. If necessary, copy any required software installation packages to the system, as
described in “Copying Software Installation Packages to the System” on page 2-18.
2-8
Express5800/320Fc: Active Upgrade™ User’s Guide
Pre-Upgrade Tasks
When you are finished preparing for the upgrade, start the Active Upgrade console.
Follow the on-screen instructions (and this document) to configure the process, then
run a Readiness Check to verify if your system is ready to upgrade.
Related Topics
• “Installing the Active Upgrade Software”
• “Software Upgrade Support” on page 2-1
• “System Prerequisites” on page 2-2
• “Recommendations” on page 2-5
Installing the Active Upgrade Software
NOTE
Your login account must be in the Administrator group to
install the Active Upgrade console.
To install the Active Upgrade console
1. Insert the Active Upgrade Software CD-ROM into one of the CD/DVD drives. If the
installation process does not start automatically, do the following:
a. Open My Computer.
b. Right-click the appropriate CD/DVD icon, and click Explore in the shortcut
menu.
c. In the CD/DVD file listing, double-click install.exe to start the installation utility.
The Active Upgrade Setup Wizard is displayed.
2. Click Next to view the end-user license agreement.
3. If you agree to the terms of the license, click the radio button for I accept... and click
Next.
4. Click Install to install the files.
5. Click Finish to close the wizard.
The setup process installs the Active Upgrade console and associated files in
C:\Program Files\Stratus\ActiveUpgrade. It also creates Start menu items under ftSY
and a shortcut on your desktop for the Active Upgrade console.
Related Topics
• “Pre-Upgrade Tasks” on page 2-7
• Configuring the Active Upgrade Process
Preparing for the Active Upgrade Process
2-9
Pre-Upgrade Tasks
Configuring Windows Firewall for the Active Upgrade Process
The Active Upgrade console requires network access to:
• Communicate with system components and underlying services in the ftServer
System Software.
• Allow communication between the Production Side and the Upgrade Side while the
system is split, so you can perform upgrade tasks.
If you have enabled Windows Firewall to protect your system, it might prevent you from
using some of the features of Active Upgrade console; therefore, you should enable the
exception for the Active Upgrade console in your Windows Firewall settings.
NOTES
1. Install the Active Upgrade software before modifying
your Windows Firewall settings. If Windows Firewall is
enabled on your system, the installation process adds
an entry for the Active Upgrade console to the list of
Windows Firewall exceptions. This entry is disabled
by default.
2. If you enable Windows Firewall after installing the
Active Upgrade software, you can reinstall the Active
Upgrade software to add the exception to Windows
Firewall.
To configure Windows Firewall
1. Open the Windows Firewall control panel.
2. Click the Exceptions tab to display the list of exceptions (Figure 2-1).
3. Click the check box next to Active Upgrade Software to activate it.
4. Click the check box next to Remote Desktop to activate it. (This allows you to
connect to the Upgrade Side with Remote Desktop while the system is in split
mode. See “Connecting to the Desktop on the Upgrade Side” on page 4-6 for more
information.)
5. Click OK to enable this exception and close the control panel.
2-10
Express5800/320Ma: Active Upgrade™ User’s Guide
Pre-Upgrade Tasks
Figure 2-1. Windows Firewall Exceptions
Related Topics
• “Pre-Upgrade Tasks” on page 2-7
• Configuring the Active Upgrade Process
Configuring a UPS-Protected System for the Active Upgrade Process
If your system is protected by a UPS, and you have configured the UPS power
connections as specified in the Express5800/320Fc: Site Planning Guide, it is best to
ensure that the CPU- I ⁄ O enclosure with A-side, UPS-protected power (CPU
enclosure 0, I/O enclosure 10) are Primary before starting the Active Upgrade
process.
When you initiate the upgrade process and split the system, the primary (active)
CPU- I ⁄ O enclosure becomes the Production Side of the system. Because the
Production Side controls the upgrade session for most of the Active Upgrade process,
and also contains the most current version of your data disks during the upgrade
process, allowing the Production Side to run on UPS power provides better protection
for your system should power fail during an upgrade.
Preparing for the Active Upgrade Process
2-11
Pre-Upgrade Tasks
To set the enclosure with A-side power as primary.
1
2.
3.
4.
5.
6.
7.
8.
9.
10.
11.
12.
13.
14.
15.
16.
17.
18.
19.
20.
21.
22.
23.
24.
Open the ft Server utility.
Expand FTServer
Expand CPU Module
Expand CPU Module (ID:1)
Under BringUp/BringDown, click the Down button.
Click Ok in the Confirmation box.
Click Ok in the Information box.
Skip steps 9-13 if the Power Switch is illuminated on the CPU/IO module 0.
Expand PCI Module.
Expand PCI Module (ID:1).
Under BringUp/BringDown, click the Down button.
Click Ok in the Confirmation box.
Click Ok in the Information box.
Expand PCI Module (ID:1).
Verify that the current status is removed.
Under BringUp/BringDown, click the Down button.
Click Ok in the Confirmation box.
Click Ok in the Information box.
Skip steps 20-24 if the Power Switch is illuminated on the CPU/IO module 0.
Expand PCI Module (ID:11).
Verify that the current status is removed.
Under BringUp/BringDown, click the Down button.
Click Ok in the Confirmation box.
Click Ok in the Information box.
NOTE
After this procedure, you might need to wait 5-10 minutes
for the system components to stabilize and return to full
duplex mode before running a readiness check.
Related Topics
• “Pre-Upgrade Tasks” on page 2-7
• Configuring the Active Upgrade Process
2-12
Express5800/320Fc: Active Upgrade™ User’s Guide
Pre-Upgrade Tasks
Installing Java Runtime Environment
Java Runtime Environment is necessary for running Active Upgrade.
Install the following Java Runtime Environment:
Sun Microsystems Java™ Runtime Environment Version 5.0
Update 8 (1.5.0_08) or later
Configuring IP address in Virtual Technician Module (VTM)
IP addresses must be configuredin VTM to run Active Upgrade.
Configure IP addresses in VTM as described in this section.
IMPORTANT
The following IP addresses must be configured in VTM.
192.168.1.1
192.168.1.2
192.168.1.3
192.168.1.4
192.168.1.5
If the address specified in the network adapter and VTM is the same, the active
Upgrade process does not run properly. If the IP addresses above are the same as
the ones in the network adapter, be sure to change the IP addresses specified in
VTM by performint the following “Changing VTM IP Address Information” before
performing the procedure described in “Configuring IP Address in VTM.”
Changing VTM IP address
Log on as an administrator or member of Administrators group, and change the IP
addresses specified in VTM using the following procedures.
1. Open C:\Program Files|ftsys|VTM in Windows Explorer, and open the
VTMNETConfig.vbs file by clicking Edit after right-clicking the
VTMNetConfig.vbs file.
Preparing for the Active Upgrade Process
2-13
Pre-Upgrade Tasks
==============================================
Network Setting
==============================================
Const DefaultGateway
= “192.168.1.1”
Const VTMOIpAddress
= “192.168.1.2”
Const VTM1IpAddress
= “192.168.1.3”
Const Host0IpAddress
= “192.168.1.4”
Const Host1IpAddress
= “192.168.1.5”
Const SubNetMask
= “255.255.255.0”
Const DnsServerIpAddress = “0.0.0.0”
Const DhcpEnabled
= false
a
b
c
d
e
(1) Figuring default gateway (a)
To change the setting of the default gateway, edit the IP address
information in (a).
(2) Configuring the network for Remote KVM Connection (b,c)
The IP address in (b) and (c) is used to access the Upgrade Side from the
Production Side using “Remote KVM” when the system is in split mode.
Specify one IP address for each module. Edit the IP address information.
(3) Configuring the network for Remote Desktop Connection (d,e)
The IP address in (d) and (e) is used to access the Upgrade Side from the
Production Side using “Remote Desktop Connection” when the system is in
split mode. Specify one IP address for each module. Edit the IP address
information.
3. Save the information edited in step 2.
Configuring the VTM IP address
Log on as an administrator or member of Administrators group, and change the IP
addresses specified in VTM using the following procedure.
1. Start Command Prompt by clicking Start, All Programs, Accessories and
Command Prompt.
2. Run the following command in Command Prompt.
> CScript//nologo “C:\Program Files\ftsys\VTM\UTMNetConfig.vbs”
After running the command above, make sure that “Finished!” is displayed
in Command Prompt before proceeding.
2-14 Express5800/320Fc: Active Upgrade™ User’s Guide
Pre-Upgrade Tasks
Gathering Information
Before you start configuring the Active Upgrade process on your system, considering
the following questions:
❏ After you complete this upgrade, will you ever want to run the same type of upgrade
again? If so, plan to create a configuration file with the details of your upgrade, so
you can use it again at a later date.
❏ Did your support provider give you a configuration file that you could use as a
template for your specific system and the type of upgrade you are performing? Or,
do you have settings from other existing configuration files that you want to
incorporate into your current configuration? (If applicable, you might be able to use
more than one configuration file at a time by nesting them).
❏ Which disks in your system contain the software you want to upgrade? Which disks
cannot or should not be upgraded given the prerequisites of the Active Upgrade
process? You need to select these disks before splitting the system.
❏ Which software installation utilities are you going to run during the Active Upgrade
process? (If you are copying these to the system from a network resource, you
need to do so before initiating split mode.) Do any of these installation programs
require access to the network or data disks during the upgrade? (If so, you cannot
use them with Active Upgrade technology.)
❏ How do you start and stop critical applications on the system you want to upgrade?
Are the applications configured as services in the Services snap-in to Microsoft
Management Console? Or do you need to run custom actions (executable files
such as .bat, .vbs, .exe) to start your applications, possibly in a particular order?
You need to identify these services and custom actions during configuration to
allow the Active Upgrade console to start and stop your applications at the
appropriate times during the upgrade process. See “Managing Critical Applications
During the Upgrade Process” on page 2-6 for more information.
❏ Do you want to preserve Event Viewer log entries that are generated on the
Production Side while the system is running in split mode? These log entries are
typically lost during the commit process, when the system resynchronizes your
RDR disks. If you want to save the files, you can configure the Active Upgrade
console to copy them to a backup directory before it commits the upgrade. You can
save the standard log files as well as any custom log files you have opened in the
Event Viewer.
When you finish answering these questions, you can use the worksheet in Table 2-1 to
record your configuration information.
Preparing for the Active Upgrade Process
2-15
Pre-Upgrade Tasks
Table 2-1. Active Upgrade Process Worksheet
Item
Value
Configuration files to use
_______________________________________
_______________________________________
_______________________________________
Disks to upgrade
_______________________________________
_______________________________________
_______________________________________
Disks that cannot be upgraded
_______________________________________
_______________________________________
_______________________________________
Software installation utilities to run
_______________________________________
_______________________________________
_______________________________________
_______________________________________
Application services to start/stop
_______________________________________
_______________________________________
_______________________________________
_______________________________________
2-16
Express5800/320Fc: Active Upgrade™ User’s Guide
Pre-Upgrade Tasks
Table 2-1. Active Upgrade Process Worksheet (Continued)
Item
Value
Custom actions to run
_______________________________________
_______________________________________
_______________________________________
_______________________________________
Log files to back up
_______________________________________
_______________________________________
_______________________________________
_______________________________________
Related Topics
• “Pre-Upgrade Tasks” on page 2-7
• “Software Upgrade Support” on page 2-1
• “System Prerequisites” on page 2-2
• “Recommendations” on page 2-5
• “Managing Critical Applications During the Upgrade Process” on page 2-6
• Configuring the Active Upgrade Process
Preparing for the Active Upgrade Process
2-17
Pre-Upgrade Tasks
Copying Software Installation Packages to the System
When the system runs in split mode, the Upgrade Side has no access to the network,
or internal data disks; therefore, if you need to download or copy any High Priority
updates (hotfixes), installation packages, or disk images (for example, .msi files) to the
system, put them on one of the disks you want to upgrade before you split the system.
You might want to do so even before you run the Active Upgrade console.
Make note of the location of the installation packages so you can find them later.
NOTE
If your installation packages are on CD-ROM, no action is
necessary. You can access the CD/DVD drive on the
Upgrade Side while the system is in split mode.
For more information about downloading updates with the Microsoft Windows
Automatic Updates utility, see “Configuring Windows Automatic Updates”.
Related Topics
• “Configuring Windows Automatic Updates”
• “Pre-Upgrade Tasks” on page 2-7
• Configuring the Active Upgrade Process
Configuring Windows Automatic Updates
When the system runs in split mode, the Upgrade Side has no access to the network.
Windows Automatic Updates requires network access to download software updates;
therefore, if you manage High-Priority updates (hotfixes) with Automatic Updates, you
must use it to download all of the updates you need to the system before you split the
system.
You can optionally configure Automatic Updates to automatically download the
software updates for you; however, you must be able to install the updates on your own
schedule, while the system is split.
To configure Automatic Updates
1. Open the Automatic Updates control panel (Figure 2-2).
2. Select Download updates for me, but let me choose when to install them.
3. Click OK to save the configuration.
2-18
Express5800/320Fc: Active Upgrade™ User’s Guide
Pre-Upgrade Tasks
Figure 2-2. Automatic Updates Control Panel
If your company pushes software updates from an enterprise-wide service, like
Windows Server Update Services (WSUS), you might need to override the default
Automatic Update policies for your system.
Typically, WSUS clients are set to install all critical updates at a time specified by the
WSUS administrator. The Automatic Update control panel on the client system can be
locked to enforce this policy. If the control panel on your system is locked, you must
ask the WSUS administrator for permission to modify your update policies.
After you configure Automatic Updates, the utility starts downloading updates in the
background. When it displays an icon indicating that updates are ready to install, you
can click the icon (Figure 2-3) to see the list of updates that have been downloaded.
Preparing for the Active Upgrade Process
2-19
Pre-Upgrade Tasks
Figure 2-3. Automatic Updates Icon in System Tray
To verify the list of updates
1. Click the Automatic Updates icon to display the Automatic Updates dialog box.
2. Select Custom Install (Advanced) and click Next. The next page displays the list
of the updates you downloaded.
3. Check the list of updates against the list of updates that have been evaluated by
NEC Corporation of America for compatibility. Make note of the updates you can
install during the Active Upgrade process.
4. Click Cancel to exit the Automatic Updates utility. Do not select or install updates
at this time.
NOTE
You should plan to install all security-related hotfixes, but
do not install other types of hotfixes, such as Microsoft
QFE patches that fix a particular problem, before
obtaining validation from NEC Corporation of America
See “Recommendations” on page 2-5 and
http://www.necam.com/support/servers/ft/hotfixes.htm
for more information.
After you have verified and recorded the list of updates you need to install, you are
ready to run the Active Upgrade console. To install your updates, click the Automatic
Updates icon in the system tray on the Upgrade Side after you have split the
system. See “Running Software Installation Programs” on page 4-10 for more
information.
Related Topics
• “Copying Software Installation Packages to the System” on page 2-16
• “Pre-Upgrade Tasks” on page 2-7
• Configuring the Active Upgrade Process
2-20
Express5800/320Fc: Active Upgrade™ User’s Guide
Starting and Exiting the Active Upgrade Console
Starting and Exiting the Active Upgrade Console
NOTES
1. Your login account must be in the local Administrators
group to run the Active Upgrade console. You cannot
use a domain account.
2. The Active Upgrade console is not supported over
remote connections.
To start the Active Upgrade console, do one of the following:
• Double-click the Active Upgrade console icon on your system’s
desktop.
• On the Start menu, click All Programs, select the ftSYS folder, and
click Active Upgrade.
To exit the Active Upgrade console, click the close button (
corner of the window.
) in the upper right-hand
NOTES
1. If you are currently editing a configuration file, save
the file before exiting the Active Upgrade console.
2. If you exit the Active Upgrade console by mistake
during an upgrade task, the program maintains its
state. For example, if you exit the Active Upgrade
console while you are in the process of splitting the
system, the split process continues to run in the
background. You can safely restart the Active
Upgrade console to continue where you left off.
Related Topics
• “Understanding the Active Upgrade Console Interface”
• “Pre-Upgrade Tasks”
• Configuring the Active Upgrade Process
Preparing for the Active Upgrade Process
2-21
Understanding the Active Upgrade Console Interface
Understanding the Active Upgrade Console Interface
The Active Upgrade console window (Figure 2-4) is divided into four major parts: a title
bar, a navigation bar, a main window, and a status bar.
Figure 2-4. Active Upgrade console
1
Title bar
2
Navigation bar
3
Main window
4
Status bar
Related Topics
• “Starting and Exiting the Active Upgrade Console”
• “Pre-Upgrade Tasks”
• Configuring the Active Upgrade Process
Title Bar
The title bar displays the name of the current page of the Active Upgrade console.
2-22
Express5800/320Fc: Active Upgrade™ User’s Guide
Understanding the Active Upgrade Console Interface
The title bar also contains a Help button (
), which you can click to display the Help
topic associated with the current page of the Active Upgrade console.
(You can also access the Help from the Production Side or Upgrade Side by clicking
Start, All Programs, ft, ftUpgrade.chm to open the Help viewer.)
Related Topics
• “Starting and Exiting the Active Upgrade Console”
• “Understanding the Active Upgrade Console Interface”
• “Pre-Upgrade Tasks”
• Configuring the Active Upgrade Process
Navigation Bar
The navigation bar displays your current location in the Active Upgrade console, and,
in some cases, allows you to control the Active Upgrade process. The navigation bar
is divided into three sections:
• Configuration
• Active Upgrade
• Links
The Configuration section of the navigation bar (Figure 2-5) displays entries specific
to configuring your system for the upgrade process.
Figure 2-5. Navigation Bar: Configuration
Preparing for the Active Upgrade Process
2-23
Understanding the Active Upgrade Console Interface
If you are creating or editing a configuration file, you can click any entry in the
Configuration section to skip directly to the associated configuration page. These
pages have the following purposes:
Configuration — Allows you to create or select a configuration file to modify, or to
start the upgrade process with no configuration file. (When you start the Active
Upgrade console, it opens on this page.)
• Disk Selection — Allows you to select the disks that contain the software you
want to upgrade.
• Other Configurations — Allows you to select other configuration files to
incorporate into the current configuration.
• Application Services — Allows you to select the application services that
need to be stopped and restarted during the upgrade process.
• Log File Backup — Allows you to select the event log (.evt) files from the
Production Side that the Active Upgrade console preserves upon merging the
system. (Otherwise, any event messages generated on the Production Side
while the system is in split mode are lost when you commit the upgrade).
• Custom Actions — Allows you to specify executable files that the Active
Upgrade console can use to stop and start your applications (or to perform
special tasks) during the upgrade process.
• Description — Allows you to specify a title and comments for the current
configuration file.
• Upgrade Summary — Displays a summary of the current upgrade
configuration, and allows you to save the current configuration file.
The Active Upgrade section of the navigation bar (Figure 2-6) contains entries specific
to the executing the upgrade process.
Figure 2-6. Navigation Bar: Active Upgrade
2-24
Express5800/320Fc: Active Upgrade™ User’s Guide
Understanding the Active Upgrade Console Interface
You can click Active Upgrade to perform a readiness check, and, if you are still
modifying a configuration file, you can click any page in the Configuration section to
go back and make additional changes.
After you initiate an upgrade session (by clicking Split on the Active Upgrade page),
the navigation bar reverts to a static mode, in which it only indicates where you are in
the upgrade process and does not allow you to skip between pages. At that point, you
use the controls in the main window to complete the upgrade process.
The pages in the Active Upgrade section of the navigation bar have the following
purposes:
Active Upgrade — Allows you to perform a readiness test, and if applicable, to
split the system for an upgrade.
• Split System — Indicates that the system is entering split mode, and allows
you to merge system resources (or abort the upgrade) after you finish running
installation packages.
• Merge System — Indicates that the system is entering merge mode, and
allows you to commit (or abort) the upgrade after you have tested your
changes.
• Commit Upgrade — Indicates that the system is committing the upgrade, and
allows you to finish the process by cleaning up system resources.
• Abort Upgrade — Indicates that the upgrade process has been aborted, and
allows you to finish the process by cleaning up system resources. (You can
abort the upgrade process at any point prior to committing the upgrade.)
• Finish — Indicates that the upgrade process is complete and allows you to
save a copy of the activity log to a file, start another upgrade, or exit the Active
Upgrade console.
The navigation bar also contains the Links shown in Figure 2-7, which are active only
while the system is running in split mode.
Figure 2-7. Navigation Bar: Links
Preparing for the Active Upgrade Process
2-25
Understanding the Active Upgrade Console Interface
These links have the following purposes:
• Remote KVM — Allows you to establish an Advanced Video Redirection session
to the Upgrade Side while the system is split to perform upgrade tasks.
• Remote Desktop — Allows you to establish a Remote Desktop Connection
session to the Upgrade Side while the system is split to perform upgrade tasks.
(For more information about any of these navigation bar entries, click the name of the
entry in this Help topic.)
Related Topics
• “Starting and Exiting the Active Upgrade Console”
• “Understanding the Active Upgrade Console Interface”
• “Pre-Upgrade Tasks”
• Configuring the Active Upgrade Process
Main Window
The main window contains controls associated with the configuration and execution of
the Active Upgrade process.
During the configuration phase, the main window allows you to specify settings for your
system (Figure 2-8), which you can save to a configuration file.
Figure 2-8. Main Window: Configuring the Active Upgrade Process
2-26
Express5800/320Fc: Active Upgrade™ User’s Guide
Understanding the Active Upgrade Console Interface
When you perform a readiness test and begin the upgrade process, the configuration
settings in the main window are replaced with an activity log (Figure 2-9) that allows
you to track the progress and success of the upgrade process.
Figure 2-9. Main Window: Activity Log
For more information about viewing and interpreting items in the activity log, see
“Viewing Active Upgrade Process Status” on page 4-21.
Related Topics
• “Starting and Exiting the Active Upgrade Console”
• “Understanding the Active Upgrade Console Interface”
• “Pre-Upgrade Tasks”
• Configuring the Active Upgrade Process
Status Bar
The status bar (Figure 2-10), which is located at the bottom of the Active Upgrade
console window, reports a quick summary of the status of the upgrade.
Preparing for the Active Upgrade Process
2-27
Understanding the Active Upgrade Console Interface
Figure 2-10. Status Bar
1
Configuration file name
4
Operational State
2
Hardware State
5
Partner State
3
Upgrade State
For more information about interpreting items in the status bar, see “Viewing Active
Upgrade Process Status” on page 4-21.
Related Topics
• “Starting and Exiting the Active Upgrade Console”
• “Understanding the Active Upgrade Console Interface”
• “Pre-Upgrade Tasks”
• Configuring the Active Upgrade Process
2-28
Express5800/320Fc: Active Upgrade™ User’s Guide
Chapter 3
Configuring the Active Upgrade
Process
3-
Configuring the Active Upgrade process involves the following tasks:
• Creating and managing configuration files
• Selecting disks to upgrade
• Selecting other configuration files to include
• Selecting application services to control
• Selecting event log files to back up
• Configuring custom actions
• Providing a description for a configuration file
• Displaying the upgrade summary
Creating and Managing Configuration Files
Configuration files allow you to save upgrade configurations that you can use
immediately or in the future.
If you frequently perform upgrades to your system, you can create a configuration file
to preserve your settings so you can perform similar upgrades as often as necessary.
If applicable, you can create multiple configuration files, each with different system
settings, to prepare the system for a particular type of system or application software
upgrade.
In addition, you can call one or more existing configuration files from the configuration
file you are currently editing, so that the settings from the called files will also apply to
the file you are editing. This is called nesting.
The default location for Active Upgrade configuration files is
\Program Files\ftsys\ActiveUpgrade\User Configurations, but you can save a
configuration file in any directory. If you specify a different directory when saving or
opening files, the Active Upgrade console uses the same user-specified directory (on
a per-user basis) the next time you open the file browser.
Configuring the Active Upgrade Process
3-1
Creating and Managing Configuration Files
NOTE
You can save a configuration file to any disk — system or
data, internal or external. The Active Upgrade console
automatically copies configuration files to a staging area
before beginning the upgrade to ensure that they are
available throughout the upgrade process.
Related Topics
• “Creating a Configuration File”
• “Loading a Configuration File” on page 3-3
• “Editing an Existing Configuration File” on page 3-4
• “Performing an Upgrade with No Configuration File” on page 3-4
• “Saving a Configuration File” on page 3-5
• “Selecting Other Configurations to Include” on page 3-7
• “Providing a Description for a Configuration File” on page 3-19
Creating a Configuration File
Creating a configuration file allows you to generate a configuration file that you can
save and use immediately or at a later time.
To create a configuration file
1. On the Configuration page, click Create Configuration File.
2. In the Create Configuration File dialog box, specify a file name for the new file.
(When you save the file, a .Config extension is automatically appended to the file
name.)
3. Next to Save in, select the directory in which to save the configuration file.
You can specify any directory on the system. The default location is
\Program Files\ftsys\ActiveUpgrade\User Configurations; however, if you
choose a new configuration directory, the Active Upgrade console uses the new
directory the next time you create or open a file.
4. Click Save to start editing the configuration.
After you create a configuration file, the configuration process opens on the Disk
Selection page.
3-2
Express5800/320Fc: Active Upgrade™ User’s Guide
Creating and Managing Configuration Files
Related Topics
• “Creating and Managing Configuration Files” on page 3-1
• “Saving a Configuration File” on page 3-5
• “Providing a Description for a Configuration File” on page 3-19
• “Selecting Disks to Upgrade” on page 3-5
Loading a Configuration File
Loading a configuration file allows you to open an existing configuration file for use.
After you load a configuration file, you can view the Upgrade Summary, and, if
applicable, proceed with the upgrade as configured, but you cannot modify the
configuration.
NOTE
To modify a configuration file, use the Edit Configuration
File option.
To load a configuration file
1. On the Configuration page, click Load Configuration File.
2. Do one of the following to select the configuration file:
• In the Locate Configuration File dialog box, type the full path name and file
name for the configuration file next to Configuration File. (You must include
the .Config file extension.)
• Click Browse to locate the file using a file browser. (The browser displays only
files with the .Config extension.) Click the file in the file browser, then click
Open to select the file.
3. In the Locate Configuration File dialog box, click Load to open the configuration
file.
(You can also drag a configuration file onto the Configuration page of the Active
Upgrade console window to load it.)
When you load a configuration file, the file opens on the Upgrade Summary page.
Related Topics
• “Creating and Managing Configuration Files” on page 3-1
• “Displaying the Upgrade Summary” on page 3-19
• Performing the Upgrade
Configuring the Active Upgrade Process
3-3
Creating and Managing Configuration Files
Editing an Existing Configuration File
Editing a configuration file allows you to open and edit a configuration file that you have
previously saved. After you edit the configuration file, you can view the Upgrade
Summary, and, if applicable, proceed with the upgrade as configured.
To edit a configuration file
1. On the Configuration page, click Edit Configuration File.
2. Do one of the following to open the file:
• In the Locate Configuration File dialog box, type the full path name and file
name for the configuration file next to Configuration File.
• Click Browse to locate the file using a file browser. (The browser displays only
files with the .Config extension.) Click the file in the file browser, then click
Open to select the file.
3. In the Locate Configuration File dialog box, click Load to open the configuration
file.
When you edit a configuration file, the file opens on the Disk Selection page.
Related Topics
• “Creating and Managing Configuration Files” on page 3-1
• “Saving a Configuration File” on page 3-5
• “Selecting Disks to Upgrade” on page 3-5
• “Displaying the Upgrade Summary” on page 3-19
Performing an Upgrade with No Configuration File
If the upgrade you want to perform does not require any special settings, you can
proceed without a configuration file.
For example, if you have only one system disk, and you just want to split the system
briefly to test how a hotfix would affect the operating system without committing the
changes, you might not need a configuration file.
To proceed without a configuration file, click No Configuration File on the
Configuration page. The Active Upgrade console immediately displays the Active
Upgrade page and runs a readiness check. If your system meets the prerequisites for
the Active Upgrade process, you can split the system at this time.
3-4
Express5800/320Fc: Active Upgrade™ User’s Guide
Selecting Disks to Upgrade
Related Topics
• “Creating and Managing Configuration Files” on page 3-1
• Performing the Upgrade
Saving a Configuration File
The Active Upgrade console automatically prompts you to save your configuration file
if you leave the Configuration section of the application, or exit the application. (To save
the configuration file, click Yes, otherwise click No or Cancel.)
You can also optionally click Save or Save As on the Upgrade Summary page, as
described in the following procedure.
To save the current configuration file
1. Click Upgrade Summary in the navigation bar.
2. On the Upgrade Summary page, do one of the following:
• Click Save to save the configuration file with the file name and path name you
previously specified. Your file is saved.
• Click Save As to save the configuration file with a new file name or path name.
Continue with step 3.
3. In the Save Configuration File dialog box, specify a name for the new file. (When
you save the file, a .Config extension is automatically appended to the file name.)
4. Next to Save in, select the directory in which to save the configuration file.
5. Click Save to save the file. Your file is saved.
Related Topics
• “Creating and Managing Configuration Files” on page 3-1
• “Displaying the Upgrade Summary” on page 3-19
Selecting Disks to Upgrade
Use the Disk Selection page to select the disks that contain the software you want to
upgrade with the Active Upgrade process. By marking these disks in your upgrade
configuration, you ensure that they will be available to the Upgrade Side of the system
when the system is in split mode.
When you open the Disk Selection page, the Active Upgrade console scans for and
displays the disks in your system. Only internal disks mirrored with RDR are
displayed, because these are the only disks that can be configured.
Configuring the Active Upgrade Process
3-5
Selecting Disks to Upgrade
You can mark each disk as a system disk or a data disk:
• System disk
A disk that contains the system or application software you want to upgrade. Only
disks marked as System are available to the Upgrade Side while the system is
split.
The Active Upgrade console automatically marks some disks as system disks.
These mandatory system disks contain either boot files or paging files (virtual
memory files) that are currently in use by the running operating system. (For more
details, see the mandatory system disk glossary entry.) You cannot change a
mandatory system disk to a data disk.
!
CAUTION
You cannot use a system disk for storing persistent data
(for example, database files) related to your critical
applications. Any new data written to the original system
disk by the Production Side while the system is in split
mode is overwritten when you commit the upgrade. (See
the Overview for information about the steps of the Active
Upgrade process.)
• Data disk
A disk that contains persistent data for your critical applications. Any disk marked
as Data is available only to the Production Side while the system is split. You
cannot upgrade software on a data disk.
(See the prerequisites for the Active Upgrade process for additional restrictions.)
Volumes on the Disk Selection page are color-coded as described in Table 3-1.
Table 3-1. Hard Disk Color Coding
3-6
Color
Description
Black
Unassigned disk space
Blue
Data disk
Light Green
System disk
Dark Green
Mandatory system disk
Red
Disk is currently simplexed because it is being resynchronized with
RDR
Express5800/320Fc: Active Upgrade™ User’s Guide
Selecting Other Configurations to Include
For more information about any volume, move your cursor over the volume to display
ToolTip help.
To select system and data disks
• For any disk you want to mark as a system disk, click System. (This automatically
marks any volume that the disk contains as a System volume.)
• For any disk you want to mark as a data disk, click Data.
NOTE
Volumes can span multiple physical disks, and physical
disks can contain multiple volumes. If a volume spans two
or more disks, and you mark one of the disks that contains
that volume as a system disk, any disk that contains a part
of that volume automatically becomes a system disk.
When you are finished selecting disks, you can click Next to proceed with the next
configuration step.
Related Topics
• “System Prerequisites” on page 2-2
• “Displaying the Upgrade Summary” on page 3-19
Selecting Other Configurations to Include
Use the Other Configurations page to optionally call one or more existing
configuration files into the configuration file you are currently editing, so that the
settings from the called files will also apply to the file you are editing. This is known as
nesting files, or creating nested files.
The configuration files that you call into the current configuration file are child
configurations, and the file from which you call the child configurations is the parent
configuration.
Configuring the Active Upgrade Process
3-7
Selecting Other Configurations to Include
Potential uses for nested files include:
• Your support provider creates a configuration file that you can call into an existing
configuration file for your system.
• You create separate configuration files, each for upgrading a different application,
which you can enable or disable at will in your parent configuration.
• You create a configuration file for an application that runs on several of your
systems and call that file into a parent configuration file that is specific to each
system.
The following restrictions apply to nested files:
• Child configuration files must be located in the same directory as the files in which
they are called. When you select configuration files in the Active Upgrade console,
only files in the present working directory are displayed.
• If you call a configuration file, and that file itself has one or more child configuration
files, those child configuration files also become part of your configuration.
• If a setting in a child configuration conflicts with a setting in the parent configuration,
the Active Upgrade console uses the setting in the parent configuration. Also, the
parent configuration always ignores disk selections from child configurations.
• If you call a configuration that you created on a different system, configuration
items (for example, application services and custom actions) must be present and
applicable on the current system, otherwise the parent configuration fails the
readiness check.
To call a child configuration file into the current file
1. On the Other Configurations page, select the check box next to the configuration
files you want to call into the current file.
2. In the file window, verify that you have selected the correct configuration files. Also,
if any of the files contain additional child configurations, ensure that you are
including only the configurations that apply to the current parent file.
3. When you are finished editing the current configuration, save the configuration file.
To remove a child configuration file from the current configuration, clear the check box
next to that configuration file. (If you need to remove a child configuration from another
configuration file, you must edit that configuration file separately.)
When you have finished specifying child configuration files, you can click Next to
proceed with the next configuration step.
3-8
Express5800/320Fc: Active Upgrade™ User’s Guide
Selecting Application Services to Control
Related Topics
• “Creating and Managing Configuration Files” on page 3-1
• “Saving a Configuration File” on page 3-5
• “Displaying the Upgrade Summary” on page 3-19
Selecting Application Services to Control
Use the Application Services page to select the critical application services you want
the Active Upgrade console to automatically stop and restart during the upgrade
process.
If you select a service on the Application Services page, the Active Upgrade console
controls the service as follows:
• When the system is split, the console saves the current Startup Type for the
service, changes the Startup Type to Disabled on the Upgrade Side, and then
stops the service on the Upgrade Side.
• When the system is merged, the console stops the service on the Production Side,
restores the previous Startup Type for the service on the Upgrade Side, and starts
the service on the Upgrade Side. This ensures continuous availability of the
service, allows for comprehensive testing on the Upgrade Side, and prevents any
conflicts associated with two instances of a service running at the same time.
• When an upgrade is aborted, if the system is in merge mode, the console shuts
down the Upgrade Side (which automatically stops the service) and restarts the
Production Side (which automatically starts the service based on its default
Startup Type). This returns the system to its previous, fault-tolerant state.
NOTES
1. Standard operating system services do not require
control during the Active Upgrade process. Select
only services that pertain to your critical applications
(for example, Exchange, SQL, and IIS).
2. The Active Upgrade console never changes the
default Startup Type for a service on the Production
Side. Maintaining the default Startup Type on the
Production Side ensures that a service is always able
to restart on the Production Side if the upgrade
process is aborted or fails.
Configuring the Active Upgrade Process
3-9
Selecting Event Log Files to Back Up
Each service on the Application Services page has a three-state check box, as
described in Table 3-2.
Table 3-2. Selection of Application Services
Check Box
State
Description
Cleared
Not selected.
Checked
Selected in the current configuration file.
Checked
(Gray)
Selected in a child configuration file. If applicable, you can click the
check box to explicitly select the service in the current configuration
file, but you cannot deselect it without editing the child configuration.
To select a service for the Active Upgrade console to control
1. On the Application Services page, find a service you want to stop and start.
2. Click the check box to the left of the service name.
3. Repeat these steps for each service you want to stop and restart.
To deselect a service, clear the check box to the left of the service name.
(By default, the services on the Application Services page are listed alphabetically. If
you prefer to sort them by other criteria, click one of the column headings. For example,
if you want to group services by those you have selected and not selected, click the
heading above the check boxes.)
When you have finished selecting services to control, or if you have no services to
control, you can click Next to proceed with the next configuration step.
Related Topics
• “Configuring Custom Actions” on page 3-12
• “Managing Critical Applications During the Upgrade Process” on page 2-6
• “Displaying the Upgrade Summary” on page 3-19
Selecting Event Log Files to Back Up
Use the Log File Backup page to optionally preserve Windows Event Viewer log files
from the Production Side of your system during the Active Upgrade process.
3-10
Express5800/320Fc: Active Upgrade™ User’s Guide
Selecting Event Log Files to Back Up
When you commit an upgrade, the system reestablishes the RDR mirrors of any
system disks by overwriting the Production Side disks (which contain the old version of
your software) with the newer Upgrade Side disks (which contain your newly-upgraded
software). Because the event log files on the Production Side are lost during this
process, you might want to preserve them for future reference. These log files contain
the only record of log messages your live applications generated while the system was
split.
The Log File Backup page allows you to select from all event logs available in the
Windows Event Viewer, including user-created logs.
NOTES
1. For information about creating a Custom Action that
preserves other files from the Production Side system
disk, see “Configuring Custom Actions” on page 3-12.
2. You must save the log files to an internal data disk or
an external disk. Do not save the files to a system
disk or network share.
3. There is no default directory. You must specify a
directory, otherwise, the Active Upgrade console
displays a warning message.
To preserve event log files
1. Specify a directory in which to save the files by doing one of the following:
• In the Staging Directory dialog box, type the full path name of the directory.
• Click Browse to locate a folder using the Browse for Folder dialog box. Click
a folder and click OK to select it.
2. For each log you want to save, click the log name to highlight it, then click the check
box to the left of the log name to preserve the file.
When you have finished selecting event log files to preserve, you can click Next to
proceed with the next configuration step.
Related Topics
• “Configuring Custom Actions” on page 3-12
• “Displaying the Upgrade Summary” on page 3-19
Configuring the Active Upgrade Process
3-11
Configuring Custom Actions
Configuring Custom Actions
Use the Custom Actions page to customize the way that the Active Upgrade process
runs in your environment. You can create custom actions to perform the following types
of tasks:
• Specify how a critical application is stopped and started during the upgrade
process.
For example, if you use special executable files to start and stop your applications,
you can use the controls on the Custom Actions page to specify when these
executable files will run during the upgrade process, and, if you have several files,
you can specify the order in which they will run.
• Check if a certain condition exists before starting the upgrade process.
For example, you can write a program to verify that a critical backup has completed,
if the load on the system is acceptable, or if it is a certain time of day before starting
the upgrade process.
• Back up files during the upgrade process.
Any files that are modified on the Production Side system disks while the system
is in split mode are lost during the commit process, when the RDR mirrors are
resynchronized. If applicable, you can write a program to save copies of important
files before you commit an upgrade. For example, you can save a copy of an
application-specific log file that does not appear in the system Event Viewer. (For
information about saving Event Viewer logs, see “Selecting Event Log Files to Back
Up” on page 3-10.)
By default, the Custom Actions page supports executable files that are batch files
(.bat), application files (.exe), or Visual Basic scripts (.vbs). For other types of
executable files, see “Executing Visual Basic Scripts and Other Types of Executable
Files” on page 3-18.
NOTES
1. Custom actions run consecutively when called. If one
action fails to terminate, it might prevent the next
action from executing, and, ultimately, prevent the
upgrade process from continuing. When you specify
an executable file for a custom action, verify that it
runs successfully outside of the Active Upgrade
process, and ensure that it completes in a timely
manner.
3-12
Express5800/320Fc: Active Upgrade™ User’s Guide
Configuring Custom Actions
2. Executable files for custom actions must be located
on a system disk. If a executable file is located on an
external or network disk, the Upgrade Side loses
access to the file while the system is in split mode.
3. For information about writing your own programs for
custom actions, see “Programming Notes for Custom
Actions” on page 3-15.
To configure a custom action
1. On the Custom Actions page, do one of the following:
• Next to File, type the full path name and file name of the executable file you
want to run. (The file must already exist on the system.) For example:
C:\bin\mybatchfile.bat
• Click Browse to locate the executable file using a file browser. Click the file
name in the file browser, then click Open to select the file.
2. Next to Arguments, type any arguments that you need to run with your executable
file.
No arguments are required; however, see “Programming Notes for Custom
Actions” on page 3-15 for information about optionally passing Active Upgrade
environment variables to your executable file.
3. In the drop-down list for Control type, select the option that best describes when
the Active Upgrade console should execute your custom action, as described in
Table 3-3.
Table 3-3. Control Types for Custom Actions
Control Type
Purpose
Start Application
Executes the custom action whenever the Active Upgrade console
needs to start applications. For example, the console needs to restart
applications on the Upgrade Side when you merge the system.
Stop Application
Executes the custom action whenever the Active Upgrade console
needs to stop applications. For example, the console needs to stop
applications on the Upgrade Side when you split the system. It also
stops applications on the Production Side when you merge the
system.
Readiness Check
Executes the custom action once during the readiness check, before
you initiate the Active Upgrade process. This control type allows you
to build your own verifications into the readiness check.
Configuring the Active Upgrade Process
3-13
Configuring Custom Actions
Table 3-3. Control Types for Custom Actions (Continued)
Control Type
Purpose
Advanced
Executes the custom action during every step of the Active Upgrade
process, including interim steps such as PrepareSplit and
PrepareMerge, which occur prior to the Split and Merge operations.
This control type allows you to have more precise control over a
custom action. Your executable file runs each time the upgrade
process switches states, but you can write a program with conditional
statements based on Active Upgrade environment variables to specify
exactly when and where particular tasks should be executed. For
example, you can write a conditional statement that triggers only on
the Upgrade Side if the system is in merge mode. See “Using Active
Upgrade Environment Variables” on page 3-16 for more information.
If you have more than one custom action, the Advanced control type
also allows you to control the order in which the custom actions are
executed (step 4).
Backup
Executes the custom action when the system is merged, allowing you
to back up files that were modified on the Production Side system disk
while the system was in split mode (before these files are lost during
the commit process).
4. If you selected the Advanced control type, optionally select an item from the
Timing drop-down list which best describes the order in which you want this
custom action to run with your other custom actions. Table 3-4 describes the timing
options. If the timing does not matter, keep the Default setting.
NOTE
Timing does not affect the order in which custom actions
run with other Active Upgrade tasks. Use this option only
if you want to ensure that one custom action runs before
or after another custom action.
Table 3-4. Timing for the Advanced Control Type
3-14
Timing
Purpose
Default
Executes the custom action in the default, consecutive order.
Early
Executes the custom action early in the list of custom actions, before
items marked as Default or Late.
Late
Executes the custom action late in the list of custom actions, after
items marked as Early or Default.
Express5800/320Fc: Active Upgrade™ User’s Guide
Configuring Custom Actions
Custom actions run consecutively according to their timing options. Subsequent
custom actions do not start until the current custom action terminates.
5. Click Add to accept the custom action. (If the Add button is inactive, ensure that
you typed the File path name and file name correctly. The executable file must exist
to be added.)
You can view the custom actions you have created at the bottom of the Custom
Actions page. If you want to remove a custom action from the list, select it and click
Remove.
When you have finished specifying custom actions to run, or if you have no custom
actions to specify, you can click Next to proceed with the next configuration step.
Related Topics
• “Programming Notes for Custom Actions”
• “Selecting Application Services to Control” on page 3-9
• “Managing Critical Applications During the Upgrade Process” on page 2-6
• “Displaying the Upgrade Summary” on page 3-19
Programming Notes for Custom Actions
The following topics describe some of the features available for programming and
monitoring custom actions:
• “Starting and Stopping Applications”
• “Using Active Upgrade Environment Variables” on page 3-16
• “Generating Exit Values” on page 3-17
• “Viewing Standard Output and Error Stream” on page 3-17
• “Executing Visual Basic Scripts and Other Types of Executable Files” on page 3-18
Starting and Stopping Applications
If you write a program to control a critical application during the upgrade process,
ensure that your program not only stops and starts the application at the appropriate
times, but also disables and enables the default startup mechanism for the application
(for example, the default Startup Type setting in the Services Control Manager or a
startup item in the system registry). If you do not disable the default startup type for an
application, it might interfere with or override your custom action.
See “Selecting Application Services to Control” on page 3-9 for information about how
the Active Upgrade console changes the Startup Type for application services.
Configuring the Active Upgrade Process
3-15
Configuring Custom Actions
Related Topics
• “Programming Notes for Custom Actions” on page 3-15
• “Configuring Custom Actions” on page 3-12
Using Active Upgrade Environment Variables
You can optionally use the environment variables specified in Table 3-5 in any program
that you write for a custom action. These environment variables are useful if you want
to write a conditional statement in your program that, for example, runs only on a
particular side of the system or only during a particular stage of the Active Upgrade
process.
Table 3-5. Environment Variables for Custom Actions
Environment Variable
Description
ACTIVE_UPGRADE_SIDE
Describes the side of the system on which the program
is running.
Values: Production, Upgrade
ACTIVE_UPGRADE_STATE
Describes the current upgrade state.
Values: Idle, PrepareSplit, Split, PrepareMerge, Merge,
Commit, Abort
ACTIVE_UPGRADE_REQUEST
Describes the current task that the Active Upgrade
console is executing.
Values: Idle, CheckReadiness, PrepareSplit,
ExecuteSplit, PrepareMerge, ExecuteMerge, Commit,
Abort, Start, Stop, Backup
ACTIVE_UPGRADE_HW_SPLIT
Describes whether or not the system is running in split
mode.
Values: Yes, No
By default, these environment variables are available to any child process of the Active
Upgrade console, including executable files for custom actions. However, if necessary,
you can also pass the environment variables to your executable files as arguments.
For example, to pass only the ACTIVE_UPGRADE_SIDE variable to an executable
file, append the following string to the Arguments for the custom action on the Custom
Actions page:
%ACTIVE_UPGRADE_SIDE%
3-16
Express5800/320Fc: Active Upgrade™ User’s Guide
Configuring Custom Actions
To pass multiple variables, add a space between each variable, as follows:
%ACTIVE_UPGRADE_SIDE% %ACTIVE_UPGRADE_REQUEST%
Related Topics
• “Active Upgrade State Model” on page 1-8
• “Programming Notes for Custom Actions” on page 3-15
• “Configuring Custom Actions” on page 3-12
Generating Exit Values
An exit value of 0 indicates that the executable file exited normally. Any other exit value
indicates that there was an error, which prevents the Active Upgrade process from
continuing with the current upgrade request. If this happens, you must correct the
problem and click Retry in the Active Upgrade console to retry the current upgrade
request (which also runs the custom action again). The Active Upgrade process does
not continue until the executable file for your custom action runs successfully.
Related Topics
• “Programming Notes for Custom Actions” on page 3-15
• “Configuring Custom Actions” on page 3-12
Viewing Standard Output and Error Stream
After your program executes, you can view standard output and error output from the
program in the Active Upgrade console, as follows:
1. In the activity log, expand an Execute custom actions node.
(There can be more than one Execute custom actions node, depending on the
types of custom actions you have created. Find the node for the upgrade stage in
which your custom action was set to run.)
2. Double-click a specific custom action to display more information about it.
3. In the detail window, view the output for your program under Status. If necessary,
scroll down in the Status box to see the full output. Or move your cursor over the
Status box to view the output as ToolTip help.
If you save the activity log to a file, you can also view the output in that file. See “Saving
the Activity Log to a File” on page 5-1 for more information.
Related Topics
• “Programming Notes for Custom Actions” on page 3-15
• “Configuring Custom Actions” on page 3-12
Configuring the Active Upgrade Process
3-17
Configuring Custom Actions
Executing Visual Basic Scripts and Other Types of Executable Files
By default, the File field on the Custom Actions page accepts only batch files (.bat),
application files (.exe), and Visual Basic scripts (.vbs). However, if necessary, you
might be able to run another type of executable file (such as a Perl script) by
implementing the command-line script host for the file.
You can also optionally run the command-line script host for Visual Basic scripts
(cscript.exe) if you need to enable options that are available only in that environment.
For example, to run your Visual Basic script in a command-line script host, do the
following when performing the procedure in “Configuring Custom Actions” on
page 3-12:
• Next to File, type the full path and file name of the command-line script host:
%SystemRoot%\system32\cscript.exe
(%SystemRoot% is an environment variable that automatically inserts your system
root directory, typically C:\WINNT.)
• Next to Arguments, type the full path name and file name of your executable file.
For example:
C:\bin\myvbscript.vbs
If applicable, you can type additional arguments that are specific to your script file or
options that are specific to the session. For example, for a cscript session, you might
want to specify the //T option to control the maximum amount of time your program is
allowed to run:
C:\bin\myvbscript.vbs //T:30
The preceding example would terminate the program and cscript session after 30
seconds. Setting this type of time limit is a useful way of ensuring that your executable
file cannot delay the upgrade process.
For more information about the cscript command, open a Command Prompt session
and enter cscript /?.
Related Topics
• “Programming Notes for Custom Actions” on page 3-15
• “Configuring Custom Actions” on page 3-12
3-18
Express5800/320Fc: Active Upgrade™ User’s Guide
Providing a Description for a Configuration File
Providing a Description for a Configuration File
Use the Description page to specify a title and comments for your configuration file.
These items appear on the Other Configurations page, the Upgrade Summary
page, and in the Locate Configuration File dialog box when you are selecting a
configuration file to load or edit.
Type a brief summary next to Title, and type additional details next to Comments.
For Comments, you might want to include information such as:
• Purpose of the configuration file (type of upgrade)
• Systems to which the file applies
• Special settings required before using the file for an upgrade
• Your name and contact information (or contact information for a support provider)
• Date you created or updated the file
When you have finished providing a description for the configuration file, you can click
Next to proceed with the next configuration step.
Related Topics
• “Creating and Managing Configuration Files” on page 3-1
• “Saving a Configuration File” on page 3-5
• “Displaying the Upgrade Summary” on page 3-19
Displaying the Upgrade Summary
When you finish creating a new configuration file, or when you load or edit an existing
configuration file, you can display a summary of the upgrade configuration that the file
contains.
To display the upgrade summary, click Upgrade Summary in the navigation bar of the
Active Upgrade console. The summary window displays information including:
• Configuration file name, title, and description
• Disks you selected for the upgrade
• Other configuration files called by the current file
• Application services to start and stop
• Custom actions to run
• Event log files to back up
Configuring the Active Upgrade Process
3-19
Displaying the Upgrade Summary
If applicable, you can also save the current configuration file from the Upgrade
Summary page.
When you are finished viewing the Upgrade Summary, and, if necessary, saving the
configuration file, you can click Next to proceed with the Active Upgrade process.
If you have changed your configuration file since you last saved it, the Active Upgrade
console displays a message indicating that you should save the file. To save the file,
click Yes, otherwise click No or Cancel.
In the next step, the Active Upgrade console runs a readiness check to verify that your
system meets the prerequisites for an online upgrade. If necessary, you can abort the
process before you split the system (or at any point up until you commit the upgrade).
Related Topics
• “Saving a Configuration File” on page 3-5
• “Performing a Readiness Check” on page 4-1
• “Aborting the Upgrade” on page 4-19
3-20
Express5800/320Fc: Active Upgrade™ User’s Guide
Chapter 4
Performing the Upgrade
4-
Performing the Active Upgrade process can involve the following tasks:
• Performing a readiness check
• Splitting the system
• Merging the System
• Committing the upgrade
• Aborting the upgrade (if necessary)
• Finishing the upgrade
• Viewing Active Upgrade process status
Performing a Readiness Check
Before you can initiate split mode on a system, the system must pass a readiness
check. The readiness check verifies that your system meets the prerequisites for the
Active Upgrade process. For example, the readiness check ensures that:
• The system is currently running in duplex mode.
• The disks you selected as system disks are present and are mirrored with RDR.
• The system contains two properly configured VTM adapters.
• The embedded Ethernet PCI adapters in your system are configured into Ethernet
teams, and each team contains at least one adapter from each physical enclosure.
• The application services you specified for control are currently running, and can be
stopped when necessary.
• The executable file for any custom action is present on the system and ready to run.
To perform a readiness test, do one of the following:
• Click Next on the Upgrade Summary page (if you are using a configuration file).
• Click Active Upgrade on the navigation bar (the readiness test starts automatically
if you have recently opened or changed your configuration).
• Click Retry on the Active Upgrade page.
Performing the Upgrade
4-1
Performing a Readiness Check
The activity log reports the overall results of the readiness check as well as the results
for each individual test. Table 4-1 describes the general meaning of the activity log
entries.
Table 4-1. Activity Log Entries
Icon
Text Color
Severity
Description
Green
Success
Task completed without error
Black
Pending
Task is in progress
Black
Information
Task information, no action necessary
Black
Warning
A problem that should be addressed, but will not
block an upgrade
Red
Error
A problem that must be corrected before continuing
with upgrade
The status bar at the bottom of the window indicates one of the following states for the
current operation:
•
Busy
A readiness check is in progress. Allow time for the task to complete.
•
Ready
The system meets the prerequisites for the Active Upgrade process. You can
proceed with the upgrade process by splitting the system.
•
Broken
One or more components in the system does not meet the prerequisites for the
Active Upgrade process. You must resolve the problem before you can continue
with the upgrade.
(For more information about interpreting Active Upgrade status, see “Viewing Active
Upgrade Process Status” on page 4-21.)
If the check is successful, you can click Split to proceed with splitting the system. See
“Splitting the System”.
If one of the readiness tests fails, you must resolve the problem, then click Retry to run
the readiness test again. When the problem is resolved, you can click Split to proceed
with splitting the system.
4-2
Express5800/320Fc: Active Upgrade™ User’s Guide
Splitting the System
Related Topics
• “System Prerequisites” on page 2-2
• “Splitting the System”
• “Viewing Active Upgrade Process Status” on page 4-21
• “Saving the Activity Log to a File” on page 5-1
• “Aborting the Upgrade” on page 4-19
• Troubleshooting
Splitting the System
Splitting an Express5800/320Fc system divides it into two independently-functioning
systems: the Production Side, which continues to run your applications, and the
Upgrade Side, which you can safely upgrade.
Splitting the system:
• Disables RDR mirroring between the internal disks in each CPU- I ⁄ O enclosure.
• Isolates the Upgrade Side from system resources such as the network, any
user-specified application data disks, and any external PCI resources.
• Disables any user-specified applications and services on the Upgrade Side so they
cannot restart if you restart the operating system on the Upgrade Side.
• Queues any ActiveService Network alerts generated on the Upgrade Side until the
system is merged.
You can split a system only if it meets the prerequisites for the Active Upgrade process
and has passed the readiness check.
NOTES
1. When in split mode, the Upgrade Side has no access
to the network. If you need a network resource to
obtain any software installation packages you intend
to run, transfer the software to the system before you
initiate split mode. Furthermore, put the software on
one of the system disks, because these are the only
disks you can access on the Upgrade Side while the
system is in split mode.
Performing the Upgrade
4-3
Splitting the System
2. Split the system only when you are sitting at the console for your
Express5800/ft series system. The Active Upgrade console
is not supported over remote connections.
!
CAUTION
Do not perform any hardware maintenance, including the
removal of either CPU- I ⁄ O enclosure, after you have
initiated the Active Upgrade process (by clicking Split).
To split the system
1. Ensure that you have addressed any critical errors or warnings that were indicated
by the readiness check.
2. Exit any non-essential applications.
3. Click Split on the Active Upgrade page.
When the system successfully enters split mode:
• The Active Upgrade console continues to run on the Production Side of the
system.
• The Active Upgrade console switches to the Split System page.
• The upgrade state, reported in the status bar, is Production Side | Split | Ready,
indicating that the system is currently split (and ready to be merged after your
software installation).
Splitting the system should take only a few minutes. The process will time out if it takes
longer than 5 minutes.
NOTES
1. Throughout the upgrade process, icons appear and
disappear in the system tray as PCI devices, such as
Ethernet PCI adapters, are reconfigured or disabled
for the current upgrade operation. This is normal. Do
not attempt to enable or reconfigure any of these PCI
devices while the upgrade session is in progress.
2. If your system is running EMC® PowerPath® software
for an external storage system, you might experience
a brief delay (10-15 seconds) when the system splits,
as PowerPath reroutes storage operations through
the Production Side.
4-4
Express5800/320Fc: Active Upgrade™ User’s Guide
Splitting the System
If the split process fails the first time, you can click Retry to try again. If the problem
persists, you can click Abort to abort the upgrade process, or see Troubleshooting for
information about resolving the problem.
When the system is split, you can:
• Manage upgrade tasks on the Upgrade Side.
• Manage your applications on the Production Side.
• Verify the Upgrade Side before merging the system.
(To perform upgrade tasks, you must establish a remote connection to the Upgrade
Side, as explained in “Managing Upgrade Tasks on the Upgrade Side” on page 4-5.)
NOTE
After you establish a connection to the Upgrade Side, you
can optionally check the status of your application
services on the Upgrade Side, to verify that they have
been stopped by the Active Upgrade console. See
“Verifying the Status of Application Services” on page 5-2.
Related Topics
• “Managing Upgrade Tasks on the Upgrade Side”
• “Managing Your Applications on the Production Side” on page 4-14
• “Verifying the Upgrade Side Before Merging the System” on page 4-15
• “Merging the System” on page 4-15
• “Viewing Active Upgrade Process Status” on page 4-21
• “Aborting the Upgrade” on page 4-19
• Troubleshooting
Managing Upgrade Tasks on the Upgrade Side
While the system is in split mode, you can perform any of the following upgrade tasks
on the Upgrade Side:
• Run software installation programs (see “Running Software Installation Programs”
on page 4-10, and “Software Upgrade Support” on page 2-1 for restrictions).
• Restart the operating system, if necessary (see “Restarting the Upgrade Side” on
page 4-12).
• Perform limited testing of the installed updates (see “Verifying the Upgrade Side
Before Merging the System” on page 4-15).
Performing the Upgrade
4-5
Splitting the System
If necessary, you can also completely abort the upgrade process from the Active
Upgrade console on the Production Side.
Because the Active Upgrade console itself runs on the Production Side of the system,
you need to establish a remote connection to the desktop on the Upgrade Side before
you can complete any of these upgrade tasks, as explained in “Connecting to the
Desktop on the Upgrade Side” on page 4-6.
Related Topics
• “Connecting to the Desktop on the Upgrade Side”
• “Running Software Installation Programs” on page 4-10
• “Restarting the Upgrade Side” on page 4-12
• “Viewing Active Upgrade Process Status” on page 4-21
• “Merging the System” on page 4-15
• “Aborting the Upgrade” on page 4-19
• Troubleshooting
Connecting to the Desktop on the Upgrade Side
While the system is in split mode, the Active Upgrade console runs on the Production
Side of the system. To perform upgrade tasks, you must establish a remote connection
to the Upgrade Side.
You can access the Upgrade Side using one of two methods:
• Remote KVM
Allows you to control the keyboard, video, and mouse of the Upgrade Side using
the Advanced Video Redirection (AVR) feature of the VTM console. You might
prefer this option if you require access to the BIOS settings and troubleshooting
information that are available in the VTM console.
• Remote Desktop
Allows you to control the keyboard, video and mouse of the Upgrade Side through
the Windows Remote Desktop component. You might prefer this option if you are
more familiar with it, or if it runs faster in your environment.
To use either connection method, click the associated link (Figure 4-1) in the navigation
bar of the Active Upgrade console. For more information, see Related Topics.
4-6
Express5800/320Fc: Active Upgrade™ User’s Guide
Splitting the System
Figure 4-1. Links for Connecting to Upgrade Side
Related Topics
• “Connecting to the Upgrade Side with Remote KVM”
• “Connecting to the Upgrade Side with Remote Desktop” on page 4-8
Connecting to the Upgrade Side with Remote KVM
Remote KVM allows you to control the keyboard, video, and mouse of the Upgrade
Side using the Advanced Video Redirection (AVR) feature of the VTM console.
To initiate a Remote KVM session with the Upgrade Side
1. Click Remote KVM in the navigation bar of the Active Upgrade console on the
Production Side. The system opens a Web browser window to load the VTM
console, which runs as a Java applet.
2. If the browser displays a warning indicating that the Web site is being blocked, click
Add to display the Trusted Sites dialog box. Click Add to add the site to your
Trusted Sites zone, then click Close to dismiss the dialog box.
3. If the browser displays additional warning messages about running Web-based
content, click Close or OK to dismiss these messages.
4. If the browser displays a message asking you to trust the signed applet distributed
by NEC Corporation of America, click Yes to continue. When the Java applet is
finished loading, the Upgrade Side desktop is displayed.
After you initiate the remote session, see Related Topics for more information about
what you can do on the Upgrade Side and how you can merge the system after you
have finished performing upgrade tasks
NOTE
If you want to refer to the Active Upgrade Help file while
you are using the Upgrade Side desktop, click Start on the
Upgrade Side desktop, then click All Programs, ftSYS,
and Active Upgrade Help to open the Help viewer.
Performing the Upgrade
4-7
Splitting the System
For more information about managing an AVR session, see the Express5800/320Fc
Virtual Technician Module User’s Guide.
To terminate a Remote KVM session with the Upgrade Side
1. Verify that any installation processes are complete, and that you have exited from
any installation programs.
2. Optionally, click Log Off in the Start menu of your remote session. In the Log Off
Windows dialog box, click Log Off.
NOTE
If you are about to merge the system, you can remain
logged on to maintain the current desktop session. After
the merge, you will be using the Upgrade Side desktop.
3. Close the browser window that contains the VTM console.
Related Topics
• “Connecting to the Upgrade Side with Remote Desktop”
• “Running Software Installation Programs” on page 4-10
• “Restarting the Upgrade Side” on page 4-12
• “Viewing Active Upgrade Process Status” on page 4-21
• “Merging the System” on page 4-15
• “Aborting the Upgrade” on page 4-19
• Troubleshooting
Connecting to the Upgrade Side with Remote Desktop
Remote Desktop allows you to control the keyboard, video and mouse of the Upgrade
Side through the Windows Remote Desktop component.
To establish a Remote Desktop Connection to the Upgrade Side
1. Click Remote Desktop in the navigation bar of the Active Upgrade console on the
Production Side. The system opens a Remote Desktop Connection window.
2. When the window displays the login screen for the remote system, enter your
administrative username and password and click OK. (Remember, you can use
only an account in the local Administrators group, not a domain account.) The
Upgrade Side desktop is displayed.
After you initiate the remote connection, see Related Topics for more information about
what you can do on the Upgrade Side and how you can merge the system after you
have finished performing upgrade tasks.
4-8
Express5800/320Fc: Active Upgrade™ User’s Guide
Splitting the System
NOTES
1. If you want to refer to the Active Upgrade Help file
while you are using the Upgrade Side desktop, click
Start on the Upgrade Side desktop, then click All
Programs, ftSYS, and Active Upgrade Help to
open the Help viewer.
2. If you maximize the Remote Desktop connection
window, its title bar (Figure 4-2) might disappear from
view (autohide). Only the Upgrade Side desktop is
visible, as if it is your local desktop. If you want to
redisplay the title bar to access its controls, push the
mouse pointer to the top of the screen.
3. The Remote Desktop title bar is a helpful reminder
that you are using the Upgrade Side desktop. If you
have maximized the window for Remote Desktop and
you want the title bar to be displayed for the duration
of your connection, click the pin button (pushpin) on
the left side of the title bar. (The pin button is displayed
only when the window is maximized.)
Figure 4-2. Remote Desktop Title Bar
For more information about managing a Remote Desktop session, see the Windows
online Help.
To terminate a Remote Desktop Connection to the Upgrade Side
1. Verify that any installation processes are complete, and that you have exited any
installation programs.
2. Click Log Off in the Start menu of your remote session.
3. In the Log Off Windows dialog box, click Log Off.
NOTE
If you are about to merge the system, you can remain
logged on to maintain the current desktop session. After
the merge, you will be using the Upgrade Side desktop.
Performing the Upgrade
4-9
Splitting the System
Related Topics
• “Connecting to the Upgrade Side with Remote KVM” on page 4-7
• “Running Software Installation Programs” on page 4-10
• “Restarting the Upgrade Side” on page 4-12
• “Viewing Active Upgrade Process Status” on page 4-21
• “Merging the System” on page 4-15
• “Aborting the Upgrade” on page 4-19
• Troubleshooting
Running Software Installation Programs
The following topics describe how to run software installation programs on the Upgrade
Side while the system is split:
• “Windows Automatic Updates”
• “Other Installation Packages” on page 4-12
(To review the types of upgrades that Active Upgrade technology supports, see
“Software Upgrade Support” on page 2-1.)
Windows Automatic Updates
If you are using Windows Automatic Updates, and you previously downloaded all of the
required software updates, the Automatic Updates icon should be present in the
system tray, and it should report that updates are ready for your computer (Figure 4-3).
If so, you are ready to apply the updates.
Figure 4-3. Automatic Updates Icon in System Tray
NOTE
You should install all security-related hotfixes, but do not
install other types of hotfixes, such as Microsoft QFE
patches that fix a particular problem, before obtaining
validation from NEC Corporation of America. See
“Recommendations” on page 2-5 for more information.
4-10
Express5800/320Fc: Active Upgrade™ User’s Guide
Splitting the System
NOTE
Before installing any software, ensure that you are
working on the Upgrade Side desktop (through a
remote connection). Do not install software on the
Production Side.
To apply the downloaded updates
1. Click the Automatic Updates icon in the Upgrade Side system tray to display the
Automatic Updates dialog box.
2. Select Custom Install and click Next.
The next page displays a list of the updates you downloaded and allows you to
select which ones to install at this time.
3. Select only the updates that you previously checked for compatibility with your
Express5800/320Fc system, then click Install.
During the installation process, the Automatic Updates dialog box minimizes to the
system tray. When the installation is complete, you can display the dialog box again. It
should report that all updates were successfully installed.
Some updates might require you to restart the operating system on the Upgrade Side.
You can click Restart Now to allow Automatic Updates to restart the Upgrade Side
automatically, or you can manually restart later. You can restart the Upgrade Side as
many times as necessary to complete the installation.
See “Restarting the Upgrade Side” on page 4-12 for information about reconnecting to
the Upgrade Side after you restart it.
Related Topics
• “Software Upgrade Support” on page 2-1
• “Managing Upgrade Tasks on the Upgrade Side” on page 4-5
• “Viewing Active Upgrade Process Status” on page 4-21
• “Merging the System” on page 4-15
• “Aborting the Upgrade” on page 4-19
• Troubleshooting
Performing the Upgrade
4-11
Splitting the System
Other Installation Packages
If you previously downloaded individual installation packages to a system disk, open
the Upgrade Side folder that contains the installation packages. Run each installation
program, one at a time.
NOTE
Before installing any software, ensure that you are
working on the Upgrade Side desktop (through a
remote connection). Do not install software on the
Production Side.
Some installation programs might require you to restart the operating system on the
Upgrade Side. You can allow these installation programs to restart the Upgrade Side
automatically, or you can manually restart later. You can restart the Upgrade Side as
many times as necessary to complete the installation; however, you might want to
avoid restarting until you have run additional installation programs to reduce the total
number of times you need to restart.
See “Restarting the Upgrade Side” on page 4-12 for information about reconnecting to
the Upgrade Side after you restart it.
Related Topics
• “Software Upgrade Support” on page 2-1
• “Managing Upgrade Tasks on the Upgrade Side” on page 4-5
• “Viewing Active Upgrade Process Status” on page 4-21
• “Merging the System” on page 4-15
• “Aborting the Upgrade” on page 4-19
• Troubleshooting
Restarting the Upgrade Side
When the system is running in split mode, if necessary, you can restart the operating
system on the Upgrade Side at any time. You can either allow an installation program
to restart the system automatically or you can perform the following procedure to restart
the system manually.
!
CAUTION
Before you restart the system, ensure that you are
working on the Upgrade Side desktop (through a
remote connection). Do not restart the Production Side.
4-12
Express5800/320Fc: Active Upgrade™ User’s Guide
Splitting the System
!
CAUTION
Do not shut down the Upgrade Side, otherwise, the
Upgrade Side will not come back online, and you must
abort the upgrade process to recover. If this happens, any
changes you made on the Upgrade Side are lost.
To manually restart the Upgrade Side
1. On the Upgrade Side, click Shut Down in the Start menu.
2. In the Shut Down Windows dialog box, select Restart from the drop-down menu
and click OK.
If you are using Remote KVM, the AVR session remains connected while the Upgrade
Side is restarting; however, you must log on again when the Upgrade Side is finished
restarting. (To send the Ctrl-Alt-Del key sequence necessary for login, select
Ctrl-Alt-Del from the drop-down menu at the bottom of the window, then click Send
Key Sequence.)
If you are using Remote Desktop Connection, the connection to the Upgrade Side is
terminated, and the Production Side desktop is displayed. While the Upgrade Side is
restarting, you can view its status in the activity log and the status bar of the Active
Upgrade console. When the console displays the message Partner: OS Up, you can
click Remote Desktop to log on to the Upgrade Side again.
NOTE
Though the Active Upgrade console reports that the
Upgrade Side operating system is up, it might take
another minute or two for all services to finish loading and
for login to be possible.
Related Topics
• “Running Software Installation Programs” on page 4-10
• “Viewing Active Upgrade Process Status” on page 4-21
• “Merging the System” on page 4-15
• “Aborting the Upgrade” on page 4-19
• Troubleshooting
Performing the Upgrade
4-13
Splitting the System
Managing Your Applications on the Production Side
While the system is split, you can continue to access and use your applications on the
Production Side; however, you must avoid doing any of the following on the
Production Side desktop:
• Installing or upgrading software.
• Creating or modifying any files on the system disk, including the system registry.
• Restarting the operating system.
!
CAUTION
Any changes you make to files on the Production Side
system disks are lost during the commit process, because
the system overwrites these system disks (which contain
the old version of your software) with the newer Upgrade
Side disks to complete the upgrade. If you need to
preserve files from the original system disks, you can save
them to a data disk.
NOTE
Be careful when switching between the Production Side
desktop and the remote connection to the Upgrade Side
desktop. When you resume software installation or restart
the system, always ensure that you are on the Upgrade
Side.
Related Topics
• “Managing Upgrade Tasks on the Upgrade Side” on page 4-5
• “Viewing Active Upgrade Process Status” on page 4-21
• “Merging the System” on page 4-15
• “Aborting the Upgrade” on page 4-19
• Troubleshooting
4-14
Express5800/320Fc: Active Upgrade™ User’s Guide
Merging the System
Verifying the Upgrade Side Before Merging the System
After you have upgraded or installed software on the Upgrade Side, you can perform
limited testing on the Upgrade Side system disks, as long as your activities do not
require access to the following resources, which are currently unavailable:
• Network
• Internal data disks
• Application data disks
For example, you might want to perform the following tasks before you merge the
system:
• Verify the presence and version number of each software package (see “Verifying
the Status of Installed Software” on page 5-3).
• If possible, verify that you can start the applications you installed or upgraded.
• If possible, configure the settings for any applications you installed or upgraded.
If you are satisfied that everything is working correctly, you can merge the system to
stop your applications on the Production Side and restart them on the Upgrade Side for
final verification.
If there are any problems, you can abort the upgrade to return the system to its original
state. Aborting the upgrade while the system is in split mode does not incur downtime,
because your critical applications are still running on the Production Side.
Related Topics
• “Managing Upgrade Tasks on the Upgrade Side” on page 4-5
• “Viewing Active Upgrade Process Status” on page 4-21
• “Merging the System” on page 4-15
• “Aborting the Upgrade” on page 4-19
• Troubleshooting
Merging the System
After you are finished performing upgrade tasks on the Upgrade Side of the system,
you can merge the system to verify your changes before you permanently commit
them.
Performing the Upgrade
4-15
Merging the System
Merging the system:
• Stops your applications and services on the Production Side.
• Merges system resources so that the network and application data disks become
available to the Upgrade Side.
• Restarts your applications (including the Active Upgrade console) from the
Upgrade Side.
To merge the system
1. Verify that all installation processes are complete, and that you have exited any
installation programs.
2. Optionally, terminate any Remote KVM or Remote Desktop sessions.
NOTE
You can remain logged on to the Upgrade Side if you want
to maintain the current desktop session. After the merge,
you will be using the Upgrade Side desktop.
3. Verify that the upgrade state, as reported in the status bar, is
Production Side | Split | Ready.
If the status is Busy, you must wait for the current task to complete. If it is Broken,
you might need to abort the upgrade.
4. Click Merge.
NOTE
Your screen might flicker and you might briefly lose control
of your keyboard and mouse as the system is merged.
Depending on the complexity of your applications and the upgrade you performed, your
applications should be back up and running in under a minute.
After the merge process completes, the upgrade state is
Fault Tolerant | Merge | Ready, indicating that the system is currently merged and the
upgrade is ready to be committed. You can test your applications to verify that the
upgrade was successful.
If the merge process fails the first time, you can click Retry to try again. If the problem
persists, you can click Abort to abort the upgrade process, or see Troubleshooting for
information about resolving the problem.
4-16
Express5800/320Fc: Active Upgrade™ User’s Guide
Merging the System
Related Topics
• “Verifying the Upgrade Side Before Committing the Upgrade”
• “Committing the Upgrade” on page 4-18
• “Viewing Active Upgrade Process Status” on page 4-21
• “Aborting the Upgrade” on page 4-19
• Troubleshooting
Verifying the Upgrade Side Before Committing the Upgrade
After you have merged the system, your critical applications (including the Active
Upgrade console) are running from the software on the Upgrade Side system disks. At
this point, you can test the software you installed and verify the general health of the
system with full access to the system’s resources, including:
• Network resources
External storage
• Application data disks
•
For example, you might want to perform the following tasks before you commit the
upgrade:
• Verify that all of your critical applications have restarted on the Upgrade Side (see
“Verifying the Status of Application Services” on page 5-2).
• Verify that you have access to your network and application data disks.
• Verify that client systems can reach all of the services that your system provides.
• Verify the presence and version number of each software package (see “Verifying
the Status of Installed Software” on page 5-3).
• Verify that you can start and run any applications that you have installed or
upgraded (if they are not already running).
• Check the configuration settings for your applications and the operating system,
which could have been altered by software installation.
If you are satisfied that everything is working correctly, you can commit the upgrade to
make the changes permanent.
If there are any problems, you can abort the upgrade to return the system to its original
state. However, aborting the upgrade while the system is in merge mode incurs
downtime, because the Active Upgrade console must stop your critical applications on
the Upgrade Side before it can restart them on the Production Side.
Related Topics
• “Committing the Upgrade”
Performing the Upgrade
4-17
Committing the Upgrade
• “Viewing Active Upgrade Process Status” on page 4-21
• “Aborting the Upgrade” on page 4-19
• Troubleshooting
Committing the Upgrade
When you are finished testing your applications on the merged system, and you are
satisfied that everything is working correctly, you can commit the upgrade to make it
permanent.
Committing the upgrade:
• Reestablishes the mirror of any internal RDR system disk by overwriting the
original partner disk with its newer, upgraded partner disk.
• Reestablishes the mirror of any internal RDR data disk by overwriting the stale
partner disk with its newer, live partner disk (the disk to which your applications
have been writing data throughout the upgrade process).
• Does not restart your applications, as they are already running on the upgraded
system. There is no additional downtime.
!
CAUTION
You cannot abort the upgrade process after you
commit an upgrade because the original state of the
system is lost (overwritten) as a result of completing the
upgrade process. Ensure that your system is working as
expected before clicking Commit.
To commit the upgrade
1. Close all non-essential applications.
2. Verify that the upgrade state, as reported in the status bar, is
Fault Tolerant | Merge | Ready.
3. Click Commit.
NOTE
Your screen might flicker and you might briefly lose control
of your keyboard and mouse as the system commits the
upgrade.
The commit process should take only a few minutes. After it completes, the upgrade
state is Fault Tolerant | Commit | Ready. You can click Finish to clean up system
resources, as described in “Finishing the Upgrade” on page 4-20.
4-18
Express5800/320Fc: Active Upgrade™ User’s Guide
Aborting the Upgrade
If the commit process fails the first time, you can click Retry to try again. If the problem
persists, see Troubleshooting for information about resolving the problem.
Related Topics
• “Finishing the Upgrade” on page 4-20
• “Viewing Active Upgrade Process Status” on page 4-21
• “Verifying If RDR Disks Are Resynchronizing” on page 5-5
• Troubleshooting
Aborting the Upgrade
If necessary, you can abort the Active Upgrade process and restore the system to its
original state at any point of the upgrade process prior to committing the upgrade.
!
CAUTION
You cannot abort the upgrade process after you commit
an upgrade because the original state of the system is lost
(overwritten) as a result of completing the upgrade
process.
When you abort an upgrade, the Active Upgrade console:
• Cancels the current Active Upgrade operation.
• If applicable (if your system is in the merge state), initiates a system restart. It shuts
down the Upgrade Side and restarts the system from the Production Side, which
automatically restarts your applications from your original Production Side system
disks.
• If applicable, reestablishes the mirror of any internal RDR system disk by
overwriting the upgraded partner disk with the original partner disk.
• If applicable, reestablishes the mirror of any internal RDR data disk by overwriting
the stale partner disk with its newer, live partner disk (the disk to which your
applications have been writing data throughout the upgrade process).
• If applicable, brings the Upgrade Side online to enable fault-tolerant, duplex mode.
To abort an upgrade, click the Abort button on the Active Upgrade page, the Split
System page, or the Merge System page.
Performing the Upgrade
4-19
Finishing the Upgrade
NOTES
1. Your screen might flicker and you might briefly lose
control of your keyboard and mouse as the system
recovers its original state.
The abort process should take only a few minutes. When the process completes, the
upgrade state is Fault Tolerant | Abort | Ready. You can click Finish to clean up
system resources, as described in “Finishing the Upgrade”.
If the abort process fails the first time, you can click Retry to try again. If the problem
persists, see Troubleshooting for information about resolving the problem.
Related Topics
• “Finishing the Upgrade”
• “Viewing Active Upgrade Process Status” on page 4-21
• “Verifying If RDR Disks Are Resynchronizing” on page 5-5
• Troubleshooting
Finishing the Upgrade
To complete the Active Upgrade process and clean up system resources after
committing or aborting an upgrade, click Finish on the Commit Upgrade page or
Abort Upgrade page.
The finish process should take only a few minutes. When the process completes, the
upgrade state is Fault Tolerant | Idle | Ready.
If the finish process fails the first time, you can click Retry to try again. If the problem
persists, see Troubleshooting for information about resolving the problem.
On the Finish page, upon successful completion of the Active Upgrade process, you
can:
• Click Exit to close the Active Upgrade console.
• Click Save Log to save the activity log to a file.
4-20
Express5800/320Fc: Active Upgrade™ User’s Guide
Viewing Active Upgrade Process Status
• Click Active Upgrade in the navigation bar to initiate another readiness test and
upgrade with the same configuration.
• Click Configuration in the navigation bar to create, edit, or load another
configuration file.
NOTE
Though the Active Upgrade process is complete, your
RDR disks continue to resynchronize in the background.
If you intend to initiate another upgrade process, you must
wait for the resynchronization to complete before you do
so. See “Verifying If RDR Disks Are Resynchronizing” on
page 5-5 for more information.
Related Topics
• “Viewing Active Upgrade Process Status” on page 4-21
• “Verifying If RDR Disks Are Resynchronizing” on page 5-5
• Troubleshooting
Viewing Active Upgrade Process Status
You can view the status of the Active Upgrade process at any point during the upgrade.
The Active Upgrade console indicates status in two ways:
• “Activity Log”
• “Status Bar” on page 4-25
Activity Log
The activity log (Table 4-4), which reports details about each upgrade operation, is
displayed in the main window of the Active Upgrade console after you have initiated a
readiness test or upgrade session.
Performing the Upgrade
4-21
Viewing Active Upgrade Process Status
Figure 4-4. Activity Log (in Active Upgrade Console)
If you want to check the status of the upgrade process when you are logged on to the
Upgrade Side of the system (while in split mode), you can also double-click the Active
Upgrade icon (
) in the system tray to open the remote activity log (Figure 4-5).
Figure 4-5. Remote Activity Log
4-22
Express5800/320Fc: Active Upgrade™ User’s Guide
Viewing Active Upgrade Process Status
NOTE
You can only view status in the remote activity log. To
control the remaining steps of the Active Upgrade
process, you must minimize or close the connection to the
Upgrade Side and use the Active Upgrade console on the
Production Side.
Table 4-2 describes the general meaning of activity log entries that appear in the local
and remote activity logs.
Table 4-2. Activity Log Entries
Icon
Text Color
Severity
Description
Green
Success
Task completed without error
Black
Pending
Task is in progress
Black
Information
Task information, no action necessary
Black
Warning
A problem that should be addressed, but will not
block an upgrade
Red
Error
A problem that must be corrected before continuing
with upgrade
Some upgrade items are collapsed into a single line. To display all of the associated
items, click the expand (+) button to the left of the item. To collapse them again, click
the collapse (-) button to the left of the item.
Double-click any item in the activity log to open a detail window with more information
about that item.
Performing the Upgrade
4-23
Viewing Active Upgrade Process Status
Figure 4-6. Activity Log Detail
In the detail window, you can click the Previous and Next buttons to review other items
of the same severity. For example, if you are viewing an error, you can click Next to
see the next error item. To change the severity level of the items you want to review,
select an option from the Show severity pulldown menu. (A severity type is unavailable
if there are currently no items of that severity in the activity log).
If necessary, you can save the items from the activity log in the Active Upgrade console
to a file. For example, you might need to send this file to NEC Technical Support or your
authorized service representative for troubleshooting purposes. See “Saving the
Activity Log to a File” on page 5-1 for more information.
Related Topics
• “Status Bar”
• “Saving the Activity Log to a File” on page 5-1
• Troubleshooting
4-24
Express5800/320Fc: Active Upgrade™ User’s Guide
Viewing Active Upgrade Process Status
Status Bar
The status bar (Figure 4-7), which is located at the bottom of the Active Upgrade
console window, reports a quick summary of the status of the upgrade.
Figure 4-7. Status Bar
1
Configuration file name
2
Hardware State (Table 4-3)
3
Upgrade State (Table 4-4)
4
Operational State (Table 4-5)
5
Partner State (Table 4-6)
The Hardware State reports whether or not your critical applications are running in
lockstep. Table 4-4 describes the possible hardware states.
Table 4-3. Status: Hardware State
Hardware State
Description
Fault-tolerant
The system is duplexed.
Production Side
The system is currently running in split mode, and your
applications are running from the Production Side (the original
copy of your software). The Upgrade Side is available for
installation tasks.
The Upgrade State reports the stage of the upgrade your system is entering or has
entered. Table 4-4 describes the possible upgrade states.
Performing the Upgrade
4-25
Viewing Active Upgrade Process Status
Table 4-4. Status: Upgrade State
Upgrade State
Description
Idle
The current upgrade session is idle. The Active Upgrade process
has just finished, or it has not been initiated yet.
Prepare Split
The Active Upgrade console is preparing to split the system by
running a final readiness check and additional background tasks.
Split
If the operational state is Ready, the system is running in split
mode. Otherwise, the Active Upgrade console is in the process of
initiating split mode.
Prepare Merge
The Active Upgrade console is preparing to merge the system by
running additional readiness tests and background tasks.
Merge
If the operational state is Ready, the system is merged.
Otherwise, the Active Upgrade console is in the process of
merging the system.
Commit
The Active Upgrade console is in the process of committing your
changes (making them permanent).
Abort
The upgrade process has been aborted, and the Active Upgrade
console is in the process of restoring the system to its previous
state.
The Operational State reports the status of the last operation that was requested.
Table 4-5 describes the possible operational states.
Table 4-5. Status: Operational State
Operational State
Description
Ready
The previous operation has been completed successfully. The
Active Upgrade process is ready to enter the next upgrade state.
Busy
The current operation is still in progress. Allow time for the
operation to complete.
Broken
The Active Upgrade console could not complete the current
operation. Check the activity log for errors. You must correct the
errors and click Retry to complete the operation, or click Abort to
abort the current upgrade session.
The Partner State reports the status of the partner system. For example, while the
system is in split mode, the Active Upgrade console is running on the Production Side,
and this field reports the health of the Upgrade Side of the system. Table 4-6 describes
the possible partner states.
4-26
Express5800/320Fc: Active Upgrade™ User’s Guide
Viewing Active Upgrade Process Status
Table 4-6. Status: Partner State
Partner State
Description
DC On
The partner operating system is shut down, but system power
is still on.
DC Off
The partner operating system is shut down and system power
is off (but the system still has housekeeping power).
BIOS POST
The partner system is performing a BIOS Power On Self Test
(POST).
Hung: BIOS POST
The partner system hung in the BIOS POST.
OS Booting
The partner operating system is booting.
Hung: OS Booting
The partner system hung in the boot process.
OS Up
The partner operating system is up. (However, the system
might not be available for use until other system resources
finish loading.)
Hung: OS Up
The partner operating system is hung.
OS Rebooting
The partner operating system is rebooting.
Hung: OS Rebooting
The partner system hung while rebooting.
OS Shutting Down
The partner operating system is shutting down.
Hung: OS Shutting Down
The partner system hung while the operating system was
shutting down.
State Sensitive Recovery:
NMI issued
The partner operating system has crashed.
State Sensitive Recovery:
Reset
The system controller is performing a hard reset of the partner
system.
Related Topics
• “Activity Log” on page 4-21
• “Saving the Activity Log to a File” on page 5-1
• Troubleshooting
Performing the Upgrade
4-27
Viewing Active Upgrade Process Status
4-28
Express5800/320Fc: Active Upgrade™ User’s Guide
Chapter 5
Troubleshooting
5-
If necessary, you can collect information about the Active Upgrade process and resolve
problems by:
• Saving the activity log to a file
• Viewing the status of application services
• Viewing the status of installed software
• Verifying If RDR disks are resynchronizing
• Learning about general problems and solutions
• Getting help
Saving the Activity Log to a File
If necessary, you can save the contents of the activity log to a file for later viewing.
To save the activity log to a file
1. Right-click the activity log, and select Save to File in the shortcut menu.
2. Next to Save in, select a folder in which to save the file.
3. Next to File name, type a name for the file. (Activity log files are saved in XML
format, which you can view in Internet Explorer. The .xml extension is added
automatically.)
4. Click Save.
NOTE
If you have just completed an upgrade session, you can
also save the activity log by clicking Save Log on the
Finish page.
Related Topics
• “Viewing Active Upgrade Process Status” on page 4-21
• Troubleshooting
Troubleshooting
5-1
Verifying the Status of Application Services
Verifying the Status of Application Services
At various stages of the Active Upgrade process, you can optionally verify the status of
services you specified for control on the Application Services page of the Active
Upgrade console.
To verify the status of a service
1. Right-click My Computer on your desktop (or in the Start menu).
2. Select Manage from the shortcut menu. Computer Management is displayed.
3. If necessary, click Services and Applications to expand it.
4. Click Services to display the Service Control Manager (Figure 5-1) in the right
pane of the window.
5. Search for a service in the list and view its current Status and Startup Type in the
fields next to the service name.
For example, while the system is in split mode, any service you selected for control by
the Active Upgrade console should be stopped (blank Status field) and its Startup Type
should be Disabled on the Upgrade Side of the system, as shown with the
MSSQLSERVER service in Figure 5-1.
5-2
Express5800/320Fc: Active Upgrade™ User’s Guide
Verifying the Status of Installed Software
Figure 5-1. Service Control Manager
Related Topics
• “Managing Critical Applications During the Upgrade Process” on page 2-6
• “Selecting Application Services to Control” on page 3-9
• “Viewing Active Upgrade Process Status” on page 4-21
• Troubleshooting
Verifying the Status of Installed Software
While you are running in split or merge mode, or after you have finished the Active
Upgrade process, you might want to verify the status of the software packages that you
installed.
If necessary, you can view a list of most of the programs present on your system in the
Add or Remove Programs control panel (Figure 5-2).
Troubleshooting
5-3
Verifying the Status of Installed Software
Figure 5-2. Add or Remove Programs Control Panel
If you installed any Windows updates, select the Show updates check box in the
control panel to display the updates in the list of programs.
NOTE
If your system is in split or merge mode, remember to view
the Add or Remove Programs control panel on the
Upgrade Side. The same control panel on the Production
Side does not list the new software you installed on the
Upgrade Side.
Related Topics
• “Running Software Installation Programs” on page 4-10
• “Viewing Active Upgrade Process Status” on page 4-21
• Troubleshooting
5-4
Express5800/320Fc: Active Upgrade™ User’s Guide
Verifying If RDR Disks Are Resynchronizing
Verifying If RDR Disks Are Resynchronizing
When you complete or abort the Active Upgrade process, the system reestablishes the
mirrors between the RDR partner disks in each CPU- I ⁄ O enclosure. If you intend to
initiate another upgrade process, you must wait for the full resynchronization to
complete before you do so.
You can tell if a disk is resynchronizing by viewing the LEDs on the front panel of the
disk. For information about interpreting the LEDs, see the operation and maintenance
guide for your system.
You can also view the status of your disks using one of the following methods:
• Run a readiness check. On the Active Upgrade page, click Retry. If the disks are
still resynchronizing, the upgrade state is reported as
Fault Tolerant | Idle | Broken and the activity log displays errors indicating that
the disks are not ready.
• View the disks on the Disk Selection page. Any volume that is red is simplexed
(and, thus, probably still resynchronizing). When a disk volume is only green, it is
duplexed and you can start another upgrade. (See “Selecting Disks to Upgrade” on
page 3-5 for more information about disk states on the Disk Selection page.)
• View the disks in ftServer Management Console (ftSMC), using the following
procedure.
To view the status of an RDR virtual disk in ftSMC
1. Open the RDR Utility.
2. Click Logical Disk Information.
3. Click one of the RDR Virtual Disk nodes.
4. Check the value of the Status property, which displays Resync nn% (where nn is
the percentage completed) while the disk is resynchronizing. When the resync
process is finished, the value is None.
Ensure that the value of the Status property for all RDR Virtual Disks is None before
you retry the Active Upgrade process.
Related Topics
• “Selecting Disks to Upgrade” on page 3-5
• “Performing a Readiness Check” on page 4-1
• “Viewing Active Upgrade Process Status” on page 4-21
• Troubleshooting
Troubleshooting
5-5
General Problems and Solutions
General Problems and Solutions
Table 5-1 describes some common problems that could prevent your system from
passing the readiness check.
!
CAUTION
Never perform hardware maintenance, such as removing
and replacing system components, while the Active
Upgrade process is running. If you experience a problem
that prevents the Active Upgrade process from completing
successfully, you should always be able to abort the
upgrade session to restore your system to its original
state. If you cannot abort an upgrade session, contact
NEC Technical Support or your authorized support
representative for assistance.
NOTE
For the latest troubleshooting information, including any
issues that were discovered post release, see the
Express5800/320Fc: Active Upgrade User’s Guide
online at http://support.necsam.com/servers/.
Table 5-1. Troubleshooting: Readiness Check
5-6
Error
Action
IO board nn is
unsafe to pull
Verify that all critical system resources (including disks,
Ethernet PCI adapters, and VTMs) are configured correctly
and duplexed. See “System Prerequisites” on page 2-2 for
more information.
RDR disk is not
duplexed
If you recently ran an upgrade session, wait for the RDR
resynchronization process to complete before running
another upgrade session. See “Verifying If RDR Disks Are
Resynchronizing” on page 5-5 for more information.
Embedded NIC not
teamed
Use the PROset utility to configure your Ethernet PCI
adapters into teams. All embedded Ethernet PCI adapters
must be teamed. See “System Prerequisites” on page 2-2
and “Recommendations” on page 2-5 for more information
about configuring Ethernet PCI adapters.
Express5800/320Fc: Active Upgrade™ User’s Guide
General Problems and Solutions
Table 5-1. Troubleshooting: Readiness Check (Continued)
Error
Action
No IP address on
Upgrade ready team
Use the Network Connections control panel to assign an IP
address (preferably a static IP address) to the Ethernet
team, or renew your DHCP lease. See “System
Prerequisites” on page 2-2 and “Recommendations” on
page 2-5 for more information about configuring Ethernet
PCI adapters.
Team does not have
link on both sides
Ensure that an embedded Ethernet team has at least one
adapter in each CPU- I ⁄ O enclosure with an active network
link. Verify that the network cables are plugged in on both
sides, and that the Ethernet team has a valid IP address.
See “System Prerequisites” on page 2-2 and
“Recommendations” on page 2-5 for more information about
configuring Ethernet PCI adapters
Active Upgrade may
fail. Check DHCP
server.
The Active Upgrade console cannot obtain IP adresses from
your DHCP server. If possible, assign static IP addresses to
your Ethernet teams and VTMs to avoid problems during the
Active Upgrade process.
Remote Desktop is
not enabled
To perform installation tasks while the system is in split
mode, you need to establish a remote connection from the
Production Side to the Upgrade Side. If you want to use
Remote Desktop to connect to the Upgrade Side, you must
enable access for Remote Desktop connections in the
System control panel. (Or you can optionally use Remote
KVM instead of Remote Desktop to connect to the Upgrade
Side.) See “Pre-Upgrade Tasks” on page 2-7 and
“Connecting to the Desktop on the Upgrade Side” on
page 4-6 for more information.
If you are running Windows Firewall, also ensure that the
exceptions for Active Upgrade console and Remote Desktop
are enabled. See “Configuring Windows Firewall for the
Active Upgrade Process” on page 2-10 for more information.
Troubleshooting
5-7
General Problems and Solutions
Table 5-2 describes some common problems with custom actions.
Table 5-2. Troubleshooting: Custom Actions
Error
Action
The executable
filename does not
exist.
Ensure that the executable file associated with your custom
action is located in the directory you specified during the
configuration process. Also, ensure that the custom action is
located on a system disk, otherwise the Upgrade Side loses
access to the executable file while the system is in split
mode.
Custom action
failed with exit
value n
Check the output for the custom action for errors. See
“Viewing Standard Output and Error Stream” on page 3-17
for more information.
You must correct the problem and click Retry in the Active
Upgrade console to retry the current upgrade request (which
also runs the custom action again). The Active Upgrade
process cannot continue until the executable file for your
custom action runs successfully.
If possible, test and debug the executable file outside of the
Active Upgrade process. Ensure that it terminates with exit
value 0 and that it completes in a timely manner.
Table 5-3 describes miscellaneous problems.
Table 5-3. Troubleshooting: Miscellaneous Problems
5-8
Error/Problem
Action
Active Upgrade console
fails to start
Wait a minute, and try to start Active Upgrade console again.
If the problem persists, it might mean that the Active
Upgrade console cannot communicate with related services
on your local system. If your system is running a network
firewall solution, check the firewall logs for blocked
communications and explicitly add these items to your
trusted zone. For information about configuring Windows
Firewall, see “Configuring Windows Firewall for the Active
Upgrade Process” on page 2-10.
Express5800/320Fc: Active Upgrade™ User’s Guide
General Problems and Solutions
Table 5-3. Troubleshooting: Miscellaneous Problems (Continued)
Error/Problem
Action
Failed to disable
PCI device: QLogic
Fibre Channel
Adapter
If you have installed QLogic SANsurfer Fibre Channel HBA
Software to upgrade the BIOS in your host bus adapter, you
should uninstall this utility when you are done upgrading the
BIOS. In this case, the Active Upgrade console cannot split
system resources because it cannot disable the HBA on the
Upgrade Side. To resolve the problem, you must abort the
upgrade, uninstall SANsurfer, restart the system (or stop the
SANsurfer service), and restart the upgrade process.
The underlying
connection was
closed: Unable to
connect to the
remote server.
If your system is running a network firewall solution, check
the firewall logs for blocked communications and explicitly
add these items to your trusted zone. For information about
configuring Windows Firewall, see “Configuring Windows
Firewall for the Active Upgrade Process” on page 2-10.
A connection
attempt failed
because the
connected party
did not properly
respond...
Remote KVM browser
window appears, but
does not open
connection
Ensure that Java™ 2 Runtime Environment (JRE) is installed
and running. Also ensure that you have added the VTM
console Web address to your Trusted Sites list, and that you
have allowed blocked Web-based content. See “Connecting
to the Upgrade Side with Remote KVM” on page 4-7 for
more information.
Remote Desktop
connection fails with the
error, The client
could not connect
to the remote
computer.
See Action under “Remote Desktop is not enabled” in
Table 5-1.
An application fails to
be stopped by the
Active Upgrade console
during split
If your application does not gracefully handle the loss of the
network or disks on the Upgrade Side, it might not stop in a
timely manner when the system enters split mode, and the
Active Upgrade process will time out in a Broken state. If
this happens, restart the Upgrade Side before performing
upgrade tasks to restore the Upgrade Side to an expected
state. If configured correctly, any applications that the Active
Upgrade console controls should not restart on the Upgrade
Side in split mode.
Troubleshooting
5-9
General Problems and Solutions
Related Topics
• “Viewing Active Upgrade Process Status” on page 4-21
• Troubleshooting
Getting Help
If you have a technical question about Express5800/320Fc hardware or software, try
these online resources first:
• Online support from NEC Technical Support. You can find the latest technical
information about an Express5800/320Fc through online product support at the
NEC Technical Support Web site:
http://support.necam.com/servers/ft
• Online product support for Microsoft® products. Your primary source for
support is the computer manufacturer who provided your software, or an
authorized Microsoft Support Provider. You can also find the latest technical
information about Microsoft Windows® and other Microsoft products through online
product support at the Microsoft Help and Support Web site:
http://support.microsoft.com/
If you are unable to resolve your questions with the help available at these online sites,
and the Express5800/320Fc system is covered by a service agreement, please
contact NEC Technical Support (866-269-1239).
5-10
Express5800/320Fc: Active Upgrade™ User’s Guide
Glossary
Glossary-
Active Upgrade technology
A process that allows you to upgrade system software and applications on an
Express5800/320Fc system while its critical applications remain online and
accessible to users. For more information, see the Overview.
application service
A program that runs in the background and performs tasks related to other
programs on the local system or on remote systems. For example, a server may
run an Exchange service, which can process email for local and remote systems.
The Active Upgrade console allows you to specify services that are related to your
applications so that, when necessary, the applications and services may be started
or stopped simultaneously.
See also custom action.
advanced video redirection (AVR) session
See Remote KVM.
call
To declare a program, script, or file that will be referenced by the current file. See
also nesting (for configuration files).
child configuration
A configuration file that is called into a parent configuration file in a nested
configuration.
commit upgrade
The stage of the Active Upgrade process during which the system makes the
upgrade permanent by remirroring the upgraded system disk and the current data
disk with their older partner disks.
You cannot abort the Active Upgrade process after you commit the upgrade,
because the original version of your system is erased as a result of reestablishing
the RDR mirrors.
Glossary-1
Glossary
configuration file
A file that contains all of the settings pertaining to the Active Upgrade process for
your system. You can create multiple configuration files, each for a different type of
upgrade that you regularly perform on your system. You can also use nesting to
incorporate the settings of one configuration file into another configuration file.
critical system resource
A system component, such as a hard disk or network adapter, that is required to
run mission-critical applications.
custom action
A mechanism for controlling your critical applications during the Active Upgrade
process. By specifying executable files and certain parameters in the Active
Upgrade console, you can ensure that your applications are stopped or restarted
at the appropriate times when the system is split or merged.
data disk
An internal RDR disk that is resynchronized from the Production Side to the
Upgrade Side upon completion of the Active Upgrade process.
Data disks are available only on the Production Side while the system is running in
split mode. They typically contain live data (for example, database files and
transaction logs) required by your applications.
A disk that contains active Windows operating system components (boot partition,
paging file) cannot be a data disk (see system disk).
duplex mode (duplexed)
The state of an ftServer system when most or all of its individual components are
paired with redundant partner components that can keep the system operational if
a hardware failure occurs.
It is safe to initiate an Active Upgrade on a duplexed system because redundant
components continue to run your applications during the upgrade process.
element
Redundant segments of an ftServer system that contain components such as
processors, hard drives, PCI slots, and certain I/O ports.
Each system comes with a minimum of two CPU elements and two I/O elements,
usually distributed over two or more enclosures. The elements in an enclosure
operate with each other, or, if necessary, with elements in another enclosure, to
emulate a single logical system.
Glossary-2
Express5800/320Fc: Active Upgrade™ User’s Guide
Glossary
enclosure
A physical container that includes at least one CPU element and at least one I/O
element. In a system with more than one physical enclosure, you may be able to
remove or upgrade one enclosure while the other continues to run your
applications uninterrupted.
executable file
A program file, such as a .exe, .bat, or .vbs file, that you can assign to a custom
action.
fault-tolerant mode
Same as duplex mode.
high priority update (hotfix)
Critical update that should be installed as soon as it becomes available.
installation program
A program file that installs a software package.
mandatory system disk
A disk that is automatically marked as a system disk (on the Disk Selection page
of the Active Upgrade console) and cannot be changed to a data disk. A mandatory
system disk contains either boot files or paging files (virtual memory files) that are
currently in use by the running operating system.
In detail, a disk becomes a mandatory system disk if:
• It contains a volume or part of a volume that the operating system identifies as
a system volume.
• It contains a volume or part of a volume that contains an operating system
paging file.
• It contains a volume or a part of a volume that contains a mount point for a
volume that is either a system volume or contains a paging file.
Note that volumes can span multiple disks and that disks can contain multiple
volumes. The operating system defines as a system volume the volume that was
used to perform the initial low level boot of the system and the volume that contains
the Windows directory. These are typically the same volume but they need not be.
Glossary-3
Glossary
merge system
The stage of the Active Upgrade process during which the system restarts your
applications on the Upgrade Side.
When the system is in a merged state, it has access to critical system resources,
which you can use to test your applications and verify if the upgrade was
successful.
nesting (nested configuration files)
A method of calling one or more existing configuration files from the configuration
file you are currently editing, so that the settings from the called files will also apply
to the file you are editing. See also child configuration and parent configuration.
parent configuration
A configuration file that calls child configuration files and incorporates their settings
in a nested configuration.
persistent data file
A file that stores permanent records for an application, such as a database file.
Production Side
The side of a split-mode system that continues to run your applications and serve
live users during the upgrade process. See also Upgrade Side.
Remote Desktop Connection
A Microsoft Windows component that allows you to control the keyboard, video and
mouse of a remote system from your local system as though you were sitting at that
system’s console.
You can click the Remote Desktop link in the Active Upgrade console to open a
Remote Desktop Connection to the Upgrade Side of a split system.
Remote KVM
A Web browser-based utility that allows you to control the keyboard, video, and
mouse of a remote system from your local desktop as though you were sitting at
that system’s console. (Remote KVM employs the Advanced Video Redirection
(AVR) feature of the VTM console.) Unlike Remote Desktop Connection, Remote
KVM can control the remote system even when the remote operating system is not
running.
You can click the Remote KVM link in the Active Upgrade console to open an AVR
session to the Upgrade Side of a split system.
Glossary-4
Express5800/320Fc: Active Upgrade™ User’s Guide
Glossary
service
See application service.
session
One complete Active Upgrade process, from split mode to finish. Or, a remote
connection to the upgrade side of the system, as in a Remote KVM (or AVR)
session.
simplex mode (simplexed)
The state of an ftServer system when one or more of its individual components is
operating without a redundant partner component. If a hardware failure occurs,
system operations may terminate.
You cannot initiate an Active Upgrade on a simplexed system because there are
insufficient system resources to keep the system operational during the upgrade
process.
split mode
The state of an ftServer system when its elements are split into two independent,
simplexed systems — a Production Side and an Upgrade Side.
split system
The stage of the Active Upgrade process during which the system enters split
mode.
Also, a system that is running in split mode.
system disk
An internal RDR disk that is resynchronized from the Upgrade Side to the
Production Side upon completion of the Active Upgrade process.
Only software located on system disks can be upgraded online. System disks are
available on both sides of the system when it is running in split mode. They typically
contain binary files (for example, operating system drivers and application
services) and configuration information (the Windows registry).
A disk that contains active Windows operating system components (boot partition,
paging files) is automatically marked as a mandatory system disk, and cannot be
changed to a data disk. Other disks default to data disks, but can be changed to
system disks per user configuration if they contain only application binaries and
configuration data.
temporary file
A file that stores data only for a short time, such as a cache file.
Glossary-5
Glossary
Upgrade Side
The side of a split-mode system on which you can upgrade software. See also
Production Side.
volume
A fixed amount of storage on a hard disk (or spanning many hard disks) that is
defined and managed as a single device in the operating system.
Glossary-6
Express5800/320Fc: Active Upgrade™ User’s Guide
Index
A
abort upgrade, 1-6
collecting dump files, 4-20
executing, 4-19
illustrated, 1-7
Abort Upgrade page, 4-19
Actions, 3-12
Active Upgrade console, 2-22
activity log, 4-21
installing, 2-9
main window, 2-26
navigation bar, 2-23
starting and exiting, 2-21
status bar, 4-25
title bar, 2-22
Active Upgrade page, 4-1
Active Upgrade process, 1-1
abort upgrade, 1-6, 4-19
commit upgrade, 1-5, 4-18
configuring, 3-1
defined, Glossary-1
finish upgrade, 4-20
general steps, 1-2
merge system, 1-4, 4-15
network connectivity, 2-2, 4-3, 4-16, 4-17
performance considerations, 2-4
preparing for, 2-1
prerequisites, 2-2, 2-5
release notes, 1-1
restarting Production Side, 4-14
restarting Upgrade Side, 4-12
split system, 1-2, 4-3
state model, 1-8
status, 4-21
troubleshooting, 5-1
activity log, 4-21
interpreting entries, 4-2, 4-23
saving to file, 5-1
administrator account, 2-8
Advanced Video Redirection, 4-7
Index-
application
controlling multiple, 3-8
managing as service, 3-9
managing during upgrade, 2-6, 4-14
managing with custom action, 3-12
application service. See service
Application Services page, 3-9
Automatic Updates. See Windows Automatic
Updates
B
backing up files
Event Viewer logs, 3-10
with custom action, 3-12
batch (BAT) file, 3-12
C
call
defined, Glossary-1
child configuration
defined, Glossary-1
color coding
activity log, 4-2, 4-23
disk selection, 3-6
commit upgrade, 1-5, 4-18
defined, Glossary-1
illustrated, 1-6
verifying Upgrade Side before, 4-17
Commit Upgrade page, 4-18
configuration file, 2-15, 3-1
controlling multiple applications, 3-8
creating, 3-2
default location, 3-1
defined, Glossary-2
describing, 3-19
displaying summary, 3-19
editing, 3-4
loading, 3-3
managing multiple systems, 3-8
Index-1
Index
nesting, 3-7
saving, 3-5
upgrading without, 3-4
Configuration page, 3-1
configuring
administrator account, 2-8
application services, 3-9
Automatic Updates, 2-18
custom actions, 3-12
disks, 3-5
firewall, 2-10
log file backup, 3-10
Remote Desktop, 2-8
UPS, 2-11
connecting to Upgrade Side, 4-6
connection failed, 5-8, 5-9
control type field, 3-13
critical application. See application
critical system resource
defined, Glossary-2
cscript session, 3-18
custom action
control types, 3-13
defined, Glossary-2
managing applications during upgrade, 2-6
order of execution, 3-12, 3-14
programming notes, 3-15
troubleshooting, 5-8
Custom Actions page, 3-12
D
data disk
defined, Glossary-2
on UPS-protected system, 2-11
selecting before upgrade, 3-6
data file
defined, Glossary-4
modifying during upgrade, 2-2
prerequisite for location, 2-1
Description page, 3-19
DHCP address, 2-5
disk drive
See also Rapid Disk Resync
color coding, 3-6
in child configuration, 3-8
requirements for upgrade, 2-4
selecting for upgrade, 3-5
Disk Selection page, 3-5
Index-2
downloading software to system, 2-18
dump files, 4-20
duplex mode
defined, Glossary-2
requirement for upgrade, 2-2
E
element
defined, Glossary-2
EMC storage system, 4-4
enclosure
defined, Glossary-3
environment variables, 3-16
error stream, 3-17
Ethernet PCI adapter
performance during upgrade, 2-4
requirements for upgrade, 2-2, 2-5
static IP address, 2-5
Ethernet team. See Ethernet PCI adapter
event log files, 3-10
EXE file, 3-12
executable file
defined, Glossary-3
prerequisite for location, 2-1
exit values, 3-17
external storage, 1-4
PowerPath software, 4-4
requirements for upgrade, 2-4, 2-5
SANsurfer software, 2-5, 5-9
F
Finish Upgrade page, 4-20
firewall, 2-10, 5-8, 5-9
firmware
requirements for upgrade, 2-4
upgrades supported, 2-2
ftServer system
duplex mode, 2-2
hardware maintenance, 4-4
merge mode, 1-4, 4-15
split mode, 1-2, 4-3
support for hotfixes, 2-5
system software requirement, 2-4
systems supported for upgrade, 2-2
ftSMC
viewing RDR disk status, 5-5
Express5800/320Fc: Active Upgrade™ User’s Guide
Index
G
M
gathering information, 2-15
glossary, Glossary-1
managing
application during upgrade, 2-6
configuration files, 3-1
Production Side, 4-14
Upgrade Side, 4-5
mandatory system disk
defined, Glossary-3
disk selection, 3-6
merge system, 1-4, 4-15
defined, Glossary-4
illustrated, 1-5
verifying Upgrade Side before, 4-15
Merge System page, 4-15
H
hardware maintenance, 4-4
Hardware State, 4-25
Help button, 2-22
high-priority update
See hotfix
host bus adapter (HBA). See external storage
hotfix, 2-1
configuring Automatic Updates, 2-18
configuring WSUS server, 2-19
defined, Glossary-3
downloading before split mode, 2-18
installing with Automatic Updates, 4-10
recommendations for ftServer system, 2-5
restarting system after installation, 4-12
verifying list of updates to install, 2-20
I
icon
Active Upgrade console, 2-21
Help, 2-22
Windows Automatic Updates, 4-10
installation program
defined, Glossary-3
installing software
Active Upgrade console, 2-9
downloading software before
upgrade, 2-18
hotfixes, 4-10
location of application data files, 2-1
modifying application data files, 2-2
network requirements, 2-2, 2-18
running installation programs, 4-12
support for upgrades, 2-1
viewing list of software, 5-3
L
links, 4-6
Remote Desktop, 4-8
Remote KVM, 4-7
Log File Backup page, 3-10
N
navigation bar, 2-23
nesting
defined, Glossary-4
network
connectivity during upgrade, 2-2, 4-3,
4-16, 4-17
performance during upgrade, 2-4
requirements for upgrade, 2-2
non-maskable interrupt (NMI), 4-27
O
Operational State, 4-26
Other Configurations page, 3-7
overview, 1-1
P
parent configuration
defined, Glossary-4
Partner State, 4-27
performance considerations, 2-4
performing an upgrade, 4-1
persistent data file. See data file
power considerations, 2-11
PowerPath software, 4-4
PrepareMerge mode, 1-8
PrepareSplit mode, 1-8
preparing for upgrade, 2-1
prerequisites, 2-2, 2-5, 4-1
pre-upgrade tasks, 2-7
problems, 5-6
Index-3
Index
Production Side
defined, Glossary-4
managing, 4-14
programming notes, custom actions, 3-15
Q
QLogic Fibre Channel adapter. See external
storage
R
Rapid Disk Resync
checking resync progress, 5-5
data loss on Production Side, 3-11, 3-12
disabling during split process, 1-4
prerequisite for upgrade process, 2-1, 2-4,
3-5
resyncing during abort process, 1-7, 4-19
resyncing during commit process, 1-5, 1-6,
4-18
running verify process, 2-8
RDR. See Rapid Disk Resync
readiness check, 4-1
troubleshooting, 5-6
rebooting. See restarting
recommendations, 2-5
release notes, 1-1
Remote Desktop Connection
configuring before Upgrade, 2-8
connecting to Upgrade Side, 4-8
defined, Glossary-4
terminating connection, 4-9
Windows Firewall exception, 2-10
Remote KVM
connecting to Upgrade Side, 4-7
defined, Glossary-4
terminating connection, 4-8
requirements, 2-2, 2-5
restarting
applications, 2-6
Production Side, 4-14
Upgrade Side, 4-12
S
SANsurfer software, 2-5, 5-9
saving
activity log to file, 5-1
configuration file, 3-5
Index-4
service
defined, Glossary-1
managing during upgrade, 2-6, 3-9
startup type, 3-9, 3-15
verifying status of, 5-2
session
defined, Glossary-5
sequence, 1-8
severity, 4-23, 4-24
simplex mode
defined, Glossary-5
upgrade fault tolerance, 2-3
software. See installing software
solutions, 5-6
split system, 1-2, 4-3
defined, Glossary-5
illustrated, 1-3
Split System page, 4-3
standard output, 3-17
startup type, 3-9, 3-15
state model, 1-8
state-sensitive recovery (SSR), 4-27
static IP address, 2-5
status bar, 4-25
Hardware State, 4-25
Operational State, 4-26
Partner State, 4-27
Upgrade State, 4-26
summary of upgrade, 3-19
support for upgrades, 2-1
system disk
copying installers to, 2-18
defined, Glossary-5
preserving event logs, 3-11
selecting before upgrade, 3-6
verifying installed software, 4-17, 5-3
system resource
defined, Glossary-2
T
temporary file
defined, Glossary-5
prerequisite for location, 2-1
timing field, 3-14
troubleshooting, 5-1
U
uninterruptible power supply (UPS), 2-11
Express5800/320Fc: Active Upgrade™ User’s Guide
Index
upgrade
fault tolerance during, 2-3
session, 1-8, Glossary-5
status, 4-21
support, 2-1
tasks, 4-5
Upgrade Side
connecting to, 4-6
defined, Glossary-6
managing, 4-5
verifying before commit, 4-17
verifying before merge, 4-15
Upgrade State, 4-26
Upgrade Summary page, 3-19
V
verifying
list of hotfixes, 2-20
status of installed software, 5-3
status of services, 5-2
Upgrade Side before commit, 4-17
Upgrade Side before merge, 4-15
Virtual Technician Module
configuring for upgrade, 2-3
Remote KVM, 4-7
static address, 2-5
upgrading firmware, 2-2, 2-4
usage during upgrade, 1-4
Visual Basic script (VBS), 3-12, 3-18
volume
defined, Glossary-6
VTM. See Virtual Technician Module
W
Windows Automatic Updates
downloading before upgrade session, 2-18
installing updates, 4-10
restarting system for update, 4-12
Windows Firewall, 2-10
Windows Server Update Services
(WSUS), 2-19
Index-5
Index
Index-6
Express5800/320Fc: Active Upgrade™ User’s Guide