1
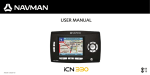
USER MANUAL ENGLISH - Europe/New Zealand iCN 300series_UM_cover.indd 1 iCN 330 1/18/06 4:51:49 PM iCN330_UM_EU_NZ_FINAL.indd 2 18/01/2006 3:52:18 p.m. Contents © 2006 Brunswick New Technologies Asia Pte Limited. Navman is a registered trademark of Brunswick New Technologies Asia Pte Limited and is used under licence by Navman New Zealand. All rights reserved. The software contains proprietary information of Navman; it is provided under a licence agreement containing restrictions on use and disclosure and is also protected by copyright law. Reverse engineering of the software is prohibited. No part of this publication may be reproduced, stored in a retrieval system, or transmitted in any form or by any means, electronic, mechanical, photocopying, recording or otherwise without the prior written permission of Navman. Back-On-Track, Drive-Away, Smart and Turn-by-Turn are either registered trademarks or trademarks of Brunswick New Technologies Asia Pte Limited and are used under licence by Navman New Zealand. All rights reserved. All other trademarks and registrations are the property of their respective owners. Published in New Zealand. 1. Introduction ............................................................................................ 5 2. Setting Up Your iCN ................................................................................. 6 3. Navigation .............................................................................................. 7 A. New Destinations .............................................................................. 7 B. Saved Destinations ......................................................................... 10 4. Preferences .......................................................................................... 12 5. GPS Status ........................................................................................... 13 Appendices............................................................................................... 13 Resetting your iCN .............................................................................. 13 Address Search Rules ......................................................................... 14 Troubleshooting .................................................................................. 14 Support Information .................................................................................. 14 Disclaimer Due to continued product development this information may change without notice. Navman does not warrant that this document is error-free. The screenshots and other presentations shown in this User Manual may differ from the actual screens and presentations generated by the actual product. All such differences are minor and the actual product will deliver the described functionality as presented in this User Manual in all material respects. Compliance This device complies with part 15 of the FCC Rules. Operation is subject to the following two conditions: (1) This device may not cause harmful interference, and (2) this device must accept any interference received, including interference that may cause undesired operation. Important information for the correct treatment and recycling of this equipment Applicable in the European Union and other European countries with separate collection systems The crossed-out wheeled bin symbol printed on this product or its packaging indicates that this product must not be disposed of as unsorted municipal waste but should instead be collected separately. As user of this product, you are responsible for returning it to an authorised collection facility set up by your local council (which can provide you with information on your nearest collection facility). Alternatively, if you are replacing the old product with a new equivalent product, the shop where you buy the new product is required to take the old product back free of charge (or direct you to the nearest recycling point) as long as the new product is of equivalent type and fulfils the same functions as the old product. Waste electrical and electronic equipment must be treated separately in order to ensure that hazardous materials contained inside the equipment are not buried thereby providing potential future problems for the environment and human health. Moreover, parts of the waste equipment can be reused and recycled, thereby reducing the quantities of waste being disposed of and preventing the depletion of natural resources. Your role in participating in the separate collection of waste electrical equipment is essential in ensuring that environmental protection and human health objectives are achieved through responsible treatment and recycling. Applicable accessory: In-vehicle power adaptor. The above information is provided in compliance with the [Waste Electrical and Electronic Equipment (Producer Responsibility) Regulations 2006] which requires the separate collection, treatment, recycling and environmentally sound final disposal of waste of electrical and electronic equipment (WEEE). 3 iCN330_UM_EU_NZ_FINAL.indd 3 18/01/2006 3:52:19 p.m. Important safety information It is your sole responsibility to place, secure and use the iCN in a manner that will not cause accidents, personal injury or property damage. Always observe safe driving practices. PLEASE READ CAREFULLY BEFORE INSTALLING PRODUCT IN VEHICLE This is the safety alert symbol. It is used to alert you to potential personal injury hazards. Obey all safety messages that follow this symbol to avoid possible injury or death. Mount the iCN in a position that is secure and does not obstruct the driver’s view. WARNING indicates a potentially hazardous situation which, if not avoided, could result in death or serious injury. Do not operate the iCN while driving. CAUTION indicates a potentially hazardous situation which, if not avoided, may result in minor or moderate injury. On main roads, the distance to an exit calculated by the iCN may be further than the distance shown on road signs. Road signs show the distance to the start of an exit while your iCN shows the distance to the next intersection, i.e., the end of the exit ramp or road. To prepare to exit a road, always follow distance information on road signs. Do not mount the iCN in a way that may interfere with the safe operation of the vehicle, the deployment of air bags or other safety equipment. Before you use your iCN for the first time, make yourself familiar with your device and its operation. CAUTION used without the safety alert symbol indicates a potentially hazardous situation which, if not avoided, may result in property damage. Do not handle the iCN while it is hot. Let the product cool, out of direct sunlight. Removing original equipment, adding accessories or modifying your vehicle could affect the vehicle’s safety or make it illegal to operate in some jurisdictions. Follow all product instructions and all instructions in your vehicle owner’s manual regarding accessories or modifications. Consult your country’s and/or state’s laws regarding operation of a vehicle with any accessories or modifications. Do not expose the iCN to direct sunlight in an unattended vehicle for prolonged periods. Overheating may damage the unit. To discourage theft, do not leave the iCN, mounting bracket or any cables in plain view in an unattended vehicle. Failure to adhere to these warnings and cautions may lead to death, serious injury, or property damage. Navman disclaims all liability for installation or use of the iCN that causes or contributes to death, injury, or property damage or that violates any law. 4 iCN330_UM_EU_NZ_FINAL.indd 4 18/01/2006 3:52:19 p.m. 1. Introduction Front Components Welcome Interchangeable Faceplate (alternate faceplates not included*) Thank you for purchasing the Navman iCN. This user manual has been prepared to guide you through the operation of your Navman iCN from first set-up through to continuous use. Please read this manual carefully before using your device for the first time. Keep this manual available for future reference. Up Left How Your iCN Works 4-Way Toggle The Global Positioning System (GPS) is a network of satellites that transmit accurate time and position information worldwide. GPS receivers receive signals from these satellites and use the information to determine an exact location. Satellites orbit the earth at 20,200 kilometres (around 12,000 miles). While a GPS receiver can detect signals from up to 12 satellites at any time, only three signals are needed to provide a position or “GPS fix” (latitude and longitude) for vehicle navigation systems. Right Down Volume Buttons Your iCN GPS antenna receives GPS signals and uses these to calculate your position on the maps stored on its memory card. To receive GPS signals, ensure that the iCN is outdoors, or in a vehicle outdoors, and the GPS antenna has an unobstructed view of the sky. The iCN can operate in all weather types except snowfall. The first time you switch on your iCN, it may take a few minutes to get a GPS fix. This may also be the case when you activate your iCN after the battery has completely drained. OK Button Colour Screen For more information about GPS and your iCN, see page 13 of this manual or consult the GPS Navigation Frequently Asked Questions guide. Selection Button Home Button Side Components Selection Button Power Button Back Components Fold-out GPS Antenna External Antenna Socket (external antenna not included*) Integrated Speaker Battery Switch Memory Card Slot Power Supply Socket * Available for purchase separately - see Accessories Brochure 5 iCN330_UM_EU_NZ_FINAL.indd 5 18/01/2006 3:52:21 p.m. 2. Setting up your iCN d. If you would like to select subregions or states from another region, go to Step 8a; otherwise continue to Step 8e. e. Select Next by pressing the right Selection Button. The Voice screen will display. Using your iCN for the first time 1. Position your iCN in your vehicle as shown in your In-Car Installation Guide. Ensure that the GPS Antenna is pulled out to the horizontal position and the Battery Switch is in the On position. 2. Press the Power button to turn on your iCN. The Language screen will display. 9. You can set your iCN to provide spoken instructions in either a male or female voice. Select your preferred option by using the left and right buttons on the 4-way toggle, then press the OK button. When you have selected your preferred option, press the right Selection Button to Save. The Display screen will open. 3. Use the 4-way toggle to choose your language, then save by pressing the right Selection Button. 4. Read the Warning message that is displayed. 5. If you agree with the Warning, select Accept by pressing the right Selection Button. NOTE: If you do not accept the Warning, your iCN will turn off. 6. The Welcome screen will display; press the right Selection Button to continue. 7. If the Voice screen displays, proceed to Step 9; if the Select Region screen displays, continue to Step 8. 10. Using the Display screen, you can set your time and distance preferences: • To set your Time Zone, press the left and right buttons on the 4-way toggle to set the number of hours difference between your time zone and UTC (GMT). • Use the 4-way toggle and the OK button to set your iCN to display the time in 12 or 24 hour format. • If you have set UK English or US English as the Language, you can use the 4-way toggle to set whether your iCN will display distances in miles or kilometres. • When you have set your preferences, press the right Selection Button to continue. 8. Select the maps you would like to use with your iCN: a. Use the 4-way toggle to highlight a map region, then press the OK button. Either the Select Subregions or Select States screen will display. b. Use the 4-way toggle to select each subregion or state map that you would like to have access to and press OK. NOTE: For optimum performance when using your iCN, ensure that the total size of the maps you select is less than 250MB. The maximum total size allowed is 350MB. 11. You can move back to any of the earlier screens by pressing the left Selection Button. Press the right Selection Button to open the Go To screen. You can access your preferences at any time from the Go To screen by pressing the right Selection Button. c. Save your selection of maps by pressing the right Selection Button. The selected maps will load. The Select Region screen will redisplay. 6 iCN330_UM_EU_NZ_FINAL.indd 6 18/01/2006 3:52:22 p.m. 3. Navigation 2. You can choose to either navigate to the nearest POI or choose from all available POIs. If you are searching for a specific POI, select All POIs using the 4-way toggle, and press OK. If you are looking for a convenient POI such as a nearby petrol station, select Nearest POI and press OK. In this screen, the right Selection Button also acts as an OK button. 3. In the Select POI screen, use the 4-way toggle to select the type of POI you are seeking, and press OK. 4. The Keyboard screen will display. If you selected Nearest POI in the earlier screen, the distance to the POI will be shown. 5. Use the 4-way toggle to move around the Keyboard screen. To select a character, press OK. For your safety, enter destination information before you start a journey. Never operate the iCN while driving. Do not leave your iCN attached to your windscreen when not in use as prolonged exposure to heat may damage the device. After you have set up your iCN, the Go To screen will be displayed. This lists the different types of destinations that you can visit. The destinations to which you can navigate fall into two broad categories - New Destinations and Saved Destinations. When you first use your iCN, you will not yet have saved favourites, and will need to input the point to which you wish to navigate. You can navigate to either a Point of Interest (POI) or to a specific area or street. This will narrow your search. To delete a character, press the left Selection Button or select ; hold the left Selection Button to delete the line. When you have entered the first few characters of your destination, or you can see your destination on the screen, press the right Selection Button. NOTE: The keyboard screen can be viewed in three modes: • To display the number/symbol Keyboard screen, select , then press OK • To display the alternate Keyboard screen, which features accented characters. select • To return to the alphabet Keyboard screen, select , then press OK. NOTE: You can return to the Go To screen at any time by pressing the Home Button. If you have set a destination, you can return to the navigation screens by pressing the left Selection Button at the Go To screen. You can cancel the trip by pressing the Home Button. If you have not set a destination, pressing the left Selection Button will display the Free Driving screen where you can view and track your current location (see page 10). Press the right Selection Button at the Go To screen to open the Preferences screen (see page 12). , then press OK; A. New Destinations Navigating to a Point of Interest (POI) A POI is a named site, feature, landmark or public venue which can be displayed as an icon on the map. POIs are grouped by type, such as car parks and airports. Your iCN comes with a number of POIs stored on its map. 6. Use the 4-way toggle to highlight your preferred destination and press OK. Use the left and right Selection Buttons to scroll back and forth through the list of possible destinations. If you are at the top of the list, pressing the left Selection Button will bring you back to the previous screen. When you select a destination, your iCN will display the Destination screen, which clearly shows your chosen destination. Press the left Selection Button to return to the previous screen. Press the right Selection Button to confirm your destination. Your iCN will calculate your route and guide you to your destination. NOTE: The POIs in your iCN will vary depending on the map that you use. NOTE: You can save this destination as a Favourite, use the 4-way toggle to select Save and press OK. You will be guided to the Favourites screen. See page 11 for more on saving destinations. 1. To navigate to a POI, use the 4-way toggle to highlight Points of Interest on the Go To screen and press OK. The first time you do this, you may be asked to select your country. Use the 4-way toggle to highlight your country and press OK. 7 iCN330_UM_EU_NZ_FINAL.indd 7 18/01/2006 3:52:22 p.m. Navigating to an Address Using your iCN, you can navigate to an area, the centre of a street, or a certain intersection. To navigate to an address, select Find Address on the Go To screen. See Address Search Rules on Page 14 for more about searching for addresses. 4. Use the 4-way toggle and the OK button to decide if you want to go to the centre of the area or to find a street within that area. If you choose to Go To Centre of Area, proceed to Step 7. If you choose to Find Street, proceed to Step 5. 1. Use the 4-way toggle to select whether you want to search for an area or a street and press OK. In some countries, you can also search by postal code. If you choose to Find Area/Town or Find Postal Code, proceed to Step 2. If you choose to Find Street, proceed to Step 5. The first time you do this, you may be asked to select your country. Use the 4-way toggle to highlight your country and press OK. You can change your country at any time using the Change Country button in the You Are Going To screen. 5. Use the 4-way toggle to move around the Keyboard screen. To select a character, press OK. This will narrow your search. To delete a character, press the left Selection Button or select ; hold the left Selection Button to delete the line. When you have entered the first few characters of the name of the place you are seeking, or you can see it on the screen, press the right Selection Button. TIP: For optimal performance when entering an address, select an area/town or postcode before searching for a street name. 2. Use the 4-way toggle to move around the Keyboard screen. To select a character, press OK. This will narrow your search. To delete a character, press the left Selection Button or select ; hold the left Selection Button to delete the line. When you have entered the first few characters of the name of the place you are seeking, or you can see it on the screen, press the right Selection Button. 6. Use the 4-way toggle to highlight the name of the street and press OK. Select whether you want to go to the centre of your destination street or to a particular intersection. In certain countries, you may be able to enter the house number of your destination. If you choose to go to a particular intersection, proceed to Step 7. If you choose to go to a particular street number, proceed to Step 8. If you choose to go to the centre of the street, proceed to Step 9. 3. Use the 4-way toggle to highlight the name of the area and press OK. If you cannot see the area or postal code you are searching for on the screen, use the left and right Selection Buttons to scroll back and forth through the list. If you are at the start of the list, pressing the left Selection Button will bring you back to the previous screen. 8 iCN330_UM_EU_NZ_FINAL.indd 8 18/01/2006 3:52:29 p.m. Navigation Screens Once you have entered a destination, your iCN will calculate your route. You can view your route in a number of ways. Use the left and right direction buttons on the 4-way toggle to switch between the 3D Map screen, Next Instruction screen, Instruction List screen and Route Summary screen. If you have not yet entered a destination, the Free Driving screen is displayed. 3D Map Screen The 3D Map screen displays your current location. You can change the map viewing angle by pressing the up or down direction buttons on the 4-way toggle. The amount of map displayed will vary according to your current speed - the faster you are travelling, the larger the area of map that will display. 7. If there is a high number of intersections on your destination street, you will be returned to the Keyboard screen. Enter the first few characters of the cross-street you are seeking and press the right Selection Button. A list screen similar to that of Step 6 will display. You will go directly to this screen if there is only a limited number of intersections on your destination street. Use the 4-way toggle to scroll to your target cross-street and press OK. This will bring you to the Destination screen. Proceed to Step 9. Your next instruction. Name of your next location. Distance to next instruction; turns red as you approach.. Additional information can display here. Press the right Selection Button to scroll the options: Your current position. Progress toward next instruction; turns red as you approach. GPS strength indicator. Press the left Selection Button to display the GPS Status screen. 8. Use the 4-way toggle and the OK button to enter the number of the building that you wish to visit and press the right Selection Button. Use the 4-way toggle to select the number you wish to go to from the list and press OK. Your current location. • Speed; • Time; • Heading; • Distance to Turn; • Distance to Go; • ETA (Estimated Time of Arrival); • Time to Go. Next Instruction Screen The Next Instruction screen displays information that you need for the next instruction, the direction to follow and the distance to the instruction. The next instruction you will follow. Name of your next location. Map of the next instruction. Distance to next instruction. 9. When you select a destination, your iCN will display a map with that destination highlighted. To choose a specific point on the Destination screen as your destination, use the 4-way toggle to highlight the map and press OK. A cursor will appear. Use the 4-way toggle to point the cursor at your destination and press OK. Your iCN will automatically update your destination to that point. Press the right Selection Button to confirm that you wish to go to this destination. Your iCN will calculate your route, and guide you on your journey. Press the left Selection Button to return to the previous screen without calculating a route. Additional information can display here. Press the right Selection Button to scroll the options: The following instruction. Distance to the following instruction. Your current location. GPS strength indicator. Press the left Selection Button to display the GPS Status screen. NOTE: You can save this destination as a Favourite; use the 4-way toggle to select Save and press OK. You will be guided to the Favourites screen. See page 11 for more on saving destinations. Progress toward next instruction; turns red as you approach. • Speed; • Time; • Heading; • Distance to Turn; • Distance to Go; • ETA (Estimated Time of Arrival); • Time to Go. 9 iCN330_UM_EU_NZ_FINAL.indd 9 18/01/2006 3:52:32 p.m. Instruction List Screen Free Driving Screen The Free Driving screen displays your current location on a 3D map. To display the Free Driving screen, press the left Selection button at the Go To screen when a route has not been calculated. The amount of map displayed will vary according to your current speed - the faster you are travelling, the larger the area of map that will display, You can change the map viewing angle by pressing the up or down direction buttons on the 4-way toggle. The Instruction List screen displays all of the turns of your route, the turn direction, the street name and the distance to the turn. A route must have been calculated for this screen to be able to display. The screen shows three turns at a time. The route can be scrolled through using the up and down buttons on the 4-way toggle. Additional information can display here. The next turn is highlighted Press the right Selection Button to scroll the options: at the top of the list. • Speed; Distance to the next turn. GPS strength indicator. Press the left Selection Button to display the GPS Status screen. Your current location. • Time; • Heading; • Distance to Turn; • Distance to Go; • ETA (Estimated Time of Arrival); • Time to Go. Your current position. Additional information can display here. Press the right Selection Button to scroll the options: GPS strength indicator. Press the left Selection Button to display the GPS Status screen. • Speed; • Time; • Heading. Your current location. Route Summary Screen B. Saved Destinations This screen provides high-level summary information about your route. Your iCN can save destinations for future use. These can be accessed in a number of ways: Additional information can display here. Press the right Selection Button to scroll the options: Destination. • Recent Trips • Recent POIs • Favourites • My Home • Speed; • Time; • Heading; • Distance to Turn; • Distance to Go; • ETA (Estimated Time of Arrival); • Time to Go. Map of entire route. GPS strength indicator. Press the left Selection Button to display the GPS Status screen. Percentage of trip completed. Recent Trips Back-On-Track™ Automatic Rerouting Your iCN automatically saves the destinations you visit. It will hold your last 30 destinations in memory as Recent Trips. To access a recent trip, use the 4-way toggle to select Recent Trips from the Go To screen, and press OK. The Recent Trips screen will open. Use the 4-way toggle to highlight the name of your destination and press OK. Use the left and right Selection Buttons to scroll back and forth through the list. If you are at the start of the list, pressing the left Selection Button will bring you back to the previous screen. Your iCN automatically re-calculates your trip if you make a wrong turn or miss a turn. If the Next Instruction or Instruction List screens are open, a large question mark will be displayed while your iCN recalculates your route. The instructions in the Instruction List screen will clear. 10 iCN330_UM_EU_NZ_FINAL.indd 10 18/01/2006 3:52:33 p.m. Recent POIs Navigating to a Favourite Your iCN automatically stores the types of POI that you visit. To access a Favourite, use the 4-way toggle to select Favourites on the Go To screen, and press OK. This will open the Favourites screen. If you have recorded a POI as a destination in your iCN, the next time you open the Points of Interest screen, that type of POI is listed. Your iCN will record the last three types of POI you have visited. If you select a recent POI, the Select POI screen will display, listing nearby POIs of that type. Use the 4-way toggle to highlight the name of your destination and press OK. Use the left and right Selection Buttons to scroll back and forth through the list. If you are at the start of the list, pressing the left Selection Button will bring you back to the previous screen. Use the 4-way toggle to highlight the name of your destination and press OK. Use the left and right Selection Buttons to scroll back and forth through the list. If you are at the start of the list, pressing the left Selection Button will bring you back to the previous screen. Navigating to My Home From the Go To screen, select My Home then press OK. The route is calculated and displayed. The My Home button is only enabled when a Favourite has been saved as My Home. Saving a Destination Every time you open the Destination screen, you can save the destination as a favourite. You can store up to 50 Favourites on your iCN. There are two types of Favourite - My Home and Favourites. Editing Favourites 1. From the Go To screen, use the 4-way toggle to select Favourites and press OK. 2. In the Favourites screen, highlight the Favourite you want to edit and press OK. 1. To save a destination as a favourite, select Save on the Destination screen and press OK. 2. The New Favourite screen will display. You can change the name of your favourite by pressing OK when the Name field is highlighted. This will open the Keyboard screen, where you can enter a new name for your Favourite. 3. You can choose to save the favourite as My Home. To do this, use the 4-way toggle to highlight the Save As My Home button and press OK. If you already have a Favourite stored as My Home, you will be asked if you want to overwrite the existing Favourite. Press the right Selection Button to confirm. 4. To save your destination as an ordinary Favourite, press the right Selection Button. Your destination will be saved. To exit without saving your destination, press the left Selection Button. 3. The Destination screen will open. Use the 4-way toggle to select Edit and press OK. 4. You can rename, Save As My Home or Delete the Favourite. • To rename the favourite, press OK when the Name is highlighted and use the Keyboard screen to edit the name. Save the name when finished by pressing the right Selection Button. • To delete the Favourite, use the 4-way toggle to highlight Delete and press OK. You will be asked if you are sure you wish to delete the Favourite. Press the right Selection Button to confirm. • To save the Favourite as My Home, use the 4-way toggle to highlight Save As My Home and press OK. If you already have a My Home stored, you will be asked if you are sure you wish to overwrite the existing Favourite. Press the right Selection Button to confirm. 11 iCN330_UM_EU_NZ_FINAL.indd 11 18/01/2006 3:52:38 p.m. 4. Preferences Display Preferences 1. From the Preferences screen, select Display and press OK. You can customise your iCN to suit your needs. 2. You can change the following display items in the same fashion as you did when first setting up your iCN. • Time Zone • 12 Hour/24 Hour clock • Distance Units; i.e. whether your iCN calculates distance in kilometres or miles (US English and UK English only). 3. You can also adjust Brightness settings. Use the 4-way toggle to select the Brightness control, and to move the pointer up and down. 4. Save your preferences by pressing the right Selection Button. To display the Preferences screen, press the right Selection Button when in the Go To screen. Navigation Preferences Map Preferences The following steps will help you to select the maps you would like to use with your iCN: NOTE: The option to change map preferences is only available in some countries. 1. From the Preferences screen, use the 4-way toggle to select Maps and press OK. The Select Region screen will display. 2. Use the 4-way toggle to highlight a map region, then press the OK button. The Select Countries or Select States screen will display. 3. Use the 4-way toggle to select each country or state map that you would like to have access to and press OK. If the map is already selected, it will be deselected. 1. From the Preferences screen, select Navigation then press OK. 2. Your iCN can avoid certain types of roads or ferries when calculating a route. You can also set your iCN to warn you if a route contains those roads or ferries. Use the 4-way toggle to select the roads you want to avoid or be warned about and press OK. 3. Use the 4-way toggle and the OK button to select whether weighting should be given to Fastest time or Shortest distance when calculating your route. 4. Save your preferences by pressing the right Selection Button. NOTE: For optimum performance when using your iCN, ensure that the total size of the maps you select is less than 250MB. The maximum total size allowed is 350MB. Language Preferences 1. From the Preferences screen, select Language then press OK. 2. Use the 4-way toggle and the OK button to set your preferred language as you did when setting up your iCN for the first time. See page 6 for further details. 4. Save your selection of maps by pressing the right Selection Button. The selected maps will load. The Select Region screen will redisplay. 5. If you would like to select countries or states from another region, go to step 2; otherwise continue to step 6. 6. Select Back by pressing the left Selection Button. The Preferences screen will redisplay. Voice Preferences 1. From the Preferences screen, select Voice then press OK. 2. Use the 4-way toggle and the OK button to choose between a male and female voice as you did when setting up your iCN for the first time. See page 6 for further details. Volume You can change the volume at any time by using the volume buttons on the left-side of the front of your iCN. 12 iCN330_UM_EU_NZ_FINAL.indd 12 18/01/2006 3:52:38 p.m. Demonstrations The satellites available from your current position are shown in different colours: 1. From the Preferences screen, select Demo and press OK. Colour Description Yellow A satellite that is being tracked, but not being used to fix your position Green A satellite that is being tracked and being used to fix your position The globe in the GPS Status screen will appear grey if your iCN does not have a GPS fix. 2. Use the 4-way toggle to highlight Demonstration Enabled and press OK. • Select Route Demonstration if you want your iCN to display a route before you undertake your journey. You can use the 4-way toggle to scroll through the Navigation screens as if you were driving the route. If your iCN is receiving a GPS signal, it will calculate your trip from your current location. Otherwise, it will calculate your trip using your last recorded destination as the starting point. • The Smart Demonstration guides you through the functionality of your iCN. You can follow this demonstration to further familiarise yourself with your iCN. • Selecting Repeat will place the demonstration you have chosen on a continuous loop. 3. Save your preferences by pressing the right Selection Button. 4. To cancel demonstration mode, return to this screen, highlight Demonstration Enabled and press OK. Select Save by pressing the right Selection Button. You can determine your GPS Status at a glance in any of the Navigation screens. will display between one and three bars to indicate the strength of the signal; the GPS Strength Indicator will display red The GPS Strength Indicator when no fix is available. For more information on GPS, see the GPS Navigation Frequently Asked Questions guide. 5. GPS Status Appendices Your iCN works by receiving signals from the GPS. The GPS Status screen provides a visual representation of the information being received. Resetting your iCN Latitude and longitude are displayed, along with a north-pointing compass, the heading in degrees and ground speed. You can reset your iCN to factory default condition, which will have the following effects: • Preferences are reset to original values; • Recent destinations and recent POIs are deleted; • The existing trip is cancelled; • The start-up wizard will display the next time you turn on your iCN; • If you selected a map region or individual countries or states, you will need to do so again the next time you turn on your iCN. To reset your iCN, complete the following: You can check the GPS Status at any time by pressing the left Selection Button on the Preferences screen or on any of the Navigation screens. 1. From the Preferences screen, press the right Selection Button. The About screen will display. 2. Press the right Selection Button several times until the caution is displayed. 3. Press the right Selection Button again to confirm that you want to reset your iCN to factory default condition. A message confirming a successful reset will display for 5 seconds, then your iCN will turn off. You can also open this screen by pressing the left Selection Button on the Go To screen when you have not programmed a trip into your iCN. If you have programmed a trip, pressing this button will return you to the navigation screens. 13 iCN330_UM_EU_NZ_FINAL.indd 13 18/01/2006 3:52:38 p.m. Address Search Rules Troubleshooting The following rules apply when searching for a destination in Europe: Problem Street Names with Dates If a street name contains a date or a number, search by the first number: Example 1: If searching for “Faubourg du 13 Juillet 1920”, search by “13”. Example 2: If searching for “Avenue du 14 Avril 1914”, search by “14”. Example 3: If searching for “Rue de la 1 ere Armée”, search by “1”. Possible Cause Recommended Solution Low battery Connect your iCN to a power source, then try to activate it. The Battery Switch is not in the On position Switch the Battery Switch to the On position. My iCN doesn’t recognise the memory card Incorrect memory card inserted Insert the memory card that came with your iCN. Your iCN will only operate with a Navman iCN 300 series Memory Card installed. Screen is hard to read Screen not bright enough Change the brightness setting on the Display screen. I can’t find the street I’m looking for Use of abbreviations Follow the Address Search Rules when entering addresses. Only enter the first few characters of the street you are seeking, and then use the Select Street screen to find it. My iCN isn’t receiving GPS signals GPS Antenna unable to receive signal Ensure that your GPS Antenna is in the horizontal position. If you have a car with a heated or heat-reflecting windscreen, you may require an external antenna in order to receive GPS signals. For more information, see the GPS Navigation Frequently Asked Questions guide. My iCN has lost GPS reception Physical position of vehicle. It is possible for the GPS signal to be interrupted due to your environment, e.g. if you are surrounded by tall buildings or if it is snowing. Your iCN will continue to try to get a fix at all times and will inform you when it is receiving a valid signal again. For more information, see the GPS Navigation Frequently Asked Questions guide. I can’t turn on my iCN while using battery power Streets Named After People (excluding Italy) If a street name is a person’s name (including at least a first and last name), search by the first name: Example 1: If searching for “Rue Albert Mathieu”, search by “Albert”. Example 2: If searching for “Fred Archer Way”, search by “Fred”. Example 3: If searching for “Franz-Grillparzer-Strasse”, search by “Franz”. Streets Named After People - Italy In Italy, if a street name is a person’s name (including at least a first and last name), search by the last name: Example 1: If searching for “Via de Angelo de Thomasis”, search by “Thomasis”. Example 2: If searching for “Via Placido Giovanella”, search by “Giovanella”. Example 3: If searching for “Via della Giacomo Marca”, search by “Marca”. Postcodes in United Kingdom and Netherlands When searching by postcode in United Kingdom or Netherlands, type the postcode with spaces and without the last two letters. Example 1: If searching for “RH6 9ST”, search by “RH6 9”. Example 2: If searching for “3514 BN”, search by “3514”. Support Information Australia: New Zealand: Europe: US and Canada: Navman Australia Pty. Ltd PO Box 479 Gladesville NSW 2111 Australia Navman New Zealand PO Box. 68-155 Newton Auckland New Zealand Navman Europe Limited 4G Gatwick House Peeks Brook Lane Horley, Surrey RH6 9ST United Kingdom Navman USA Inc 5275 Capital Boulevard Raleigh, NC 27616-2925, United States of America support.navman.com www.navman.com support.navman.com www.navman.com support.navman.com www.navman.com support.navman.com www.navman.com 14 iCN330_UM_EU_NZ_FINAL.indd 14 18/01/2006 3:52:39 p.m. iCN330_UM_EU_NZ_FINAL.indd 15 18/01/2006 3:52:39 p.m. MN000491A-G iCN 300series_UM_cover.indd 2 1/18/06 4:58:50 PM