1
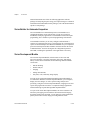
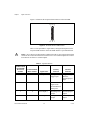
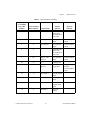
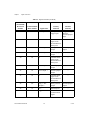
NI Vision
NI PCI-8254R User Manual
1394a Image Acquisition Device with Reconfigurable I/O
NI PCI-8254R User Manual
September 2006
371578C-01
Support
Worldwide Technical Support and Product Information
ni.com
National Instruments Corporate Headquarters
11500 North Mopac Expressway
Austin, Texas 78759-3504
USA Tel: 512 683 0100
Worldwide Offices
Australia 1800 300 800, Austria 43 0 662 45 79 90 0, Belgium 32 0 2 757 00 20, Brazil 55 11 3262 3599,
Canada 800 433 3488, China 86 21 6555 7838, Czech Republic 420 224 235 774, Denmark 45 45 76 26 00,
Finland 385 0 9 725 725 11, France 33 0 1 48 14 24 24, Germany 49 0 89 741 31 30, India 91 80 41190000,
Israel 972 0 3 6393737, Italy 39 02 413091, Japan 81 3 5472 2970, Korea 82 02 3451 3400,
Lebanon 961 0 1 33 28 28, Malaysia 1800 887710, Mexico 01 800 010 0793, Netherlands 31 0 348 433 466,
New Zealand 0800 553 322, Norway 47 0 66 90 76 60, Poland 48 22 3390150, Portugal 351 210 311 210,
Russia 7 095 783 68 51, Singapore 1800 226 5886, Slovenia 386 3 425 4200, South Africa 27 0 11 805 8197,
Spain 34 91 640 0085, Sweden 46 0 8 587 895 00, Switzerland 41 56 200 51 51, Taiwan 886 02 2377 2222,
Thailand 662 278 6777, United Kingdom 44 0 1635 523545
For further support information, refer to the Technical Support and Professional Services appendix. To comment
on National Instruments documentation, refer to the National Instruments Web site at ni.com/info and enter
the info code feedback.
© 2005–2006 National Instruments Corporation. All rights reserved.
Important Information
Warranty
The NI PCI-8254R is warranted against defects in materials and workmanship for a period of one year from the date of shipment, as evidenced
by receipts or other documentation. National Instruments will, at its option, repair or replace equipment that proves to be defective during the
warranty period. This warranty includes parts and labor.
The media on which you receive National Instruments software are warranted not to fail to execute programming instructions, due to defects in
materials and workmanship, for a period of 90 days from date of shipment, as evidenced by receipts or other documentation. National Instruments
will, at its option, repair or replace software media that do not execute programming instructions if National Instruments receives notice of such defects
during the warranty period. National Instruments does not warrant that the operation of the software shall be uninterrupted or error free.
A Return Material Authorization (RMA) number must be obtained from the factory and clearly marked on the outside of the package before any
equipment will be accepted for warranty work. National Instruments will pay the shipping costs of returning to the owner parts which are covered by
warranty.
National Instruments believes that the information in this document is accurate. The document has been carefully reviewed for technical accuracy. In
the event that technical or typographical errors exist, National Instruments reserves the right to make changes to subsequent editions of this document
without prior notice to holders of this edition. The reader should consult National Instruments if errors are suspected. In no event shall National
Instruments be liable for any damages arising out of or related to this document or the information contained in it.
EXCEPT AS SPECIFIED HEREIN, NATIONAL INSTRUMENTS MAKES NO WARRANTIES, EXPRESS OR IMPLIED, AND SPECIFICALLY DISCLAIMS ANY WARRANTY OF
MERCHANTABILITY OR FITNESS FOR A PARTICULAR PURPOSE. CUSTOMER’S RIGHT TO RECOVER DAMAGES CAUSED BY FAULT OR NEGLIGENCE ON THE PART OF NATIONAL
INSTRUMENTS SHALL BE LIMITED TO THE AMOUNT THERETOFORE PAID BY THE CUSTOMER. NATIONAL INSTRUMENTS WILL NOT BE LIABLE FOR DAMAGES RESULTING
FROM LOSS OF DATA, PROFITS, USE OF PRODUCTS, OR INCIDENTAL OR CONSEQUENTIAL DAMAGES, EVEN IF ADVISED OF THE POSSIBILITY THEREOF. This limitation of
the liability of National Instruments will apply regardless of the form of action, whether in contract or tort, including negligence. Any action against
National Instruments must be brought within one year after the cause of action accrues. National Instruments shall not be liable for any delay in
performance due to causes beyond its reasonable control. The warranty provided herein does not cover damages, defects, malfunctions, or service
failures caused by owner’s failure to follow the National Instruments installation, operation, or maintenance instructions; owner’s modification of the
product; owner’s abuse, misuse, or negligent acts; and power failure or surges, fire, flood, accident, actions of third parties, or other events outside
reasonable control.
Copyright
Under the copyright laws, this publication may not be reproduced or transmitted in any form, electronic or mechanical, including photocopying,
recording, storing in an information retrieval system, or translating, in whole or in part, without the prior written consent of National
Instruments Corporation.
National Instruments respects the intellectual property of others, and we ask our users to do the same. NI software is protected by copyright and other
intellectual property laws. Where NI software may be used to reproduce software or other materials belonging to others, you may use NI software only
to reproduce materials that you may reproduce in accordance with the terms of any applicable license or other legal restriction.
Trademarks
National Instruments, NI, ni.com, and LabVIEW are trademarks of National Instruments Corporation. Refer to the Terms of Use section
on ni.com/legal for more information about National Instruments trademarks.
FireWire® is the registered trademark of Apple Computer, Inc. Other product and company names mentioned herein are trademarks or trade names
of their respective companies.
Members of the National Instruments Alliance Partner Program are business entities independent from National Instruments and have no agency,
partnership, or joint-venture relationship with National Instruments.
Patents
For patents covering National Instruments products, refer to the appropriate location: Help»Patents in your software, the patents.txt file
on your CD, or ni.com/patents.
WARNING REGARDING USE OF NATIONAL INSTRUMENTS PRODUCTS
(1) NATIONAL INSTRUMENTS PRODUCTS ARE NOT DESIGNED WITH COMPONENTS AND TESTING FOR A LEVEL OF
RELIABILITY SUITABLE FOR USE IN OR IN CONNECTION WITH SURGICAL IMPLANTS OR AS CRITICAL COMPONENTS IN
ANY LIFE SUPPORT SYSTEMS WHOSE FAILURE TO PERFORM CAN REASONABLY BE EXPECTED TO CAUSE SIGNIFICANT
INJURY TO A HUMAN.
(2) IN ANY APPLICATION, INCLUDING THE ABOVE, RELIABILITY OF OPERATION OF THE SOFTWARE PRODUCTS CAN BE
IMPAIRED BY ADVERSE FACTORS, INCLUDING BUT NOT LIMITED TO FLUCTUATIONS IN ELECTRICAL POWER SUPPLY,
COMPUTER HARDWARE MALFUNCTIONS, COMPUTER OPERATING SYSTEM SOFTWARE FITNESS, FITNESS OF COMPILERS
AND DEVELOPMENT SOFTWARE USED TO DEVELOP AN APPLICATION, INSTALLATION ERRORS, SOFTWARE AND HARDWARE
COMPATIBILITY PROBLEMS, MALFUNCTIONS OR FAILURES OF ELECTRONIC MONITORING OR CONTROL DEVICES,
TRANSIENT FAILURES OF ELECTRONIC SYSTEMS (HARDWARE AND/OR SOFTWARE), UNANTICIPATED USES OR MISUSES, OR
ERRORS ON THE PART OF THE USER OR APPLICATIONS DESIGNER (ADVERSE FACTORS SUCH AS THESE ARE HEREAFTER
COLLECTIVELY TERMED “SYSTEM FAILURES”). ANY APPLICATION WHERE A SYSTEM FAILURE WOULD CREATE A RISK OF
HARM TO PROPERTY OR PERSONS (INCLUDING THE RISK OF BODILY INJURY AND DEATH) SHOULD NOT BE RELIANT SOLELY
UPON ONE FORM OF ELECTRONIC SYSTEM DUE TO THE RISK OF SYSTEM FAILURE. TO AVOID DAMAGE, INJURY, OR DEATH,
THE USER OR APPLICATION DESIGNER MUST TAKE REASONABLY PRUDENT STEPS TO PROTECT AGAINST SYSTEM FAILURES,
INCLUDING BUT NOT LIMITED TO BACK-UP OR SHUT DOWN MECHANISMS. BECAUSE EACH END-USER SYSTEM IS
CUSTOMIZED AND DIFFERS FROM NATIONAL INSTRUMENTS' TESTING PLATFORMS AND BECAUSE A USER OR APPLICATION
DESIGNER MAY USE NATIONAL INSTRUMENTS PRODUCTS IN COMBINATION WITH OTHER PRODUCTS IN A MANNER NOT
EVALUATED OR CONTEMPLATED BY NATIONAL INSTRUMENTS, THE USER OR APPLICATION DESIGNER IS ULTIMATELY
RESPONSIBLE FOR VERIFYING AND VALIDATING THE SUITABILITY OF NATIONAL INSTRUMENTS PRODUCTS WHENEVER
NATIONAL INSTRUMENTS PRODUCTS ARE INCORPORATED IN A SYSTEM OR APPLICATION, INCLUDING, WITHOUT
LIMITATION, THE APPROPRIATE DESIGN, PROCESS AND SAFETY LEVEL OF SUCH SYSTEM OR APPLICATION.
Compliance
Compliance with FCC/Canada Radio Frequency Interference
Regulations
Determining FCC Class
The Federal Communications Commission (FCC) has rules to protect wireless communications from interference. The FCC
places digital electronics into two classes. These classes are known as Class A (for use in industrial-commercial locations only)
or Class B (for use in residential or commercial locations). All National Instruments (NI) products are FCC Class A products.
Depending on where it is operated, this Class A product could be subject to restrictions in the FCC rules. (In Canada, the
Department of Communications (DOC), of Industry Canada, regulates wireless interference in much the same way.) Digital
electronics emit weak signals during normal operation that can affect radio, television, or other wireless products.
All Class A products display a simple warning statement of one paragraph in length regarding interference and undesired
operation. The FCC rules have restrictions regarding the locations where FCC Class A products can be operated.
Consult the FCC Web site at www.fcc.gov for more information.
FCC/DOC Warnings
This equipment generates and uses radio frequency energy and, if not installed and used in strict accordance with the instructions
in this manual and the CE marking Declaration of Conformity*, may cause interference to radio and television reception.
Classification requirements are the same for the Federal Communications Commission (FCC) and the Canadian Department
of Communications (DOC).
Changes or modifications not expressly approved by NI could void the user’s authority to operate the equipment under the
FCC Rules.
Class A
Federal Communications Commission
This equipment has been tested and found to comply with the limits for a Class A digital device, pursuant to part 15 of the FCC
Rules. These limits are designed to provide reasonable protection against harmful interference when the equipment is operated
in a commercial environment. This equipment generates, uses, and can radiate radio frequency energy and, if not installed and
used in accordance with the instruction manual, may cause harmful interference to radio communications. Operation of this
equipment in a residential area is likely to cause harmful interference in which case the user is required to correct the interference
at their own expense.
Canadian Department of Communications
This Class A digital apparatus meets all requirements of the Canadian Interference-Causing Equipment Regulations.
Cet appareil numérique de la classe A respecte toutes les exigences du Règlement sur le matériel brouilleur du Canada.
Compliance with EU Directives
Users in the European Union (EU) should refer to the Declaration of Conformity (DoC) for information* pertaining to the
CE marking. Refer to the Declaration of Conformity (DoC) for this product for any additional regulatory compliance
information. To obtain the DoC for this product, visit ni.com/certification, search by model number or product line,
and click the appropriate link in the Certification column.
* The CE marking Declaration of Conformity contains important supplementary information and instructions for the user or
installer.
Conventions
The following conventions are used in this manual:
»
The » symbol leads you through nested menu items and dialog box options
to a final action. The sequence File»Page Setup»Options directs you to
pull down the File menu, select the Page Setup item, and select Options
from the last dialog box.
This icon denotes a note, which alerts you to important information.
This icon denotes a caution, which advises you of precautions to take to
avoid injury, data loss, or a system crash.
When symbol is marked on a product, it denotes a warning advising you to
take precautions to avoid electrical shock.
bold
Bold text denotes items that you must select or click in the software, such
as menu items and dialog box options. Bold text also denotes parameter
names.
italic
Italic text denotes variables, emphasis, a cross-reference, or an introduction
to a key concept. Italic text also denotes text that is a placeholder for a word
or value that you must supply.
monospace
Text in this font denotes text or characters that you should enter from the
keyboard, sections of code, programming examples, and syntax examples.
This font is also used for the proper names of disk drives, paths, directories,
programs, subprograms, subroutines, device names, functions, operations,
variables, filenames, and extensions.
Contents
Chapter 1
Introduction
Software Overview ........................................................................................................1-1
Vision Builder for Automated Inspection .......................................................1-2
Vision Development Module ..........................................................................1-2
IEEE 1394 and NI 8254R ..............................................................................................1-3
Functional Overview......................................................................................................1-3
Start Conditions .............................................................................................................1-4
Acquisition Window Control.........................................................................................1-4
Chapter 2
Digital I/O
RIO and LabVIEW FPGA .............................................................................................2-1
TTL Inputs and Outputs.................................................................................................2-2
Isolated Inputs and Outputs ...........................................................................................2-3
I/O for Normal Operation ..............................................................................................2-4
Trigger Inputs ..................................................................................................2-5
Timed Pulse Output.........................................................................................2-5
Initiating a Timed Pulse ....................................................................2-5
Pulse Modes ......................................................................................2-6
Pulse Delay .......................................................................................2-6
Pulse Width .......................................................................................2-7
Trigger Polarity .................................................................................2-7
Trigger Change Detectors................................................................................2-8
Quadrature Encoder.........................................................................................2-8
Product Selection Port .....................................................................................2-8
Using ISO Input 5 as a Latch ............................................................2-9
General-Purpose I/O........................................................................................2-9
General-Purpose Inputs.....................................................................2-9
General-Purpose Outputs ..................................................................2-10
I/O for Fault Conditions ..................................................................................2-10
Shutdown ..........................................................................................2-11
Watchdog Timer ...............................................................................2-11
Considerations When Connecting the Digital I/O .........................................................2-12
Wiring an Isolated Input to a Sourcing Output Device ...................................2-12
Wiring an Isolated Output to an External Load...............................................2-13
Protecting Inductive Loads..............................................................................2-14
Transmission Line Effects...............................................................................2-15
© National Instruments Corporation
vii
NI PCI-8254R User Manual
Contents
Chapter 3
Signal Connections
Connectors..................................................................................................................... 3-2
2-Position Isolated Outputs Power Connector ................................................ 3-2
IEEE 1394a Connector.................................................................................... 3-3
General-Purpose Digital I/O ........................................................................... 3-3
Cabling .......................................................................................................................... 3-8
IEEE 1394 Camera Cables.............................................................................. 3-8
I/O Terminal Block ......................................................................................... 3-9
NI Vision I/O Terminal Block and Prototyping Accessory ............................ 3-9
Power Requirements...................................................................................................... 3-9
Isolated Outputs Power Connector ................................................................. 3-9
Appendix A
Technical Support and Professional Services
Glossary
Index
NI PCI-8254R User Manual
viii
ni.com
1
Introduction
The National Instruments PCI-8254R is an IEEE 1394a interface device for
PCI with reconfigurable I/O (RIO). The NI 8254R is OHCI compliant and
should be used with IEEE 1394a devices that run natively in
Windows 2000/XP.
The NI 8254R device ships with documentation and NI Vision Acquisition
Software, which contains all of the drivers in the NI Vision product line.
With NI Vision Acquisition Software, you can quickly and easily start your
applications without having to program the device at the register level.
The NI 8254R includes TTL inputs and outputs for triggering, and isolated
inputs and outputs for connecting to external devices, such as lighting
controllers, proximity sensors, and quadrature encoders.
Behind the digital I/O of the NI 8254R is an FPGA which has been
preconfigured with the functionality required for most common machine
vision tasks. However, if the factory configured functionality does not
fulfill your requirements, the FPGA is user configurable with the
LabVIEW FPGA Module. The NI 8254R provides a convenient 44-pin
D-SUB connector on its front panel to access its digital I/O.
For detailed specifications of the NI 8254R, refer to the Specifications
section of NI PCI-8254R Quick Start Guide.
Software Overview
Programming the NI 8254R requires two drivers to control the hardware:
NI-IMAQdx and NI-IMAQ I/O. Both drivers are included with NI Vision
Acquisition Software 8.2.1 or later.
NI-IMAQdx has an extensive library of functions you can call from the
application development environment (ADE) and handles many of the
complex issues between the computer and the image acquisition device,
such as programming interrupts and camera control. NI-IMAQ I/O
provides functions you can call from the ADE and controls the I/O
functionality for the NI 8254R.
© National Instruments Corporation
1-1
NI PCI-8254R User Manual
Chapter 1
Introduction
National Instruments also offers the following application software
packages for analyzing and processing your acquired images. For detailed
information about individual software packages, refer to the documentation
specific to each package.
Vision Builder for Automated Inspection
NI Vision Builder for Automated Inspection (Vision Builder AI) is
configurable machine vision software that you can use to prototype,
benchmark, and deploy applications. Vision Builder AI does not require
programming, but is scalable to powerful programming environments.
Vision Builder AI allows you to easily configure and benchmark a
sequence of visual inspection steps, as well as deploy the visual inspection
system for automated inspection. With Vision Builder AI, you can perform
powerful visual inspection tasks and make decisions based on the results
of individual tasks. You also can migrate the configured inspection to
LabVIEW, extending the capabilities of the applications if necessary.
Vision Development Module
NI Vision Development Module, which consists of NI Vision and
NI Vision Assistant, is an image acquisition, processing, and analysis
library of more than 270 functions for the following common machine
vision tasks:
•
Pattern matching
•
Particle analysis
•
Gauging
•
Taking measurements
•
Grayscale, color, and binary image display
You can use the Vision Development Module functions individually or
in combination. With the Vision Development Module, you can acquire,
display, and store images, as well as perform image analysis and
processing. Using the Vision Development Module, imaging novices and
experts can program the most basic or complicated image applications
without knowledge of particular algorithm implementations.
As a part of the Vision Development Module, NI Vision Assistant is an
interactive prototyping tool for machine vision and scientific imaging
developers. With Vision Assistant, you can prototype vision applications
quickly and test how various image processing functions work.
NI PCI-8254R User Manual
1-2
ni.com
Chapter 1
Introduction
Vision Assistant generates a Builder file, which is a text description
containing a recipe of the machine vision and image processing functions.
This Builder file provides a guide you can use for developing applications
in any ADE, such as LabWindows™/CVI™ or Visual Basic, using the
Vision Assistant machine vision and image processing libraries. Using the
LabVIEW VI creation wizard, Vision Assistant can create LabVIEW VI
diagrams that perform the prototype you created in Vision Assistant.
You can then use LabVIEW to add functionality to the generated VI.
IEEE 1394 and NI 8254R
The NI 8254R uses FireWire® (IEEE 1394) technology, compatible with
more than 50 machine vision grade cameras. FireWire is a cross-platform
implementation of the high-speed serial data bus—defined by the
IEEE 1394-1995 and IEEE 1394a-2000—that can move large amounts of
data between computers and peripheral devices. It features simplified
cabling via twisted pairs, hot swapping, and transfer speeds of up to 400
megabits per second. You can support up to 63 devices on the high speed
bus with IEEE 1394.
The IEEE 1394a standard offers up to 400 Mb/s bandwidth. The NI 8254R
provides two direct-connect IEEE 1394a ports, but more IEEE 1394
devices can be added with the addition of IEEE 1394 hubs. The NI 8254R
can acquire images from IEEE 1394 cameras conforming to the IIDC
1394-based Digital Camera Specification, Version 1.30 and higher.
The IEEE 1394 bus provides a fixed amount of bandwidth that is shared
between the two IEEE 1394a ports on the NI 8254R. These ports provide
direct connection for up to two DCAM-compliant IEEE 1394 cameras,
depending on the amount of bandwidth each camera requires. Higher frame
rates and larger image sizes require a higher data transfer rate and use more
bandwidth.
Functional Overview
The NI 8254R features a flexible, high-speed data path optimized for
receiving and formatting video data from IEEE 1394 cameras.
The following block diagram illustrates the key functional components of
the NI 8254R.
© National Instruments Corporation
1-3
NI PCI-8254R User Manual
Chapter 1
Introduction
V2 FPGA
ISO In
TTL In
DSUB
PCI
CONN
PCI
Bridge
Dust
MITE
CPLD
TTL Out
ISO Out
Config ROM
ISO Power
Connection
1394
Conns
1394A
Controller
Power
Supply
+5 V, +1.5 V
1394
Power Conn
Figure 1-1. NI 8254R Block Diagram
Start Conditions
The NI 8254R can start acquisitions in the following ways:
•
Software control—The NI 8254R supports software control of
acquisition start. You can configure the NI 8254R to capture a fixed
number of frames. Use this configuration for capturing a single frame
or a sequence of frames.
•
Trigger control—You can start an acquisition by enabling external
trigger lines. Each of these inputs can start a video acquisition on a
rising or falling edge.
Acquisition Window Control
You can configure the following parameter on the NI 8254R to control the
video acquisition window:
•
NI PCI-8254R User Manual
Acquisition window—The NI 8254R and the IIDC 1394-based
Digital Camera Specification allow you to specify a particular region
of active pixels and lines on a camera to acquire. In many cases,
specifying a smaller acquisition window will increase the maximum
frame rate of the camera. Valid acquisition windows, and their
corresponding frame rates, are defined by the camera.
1-4
ni.com
2
Digital I/O
The digital I/O functions on the NI 8254R are accessible through 2 TTL
inputs, 10 TTL outputs, 13 isolated inputs, and 4 isolated outputs.
You can use input signals as triggers, product selection ports, change
detectors, or to read quadrature encoders. Uses for output signals include
controlling camera reset and exposure, controlling strobe lighting,
outputting inspection results, or communicating with PLCs. You can also
define the functions of digital input and output signals.
For information about how to use LabVIEW to implement specific digital
I/O functions, refer to the examples at <LabVIEW>\examples\IMAQ\
IMAQ IO.llb. For information about how to use C or Visual Basic to
implement specific digital I/O functions, refer to the examples at
<National Instruments>\NI-IMAQ IO\Examples\.
RIO and LabVIEW FPGA
Behind the digital I/O of the NI 8254R is an FPGA which has been
preconfigured with the functionality required for most common machine
vision tasks. If the factory configured functionality does not fulfill your
requirements, the FPGA is user configurable with the LabVIEW FPGA
Module. RIO technology, found throughout the NI platform, includes
NI PCI and PXI R Series DAQ devices, NI CVS-1450 Series Compact
Vision Systems, the NI 8254R, the NI 8255R, and NI CompactRIO. RIO
allows you to develop custom FPGA logic on compact vision systems or
with the NI 8254R device to add triggering, pulse-width modulation
signals, or custom communications protocols to your machine vision
application.
Using National Instruments RIO hardware and the LabVIEW FPGA
Module, you can define your hardware without in-depth knowledge of
hardware design tools or hardware description languages (HDL). When the
signal requirements change, the LabVIEW code can be modified and
downloaded to the FPGA to change the I/O mix or type. This flexibility
allows you to reuse the same hardware and software at no extra expense.
© National Instruments Corporation
2-1
NI PCI-8254R User Manual
Chapter 2
Digital I/O
NI-IMAQ I/O devices such as the such as the NI 8254R, the NI 8255R, and
the CVS-1450 Series Compact Vision Systems have 29 digital I/O lines
with built-in functionality for communicating with external devices, such
as reading quadrature encoder inputs, generating strobe pulses, and writing
to or reading from digital lines.
NI-IMAQ I/O devices have 15 digital input lines—13 isolated 24 V lines
and two dedicated TTL lines. There are 14 digital output lines—four
isolated 24 V lines and 10 dedicated TTL lines. Using these signals, you
can dynamically control your lighting or cameras, synchronize with a
conveyor belt, or communicate with relays that control solenoids and other
actuators.
TTL Inputs and Outputs
TTL is a fast-switching 5 V digital signaling standard commonly used for
applications that require high precision, such as camera triggering. TTL
inputs and outputs do not require a separate power supply.
Caution Do not connect voltage or current sources to TTL outputs. Doing so could
damage the NI 8254R device.
Table 2-1 summarizes the TTL inputs and outputs available on the
NI 8254R.
Table 2-1. NI 8254R TTL Inputs and Outputs
Primary
Function
Trigger
Timed
Pulse
Input
or
Output
Number
Available
Input
2
Output
NI PCI-8254R User Manual
6
44-Pin
D-SUB on
NI 8255R
Device Pin
Number
37-Pin
Terminal
Block
Number
1
1
TTL Input 1,
General Purpose*
16
2
TTL Output 1, Pulse 1
TTL Output 2, Pulse 2
TTL Output 3, Pulse 3
TTL Output 4, Pulse
TRIG 1, Pulse 5
TRIG 2, Pulse 6
4
6
7
18
24
9
5
7
8
20
—
—
Signal Names
TTL Input 0,
General Purpose*
2-2
ni.com
Chapter 2
Digital I/O
Table 2-1. NI 8254R TTL Inputs and Outputs (Continued)
Primary
Function
Input
or
Output
Number
Available
Signal Names
44-Pin
D-SUB on
NI 8255R
Device Pin
Number
Watchdog
Output
1
TTL Output 0
3
4
General
Purpose
Output
3
TTL Output 5
TTL Output 6
TTL Output 7
19
21
22
21
23
24
37-Pin
Terminal
Block
Number
* TTL Input 0 and TTL Input 1 can also function as trigger change detectors.
Isolated Inputs and Outputs
The isolated inputs and outputs on the NI 8254R have a separate ground
reference from the main NI 8254R device supply, providing an easy means
to prevent ground loops that can introduce noise into a system. You can
apply signals up to 30 V to the isolated inputs. The voltage swing of the
isolated outputs is determined by the voltage you supply on the 2-position
isolated outputs power connector.
Viso is referred to as V, and Ciso is referred to as C on the 2-position isolated outputs
power connector on the NI 8254R.
Note
The isolated outputs have current-limiting protection circuitry. If this circuitry is
tripped, you can re-enable the outputs by removing the fault and restarting your computer.
Note
© National Instruments Corporation
2-3
NI PCI-8254R User Manual
Chapter 2
Digital I/O
Table 2-2 summarizes the isolated inputs and outputs available on the
NI 8254R.
Table 2-2. NI 8254R Isolated Inputs and Outputs
Input or
Output
Number
Available
Signal
Names
44-Pin
D-SUB on
NI 8255R
Device Pin
Number
Trigger
Input
3
TRIG 0*
ISO Input 5†
ISO Input 8*
11
35
40
—
15
27
Quadrature
Encoder
Input
1
ISO Input 6
ISO Input 7
37
38
25
26
External
Shutdown
Control
Input
1
ISO Input 11
44
31
Product
Selection
Port†
Input
1
ISO Input 0
ISO Input 1
ISO Input 2
ISO Input 3
ISO Input 4
15
30
31
32
34
9
10
11
13
14
General
Purpose
Input
2
ISO Input 9*
ISO Input 10*
41
43
29
30
General
Purpose
Output
4
ISO Output 0
ISO Output 1
ISO Output 2
ISO Output 3
12
13
27
28
198
35
36
37
Primary
Function
37-Pin
Terminal
Block
Number
* TRIG 0, ISO Input 8, ISO Input 9, and ISO Input 10 can also function as trigger change detectors.
†
ISO Input 5 can also function as a latch for the product selection port.
I/O for Normal Operation
The following sections describe I/O functions that are available on the
NI 8254R during normal operation.
NI PCI-8254R User Manual
2-4
ni.com
Chapter 2
Digital I/O
Trigger Inputs
Trigger inputs are available from both TTL inputs and isolated inputs. You
can use these trigger inputs to synchronize the NI 8254R with an external
event, such as the assertion of a signal generated by a proximity sensor or
a PLC, to indicate that an inspection item is passing in front of the camera.
The NI 8254R uses this input to initiate a timed pulse that can be used for
camera control, lighting control, encoder pulse counting, and result output
timing.
For more information about creating a timed pulse output, refer to the
Timed Pulse Output section.
TTL Input 0, TTL Input 1, TRIG 0, ISO Input 6, ISO Input 7, ISO Input 8,
and ISO Input 11 can alternatively function as general-purpose inputs.
ISO Input 5 can alternatively function as a latch for the product selection
port.
Timed Pulse Output
The NI 8254R is capable of timed pulse output on six different digital
outputs, which provides precise control over time-critical signals, such as
camera exposure. This section describes the various uses for the timed
pulse output and the parameters you can set to control these outputs.
Uses for timed pulse output include controlling camera reset and exposure,
controlling strobe lighting, operating plungers on an assembly line, and
communicating with PLCs. You can configure the start of the pulse output
generation to occur from software or from a rising or falling edge of a
trigger input.
In addition to controlling the timing of pulse output, you can also configure
the polarity of the output signal, resulting in a high-true or low-true signal.
Based on the polarity setting, the output signal asserts after the appropriate
delay time and de-asserts after the configured pulse width. You can set the
delay time in microseconds or in quadrature encoder counts from the start
signal—either a hardware trigger or a software command. Width is always
configured in microseconds.
Initiating a Timed Pulse
Each timed pulse generator has a trigger input that specifies whether to wait
on a particular trigger input to generate the pulse or to immediately
generate the pulse when software sets the pulse mode to Start in LabVIEW
or imaqIOPulseStart in C and Visual Basic.
© National Instruments Corporation
2-5
NI PCI-8254R User Manual
Chapter 2
Digital I/O
When the pulse generator is configured for a particular trigger input, after
generating a pulse, it waits for another trigger before generating another
pulse. When the pulse generator is configured to immediately generate the
pulse on a software start, after generating a pulse, it immediately generates
another pulse.
If the trigger input is set to Immediate in LabVIEW or using a None status
signal in C and Visual Basic, the pulse generation occurs as soon as the
pulse mode is set to Start in LabVIEW or imaqIOPulseStart in C and
Visual Basic. If the trigger input is set to one of the hardware trigger inputs,
the timed pulse output waits for an assertion edge on the appropriate trigger
input. The assertion edge is configurable based on the trigger polarity
parameter. It then generates one pulse and rearms to wait for the next
trigger. In either case, the pulse output generation stops and resets if the
pulse mode parameter is set to Stop in LabVIEW or imaqIOPulseStop in
C and Visual Basic.
The following figure shows an output pulse when a trigger is selected.
Trigger
Input
Output
Pulse
Pulse Modes
Each pulse generator has a Start, Single Shot, and Stop mode. Configure
the pulse generator when in Stop mode. Then, set the pulse generator to
Start mode for continuous or rearmed pulses, and set it to Single Shot for a
pulse that should assert only once.
Pulse Delay
Pulse delay is the amount of time between a trigger and the first (assertion)
edge of an output pulse. The pulse delay is configurable in units of
microseconds or quadrature encoder counts. If configured for
microseconds, available values are between 1 µs and 4,294,967,295 µs,
which is 4,294 seconds, or approximately 71 minutes. If the delay is
configured for quadrature encoder counts, the range of choices is 0 counts
to 4,294,967,295 counts.
NI PCI-8254R User Manual
2-6
ni.com
Chapter 2
Digital I/O
Pulse Width
Pulse width is the amount of time between the first (assertion) edge of a
pulse and the second (deassertion) edge. Pulse width is configurable only
in microseconds from 1 µs to 4,294,967,295 µs.
Trigger Polarity
Each pulse generator can be individually configured for rising or falling
edge triggering. Even if multiple pulse generators are using the same
trigger, each can have different polarities.
The following figure shows the output of a pulse generator configured to
look for a rising edge trigger and output a high pulse with a microsecond
width and delay.
Delay
Width
Trigger
Pulse
The following figure shows how to create a high and low pulse train with a
microsecond delay and width.
High Pulse Train
Delay
Width
Delay
Width
Low Pulse Train
Software
Start
© National Instruments Corporation
2-7
NI PCI-8254R User Manual
Chapter 2
Digital I/O
Trigger Change Detectors
The NI 8254R is capable of detecting edges on various trigger lines and
latching this information for future retrieval. This feature is useful for
high-precision hardware-monitoring of the presence of external events
without the need for software polling. You can arm for the detection of a
rising edge, falling edge, or both on a supported trigger input line.
Supported trigger input lines include TTL Input 0, TTL Input 1,
ISO Input 8, ISO Input 9, ISO Input 10, and TRIG 0.
Quadrature Encoder
The quadrature encoder uses ISO Input 6 for its Phase A input and
ISO Input 7 for its Phase B input. Encoder speed is limited by the speed of
the isolated inputs. Each isolated input can change at a maximum rate of
100 kHz, making the maximum encoder rate 400,000 counts/s.
The quadrature encoder can also be used as a timebase for the pulse
generation delay.
The following figure shows a rising edge trigger and a low pulse with a
quadrature encoder delay and a microsecond width.
Trigger
Low Pulse
Delay
Width
Phase A
Phase B
Product Selection Port
The product selection port consists of a group of five isolated digital inputs
that the software running on the NI 8254R reads simultaneously. You can
program the NI 8254R to switch between up to 32 (25) inspection
sequences for different parts on an assembly line.
Based on the input to the product selection port, you can configure the
application software to run the appropriate inspection sequence. For
NI PCI-8254R User Manual
2-8
ni.com
Chapter 2
Digital I/O
example, an upstream NI 8254R device programmed for part classification
might drive the product selection port of a downstream NI 8254R device.
Alternatively, a PLC with information about which part is being inspected
can drive the product selection port of the NI 8254R.
Using ISO Input 5 as a Latch
You can configure the product selection port to use ISO Input 5 as a latch.
A rising edge on ISO Input 5 can latch the data into a data register on the
NI 8254R. Before each inspection, the software checks the status of the
product select inputs and reads the most recent value latched into the
register. If ISO Input 5 is not used as a latch, it can be used as an extra bit
of data.
Note
In Vision Builder AI, ISO Input 5 is always designated as a latch.
Table 2-3 lists the product selection ports.
Table 2-3. NI 8254R Product Selection Ports
Function
External Connection
Data(5), rising edge latch
ISO Input 5
Data(4)
ISO Input 4
Data(3)
ISO Input 3
Data(2)
ISO Input 2
Data(1)
ISO Input 1
Data(0)
ISO Input 0
General-Purpose I/O
General-purpose inputs and outputs are available as both TTL and isolated
connections. The software running on the NI 8254R can read the inputs and
drive the outputs high or low at any time.
General-Purpose Inputs
The primary difference between general-purpose inputs and trigger inputs
is that you cannot use general-purpose inputs to initiate a timed pulse
generator. In an application, use the general-purpose inputs to get the status
of the inputs at a given point and not to synchronize the NI 8254R with an
external event.
© National Instruments Corporation
2-9
NI PCI-8254R User Manual
Chapter 2
Digital I/O
An example of how to use general-purpose inputs is reading the status of a
general-purpose input as the first step in your inspection sequence and
recording that value as part of your inspection.
General-Purpose Outputs
The primary difference between general-purpose outputs and timed pulse
outputs is that the timing of general-purpose outputs is controlled by
software rather than hardware. As a result, timing of general-purpose
outputs changes as the inspection algorithm changes, which makes
general-purpose outputs less appropriate than timed outputs for camera
control, strobe light control, and other applications that require precise
timing.
An example of using general-purpose outputs is driving a relay that turns
on an Inspection in Progress light for an operator to see while the
inspection sequence is running.
I/O for Fault Conditions
The NI 8254R recognizes the following fault conditions:
•
External shutdown, when Shutdown mode is enabled
•
Watchdog timer expiration
In the event of a fault condition, the behavior of the NI 8254R is dependent
on configuration settings of the software-enabled Shutdown mode. To
resume operation, address the fault condition and cycle power on your
computer.
Table 2-4 summarizes how user configuration affects the behavior of the
NI 8254R in the event of a fault condition.
Table 2-4. Fault Condition Behavior
Shutdown Enabled
Outputs Change to
User-Defined States
External Shutdown
On
Off
Yes
No
Watchdog
On
Off
Yes
No
Fault Condition
The following sections describe each fault condition.
NI PCI-8254R User Manual
2-10
ni.com
Chapter 2
Digital I/O
Shutdown
Shutdown mode is a software-enabled feature that, when activated, allows
an external device to halt the NI 8254R device processing operations.
Additionally, Shutdown mode allows you to specify user-defined
shutdown states for all fault conditions.
When Shutdown mode is enabled and the shutdown input signal,
ISO Input 11, turns off, the NI 8254R registers an external shutdown
condition. When a fault occurs, outputs operate according to user-defined
shutdown states. Each TTL output is configurable to drive high, drive low,
or tri-state, and each isolated output is on/off configurable.
For prototyping when equipment is unavailable, you can wire from V to
ISO Input 11 to simulate external equipment that indicates to the NI 8254R to operate
normally.
Note
Watchdog Timer
The watchdog timer is a software configurable feature that can monitor
software on the NI 8254R and take action if the software is unresponsive.
The millisecond counter on the watchdog timer is configurable up to
65,534 ms, in 1 ms increments, before it expires.
Configure the watchdog timer to take one of the following actions when it
expires.
Caution Use the Indicator Only option only to test the watchdog timer. If software
becomes unresponsive, it cannot be relied upon to send notification to the host.
•
Indicator Only—This option sends the expiration signal back to the
development machine through software. True indicates an expired
watchdog timer. False indicates an unexpired watchdog timer. The
expiration signal that indicates an expired watchdog timer continues to
assert until the watchdog timer is disarmed. Disarming the watchdog
timer resets the software indicator.
•
TTL Output 0—This option outputs a signal on TTL Output 0. High
indicates that the watchdog timer has expired. Low indicates that the
watchdog timer has not expired. If the watchdog timer has expired, the
expiration signal continues to assert until the watchdog timer is
disarmed.
•
Shutdown—If Shutdown mode is enabled, the outputs go to the
user-defined shutdown states.
© National Instruments Corporation
2-11
NI PCI-8254R User Manual
Chapter 2
Digital I/O
Considerations When Connecting the Digital I/O
The isolated trigger inputs on the NI 8254R are current sinking and
optically isolated. The following are considerations you need to make when
connecting the digital I/O.
Wiring an Isolated Input to a Sourcing Output Device
You can wire an isolated input to a sourcing output device, as shown in the
following figure. Refer to the NI PCI-8254R Quick Start Guide for
switching thresholds and current requirements.
Do not apply a voltage greater than 30 VDC to the isolated inputs. Doing so could
damage the NI 8254R.
Caution
The following figure shows an example of connecting an isolated input to
a sourcing output device.
Sourcing
Output
Device
V
Vcc
Input
Current
Limiter
C
NI 8254R
NI PCI-8254R User Manual
2-12
ni.com
Chapter 2
Digital I/O
Wiring an Isolated Output to an External Load
The digital output circuit sources current to external loads, as shown in the
following figure.
Caution Do not draw more than 100 mA from 24 V or 30 V isolated outputs. Do not draw
more than 50 mA from 5 V isolated outputs.
V
Vcc
Digital Output
Load
C
NI 8254R
© National Instruments Corporation
2-13
NI PCI-8254R User Manual
Chapter 2
Digital I/O
Protecting Inductive Loads
When an inductive load, such as a relay or solenoid, is connected to an
output, a large counter-electromotive force may occur at switching time
due to energy stored in the inductive load. This flyback voltage can damage
the outputs and the power supply.
To limit flyback voltages at the inductive load, install a flyback diode across
the load. Mount the flyback diode as close to the load as possible. Use this
protection method if you connect any of the isolated outputs on the
NI 8254R to an inductive load.
The following figure shows an example of using an external flyback diode
to protect inductive loads.
V
Vcc
Digital
Output
Load
C
External
Flyback
Diode for
Inductive Loads
NI 8254R
NI PCI-8254R User Manual
2-14
ni.com
Chapter 2
Digital I/O
Transmission Line Effects
Transmission line effects can degrade the signals on the I/O cables and
cause instability. To minimize transmission line effects, use twisted pair
wires with a characteristic impedance of 118 Ω to connect external signals
to the 44-pin I/O D-SUB connector.
The following figure shows connections to the 44-pin D-SUB connector
that minimize transmission line effects.
44-Pin
DSUB
TTL OUT(0)
118 Ω
3
2
Receiving
Equipment
+5 V
62 kΩ
TTL IN(0)
16
17
RS
Transmitting
Equipment
NI 8254R
When connecting to TTL inputs on the NI 8254R, match the output
impedance of the transmitting device to the characteristic impedance of the
cable. For example, if the cable characteristic impedance is 118 Ω, make
Rs equal to 118 Ω, as shown in the figure above.
© National Instruments Corporation
2-15
NI PCI-8254R User Manual
3
Signal Connections
The following diagram shows the connectors on the NI 8254R device.
NI PCI-8254R
1
IEEE-1394
2
V
3
C
5–30V
4
DIGITAL I/O
1
2
IEEE 1394a Connector
IEEE 1394a Connector
© National Instruments Corporation
3-1
3
4
2-Position Isolated Outputs Power Connector
Digital I/O Connector
NI PCI-8254R User Manual
Chapter 3
Signal Connections
Table 3-1 summarizes the functions of the connectors on the NI 8254R
device.
Table 3-1. NI 8254R Connector Functions
Peripheral
Connector
Function
Isolated Output Power
2-position isolated outputs
power connector
Power for isolated outputs
IEEE 1394
6-pin IEEE 1394a connector
Power and data connection to
IEEE 1394 cameras
Digital Input/Output
44-pin female high-density
D-SUB
External TTL I/O; External
isolated I/O
Camera Power
4-pin computer power
Power from PC power supply
to IEEE 1394a connector
Connectors
This section describes the connectors on the NI 8254R device and includes
pinouts and signal descriptions for each connector.
2-Position Isolated Outputs Power Connector
The isolated outputs power connector on the NI 8254R device
accommodates one power supply. The V terminal provides the isolated
output circuitry (5 to 30 VDC) for the NI 8254R device. The C terminal
provides the common-mode signal for the NI 8254R device.
Figure 3-1 illustrates the isolated outputs power connector on the NI 8254R
device.
V C
Figure 3-1. NI 8254R Isolated Power Connector
NI PCI-8254R User Manual
3-2
ni.com
Chapter 3
Signal Connections
Table 3-2 summarizes the functions of the power connector terminals.
Table 3-2. Power Connector Terminals
Terminal
Description
V
Isolated power (5 to 30 VDC)
C
Isolated common-mode signal
IEEE 1394a Connector
The IEEE 1394a connectors on the NI 8254R device provide a reliable,
high-frequency connection between the NI 8254R device and up to
two DCAM-compliant IEEE 1394 cameras. To access the IEEE 1394a
connectors on the NI 8254R device, use any standard 6-pin IEEE 1394
cable.
You can use a 4-pin to 6-pin converter cable with cameras that have their own
external power supply and do not require power from the IEEE 1394 bus.
Note
General-Purpose Digital I/O
The 44-pin D-SUB connector provides access to the general-purpose
digital inputs and outputs. The general-purpose digital I/O available on this
connector includes 2 TTL inputs, 9 TTL outputs, 13 isolated inputs, and
4 isolated outputs. For easy connection to the digital I/O connector, use the
National Instruments digital I/O cable and the NI Vision I/O Terminal
Block and Prototyping Accessory.
The accessories available for use with the NI 8254R do not provide access to all
available I/O on the NI 8254R device. To access this I/O, you can create a custom cable
using a standard male 44-pin D-SUB connector.
Note
For more information about the National Instruments digital I/O cable and
terminal block, refer to the Optional Equipment section of the
NI PCI-8254R Quick Start Guide.
Isolated inputs are compatible with 5 V logic if the external circuit meets the voltage
and current requirements listed in the Specifications section of the NI PCI-8254R Quick
Start Guide.
Note
© National Instruments Corporation
3-3
NI PCI-8254R User Manual
Chapter 3
Signal Connections
Figure 3-2 illustrates the 44-pin D-SUB connector on the NI 8254R.
44 30 15
31 16 1
Figure 3-2. NI 8254R 44-Pin D-SUB Connector
Table 3-3 lists pin numbers, signal names, and signal descriptions for the
44-pin D-SUB connector on the NI 8254R and the 37-pin terminal block.
Caution Do not draw more than 500 mA combined from the V pins on the 44-pin D-SUB
connector. Do not draw more than 100 mA from 24 V or 30 V isolated outputs. Do not draw
more than 50 mA from 5 V isolated outputs.
Table 3-3. Signal Connections
44-Pin D-SUB
on NI 8255R
Device Pin
Number
37-Pin Terminal
Block Number
1
1
TTL Input 0
Pulse generator
trigger input
Trigger Change
Detector,
General-purpose
input
2
3
C
Common-mode
signal of the
NI 8255R device
main power
—
3
4
TTL Output 0
Watchdog timer
output
General-purpose
output
4
5
TTL Output 1
Pulse generator
output
General-purpose
output
NI PCI-8254R User Manual
Signal Name
3-4
Primary
Function
Alternate
Function
ni.com
Chapter 3
Signal Connections
Table 3-3. Signal Connections (Continued)
44-Pin D-SUB
on NI 8255R
Device Pin
Number
37-Pin Terminal
Block Number
5
6
6
Primary
Function
Alternate
Function
C
Common-mode
signal of the
NI 8255R device
main power
—
7
TTL Output 2
Pulse generator
output
General-purpose
output
7
8
TTL Output 3
Pulse generator
output
General-purpose
output
8
6
C
Common-mode
signal of the
NI 8255R device
main power
—
9
NC
TRIG 2*/TTL
Output 9
Pulse generator
output
General-purpose
output
10
17
Viso
Isolated power
—
11
NC
TRIG 0*/ISO
Input 12
Pulse generator
trigger input
Trigger Change
Detector,
General-purpose
input
12
19
ISO Output 0
General-purpose
output
—
13
35
ISO Output 1
General-purpose
output
—
14
34
Ciso
Isolated
common-mode
signal
—
15
9
ISO Input 0
Input port,
Data(0)
—
© National Instruments Corporation
Signal Name
3-5
NI PCI-8254R User Manual
Chapter 3
Signal Connections
Table 3-3. Signal Connections (Continued)
44-Pin D-SUB
on NI 8255R
Device Pin
Number
37-Pin Terminal
Block Number
16
2
TTL Input 1
Pulse generator
trigger input
Trigger Change
Detector,
General-purpose
input
17
3
C
Common-mode
signal of the
NI 8255R device
main power
—
18
20
TTL Output 4
Pulse generator
output
General-purpose
output
19
21
TTL Output 5
General-purpose
output
—
20
22
C
Common-mode
signal of the
NI 8255R device
main power
—
21
23
TTL Output 6
General-purpose
output
—
22
24
TTL Output 7
General-purpose
output
—
23
22
C
Common-mode
signal of the
NI 8255R device
main power
—
24
NC
Trig 1*/TTL
Output 9
Pulse generator
output
General-purpose
output
25
33
Viso
Isolated power
—
26
34
Ciso
Isolated
common-mode
signal
—
NI PCI-8254R User Manual
Signal Name
3-6
Primary
Function
Alternate
Function
ni.com
Chapter 3
Signal Connections
Table 3-3. Signal Connections (Continued)
44-Pin D-SUB
on NI 8255R
Device Pin
Number
37-Pin Terminal
Block Number
27
36
28
Primary
Function
Alternate
Function
ISO Output 2
General-purpose
output
—
37
ISO Output 3
General-purpose
output
—
29
12
Ciso
Isolated
common-mode
signal
—
30
10
ISO Input 1
Input port,
Data(1)
—
31
11
ISO Input 2
Input port,
Data(2)
—
32
13
ISO Input 3
Input port,
Data(3)
—
33
16
Ciso
Isolated
common-mode
signal
—
34
14
ISO Input 4
Input port,
Data(4)
—
35
15
ISO Input 5
Input port latch,
Data(5)
36
28
Ciso
Isolated
common-mode
signal
37
25
ISO Input 6
Quadrature
encoder Phase A
General-purpose
input
38
26
ISO Input 7
Quadrature
encoder Phase B
General-purpose
input
39
28
Ciso
Isolated
common-mode
signal
© National Instruments Corporation
Signal Name
3-7
Pulse generator
trigger input
—
—
NI PCI-8254R User Manual
Chapter 3
Signal Connections
Table 3-3. Signal Connections (Continued)
44-Pin D-SUB
on NI 8255R
Device Pin
Number
37-Pin Terminal
Block Number
40
27
ISO Input 8
Pulse generator
trigger input
Trigger Change
Detector,
General-purpose
input
41
29
ISO Input 9
General-purpose
input
Trigger Change
Detector,
General-purpose
input
42
32
Ciso
Isolated
common-mode
signal
43
30
ISO Input 10
General-purpose
input
Trigger Change
Detector,
General-purpose
input
44
31
ISO Input 11
User shutdown
General-purpose
input
Signal Name
Primary
Function
Alternate
Function
—
* TRIG 0, TRIG 1, and TRIG 2 are not available on the 37-pin terminal block or the signal accessory. If you need access to
these signals, you can get them directly from the 44-pin D-SUB connector.
Cabling
IEEE 1394 Camera Cables
You can connect cameras to the NI 8254R using standard IEEE 1394
cables. IEEE 1394 cables provide both a data path and power to your
camera.
NI PCI-8254R User Manual
3-8
ni.com
Chapter 3
Signal Connections
I/O Terminal Block
National Instruments provides an I/O terminal block with the NI 8254R,
which can be mounted either horizontally or vertically. The I/O terminal
block breaks the signals out into easy-to-use screw terminals and comes
with a cable that connects directly to the 44-pin D-SUB connector on the
NI 8254R.
Note TRIG 0, TRIG 1, and TRIG 2 signals are not accessible via the standard 44 to 37-pin
cable and I/O terminal block.
NI Vision I/O Terminal Block and Prototyping Accessory
Use the NI Vision I/O Terminal Block and Prototyping Accessory to
troubleshoot and prototype digital I/O applications for the NI 8254R, the
NI 8255R, and the CVS-1450 Series Compact Vision System. The
NI Vision I/O Terminal Block and Prototyping Accessory provides screw
terminals for easy connections and LEDs for each signal.
Note TRIG 0, TRIG 1, and TRIG 2 signals are not accessible via the standard 44 to 37-pin
cable and NI Vision I/O Terminal Block and Prototyping Accessory.
Power Requirements
This section describes the power requirements of the NI 8254R.
Isolated Outputs Power Connector
Figure 3-3 illustrates the isolated outputs power connector on the
NI 8254R.
V C
Figure 3-3. NI 8254R Isolated Power Connector
© National Instruments Corporation
3-9
NI PCI-8254R User Manual
Chapter 3
Signal Connections
The isolated outputs power connector on the NI 8254R device
accommodates one power supply. The V terminal provides the isolated
output circuitry (5 to 30 VDC) for the NI 8254R device. The C terminal
provides the common-mode signal for the NI 8254R device.
Table 3-4. Power Connector Terminals
Terminal
NI PCI-8254R User Manual
Description
V
Isolated power (5 to 30 VDC)
C
Isolated common-mode signal
3-10
ni.com
Technical Support and
Professional Services
A
Visit the following sections of the National Instruments Web site at
ni.com for technical support and professional services:
•
Support—Online technical support resources at ni.com/support
include the following:
–
Self-Help Resources—For answers and solutions, visit the
award-winning National Instruments Web site for software drivers
and updates, a searchable KnowledgeBase, product manuals,
step-by-step troubleshooting wizards, thousands of example
programs, tutorials, application notes, instrument drivers, and
so on.
–
Free Technical Support—All registered users receive free Basic
Service, which includes access to hundreds of Application
Engineers worldwide in the NI Discussion Forums at
ni.com/forums. National Instruments Application Engineers
make sure every question receives an answer.
For information about other technical support options in your
area, visit ni.com/services or contact your local office at
ni.com/contact.
•
Training and Certification—Visit ni.com/training for
self-paced training, eLearning virtual classrooms, interactive CDs,
and Certification program information. You also can register for
instructor-led, hands-on courses at locations around the world.
•
System Integration—If you have time constraints, limited in-house
technical resources, or other project challenges, National Instruments
Alliance Partner members can help. To learn more, call your local
NI office or visit ni.com/alliance.
•
Declaration of Conformity (DoC)—A DoC is our claim of
compliance with the Council of the European Communities using
the manufacturer’s declaration of conformity. This system affords
the user protection for electronic compatibility (EMC) and product
safety. You can obtain the DoC for your product by visiting
ni.com/certification.
© National Instruments Corporation
A-1
NI PCI-8254R User Manual
Appendix A
Technical Support and Professional Services
•
Calibration Certificate—If your product supports calibration,
you can obtain the calibration certificate for your product at
ni.com/calibration.
If you searched ni.com and could not find the answers you need, contact
your local office or NI corporate headquarters. Phone numbers for our
worldwide offices are listed at the front of this manual. You also can visit
the Worldwide Offices section of ni.com/niglobal to access the branch
office Web sites, which provide up-to-date contact information, support
phone numbers, email addresses, and current events.
NI PCI-8254R User Manual
A-2
ni.com
Glossary
A
ADE
Application development environment such as LabVIEW, Visual Basic, or
MSVC.
B
bandwidth
The range of frequencies present in a signal, or the range of frequencies to
which a measuring device can respond.
C
current
The rate of flow of electric charge measured in amperes
D
D-SUB
A serial connector.
DCAM
Digital camera.
deployment machine
Machine used to run the software in its final state. this machine typically
runs the software without an ADE in the form of an executable.
development machine
Machine used to develop an application. A development machine usually
has and ADE installed on it.
E
exposure
The amount of time that light reaches the image sensor.
© National Instruments Corporation
G-1
NI PCI-8254R User Manual
Glossary
F
falling edge
An edge trigger occurs when the trigger signal passes through a specified
threshold. A slope that is negative to the trigger is specified as the falling
edge.
FireWire
A high-speed serial interface invented by Apple Computer in 1989, also
known as IEEE 1394 or iLink.
FPGA
Field-programmable gate array. An FPGA is a semi-conductor device
which contains a large quantity of gates (logic devices), which are not
interconnected, and whose function is determined by a wiring list, which is
downloaded to the FPGA. The wiring list determines how the gates are
interconnected, and this interconnection is performed dynamically by
turning semiconductor switches on or off to enable the different
connections.
H
HDL
Hardware description language. An example of an HDL is VHDL—a
language used to design digital circuitry.
hot swapping
The act of removing or swapping a device when the computer is still on.
I
IEEE
Institute of Electrical and Electronics Engineers. A standard-setting body
IIDC
IEEE 1394 Trade Association Instrumentation and Industrial Control
Working Group, Digital Camera Sub Working Group.
isolated
A signal which has no electrical connection to the overall system power.
N
NI-IMAQ
NI PCI-8254R User Manual
Driver software for National Instruments image acquisition (IMAQ)
hardware.
G-2
ni.com
Glossary
P
pixel
The fundamental picture element in a digital image. The smallest
resolvable rectangular area of an image, either on a screen or stored in
memory. Each pixel has its own brightness and color, usually represented
as red, green, and blue intensities.
PLC
Programmable Logic Controller. An industrial computer used for factory
automation, process control, and manufacturing systems.
proximity sensor
Optical sensor which toggles an electrical signal when an object passes
near it.
Q
quadrature encoder
An encoding technique for a rotating device where two tracks of
information are placed on the device, with the signals on the tracks offset
by 90 degrees from each other. This makes it possible to detect the direction
of the motion.
R
RIO
Reconfigurable inputs and outputs.
rising edge
An edge trigger occurs when the trigger signal passes through a specified
threshold. A slope that is positive to the trigger is specified as the rising
edge.
T
trigger
Any event that causes or starts some form of data capture.
TTL
Transistor-transistor logic. A digital circuit composed of bipolar transistors
wired in a certain manner. A typical medium-speed digital technology.
Nominal TTL logic levels are 0 and 5 V.
twisted pair cabling
A twisted pair cable has two insulated copper wires that are twisted around
each other, to reduce crosstalk or electromagnetic induction between the
pairs of wires. Each connection on twisted pair requires both wires.
© National Instruments Corporation
G-3
NI PCI-8254R User Manual
Glossary
V
VDC
Volts direct current.
voltage
The electromotive force.
NI PCI-8254R User Manual
G-4
ni.com
Index
A
G
acquisition window control, 1-4
general purpose outputs, 2-10
general-purpose I/O, 2-9
general-purpose inputs, 2-9
C
cabling, 3-8
calibration certificate (NI resources), A-2
connector functions, 3-2
connectors, 3-2
2-position isolated output power, 3-2
general-purpose digital I/O, 3-3
IEEE 1394a, 3-3
conventions used in the manual, v
H
help, technical support, A-1
I
I/O for fault conditions, 2-10
I/O for normal operation, 2-4
I/O terminal block, 3-9
IEEE 1394, 1-3
camera cables, 3-8
IEEE 1394a, connector, 3-3
instrument drivers (NI resources), A-1
isolated inputs, 2-3
list of, 2-4
isolated outputs, 2-3
list of, 2-4
power connector, 3-9
D
Declaration of Conformity (NI resources), A-1
diagnostic tools (NI resources), A-1
digital I/O
connection considerations, 2-12
overview, 2-1
documentation
conventions used in the manual, v
NI resources, A-1
drivers (NI resources), A-1
K
KnowledgeBase, A-1
E
examples (NI resources), A-1
L
LabVIEW FPGA Module, 2-1
LabVIEW, Vision Builder AI, 1-2
latch, 2-9
F
FireWire, 1-3
FPGA, 2-1
© National Instruments Corporation
I-1
NI PCI-8254R User Manual
Index
N
NI support and services, A-1
NI Vision Assistant, 1-2
NI Vision Terminal Block and Prototyping
Accessory, 3-9
National Instruments support and
services, A-1
NI 1427
software programming choices
NI Vision Builder for Automated
Inspection, 1-2
NI Vision Development Module, 1-2
NI 8254R
acquisition window control, 1-4
cabling, 3-8
connection considerations, 2-12
connector functions, 3-2
connectors, 3-2
digital I/O, 2-1
functional overview, 1-3
general-purpose I/O, 2-9
I/O for fault conditions, 2-10
I/O for normal operation, 2-4
IEEE 1394, 1-3
isolated inputs, 2-3
isolated outputs, 2-3
LabVIEW FPGA Module, 2-1
power requirements, 3-9
product selection port, 2-8
quadrature encoder, 2-8
reconfigurable I/O, 2-1
signal connections, 3-1
software overview, 1-1
start conditions, 1-4
timed pulse output, 2-5
trigger change detectors, 2-8
trigger inputs, 2-5
TTL inputs, 2-2
TTL outputs, 2-2
NI 8255R
NI Vision Terminal Block and
Prototyping Accessory, 3-9
NI PCI-8254R User Manual
P
power connector terminals, 3-10
power requirements, 3-9
product selection port, 2-8
programming examples (NI resources), A-1
protecting inductive loads, 2-13
pulse delay, 2-6
pulse modes, 2-6
pulse width, 2-7
Q
quadrature encoder, 2-8
R
reconfigurable I/O, 2-1
RIO. See reconfigurable I/O
S
shutdown, 2-11
signal connections, 3-1
software
NI resources, A-1
overview, 1-1
software programming choices
NI Vision Builder for Automated
Inspection, 1-2
NI Vision Development Module, 1-2
start conditions, 1-4
support, technical, A-1
I-2
ni.com
Index
T
W
technical support, A-1
timed pulse output
initiating, 2-5
overview, 2-5
training and certification (NI resources), A-1
transmission line effects, 2-14
trigger change detectors, 2-8
trigger inputs, 2-5
trigger polarity, 2-7
troubleshooting (NI resources), A-1
TTL inputs, 2-2
list of, 2-2
TTL outputs, 2-2
list of, 2-2
watchdog timer, 2-11
Web resources, A-1
wiring
isolated input to sourcing output
device, 2-12
isolated output to external load, 2-12
© National Instruments Corporation
I-3
NI PCI-8254R User Manual