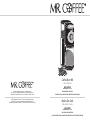
1
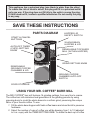
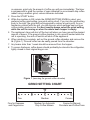
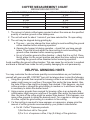
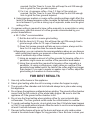
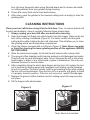
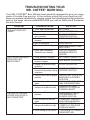
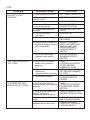
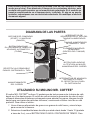
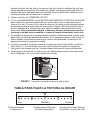
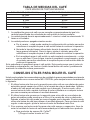
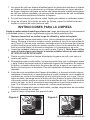
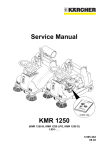
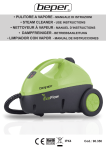
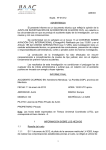
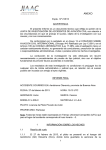
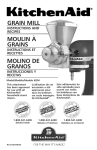
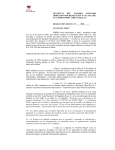
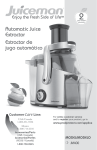
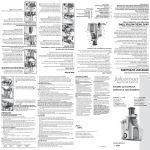
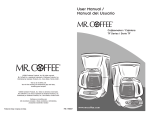
INTRODUCTION
Thank you for selecting a MR. COFFEE® Burr Mill, the finest coffee burr mill in its class
on the market. Your new burr mill presents an innovative 12 cup flexible, auto-off timer.
The mill has 16 different coffee grind settings - from fine to coarse - for the freshest coffee
ever, a translucent, 4.5 oz. or 8 oz. whole bean hopper, a translucent, removable ground
coffee chamber with capacity for 12 5-oz. cups of medium grind coffee grounds, and hidden
cord storage. The removable ground coffee chamber is dishwasher safe, top rack.
Available in matte black or white, your new MR. COFFEE® Burr Mill’s sleek styling
incorporates the latest in safety features, including a hopper lid safety switch to stop
grinding operations if the lid is opened; an auto-off switch that shuts off the mill when the
ground coffee chamber is not properly seated; and easily accessible, clearly marked
START and CANCEL buttons. The mill’s auto-off timer will shut off the unit when the
desired amount of beans have been ground.
Please read ALL of the instructions in this manual carefully before you begin to use this
appliance. Proper care and maintenance will ensure a long life and a trouble-free operation
for this appliance.
Please save these instructions and refer to them for cleaning
and care tips.
TABLE OF CONTENTS
Page
INTRODUCTION........................................................................................ 2
TABLE OF CONTENTS............................................................................. 2
IMPORTANT SAFEGUARDS.................................................................... 3
SPECIAL CORD SET INSTRUCTIONS..................................................... 3
PARTS DIAGRAM..................................................................................... 4
USING YOUR MR. COFFEE® BURR MILL............................................... 4
GRIND SETTING CHART.......................................................................... 5
COFFEE MEASUREMENT CHART.......................................................... 6
HELPFUL GRINDING HINTS.................................................................... 6
FOR BEST RESULTS............................................................................... 7
CLEANING INSTRUCTIONS..................................................................... 8
TROUBLESHOOTING YOUR MR. COFFEE® BURR MILL...................... 9
IF SERVICE IS REQUIRED....................................................................... 11
1 YEAR LIMITED WARRANTY.............................................................. 11
IMPORTANT SAFEGUARDS
To reduce the risk of fire, electric shock and/or injury to persons, basic safety
precautions should always be followed when using electrical appliances, including
the following:
1. READ ALL INSTRUCTIONS BEFORE USING THE MACHINE.
2. To protect against electric shock, do not immerse cord, plugs or machine in
water or in any other liquid.
3. Close adult supervision is necessary when this appliance is used by or near
children.
4. Press CANCEL button and unplug from outlet when not in use and before
cleaning. Allow the appliance to cool before installing or removing parts and
before cleaning the appliance.
5. Avoid contacting moving parts.
6. Do not operate any appliance with a damaged cord or plug or after the appliance
malfunctions, or has been damaged in any manner. Return this appliance only
to the nearest Authorized Service Center for examination, repair or adjustment.
7. The use of accessory attachments not recommended for MR. COFFEE® products
may cause hazards or injuries.
8. Do not use the appliance outdoors.
9. Do not let the appliance cord hang over edge of table or counter, or touch hot
surfaces.
10. Check the appliance hopper for presence of foreign objects before using.
11. Do not place this appliance on or near a hot gas or electric burner or in a heated
oven.
12. To disconnect, press the CANCEL button, then remove the plug from the wall
outlet.
13. Do not use the appliance for other than intended household use.
SPECIAL CORD SET INSTRUCTIONS
1. A short power supply cord is provided to reduce the hazards resulting from a
person or pet becoming entangled in or tripping over a longer cord.
2. An extension cord may be purchased and used if care is exercised in its use.
3. If an extension cord is used, the marked electrical rating of the extension cord
must be at least 10 amps and 120 volts. The resulting extended cord must be
arranged so that it will not drape over a countertop or tabletop where it can be
pulled on by children or tripped over accidentally.
This appliance has a polarized plug (one blade is wider than the other).
To reduce the risk of electric shock, this plug will fit in a polarized outlet
only one way. If the plug does not fit fully in the outlet, reverse the plug.
If it still does not fit, contact a qualified electrician. Do not modify the plug
in any way.
SAVE THESE INSTRUCTIONS
PARTS DIAGRAM
START & CANCEL
BUTTONS
HOPPER LID
SAFETY SWITCH
WHOLE BEAN
HOPPER & LID
AUTO-OFF TIMER
(CUPS) SETTING
KNOB
REMOVABLE TOP BURR
MILL (WITHIN HOPPER)
GRIND SETTING KNOB
REMOVABLE
GROUND COFFEE
CHAMBER & LID
GROUND COFFEE
CHAMBER AUTO-OFF
SWITCH
CORD STORAGE
USING YOUR MR. COFFEE® BURR MILL
The MR. COFFEE® burr mill features 16 grinding settings, from very fine to coarse.
The coffee burr mill minimizes heat generation in the grinding process by using
opposing burrs to crush the whole beans to a uniform grind, preserving the unique
flavor of your favorite coffee. To use:
1. Fill the whole bean hopper with fresh coffee beans and close the lid to preserve
freshness.
2. Select the number of cups of coffee you will be brewing, from 1 to 12 (adjusted
to 5 oz. cups), with the TIMER SETTING KNOB. To obtain the best cup of coffee
3.
4.
5.
6.
7.
8.
or espresso, grind only the amount of coffee you will use immediately. The timer
is programmed to grind the number of cups indicated for an automatic drip coffee
maker using a medium grind, unless otherwise indicated.
Press the START button.
While the machine is ON, rotate the GRIND SETTING KNOB to select your
preferred coffee grind setting (see grind setting chart). If you turn the grind setting
knob to the right, the grind will be progressively coarser at each point. As you
familiarize yourself with the mill, you will discover which settings best suit your
coffee-making preferences. For best results always select the grind setting
while the unit is running or when the whole bean hopper is empty.
The appliance’s timer will shut off the burr mill when you have ground the desired
amount of beans. If the ground coffee chamber is not correctly seated while the
mill is operating, the auto-off switch will shut off the appliance.
When grinding is complete, pull out the ground coffee chamber and remove the
lid (Figure 1). Ground coffee can be easily poured from the chamber.
Any beans older than 1 week should be removed from the hopper.
To ensure freshness, coffee beans should preferably be stored in the refrigerator,
tightly closed in their original bag or can.
Figure 1 (removing the ground coffee chamber)
GRIND SETTING CHART
Fine
Fine for Espresso
and Cappuccino
Medium
Medium for Automatic
Drip Coffee Makers
Coarse
Coarse for Manual,
Percolator and Coffee Press
COFFEE MEASUREMENT CHART
MEDIUM GROUND COFFEE
CUPS OF COFFEE (5 OZ. EACH)
12 Cups
10 Cups
8 Cups
6 Cups
4 Cups
2 Cups
BEAN QUANTITY/TABLESPOONS
9 Tbsp
7.5 Tbsp
6 Tbsp
4.5 Tbsp
3 Tbsp
1.5 Tbsp
1. The amount of whole coffee beans required is about the same as the specified
quantity of medium ground coffee tablespoons.
2. The unit will work for about 1 minute if you have selected the 12 cups setting.
3. The unit may be stopped during grinding by:
a. The user – you may change the timer setting to avoid overfilling the ground
coffee chamber before resuming operation.
b. Opening the hopper lid during operation – check that you have enough
beans. Close the lid and adjust the timer setting to avoid overfilling the
ground coffee chamber before resuming operation.
c. An out of position ground coffee chamber – check that it is not full. Close
the lid, place it in the correct position and adjust the timer setting to avoid
overfilling the ground coffee chamber before resuming operation.
Avoid overfilling the ground coffee chamber. This can cause the unit motor to overheat
and break a thermal fuse inside the mill, possibly damaging the unit permanently.
HELPFUL GRINDING HINTS
You may customize the above bean quantity recommendations as you familiarize
yourself with your new MR. COFFEE® burr mill, but always bear in mind the following:
1. Using finer grounds than required for brewing coffee in an automatic drip coffee
maker might cause an overflow of the paper filter and/or the brew basket. Also,
the taste of the coffee might be stronger than desired. If this happens, use less
coffee grounds or change the grind setting to medium or to whichever setting
is necessary to obtain the desired result.
2. Using coarser grounds than required for brewing coffee in an automatic drip
coffee maker might cause an overflow of the paper filter and/or the brew basket.
Also, the taste of the coffee might be weaker than desired. If this happens, use
more coffee grounds to obtain the desired result. For a regular or stronger cup
of coffee, adjust the grind setting to a medium to fine setting.
3. If a finer setting is required to brew espresso or cappuccino, please grind the
amount of coffee grounds recommended by your product manufacturer.
a. For Mr. Coffee® Espresso products:
1) Set the burr mill to Fine grind.
2) For 2 oz. of espresso coffee, 2 tsp (0.6 tbsp) of fine grind are
required. Set the Timer to 3 cups, this will keep the unit ON enough
time to grind the finer grounds required.
3) For 4 oz. of espresso coffee, 4 tsp (1.3 tbsp) of fine grind are
required. Set the Timer to 5 cups, this will keep the unit ON enough
time to grind the finer grounds required.
b. Using improper medium or coarse coffee grinding settings might affect the
taste of the brewed espresso coffee, because the optimum coffee extraction
is not achieved. If you like a strong cup of espresso, make sure the grind
setting is fine.
If
a
coarser
setting is required to brew coffee manually, in a percolator or using
4.
a coffee press, grind the amount of coffee grounds recommended by your
product manufacturer.
a. Mr. Coffee® recommendation:
1) Set the burr mill to a coarse grind setting.
2) Set the timer to 8-10 cups, this will keep the unit ON enough time to
grind enough coffee for 12 cups of brewed coffee.
3) Given that coarse grounds will take up more volume, always set the
timer for 2-4 cups less than the amount desired.
b.Remember, you can customize the recommendations above as you discover
which setting best meets your personal coffee-making preference. As in the
case of automatic drip coffee makers,
1) Using an excessive amount of coffee grounds for brewing coffee in a
percolator might cause an overflow of the percolator brew basket.
2) Using finer grounds than required for brewing coffee manually in a
percolator, or using a coffee press, might cause an overflow of the
percolator brew basket and/or the taste of the coffee might be stronger
than desired. If you want a regular or weaker cup of coffee, adjust the
grind setting to a medium to coarse setting.
FOR BEST RESULTS
1. Use only coffee beans in this appliance.
2. Select grind setting while the mill is running or when the hopper is empty.
3. The ground coffee chamber and its lid should always be in place when using
this appliance.
4. Do not leave the appliance unattended when grinding. The ground coffee chamber
cannot hold the full contents of the whole bean hopper. Be sure to shut the
appliance off if the ground coffee chamber is full.
5. Do not use the finest setting when grinding coffee for your automatic drip
coffeemaker. The finer grounds could cause the coffee basket to overflow.
6. To avoid overheating the motor, do not grind more than 2 full whole bean hoppers
or 2 full 12-cup cycles without a break. Allow the motor to cool to room temperature
at least 2 minutes between cycles.
7. Flavored coffee beans will gum up the burrs and leave an oily residue when
stored in the whole bean hopper for long periods of time. Be sure to clean your
burr mill more frequently when using flavored beans and to remove all cakedon coffee particles from your grinder during cleaning.
8. Clean after every third use for best performance.
9. After using, open the grinder to the coarsest setting and run empty to clear the
grinding path.
CLEANING INSTRUCTIONS
Clean your burr mill before using it for the first time. Then, to ensure optimal mill
function and durability, clean it regularly following these simple steps.
1. Always unplug your burr mill after use and before cleaning.
2. Open the hopper lid. Empty any whole beans from the hopper. Remove the top
burr mill by rotating it clockwise (Figure 2). For better results hold the grind
setting button while rotating the burr mill clockwise. This will allow you to clean
the grinding wheel and the grinding compartment.
3. Clean the interior recesses with a soft brush (Figure 3). Note: Never use water
or liquid for cleaning the lower grinding section of this appliance. BRUSH
NOT INCLUDED.
4. Wipe the whole bean hopper, its lid and the mill exterior with a damp cloth.
5. The ground coffee chamber and lid can be washed in mild detergent and water.
They both are top rack dishwasher safe. Do not immerse the mill or the whole
bean hopper in water or any other liquid or place in dishwasher. Use only nonabrasive cleaners to remove stains.
6. After completely drying the whole bean hopper and top burr mill, replace the burr
mill in position by aligning snaps with receptacle and rotating counterclockwise
to lock it in position. For better results, hold the grind setting button while rotating
the burr mill counterclockwise. Once the burr mill is in position, pull gently to check
it is properly locked in position. If the burr mill comes out, repeat this step again.
7. Replace the ground coffee chamber and lid, making sure both snap securely
into place.
8. Fill the hopper with whole beans.
Figure 3
Figure 2
Mediu
Mediu
m
Coarse
m
Coarse
Note: Brush not included
TROUBLESHOOTING YOUR
MR. COFFEE® BURR MILL
Your MR. COFFEE® Burr Mill has been carefully designed to give you many
years of trouble-free service. In the unlikely event that your new burr mill
does not operate satisfactorily, please review the following potential problems
and try the steps recommended BEFORE you call an Authorized Sunbeam
Service Center.
PROBLEM
THE UNIT DOES NOT
GRIND
POSSIBLE CAUSE
1. Timer has not been set
2. Hopper lid has been opened
3. Ground coffee chamber is
not in position
4. Start button has not been
pressed
5. Unit is unplugged
6. There’s a power outage
7. Motor has overheated,
thermal fuse is broken
THE COFFEE GROUNDS
PRODUCED ARE
INSUFFICIENT
1. Timer setting is incorrect
2. Insufficient amount of whole
beans in hopper
3. Hopper lid opened during
operation
4. Ground coffee chamber
moved out of position during
operation
5. Top burr mill is not in proper
position
6. Unit and burr mill are not
clean
7. There is a foreign object
between the two burr mills
THE SIZE OF GROUND
COFFEE PARTICLES IS
NOT CONSISTENT
1. Top burr mill is not in proper
position
2. Unit and burr mill are not
clean
3. There’s a foreign object
between the two burr mills
4. Grind setting is not correct
SOLUTION
SET TIMER
CLOSE HOPPER LID
PLACE CHAMBER IN
PROPER POSITION
PRESS START BUTTON
PLUG UNIT IN
WAIT FOR POWER TO BE
RESTORED
CALL AUTHORIZED
SUNBEAM SERVICE
CENTER
SET TIMER CORRECTLY
ADD BEANS TO HOPPER
CLOSE HOPPER LID
PLACE CHAMBER IN
PROPER POSITION
UNPLUG UNIT, PLACE TOP
BURR MILL IN PROPER
POSITION
CLEAN UNIT, UNPLUG IT
AND CLEAN BURR MILL
UNPLUG UNIT AND
CAREFULLY DISLODGE
FOREIGN OBJECT
UNPLUG UNIT, PLACE
TOP BURR MILL IN
PROPER POSITION
CLEAN UNIT, UNPLUG IT
AND CLEAN BURR MILL
UNPLUG UNIT AND
CAREFULLY DISLODGE
FOREIGN OBJECT
TURN KNOB TO CORRECT
GRIND SETTING
CONT.
PROBLEM
THE UNIT STOPS
GRINDING
POSSIBLE CAUSE
1. Timer setting is incorrect
2. Timer was inadvertently
rotated to OFF
3. Hopper lid has been opened
4. Ground coffee chamber is
not in correct position
5. Cancel button has been
pressed
6. The unit has been
unplugged
7. There’s a power outage
8. Ground coffee chamber is
full and is clogging the burr
mill compartment
9. Motor has overheated,
thermal fuse is broken
THE TIMER KNOB DOES
NOT TURN
1. Timer is at OFF setting,
cannot turn clockwise
anymore
2. Timer is at 12 setting,
cannot turn
counterclockwise anymore
3. Timer knob is broken
THE GRIND SETTING
KNOB DOES NOT TURN
1. Knob is at the Fine (A)
Setting, cannot turn clockwise
anymore
2. Knob is at the Coarse (E)
Setting, cannot turn
counterclockwise anymore
3. Unit and burr mill are not
clean
4. There’s a foreign object
between the two burr mills
SOLUTION
SET TIMER CORRECTLY
SET TIMER CORRECTLY
CLOSE HOPPER LID
PLACE CHAMBER IN
PROPER POSITION
PRESS START BUTTON
AGAIN
PLUG UNIT IN
WAIT FOR POWER TO BE
RESTORED
REMOVE CHAMBER,
EMPTY AND REPLACE;
UNPLUG UNIT AND
CLEAN BURR MILL
COMPARTMENT IF
NEEDED
CALL AUTHORIZED
SUNBEAM SERVICE
CENTER
TURN
COUNTERCLOCKWISE
TO SET DESIRED
NUMBER OF CUPS
TURN CLOCKWISE TO
SET DESIRED NUMBER
OF CUPS
CALL AUTHORIZED
SUNBEAM SERVICE
CENTER
TURN
COUNTERCLOCKWISE
FOR DESIRED GRIND
SETTING
TURN CLOCKWISE FOR
DESIRED GRIND SETTING
CLEAN UNIT, UNPLUG IT
AND CLEAN BURR MILL
UNPLUG UNIT AND
CAREFULLY DISLODGE
FOREIGN OBJECT
IF SERVICE IS REQUIRED,
DO NOT RETURN THIS APPLIANCE TO YOUR STORE
All repairs must be made by an Authorized Sunbeam Service Center. Please call us
for assistance or for the location of the nearest Authorized Sunbeam Service Center.
For service, please call 1-800-672-6333 (U.S.A.), 1-800-000-0000 (Canada)
or contact us through www.mrcoffee.com.
TO ASSIST US IN SERVING YOU, PLEASE HAVE THE MILL MODEL NUMBER
AND DATE OF PURCHASE AVAILABLE
We welcome your questions, comments or suggestions.
In all your communications, please include your complete name,
address and telephone number and a description of the problem.
1 YEAR LIMITED WARRANTY
Sunbeam Products, Inc., or if in Canada, Sunbeam Corporation (Canada) Limited (collectively “Sunbeam”)
warrants that for a period of one year from the date of purchase, this product will be free from defects in material
and workmanship. Sunbeam, at its option, will repair or replace this product or any component of the product found
to be defective during the warranty period. Replacement will be made with a new or remanufactured product or
component. If the product is no longer available, replacement may be made with a similar product of equal or greater
value. This is your exclusive warranty.
This warranty is valid for the original retail purchaser from the date of initial retail purchase and is not
transferable. Keep the original sales receipt. Proof of purchase is required to obtain warranty performance. Sunbeam
dealers, service centers or retail stores selling Sunbeam products do not have the right to alter, modify or in any
way change the terms or conditions of this warranty.
This warranty does not cover normal wear of parts or damage resulting from any of the following:
negligent use or misuse of the product, use on improper voltage or current, use contrary to the operating instructions,
disassembly, repair or alteration by anyone other than Sunbeam or an authorized Sunbeam service center. Further,
the warranty does not cover: Acts of God, such as fire, flood, hurricanes and tornadoes.
WHAT ARE THE LIMITS ON SUNBEAM’S LIABILITY?
Sunbeam shall not be liable for any incidental or consequential damages caused by the breach of any
express, implied or statutory warranty or condition. Except to the extent prohibited by applicable law, any implied
warranty or condition of merchantability or fitness for a particular purpose is limited in duration to the duration of
the above warranty. Sunbeam disclaims all other warranties, conditions or representations, express, implied, statutory
or otherwise. Sunbeam shall not be liable for any damages of any kind resulting from the purchase, use or misuse
of, or inability to use the product including incidental, special, consequential or similar damages or loss of profits,
or for any breach of contract, fundamental or otherwise, or for any claim brought against purchaser by any other
party. Some provinces, states or jurisdictions do not allow the exclusion or limitation of incidental or consequential
damages or limitations on how long an implied warranty lasts, so the above limitations or exclusions may not apply
to you. This warranty gives you specific legal rights, and you may also have other rights that vary from province to
province, state to state or jurisdiction to jurisdiction.
HOW TO OBTAIN WARRANTY SERVICE
In the U.S.A.: If you have any question regarding this warranty or would like to obtain warranty service,
please call 1-800-672-6333 and a convenient service center address will be provided to you.
In Canada: If you have any question regarding this warranty or would like to obtain warranty service,
please call 1-800-000-0000 and a convenient service center address will be provided to you.
In the U.S.A., this warranty is offered by Sunbeam Products, Inc., located in Boca Raton, Florida
33431. In Canada, this warranty is offered by Sunbeam Corporation (Canada) Limited, located at 5975
Falbourne Street, Mississauga, Ontario L5R 3V8. PLEASE DO NOT RETURN THIS PRODUCT TO ANY
OF THESE ADDRESSES OR TO THE PLACE OF PURCHASE.
Printed in China. ©2003 Sunbeam Products, Inc. All rights reserved.
Mr. Coffee® is a registered trademark of Sunbeam Products, Inc.
Rev. 8/9/02
Coffee Burr Mill
User’s Manual
BMX SERIES
(MODELS BMX 3, 4, 5 & 6)
©2003 Sunbeam Products, Inc. All rights reserved.
Mr. Coffee® is a registered trademark of Sunbeam Products, Inc.
Distributed by Sunbeam Products, Inc., Boca Raton, Florida 33431.
FOR HOUSEHOLD USE ONLY
PLEASE READ ALL INSTRUCTIONS BEFORE USING APPLIANCE
© 2003 Sunbeam Products, Inc. Todos los derechos reservados.
Mr. Coffee® es una marca registrada de Sunbeam Products, Inc.
Distribuido por Sunbeam Products, Inc., Boca Ratón, Florida, EE.UU. 33431.
Molino De Café
Manual del Usuario
SERIE BMX
(MODELOS BMX 3, 4, 5 & 6)
SÓLO PARA USO DOMÉSTICO
FAVOR DE LEER TODAS LAS INSTRUCCIONES ANTES DE UTILIZAR ESTA UNIDAD
INTRODUCCIÓN
Gracias por seleccionar un Molino MR. COFFEE®, el mejor molino de café en su categoría en
el mercado. Su nuevo molino dispone de un contador de tiempo innovador y flexible para hasta
12 tazas de café, el cual se apaga solo. El molino muele la harina de café en 16 gradaciones
diferentes de textura – desde fina hasta gruesa – para el café más fresco que haya probado
jamás, y cuenta con un tanque alimentador de granos o tolva translucente, de 4.5 oz u 8 oz, un
receptáculo translucente y removible para el café molido, con capacidad para 12 tazas de 5 oz
de harina de café molido de textura mediana, y almacenaje oculto para el cordel eléctrico. El
receptáculo removible para el café molido se puede lavar en el escurridor superior del lavaplatos.
Disponible en blanco o negro mate, el elegante diseño de su nuevo Molino MR. COFFEE®
incorpora lo último en rasgos de seguridad, incluyendo un interruptor de seguridad en la tapa del
tanque alimentador, el cual detiene la molienda si se abre la tapa; un interruptor de apagado
automático que apaga el molino cuando el receptáculo para el café molido no está insertado
correctamente; y botones de COMENZAR (START) y CANCELAR (CANCEL) marcados claramente
y fácilmente accesibles. El contador de tiempo de apagado automático del molino apagará la
unidad cuando la cantidad deseada de granos se haya molido.
Favor de leer cuidadosamente TODAS las instrucciones en este manual antes de
comenzar a utilizar esta unidad. El cuidado y mantenimiento adecuados le asegurarán
un larga vida y una operación sin contratiempos para esta unidad.
FAVOR DE CONSERVAR ESTAS INSTRUCCIONES Y DE
REFERIRSE A ELLAS PARA CONSEJOS DE LIMPIEZA Y CUIDADO.
TABLA DE CONTENIDO
Página
INTRODUCCIÓN.......................................................................................... 2
TABLA DE CONTENIDO............................................................................. 2
ADVERTENCIAS DE SEGURIDAD.................................................................... 3
INSTRUCCIONES ESPECIALES SOBRE EL CORDEL ELÉCTRICO.............. 3
DIAGRAMA DE LAS PARTES..................................................................... 4
UTILIZANDO SU MOLINO MR. COFFEE®................................................... 4
TABLA PARA FIJAR LA TEXTURA AL MOLER............................................. 5
TABLA DE MEDIDAS DEL CAFÉ................................................................. 6
CONSEJOS ÚTILES PARA MOLER EL CAFÉ.................................................. 6
PARA RESULTADOS ÓPTIMOS................................................................. 7
INSTRUCCIONES PARA LA LIMPIEZA........................................................... 8
RESOLVIENDO PROBLEMAS CON SU MOLINO MR. COFFEE®.................... 9
SI SE REQUIERE UNA REPARACIÓN............................................................ 11
GARANTÍA LIMITADA DE 1 AÑO................................................................. 11
ADVERTENCIAS DE SEGURIDAD
Para disminuir el riesgo de un fuego, corrientazo eléctrico y/o lesión a las personas,
siempre deben obedecerse las precauciones fundamentales de seguridad al utilizarse
artefactos eléctricos, incluyendo las siguientes:
1. LEA TODAS LAS INSTRUCCIONES ANTES DE UTILIZAR LA UNIDAD.
2. Para protegerse de un corrientazo eléctrico, no sumerja el cordel, el enchufe o la
unidad en agua ni en cualquier otro líquido.
3. Se requiere una supervisión adulta atenta cuando esta unidad es utilizada por, o
cerca de, niños.
4. Oprima el botón de CANCEL (CANCELAR) y desenchufe la unidad del tomacorriente
cuando no se esté utilizando y antes de limpiarla. Permita que la unidad se enfríe
antes de instalar o remover partes y antes de limpiar la unidad.
5. Evite hacer contacto con las partes en movimiento.
6. No opere artefacto eléctrico alguno con un cordel o enchufe averiado o luego de que
la unidad se averíe o haya sido dañada de manera alguna. Devuelva esta unidad
solamente al Centro de Servicio Autorizado más cercano para su examen, reparación
o ajuste.
7. El uso de aditamentos accesorios que no están recomendados para los productos
MR. COFFEE® pueden causar riesgos de daños o lesiones.
8. No utilice la unidad a la intemperie.
9. 9No permita que el cordel de la unidad cuelgue del borde de una mesa o mostrador,
ni que haga contacto con superficies calientes.
10. Examine el tanque alimentador o tolva para asegurarse de que no contiene objetos
extraños antes de utilizar la unidad.
11. No coloque esta unidad encima o cerca de un quemador caliente eléctrico o de gas,
ni en un horno caliente.
12. Para desconectar la unidad, oprima el botón de CANCEL (CANCELAR), luego
remueva el enchufe del tomacorriente.
13. No utilice la unidad para cualquier fin que no sea el uso doméstico para el cual fue
fabricada.
INSTRUCCIONES ESPECIALES SOBRE
EL CORDEL ELÉCTRICO
1. Se provee un cordel eléctrico corto para disminuir los riesgos de que una persona
o mascota se pudieran enredar o tropezar con un cordel más largo.
2. Se puede adquirir y utilizar una extensión eléctrica si se usa con precaución.
3. Si se utiliza una extensión eléctrica, la calificación eléctrica rotulada de la extensión
debe ser de al menos 10 amperios y 120 voltios. El cordel extendido resultante debe
acomodarse para que no cuelgue del borde de un mostrador o mesa donde pueda
ser tirado por niños o donde se pueda tropezar con él accidentalmente.
Esta unidad cuenta con un enchufe polarizado (uno de sus contactos es más
ancho que el otro). Para disminuir el riesgo de un corrientazo eléctrico, este
enchufe sólo podrá penetrar en un tomacorriente polarizado. Si el enchufe no
penetra completamente en el tomacorriente, inviértalo. Si aún no se puede
enchufar, comuníquese con un electricista autorizado. No modifique el enchufe
de manera alguna.
DIAGRAMA DE LAS PARTES
BOTONES DE COMENZAR
(START) Y CANCELAR
(CANCEL)
INTERRUPTOR DE
SEGURIDAD DE LA TAPA DEL
TANQUE ALIMENTADOR
TANQUE ALIMENTADOR
DE GRANOS + TAPA
BOTÓN PARA FIJAR
EL CONTADOR DE TIEMPO DE
APAGADO AUTOMÁTICO
(TAZAS)
ELEMENTO MOLEDOR
REMOVIBLE
(DENTRO DEL TANQUE)
BOTÓN PARA INDICAR
LA TEXTURA AL MOLER
ALMACENAJE DEL CORDEL
RECEPTÁCULO REMOVIBLE
PARA EL CAFÉ MOLIDO + TAPA
ALMACENAMIENTO
DEL CORDEL
INTERRUPTOR DE APAGADO
AUTOMÁTICO PARA
EL RECEPTÁCULO PARA
EL CAFÉ MOLIDO
UTILIZANDO SU MOLINO MR. COFFEE®
El molino MR. COFFEE® le ofrece 16 gradaciones de textura para moler la harina de café,
desde muy fina hasta gruesa. El molino de café minimiza la generación de calor al moler
utilizando elementos moledores contrapuestos para aplastar los granos íntegros de café
hasta lograr una harina de partículas uniformes, conservando el sabor único de su café
preferido. Para utilizar el molino:
1. Llene el tanque alimentador de granos con granos de café fresco y cierre la tapa
para conservar la frescura.
2. Seleccione la cantidad de tazas de café que usted colará, desde 1 hasta 12 (ajustado
a tazas de 5 oz), con el BOTÓN PARA FIJAR EL CONTADOR DE TIEMPO. Para
3.
4.
5.
6.
7.
8.
obtener la mejor taza de café o de expreso, tan solo muela la cantidad de café que
usted utilizará de inmediato. El contador de tiempo está programado para moler la
cantidad de tazas indicadas para una cafetera de goteo automático utilizando una
textura mediana, salvo indicación al contrario.
Oprima el botón de COMENZAR (START).
Con la unidad ENCENDIDA, gire el BOTÓN PARA INDICAR LA TEXTURA AL MOLER
para seleccionar su textura preferida para moler café (véase la tabla para fijar la
textura al moler). Si gira el botón hacia la derecha, la harina molida correspondiente
a cada marca será progresivamente más gruesa. Según usted se familiariza con el
molino, descubrirá la configuración que mejor se adapta a sus preferencias para
hacer café. Para resultados óptimos, seleccione siempre la textura para moler
mientras la unidad esté encendida o cuando el tanque alimentador esté vacío.
El contador de tiempo de la unidad apagará el molino automáticamente cuando usted
haya molido la cantidad deseada de granos. Si el receptáculo para el café molido no
está insertado correctamente mientras el molino está operando, el interruptor de
apagado automático apagará la unidad.
Cuando concluya la molienda, saque el receptáculo para el café molido y quítele la
tapa (Figura 1). El café molido se puede verter fácilmente desde el receptáculo.
Los granos que tengan más de 1 semana deben retirarse del tanque alimentador.
Para asegurar la frescura, los granos de café deben almacenarse preferentemente
en el refrigerador, en su envase original bien cerrado.
FIGURA 1 (sacando el receptáculo para el café molido)
TABLA PARA FIJAR LA TEXTURA AL MOLER
Fina
Fina para Expreso
y Cappuccino
Mediana
Mediana para Cafeteras
de Goteo Automático
Gruesa
Gruesa para Colado Manual,
Percolador y Prensa de Café
TABLA DE MEDIDAS DEL CAFÉ
CAFÉ MOLIDO DE TEXTURA MEDIANA
TAZAS DE CAFÉ (5 OZ CADA UNA)
12 Tazas
10 Tazas
8 Tazas
6 Tazas
4 Tazas
2 Tazas
CANTIDAD DE GRANOS/CUCHARADAS
9 Cdas
7.5 Cdas
6 Cdas
4.5 Cdas
3 Cdas
1.5 Cdas
1. La cantidad de granos de café que se necesita es aproximadamente igual a la
cantidad especificada de cucharadas de café molido de textura mediana.
2. La unidad operará durante aproximadamente 1 minuto si usted ha seleccionado 12
tazas en el contador.
3. La unidad puede ser apagada mientras muele:
a. Por el usuario – usted puede cambiar la configuración del contador para evitar
sobrellenar el receptáculo para el café molido antes de continuar la operación.
b. Abriendo la tapa del tanque alimentador durante la operación – coteje que
tenga granos suficientes. Cierre la tapa y ajuste el contador para evitar
sobrellenar el receptáculo para el café molido antes de continuar la operación.
c. Si el receptáculo para el café molido no está insertado correctamente – coteje
que no esté lleno. Cierre la tapa, inserte el receptáculo correctamente y ajuste
el contador para evitar sobrellenar el receptáculo para el café molido antes de
continuar la operación.
Evite sobrellenar el receptáculo para el café molido. Esto puede causar que el motor de
la unidad se sobrecaliente y se funda un fusible termal dentro del molino, posiblemente
averiando la unidad de manera permanente.
CONSEJOS ÚTILES PARA MOLER EL CAFÉ
Usted puede adaptar las recomendaciones de cantidad de granos presentadas previamente
según se familiariza con su nuevo molino MR. COFFEE®, pero siempre tome en consideración
lo siguiente:
1. El utilizar harina más fina que lo requerido para colar café en una cafetera de goteo
automático puede causar que el filtro y/o la canasta de colar se desborden. Además,
el sabor del café puede ser más cargado que lo deseado. Si esto sucede, utilice
menos harina de café o cambie la textura al moler a Mediana o a cualquier textura
que sea necesaria para obtener el resultado deseado.
2. El utilizar harina más gruesa que lo requerido para colar café en una cafetera de
goteo automático puede causar que el filtro y/o la canasta de colar se desborden.
Además, el sabor del café puede ser menos cargado que lo deseado. Si esto sucede,
utilice más harina de café para obtener el resultado deseado. Para una taza de café
regular o más cargado, ajuste la textura al moler de Mediana hasta Fina.
3. Si se requiere una textura más fina para colar café expreso o cappuccino, favor de
moler la cantidad de harina de café recomendada por el fabricante de su producto.
a. Para productos de expreso Mr. Coffee®:
1) Ponga el molino a moler en Fina.
2) Para 2 oz de café expreso, se requiere 2 cdtas (0.6 cdas) de harina
fina. Ponga el contador a marcar 3 tazas, esto mantendrá la unidad ENCENDIDA
el tiempo suficiente para moler la harina más fina que se necesita.
3) Para 4 oz de café expreso, se requiere 4 cdtas (1.3 cdas) de harina
fina. Ponga el contador a marcar 5 tazas, esto mantendrá la unidad
ENCENDIDA el tiempo suficiente para moler la harina más fina que se
necesita.
b.El moler la harina del café indebidamente en las posiciones de Mediana o
Gruesa puede afectar el sabor del café expreso colado, ya que no se logra la
extraccion óptima del café. Si a usted le gusta una taza de expreso cargada,
asegúrese de que fija el botón de moler en Fina.
4. Si se requiere harina más gruesa para colar café manualmente, en un percolador
o utilizando una prensa de café, muela la cantidad de harina de café recomendada
por el fabricante de su producto.
a. La recomendación de Mr. Coffee®:
1) Fije el molino para moler harina Gruesa.
2) Especifique 8-10 tazas en el contador de tiempo, esto mantendrá la unidad
ENCENDIDA el tiempo necesario para moler harina de café suficiente para
12 tazas de café colado.
3) Ya que la harina gruesa ocupa más volumen, siempre fije el contador para
2-4 tazas menos que la cantidad deseada.
b.Recuerde que usted puede personalizar las recomendaciones antedichas según
usted vaya descubriendo la configuración que mejor se adapta a sus preferencias
para hacer café. Como en el caso de las cafeteras de goteo automático,
1) El utilizar una cantidad excesiva de harina para colar café en un percolador
podría causar que la canasta de colar del percolador se desborde.
2) El utilizar una harina más fina que la requerida para colar café manualmente
en un percolador, o utilizando una prensa de café, podría causar que la
canasta de colar del percolador se desborde y/o el sabor del café podría
estar más cargado que lo deseado. Si usted desea una taza de café regular
o menos cargada, fije la textura de la harina de Mediana a Gruesa.
PARA RESULTADOS ÓPTIMOS
1. Sólo utilice granos de café en esta unidad.
2. Seleccione la textura de la harina cuando la unidad esté encendida o cuando el
tanque alimentador esté vacío.
3. El receptáculo para el café molido y su tapa siempre deben estar en su lugar al
utilizar esta unidad.
4. No deje la unidad desatendida cuando esté moliendo. El contenido completo del
tanque alimentador no cabe en el receptáculo para el café molido. Asegurese de
apagar la unidad si el receptáculo para el café molido está lleno.
5. No utilice la gradación más fina para moler harina cuando esté moliendo café para
su cafetera de goteo automática. La harina más fina pudiera hacer que la canasta
del café se desborde.
6. Para evitar sobrecalentar el motor, no muela más de 2 tanques alimentadores llenos
o 2 ciclos completos de 12 tazas sin un descanso. Permita que el motor se enfríe a
temperatura ambiente al menos 2 minutos entre cada ciclo.
7. Los granos de café con sabores añadidos tupirán los elementos moledores y dejarán
un residuo aceitoso si se almacenan en el tanque alimentador por largos períodos
de tiempo. Asegúrese de limpiar su molino más frecuentemente cuando muela granos
de café con sabores añadidos y de remover todas las partículas de café incrustadas
en los elementos moledores al efectuar la limpieza.
8. Por cada tres ocasiones que utilice la unidad, límpiela para obtener un rendimiento óptimo.
9. Luego de utilizarla, fije el botón de moler en Gruesa y opere la unidad vacía para
limpiar el conducto de moler harina de café.
INSTRUCCIONES PARA LA LIMPIEZA
Limpie su molino antes de usarlo por primera vez. Luego, para asegurar un funcionamiento
y durabilidad óptimos, límpielo regularmente siguiendo estos pasos sencillos:
1. Siempre desenchufe su molino luego de utilizarlo y antes de limpiarlo.
2. Abra la tapa del tanque alimentador o tolva. Vacíe cualesquiera granos de café del
tanque. Remueva el elemento moledor superior girándolo a favor de las manecillas del
reloj (Figura 2). Para un mejor resultado, mantenga inmóvil el botón para fijar la textura
al moler mientras gira el elemento moledor superior a favor de las manecillas del reloj.
Esto le permitirá limpiar los elementos moledores y el compartimiento de moler.
3. Limpie las cavidades interiores con un cepillo suave (Figura 3). Nota: Nunca utilice
agua ni líquido alguno para limpiar la sección moledora inferior de esta unidad.
EL CEPILLO NO ESTÁ INCLUIDO.
4. Pásele un paño húmedo al tanque alimentador de granos de café, a su tapa y al
exterior del molino.
5. El receptáculo para el café molido y su tapa se pueden lavar con un detergente suave
y agua. Ambos se pueden lavar en el escurridor superior del lavaplatos. No sumerja
el molino o el tanque alimentador de granos de café en el agua ni en ningún otro
líquido ni los coloque en el lavaplatos. Use sólo limpiadores no abrasivos para remover
manchas.
6. Luego de secar completamente el tanque alimentador y el elemento moledor superior,
reemplace el elemento en su lugar alineando sus bordes levantados con el receptáculo
y girándolo en contra de las manecillas de reloj hasta que encaje en su lugar. Para un
mejor resultado, mantenga inmóvil el botón para fijar la textura al moler mientras gira
el elemento moledor superior en contra de las manecillas del reloj. Cuando el elemento
esté en su lugar, tire de él suavemente para asegurarse de que haya encajado en su
lugar. Si el elemento moledor se desprende, vuelva a repetir este paso.
7. Reemplace el receptáculo para el café molido y su tapa, asegurándose de que ambos
encajan firmemente en su lugar.
8. Llene el tanque alimentador con granos de café.
Figura 3
Figura 2
B
C
Mediu D
m
E
Coarse
B
C
Mediu
D
m
E
Coarse
Nota: El cepillo no está incluido
RESOLVIENDO PROBLEMAS
CON SU MOLINO MR. COFFEE®
Su Molino MR. COFFEE® ha sido diseñado con esmero para darle muchos años de servicio
sin contratiempos. En el caso improbable de que su nuevo molino de café no funcione
adecuadamente, favor de examinar los siguientes problemas potenciales y efectuar los
pasos recomendados ANTES de llamar a un Centro de Servicio Autorizado Sunbeam.
PROBLEMA
LA UNIDAD NO MUELE
CAUSA POSIBLE
SOLUCIÓN
1. No se ha fijado la cantidad de
tazas en el contador de tiempo
2. La tapa del tanque alimentador
está abierta
3. El receptáculo para el café
molido no está en su lugar
4. El botón de comenzar
(START) no ha sido oprimido
5. La unidad está desenchufada
6. Hay un apagón eléctrico
FIJE LA CANTIDAD DE TAZAS
EN EL CONTADOR
CIERRE LA TAPA DEL TANQUE
7. El motor se ha sobrecalentado,
el fusible termal se ha fundido
LA HARINA DE CAFÉ
PRODUCIDA NO ES
SUFICIENTE
1. La cantidad de tazas fijadas
en el contador de tiempo es
incorrecta
2. Hay una cantidad insuficiente
de granos de café en el
tanque alimentador
3. La tapa del tanque alimentador
ha sido abierta durante el
funcionamiento
4. El receptáculo para el café
molido se salió de su lugar
durante el funcionamiento
5. El elemento moledor superior
no está en su lugar apropiado
6. La unidad y el elemento
moledor no están limpios
7. Hay un cuerpo extraño entre
los dos elementos moledores
EL TAMAÑO DE LAS
PARTÍCULAS DE HARINA
DE CAFÉ NO ES UNIFORME
1. El elemento moledor superior
no está en su lugar apropiado
2. La unidad y el elemento
moledor no están limpios
3. Hay un cuerpo extraño entre
los dos elementos moledores
COLOQUE EL RECEPTÁCULO
EN EL LUGAR APROPIADO
OPRIMA EL BOTÓN DE
COMENZAR (START)
ENCHUFE LA UNIDAD
ESPERE A QUE SE RESTAURE
EL SERVICIO
LLAME A UN CENTRO DE
SERVICIO AUTORIZADO
SUNBEAM
FIJE EL CONTADOR
CORRECTAMENTE
AÑADA GRANOS DE CAFÉ
AL TANQUE
CIERRE LA TAPA DEL TANQUE
COLOQUE EL RECEPTÁCULO
EN EL LUGAR APROPIADO
GIRE EL BOTÓN PARA
CORREGIR LA TEXTURA
FIJADA PARA MOLER
LIMPIE LA UNIDAD,
DESENCHÚFELA Y LIMPIE EL
ELEMENTO MOLEDOR
DESENCHUFE LA UNIDAD Y
DESALOJE EL CUERPO
EXTRAÑO CON PRECAUCIÓN
DESENCHUFE LA UNIDAD,
COLOQUE EL ELEMENTO
MOLEDOR SUPERIOR EN EL
LUGAR APROPIADO
LIMPIE LA UNIDAD,
DESENCHÚFELA Y LIMPIE EL
ELEMENTO MOLEDOR
DESENCHUFE LA UNIDAD Y
DESALOJE EL CUERPO
EXTRAÑO CON PRECAUCIÓN
4. La textura fijada para moler
es incorrecta
1. La cantidad de tazas fijadas
en el contador de tiempo es
incorrecta
2. El contador de tiempo fue
girado inadvertidamente a
APAGADO (OFF)
3. La tapa del tanque alimentador
ha sido abierta
4. El receptáculo para el café
molido se salió de su lugar
5. El botón de cancelar
(CANCEL) ha sido oprimido
6. La unidad ha sido
desenchufada
7. Hay un apagón eléctrico
8. El receptáculo para el café
molido está lleno y está
atascando el compartimiento de
los elementos moledores
9. El motor se ha sobrecalentado,
el fusible termal se ha fundido
1. El contador de tiempo marca
APAGADO (OFF), ya no se
puede girar más a favor de las
manecillas del reloj
2. El contador de tiempo marca
12, ya no se puede girar más en
contra de las manecillas del reloj
3. El botón del contador de tiempo
está averiado
1. El botón se encuentra en la
posición Fina (A), ya no se
puede girar más a favor de las
manecillas del reloj
2. El botón se encuentra en la
posición Gruesa (E), ya no se
puede girar más en contra de
las manecillas del reloj
3. La unidad y el elemento
moledor no están limpios
4. Hay un cuerpo extraño entre
los dos elementos moledores
SI SE REQUIERE UNA REPARACIÓN,
NO DEVUELVA ESTA UNIDAD A SU TIENDA
Todas las reparaciones deben ser efectuadas por un Centro de Servicio Autorizado Sunbeam.
Favor de llamarnos para recibir asistencia o para saber la ubicación del Centro de Servicio
Autorizado Sunbeam más cercano.
Para servicio, favor de llamar al 1-800-672-6333 (EE.UU.), 1-800-000-0000 (Canadá)
o comuníquese con nosotros a través de www.mrcoffee.com.
PARA AYUDARNOS A SERVIRLE, FAVOR DE TENER DISPONIBLES EL NÚMERO
DE MODELO DEL MOLINO Y SU FECHA DE ADQUISICIÓN.
Aguardamos sus preguntas, comentarios o sugerencias.
En todas sus comunicaciones, favor de incluir su nombre y dirección completos,
número teléfonico y una descripción del problema.
GARANTÍA LIMITADA DE 1 AÑO
Sunbeam Products Inc., o, en el Canadá, Sunbeam Corporation (Canada) Limited (“Sunbeam”
colectivamente) garantiza que, por un período de un año a partir de la fecha de compra, este producto estará libre
de defectos en el material y en la mano de obra. Sunbeam, a su criterio, reparará o reemplazará este producto o
cualquiera de los componentes del mismo que estén defectuosos durante el período de garantía. El reemplazo
será hecho con un producto o componente nuevo o reconstruido. Si el producto ya no se encuentra disponible,
se reemplazará con un producto similar de igual o mayor valor. Esta es su garantía exclusiva.
Esta garantía es válida para el comprador original al detal a partir de la fecha inicial de compra al detal
y no es transferible. Conserve el recibo original de compra. La evidencia de compra es requerida para honrar la
garantía. Los concesionarios, centros de servicio de Sunbeam o tiendas al detal que vendan productos Sunbeam,
no tienen el derecho de alterar, modificar o cambiar de forma alguna los términos o condiciones de esta garantía.
Esta garantía no cubre el desgaste por el uso normal de las partes o daños que resulten de cualesquiera
de las siguientes: uso negligente o incorrecto del producto, uso bajo un voltaje o corriente inadecuados, uso contrario
a las instrucciones de operación, desensamble, reparaciones o alteraciones que no sean hechas por Sunbeam o
por un centro de servicio autorizado Sunbeam. Además, la garantía no cubre: factores de fuerza mayor tales como
incendios, inundaciones, huracanes y tornados.
¿CUÁLES SON LOS LÍMITES DE LA RESPONSABILIDAD DE SUNBEAM?
Sunbeam no será responsable de ningún daño incidental o consecuente causado por el incumplimiento de
cualquier garantía o condición expresa, implícita o estatutaria. Excepto hasta donde esté prohibido por el derecho aplicable,
cualquier garantía o condición implícita de comercialización o de aptitud para un propósito en particular está limitada en
duración al período de la garantía antedicha. Sunbeam rechaza cualesquiera otras garantías, condiciones o representaciones,
expresas, implícitas, estatutarias o de otra índole. Sunbeam no será responsable de cualesquiera daños de clase alguna
que resulten de la adquisición, uso o mal uso de, o incapacidad para utilizar el producto, incluyendo daños incidentales,
especiales, consecuentes o similares, o la pérdida de ganancias, o por cualquier incumplimiento de contrato, fundamental
o de otra índole, o por cualquier reclamación incoada contra el comprador por cualquier tercero. Algunas provincias,
estados o jurisdicciones no permiten la exclusión o limitación de daños incidentales o consecuentes o limitar la duración
de una garantía implícita, así que las limitaciones o exclusiones antedichas pueden no ser aplicables a usted. Esta garantía
le da a usted derechos legales específicos, y usted puede también tener otros derechos que varían de provincia en
provincia, de estado en estado y de jurisdicción en jurisdicción.
CÓMO OBTENER EL SERVICIO DE LA GARANTÍA
En los EE.UU.: Si usted tiene cualquier pregunta con respecto a esta garantía o si desea obtener servicio, favor
de llamar al 1-800-672-6333 y se le proveerá una dirección de un centro de servicio de acceso conveniente para usted.
En el Canadá: Si usted tiene cualquier pregunta con respecto a esta garantía o si desea obtener servicio, favor
de llamar al 1-800-000-0000 y se le proveerá una dirección de un centro de servicio de acceso conveniente para usted.
En los EE.UU., esta garantía es ofrecida por Sunbeam Products, Inc., localizado en Boca Ratón,
Florida 33431. En el Canadá, esta garantía es ofrecida por Sunbeam Corporation (Canada) Limited, localizado
en 5975 Falbourne Street, Mississauga, Ontario L5R 3V8. FAVOR DE NO DEVOLVER ESTE PRODUCTO
A CUALQUIERA DE ESTA DIRECCIONES O AL LUGAR DONDE LO ADQUIRIÓ.
Impreso en la China. © 2003 Sunbeam Products, Inc. Todos los derechos reservados.
Mr. Coffee® es una marca registrada de Sunbeam Products, Inc.