1
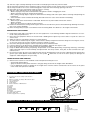
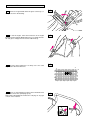
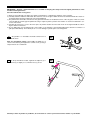
Please Read These Instructions
Before Using Your Mower
Operating Instructions
for model
HP470 & SP470 Lawnmowers
with Briggs & Stratton engine
Product Codes:
299164623/BQ
297264623/BQ
Call our Helpline if you have any problems:
Helpline Number
0870 240 2114
Thank you for purchasing a Mountfield lawnmower. This machine will give you many years os safe and reliable service if
operated in accordance with these instructions. Please read and understand these Operating instructions before using
your mower, failure to do so could result in personal injury or damage to the equipment.
NEVER TIP THE MOWER ON ITS SIDE AS THIS WILL FLOOD THE AIR FILTER WITH OIL.
To access the underside, lift the front wheels by lowering the handle unitl it rests on the ground.
SAFETY PRECAUTIONS
Read the
instructions
before using
the machine.
Bevare of moving
blades.
Do not put hands
or feet near the
blades.
Warning!
Disconnect the
spark plug cap
before carrying
out any repairs
or maintenance.
Beware of thrown
objects that may
be thrown up by
the blade.
Keep other
people at a safe
distance whilst
working.
The following safety precautions must be observed at all times. Please read them very carefully.
TRAINING
1)
2)
3)
4)
5)
Read the instructions carefully. Get familiar with the controls and proper use of the equipment. Learn how to stop the engine
quickly.
Only use the lawnmower for the purpose for which it was designed, i.e. for cutting and collecting grass. Any other use can
be hazardous, causing damage to the machine.
Never allow children or people unfamiliar with these instructions to use the lawnmower. Local regulations may restrict the
age of the operator.
Never use the lawnmower:
– When people, especially children, or pets are nearby.
– If the operator has taken medicine or substances that can affect his ability to react and concentrate.
Remember that the operator or user is responsible for accidents or hazards occurring to other people or their property.
PREPARATION
1)
2)
3)
4)
5)
6)
While mowing, always wear sturdy footwear and long trousers. Do not operate the equipment when barefoot or wearing
open sandals.
Thoroughly inspect the area where the equipment is to be used and remove all objects which may be thrown by the machine
or damage the cutter assembly and the engine (stones, sticks, metal wire, bones, etc.)
WARNING: DANGER! Engine fuel is highly flammable:
– Store fuel in containers specifically designed for this purpose.
– Refuel using a funnel and outdoors only. Do not smoke while refuelling or whenever handling the fuel.
– Add fuel before starting the engine. Never remove the cap of the fuel tank or add fuel while the engine is running or when
the engine is hot.
– If fuel is spilled, do not attempt to start the engine but move the machine away from the area of spillage and avoid creating any source of ignition until the fuel has evaporated and the vapour dispersed.
– Replace all fuel tanks and containers caps securely.
Substitute faulty silencers.
Before use, always inspect the machine, especially the condition of the blades, and check that the screws and cutting
assembly are not worn or damaged. Replace worn or damaged blades and screws in sets to preserve balance.
Before mowing, attach the discharge opening guards (grass-catcher or stone-guard).
OPERATION
1)
2)
3)
4)
5)
6)
7)
8)
9)
10)
Do not operate the engine in a confined space where dangerous carbon monoxide fumes can collect.
Mow only in daylight or good artificial light.
If possible, avoid operating the equipment in wet grass.
Always be sure of your footing on slopes.
Walk, never run and do not allow yourself to be pulled along by the lawnmower.
Mow across the face of slopes, never up and down.
Exercise extreme caution when changing direction on slopes.
Do not mow on slopes of more than 20°.
Exercise extreme caution when pulling the lawnmower towards you.
Stop the blade if the lawnmower has to be tilted for transportation when crossing surfaces other than grass, and when transporting the lawnmower to and from the area to be mowed.
11) Never operate the lawnmower with defective guards, or without safety devices, such as the stone-guard and/or grass-catcher, in place.
12) Do not change the engine governor settings or overspeed the engine.
13) On power-driven models, disengage the drive clutch before starting the engine.
14)
15)
16)
17)
18)
Start the engine carefully, following the instructions and keeping feet well away from the blade.
Do not tilt the lawnmower when starting the engine. Start the engine on a flat surface that is free of obstacles and tall grass.
Do not put hands or feet near or under rotating parts. Keep clear of the discharge opening at all times.
Never pick up or carry a lawnmower while the engine is running.
Stop the engine and disconnect the spark plug wire:
– Before carrying out any work underneath the cutting deck or before unclogging the chute;
– Before checking, cleaning or working on lawnmower;
– After striking a foreign object. Inspect the lawnmower for damage and make repairs before restarting and operating the
lawnmower;
– If the lawnmower starts to vibrate abnormally (find and remove the cause of the vibration immediately).
19) Stop the engine:
– Whenever you leave the lawnmower unattended. Remove the key from models with electric starters.
– Before refuelling.
– Every time you remove or replace the grass-catcher.
20) Reduce the throttle before turning off the engine and turn the fuel off when you have finished mowing, following the instructions in the engine handbook.
21) When mowing, always keep to a safe distance from the rotating blade. This distance is the length of the handle.
MAINTENANCE AND STORAGE
1)
2)
3)
4)
5)
6)
7)
8)
9)
Keep all nuts, bolts and screws tight to be sure the equipment is in safe working condition. Regular maintenance is essential for safety and performance.
Never store the equipment with fuel in the tank inside a building where vapour may reach a flame or a spark or a source of
extreme heat.
Allow the engine to cool before storing in an enclosed space.
To reduce the fire hazard, keep the engine, exhaust silencer, battery compartment and fuel storage area free of grass, leaves,
or excessive grease. Do not leave containers with grass cuttings in rooms.
Check the stone-guard and grass-catcher frequently for wear and deterioration.
If the fuel tank has to be drained, this should be done outdoors and when the engine is cool.
Wear strong work gloves when removing and reassembling the blade.
Keep the blade balanced during sharpening. All operations on the blade (dismantling, sharpening, balancing, remounting
and/or replacing) require a certain familiarity and special tools. For safety reasons, these jobs are best carried out at a specialized centre.
For reasons of safety, do not use the equipment with worn or damaged parts. Parts are to be replaced and not repaired. Use
genuine spare parts (blades should always bear the symbol ). Parts that are not of the same quality can damage the
equipment and be dangerous for your safety.
TRANSPORTATION AND HANDLING
1)
Whenever the machine is to be handled, raised, transported or tilted you must:
– wear strong working gloves;
– grasp the machine at the points that offer a safe grip, taking account of the weight and its distribution.
– use an appropriate number of people for the weight of the machine and the characteristics of the vehicle or the place
where it has to be placed or collected.
6
EQUIPMENT IDENTIFICATION LABEL
4
1
17
18
19
LWA
1.
2.
3.
4.
5.
6.
Acoustic power level according to EEC directive
2000/14/CE
Mark of conformity according to EEC directive 98/37
Year of manufacture
Lawnmower type
Serial number
Name and address of Manufacturer
11.
12.
13.
14.
15.
16.
17.
18.
19.
Chassis
Engine
Blade
Stone-guard
Grass-catcher
Handle
Throttle control (if fitted)
Engine brake lever
Drive engagement lever (if fitted)
dB
kg
S/N
3
5
2
16
14 15
11 13 12
DESCRIPTION OF THE SYMBOLS SHOWN ON THE CONTROLS (where present)
1
2
3
4
5
6
7
1.
2.
3.
4.
5.
6.
7.
Slow
Fast
Choke
Engine stop
Transmission engaged
Off
Start
HOW TO GET MOWING
YourMountfield lawnmower does not contain petrol or oil and these must be added before use. Running the mower with
insufficient oil can cause serious damage to the engine and will invalidate your warranty.
NEVER TIP THE MOWER ON ITS SIDE AS THIS WILL FLOOD THE AIR FILTER WITH OIL.
To access the underside, lift thefront wheels by lowering the handle unitl it rests on the ground.
Carefully remove the mower from the carton and read these Operating Instructions. An Owner's Manual for the engine is also
included, please read this before starting the engine.
1. FINISH ASSEMBLY
NOTE – The machine can be supplied with some of the components already fitted.
1.1
5
1.1
Attach the bottom of the handle (1) to the holes on the
side of the chassis. Secure it using the nuts and bolts supplied
(2). Fit the top of the handle (3) using the nuts and bolts (4) provided, ensuring that the spiral (5) of the starter cable is positioned correctly.
3
On some models: connect the engine brake cable (6) by
attaching the wire terminal (7) to the hole on the control lever (8).
Fasten the cable support (6a) to the handle using the nuts and
bolts (9) as shown.
10
5
4
Attach the control cables using the able ties (10).
2
4
1
8
2
7
9
6a
6
1.2 Carefully detach the plate (1) and washers (2) from the top
of the grass-catcher (3). Eliminate the washers (2) and fit the
plate (1) onto the top of the grass-catcher (3) so that it clicks into
place. Assemble the two parts of the grass-catcher (3) and (4),
making sure that the hooks are fully locked into place and fasten them using the screws supplied (5).
1.2
1
2
1
2
3
3
3
5
5
4
2. DESCRIPTION OF CONTROLS
2.1 The blade brake is controlled by the lever (1), which
should be held against the handle when starting and using the
lawnmower. The engine stops when the lever is released.
2.1
1
2.2 In the power-driven models, pull the lever (1) towards the
handle for forward movement. The lawn-mower stops moving
forward when the lever is released.
2.2
1
2.3
The cutting height is adjusted using the levers (1).
2.3
The four wheels must be at the same height.
1
MAKE THIS ADJUSTMENT ONLY WHEN THE BLADE HAS
STOPPED MOVING.
1
3. GRASS CUTTING
3.1
Lift the stone-guard and attach the grass-catcher (1) correctly as shown in the drawing.
3.1
1
3.2 To start the engine, follow the instructions in the engine
booklet and then pull the blade brake lever (1) towards the handle and give a sharp pull on the starter cable knob (2).
3.2
1
2
3.3
The lawn will look better if it is always cut to the same
height and in alternate directions.
3.3
1
2
3.4 When you have finishing mowing, release the brake lever
(1) and disconnect the spark plug cap (2).
WAIT FOR THE BLADE TO STOP before carrying out any type
of work on the machine.
3.4
1
2
4. ROUTINE MAINTENANCE
IMPORTANT – Regular, careful maintenance is essential for keeping the safety level and original performance of the
machine unchanged in time.
Store the lawnmower in a dry place.
1) Wear strong working gloves during any cleaning, maintenance or adjustment operation on the machine.
2) Carefully clean the machines with water after each cut; remove the grass debris and mud accumulated inside the chassis to
avoid their drying and thus making the next start-up difficult.
3) The paintwork on the inside of the chassis may peel off in time due to the abrasive action of the cut grass; in this case, intervene promptly by touching up the paintwork using a rustproof paint to prevent the formation of rust that would lead to corrosion of the metal.
4) Should it be necessary to access the lower part, only tilt the machine from the side shown in the engine handbook; following the relative instructions.
5) Do not drip petrol onto the plastic parts of the engine or the machine to prevent damaging them and remove all traces of
spilt petrol immediately. The warranty does not cover damage to plastic parts caused by petrol.
4.1
All operations on the blade should be carried out at a
specialized centre.
4.1
Note for specialized centres: Reassemble the blade (2) as
shown in the drawing and tighten the central screw (1) using a
torque wrench set to 50-60 Nm.
2
1
4.2
4.2 In the power-driven models, regulate the adjuster (1) so
that the wire (2) is slightly loose, with the lever (3) at rest.
3
1
2
Should you have any doubts or problems, do not hesitate to contact your nearest Service Centre or your Dealer.
Guarantee
GGP UK Limited undertakes to provide a full guarantee against defective materials or
workmanship for two years from the date of purchase.
If the machine is used for commercial purposes; i.e. for hire; or by contractors, caravan
sites or similar users, this guarantee period shall be 90 days.
If any part is found to be defective within the guarantee period, GGP UK Limited via their
authorised dealer, will effect the repair or replacement at no charge to the owner providing
that the fault is reported direct to the dealer. All repairs must be carried out by an authorised Mountfield dealer. Delivery and collection of the machine is the owner's responsibility
and not covered under the terms of this guarantee.
This guarantee is not transferable. Proof of purchase will be required in the event of a
claim.
This gurantee does not apply to the routine replacement of parts that are subject to normal wear and tear - or to normal service and maintenance parts. This guarantee does not
cover faults caused by neglect or misuse.
The engine manufacturer guarantees the engine fitted to this machine.
This guarantee is in addition to, and does not detract from, the contractual rights of the
owner under statute or common law.
On delivery of your new Mountfield mower,
we suggest that you complete the box to the right.
The information for your machine is on the serial
number label, which is fixed on the cutter deck at the
base of the handles. You will be asked for these
details if you have any problems or require spare parts.
Please keep your receipt, proof of purchase will be
required in the event of a claim.
Manufactured by:
GGP ITALY SPA
Via del Lavoro, 6 - 31033
Castelfranco V.to (TV) - ITALY
Model: . . . . . . . . . . . . . . . .
Type: . . . . . . . . . . .
(Year) . . . . . . .
LWA
96 dB
S/N° . . . . . . . . . . . . . . . .
Service Record
1st Service
2nd Service
Date of Service:
Date of Service:
Next Service Due:
Next Service Due:
Dealer's Signature:
Dealer's Signature:
Dealer's Stamp:
Dealer's Stamp:
GGP UK LIMITED
Bell Close, Newnham Industrial Estate, Plympton, Plymouth, Devon, PL7 4JH, England
Manufactured by:
GGP ITALY SPA- Via del Lavoro, 6 - 31033 Castelfranco V.to (TV) - ITALY
Part Number 71503705/1