1
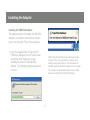
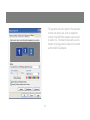
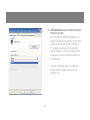
Installation Guide
USB 2.0 Video Card
GUC2015V
1
PART NO. M0415
2
Welcome
Thank you for purchasing IOGEAR’s USB 2.0 External Video Card (EVC) which will allow you to connect
an additional display using only a USB 2.0 Port. IOGEAR only manufactures high quality connectivity
devices so we are sure you will be satisfied with your purchase. IOGEAR is dedicated to customer service
and satisfaction, and wishes you the best with your new USB 2.0 External Video Card.
To better serve you, IOGEAR offers an array of additional USB 2.0, FireWire, KVM, and many more
peripheral products. For more information, to purchase additional IOGEAR products, visit us at www.
IOGEAR.com.
We hope you enjoy using your USB 2.0 External Video Card.
Note: Your order has been carefully packaged and inspected, and we hope you are pleased with the IOGEAR product you purchased. Please
inspect the contents of the package to ensure that you have received all items and that nothing has been damaged. If you discover a problem,
please contact your dealer immediately for assistance.
3
Table of Contents
Package Contents
5
Windows Operations
12
Overview
6
Uninstalling Drivers
18
Requirements
7
Technical Support
19
Supported Modes
9
Warranty
20
Installing the Adapter
11
Contact
21
4
Package Contents
This package contains:
1 USB 2.0 External Video Card
1 USB 2.0 Cable
1 Installation CD
1 User Manual
1 Warranty/Registration Card
* If any items are damaged or missing, please contact your dealer.
5
Overview
• The USB VGA Adapter allows you to connect an extra monitor to your desktop PC or laptop’s
USB port.
• The connected monitor can be configured to either clone your primary screen, or extend the
Windows desktop allowing visibility of more applications at the same time.
• The USB to VGA driver used to control the extra screen uses very little computer resource and offers
a vast array of screen resolutions and color depths. This ensures that there is little difference in
performance between a directly connected screen and a screen connected through the USB VGA
Adapter.
6
System Requirements
•
•
•
•
The USB VGA Adapter supports all analogue CRT and LCD monitors with a VGA connector. DVI- A
and DVI- I monitors can also be connected using a suitable VGA DVI converter.
The USB driver software can be installed on any desktop or laptop system running Windows XP Home
or Professional. Currently, there is no driver support for other platforms or previous Windows versions.
Windows XP service pack 2 is highly recommended as it fixes instability in the windows graphics
drivers.
Only one USB VGA Adapter can be connected to the PC at a time. If you attach two modules to a
PC, only one will be active.
7
The minimum hardware requirements for the PC are:
• PC with 1.2GHz or higher processor clock speed required. Intel Pentium/Celeron family, or AMD
K6/Athlon/Duron family, or compatible processor recommended
• 256 megabytes (MB) of RAM or higher (512MB Recommended)
• USB 2.0 port.
• 30Mb of available disk space
• Super VGA (800 x 600) or higher- resolution video adapter and monitor
• CD-ROM or DVD drive
Power
• The USB VGA Adapter may require an external power supply to operate correctly and conform to
USB2.0 specifications. However, the Module is able to run from power supplied by the USB bus and
should run without any problems on the vast majority of systems. A 5V 400mA supply should be used
if external power to the USB VGA Adapter is required.
VGA Support
• The VGA output on the USB VGA Adapter is via a standard 15- pin HD Sub- D connector. This should
be connected directly to a computer monitor. The VGA connector may be plugged and unplugged
while the USB VGA Adapter is on. The USB VGA Adapter should be connected to a USB 2.0 port.
8
Supported Modes
Supported screen modes
There are three components that make up the screen mode:
•
•
•
Resolution: In common usage, this refers to the number of pixels displayed on screen horizontally
and vertically.
Color Depth: This defines the number of different colors that can be shown on the screen at the
same time.
Refresh rate: Measures the speed that the entire screen is rescanned. Higher frequencies reduce
flicker. Below is a list of refresh rates supported at various resolutions and color depths for the USB
VGA Adapter:
9
Resolution/
ColurDepth
640x480
800x600
1024x768
1280x960
1280x1024
16 bit
60 72 75
56 60 72 75 85
60 70 75 85
60 85
60 75 85
24 bit
60 72 75
56 60 72 75 85
60 70 75 85
60 85
60 75
Note that interlaced modes are not supported.
Additional modes may be offered, depending upon the connected monitor, but these are not currently guaranteed. Most monitors advertise the supported modes through the VGA connector. If this in the case, the USB VGA Adapter will identify the supported modes from the monitor and make
only these available under Windows. The modes available through Windows will be a combination of those supported by the monitor and the USB
VGA Adapter. This ensures that the monitor cannot be put into an unsupported mode, which might damage it. If the monitor does not advertise the
supported modes, the USB VGA Adapter will choose a set of common screen modes. If cloning the primary display, the USB VGA Adapter will try
to use the preferred monitor mode. In some cases, this may not be the most appropriate mode for the cloned desktop. It is recommended that the
primary display resolution is changed to closer match the default resolution of the USB VGA Adapter monitor.
10
Installing the Adapter
Installing the USB VGA Adapter
The preferred method of installing the USB VGA
Adapter is to install the drivers before connecting it to the computer. This is done as follows:
1. Insert the supplied driver CD into the CD
ROM drive. Navigate to the XP driver’s area
and double click “Setup.exe” to start
installing the drivers for the USB VGA
Adapter. The following progress window will
be seen:
Note: During the install the screen will blank a couple
of times. This is normal behavior for windows when
installing new graphics drivers. Once the drivers are
installed, attach the USB VGA Adapter to the computer.
The computer will automatically detect the new USB
device and install start the USB VGA Adapter.
11
Windows Operation
modes of operation, Clone and Extend are
covered below.
USB VGA Adapter Operation
1. Initial Use
When the USB VGA Adapter first starts, it
will clone the primary monitor. Changes to
the screen mode and USB VGA Adapter
operation mode can be made under the
Windows display properties. If no output is
seen on the monitor connected to the USB
VGA Adapter, it may be in a mode which
cannot be displayed by the monitor. This
can happen if the monitor does not report
its supported modes to the USB VGA
Adapter. Reduce the resolution of the
primary display, and in turn the resolution
of the USB VGA Adapter display until an
image is shown. Note that placing the
monitor into an unsupported mode for
long periods can damage it. The two main
2. Clone Mode
Clone mode copies the primary display to
the monitor connected to the USB VGA
Adapter. For instance, this makes it easy to
use a laptop with a desktop monitor. To set
up the VGA connector to clone the primary
display, go to the “Settings” tab of the Display properties page. Click on the Monitor
connected to the “USB Display Adapter
(Newnham)” and ensure that the “Extend
my Windows desktop onto this monitor” is
unchecked.
12
The resolution, color depth and refresh rate
of the primary screen will be replicated to the
monitor connected to the VGA USB VGA
Adapter. If the monitor connected to the VGA
USB VGA Adapter supports a lower resolution than the primary display, then a part of the
screen is shown on the cloned display. As the
mouse is moved around the screen, the USB
VGA Adapter display will scroll to the current
area.
13
3. Extended Mode
Click on the Monitor connected to the “USB
Display Adapter (Newnham)” and ensure that
the “Extend my Windows desktop onto this
monitor” is checked. The orientation of the
screens can also be adjusted by dragging
the location of the blue screens to match the
actual physical layout.
Extended mode extends the desktop across
multiple monitors. This provides a number of
advantages to increase productivity:
• Read email on one display, open
attachments on the other.
• Expand a spreadsheet across both
monitors.
• For graphics editing increase your
working area by allowing all the pallets
and toolbars to be placed on the second
display.
• Keep your desktop on the USB VGA
Adapter display and watch a DVD on the
primary display.
To set up extended mode, go to the “Settings” tab of the Display properties page.
14
The resolution and color depth of the extended
monitor can also be set. A list of supported
modes of the USB VGA Adapter can be found
in section 2.4. The listed modes will be a combination of the supported modes of the monitor
and the USB VGA Adapter.
15
4. USBVGAAdapterbehaviorwithstandbyand
hibernate modes
If the PC that the USB VGA Adapter is connected to is placed into standby or hibernate
mode, the display will go blank. When the
PC is again powered up, the connected
display will return to the connected monitor
in the same mode as it was before stand by
or hibernation.
To adjust the refresh rate of the extended
screen, click on advanced and then the
“Monitor” tab.
16
5. Using multiple USB VGA Adapters
It is possible that multiple USB VGA
Adapters are being used, for example one
in the office and one at home. Each VGA
connector has a unique windows identifier.
This allows a different display profile to be
automatically associated with each USB
VGA Adapter, saving the display settings on
a per- USB VGA Adapter basis.
6. Unplugging the USB VGA Adapter
If the USB VGA Adapter is powered off or
the USB cable is removed from the computer, the display will blank. All windows and
icons should move to the primary screen.
On reconnection or powering up of the
USB VGA Adapter, the display will return to
the connected monitor in the same mode
as it was before disconnection. However,
windows and icons that were previously on
the screen will not be moved back.
This allows for different physical positioning,
or different resolutions, of connected monitors in the office and the home.
Note: Only one USB VGA Adapter can be connected to the
computer at a time.
17
Uninstalling Drivers
7. Removing the USB VGA Adapters
The USB VGA Adapter software can be removed from the “Add or Remove Programs” utility under the
Windows control panel.
•
•
•
•
Open “Add or remove programs”
Find the “USB Display Adapter” entry and click on “Remove”
Click Yes to confirm that you want to remove it
The uninstaller will then automatically remove all USB VGA Adapter software.
18
Technical Support
If you need technical support, please check out our IOGEAR Tech Info Library (T.I.L.) at
www.iogear.com/support for the latest tips, tricks, and troubleshooting. The IOGEAR T.I.L. was designed
to provid you with the latest technical information about our products. Most of the answers to your
questions can be found here, so please try it out before contacting technical support.
Technical support is available Monday through Friday from 8:00 am to 5:00 pm PST and can be reached
at 866-946-4327 or by email [email protected].
19
Warranty
IN NO EVENT SHALL THE DIRECT VENDOR’S LIABILITY FOR DIRECT, INDIRECT, SPECIAL,
INCIDENTAL OR CONSEQUENTIAL DAMAGES RESULTING FROM THE USE OF THE PRODUCT, DISK,
OR ITS DOCUMENTATION EXCEED THE PRICE PAID FOR THE PRODUCT.
The direct vendor makes no warranty or representation, expressed, implied, or statutory with respect to
the contents or use of this documentation, and especially disclaims its quality, performance,
merchantability, or fi tness for any particular purpose.
The direct vendor also reserves the right to revise or update the device or documentation without
obligation to notify any individual or entity of such revisions, or updates. For further inquiries please
contact your direct vendor.
20
Contact
IOGEAR, INC.
23 Hubble
Irvine, CA 92618
P 949.453.8782
F 949.453.8785
Visit us at:
www.iogear.com
©2007 IOGEAR. All Rights Reserved. PKG-M0415
IOGEAR, the IOGEAR logo, ION, are trademarks or registered trademarks of IOGEAR Inc. Microsoft and Windows are registered trademarks
of Microsoft Corporation. MAC, Macintosh, and Apple are registered trademarks of Apple Computer, Inc. All other brand and product names
are trademarks or registered trademarks of their respective holders. IOGEAR makes no warranty of any kind with regards to the informatio
presented in this document. All information furnished here is for informational purpose only and is subject to change without notice. IOGEAR
assumes no responsibility for any inaccuracies or errors that may appear in this document. Reproduction in whole or part without permission
is prohibited.
21
About Us
FUN
IOGEAR offers connectivity solutions that are innovative, fun, and stylish,
helping people enjoy daily life using our high technology products.
GREEN
IOGEAR is an environmentally conscious company that emphasizes the
importance of conserving natural resources. The use of our technology
solutions helps reduce electronic waste.
HEALTH
IOGEAR supports healthy and fit lifestyles. By integrating products with
the latest scientific developments, IOGEAR’s solutions enhance the life of
end-users.
© 2007 IOGEAR, INC.