1
motorola.com
MORE HERE >
8988485L64-O
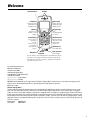
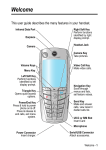
Welcome
Internal Antenna
Earpiece
Left Soft Key
Perform functions
identified by left
display prompt.
Right Soft Key
Perform functions
identified by right
display prompt.
Menu Key
Open a menu
when G is in the
display.
Navigation Keys
Power/End Key
Press & hold to
turn phone
on & off.
Press & release
to end phone
calls, exit menu
system.
Send/Answer Key
Make and answer
calls; press in idle
to list recently
dialed calls.
S
Scroll through lists,
set volume.
USB Connector
Insert data cable.
Power Connector
Headset
Insert charger.
Connector
You can change covers and keypads on your C350 Series phone.
Your phone may not appear exactly as the phone image above.
Note that all key locations, sequences, and functions remain the
same with any of the covers.
Microphone
Personal Communications Sector
600 North U.S. Highway 45
Libertyville, Illinois 60048
1-800-331-6456 (United States)
1-888-390-6456 (TTY/TDD United States)
1-800-461-4575 (Canada)
www.motorola.com (United States)
www.motorola.ca (Canada)
MOTOROLA and the Stylized M Logo are registered in the US Patent & Trademark Office. All other product or service names are the property of their
respective owners. Acrobat and Acrobat Reader are registered trademarks of Adobe Systems Incorporated.
© Motorola, Inc. 2003
Software Copyright Notice
The Motorola products described in this manual may include copyrighted Motorola and third party software stored in semiconductor memories or other
media. Laws in the United States and other countries preserve for Motorola and third party software providers certain exclusive rights for copyrighted
software, such as the exclusive rights to distribute or reproduce the copyrighted software. Accordingly, any copyrighted software contained in the Motorola
products may not be modified, reverse-engineered, distributed, or reproduced in any manner to the extent allowed by law. Furthermore, the purchase of the
Motorola products shall not be deemed to grant either directly or by implication, estoppel, or otherwise, any license under the copyrights, patents, or patent
applications of Motorola or any third party software provider, except for the normal, non-exclusive, royalty-free license to use that arises by operation of law
in the sale of a product.
Manual number:
6809464A31-O
Cover number:
8988485L64-O
1
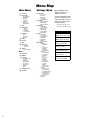
Menu Map
Main Menu
m Voice Dial
z Recent Calls
•
•
•
•
•
•
•
Received Calls
Dialed Calls
Notepad
Call Times
Call Cost
Data Times
Data Volumes
o Chat *
v Media Center
•
•
•
•
Theme
My Tones
MotoMixer
Picture Viewer
w Ring Styles
• Alert
• alert Detail
• My Tones
è
q
6
Games
Browser *
AIM *
Office Tools
• Datebook
• Calculator
ã Settings
• (see next page)
More >
r Phonebook
: MyMenu
U Messages *
•
•
•
•
•
•
•
•
Create Message
Voicemail
Text Msgs
Browser Msgs
Info Services
Quick Notes
Outbox
Drafts
7 SIM Applications *
Q Fixed Dial
2
Settings Menu
Call Forward *
• Voice Calls
• Fax Calls
• Data Calls
• Cancel All
• Forward Status
Phone Status
• My Tel. Numbers *
• Battery Meter
• Other Information
In-Call Setup
• In-Call Timer
• Call Cost Setup *
• My Caller ID
• Talk and Fax *
• Answer Options
• Call Waiting *
Security
• Phone Lock
• Lock Keypad
• Lock Application
• Fixed Dial
• Call Barring *
• SIM PIN
• New Passwords
Other Settings
• Personalize
• Main Menu
• Keys
• Color Style
• Greeting *
• Wallpaper
• Screen Saver
• Initial Setup
• Time and Date
• 1-Touch Dial
• Backlight
• Zoom
• TTY Setup
• Scroll
• Animation
• Language
• Battery Save
• Contrast
• DTMF
• Master Reset
• Master Clear
• Network
• New Network
• Network Setup
• Available Networks
• My Network List
• Service Tone
• Call Drop Tone
• Car Settings
• Headset
Note: Select More when it
appears in the menu to see
additional menu items.
This is the standard phone menu
layout. Menu organization and
feature names may vary on your
phone. Not all features may be
available for all users.
*
optional network, SIM card, or
subscription-dependent features
Shortcuts
Open Phonebook:
Press S d or e in idle
Set Ring Volume:
Press S b or c in idle
Display My Number:
Press M # in idle
View dialed calls list:
Press N in idle
Change Display Zoom:
Press M, then hold M
Lock Keypad:
Press M *
Exit menu system:
Press O in a menu
Contents
Menu Map . . . . . . . . . . . . . . . . . . . . . . . . . . . . . . . . . . . . 2
Messages. . . . . . . . . . . . . . . . . . . . . . . . . . . . . . . . . . . . . 4
Setting Up the Text Message Inbox . . . . . . . . . . . . . . . 4
Sending Messages, Pictures, and Sounds . . . . . . . . . . 4
Sending a Quick Note Text Message . . . . . . . . . . . . . . 4
Viewing the Status of Sent Text Messages . . . . . . . . . 5
Receiving a Message . . . . . . . . . . . . . . . . . . . . . . . . . . 5
Reading, Locking, or Deleting a Text Message . . . . . . 5
Reading Information Service Messages . . . . . . . . . . . 6
Using Chat . . . . . . . . . . . . . . . . . . . . . . . . . . . . . . . . . . 6
Customizing Your Messages Menu . . . . . . . . . . . . . . . 8
Setting Up Your Phonebook . . . . . . . . . . . . . . . . . . . . . 9
Viewing Entry Details . . . . . . . . . . . . . . . . . . . . . . . . . . 9
Creating a Phonebook Entry . . . . . . . . . . . . . . . . . . . . 9
Storing a PIN Code With a Phone Number . . . . . . . . . 9
Recording a Voice Name For a Phonebook Entry . . . 10
Dialing a Phonebook Entry . . . . . . . . . . . . . . . . . . . . . 10
Editing a Phonebook Entry . . . . . . . . . . . . . . . . . . . . . 10
Deleting a Phonebook Entry . . . . . . . . . . . . . . . . . . . 11
Using Phonebook Categories . . . . . . . . . . . . . . . . . . 11
Sorting Phonebook Entries . . . . . . . . . . . . . . . . . . . . 11
Copying Phonebook Entries . . . . . . . . . . . . . . . . . . . . 11
Checking Phonebook Capacity . . . . . . . . . . . . . . . . . 12
Setting 1-Touch Dial Preference . . . . . . . . . . . . . . . . . 12
Personalizing Your Phone . . . . . . . . . . . . . . . . . . . . . . 13
Personalizing a Ring Style . . . . . . . . . . . . . . . . . . . . . 13
Activating Ringer IDs . . . . . . . . . . . . . . . . . . . . . . . . . 13
Setting Ringer or Keypad Volume . . . . . . . . . . . . . . . 13
Setting Reminders . . . . . . . . . . . . . . . . . . . . . . . . . . . 13
Creating and Editing Alert Tones . . . . . . . . . . . . . . . . 13
Setting the Menu Language . . . . . . . . . . . . . . . . . . . . 14
Setting Menu Scroll Behavior . . . . . . . . . . . . . . . . . . . 14
Setting Menu Animation . . . . . . . . . . . . . . . . . . . . . . . 15
Resetting All Options . . . . . . . . . . . . . . . . . . . . . . . . . 15
Clearing All Information . . . . . . . . . . . . . . . . . . . . . . . 15
Using MyMenu . . . . . . . . . . . . . . . . . . . . . . . . . . . . . . 15
Getting More Out of Your Phone . . . . . . . . . . . . . . . . . 16
Making a Conference Call . . . . . . . . . . . . . . . . . . . . . 16
Forwarding a Call . . . . . . . . . . . . . . . . . . . . . . . . . . . . 16
Barring Calls . . . . . . . . . . . . . . . . . . . . . . . . . . . . . . . . 16
Using TTY Mode . . . . . . . . . . . . . . . . . . . . . . . . . . . . 17
Using Fixed Dialing . . . . . . . . . . . . . . . . . . . . . . . . . . 17
Using DTMF Tones . . . . . . . . . . . . . . . . . . . . . . . . . . . 17
Monitoring Phone Use . . . . . . . . . . . . . . . . . . . . . . . . 18
Using Hands-Free Features . . . . . . . . . . . . . . . . . . . . 19
Making Data and Fax Calls . . . . . . . . . . . . . . . . . . . . 19
Adjusting Network Settings . . . . . . . . . . . . . . . . . . . . 20
Monitoring Battery Charge . . . . . . . . . . . . . . . . . . . . . 20
Viewing Phone Specifications . . . . . . . . . . . . . . . . . . 20
Personal Organizer Features . . . . . . . . . . . . . . . . . . . . 21
Using the Datebook . . . . . . . . . . . . . . . . . . . . . . . . . . 21
Using the Calculator . . . . . . . . . . . . . . . . . . . . . . . . . . 22
Security . . . . . . . . . . . . . . . . . . . . . . . . . . . . . . . . . . . . . 24
Locking the SIM Card . . . . . . . . . . . . . . . . . . . . . . . . . 24
Locking and Unlocking Applications . . . . . . . . . . . . . . 24
Line Security . . . . . . . . . . . . . . . . . . . . . . . . . . . . . . . 24
Troubleshooting . . . . . . . . . . . . . . . . . . . . . . . . . . . . . . 25
Index . . . . . . . . . . . . . . . . . . . . . . . . . . . . . . . . . . . . . . . 28
3
Messages
Messages
Text messages are brief messages that you
can send and receive.
Note: Your message inbox must be set up before you can
send and receive messages (see page 4).
Quick notes are prewritten text messages that
you can insert into a message and send
quickly.
Shortcut: While dialing (with digits visible in the display),
you can press M > Send Message to create a text message
addressed to the number entered.
Setting Up the Text Message
Inbox
When you manually enter multiple phone numbers in the
To field, you must insert a space between each number.
Press and hold 1 to insert a space as needed.
Your message inbox must be set up before you can send
and receive messages.
Find the Feature
Note: Your service provider may have already set up the
message inbox for you.
Press
1 keypad keys
Find the Feature
> Create Message
M > Messages
M > Text Msg Setup
Reply Type
Cleanup
Email Gateway
SMS Alert
Description
number of the service
center that handles your
outgoing text messages
standard type of replies you
want to send—text
messages or other formats
number of days you want to
keep messages in the
inbox, or number of
messages you want to keep
port number for the email
gateway that handles your
outgoing email messages
(required to send a text
message to an email
address)
turns the message alert On
or Off for messages that
arrive while you are on a
voice call
Sending Messages, Pictures,
and Sounds
You can send text messages and pictures or sounds to
one or more recipients. You can manually enter each
recipient’s phone number, or select one or more numbers
from the phonebook.
To
enter the text message (see
your user’s guide)
To insert a picture, animation,
or sound file in the message,
press:
To set up the message inbox, you must configure the
following settings. Contact your service provider to obtain
information, if necessary. Actual field names and values
may vary depending on the technologies available to your
service provider. Some settings may not be available for all
phone models.
Setting
Srvce Center No.
M > Messages
M > Insert > object type
2 OK (+)
3 keypad keys
> object
Note: Some files may not be
compatible with some brands
of phones.
store the message contents
and open the address editor
enter one or more phone
numbers where you want to
send the message
Note: Remember to press
and hold 1 to add a space
between numbers that you
enter manually.
or
PH.BOOK (+)
4 OK (+)
5 DONE (-)
6
S
7 SELECT (+)
select one or more phone
numbers from the phonebook
store the number(s)
finish the message
scroll to Send Message,
Message Details,
Save to Drafts, or
Cancel Message
select the option
Sending a Quick Note Text
Message
Quick notes are prewritten text messages that you can
insert into a message and send quickly (for example,
Meet me at ...). You can also create new quick notes.
Find the Feature
M > Messages
> Quick Notes
4
Press
1
To
scroll to the quick note
S
2 READ (+)
or
M
read the quick note
open the Quick Note Menu for
the following options
You can store these embedded object files on your phone,
and use them as screen saver images, wallpaper images,
and event alerts. While reading the message:
Press
1 S up or down
2 M
Description
Create a new quick note.
Edit the quick note.
Delete the quick note.
Open a new message with the quick note
in the Msg field.
Viewing the Status of Sent Text
Messages
Text messages that you send are stored in the outbox.
3
S
4 SELECT (+)
5
S
6 SELECT (+)
7 STORE (+)
8
S
9 SELECT (+)
M > Messages > Outbox
Find the Feature
Messages are sorted from newest to oldest. The following
indicators show message status:
< = sending in progress
> = sending failed
display a list of items you can
store
scroll to File Attachment
display the file name
view storage options
scroll to Store Only,
Set as Screen Saver,
Set as Wallpaper, or
Set as Ring Tone
store the file and, optionally,
set it as your screen saver,
wallpaper image, or ring tone
If you select Set As Ring
Tone, your phone displays
Set As Which?
h = delivered
Select the event for the ring
tone, and enter a name for
the tone.
Receiving a Message
Note: Your message inbox must be set up before you can
send and receive messages. See page 4.
Note: When you set an animation as a wallpaper image,
only the first frame of the animation displays.
When you receive a new message, your phone displays
the g (message waiting indicator) and New Message, and
sounds an alert.
Reading, Locking, or Deleting a
Text Message
Press
1 READ (+)
To
open the message (or your
text message inbox if there
are multiple messages)
If reminders are turned on, your phone sends a reminder
at regular intervals until you close the new message
notification, read the message, or turn off your phone.
When your phone displays Memory is Full!, you must
delete some existing messages from your inbox, outbox, or
drafts folder to receive new messages.
Storing Picture or Sound Files
Text messages that you receive can contain pictures,
animations, and ring tones. Pictures and animations are
displayed as you read the message. A ring tone begins
playing when you scroll to or select the p (sound file)
indicator.
Messages
Option
New
Edit
Delete
Send
To
highlight the file in the
message
open the Text Msg Menu
scroll to Store
Messages in the text message inbox are sorted from
newest to oldest.
Find the Feature
M > Messages
> Text Msgs
Press
1
S
2 READ (+)
3 BACK (-)
or
REPLY (+)
or
M
To
scroll to the message
(i = unread,
j = read, { = read and
locked)
open the message
close the message
compose and send a reply
open the Text Msg Menu for
the following options
5
Option
Delete
Call Back
Reply
Forward
Messages
Chat
Lock/Unlock
Store
Delete All
New Message
Setup
Description
Delete the message.
Call the number in the message
header or embedded in the
message.
Open a new text message, with
the sender’s Reply To number or
email address in the To field.
Open a copy of the text
message, with an empty To field.
Open a chat session with the
message sender.
Lock or Unlock the message.
Store a message attachment
(picture, animation, or sound
file) or a phone number in the
message.
You can also save some
attachments as your Wallpaper,
Screen Saver, or Ring Tone.
Delete all unlocked and read
messages.
Open a new text message.
Open the text message inbox
setup menu.
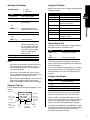
Reading Information Service
Messages
Information service messages are broadcast
messages that you can receive, such as stock
updates or news headlines.
technologies available to your service provider. Some
settings may not be available for all phone models.
Setting
Service
Active Channels
Quick View
Save Q. View
Language
Cleanup
Description
select Yes or No to turn
broadcasts on or off
set the subscription
channels
enter or edit the quick view
channel number
select whether to save
single-line quick view
messages in the inbox
select the language(s) in
which you want to accept
broadcasts
select the number of days
to keep messages in the
inbox, or the number of
messages to keep
Receiving an Information Services
Message
Note: Your information services message inbox must be
set up before you can receive information services
messages.
Receiving Long Messages
If the new message is a long information services
message, your phone displays the g (message waiting
indicator) and New Message, and sounds an alert. To view
the new message, see page 5. To read, lock, or delete an
existing message, see page 5.
Receiving Quick View Messages
Your information services message inbox must be set up
before you can receive information services messages.
The number of messages the inbox can hold depends on
the length of the messages, and the number of other
messages and drafts stored on your phone.
Setting Up the Information Services
Message Inbox
Note: Your service provider may have already set up the
information services inbox for you.
Find the Feature
M > Messages
M > Info Srvc Setup
To set up the information services inbox, you must
configure the following settings. Contact your service
provider to obtain information, if necessary. Actual field
names and values may vary depending on the
6
If the new message is a short quick view message, it
appears directly in your display.
Action
Read the message
and press O
To
read and delete the quick
view message
If the message is more than 2 lines, you can press
SAVE (-) to save it in your information services inbox. To
automatically save quick view messages, or change the
channels that send messages, change your information
services setup.
Using Chat
You can exchange text messages in real time
with another wireless phone user in a chat
session. The messages you send appear
immediately on your chat partner’s phone.
Starting a Chat Session
Using the Chat Menu
During a chat session, press M to open the Chat Menu for
the following options:
M > Chat
M > New Chat
Find the Feature
Press
1 keypad keys
2 OK (+)
3 keypad keys
To
enter your Chat Name
save your Chat Name
enter your chat partner’s
phone number
or
Option
New Chat
Call Partner
Call Number
Store Number
End Chat
select a number from the
phonebook or recent call lists
store the number
enter your first chat message
4 OK (+)
5 keypad keys
Go to Top
Go to Bottom
Clear Log
Re-send
or
INSERT (+)
6 OK (+)
select a quick note
send the chat message
7 CHAT (+)
8 OK (+)
Your phone displays the chat
log. A < appears next to your
message until the message is
sent. When your chat partner
replies, the reply appears
below your text.
enter a reply to your partner
send your reply
Notes:
• If you send a chat message to a phone that only has
text messaging, the chat text appears as a text
message on the other phone. The reply appears as
chat text on your phone.
• You can start a chat session from a text message.
Press M and select Chat to start a new session with
the sender’s Reply To number in the To field.
• When your phone displays Memory is Full!, you must
delete some existing messages from your inbox,
outbox, or drafts folder to receive new chat messages.
The chat log displays the messages exchanged in a chat
session.
Chat name
5
9 Chat text
Message
Status:
>> sending
> failed
Carlo>What time
does it start?
>>Katy>10 AM
G CHAT
EXIT
Exit
chat
Responding to Chat
When you receive a chat message, your phone displays
Chat from chat name, and sounds an alert.
Press
ACCEPT (+)
or
IGNORE (-)
Press M to
open the
Chat Menu
Newest
messages
appear at
bottom of
log.
Enter
reply
To
accept the chat session
refuse the chat session
If reminders are turned on, your phone reminds you at
regular intervals until you respond to the chat notification
or turn off your phone.
If you receive another chat request during a chat session,
the new request appears as an incoming text message,
with the requestor’s chat name at the beginning of the
message.
Ending a Chat Session
Press
1 M
2
Using the Chat Log
Press S to
scroll and see
more text.
Send Message
Messages
BROWSE (+)
Description
Open a new chat session.
Call your chat partner.
Call the number in the chat log.
Create a phonebook entry for the
number in the chat log.
End the chat session.
Go to the top of the chat log.
Go to the bottom of the chat log.
Clear all text from the chat log.
Re-send your most recent chat
message, if it failed.
Create a new chat message.
S
3 SELECT (+)
4 YES (-)
To
open the Chat Menu
scroll to End Chat
select End Chat
end the chat session
A chat session also ends when you turn off your phone,
answer an incoming call, or start a new chat session.
Your chat partner is not notified when you end a chat
session. If your partner sends more chat text, your phone
treats it as an incoming text message, with your chat
partner’s chat name at the beginning of the message.
If you exit the chat log without selecting End Chat, and your
chat partner sends another message, your phone notifies
you and adds it to the chat log. You can re-enter the
session by returning to the chat log.
7
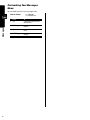
Customizing Your Messages
Menu
You can reorder the items in your messages menu:
Find the Feature
Press
1
S
Messages
2 GRAB (+)
8
3
S
4 INSERT (+)
M > Messages
M > Reorder List
To
scroll to the menu item you
want to move
grab the menu item you want
to move
move the item up or down the
menu
insert the item in the new
location
Setting Up Your Phonebook
You can store a list of names and phone numbers or email
addresses in your phone’s electronic phonebook.
To see the names in your phonebook, press
M > Phonebook from the idle display. Scroll to a name and
press VIEW (+) to view details of the phonebook entry as
shown in the following display.
Shortcut: In idle, press S up or down to open the
Phonebook.
Voice Name
Entry’s Name
Entry’s phone
number or
email
address
Creating a Phonebook Entry
You can store a phonebook entry on your phone or on the
SIM card.
Ringer ID
Icon ID
the icon that appears when
you receive calls or
messages from this entry
More
create another entry with the
same Name
Completing a Phonebook Entry
When you are finished entering information for a
phonebook entry:
Press
DONE (-)
Entering Information
To create or edit a phonebook entry:
M > Phonebook
M > New
> Phone Number or
Email Address
Shortcut: Enter a phone number in the idle display, then
press STORE (+) to create a phonebook entry with the
number in the No. field.
Description
the type of phone number
(only for phone numbers not
stored on the SIM)
select whether to store the
entry on your Phone or SIM
record a voice name for the
entry
the number you use to speed
dial the entry. Entries with a
speed dial number from 1 to
100 are stored on your
phone. Entries with a speed
dial number of 101 or higher
are stored on your SIM card.
the alert your phone uses
when you receive calls or
messages from this entry
To
store the entry and return to
the phonebook list
Setting Up Your Phonebook
Edit entry
Speed Number
(P) indicates entry stored Return Press M to open the
to list
Phonebook Menu
in phone memory, (S)
indicates SIM memory
Note: Entries stored on the SIM card do not have Type,
Voice Name, Icon ID, or Ringer ID information.
Find the Feature
Store To
Speed No.
Viewing Entry Details
Voice Name indicator
Type indicator
identifies
indicates a recorded
number type:
voice name
T Work
P Home
5
9
O Main
TVCarlo Emrys
Q Mobile
S Fax
5551212
R Pager
Speed No.15#(P)
h Email
G EDIT
BACK
Phonebook item
Type
Storing a PIN Code With a
Phone Number
You can store a PIN code with the phone number for calls
that require additional digits (for example, to make a
calling card call, or to retrieve voicemail or answering
machine messages). Insert one or more of the following
A phone number or email address is required for a
phonebook entry. All other information is optional. You can
enter the following information for a phonebook entry.
Phonebook item
Name
Category
No. or Email
Description
a name for the entry
the category that classifies
the entry (see page 11)
the phone number or email
address
9
characters in the dialing sequence to ensure that the
number dials and connects properly:
Press
M > Insert Pause
To
inserts a p (pause) character
Your phone dials the
preceding digits, waits for the
call to connect, then sends
the remaining digit(s).
M > Insert Wait
Setting Up Your Phonebook
M > Insert 'n'
Note: If your network does
not recognize the first pause
character, try two (pp).
inserts a w (wait) character
Your phone dials the
preceding digits, waits for the
call to connect, then prompts
you for confirmation before it
sends the remaining digit(s).
inserts an n (number)
character
Your phone prompts you for a
number before dialing the
call. The number you enter is
inserted into the dialing
sequence in place of the n
character.
Notes:
• You can store a maximum of 40 digits per number for
a phonebook entry on your phone. The maximum
number may vary for entries stored on the SIM card.
Each character counts as one digit.
• You cannot store numbers that contain a w or n
character on the SIM card.
Recording a Voice Name For a
Phonebook Entry
A voice name lets you call the phonebook entry using
voice dial. You can record a voice name for a new or
existing phonebook entry.
Note: You cannot record a voice name for an entry stored
on a SIM card.
Record your voice name in a quiet location. Hold the
phone about 4 inches (10 centimeters) from your mouth,
and speak directly into the phone’s microphone in a
normal tone.
Find the Feature
Press
1
S
2 VIEW (+)
3 EDIT (+)
4
10
S
M > Phonebook
To
scroll to the entry
view entry details
edit the entry
scroll to Voice Name
Press
5 RECORD (+)
6 RECORD (+)
and release,
then say the
entry’s name
(within 2
seconds)
7 RECORD (+)
and release,
then repeat the
name
8 Press
DONE (-)
To
begin recording
record the voice name
confirm the voice name
store the voice name
Dialing a Phonebook Entry
Use one of the following procedures to call a number (or
send a text message to an email address) in your
phonebook.
Note: You can also use speed dial or 1-touch dial. See
your User’s Guide.
Using the Phonebook List
Find the Feature
Press
1 keypad key
letters
2
S
3 N
M > Phonebook
To
jump to entries that begin
with that letter (optional)
scroll to the entry you want
call the entry
Using Voice Dial
Find the Feature
M > Voice Dial
Say the prerecorded phonebook entry name.
Editing a Phonebook Entry
Find the Feature
Press
1
S
2 VIEW (+)
3 EDIT (+)
M > Phonebook
To
scroll to the entry you want to
edit
display the entry’s detailed
view
edit the entry
Edit the entry as described on page 9.
Tip: Press M to open the Phonebook Menu to perform
various operations on the selected entry.
Deleting a Phonebook Entry
Find the Feature
Press
1
S
2 M
3
M > Phonebook
To
scroll to the entry
open the Phonebook Menu
scroll to Delete
S
4 SELECT (+)
Press
1
S
2 M
3
S
4 SELECT (+)
To
scroll to the category
You cannot edit the All
category
open the Categories menu
scroll to Delete
delete the category
delete the entry
Reordering Categories
Using Phonebook Categories
Find the Feature
Phonebook categories let you classify entries as
“Business,” “Personal,” “General,” or other
types.
Creating, Editing, or Adding Members to a
Category
Find the Feature
Press
S
2 M
3
S
4
5
6
7
8
SELECT (+)
9
S
CHANGE (+)
keypad keys
OK (+)
CHANGE (+)
10 ADD (+)
To
scroll to a category to edit
(select any category if you
are creating a new one)
You cannot edit the All
category
open the Category menu
scroll to New or Edit
select New or Edit
select the category Name
enter the category name
store the category name
open the member list
scroll to a phonebook entry
you want to add or remove
add an unchecked entry
or
REMOVE (+)
11 DONE (-)
12 CHANGE (+)
13
S
14 SELECT (+)
15 DONE (-)
remove a checked entry
close the member list
select the category Ringer ID
scroll to the ringer ID to use
for calls from category entries
select the ringer ID
store the category and return
to the phonebook list
Deleting a Category
Find the Feature
M > Phonebook
M > Categories
2 GRAB (-)
3
S
4 INSERT (-)
To
scroll to the category you
want to move
grab the category you want to
move
move the category up or
down the menu
insert the category in the new
location
Viewing Category Entries
You can select a category to show only its entries:
Find the Feature
M > Phonebook
M > Categories
> the category to view
Sorting Phonebook Entries
You can sort your phonebook list by speed dial number
(the standard), name, voice name, or email address.
Note: The voice name sort is identical to the name sort,
except that the entries with voice name tags appear first.
Find the Feature
Press
1 M
2
S
3 SELECT (+)
4
S
5 CHANGE (+)
6
S
7 SELECT (+)
8 DONE (-)
Setting Up Your Phonebook
1
M > Phonebook
M > Categories
Press
1 S
M > Phonebook
M > Categories
M > Reorder List
M > Phonebook
To
open the Phonebook Menu
scroll to Setup
select Setup
scroll to Sort by
select Sort by
scroll to the sort order
select the sort order
store the sort order
Copying Phonebook Entries
Note: These procedures do not delete the original entries.
11
Copying a Single Entry
Find the Feature
Press
1
S
2 M
M > Phonebook
To
scroll to the entry
3
S
open the Phonebook Menu
scroll to Copy Entry
4
SELECT (+)
select Copy Entry
5 keypad keys
6 OK (+)
The phone displays the next
available speed dial number.
edit the speed dial number
copy the entry to the new
speed dial location
Tip: The SIM card cannot store Type and Voice Name data
for entries. When you try to copy an entry with a type or
voice name to the SIM card, the phone asks you for
confirmation before dropping this information and copying
the entry.
Setting Up Your Phonebook
Copying Multiple Entries
Find the Feature
Press
1 M
2
S
3 SELECT (+)
4
S
5 CHANGE (+)
6 keypad keys
7 OK (+)
8
S
9 CHANGE (+)
10 keypad keys
11 OK (+)
12
S
13 CHANGE (+)
14 keypad keys
15 OK (+)
16 DONE (-)
12
M > Phonebook
To
open the Phonebook Menu
scroll to Copy Entries
select Copy Entries
scroll to From (start)
select From (start)
enter the low speed dial
number for the range of
entries that you want to copy
store the number
scroll to From (end)
select From (end)
enter the high speed dial
number for the range of
entries that you want to copy
store the number
scroll to To (start)
select To (start)
enter the low speed dial
number for the entries’ new
location
store the number
copy the entries
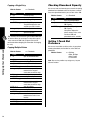
Checking Phonebook Capacity
You can see how much memory space remains for storing
phonebook and datebook entries on the phone, and how
many more phonebook entries you can store on the SIM.
Find the Feature
Press
1 M
2
S
3 SELECT (+)
M > Phonebook
To
open the Phonebook Menu
scroll to Phone Capacity or
SIM Capacity
select Phone Capacity or
SIM Capacity
Your phone displays the
phone memory meter, or the
number of SIM card
phonebook entries available.
Setting 1-Touch Dial
Preference
You can set 1-touch dial to call the entries in your phone
memory phonebook, the fixed dial list, or the SIM card
phonebook.
Find the Feature
M > Settings
> Other Settings
> Initial Setup
> 1-Touch Dial
Note: Your service provider may assign entry 1 to your
voicemail number.
Personalizing Your Phone
Personalizing a Ring Style
You can change the alerts that notify you of events such
as incoming calls, text messages, etc. Any changes you
make are saved to the current ring style.
Find the Feature
M > Ring Styles
> Alert Detail
Note: Alert represents the current alert style.
Press
1
S
2 CHANGE (+)
3
S
4 SELECT (+)
Creating and Editing Alert
Tones
You can create and store custom alert tones on your
phone. The tones appear in the list of available alerts.
Creating a Tone
Find the Feature
select the event
scroll to the alert you want
Press
1 CHANGE (+)
select the alert
2
S
or
To create new alert tones, see page 13.
Activating Ringer IDs
When ringer IDs are turned on, your phone uses distinctive
ringer alerts to notify you of incoming calls or messages
from specific entries stored in your phonebook.
Find the Feature
M > Ring Styles
> Alert Detail
> Ringer IDs > On or Off
Note: Alert represents the current ring style.
To assign a ringer ID to a new or existing phonebook
entry, see page 9.
Find the Feature
M > Ring Styles
> Alert Detail
> Ring Volume or
Key Volume
3
4
5
6
7
keypad keys
OK (+)
CHANGE (+)
keypad keys
OK (+)
DONE (-)
Press S up or down to select a note in octaves 0-8.
Basic notes: c d e f g a b Sharp Notes: #c #d #f #g #a
You can also enter note details and rests. For example,
*2#g0r plays a second-octave G sharp whole note
followed by a rest. Press number keys repeatedly to cycle
cycle through the options in the following table.
Note Table
Key
Display
1
1
.
:
Setting Reminders
Find the Feature
;
2
Note: Alert represents the current ring style.
a
b
M > Ring Styles
> Alert Detail
> Reminders
> Beep, Vibrate, or Off
store the notes
select Name
enter the name for the tone
store the name
store the tone
Entering Notes
Note: Alert represents the current ring style.
A reminder is an alert that rings or vibrates at regular
intervals to notify you about a voicemail, text, email, or
chat message that you have received.
To
select Notes
enter notes for the tone (see
the following section)
c
2
3
d
e
f
3
Description
1/2 note, as in *4c1
dotted note, as in *4c. which
is 1 and 1/2 counts
double dotted note, as in *1a:
which is 1 and 3/4 counts
2/3 length note, as in *1a;
which is 2/3 of a count
A note
B note
C note
1/2 note, as in *4c2
D note
E note
F note
1/8 note, as in *4c3
Personalizing Your Phone
Setting Ringer or Keypad
Volume
M > Ring Styles
> My Tones
> [New Tone]
To
scroll to the event
13
Key
4
5
6
7
8
0
*
#
Display
Description
G note
4
1/16 note, as in *1c4
5
1/32 note, as in *4c5
6
sets octave six, as in *6
r
inserts a rest (you can add
length modifiers, such as r1)
7
sets octave seven, as in *7
8
sets octave eight, as in *8
0
whole note, as in *4c0
*
sets an octave when followed
by 0-8, as in *4c for a C note
in octave four
#
sharp note, as in *4#c
&
flat note, as in *4&d
move cursor left
move cursor right
g
Example
To create a simple tone, you can enter notes by pressing
S up and down, and enter rests by pressing 7.
For example:
Press
1
Personalizing Your Phone
2
3
S
To
scroll up to *4c ,
then wait for the
highlight to
disappear
scroll up to *4d
S
The phone adds a 2
after each note, to
indicate it is a half
note. To change the
length, see
page 13.
*4c2*4d2*4e
scroll up to *4e
S
4 7
5
S
enter a rest
scroll down to *4c
Display
*4c
*4c2*4d
2 EDIT (+)
3
S
4 CHANGE (+)
14
keypad keys
6 OK (+)
7 DONE (-)
store the details
store the tone
Deleting a Tone
You cannot delete the standard alert tones included with
your phone. To delete a custom tone that you created:
Find the Feature
M > Ring Styles
> My Tones
Press
1
S
2 M
3
S
4 SELECT (+)
5 YES (-)
To
scroll to the tone
open the Tone Menu
scroll to Delete
select Delete
confirm the deletion
Downloading a Tone
You can download custom ring tones from the microbrowser application, or from a text message. To download
tones from a text message, see page 5.
You can send ring tones to other wireless phone users. To
insert a tone in a text message, see page 4.
Setting the Menu Language
You can set the language in which menu features and
options are displayed.
Find the Feature
M > Settings
> Other Settings
> Initial Setup
> Language
Setting Menu Scroll Behavior
You can set the highlight bar to stop or wrap around when
you reach the top or bottom of a menu list.
M > Ring Styles
> My Tones
S
or
*4c*4d*4er2*4c
You cannot edit the standard alert tones included with your
phone. To edit a custom tone that you created:
1
S
*4c2*4d2*4e2r
Editing a Tone
Press
5
To
enter new text or notes
Send Tones
6 M>
play the tone
Play All
Find the Feature
Press
To
scroll to the tone
open the tone details
scroll to Name or Notes
select the details to edit
Find the Feature
M > Settings
> Other Settings
> Initial Setup
> Scroll
Setting Menu Animation
Menu animation provides smooth scrolling of the highlight
bar and menu items as you scroll through a menu list. Turn
off menu animation to extend battery life.
M > Settings
Find the Feature
> Other Settings
> Initial Setup
> Animation
Resetting All Options
You can reset all options back to their factory settings
except for the unlock code, security code, and lifetime
timer.
M > Settings
Find the Feature
> Other Settings
> Initial Setup
> Master Reset
Clearing All Information
You can reset all options back to their factory settings
except for the unlock code, security code, and lifetime
timer and clear all user entries (such as Phonebook entries
and downloaded wallpapers, screen savers, and sounds).
Action
Press N in idle
Press O
Press S up or
down
To
go to the dialed calls list
exit the menu system and
return to the idle display
open the phonebook
Creating a MyMenu Shortcut
To add a menu item to the MyMenu list, just select the
menu item and hold M until the phone asks you for a
confirmation.
Using a MyMenu Shortcut
You can use MyMenu from the idle display, while on a call,
or while scrolling through a menu. Just press M and then
the MyMenu key number (1 through 99).
To select a feature from the MyMenu list:
Find the Feature
M > MyMenu > the feature
Note: To edit or delete a MyMenu feature, highlight it in
the list and press M to open a menu of options for the
feature.
Caution: Master clear erases all user-downloaded content
and user-entered information stored in your phone’s
memory, including phonebook and datebook entries. Once
you erase the information, it cannot be recovered. Master
clear does not delete any information stored on the SIM
card.
M > Settings
Find the Feature
> Other Settings
> Initial Setup
> Master Clear
Your phone includes several standard shortcuts. You can
create additional custom shortcuts to frequently used
menu items.
Standard Shortcuts
The following shortcuts are pre-programmed in your
phone. You cannot edit or delete these shortcuts.
Action
Press M, then press
and hold M (within
two seconds)
Press M * in idle
Press S left when
your phone is idle or
ringing
Press M # in idle
To
zoom in/out on your phone
display
Personalizing Your Phone
Using MyMenu
lock/unlock your keypad
lower ring volume to vibrate
alert, then silent alert
Press S right to cycle
back to vibrate alert, then
ring alert.
see your phone number
15
Getting More Out of Your Phone
Making a Conference Call
Link an active call and a call on hold together so
that all parties can speak to each other.
Press
5
6 SELECT (+)
7
Press
1 keypad keys
2 N
3 HOLD (+)
(if available)
To
dial the first person’s number
call the number
put the first call on hold
Getting More Out of Your Phone
N
LINK (-)
O
BROWSE (+)
dial the next person’s number
call the number
connect the two calls
end the entire call
Tip: Repeat steps 3-6 to add additional parties to the
conference call.
You can forward your phone’s incoming voice,
fax, and/or data calls directly to another phone
number.
Detailed
Off
10 OK (+)
Note: Repeat this procedure to enter forwarding
information for other call types.
Description
forwards all calls
forwards calls if your phone
is unavailable
uses different forwarding
numbers if you are out of
range, unable to answer, or
busy (voice calls only)
does not forward calls
Your network may store call forwarding status for you. To
confirm the network call forward settings:
Find the Feature
M > Settings
Press
1
S
2 VIEW (-)
1
S
2 SELECT (+)
3
S
4 CHANGE (+)
16
To
scroll to the type of calls you
want to forward
Scroll to Cancel All to cancel
all call forwarding.
view call forwarding details
scroll to Forward
select Forward
To
scroll to Voice, Fax, or Data
calls
confirm the network settings
Barring Calls
Call barring lets you restrict outgoing or
incoming calls. You can restrict all calls, calls to
international numbers, or calls while roaming, or
all calls but home.
Find the Feature
M > Settings > Security
> Call Barring
> Call Forward
Press
M > Settings
> Call Forward
> Forward Status
Setting Up or Cancelling Call Forwarding
Find the Feature
browse through your
phonebook or other lists for
the forwarding phone number
store the forwarding phone
number
Checking Call Forwarding Status
Forwarding a Call
Setting
All Calls
If Unavailable
store the option
scroll to To
(same for If Busy,
If No Answer, or
If Unreachable)
change the phone number
enter the forwarding phone
number
or
M > Hold
keypad keys
S
8 CHANGE (+)
9 keypad keys
or
4
5
6
7
S
To
scroll to a forward option
Press
1
S
2 CHANGE (+)
3
S
4 SELECT (+)
5 keypad keys
6 OK (+)
To
scroll to Outgoing Calls or
Incoming Calls
select the option
scroll to a restriction setting
select the restriction setting
enter your call barring
password
submit your password
Using TTY Mode
You can use an optional TTY device with your
phone to send and receive calls. You must plug
the TTY device into the phone’s headset jack and
set the phone to operate in one of three TTY
Switching to TTY Mode During a Voice Call
Press
1 M
2
S
modes.
3 SELECT (+)
Notes:
4
• Use a TSB-121 compliant cable (provided by the TTY
manufacturer) to connect the TTY device to your
phone.
• Set the phone volume to level 4 (middle setting) for
proper operation. If you experience a high number of
incorrect characters, adjust the volume as necessary
to minimize the error rate.
Setting TTY Mode
When you set your phone to a TTY mode, it operates in
that mode whenever the TTY device is connected.
Find the Feature
1
2
3
4
S
CHANGE (+)
S
SELECT (+)
To
scroll to TTY Setup
change the TTY mode
scroll to the TTY mode
select the TTY mode
The TTY Setup menu includes the following options:
Setting
Voice
TTY
VCO
HCO
Description
Return to voice mode
Transmit and receive TTY characters
Receive TTY characters but transmit
by speaking into the microphone
Transmit TTY characters but receive
by listening to the earpiece
When your phone is in a TTY mode, the international
TTY symbol and the mode setting are shown in the
display during an active digital TTY call. You can press
TTYMODE (-) to change the mode setting.
select the TTY mode
Returning to Voice Mode
To return to normal voice mode, select Voice from the
TTY Setup menu.
Using Fixed Dialing
When you turn on fixed dialing, users can only
call numbers stored in the fixed dial list. Use this
feature to limit outgoing calls to a predefined list
of numbers, country codes, area codes, or other
prefixes.
Turning Fixed Dial On or Off
Find the Feature
M > Settings
> Other Settings
> Initial Setup
> TTY Setup
Press
5 SELECT (+)
display the TTY Setup menu
scroll to the TTY mode
M > Settings > Security
> Fixed Dial > On or Off
Using the Fixed Dial List
You must turn on fixed dialing to open the fixed dial list
(see above)
Find the Feature
M > Fixed Dial
You create and edit fixed dial entries just like phonebook
entries. Fixed dial entries are stored on your SIM card, and
do not have Type, Voice Name, or Ringer ID information.
Getting More Out of Your Phone
• For optimal performance, your phone should be at
least 12 inches (30 centimeters) away from the TTY
device. Placing the phone too close to the TTY device
may cause high error rates.
S
To
open the Call menu
scroll to TTY Setup
Using DTMF Tones
You can send numbers to the network as dual tone
multi-frequency (DTMF) tones during a call. Use DTMF
tones to communicate with automated systems that
require you to submit a PIN code or credit card number.
Press
M > Send Tones
v
To
send a number to the
network as DTMF tones, for
credit card calling or
password entry
To set DTMF tones to be long, short, or off:
Find the Feature
M > Settings
> Other Settings
> Initial Setup > DTMF
Short sends a short fixed-duration tone for each keypress.
Long sends each tone for as long as you depress the key.
Short DTMF tones work with most automated systems.
Some systems (such as home answering machines) may
require long tones for proper activation.
17
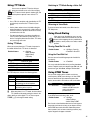
Monitoring Phone Use
Viewing and Resetting Call Timers
Network connection time is the elapsed time
from the moment you connect to your service
provider’s network to the moment you end the
call by pressing O. This time includes busy
signals and ringing.
The amount of network connection time you track on
your resettable timer may not equal the amount of
time for which you are billed by your service provider.
For billing information, please contact your service
provider directly.
Select one of the following options:
Setting
Time
Cost
Total Cost
To view a call timer:
Find the Feature
M > Recent Calls
Getting More Out of Your Phone
> Call Times
Select one of the following options:
Setting
Last Call
Dialed Calls
Received Calls
All Calls
Lifetime
Description
Time spent on the last call dialed
or received. You cannot reset this
timer.
Total time spent on dialed calls
since the last time you reset this
timer.
Total time spent on calls received
since the last time you reset this
timer.
Total time spent on dialed and
received calls since the last time
you reset this timer.
Total time spent on all calls on this
phone. You cannot reset this
timer.
To reset the call timer:
Press
1 RESET (+)
2 YES (-)
To
reset the time (if available)
confirm the reset
Using Timers During a Call
You can set a timer to beep at selected intervals during a
call, and display different types of information during a call.
Find the Feature
M > Settings
> In-Call Setup
> In-Call Timer
> Display
18
Credit Available
Off
Description
Display the approximate
elapsed time for the current call.
Display the cost of the
current call (if you
subscribe to a call cost
option or advice of
charge).
Display the cost of all
calls since the last
time you reset the
timer (if you subscribe
to a call cost option or advice of
charge).
Display how much
credit you have left (if
you subscribe to a call
cost option or advice
of charge).
No in-call timer display.
Viewing and Resetting Call Cost Trackers
To view a cost tracker:
Find the Feature
M > Recent Calls
> Call Cost
Select one of the following options:
Setting
Credit
Available
Description
Amount of credit
available. For GSM
advice-of-charge, this is
only available if you set
a credit limit.
Expiration Date Date that the available
credit expires (available
only with a subscription
to a prepay option).
Last Deposit
Amount of the last
deposit (available only
with a subscription to a
prepay option).
Last Call
Amount spent on the last call you
dialed or received. You cannot
reset this cost tracker.
Dialed Calls
Amount spent on calls you dialed
since the last time you reset this
cost tracker.
Setting
Received Calls
All Calls
Description
Amount spent on calls you
received since the last time you
reset this cost tracker.
Amount spent on all dialed and
received calls since the last time
you reset this cost tracker.
You can reset this value separate
from Dialed Calls and
Received Calls, so Dialed Calls
plus Received Calls may not
equal All Calls.
To reset the cost tracker:
Press
1 RESET (+)
2 OK (-)
Making a Cable Connection
Installing the Software
To transfer data between your phone and computer, you
must install the software included with the Motorola
Original data kit. See the data kit’s user guide for more
information.
M > Settings
> In-Call Setup
> Call Cost Setup
Using Hands-Free Features
You can purchase an optional Motorola Original™
Easy-Install Hands-Free Kit for your car. This
accessory provides an alternative way for you to
use your phone without using your handset.
Note: The use of wireless devices and their
accessories may be prohibited or restricted in certain
areas. Always obey the laws and regulations on the use of
these products.
Setting Automatic Answer
You can set your phone to automatically answer calls after
two rings (four seconds) when connected to the
Easy-Install Hands-Free Kit or a phone headset.
M > Settings
> Other Settings
> Car Settings or
Headset
> Auto Answer
Use a Motorola Original USB cable to connect your phone
to the external device.
Note: Your phone requires a mini-USB connector. Check
your computer or hand-held device to determine the type
of cable you need.
To Attach a Serial Cable
1 Use the interchangeable head on the Motorola
Multi-Connect Serial Cable to connect a
computer, Palm III device, or Palm V device to
your phone. Plug the serial cable into the
detachable head. Make sure that the Motorola
logo on the detachable head and the metal
shielding on the serial cable plug are both facing
you.
2 With the Motorola logo and the phone both
facing you, plug the detachable head into your
phone’s accessory connector port.
3 Plug the other end of the cable into the serial
interface connection on the external device and
tighten the screws.
Getting More Out of Your Phone
To
reset the cost (if available)
enter your PIN2 code to
confirm the reset
You can set a credit limit so that the phone
displays your remaining credit during calls. The
phone notifies you when you near your limit, and
ends the call when you reach it.
Find the Feature
Note: 56K modems are capable of receiving 56Kbps
from a compatible service provider. Receiving is
currently limited in the U.S. and Canada to 53 Kbps,
and transmitting to 33.6 Kbps. Actual speeds will vary
depending on line conditions.
Attaching the Cable
Adjusting Call Cost Settings
Find the Feature
• use your phone as a modem to connect to the Internet
To Attach a USB Cable
1 Plug the end of the cable with the Motorola logo
into your phone’s accessory connector port.
Make sure that the logo and the phone are both
facing you.
2 Plug the other end—the USB connection—into
the USB port on the external device.
Making a Data or Fax Call
Use this feature to transfer data from your computer onto
another device.
Making Data and Fax Calls
An optional Motorola Original™ data kit lets you
transfer data between your phone and a computer
or other external device. You can:
• use your phone to make and answer data and fax
calls on your computer or hand-held device.
19
Connect your phone to the device as described on
page 19 and do the following:
Getting More Out of Your Phone
Action
To
1 Check the phone make sure that the phone is
connected and powered on
2 Open the
place the call through the
application on
application (such as
your computer
dial-up-networking or fax)
Note: You cannot dial data or
fax numbers through your
phone’s keypad. You must
dial them through your
computer, unless you are
making a talk then fax call
(see page 20).
3 End the call from close the call and connection
the connected
when the transfer is complete
device
Receiving a Data or Fax Call
To
select Talk and Fax
5 N
Your selection applies to the
next call only.
make the call
Speak and, when ready,
initiate the fax transfer on the
connected device. When the
transfer is complete, end the
call from the connected
device.
Adjusting Network Settings
Your service provider registers your phone to a
network. You can view information about the
current network, change how your phone
searches for a network, specify your preferred
networks, and activate alerts that indicate when a call is
dropped or network registration changes.
Find the Feature
Use this procedure to transfer data or a fax to your
computer or hand-held device. Connect your phone to the
device as described on page 19.
Transferring the Data or Fax
Your phone notifies you when the call arrives, and
transfers the call to the connected device. Use the
application running on the device to answer the call.
When the data or fax transfer is complete:
Action
To
End the call from the close the connection
connected device
You can place a call where you talk and then
send a fax to the same phone number within
the same call.
Connect to the device that will send the fax and do the
following:
Press
1 keypad keys
2 M
3
S
To
enter the phone number
open the Dialing Menu
scroll to Talk and Fax
M > Settings
> Other Settings
> Network
Monitoring Battery Charge
To view a detailed battery charge meter:
Find the Feature
M > Settings
> Phone Status
> Battery Meter
Ending the Data/Fax Connection
Making a or Talk and Fax Call
20
Press
4 SELECT (+)
Viewing Phone Specifications
To view your phone’s feature specifications:
Find the Feature
M > Settings
> Phone Status
> Other Information
Personal Organizer Features
Using the Datebook
Notes:
The datebook is a calendar that lets you schedule and
organize events such as appointments and meetings. You
can set the datebook to play a reminder alarm for specific
events.
• You must create an event to use the reminder alarm.
• Your phone must be turned on for the reminder alarm
to sound.
M > Office Tools
Find the Feature
> Datebook > day
Note: You must set the correct time and date on your
phone to use the datebook (see your User Guide).
To schedule or review events in the datebook:
M > Office Tools
Find the Feature
> Datebook
Viewing by the Week
The datebook initially displays a calendar for the week.
Lines or filled boxes indicate scheduled events.
Untimed
Days of week
9
event 5
(press S
b
9 JAN-15 JAN c
to select)
S M T W T F S
12 hour
window
One-hour event
G VIEW
EXIT
Go to
Exit the
selected day
datebook
Press M to open
Full day (12-hour)
the Datebook Menu
event scheduled
M > New
Press
1 CHANGE (+)
2 keypad keys
3 OK (+)
4
5 DONE (-)
> Datebook
Show event
details
Viewing by the Event
Select an event and press VIEW (+) to see event details.
Alarm
1
S
2 VIEW (+)
3
S
4 VIEW (+)
5 EDIT (+)
6
S
7 CHANGE (+)
8 keypad keys
9 DONE (-)
To
scroll to the day
display the day view
scroll to the event
display the event view
edit the event
scroll to the information you
want to change
edit the information
enter the new information
store the information
Copying an Event
Day and time
5
Down
scroll arrow
Return to
previous screen
x THU 9:00am
9
Marie, meeting about
new product
G EDIT
BACK
Find the Feature
Press
Press M to open
the Datebook Menu
Adding a Datebook Event
A title is required for a datebook event. All other
information is optional.
M > Office Tools
> Datebook
Event details
Edit event
Personal Organizer Features
Press M to open
the Datebook Menu
M > Office Tools
Find the Feature
Press
Select a day and press VIEW (+) to see the day’s
events.
Untimed
Day of week
5
9
event
b THU 13-JAN c
Alarm
y Joes B-day
Down
9:00xMarie,...
scroll
Event
G VIEW
BACK
You can enter start time,
duration, date, repeating
events, and reminder alarm.
store the event
Changing Event Information
Viewing by the Day
Return to
previous screen
S
To
select Title
enter a title for the event
store the event title
scroll to other fields and enter
information as necessary
1
S
2 VIEW (+)
3
S
4 M
5
S
6 SELECT (+)
To
scroll to the day
display the day view
scroll to the event to copy
open the Datebook Menu
scroll to Copy
copy the event
21
Press
7 YES (+)
To
confirm the copy
8 keypad keys
9 c (+)
10 DONE (-)
Your phone assumes that
you want to change the date,
and displays the Date field.
enter the date information
move to day, month, and year
save the copy of the event
scroll to and edit event
information, if necessary
store the information
11
S
12 DONE (-)
M > Office Tools
> Datebook
Press
1
S
2 VIEW (+)
3
S
4 M
5
S
6 SELECT (+)
To
scroll to the day
display the day view
scroll to the event to delete
open the Datebook Menu
scroll to Delete
select Delete
Personal Organizer Features
Viewing and Dismissing an Event Reminder
When you set a reminder alarm for an event, the phone
displays an event reminder and sounds a reminder alarm
(to set change reminder settings, see page 13).
To view or dismiss an event reminder:
Press
VIEW (+)
Calculating Numbers
> Calculator
Press
1 number keys
S left or right
2
Selected
function
appears
here
Press S
to highlight
a function
Exit the
calculator
Function
.
C
CE
+
-
Press S to scroll through
the event details.
%
÷
$
±
dismiss the reminder
MR
Changing the Datebook Setup
You can change the datebook’s daily start time, and set
the length of time that events are stored
Find the Feature
Calculator
9
+
0
b . C = + - x c
G SELECT
EXIT
Press M to open
the Calculator Menu
Entered
number
Press S
to scroll to
other
functions
Perform the
highlighted
function
MS
MC
Description
Insert a decimal point
Clear the calculation
Clear entry (replaces the C function
when you enter more values in a
calculation)
Add
Subtract
Multiply
Divide
Divide the displayed value by 100
Calculate the exchange rate
Change the entry’s sign (positive/
negative)
Recall the value stored in memory
Store the displayed number in memory
Clear memory
Converting Currency
The currency converter works just like the calculator, but
uses the $ (currency) function:
Find the Feature
M > Office Tools
> Calculator
M > Exchange Rate
> Datebook
22
perform the function
5
M > Office Tools
M > Setup
To
enter a number
highlight a calculator function
The calculator can perform the following functions:
x
If you have more than one event set up for the same time,
the phone displays each event in sequence. As you view
and dismiss each event reminder, the next one is
displayed.
M > Office Tools
Find the Feature
To
view the event
or
EXIT (-)
You can use your phone as a convenient calculator and
currency converter.
3 SELECT (+)
Deleting an Event
Find the Feature
Using the Calculator
Press
1 number keys
2 OK (+)
To
enter the exchange rate
store the exchange rate
Press
3 number keys
4 S (left or right)
5 SELECT (+)
To
enter the amount to convert
(amount to multiply by the
exchange rate)
highlight the $ function
perform the conversion
Personal Organizer Features
23
Security
Locking the SIM Card
Your PIN (Personal Identication Number) code protects
the information stored on your SIM card. When the SIM
PIN feature is activated, you must enter your SIM card PIN
code to unlock the SIM card each time you turn on the
phone or insert the SIM card in the phone.
Security
Find the Feature
M > Settings > Security
> SIM PIN > On or Off
Unblocking the SIM Card PIN Code
If you enter an incorrect SIM card PIN code 3 times in a
row, your SIM card is disabled and your phone displays
SIM Blocked. You must enter a PIN unblocking key (PUK)
code, which you can obtain from your service provider.
Caution: In the following key sequence, each key press
must occur within two seconds of the previous keypress. If
the unblocking attempt is tried unsuccessfully 10 times,
the SIM card is permanently disabled and your phone
displays SIM Disabled.
Press
1 UNBLOCK (+)
2 keypad keys
3 OK (+)
4 keypad keys
5 OK (+)
6 keypad keys
7 OK (+)
To
open the PIN unblocking
editor
enter the PUK code
submit the PUK code
enter a new SIM card PIN
Note: The SIM PIN must be
between 4 and 8 digits.
assign the new SIM PIN
re-enter the new SIM PIN
confirm the new SIM PIN and
unblock the SIM card
Locking and Unlocking
Applications
You can lock specific phone applications (such as the
phonebook) so that users must enter the unlock code to
use them.
Find the Feature
M > Settings > Security
> Lock Application
Press
1 keypad keys
2 OK (+)
3
S
4 CHANGE (+)
5
S
6 SELECT (+)
24
To
enter your unlock code
open the lock application
menu
scroll to the application
select the application
scroll to Locked or Unlocked
select Locked or Unlocked
Line Security
If your phone displays Line Not Secure while you are on a
call, your phone has detected another device monitoring
the call. This message does not appear when caller ID,
call cost, or other information fills the display.
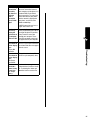
Troubleshooting
Check these questions first if you have problems with your
phone. If you need additional help, contact the Motorola
Customer Call Center at 1-800-331-6456 (United States)
or 1-800-461-4575 (Canada).
Question
Is your battery
charged? Do
you see 6 in
the display?
Has the phone
been
damaged,
dropped, or
gotten wet?
Was a
non-Motorola
battery
charger used?
The signal strength indicator
should have at least one segment
showing (1). If it does not, move
to an area with a stronger signal
to use your phone.
While on a call, press right on the
S key.
Your phone may be muted. Press
UNMUTE (+) if necessary to
unmute the phone.
Also, make sure that your phone’s
microphone is not blocked by its
carrying case or a sticker.
Dropping your phone, getting it
wet, or using a non-Motorola
battery charger can damage the
phone. The phone’s limited
warranty does not cover liquid
damage or damage caused from
using non-Motorola accessories.
The following refer to specific problems:
Problem
My phone was
stolen. To
whom should I
report this?
I forgot my
password.
Solution
Report a stolen phone to the
police and to your service provider
(the company that sends you your
monthly wireless service bill).
See your user’s guide for
information about what to do if you
forget a code or password.
Solution
Be sure to press and hold O
(the End/Power key) until the
display appears and you hear an
audible alert (this could take a
couple of seconds). If nothing
happens, check that the battery is
charged. See your user’s guide.
I pressed keys, You might need to reset your
but the display phone. See your user’s guide.
has stopped
responding.
The display
The SIM card may be incorrectly
says:
inserted. Check the SIM card to
Insert SIM Card make sure that it is inserted
properly as described in your
or
Check SIM Card user’s guide. Make sure that you
even though I have a valid 3-volt SIM card.
have inserted
Note: Be sure to turn your phone
my SIM card in
off and then back on after you
the phone.
re-insert the SIM card.
Call your service provider (the
The display
company that sends you your
says:
monthly wireless service bill) to
SIM Blocked.
obtain the PIN unblocking key
How do I
(PUK) code. See page 24.
unblock my
SIM card?
Enter the factory-preset unlock
The display
code (1234), or the last four digits
says: Enter
of your phone number. See your
Unlock Code.
user’s guide. If this fails, call your
How do I
service provider (the company
unlock my
that sends you your monthly
phone?
wireless service bill).
My phone asks The application you want is
locked. If you own the phone but
for an unlock
do not know the unlock code, see
code when I
your user’s guide.
try to open a
feature.
My phone says Your phone does not accept the
Terminal
SIM card inserted. Contact your
Blocked.
service provider.
My phone
If you see W or a in the display,
does not ring. then the ring tone is turned off. To
turn a ring tone on, see your
user’s guide.
Troubleshooting
Do you have a
valid 3-volt
SIM card
inserted in
your phone?
Does the
handset have
a signal? Do
you see 0 in
the display?
Is the earpiece
volume too
low?
Is the other
party unable to
hear you?
Answer
The battery level indicator should
have at least one segment
showing (7). If it does not,
recharge your battery as
described in your user’s guide.
If necessary, turn off your phone
and make sure that you have
inserted a valid SIM card as
described in your user’s guide.
Problem
I pressed the
End/Power
key, but
nothing
happened.
Also, the ring tone may be set to
Silent even though your phone is
set to a ring alert profile. Be sure
to listen to your ring tone before
setting it to make sure it is
effective in the environment where
you use your phone.
25
Problem
My phone
rings even
though I
selected the
Silent (or
Vibrate) alert
profile.
I tried to place
a call and
heard an
alternating
high/low tone.
Solution
The ring tone may be set to play a
tone even though your phone is
set to a silent alert profile. See
page 13.
Troubleshooting
Your phone also may have the
Call Barring feature turned on. If
you know the unlock code, you
can change this setting in the
security menu
(M > Settings > Security). Also,
check to be sure your SIM card is
installed and working.
My phone has Make sure you have a phone
poor reception signal. Stay clear of any
and drops
obstructions such as bridges,
calls.
parking garages, or tall buildings.
I cannot hear
While on a call, press the volume
others on my
key on the left side of your phone.
phone.
Your phone display should show
the volume increasing.
How do I see
the calls I sent
or received?
Also, make sure that your phone’s
earpiece is not blocked by its
carrying case.
Before you can use text or
information services messages,
you must set up the appropriate
inbox. See page 4.
To see the most recent calls you
dialed or received, open the
“Recent Calls” lists:
M > Recent Calls
> Received Calls or
Dialed Calls
26
Solution
Your phone sends commands and
passwords as DTMF tones. You
can set your phone’s DTMF tones
to be Long, Short, or Off. If you
have trouble sending numbers,
check your DTMF setting.
From the idle display, press:
Your call did not reach the
wireless system. You may have
dialed the number too soon after
turning the phone on. Wait until
the display shows the name of
your service provider before
making a call.
I cannot make/ Make sure that you have a phone
answer calls.
signal. Avoid electrical or radio
interference, and obstructions
such as bridges, parking garages,
or tall buildings.
I cannot open
my inbox.
Problem
My phone will
not dial
voicemail
commands,
passwords, or
other codes.
M > Settings > Other Settings
> Initial Setup > DTMF
Press S to scroll to Long or
Short.
My phone’s
display is too
light.
What can I do
to extend
battery life?
I plugged the
data cable into
my phone but
my phone did
not beep. How
do I know if
the data cable
is ready to go?
My phone
beeped when I
attached the
data cable, but
my fax and
data
applications
don’t work.
Press SELECT (+) to select it.
You can change the level of
contrast in your phone display.
See your user’s guide.
You can also change the backlight
settings.
Your battery’s performance is
affected by charge time, feature
use, temperature changes, and
other factors. For tips on battery
use, see your user’s guide.
The beep indicates that you are
set up correctly. If you did not
hear a beep, make sure that both
ends of the data cable are
connected—the smaller end to
your phone and the larger end to
your computer.
Finally, your computer may have
deactivated the port to save
power. Try opening an application
that uses the port, like a fax or
dial-up application, and your
computer will automatically
activate the port.
Some wireless networks may not
support data or fax transmission.
If you are roaming on an
unfamiliar network, this may be
the case.
Also, remember that data and fax
transmission usually requires a
subscription. Call your service
provider for more information.
Problem
When sending
data with the
data cable,
why does the
computer
show a
connection
rate of 19200
Kbps?
Solution
19200 Kbps is the data transfer
rate of the connection between
your computer and the phone in a
standard CSD (Circuit Switch
Data) connection. The rate of the
connection between your phone
and the network is displayed on
your phone, and will be either
14400 or 9600 Kbps.
Troubleshooting
A GPRS connection may have a
higher data transfer rate.
I can’t end my Try pressing O on your phone.
data call by
Also try disconnecting the cable or
closing the
turning off the phone. If possible,
application on always close the connection
my computer. through your computer. These
What can I do? alternative methods may disrupt
the application on your computer.
I launched the You may be in an area without
micro-browser service, or you may be connected
but the display to a network that does not support
says:
Internet access.
Service Not
Available.
I launched the Try again in a few minutes. The
micro-browser servers may be temporarily busy.
but the display
says:
Data Server
Unavailable.
I tried to
You do not have enough memory
download a
to download and install the theme
theme, but my file. Try deleting files before you
phone says:
download a theme or other files.
Not enough
memory.
27
Index
A
accessories
connector ports 1
optional 17, 19
alert
creating 13
downloading 5
reminders 13
setting 5
type, selecting 13
alert profile 13
animation
downloading 5
menu 15
storing 5, 6
wallpaper 5
application, locking and unlocking 24
appointments. See datebook
B
barring calls 16
battery 15, 26
C
calculator 22
calendar. See datebook
call
alert type, selecting 13
alert, creating 13
barring 16
calling card 9
costs 18, 19
timing 18
call barring 16
call cost information 18, 19
call forwarding 16
call timers 18
calling card call 9
car kit 19
chat 6
computer 19
conference call 16
cost trackers 18
credit information 18, 19
currency converter 22
D
data call
connecting to external device 19
receiving 20
sending 19
datebook
adding an event 21
alarm 21
calendar 21
28
changing event information 21
copying an event 21
day view 21
deleting an event 22
event view 21
reminders 13, 21, 22
week view 21
Datebook Menu 21
display
animation 15
language 14
DTMF tones 17, 26
E
earpiece
illustration 1
email
address, storing in phonebook 9
reminders, turning on/off 13
end key 1
event alert 13
exchange rate, calculating 22
external device 19
F
factory settings, resetting 15
fax call
connecting to external device 19
receiving 20
sending 19
fixed dial
defined 17
dialing numbers 17
editing an entry 10, 17
storing an entry 9
forwarding calls 16
frequency, changing 20
H
hands-free mode 19
headset 19
I
icon ID 9
inbox, text message 4
indicators
voice name 9
information services 6
K
key
end 1
left soft key 1
menu 1
navigation 1
right soft key 1
send 1
voice 10
L
language, setting 14
left soft key
functions 1
lock
application 24
SIM card 24
M
master clear 15
master reset 15
Memory is Full! message 7
menu
customizing 8
Datebook Menu 21
features 16
language, setting 14
My Tones Menu 14
MyMenu 15
Phonebook Menu 9
rearranging features 8
scroll feature 14
menu key 1
message
animation 5
chat 6
deleting 5
inbox setup 4
information services 6
locking 5
outbox 5
picture 5
quick note 4
quick view 6
reading 5
receiving 5
reminders, text message 5, 13
reminders, turning on/off 13
reminders, voicemail 13
reordering menu 8
ring tone 5
sending 4
status 5
microphone 1
My Menu
creating 15
using 15
my tones 13
My Tones Menu 14
N
R
U
navigation key 1
network settings 20
reminders
chat message 7
datebook 21, 22
setting 13
text message 5, 13
turning on/off 13
voicemail message 13
right soft key
functions 1
ring alert
creating 13
ID 13
setting 5
type, selecting 13
ring tone
downloading 5
setting as event alert 5
unblocking the SIM card 24
unlocking applications 24
O
1-touch dial
setting preference 12
outbox 5
P
phone
connecting to external device 19
credit available 18
credit information 18, 19
erase user-entered information 15
frequency, changing 20
language, setting 14
network settings 20
reset all options 15
phone number
sending text message to 4
storing in phonebook 9
phonebook
capacity, checking 12
copying entries 11
deleting an entry 11
dialing a number 10
editing an entry 10
email address 9
entry name 9
fields 9
icon ID 9
number type indicator 9
phone number 9
ringer ID 13
sorting entries 11
speed dial number 9
storing an entry 9
voice name entry 10
voice name indicator 9
Phonebook Menu 9
picture
downloading 5
storing 5, 6
wallpaper 5
PIN code
activating/deactivating 24
defined 24
protecting the SIM card 24
unblocking 24
profile, alert 13
PUK code 24
Q
quick note 4
quick view message 6
V
vibrate alert 13
voice dial
dialing a number 10
recording voice name 10
voice name
defined 10
phonebook indicator 9
recording 10
W
wallpaper 5
S
scroll feature 14
send key 1
short message service. See text
message
SIM Blocked message 24
SIM card
protecting 24
SIM Blocked message 24
SIM Disabled message 24
unblocking 24
SIM Disabled message 24
SIM PIN code
activating/deactivating 24
protecting the SIM card 24
unblocking 24
SMS. See text message
soft keys
illustration 1
sound
downloading 5
storing 5, 6
speed dial
changing number 9
sorting phonebook entries by 11
T
Talk and Fax call 20
text message
deleting 5
inbox setup 4
locking 5
reading 5
receiving 5
reminders 5, 13
sending 4
status 5
Text Msg Menu 6
timers 18
TTY device 17
U.S. patent Re. 34,976
29