1
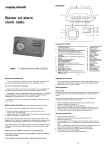
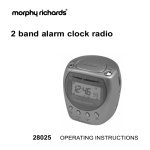
Illustration
30
29
1
2
Stereo cd alarm
clock radio
28
4
3
5
12
11
6
27
7
24
8
15
26
19
20
16
21
22
23
9
10
13
25
14
17
○
18
31
○
○
32
24
Location of controls
1
2
3
4
5
6
29006
OPERATING INSTRUCTIONS
Alarm 1 and 2 selector switch
Alarm function selector switch
Play/pause
button
Play mode/program button
REPEAT button: For continuous cd playback
MIN Skip/fast search/selection (
backward):
-to skip cd tracks and for reverse within a track
-for quick and normal setting of time and alarm clock
functions. Quick selection: press and hold
normal selection: press repeatedly
7
HOUR Skip/fast search/selection (
forward):
-to skip cd tracks and for fast search within a track
-for quick and normal setting of time and alarm clock
functions. Quick selection: press and hold,
normal selection : press repeatedly
8
Stop button: to stop cd playback
9
Snooze button: Stops alarm and repeats
10 PTS button: to select your favourite cd track to wake up to
11 Alarm 1 button: to set alarm 1
12 Alarm 2 button: to set alarm 2
13
14
15
16
17
18
19
20
21
22
23
24
25
26
27
28
29
30
31
32
Sleep button: to select sleep function
and set countdown time
Time button: to set time
Power on/off button: to turn radio,
cd and alarm on and off
PM indicator
Alarm 1 on indicator
Alarm 2 on indicator
Power indicator
Program indicator
Random indicator
Repeat indicator
FM stereo indicator
Speakers
Tuning indicator
Function selector switch
Volume control
Cd open tab
Earphone socket
FM wire aerial
Dial scale with pointer
Battery compartment
P.2
Electrical requirements
Setting the clock time
1
Check the voltage on the rating plate of your clock radio corresponds with
your house electricity supply which must be A.C. (alternating current).
If the socket outlets in your home are not suitable for the plug supplied with
this appliance the plug should be removed and the appropriate one fitted.
IMPORTANT : THE PLUG REMOVED FROM THE MAINS LEAD, IF SEVERED, MUST
BE DESTROYED AS A PLUG WITH A BARED FLEXIBLE CORD IS
HAZARDOUS IF ENGAGED INTO A LIVE SOCKET OUTLET.
Should the fuse in the 13 amp plug require changing a 3 amp BS1362 fuse
must be fitted.
Battery back-up facility (unit will work without a battery being fitted)
Your cd alarm clock radio is equipped with a battery back-up facility.
1
2
3
Remove the battery compartment cover (underneath the unit) by
pushing in the clip and lifting off.
Insert a battery size 9 volts PP3/6LR61 (Ensure battery is inserted correctly).
Replace the battery compartment cover.
Should a power interruption occur the clock will continue to run, however, time
keeping will not be accurate. The display will be extinguished to conserve battery
life but the memory will retain details of the clock time and alarm settings.
If the optional battery is not installed in case of the AC power failure the clock will
reset to 12:00 when power is restored. You will need to reset the clock and
alarm settings.
Battery back-up is designed to operate for a short period only.
2
While holding down the TIME button, press the
or
to set the
desired time. The pm indicator will light up when midday has been reached.
Release the button to save time setting.
Radio operation
FM wire aerial
To obtain the maximum FM reception fully extend the wire FM aerial (which is
located at the rear of the unit) and alter the direction of the wire for best results.
The aerial for the MW waveband is located inside the unit. To obtain the
maximum MW reception rotate the clock radio.
1
2
3
4
5
Slide the FUNCTION SELECTOR switch to select MW or FM.
Press the POWER on/off button.
Adjust the VOLUME control to a suitable level.
Slowly adjust the TUNING control to select your desired station. The
FM stereo indicator will light up when FM stereo signal is received.
To switch off the radio, press the POWER on/off button.
To play compact disc
1
2
3
4
5
6
7
Press the POWER/ON OFF button, the power indicator will light up.
Open the cd door using cd open tab, load a disc in the cd compartment.
Close the cd door by pushing down until it locks into place.
Select the cd mode by switching the function selector to cd.
Press the
play/pause button. The display will show the track number when
you begin to play a cd. After a few seconds, the display reverts to the
current time.
Note : The same button can be used to momentarily interrupt playback. The
track number will flash until the
button is pressed again.
Adjust the volume control until the desired level is reached.
Press the stop button to stop playback.
To switch off the cd press the power on/off button.
If the unit is not to be used for a prolonged period, remove the battery to
avoid battery leakage.
In the interests of environmental safety : dispose of batteries safely.
P.3
P.4
Other cd functions
1
Waking up to cd music
SKIP/FAST REVERSE SEARCH
Press
once to skip to the next track or many times as required to reach
desired track. Press the
to return to the beginning of the current track or
as many times as required to go back to desired track. Press
or
and
hold for fast search within the current track.
REPEAT button
1 Press once for repeat of current track. The repeat indicator will flash.
2 Press again for the whole cd to be repeated, the indicator will light.
3 Press again to cancel the repeat function. Repeat LED indicator will go
out.
RANDOM
1 Press playmode button for random playback of all cd tracks. The random
LED indicator will light up.
2 Press again to cancel the function. Press twice if program has been set.
Repeat and random modes can be used simultaneously.
When the cd compartment is empty or a cd is incorrectly loaded or damaged the
nd (no disc) symbol will be displayed.
Program
(see point 2 of waking to cd music)
Use PTS button to program. Press the PLAY MODE button twice, program
indicator will light up.
Setting alarm
The unit allows you to select two different wake-up times that can be used
separately or simultaneously (ALARM 1 OR 2 OR ALARM 1 and 2).
Before setting the alarm move the selector to either alarm 1 or alarm 2 or alarm
1 and 2.
ALARM 1: Press and hold the alarm 1 button, and then
or
desired wake-up time. Release the button to save the setting.
to set the
ALARM 2: Press and hold the alarm 2 button and proceed as above.
Select the alarm selector switch to AUTO then set the function selector switch to
FM or MW for radio or to CD for cd music, BUZZER (for buzzer) or OFF to
cancel alarm.
1
2
3
4
Follow steps 1 and 3 of the ‘to play compact disc’ procedure.
To wake up to your favourite cd track, press and release the PTS button and
then press
or
until desired track number is displayed. Press the PTS
button to store. Repeat for up to 20 tracks. Wait until the clock reverts back
to the time or press the time button. Press the PLAY MODE button twice and
the program indicator will light up. The PTS button can be pressed at any time
to check track selection.
Press the POWER button, the power indicator will go out.
Set the ALARM selector switch to AUTO; the alarm indicators will
light up. At the wake time, the unit will playback the whole cd unless the
REPEAT mode is selected. The player will remain in operation for 1 hour. To
stop playback, press the POWER on/off button.
Waking up to buzzer
Set alarm selector switch to BUZZER; the alarm indicators will light.
How to cancel the alarm
The alarm is programmed to sound for 1 hour.
1 SNOOZE; press this button to temporarily stop the alarm (display will
start flashing). The alarm will sound again 6 minutes later.
2 POWER on/off; press to stop the alarm, the alarm will sound again 24
hours later.
3 Switch alarm selector switch to the off position to cancel alarm permanently,
indicators will disappear.
Sleep to music
1
2
3
4
Select the function selector switch to the desired mode CD/MW/FM.
Press the sleep button and the display will read --. Press again to set 90, 60,
30.
For cd to start playing press the PLAY button. The cd or radio will then play
for a selected time period before automatically turning off.
Press the POWER on/off button to cancel the music before the end of the
programmed duration.
Note; If cd contents is shorter than the selected sleep time, playback will stop at
the end of the cd unless the REPEAT mode has been activated.
Waking up to the radio
1
2
Follow the instructions given under ‘Radio operation’ to select the desired
radio station.
Set ALARM function switch to AUTO, alarm indicators will light up.
P.5
P.6
Maintenance
Guarantee
Do not expose your cd clock radio to extremes of temperature. The product should
be kept in a warm environment free from dust and damp. For external cleaning
use only a soft, clean, damp cloth. Use of detergents may damage the finish.
Technical specification
AC Power supply
Battery back-up
CD player
Laser
Radio
:
:
:
:
:
:
230v
50Hz
9V DC type 6LR61/PP3 (not included)
Frequency response (3dB) 100Hz to 18kHz
= 780nm Max power = 5mW
FM 88Mhz - 108Mhz
MW 540Khz - 1600Khz
WARNING : This unit uses a laser beam. To prevent an accident occuring the
unit should only be opened by a qualified engineer. If the door interlocks become
defective the laser may cause invisible radiation. Avoid exposure to the beam.
If there is a scratch, dirt or finger prints on the cd, it may cause tracking errors.
Before playing, clean the cd with a clean cloth. Wipe the cd from the centre
outwards. After playing, store the disc in its cd case.
Morphy Richards products are manufactured to internationally accepted quality
standards. In addition to your statutory rights, Morphy Richards guarantee your
product to be free from manufacturing and component defects for a period of TWO
YEARS from date of purchase.
If your product proves to be defective within 28 days of purchase, your Morphy
Richards dealer from whom the product was purchased will be pleased to replace it
free of charge.
Should your product develop a defect within the guarantee period but after the
replacement period, please return the product to the following address, together with
the proof of purchase, brief details of the symptoms and your own name and
address.
After Sales Division
Morphy Richards Limited
Talbot Road
Mexborough
South Yorkshire
S64 8AJ
The cd clock radio is for indoor use only.
Warning labels
WARNING: to reduce the risk of electric shock, do not expose this appliance
to rain or moisture.
ATTENTION: To reduce the risk of electric shock, do not
remove the cover. There are no user serviceable parts inside
the unit. Refer any servicing to qualified personnel.
Your post office will provide a certificate of posting. The product will be repaired
and returned to you promptly.
Helpline (8:30-5:00 Mon-Thur/ 8:30-4:00 Fri) UK 0870 060 2614
Republic of Ireland 1800 409119
Replacement parts 0870 167 6645
Morphy Richards Website: www.morphyrichards.co.uk
The lightning flash with arrowhead symbol within the triangle is a warning
sign alerting the user of ‘dangerous voltage’ inside the unit.
The exclamation point within the triangle is a warning sign alerting the user of
important instructions accompanying the product.
To prevent fire or shock hazard do not expose this apparatus to dripping or
splashing.
P.7
446/8001/98 Rev 1
Morphy Richards Ltd, Talbot Road, Mexborough, S64 8AJ