1
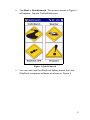
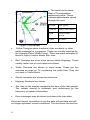
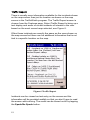
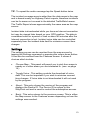
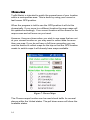
TrafficWatch
Users Manual
Table of Contents
Introduction . . . . . . . . . . . . . . . . . . . . . . . . . . . . . . . . . . . . 3
Subscription. . . . . . . . . . . . . . . . . . . . . . . . . . . . . . . . . . 3
TrafficWatch Overview . . . . . . . . . . . . . . . . . . . . . . . . . . . 4
Start TrafficWatch. . . . . . . . . . . . . . . . . . . . . . . . . . . . . 4
Interpreting the Data . . . . . . . . . . . . . . . . . . . . . . . . . . . 7
San Jose. . . . . . . . . . . . . . . . . . . . . . . . . . . . . . . . . . . . 9
Using TrafficWatch . . . . . . . . . . . . . . . . . . . . . . . . . 10
Features . . . . . . . . . . . . . . . . . . . . . . . . . . . . . . . . . . . . 11
Traffic Report . . . . . . . . . . . . . . . . . . . . . . . . . . . . . . 12
Settings . . . . . . . . . . . . . . . . . . . . . . . . . . . . . . . . . . . . 13
Choose Map . . . . . . . . . . . . . . . . . . . . . . . . . . . . . . . 14
Troubleshooting Problems . . . . . . . . . . . . . . . . . . . . . . . . 17
Internet Connection Problems. . . . . . . . . . . . . . . . . . . 17
You can find additional product and support information at the
following website: http://www.mobilecrossing.com or contact:
Mobile Crossing
1230 Oakmead Parkway, Suite 304
Sunnyvale, CA 94085
(408) 738-8816
(800) 605-8198
Fax (408) 738-8806
email: [email protected]
© 2005 Mobile Crossing - All rights reserved
March 2005
2
Introduction
TrafficWatch is a programs that can be used to help drivers with
traffic related information. This program is designed to be used with
QuickLaunch which ties this and other programs to the WayPoint
navigation software.
TrafficWatch is built in to all WayPoint units.
TrafficWatch is supported by a live database that collects
information and sends the data to the Pocket PC via the internet. It
can make use of a live mobile connection or it can collect data via
ActiveSync and then display the data when the connection is lost.
For example, a user could collect traffic data prior to leaving the
home or office and then reference the data for decisions while
traveling.
This program uses your GPS position as reported by WayPoint to
determine the area of coverage for the screen. In the absence of
current GPS data this program will use the last known position.
Subscription
TrafficWatch, along with Weather Underground, requires a
subscription and monthly fee to access the live data. One
subscription provides access to both programs. The WayPoint 200
includes a one year free subscription. WayPoint 100 users can add
this service for a small monthly fee.
3
TrafficWatch Overview
TrafficWatch uses an Internet connection to retrieve live traffic
information in the form of a road map display, text displays and
table displays as well as audio. Data shows the speed of traffic flow
and the location of traffic incidents for major freeways and some
surface streets. TrafficWatch can be used to identify potential
traffic bottlenecks in selected areas in real time or near real time.
Start TrafficWatch
To start TrafficWatch follow these steps:
1. Make sure you have an Internet connection. (See “Internet
Connection Problems” on page 17 if you are not sure.)
2. You should be running the WayPoint Navigation program or
have used it with a GPS connection in the past. The most
recent GPS position will be used to determine which traffic
map to display.
3. Start QuickLaunch and use the TrafficWatch icon to start
TrafficWatch. QuickLaunch can be started two different
ways.
4
•
Tap Start > QuickLaunch. The screen shown in Figure 1
will appear. Tap the TrafficWatch icon.
Figure 1 QuickLaunch
•
You can also use the WayPoint hotkey button from the
WayPoint navigation software as shown in Figure 2.
5
Press and hold the WayPoint button for about a second.
Figure 2 Starting QuickLaunch from WayPoint
This will also bring up the QuickLaunch program and the
TrafficWatch icon can be selected.
When the TrafficWatch icon is tapped the following sequence will
be seen:
1. An updater program will run that checks to see if you have
the latest version of TrafficWatch. If there is an updated
version you will be given an opportunity to download it.
2. Wait a few seconds for the splash screen and then the local
map to be downloaded.
3. The local traffic map will be shown based on your current or
last known GPS location.
If you tap the
in the title bar, the program revert to background
operation and will continue to update maps as long as an Internet
connection is maintained. Use the exit command to actually exit the
program.
6
The running copy of TrafficWatch can be displayed using the
QuickLaunch thus WayPoint can be used to view TrafficWatch at
any time by calling up QuickLaunch.
It is also possible to use TrafficWatch without using QuickLaunch.
It can be started with Start > Programs > TrafficWatch. When
starting TrafficWatch in this way it is possible to switch between
WayPoint and TrafficWatch directly using the WayPoint hardware
button.
If the Internet connection is lost the time is recorded and if the data
becomes too old to be useful a warning will appear.
The GPS location is shown as a blue dot on the map screen. If you
are driving the blue dot will track your position and move on the
screen. The screen will attempt to follow your position but if you
travel too far the unit will need to obtain a new map. This will be
done automatically if you have a live Internet connection.
The data is updated automatically. A progress bar shows when
data is being updated.
To view the data tap the road icon from the lower right corner of the
today screen, start QuickLaunch again, or reselect the program.
The data will pop forward automatically if the Internet connection is
lost. The time is recorded and if the data becomes too old to be
useful a warning will appear.
Interpreting the Data
The traffic data is shown on a Map that indicates freeways and
some major surface streets for orientation. There are several forms
of data than may be shown on the map as illustrated in Figure 3.
7
• The small circles show
Dept of Transportation
measuring points. These
indicate approximate speed
through the area.
Green
full speed
Yellow
some slow down
Red
severe slow
down
open
no data
Figure 3 Sacramento
•
Yellow Triangles show incidents (often accidents or other
traffic stoppage) or congestion. These are usually reported by
the Highway Patrol (State Police). There are some examples of
these in figure 4 which shows San Jose.
•
Red Triangles are even more severe traffic stoppage. These
usually mean one or more lanes are closed.
•
Traffic Cameras are shown in some areas. These are live
cameras as seen on TV monitoring the traffic flow. They are
not used in TrafficWatch.
•
Airport Locations are shown for reference.
•
Highway Numbers are shown.
•
The time on the display represents the time of the last sample.
The update interval is automatic and determined by the
frequency of update information.
•
Error messages may be shown just above the time data.
Once an Internet connection is lost the data will get stale and will
no longer represent current conditions. The time since the last live
8
data (Internet connection) will be displayed and after 45 minutes
the display will be considered too old to be usable.
San Jose
San Jose represents a more complicated view of this data. As can
be seen in Figure 4 there is more traffic data than roads on the
map.
Figure 4 San Jose
The map data only shows the major freeways anchored around
I-680 and I-280 with I-880 shown through the center although it is
not marked. It is connected to highway 17 at the bottom of the map
and extends northward.
The San Jose airport can barely be discerned if you know where to
look (hint: it is the nose of the plane just peeking out from under all
the traffic data). Highway 101 is shown and there are some state
highways as well. You can see State Road (SR) 237 clearly and
SR-85 is conspicuous by its absence of speed information.
9
SR-84 is shown running between I-880 and US101 across the bay
waters to I-880, but the real road extends down to I-280 and up to I680 and beyond. The speed sensors show where the road goes
even though the map does not.
Locals can probably discern Lawrence Expy, San Tomas Expy,
Montague Expy, Tully Road, Capital Expy, Almaden Expy, Foothill
Expy, and Central Expy which all show speed data.
Using TrafficWatch
The ideal way to use TrafficWatch is with a live data connection all
of the time. If you use the program like this the map will change
automatically to show you information about the area you are near
so long as WayPoint is also running to provide the GPS input.
Another way to use this program is to collect data from home or
work and then grab the PDA unit as you leave. The data image will
be the latest one available and will likely still be able to provide you
with accurate information to use to make traffic decisions.
If you want more information about a particular incident you see on
the screen you can tap the incident and after a short delay a voice
will tell you about the incident if there is more information on it.
Sometimes there is no further information available. You can also
circle a group of incidents and the voice will tell you about all of
them.
For text of the incident data see the section titled Traffic Report on
page 12 for the Traffic Report.
10
Features
The features screen can be reached by tapping the Features
command or pressing the cursor up button. It is show in Figure 5.
Figure 5 Features
The Features screen shows 4 choices which include:
•
Settings - This entry is described in on page 13.
•
Back - Tapping this icon will return to the map we just left
which is the main TrafficWatch screen.
•
Traffic Report - Shows all of the traffic incidents in our selected
map. (See on page 12.)
•
Best Highway - Shows average speeds for freeways in the
area to help you decide on the best road to use.
11
Traffic Report
There is usually more information available for the incidents shown
on the map screen than just its location as shown on the map
screen in the TrafficWatch program. The Traffic Report screen is
chosen from the Features page. Select Traffic Report to bring up a
text display and audio of recent incidents of interest to the user
based on the most current map selected, see Figure 6.
Often these incidents are exactly the same as the ones shown on
the map screen but there can be additional information that is not
tied to a specific location on the map.
Figure 6 Traffic Report
Incidents can be viewed as text entry on the screen and the
information will be provided audibly so that you don’t have to read
the screen while driving. The audio can be turned on/off by tapping
the Speak/No Speak button.
12
TIP: To repeat the audio message tap the Speak button twice.
The incident coverage area is wider than the data areas in the map
and is based mostly on Highway Patrol reports, therefore incidents
can be for areas not covered in the detailed TrafficWatch areas.
The Traffic Report shows approximately the same area as the map
screen.
Incident data is downloaded while you have an Internet connection
but may be viewed later based on your GPS position. The data is
considered valid for a period of time or about 45 minutes after the
Internet connection is lost. Incident voice data can be controlled
separately from the incident data itself to minimize connect time
charges.
Settings
The settings screen can be reached from the map screen by
tapping the Settings command or pressing the cursor down button.
It can also be reached from the Features screen. It shows 4
choices which include:
•
Choose Map - This panel will permit you to pick from maps in
nearby or in other areas you are interested in. (see on page
14.)
•
Toggle Voice - This setting controls the download of voice
data. This can be important if you wish to minimize connect
time charges. If Voice data is not downloaded it will not used
by the program.
•
About - This entry shows the version of the program and
displays the Device ID. The Device ID is unique to this
WayPoint unit and is used to control the subscription access.
•
Back - This entry returns to the previous screen. This is either
the Map screen or the Features screen depending on how the
settings was reached.
13
Choose Map
TrafficWatch is intended to watch the general area of your location
within a metropolitan area. This is done by using your current or
last known GPS position.
When the program is told to use the GPS position it will do this
dynamically. If you move to a different location the map usage will
be updated accordingly. Your current location will be shown on the
map screen and will move as you travel.
However, there are times when you wish to see maps that are not
at your current location or you may want to collect data for more
than one map. If you do not have a full time connection you can
use this feature to collect maps for the trip so that the GPS location
needs to switch maps it will already have maps available.
Figure 7 Choose Maps
The Choose maps function can be used check traffic for several
places within the United states. The pull down menu will show the
available states.
14
By default TrafficWatch checks the last GPS location. Use the Add
button to select other locations. Telling it other places to collect
data for can be very useful for commuters that drive further than
the area covered by one map.
If you select several areas in the Pick list it can take some time to
gather all of the data. You can select up to 8 cities which need not
be in the same state. You can clear this list with the Delete button.
You can use this screen to tell it which maps you want information
for and you can choose one map to be displayed. The one choice
will determine which information is displayed on the map screen,
the traffic report, or the best highways screen. Tapping OK will
return you to the features page.
Map Coverage
The map coverage will vary by state depending on the available
data. Areas that have map coverage for California include:
•
LA East (Yorba, Brea, Whittier, West Covina, San Dimas,
Pomona)
•
LA South (Long Beach, Torrance, LA)
•
LA West (LAX, LA, Hollywood - zoomed in)
•
LA North (LA, Hollywood, Encino, Simi Valley, Santa
Clarita, Burbank)
•
LA Central (Santa Ana, LA, Hollywood, Burbank,
Pasadena, San Gabriel, Whittier)
•
Orange County West (Coasta Mesa, Fountain Valley,
Garden Grove, Santa Ana)
•
Orange County South (Mission Viejo, Irvine, Santa Ana,
Tustin)
15
•
San Diego (Chula Vista, Coronado, San Diego, Poway,
Grove, National City)
•
SF Central (Foster City, San Bruno, San Franciso,
Oakland)
•
SF East (Oakland, Berkeley, Richmond, Vallejo, Walnut
Creek)
•
San Jose (Los Gatos, Palo Alto, Foster City, Fremont San
Jose)
•
Sacramento. (Elk Grove, Sacramento, Rancho Cordova)
For areas outside of California there is currently data available for:
• GA - Atlanta
• NV - Las Vegas, Reno, Lake Tahoe
• WA - Seattle
New locations will be added when they become available. If you
have a need for a particular city please tell Mobile Crossing. It may
be that it can be added.
16
Troubleshooting Problems
Errors you might see include:
•
No owner information - You must fill in the owner information
with both your name and email address.
•
No License – your subscription service has expired. You need
to renew your subscription.
•
Trial period Expired - Your trial period is over. You will need to
subscribe to continue service.
•
No internet - the program cannot connect to the internet. This
might be normal if you have removed the internet connection.
To troubleshoot this problem, see Internet Connection
problems on page 17.
•
Web Service Not Available - The site serving the data is down,
Check again later.
•
No Recent Traffic Data - The traffic data is out of date. This
generally occurs 45 minutes after the last live data. To clear
this problem re-establish an Internet connection.
Internet Connection Problems
Internet Explorer on the Pocket PC can be used to verify that an
Internet connection is present on the device. This connection can
be established via a network card, a connection to a cell phone, a
connection to a modem, or via ActiveSync.
The easiest connection to establish is with ActiveSync. The
ActiveSync connection presumes you have an internet connection
on the pc itself and then passes this connection to the PDA. It must
be already connected before the PDA can use it. Since this
connection can be used to verify proper operation it will be
described.
17
1. On the Pocket PC check Settings > Connections >
Connections > Advanced > Network Card.
2. In the top menu, check that the setting is 'Work'.
3. On the PC be sure that the unit shows connected and check
the settings in ActiveSync.
4. Under Tools > Options > Rules ensure the Pass through
setting is also set to 'Work'. The setting in active sync and
the PDA must agree.
18