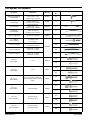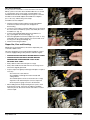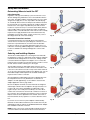
1
FST PRO FUEL SYSTEM TESTER
MODEL MV5545
USER’S MANUAL
Have a technical question?
If you have questions, or require technical
service, please contact our trained service
technicians at:
1-314-679-4200 ext. 4782
Monday – Friday 7:30 am to 4:15 pm CST
Visit our website at www.mityvac.com for
new products, catalogs, and instructions
for product use.
Need service parts?
To order replacement or service parts, visit us
online at www.mityvacparts.com or call toll free
1-800-992-9898.
SEPTEMBER - 2007
Form 824127
Section -
MV59-1
Contents
Introduction . . . . . . . . . . . . . . . . . . . . . . . . . . . . . . . . . . . . . . . . . . . . . . . 3
Safety Precautions . . . . . . . . . . . . . . . . . . . . . . . . . . . . . . . . . . . . . . . . . 3
Specifications . . . . . . . . . . . . . . . . . . . . . . . . . . . . . . . . . . . . . . . . . . . . . 3
Components, Service Parts, and Accessories . . . . . . . . . . . . . . . . . . . 3
Standard Kit Components . . . . . . . . . . . . . . . . . . . . . . . . . . . . . . . . 3, 4
Service Parts . . . . . . . . . . . . . . . . . . . . . . . . . . . . . . . . . . . . . . . . . . . . . 5
Fuel System Test Adapters. . . . . . . . . . . . . . . . . . . . . . . . . . . . . . . . 6-7
Assembly. . . . . . . . . . . . . . . . . . . . . . . . . . . . . . . . . . . . . . . . . . . . . . . . 8
Bypass Hose . . . . . . . . . . . . . . . . . . . . . . . . . . . . . . . . . . . . . . . . . . 8
Flowmeter Faceplates . . . . . . . . . . . . . . . . . . . . . . . . . . . . . . . . . . . 8
Connections . . . . . . . . . . . . . . . . . . . . . . . . . . . . . . . . . . . . . . . . . . . . . 8
Adapters . . . . . . . . . . . . . . . . . . . . . . . . . . . . . . . . . . . . . . . . . . . . . . 8
Banjo Connections. . . . . . . . . . . . . . . . . . . . . . . . . . . . . . . . . . . . . . 9
Flex Hose Connections . . . . . . . . . . . . . . . . . . . . . . . . . . . . . . . . . 10
Proper Use, Care, and Servicing . . . . . . . . . . . . . . . . . . . . . . . . . . . . 10
Principle of Operation . . . . . . . . . . . . . . . . . . . . . . . . . . . . . . . . . . . . . . 11
Fuel Delivery Basics . . . . . . . . . . . . . . . . . . . . . . . . . . . . . . . . . . . . . . 11
Application of the FST . . . . . . . . . . . . . . . . . . . . . . . . . . . . . . . . . . . . 11
Diagnosing Fuel Delivery Systems . . . . . . . . . . . . . . . . . . . . . . . . . . 11
Simulating Engine Demand . . . . . . . . . . . . . . . . . . . . . . . . . . . . . . 12
Pinpointing Fuel System Malfunctions . . . . . . . . . . . . . . . . . . . . . 13
Types of Fuel Delivery Systems . . . . . . . . . . . . . . . . . . . . . . . . . . . . . . 14
Return Fuel Systems . . . . . . . . . . . . . . . . . . . . . . . . . . . . . . . . . . . . . 14
Returnless Fuel Systems . . . . . . . . . . . . . . . . . . . . . . . . . . . . . . . . . . 14
Mechanically Regulated. . . . . . . . . . . . . . . . . . . . . . . . . . . . . . . . . 15
In-tank Filtering/In-tank Return . . . . . . . . . . . . . . . . . . . . . . . . . 15
External Filtering/In-tank Return . . . . . . . . . . . . . . . . . . . . . . . . 15
External Filtering/External Return . . . . . . . . . . . . . . . . . . . . . . . 15
Electronically Regulated. . . . . . . . . . . . . . . . . . . . . . . . . . . . . . . . . 16
Identifying Fuel Delivery Systems . . . . . . . . . . . . . . . . . . . . . . . . . . . 16
Fuel System Components . . . . . . . . . . . . . . . . . . . . . . . . . . . . . . . . . . 17
Fuel Tank . . . . . . . . . . . . . . . . . . . . . . . . . . . . . . . . . . . . . . . . . . . . . . . 17
Fuel Pump . . . . . . . . . . . . . . . . . . . . . . . . . . . . . . . . . . . . . . . . . . . . . . 17
Fuel Inlet Strainer/Sock . . . . . . . . . . . . . . . . . . . . . . . . . . . . . . . . . . . 17
Fuel Filter. . . . . . . . . . . . . . . . . . . . . . . . . . . . . . . . . . . . . . . . . . . . . . . 18
Pressure Regulator . . . . . . . . . . . . . . . . . . . . . . . . . . . . . . . . . . . . . . . 18
Fuel Lines . . . . . . . . . . . . . . . . . . . . . . . . . . . . . . . . . . . . . . . . . . . . . . 18
Setup and Installation . . . . . . . . . . . . . . . . . . . . . . . . . . . . . . . . . . . . . . 19
Determining Where to Install the FST . . . . . . . . . . . . . . . . . . . . . . . . 19
Inline Connection . . . . . . . . . . . . . . . . . . . . . . . . . . . . . . . . . . . . . . 19
Alternative Connection Locations . . . . . . . . . . . . . . . . . . . . . . . . . 19
Selecting and Installing Adapters . . . . . . . . . . . . . . . . . . . . . . . . . . . 19
Setting up the FST Pro. . . . . . . . . . . . . . . . . . . . . . . . . . . . . . . . . . . . 20
Installing the FST Pro . . . . . . . . . . . . . . . . . . . . . . . . . . . . . . . . . . . . . 20
Testing and Diagnostics . . . . . . . . . . . . . . . . . . . . . . . . . . . . . . . . . . . . 22
Return Fuel Systems . . . . . . . . . . . . . . . . . . . . . . . . . . . . . . . . . . . . . 22
Returnless Fuel Systems (Mechanical) . . . . . . . . . . . . . . . . . . . . . . . 26
Returnless Fuel Systems (Electronic) . . . . . . . . . . . . . . . . . . . . . . . . 28
Fuel visualization. . . . . . . . . . . . . . . . . . . . . . . . . . . . . . . . . . . . . . . . . 31
Pressure Leakdown Test . . . . . . . . . . . . . . . . . . . . . . . . . . . . . . . . . . 31
Disconnecting the FST . . . . . . . . . . . . . . . . . . . . . . . . . . . . . . . . . . . . . 32
Appendix A . . . . . . . . . . . . . . . . . . . . . . . . . . . . . . . . . . . . . . . . . . . . . . 34
Appendix B . . . . . . . . . . . . . . . . . . . . . . . . . . . . . . . . . . . . . . . . . . . . . . 36
Appendix C . . . . . . . . . . . . . . . . . . . . . . . . . . . . . . . . . . . . . . . . . . . . . . 38
Appendix D . . . . . . . . . . . . . . . . . . . . . . . . . . . . . . . . . . . . . . . . . . . . . . 40
Warranty . . . . . . . . . . . . . . . . . . . . . . . . . . . . . . . . . . . . . . . . . . . . . . . . 42
Page Number - 2
Form 824127
Introduction
•
The Mityvac FST Pro Fuel System Tester is an advanced
diagnostic tool designed for troubleshooting and pinpointing
common automotive fuel delivery system malfunctions,
including:
•
• Failing fuel pump
• Faulty pressure regulator
• Blocked inline filter
• Blocked inlet strainer/sock
• Pinched or crushed fuel line
• Fuel contamination
• Fuel tank vortex
• Fuel system leaks
This manual focuses on the application of the FST to modern
electronic fuel injection (EFI) systems. However, it is equally
capable of diagnosing earlier fuel injection systems such as
throttle body injection (TBI), continuous injection (CIS) and even
pre-fuel injection carbureted systems. A separate low pressure
gauge is available from Mityvac for systems that operate below
15 PSI (100 kPa).
Safety Precautions
The use of this service tool requires the exposure of highly
flammable gasoline. To prevent fires, explosions and/or severe
injury, always apply extra precautions when diagnosing or
working on fuel systems.
The FST Pro is designed for servicing a variety of vehicles in a
safe, convenient manner. However, fuel delivery systems vary
widely between makes and models of vehicles, potentially
requiring additional steps or equipment to perform a proper
service job. The procedures outlined in this manual are to serve
as guidelines for the use of this equipment. In addition to these
guidelines, always follow the manufacturer’s recommended
procedures when servicing each unique vehicle. Use common
sense in the application of this tester; and do not attempt to
force a test on a fuel system for which this equipment is not
designed to perform.
•
Specifications
Maximum Flow Capacity:
•
•
•
•
•
•
Always read carefully and understand instructions prior to
using this equipment
Wear safety glasses at all times
Operate the vehicle only in a well ventilated area, and away
from potential sources of flame or ignition.
Prior to starting an engine, make sure all components of the
tester, body parts, and personal clothing are clear of rotating
engine components
Avoid burns by remaining cautious of engine parts that may
become hot when the engine is running
Never leave a vehicle unattended while testing
Check and secure all fuel system connections before
starting the vehicle or activating the fuel pump
Form 824127
1.0 gallon/minute (3.8 liters/minute)
Maximum Rated Pressure: 200 PSI (1340 kPa) (13.8 bar)
Components, Service Parts
and Accessories
The Mityvac FST Pro combines the highest quality materials
and workmanship to create a durable, finely tuned diagnostic
tool, which with proper care will provide years of valuable
service. All components are designed and quality controlled
in the U.S.
Following is a list of standard components, service parts and
accessories relating to model MV5545. Components and
accessories are available from your local Mityvac distributor.
Service parts, warranty information and technical service
information are available at the contact information shown on
the front of this user manual.
Standard Kit Components
Model MV5545 includes the following high quality components:
•
•
This tester is designed for use on gasoline/petrol engines only.
It is safe for use with gasoline and most gasoline additives, but
is not compatible with diesel fuel or alternative/flex fuels that
contain ethanol.
•
Wear gloves and protective clothing to avoid the contact of
gasoline on skin. If contact occurs, immediately wash the
area and perform necessary first aid
Always keep a fire extinguisher on hand when performing
fuel related diagnostics. Make sure the extinguisher is rated
for fuel, electrical and chemical fires
Avoid spilling fuel on hot engine parts. Clean-up any fuel
spills immediately after they occur.
•
•
•
•
•
•
•
•
•
3.5" (90 mm) diameter diaphragm style Pressure Gauge
- 0 to 120 PSI (0 to 8 bar) (0 to 800 kPa) scale of measure
- Push-button pressure relief valve
- 360° swivel hook
- Protective rubber boot
Flowmeter Assembly
- Borosilicate glass variable area flowtube with protective
shield and precision aluminum float
- 3-way Flow Control Valve
- Fuel bypass port
- Male push-to-connect, quick-change coupler
w/ Schrader valve
- (2x) Male SAE J2044 quick-connects
- Replaceable faceplates with 0 to 1.0 gallon/minute
scale of measurement
- Protective rubber boot
(2x) Replaceable flowmeter faceplates with 0 to 4 liters/
minute scale of measurement
1/8" (3 mm) ID x 6' (1.8 m) long Pressure Relief Hose
1/4" (6.5 mm) ID x 6' (1.8 m) long Bypass Hose
(2x) Flowmeter Connection Hose
(2x) Scissor Hose Clamp
(2x) Hose Plug
(6x) Quick-connect Replacement Clip
Custom Storage Case
Automotive Fuel System Test Adapters
(see Fuel System Test Adapters on page 6)
Page Number - 3
Standard Kit Components
Part Number
Description
824141
High Pressure Gauge
824149
Pressure Relief Hose (1/8"/3mm ID x 6'/1.8 m long)
824148
Bypass Hose (1/4"/6.5 mm ID x 6'/1.8 m long)
824144
Scissor Hose Clamps (Qty 2)
824147
Flowmeter Hose (3/8"/9.5 mm ID x 4'/1.2 m long)
824173
Hose Plug (Qty 2)
824143
Flowmeter Faceplates (Liters/Minute)
includes front and back plate
824142
Flowmeter Faceplates (Gallons/Minute)
includes front and back plate
824141
824172
Quick-connect Replacement Clips (Qty 6)
824179
Storage Case
824149
824148
824144
824147
824173
824172
824142
824143
Accessories
Part Number
Description
MVA500
Low Pressure Gauge
MVA501
Flowmeter Faceplate (0 to 60 Gallons/Hour)
includes front and back plate
MVA5549
MotorVac Adapter Set
MVA5552
Pressure Test Accessory Kit
MVA506
Inline Pressure Test Assembly
MVA509
Extended Pressure Test Hose
824179
MVA5549
MVA5552
MVA509
Page Number - 4
Form 824127
Service Parts
2
3
Part Number
Description
1
824182
Flow Tube Shield
2
824177
Male Quick-Connect Fitting
3
824176
Bypass Port
4
824175
Flow Control Valve Knob
5
824174
Flowmeter Inlet/Outlet Connector (Qty 2)
7
7
6
824146
Flow Control Valve
7
824145
Flowmeter Seal Kit
824183
Wing-Style Hose Clamp (Qty 4)
824181
Flowmeter Boot
824180
Adapter O-Ring Kit
824178
Ford Springlok Tether with Clip
1
10
824182
824181
824180
4
6
824178
824177
824176
7
7
824175
824174
824146
5
824145
Form 824127
824183
Page Number - 5
Fuel System Test Adapters
Description
Applications
Order No.
Reference
No.
GM/Chrysler Right Angle
Test Port Adapter
GM & some Chrysler
vehicles with 7⁄16" x 20
thread test port on fuel rail
MVA507**
20
Ford/Chrysler Right Angle
Test Port Adapter
Ford & some Chrysler
vehicles with .308 x 32
thread test port on fuel rail
MVA508**
21
GM/Chrysler
Test Port Adapter
GM & some Chrysler
vehicles with 7⁄16" x 20
thread test port on fuel rail
MVA510**
18
Ford/Chrysler
Test Port Adapter
Ford & some Chrysler
vehicles with .308 x 32
thread test port on fuel rail
MVA511**
19
⁄8" Quick-change Adapter
GM, Chrysler, Jeep/Eagle
MVA512
1
⁄4" - 3⁄8" Barbed
Flex Hose Adapter
Vehicles with 1⁄4", 5⁄16"
or 3⁄8" rubber to steel
hose connection
⁄4" Flex Hose Adapter
Vehicles with 1⁄4" rubber
to steel hose connection
3
1
1
16
16A
MVA505*
⁄16" Flex Hose Adapter
Vehicles with 5⁄16" rubber
to steel hose connection
16B
⁄8" Flex Hose Adapter
Vehicles with 3⁄8" rubber
to steel hose connection
16C
5
3
13B
M8 x 1.0
Banjo Adapter
Toyota
MVA513
13A
14B
M10 x 1.0
Banjo Adapter
Toyota
MVA514
14A
M12 x 1.25
Banjo Adapter
Toyota, Lexus, Geo, Honda, Acura,
Hyundai, Mazda, Daihatsu, Chrysler
imports
15B
MVA515
15A
9B
M12 x 1.5
Banjo Adapter
Audi, Volkswagen
MVA516
9A
12A
M12 x 1.5
Ball Nose Adapter
European vehicles
with CIS fuel system
MVA517
12B
10A
M14 x 1.5
Ball Nose Adapter
European vehicles
with CIS fuel system
MVA518
10B
Page Number - 6
** Not included in MV5545. Available individually or in MVA5552 Pressure Test Accessory Kit
Form 824127
Fuel System Test Adapters
Description
Applications
M16 x 1.5
Ball Nose Adapter
European vehicles
with CIS fuel system
Order No.
Reference
No.
11A
MVA519
11B
3A
M16 x 1.5 Adapter
GM Vortec
MVA520
3B
4A
M14 x 1.25 Adapter
GM Vortec
MVA521
4B
6A
3
⁄8" Flare Nut Adapter
Carbureted & early
fuel injected systems
MVA522
6B
5A
5
⁄16" Flare Nut Adapter
Carbureted & early
fuel injected systems
MVA523
5B
7A
3
⁄8" Spring Lock Adapter
Ford fuel injection systems
MVA524
7B
8A
1
⁄2" Spring Lock Adapter
Ford fuel injection systems
MVA525
8B
2B
5
⁄16" Quick-Change Adapter
GM, Chrysler, Jeep/Eagle
MVA526
2A
Form 824127
Page Number - 7
Assembly
For flexibility and ease of storage, the FST Pro features a modular
design that is quick to assemble and breakdown. Proper assembly
for testing is covered in the Setup and Installation instructions
Bypass Hose
Prior to the first use of the FST, the 1/4" (6.5 mm) ID clear bypass
hose should be assembled to the bypass port extending from the
side of the flowmeter, above the flow control valve. To connect the
fuel bypass hose:
1. Unscrew the compression nut from the fuel bypass port extending
from the side of the flowmeter just above the flow control valve
(Fig. 1).
2. Slip the compression nut over one end of the clear bypass hose,
1/4" (6.5 mm) ID x 6’ (1.8 m) long (Fig. 2).
3. Push the end of the bypass hose over the barb extending from
the bypass port (Fig. 3).
Fig. 1
Fig. 2
Fig. 3
Fig. 4
4. Slide the compression nut up over the end of the tube and
thread it back onto the bypass port. Tighten the nut using a
7/16" open-end wrench (Fig. 4).
Flowmeter Faceplates
The flowmeter is shipped with faceplates installed on the front and
back. The flow scale unit of measure printed on both plates is
gallons per minute (GPM). Included with the kit are faceplates with a
liters/minute (LPM) flow scale. Faceplates printed with a gallons per
hour (GPH) flow rate scale can be purchased separately.
The faceplates are held securely by the lip of the rubber boot that
surrounds the flowmeter. For accuracy, they pilot on the caps that
seal the top and bottom of the flowtube.
To remove the faceplates, simply peel back the edges of the rubber
boot. To install new faceplates, match the replacement faceplate to
the correct side of the flowmeter, position the cutout over the flowtube, and then carefully work the lip of the rubber boot back over
the edge.
Connections
The hoses that route fuel from the vehicle’s fuel delivery system
into and out of the FST Pro, utilize a special female quick-connect
fitting (Fig. 5). This fitting was selected for several important reasons:
1. It conforms to the SAE J2044 specification for fuel fittings
2. It is a common fuel delivery system connection on which many
manufacturers are standardizing
3. It does not restrict fuel flow, which could cause a
false diagnosis
4. The connection releases with a simple push-button action. No
special tools are required to disconnect the fittings.
The flowmeter inlet and outlet ports, as well as the adapters and
fittings that connect the FST into the fuel delivery system, have the
complimenting male SAE J2044 endform (Fig. 6).
Fig. 7
To secure the male to female connection, simply push the male
endform into the female quick-connect until it snaps securely into
place (Fig. 7). Always test the connection by trying to pull
it apart without pressing the release button.
Fig. 5
Page Number - 8
Fig. 6
Form 824127
To release the connection, press and hold the release button on
the side of the female quick-connect, while pulling the connection
apart (Fig. 8). Do not attempt to release the quick-connect connection
using a disconnect tool, as this may damage the fitting. Replacement
clips are included if needed
Adapters
The FST Pro includes a selection of adapters for connecting inline with
the fuel delivery systems of a wide range of automotive makes and
models. The chart on pages 6 and 7 outlines the adapters available,
and their applications. Each adapter is etched with an identification
number for easy reference. Adapters can be purchased separately in
sets according to the order number indicated in the chart.
Fig. 8
In most cases, selecting and installing adapters into the fuel delivery
system and connecting the FST for testing, is straightforward and
logical. Simply match the fuel system connection to the equivalent
male and female adapter set, and install them as outlined in the
Setup and Installation instructions later in this manual.
Banjo Connections
Banjo style connections are commonly used by many Asian and
European manufacturers to connect a hose or fuel line to the filter
and/or the fuel rail. Often, this will be the best place to connect the
FST inline with the fuel system. This type of connection may be a
little confusing the first time it is encountered.
Banjo
Fitting
Banjo Bolt
Fuel Rail
A banjo connection consists of a round, hollowed-out “banjo”
connector with two flat sides. A hollow bolt with a cross-hole
passes through the banjo connector and threads into the connecting
component (i.e. filter, fuel rail). When the bolt is tightened, it creates
a secure face-to-face seal through which the fuel flows. See Fig. 9 for
an illustration of this connection.
Two (2) threaded adapters and a closed end nut are required to
properly install the FST into a banjo style connection. Refer to the
adapter chart for a list of the banjo adapters included with the FST.
To install the banjo adapters:
Fig. 9
1. Follow the proper procedure under the Setup and Installation
instructions to relieve the fuel pressure and prepare for
disconnecting.
2. Loosen and remove the bolt from the banjo connection at the
fuel filter or fuel rail.
Banjo Bolt
Adapter
3. Pass the hollow adapter with the cross-hole through the banjo
fitting. Be sure to include a washer on both sides of the banjo
fitting (Fig. 10).
Closed
End Nut
4. Thread the closed-end nut onto the end of the bolt and tighten
securely with a wrench, trapping the banjo fitting.
Banjo Fitting
5. Thread the hollow bolt adapter without the cross-hole into the
filter or fuel rail, in place of the original bolt, and tighten securely
with a wrench. Be sure to include a washer between the face of
the filter or fuel rail, and the opposing face of the adapter bolt
(Fig. 11).
Fig. 10
Banjo Adapter
6. Follow normal testing procedures.
NOTE: Always throw away the original used washers, and replace
them with new when reconnecting the banjo fitting back to the
vehicle’s original specification.
Fuel Filter
Fig. 11
Form 824127
Page Number - 9
Flex Hose Connections
In many cases it is convenient to connect the FST Pro into the fuel
delivery system at a location where a flexible rubber hose is secured
to a steel fuel line using a screw clamp. A special adapter set is
included with the FST Pro for installing it into this type of connection.
It includes a universal barb adapter, three flexible hose adapters
(1/4", 5/16", 3/8"), and four wing screw clamps.
To install the flex hose adapters:
1. Follow the proper procedure under the Setup and Installation
instructions to relieve the fuel pressure and prepare for
disconnecting.
2. Loosen the screw clamp securing the rubber hose to the steel fuel
line on the vehicle’s fuel delivery system, and carefully disconnect
the rubber hose. (Fig. 12).
3. Insert the universal barb adapter (#16) into the rubber hose
(Fig. 13) and tighten the hose clamp (Fig. 14).
4. Select the appropriate size flex hose adapter (1/4", 5/16", or 3/8"),
and install it onto the steel fuel line (Fig. 15). Secure it with one of
the wing screw clamps provided (Fig. 16).
5. Follow normal testing procedures.
Proper Use, Care and Servicing
Fig. 12
Fig. 13
With proper care and maintenance, the FST Pro will provide years
of accurate, reliable service.
The FST is designed for use in testing modern fuel delivery systems
on vehicles equipped with gasoline powered combustion engines.
•
CAUTION: DO NOT USE THE FST PRO ON DIESEL SYSTEMS
•
CAUTION: DO NOT USE THE FST PRO ON VEHICLES
OPERATING ON ALTERNATIVE FUELS SUCH AS E85
OR OTHER “FLEX” FUELS
•
Always drain the fuel from the FST prior to storage.
•
Always disassemble the FST and return it to the storage case in
which it was originally purchased.
•
Inspect components regularly for damage and replace or repair as
necessary:
- Check hoses for cracks and cuts
- Check adapters for damage and wear to threads and
sealing surfaces
- Check female quick-connects for wear and cuts to o-rings
- Inspect the male and female quick-connect components
where the pressure gauge connects to the flowmeter
•
After installing the FST and pressurizing the fuel system, check
the flowmeter for leaks. If any leaks are evident, immediately
relieve the pressure, disconnect the FST, and send it to a service
center for repair.
Fig. 14
Fig. 15
Fig. 16
Page Number - 10
Form 824127
Principle of Operation
Fuel Delivery Basics
Modern fuel injected engines rely on precision fuel delivery to
perform at peak output and efficiency. It is the function of the
fuel delivery system to ensure that proper fuel pressure and
volume are present in the fuel rail to meet the demands of the
engine under varying operating conditions. When a fuel delivery
system is designed to meet a particular vehicle’s requirements,
a fuel pump is selected that can deliver at least the maximum
fuel pressure and volume requirement of the engine. Other
components of the fuel delivery system act upon the output of
the fuel pump to ensure the fuel pressure at the injectors is
maintained at the predetermined specification.
The maximum volume of fuel required by an engine varies
depending on its size. For example, an 8.0 liter engine running
at 3,000 rpm could consume as much as .34 gallons of fuel per
minute, while a 1.8 liter engine at the same speed would use
only .08 gallons per minute. When manufacturers design a fuel
delivery system for a specific engine, they consider the fuel
requirements based on the size, expected load and speed. This
data is used to program the vehicle’s Electronic Control Module
(ECM), which in turn controls the opening and closing (duty
cycle) of the fuel injectors. With the exception of emerging
electronically controlled fuel injection systems, the ECM
assumes that fuel pressure and volume to the engine are
maintained according to the designer’s specifications. If a
malfunction in the fuel delivery system such as a blocked filter,
faulty pressure regulator, or bad fuel pump, causes pressure or
flow to vary at the fuel rail, the ECM cannot directly sense this.
The only way the ECM can recognize a fuel related problem
exists, is through the O2 sensor in the exhaust. The O2 sensor
alerts the ECM if the exhaust mixture is rich or lean. The ECM
can only respond by opening the injectors for longer or shorter
time periods to inject more or less fuel. This may be enough to
mask small problems from the driver, but will result in poor fuel
efficiency. If the vehicle owner does not notice a decrease in
efficiency, and have the vehicle serviced, eventually the
malfunction will lead to greater drivability problems.
To help compensate for small fuel delivery problems such as a
partially clogged filter, manufacturers build a safety factor into the
fuel system so that it is capable of supplying somewhat greater
fuel pressure and volume than the engine will ever require.
Because of this, if a fuel delivery system is malfunctioning
enough to cause a noticeable drivability problem, with the
aid of the FST Pro, a technician should be able to accurately
diagnose and pinpoint the cause of the problem.
Application of the FST
The function of the FST Pro is to:
•
Inform technicians that there is a malfunction in the fuel
delivery system preventing the engine from receiving the
optimal fuel pressure and flow it requires to perform at peak
efficiency and performance.
•
Assist the technician in accurately pinpointing fuel delivery
system malfunctions, so as to obsolete current confusing,
time consuming, and costly troubleshooting procedures.
The FST is able to perform these functions by providing
real-time values for fuel pressure and flow, and by allowing
Form 824127
the technician to simulate varying load conditions on the engine
while the vehicle is idling in the shop. These functions are
performed by means of a pressure gauge, flow gauge
(flowmeter), and a patented flow control valve.
The FST operates by measuring and acting upon the flow of fuel
as it is pumped from the fuel tank to the engine by a vehicle’s
fuel delivery system. To accomplish this, the FST is designed to
be connected inline with the fuel system, such that fuel flows
normally through the tester just prior to entering the fuel rail.
It is critical that the FST be installed as close as possible to,
and directly inline with the fuel rail so that the pressure and
flow measurements most accurately represent the conditions
experienced by the engine. The further away from the fuel rail
that the tester is installed, the more likely the chance that an
external factor such as a blocked fuel line will affect the
accuracy of the test results. Figure 17 illustrates a typical installation of the FST on a return type fuel delivery system.
Fig. 17
NOTE: When conducting an initial evaluation of the fuel system
using the FST, never install it with any component such as a fuel
filter or pressure regulator located between it and the fuel rail.
Doing so will likely cause the readings to deviate from the pressure and flow that the engine is experiencing, thus reducing the
accuracy and the reliability of the test results.
Diagnosing Fuel Delivery Systems
Upon proper installation of the FST and vehicle startup (see
Setup and Installation), the value for fuel pressure at idle will be
indicated on the pressure gauge, and the volume of fuel flowing
to the engine will be displayed by the flowmeter.
NOTE: While normal operating specifications for pressure and
flow will vary between vehicle makes, models, years and
engines, it is most likely that fuel pressure is the only one for
which a documented specification is available.
Regardless of the vehicle’s type of fuel delivery system
(see Modern Fuel Delivery Systems), the idle pressure can
immediately be noted and compared to the manufacturer’s
specification. However, the idle flow will vary significantly
depending on whether the fuel delivery system is return or
returnless. Assuming the fuel delivery system is operating
properly, the indicated flow of a return system will represent the
total volume the pump is capable of producing at the specified
pressure. On the other hand, the indicated flow of a returnless
system will represent only what the engine is using at idle.
Chances are this volume is so low, that it will not even register
on the flowmeter.
Page Number - 11
In regards to return fuel systems, knowing the pressure and flow at
idle is a very good indication as to whether the fuel system is
functioning properly. However, while pressure can be compared to
a manufacturer’s spec, idle flow is not typically documented. Most
return fuel systems will flow around .5 gallons (2 liters) per minute at
idle. However, the idle flow may range from .3 to .7 GPM (1.1 to 2.6
LPM) depending on the vehicle make, model, year and engine. Under
a heavy load, a 5.0 liter engine may require as much .5 GPM (2 LPM),
while a 2.0 liter engine may only require .2 GPM (.75 LPM). Any return
fuel system flowing less than .3 GPM at idle should be considered
suspect for a malfunction. Due to flow variances, additional testing
described below will provide a more accurate diagnosis of fuel
system performance.
Using the FST to test a returnless system at idle will provide a
measurement for idle pressure. However flow at idle will provide no
additional insight as to its peak performance capability. Using the
patented flow control valve on the FST to execute simple pressure
and flow demand tests is required for an accurate diagnosis.
Simulating Engine Demand
At idle, an engine requires very little fuel, and places very little
demand on the fuel delivery system. A typical fuel pump is capable of
providing up to 30X more fuel than an engine requires at idle. Testing
a fuel delivery system at idle may be acceptable if the driver has no
intention of actually driving the car, but what happens when a driver
needs to accelerate or commit to a driving condition that places a
load on the engine?
The key to determining if a fuel delivery system can meet maximum
engine requirements is to test it under the engine’s most demanding
conditions. Using patented technology, the FST Pro is the only tester
capable of simulating demand on a vehicle’s fuel delivery system to
determine if it can meet the peak requirements of the engine.
Fig. 18
The FST has a built-in flow control valve that enables an operator to
manually vary the flow restriction such that it simulates a car’s throttle
position from idle, all the way to wide-open. The flow control valve is
located on the side of the FST flowmeter assembly. Arrows on the
faceplate and rubber boot illustrate the three positions of the valve
as OPEN, CLOSED, and BYPASS.
When the valve is in the OPEN position pointing down, fuel flows
normally through the tester without affecting the normal operation of
the fuel delivery system (Fig. 18). On a return system,
.3 to .5 GPM of flow is typical, while a returnless system will indicated
little to no flow. Fuel pressure should read within the manufacture’s
specification regardless of the type of fuel system.
When the valve is rotated 90° to the CLOSED position, flow through
the FST is completed restricted (Fig. 19). On a return system or electronically regulated returnless system, this is referred to as “deadheading” the fuel pump. The flow will drop to zero, and the pressure
gauge will indicate the peak pressure output of the pump. Peak pressure will typically be 50% to 100% higher than the normal operating
specification. This is termed the Peak Pressure Test, and
is effective only on return or electronically regulated returnless fuel
systems. Closing the valve on a mechanically regulated returnless
system will have no effect on fuel pressure.
CAUTION: A pump should never be dead-headed for longer than a
brief instant. Doing so can cause serious damage to the fuel system
and/or pump.
Fig. 19
Page Number - 12
Form 824127
When the valve is rotated to the BYPASS position pointing up, fuel is
routed through the bypass port located on the side of the flowmeter
just above the flow control valve (Fig. 20). Bypassing eliminates all
restriction to the flow, and the maximum volume output of the pump
is indicated on the flowmeter. Fuel pressure will drop to zero. This is
termed the Peak Flow Test, and is applicable to return and returnless
systems.
If the flow control valve in the CLOSED position is considered to
simulate a closed throttle, and the BYPASS position is considered
to simulate wide-open throttle (WOT), then any position in-between
would represent some unique throttle position between idle and WOT.
With this in mind, the operator can simulate any engine demand
scenario by simply rotating the valve between CLOSED and BYPASS.
By monitoring the corresponding pressure and flow on the FST, the
fuel delivery system’s ultimate capability to meet engine requirements
can be determined.
Although it may sound complicated, applying this principle is quite
simple. For example a 3.8L engine with a maximum speed of 6,000
rpm can require an estimated flow of up to .34 GPM (1.3 LPM) of fuel
(see Appendix A). Keeping an eye on the flowmeter, the valve should
be rotated from the OPEN position, past the CLOSED position until
the reading across the top of the float is .34 GPM. The corresponding
pressure value should be noted. On a return system or electronically
regulated returnless system, the pressure value should be higher than
the manufacturer’s specification. On a mechanically regulated returnless
system, the pressure should be within the manufacturer’s specification.
Pinpointing Fuel System Malfunctions
To pinpoint the cause of a fuel system malfunction, a simple
knowledge of fuel system components, and their affect on system
performance, is combined with the results from the tests above to
determine the most likely point of failure. For example, initial FST
testing of a return fuel system would yield values for four critical
performance indicators, Idle Pressure, Idle Flow, Peak Pressure, and
Peak Flow. A clogged inline fuel filter would restrict fuel flow, causing
low values for idle and peak flow, but idle and peak pressure would
remain within spec. An under-restricting pressure regulator would
produce a higher than normal idle flow and low idle pressure, but
normal values for peak flow and peak pressure. Noting the values
of these test indicators, and comparing them to the vehicle’s
specifications, the technician can in most cases accurately pinpoint
the cause of a malfunction.
Fig. 20
Testing a returnless system will generate performance measurements
for Idle Pressure, Peak Flow, and Peak Demand Pressure. The values
for these indicators are applied in the same way, to pinpoint the cause
of a fuel system malfunction.
This logic can be applied to all components that can influence fuel
delivery system performance. The details of this method are
documented in the Testing and Diagnostic section of this manual.
Form 824127
Page Number - 13
Types of Fuel Delivery Systems
For the purpose of accurately applying and testing with the FST Pro,
today’s fuel delivery systems can be divided into three typical
configurations:
•
•
•
Return (Bypass) Fuel Systems
Returnless Fuel Systems – Mechanically Regulated
Returnless Fuel Systems – Electronically Regulated
The fundamental differences between return and returnless fuel
systems affect the values for pressure and flow displayed by the FST,
and influence its diagnostic capabilities. Even the differences between
mechanically and electronically regulated returnless systems produce
substantially varying results. The key to achieving the most accurate
fuel system diagnosis begins with a basic understanding of the differences between fuel systems, and how the FST responds to each.
Return Fuel Systems
In a return type of fuel system, a continuous volume of fuel is pumped
to the engine via the fuel supply line. The engine uses what it needs,
and the rest is returned back to the tank via the fuel return line
(Fig. 21). The fuel pump receives power directly from the electrical
system. Pump speed is not controlled by any external source, so
when the system is functioning properly, it outputs a constant flow.
Fuel pressure in a return system is created by a pressure regulator
mounted at the exit point of the fuel rail or fuel return line. As the
unused fuel leaves the fuel rail, it passes through the regulator, which
restricts the volume of the returning fuel (see Fuel System
Components/Pressure Regulator). This causes backpressure to build
up in the fuel rail and fuel supply line, all the way back to the fuel
pump. This “backpressure” is the pressure at which fuel is delivered
to the injectors, and what is referred to by the vehicle manufacturer’s
specification for proper fuel pressure.
Fuel Filter
Fuel Supply Line
Pressure Test Port
Fuel Rail
Fuel
Tank
Pump Module
Pressure
Regulator
Fuel Return
Line
Inlet Strainer
Fig. 21
An inline filter is installed in the fuel supply line between the fuel pump
and the fuel rail to filter out impurities before they reach the injectors.
It’s typically mounted under the frame or in the engine bay, making it
relatively easy to replace.
A properly functioning return type system will always deliver a much
greater volume of fuel to the engine than what it will require, even
under a heavy load or a wide-open throttle (WOT) condition. A
normally functioning return fuel system will continuously circulate
around .5 gallon (2 liters) of gas per minute at normal operating
pressure. Ultimately, the fuel system designer determines what the
flow will be based on the engine requirements, but it will typically
vary between the .3 and .7 GPM depending on engine size.
Due to its layout, and the location of critical components, return
systems are the most easily and accurately diagnosed by the FST.
When installed and operated as recommended, the FST can measure
four (4) critical values that combine to precisely diagnose the fuel
system and pinpoint any malfunctions.
Fuel Filter
Pressure Test Port
Fuel Supply Line
Pump Module
Fuel Rail
Returnless Fuel Systems
The term “returnless” describes fuel delivery systems that do not
return unused fuel back to the tank once it has entered the fuel rail.
The fuel rail becomes the end of the line, where fuel pumped from the
tank remains under pressure until it’s used by the engine (Fig. 22).
Fuel
Tank
Pressure Regulator
Inlet Strainer
Fig. 22
Page Number - 14
Form 824127
Returnless fuel systems (mechanically regulated) were pioneered by
Chrysler in the mid-90s. Since that date, other car manufacturers
have been implementing returnless systems onto their cars. Now
returnless systems are common on most all new cars and light trucks.
Mechanically Regulated
In the case of mechanically regulated returnless systems, the term
“returnless” can be misleading. Like a return system, the fuel pump
operates continuously, producing an uncontrolled output. Since the
engine will only use a portion of the total pump output, the excess
fuel must still be returned. This is done either in the tank, or the fuel
is routed just outside the tank for filtering, and then returned.
Mechanically regulated systems utilize a spring operated pressure
regulator mounted in the tank as part of the pump module. The regulator is very similar to those used in return systems, except it is not
vacuum- or pressure-modulated. Fuel pressure in returnless systems
is typically higher than return systems to compensate for the lack of
modulation, and to help prevent the fuel from boiling in the fuel rail.
Mechanically regulated returnless fuel systems employ one of three
basic concepts to filter the fuel and accommodate the excess output
of the pump. All three methods utilize a fuel pump module with
built-in pressure regulator. The FST is very capable of diagnosing
a malfunction of any of the three variations. However the type of
return/filtration method employed has a significant impact on the
FST’s capability to pinpoint the malfunction. Refer to the Testing and
Diagnostics section later in this manual for the proper application of
the FST in diagnosing each system. In some cases, pinpointing the
exact cause of the malfunction may be irrelevant because the pump,
filter, and pressure regulator are all part of a module assembly that
must be replaced as a complete unit.
In-tank Filtering/In-tank Return
This method involves filtering and returning the excess fuel without it
leaving the tank (Fig. 23). Both pressure regulator and filter are part of
the fuel pump module. Filtering is accomplished in one of three ways:
•
•
•
Fuel Filter
Fig. 23
Fuel Rail
Fuel Supply Line
A pre-pump filter is used to filter the fuel before it enters the pump.
The filter is located after the pressure regulator, where it filters the
unused fuel before mixing it back into the fuel reserve.
The filter is located in the pump module, between the pump and
the regulator.
Fuel Filter
Pressure Regulator
Some manufacturers have designed in-tank filter/regulator systems
that use some variation or combination of these three concepts to
produce what they consider to be the most effective system. In cases
involving in-tank filtering and return, all of the control components are
included as part of the pump module assembly, and are most likely
replaced as a complete unit.
Fuel Pump
Fig. 24
Inlet Strainer/Sock
External Filtering/In-tank Return
This system of fuel filtration and return uses a pressure regulator on
the pump module to regulate fuel pressure and return unused fuel
before it leaves the tank. The main filtration is handled by an inline
filter mounted externally between the tank and the fuel rail (Fig. 24).
External Filtering/External Return
In this type of filtering/return system, the fuel is pumped out of the
tank to an external filter mounted on or near the tank (Fig. 25). The filter serves as a sort of manifold, with a single fuel supply line running
into one end of the filter, and two fuel lines exiting the filter. One of the
exiting lines supplies fuel to the engine, while the other returns the
unused fuel to the regulator and the tank.
Fuel Return
Fig. 25
Form 824127
Page Number - 15
Electronically Regulated
Fuel Filter
Fuel Supply Line
Ford began developing an electronically regulated returnless fuel
Pressure Test Port
delivery system in the late nineties, and began implementing it on
their cars in the early to mid-2000s. This system shares some of the
Fuel Rail
features and benefits of both return and returnless systems, but with
the addition of advanced control technology. The two main differences of an electronically regulated fuel system are the replacement
Pressure
of the mechanical pressure regulator with an electronic pressure
Sensor
sensor, and the introduction of a variable speed fuel pump (Fig. 26).
The fuel pressure sensor is mounted directly onto the fuel rail, which
ensures the most accurate reading of the pressure at the injectors.
The signal from the pressure sensor is fed to the ECM where it is
combined with other inputs such as from the O2 sensor. The ECM
processes the data and uses it to control the duty cycle of the
injectors and the speed of the fuel pump. Fuel pressure and volume
are controlled by the ECM speeding up or slowing down the fuel
pump. This eliminates the need for a pressure regulator.
Pump Module
ECM/PCM
Fuel
Tank
Fig. 26
Although a whole new level of technology and control has been
introduced with this system, the engine requirements are still the
same. The FST is just as effective at diagnosing an electronically
regulated system as a mechanical, and the test procedures are
just as straightforward.
Identifying Fuel Delivery Systems
Begin by opening the hood and locating the fuel rail. If the engine
has only one bank of cylinders, there will be only one fuel rail.
Engines with two cylinder banks will typically have two fuel rails,
each feeding the injectors in one of the banks. There will be a
crossover between the rails to allow fuel to flow from one side to
the other. Fuel rails vary in appearance from simple round tubes to
square or rectangular in shape.
Look for the fuel line(s). They typically come up from under the car at
the base of the firewall, run up the firewall, and then extend over to the
fuel rail(s). A return system will have two lines, one supplying fuel from
the tank, the second returning the unused fuel back to the tank. It is
easy to confuse fuel lines with lines for the evaporative system, so
inspect them closely. Fuel lines will be either steel or fuel rated rubber.
To Manifold
Vacuum or
Atmosphere
Pressure Regulator
Fuel Return Line
Return systems will have a pressure regulator typically mounted on
the end of the fuel rail, such that unused fuel flows out of the fuel rail,
through the pressure regulator, and into the return line. The pressure
regulator will typically have a vacuum line attached, which adjusts
fuel pressure regulation according to engine speed (Fig. 27). Some
cars will have a pulse dampener, which can be easily confused with
the regulator. The pulse damper is typically found on returnless
systems. It does not have a vacuum line attached to it, and is commonly mounted at the inlet, or extends from the side of the fuel rail.
Returnless fuel systems will have a single fuel line running to the fuel
rail. There will be no fuel pressure regulator located at the fuel rail.
Electronically controlled fuel systems will have a pressure transducer
mounted on the fuel rail (see Fuel System Components). The
transducer will have an obvious electrical connection with three
to five wires extending from it.
Page Number - 16
Fig. 27
Fuel Supply Line
Form 824127
Fuel System Components
peak capability of the pump. The manufacturer’s service manual
should document this in their fuel system diagnostic procedure.
The modern fuel delivery system is comprised of several critical
components. A malfunction of one or more of these can cause
the system to fail or under perform. The function of the FST is
to diagnose when a fuel system failure has occurred, and to
pinpoint the component(s) which caused the failure. To reach
an accurate diagnosis, a basic knowledge of the fuel system
components and their role in achieving optimum engine
performance is helpful. Following is a list of common components that contribute to the function of the fuel delivery system.
A failure of one or more of these components can typically be
diagnosed using the FST Pro:
Fuel pumps fail or fail to perform due to high mileage,
contaminated fuel, or electrical problems. While there is no fix
for wear due to high mileage, fuel and electrical problems can
be identified, corrected, and prevented. In the case of fuel
contamination, it is almost certain the pump will have to be
replaced due to irreversible damage. However, electrical issues
such as a loose ground, bad connection, or low voltage, can
many times be corrected before the pump experiences any
permanent damage.
Fuel Tank
Contaminated fuel is a major cause of fuel pump failures. Dirt,
debris and scale can clog the inlet strainer and fuel filter causing
the pump to work harder and reduce its life. They also wreak
havoc inside the pump by acting like an abrasive to grind at
parts. Chemical contaminates can cause precision made
components to swell or gum-up, leading to under-performance
or complete failure. For all of these reasons, fuel tanks should
be completely drained and professionally cleaned, or possibly
even replaced, each time a fuel pump is replaced or
contamination is suspected.
The fuel tank serves as a reservoir to store the fuel until it is
needed by the engine. Fuel tanks have been manufactured from
a variety of metals and plastics. The fuel pump hangs down into
the tank, drawing the fuel from very close to the bottom. The
most likely influences of the fuel tank towards a fuel system failure would be the result of rust or scale produced by a metallic
tank, the collection of impurities introduced from the outside, or
a dented tank that interferes with the function of the fuel pump.
It is critical that the fuel tank be emptied, cleaned, and inspected
any time a fuel pump is replaced or impurities are suspected.
Check all electrical connections. When electrical connections fail,
voltage to the pump will be reduced, causing the pump to run
inefficiently and ultimately reducing its life. Check the vehicle
harness plugs for soot or burned wires. Check the pump
module/hanger plug for melted plastic or loose terminals on the
flange. Perform a voltage drop test across all electrical connectors and all electrical components involved with the fuel pump.
Also check the wires from the pump to the flange when replacing
a pump-only application. A damaged wiring harness, if not
repaired, may cause a premature failure to a replacement pump.
Fuel Pump
Each component of the fuel delivery system has its own unique
affect on pressure and flow when it malfunctions. When a fuel
pump is failing or under-performing, its total output declines,
causing both flow and pressure to drop. When testing a
vehicle’s fuel delivery system with the FST Pro, the affects of an
under-performing pump can be diagnosed by observing how
pressure and flow respond to simulated load conditions. Other
common test methods such as testing amperage draw or
pressure alone can not reliably detect a malfunction, and/or
do not have the capability to simulate a load condition. This,
combined with a lack of fuel delivery system knowledge and
training, leads to the high rate of misdiagnosis.
•
•
•
•
•
•
Fuel Tank
Fuel Pump
Fuel Pump Inlet Strainer/Sock
Inline Fuel Filter
Pressure Regulator
Fuel Lines
The fuel pump is the heart of the fuel delivery system. It pumps
fuel from a vehicle’s fuel tank to the engine, where it is mixed
with air and injected into the cylinders for burning. Fuel pumps
in most modern fuel delivery systems are located inside the fuel
tank, and run on electricity supplied by the vehicle’s electrical
system. They pump a continuous volume of fuel at a given
voltage, and are typically extremely reliable when operated
under the conditions for which they are designed. Despite their
reliability and the high cost and hazard of replacement, fuel
pumps have a higher return rate than almost any other
automotive part. They are commonly misdiagnosed and
needlessly replaced, costing consumers, repair shops and
manufacturers millions of dollars each year. It’s estimated that
80% or more of returned pumps are found to function properly
when tested by the manufacturer.
Most mechanically regulated fuel delivery systems operate the
fuel pump at one speed, based on a constant voltage from the
electrical system. However some automotive manufacturers
have begun incorporating two or three speed pumps to improve
efficiency and reduce emissions. Like electronically regulated
returnless systems, the speed of the pump is controlled by the
ECM. However the ECM does not increase pump speed based
on fuel pressure. In such a case, the fuel pump may not
increase speed/output in reaction to the simulated load method
used by the FST. Instead, a scanner or manufacturer’s software
is required to manually increase the speed in order to test the
Form 824127
Fuel Inlet Strainer/Sock
Fuel flows from the tank through an inlet strainer/sock before
entering the fuel pump. It is designed to capture dirt and debris
that could damage the pump. Because it is not easily accessible, it is large in size so that it should not have to be replaced
except when the pump is serviced or replaced.
If the inlet strainer becomes clogged or plugged, it will limit the
amount of fuel flowing to the fuel system, to the point that it will
starve the engine of adequate pressure and volume. This can
create drivability problems. In addition, a clogged strainer makes
the fuel pump work harder to pull fuel through it, and can starve
the pump of fuel that it needs for lubrication and cooling. All of
these factors can lead to premature pump failure.
Page Number - 17
A clogged inlet strainer can starve the fuel pump of fuel, causing
it to cavitate. Cavitation will create rapid changes in fuel density,
causing the float in the FST flowmeter to bounce up and down.
It can also cause the needle on the pressure gauge to bounce.
In addition, as the pump tries to pull gas through the clogged
strainer, it creates a pressure drop that may cause air bubbles to
form and become visible.
high. This causes the regulator to pass more fuel back to the
tank, lowering fuel pressure in the rail. When the throttle is
opened, manifold pressure drops. This causes the regulator
to close, allowing less fuel flow back to the tank, so fuel rail
pressure increases. Vacuum modulation ensures the injectors
are receiving the proper fuel pressure for peak engine
performance, depending on the engine’s requirements.
Always inspect the inlet strainer whenever a fuel pump is being
serviced. If it is rusty, brown, or dark colored, proper action must
be taken to clean and service the tank. Never reuse old filters or
strainers, especially when installing a new fuel pump.
Fuel Filter
Atmospheric modulated pressure regulators modify fuel
pressure with changes in atmospheric pressure. This allows
fuel systems to compensate for changes in altitude.
Atmospheric modulated fuel systems rely more on the ECM to
control fuel injection performance using other feedbacks such
as the O2 sensor, and controlling fuel injector duty cycle.
Fuel filters ensure that the fuel sent to the injectors is clean.
They are installed in the fuel supply line, such that fuel flows
from the tank, through the filter on its way to the fuel rail. Filters
are typically mounted under the car along the frame, or in the
engine bay where they are relatively accessible for periodic
replacement.
Mechanically regulated returnless fuel delivery systems use a
constant pressure regulator located in the fuel tank, as part of
the fuel pump module. It maintains constant pressure due to
a fixed spring rate. Fuel pressures in returnless systems are
typically higher than return systems, to compensate for the lack
of modulation.
A clean filter should have little or no affect on the pressure or
flow of fuel. A clogged filter becomes a restriction to flow. As
blockage in the filter increases, flow decreases. Depending on
the type of fuel delivery system and the level of restriction, a
clogged fuel filter will cause pressure to increase between the
pump and the filter, and/or decrease between the filter and the
fuel rail. Because fuel systems are designed to deliver a greater
volume and pressure than the engine will require, small
blockages may not be noticeable. However, as the restriction
increases, it will cause the engine to under-perform and/or stall
or hesitate under load. In addition, it causes the fuel pump to
work harder, which can lead to premature failure.
When diagnosing a potential pressure regulator failure, consider
what happens in the fuel delivery system when the regulator fails
to maintain the proper fuel pressure. If the regulator sticks in the
open position, such that there is little or no restriction to flow,
fuel will flow freely through the regulator and back to the fuel
tank. Fuel system pressure may drop drastically below what
is required by the injectors. Depending on how the low the
pressure drops, the malfunction may not be noticeable when
the car is idling or running under a minimal load. But if a heavy
load condition is introduced on the engine, such as a hard
acceleration, the lack of pressure will cause the engine to
stumble and lack power.
The FST Pro can accurately diagnose a clogged fuel filter by
comparing flow and pressure levels at idle with those at
simulated load conditions.
If the sticking regulator was over-restricting the flow of fuel back
to the tank, it would cause fuel system pressure to increase
above normal. Because the fuel pump produces much greater
flow than what the engine will typically require, this malfunction
may not be evident at idle or at minimal load conditions.
However, fuel economy could drop severely as the high
pressure causes too much fuel to be injected into the engine.
Pressure Regulator
The pressure regulator is a component of mechanically regulated
fuel delivery systems. It creates and maintains the pressure
required by the fuel injectors to perform at their optimum
efficiency. While it’s the fuel pump that creates the flow of fuel,
it’s the regulator that creates the pressure by restricting the flow.
The pressure regulator uses a spring to control the amount of
restriction based on the pressure in the fuel system. When the
engine is off and there is no flow of fuel, the regulator spring
completely closes the restriction, trapping pressure in the fuel
rail. When the engine is started, the restriction causes the
pressure to increase in front of the regulator. When fuel system
pressure builds to the optimum level, it overcomes the force of
the regulator spring, and the regulator opens to allow fuel to flow
through. As the fuel requirements of the engine differ from idle,
the regulator automatically increases or decreases the restriction
to maintain the optimum pressure at the injectors.
Pressure regulators used in return type fuel systems are
mounted on the fuel rail, and are either vacuum or atmospheric
modulated. Vacuum modulated pressure regulators use manifold
vacuum to maintain a constant pressure differential across the
fuel injectors. This means that fuel rail pressure will vary
depending on manifold vacuum. At idle, manifold vacuum is
Page Number - 18
Fuel Lines
Fuel lines are manufactured from steel, rubber or plastic. They
can affect fuel delivery performance if they become clogged,
pinched, kinked, dented or ruptured. Because fuel delivery
systems keep fuel under pressure, a ruptured fuel line will be
evident by leaking fuel. Likewise, most other restrictions can
identified with a simple visual inspection.
A restricted fuel supply line due to damage or blockage will have
the same affect as a clogged inline filter. If FST Pro test results
indicate a restriction to the supply of fuel, always make a visual
inspection of the lines before performing additional diagnostics
or replacing a suspect component.
A restricted fuel return line due to damage or blockage will have
the same effect as an over-restricting pressure regulator. If FST
Pro test results indicate a restriction to the return of fuel, always
make a visual inspection of the lines before performing additional diagnostics or replacing a suspect component.
Form 824127
Setup and Installation
Determining Where to Install the FST
Inline Connection
Regardless of the type of fuel delivery system, the FST Pro is most
effective at diagnosing malfunctions when connected inline with the
flow of fuel. The initial installation should be made at an access point
along the fuel supply line, as close as possible to the fuel rail (Figs.
28, 29 and 30). At this location, the fuel pressure and flow measured
by the tester will most accurately represent the conditions within the
fuel rail. Due to some engine compartment layouts and connector
locations, it may be necessary to connect the tester directly after the
in-line fuel filter, which may be located in the engine compartment,
under the frame, or near the fuel tank. In this case, be sure to carefully
inspect the fuel supply line between the tester and fuel rail for any
irregularities such as leaks, crimps, or kinks, as these may cause a
false diagnosis based on the tester readings.
Fig. 28
Alternative Connection Locations
Connecting the FST inline as instructed above for the initial test,
ensures the most accurate fuel system diagnosis. However, in some
instances it may be beneficial to connect the tester at alternative
locations in order to more accurately pinpoint the exact cause of a
malfunction. Performing additional diagnostics at different connection
locations is detailed in the Testing and Diagnostics section of this
manual.
Selecting and Installing Adapters
The FST Pro includes adapters for connecting the tester inline with
the fuel delivery systems of a wide variety of US, European, and Asian
manufactured cars and light trucks. In most cases, making an inline
connection with the FST requires two adapters, one to connect the
fuel line from the fuel tank to the FST inlet, and the second to connect
the FST outlet to fuel line continuing on to the engine.
The FST utilizes female 3/8” SAE J2044 quick-connectors on the
ends of the inlet and outlet hoses that connect into the fuel line. This
is the same connection that is used on many newer makes and models of cars. If the vehicle being tested uses this adapter style, only one
intermediate adapter will be required. This should be evident upon
inspection of the vehicle’s connection.
Fig. 29
All of the adapters included with the FST have an identification number stamped into them for easy identification. To determine an
adapter’s size and application(s), use its number to locate it in the
Adapter Application Chart on page 6 and 7.
Most of the adapters and their connection methods are straight forward. Simply match the FST test adapter to the type of fuel line connection used on the vehicle. All adapters should thread or snap
together easily to form a leak-proof seal. Always err on the side of
caution. If the connection has to be forced, or if there is looseness in
the connection, do not attempt to pressurize the system. Contact the
Mityvac technical service department at the number on the front of
this manual if there are any questions or concerns about the connection.
Fig. 30
If you have access to the fuel system adapters manufactured by
MotorVac for their CarbonClean® fuel system cleaner, these may be
utilized with the FST Pro. Mityvac model MVA5549 MotorVac Adapter
Kit is available to make this conversion.
NOTE: In many cases it may only be possible to identify the type of
connection after the fuel line has been disconnected. However, to
Form 824127
Page Number - 19
reduce fuel spillage, whenever possible, try to select the required
adapters before disconnecting the fuel line, and have them ready to
install.
Setting-up the FST Pro
Once the installation point has been determined, follow the instructions below to setup the tester prior to disconnecting the fuel line.
1. Place the vehicle transmission in park or neutral, apply the parking
brake, and turn the key off.
2. Hang the pressure gauge under the vehicle hood or other appropriate location.
3. Connect the flowmeter to the pressure gauge using the female
push-to-connect coupler extending from the bottom of gauge,
and the male connector located on top of the flowmeter. Make
sure the quick-connect sleeve snaps forward to lock the connection.
Fig. 31
Fig. 32
NOTE: The flowmeter should hang vertically for the most accurate
fuel flow measurement.
4. Connect the 1/8" (3 mm) clear pressure relief hose to the barb
extending from the push-button pressure relief valve located just
under the gauge (Fig. 31).
Fuel Line
Connection Location
5. Place the free ends of the bypass hose and pressure relief hose
into an approved gasoline fuel container. Secure hoses in fuel
container as necessary to prevent spills.
6. Connect one end of each 3/8" inlet and outlet connection hoses
to the bottom fittings on the FST flowmeter (Fig. 32).
Installing the FST Pro
1. Be sure the vehicle transmission in park or neutral, the parking
brake is applied, and the engine is off.
2. Follow the vehicle manufacturer’s recommended procedure to
relieve the pressure from the vehicle fuel delivery system.
Fig. 33
3. Locate the fuel supply line to the engine’s fuel rail, and select the
best location to disconnect the supply line and install the FST
(Fig. 33). If uncertain of the proper connection point, see the
previous section entitled Determining Where to Install the FST.
For additional assistance, consult the vehicle manufacturer’s
service information, or refer to the Types of Fuel Delivery Systems
section earlier in this manual.
If the engine has a cover, it will most likely have to be removed to
gain appropriate access.
4. Remove or disconnect any obstacles required to gain access to
the connection, and place shop towels under and around the
connection to absorb fuel from the disconnected line.
Fig. 34
To minimize fuel spillage and reduce the amount of time the fuel
line is disconnected, try to identify the type of connection before
disconnecting the fuel line, and have the required FST connection
adapter(s) readily available (see Selecting and Installing Adapters
above). Also, identify the inlet and outlet hoses to the tester, and
keep them convenient.
5. Follow the vehicle manufacturer’s service information for the proper method to disconnect the fuel line. Special wrenches or disconnect tools may be required (Fig. 34).
WARNING: Avoid spilling fuel on hot engine parts. Clean-up any
fuel spills immediately after they occur.
Fig. 35
6. Install the appropriate adapter into the fuel supply line extending
from the tank (Fig. 35).
Page Number - 20
Form 824127
7. Connect the hose extending from the flowmeter connection
labeled “IN”, to the other end of the adapter (Fig. 36).
8. Install the second FST connection adapter to the fuel line running
to the fuel rail. If the fuel line connection used by the vehicle manufacturer is a 3/8” quick-connect style (SAE J2044), a second
adapter is not required.
9. Connect the hose extending from the flowmeter connection
labeled “OUT”, to the other end of the adapter or directly to the
fuel line running to the fuel rail, depending on the type of connection (Fig. 37).
10. Before proceeding:
Double check the connections. The tester should be installed
such that the fuel flowing from the tank to the engine enters the
FST through the port labeled “IN”, out of the tester through the
port labeled “OUT”, and on to the fuel rail.
Route and secure the clear pressure relief and bypass hoses into
an approved gasoline container
Fig. 36
Fig. 37
Route the flowmeter inlet and outlet fuel hoses away from rotating
engine components, belts, fans, and hot exhaust components
Remove the fuel spillage rags
Reconnect components such as PCV tubes, wiring harnesses,
vacuum tubes, etc., that were disconnected to gain access to the
fuel line connection.
Check the operating position of the flow control valve on the side
of the flowmeter. Ensure it is in the OPEN position pointing down
(Fig. 38).
11. Re-enable the fuel pump (if previously disabled), and cycle the
ignition switch to the ON position for a brief time, and then back
OFF. Do not start the engine.
On most vehicles, cycling the ignition ON and OFF will allow the
fuel pump to run briefly, and prime the tester. After cycling the
ignition, check all fuel connections for leaks. If all fitting connections are secure, the installation is complete and the FST Pro is
ready to be used for diagnostic tests.
Form 824127
Fig. 38
Page Number - 21
Testing and Diagnostics
Testing and diagnostic procedures vary depending on the type of fuel
delivery system. Prior to testing, the fuel delivery system must be
identified as Return, Returnless (mechanically regulated) or Returnless
(electronically regulated). For detailed information on fuel delivery systems and how to identify them, refer to the section entitled Types of
Fuel Delivery Systems, earlier in this manual. If the fuel system is a
return or mechanically regulated returnless system, it must also be
determined if the fuel pump has multiple speeds. For more information on types of fuel pumps refer to Fuel System Components/Fuel
Pump in this manual.
Return Fuel Delivery Systems
At this point, it is assumed that the FST has been properly installed
inline with the fuel delivery system as recommended, and that it has
been primed to ensure no leaks are present (see Setup and
Installation). The following procedure will ensure the most effective
diagnostic use of the FST:
Fig. 39
Test Procedure
Operational Test
1. Check the operating position of the flow control valve on the side
of the flowmeter to ensure the knob is in the OPEN position pointing down (Fig. 39). This will allow normal fuel system operation.
2. Start the car and allow it to idle.
Cranking or starting the engine should activate the ECM’s electric
fuel pump controls to turn on and run the fuel pump. If the fuel
pump does not operate, refer to the vehicle service information for
electrical diagnosis and repair of the fuel pump and associated
controls.
After connecting the FST, it is normal to have air trapped in the
fuel lines and flowmeter. Cycling the ignition switch (or cranking
the engine briefly) with the flow control valve in the BYPASS position can help purge air from the system. Once fuel fills the
flowmeter and flows through the bypass hose, return the valve to
the OPEN position. The bypass hose must be routed and secured
into an approved fuel container before operating the flow control
valve in BYPASS mode.
Fig. 40
To perform an accurate diagnosis using the FST, the car must be
running in order to provide the correct operating voltage to the
fuel pump. Testing the fuel system by activating the fuel pump
using a scan tool will cause the fuel pump to severely under-perform.
3. If the vehicle utilizes a multiple speed fuel pump, use a scanner or
manufacturer’s recommended procedure to operate the pump at
the highest speed.
4. Note the fuel system pressure indicated on the pressure gauge,
and compare it with the vehicle manufacturer’s specification (Fig.
40).
Typical electronic fuel injection system pressures range from 30 to
60 PSI (205 to 410 kpa) depending on the vehicle being tested.
Always use the recommended vehicle service information, procedures, and pressure specifications for the specific vehicle being
tested.
Read top
of float
Fig. 41
5. Note the volume of fuel passing through the flowmeter by reading
across the top of the float and comparing it to the corresponding
value on the scale printed on the faceplate (Fig. 41).
Page Number - 22
Form 824127
At idle, the volume of fuel flowing through the tester should remain
steady between 0.3 and 0.6 gallons per minute (GPM) or 1.1 and
2.2 liters per minute (LPM).
6. Noting the values for pressure and volume, if either is out of
range, these are indications of a problem with one or more components of the fuel system. However, performing the Pressure and
Flow Demand Tests below, is required to reach a more accurate
diagnosis, and to pinpoint the cause of a malfunction.
Pressure Demand (Dead-head) Test
7. With the car idling, rotate the flow control valve on the side of the
flowmeter towards the 90° CLOSED position (Fig. 42).
Rotating the valve to CLOSED creates a restriction to the flow of
fuel through the tester. Watch the pressure gauge, as the valve is
rotated, the pressure should increase. Note the pressure when the
valve is fully closed. A good fuel pump should be capable of producing pressure 50% to 100% higher than the rating of the fuel
system.
Fig. 42
Caution: Never rotate the valve to the closed position for longer
than a brief instant. This is referred to as “dead-heading” the
pump, and can cause serious damage to the fuel system or
pump.
8. After noting the peak pressure, rotate the flow control valve back
to the OPEN position, and proceed to the flow demand test.
Flow Demand Test
9. With the car idling, rotate the flow control valve past the CLOSED
position to the BYPASS position pointing up (Fig. 43).
With the valve in the BYPASS position, the flow of fuel is routed
through the bypass port located above the valve, through the
bypass hose, and into the reservoir. All restriction to the flow of
fuel is removed. This allows the pump to output its maximum flow,
the value of which can be read on the flowmeter. The free flow
output of a typical fuel pump is between .7 and 1.0 GPM (2.5 and
4 LPM).
Note: Turning the valve to the full BYPASS position will prevent
fuel from flowing to the engine. If left in the BYPASS position for
too long, the engine will stall. If this happens, simply return the
valve to the OPEN position and restart the vehicle.
Fig. 43
10. After noting the peak flow, return the flow control valve to the
OPEN position. Testing is complete.
Diagnosing the Results
The values for four critical fuel system performance indicators should
have been noted while following the procedures and performing the
tests outlined above:
•
•
•
•
Idle Pressure
Idle Flow
Peak (Dead-head) Pressure
Peak (Bypass) Flow
These indicators are the key to properly diagnosing a malfunctioning
fuel delivery system, and pinpointing the cause. In addition to these
values, note the vehicle’s engine size and maximum engine speed
(RPM). Refer to the Maximum Engine Fuel Volume Requirements
table (Appendix A), and use the size and speed values to determine
the maximum fuel volume requirement of the engine.
Refer to the Return Fuel System Diagnostic Guide (Appendix B). If
according to the chart, the FST test values indicate a normal operating fuel delivery system, then the engine is receiving the proper pressure and flow of fuel, even under maximum load conditions. If the
FST indicates a normal operating fuel delivery system, yet the vehicle
Form 824127
Page Number - 23
continues to experience symptoms of a fuel delivery malfunction, it
could be caused by contaminated fuel, faulty fuel injector(s), or an
intermittent component malfunction such as a sticking pressure regulator or loose electrical connection. Follow the vehicle manufacturer’s
recommended procedures for the inspection and repair of these components.
If the FST test results indicate a fuel delivery system malfunction, and
the diagnostic chart clearly pinpoints the cause, follow the vehicle
manufacturer’s repair procedures to correct the malfunction. After
performing the repairs, re-test the fuel delivery system with the FST to
ensure it is operating normally.
If the FST test results are inconclusive as to whether there is a fuel
delivery system malfunction, or if a malfunction is evident but the
diagnostic chart does not clearly indicate the cause, additional testing
may be performed to provide more insight into the performance of the
system. Extended test procedures are outlined below, and provide a
more in-depth understanding of how the components of the fuel system affect its performance.
Additional Testing and Diagnostics
Zone 2 – Blue
To perform more in-depth diagnostics, consider the fuel delivery system split into three zones as shown in figure 44. The initial test procedures outlined above are performed in Zone 2 because the fuel pressure and flow within this zone, most accurately represent the conditions present in the fuel rail. Depending on the suspected component
malfunction, connecting the FST in either Zone 1 or Zone 3 and comparing the test results to those in Zone 2 can help pinpoint a malfunction.
Zone 1– Red
Zone 3 - Yellow
Blocked Inline Fuel Filter
If the inline filter is clean, pressure and flow in Zones 1 and 2 should
be equal. A clogged filter will cause the pressure to increase in Zone 1
and the flow to decrease in Zone 2.
If the results of testing in Zone 2 indicate a blocked fuel filter, but are
not entirely conclusive, retest the fuel system with the FST connected
in Zone 1, preferably at the inlet of the fuel filter. If the idle pressure
and the peak flow in Zone 1 are higher than Zone 2, replace the inline
fuel filter and retest.
Fig. 44
If the idle pressure and peak flow in Zone 1 remain the same as Zone
2, this would indicate a clogged inlet strainer/sock.
Clogged Inlet Strainer/Sock
The test results for pressure and flow of a clogged inlet strainer will
closely match those of a clogged inline filter. The peak pressure of a
clogged inlet strainer will be slightly lower than the peak pressure of a
clogged inline filter, and the current draw will also be lower.
A clogged inlet strainer can cause the fuel pump to cavitate because
it is starved for fuel. Cavitation will create rapid changes in fuel density, causing the float in the FST flowmeter to bounce up and down. It
can also cause the needle on the pressure gauge to bounce. Also, as
the pump tries to pull gas through the clogged strainer, it creates a
pressure drop that may cause air bubbles to form and become visible.
These indications of a clogged inlet strainer may or may not be evident during testing. If the results are inconclusive, retest the fuel system with the FST connected in Zone 1, preferably at the inlet of the
fuel filter.
If the idle pressure and peak flow in Zone 1 remain the same as Zone
2, this would indicate a clogged inlet strainer/sock. Replace the
strainer or the pump module, and retest.
Page Number - 24
Form 824127
Under-restricting Fuel Pressure Regulator
An under-restricting pressure regulator will cause the idle pressure in
Zones 1 and 2 to drop below spec, and the idle flow to be higher than
normal. If this is what the FST is indicating, and the peak pressure
and flow are normal, then the cause is most certainly the pressure
regulator.
If the fuel pressure regulator is vacuum modulated (see Fuel System
Components/Pressure Regulator), it is possible to check if it is sticking by disconnecting the vacuum line. If the regulator is functioning
properly, disconnecting the vacuum line should cause the fuel pressure to increase.
Over-restricting Fuel Pressure Regulator
If Zone 2 testing indicates idle pressure is high and flow is low, yet
peak pressure and flow are normal, this is a clear indication of an
over-restriction in Zone 3. Over-restriction can be caused by a malfunctioning fuel pressure regulator or blockage in the return fuel line.
Perform a careful visual inspection of the fuel return line to ensure it’s
not crushed, dented or kinked. If damage or restriction is noted, repair
the line and retest.
Inspect the fuel pressure regulator for physical damage. Also look for
dampness that could indicate a ruptured diaphragm that is leaking
fuel. Replace and retest if necessary.
If the pressure regulator is vacuum modulated, use a vacuum gauge
to verify the vacuum reading at the regulator. A below normal vacuum
reading would cause the regulator to over-restrict the flow. Follow the
vehicle manufacturer’s procedure for locating and repairing the cause
of the vacuum loss, and retest.
If vacuum is normal, connect the FST in Zone 3, preferably right after
the pressure regulator. Test the fuel system at this point, and compare
the results to Zone 2. The pressure in Zone 3 should be very low. If it
remains high, there is a restriction in the fuel return line. If the pressure
drops off to near zero, then replace the fuel pressure regulator.
Fuel Pump Malfunction
A malfunction at the fuel pump is typically indicated by a reduction in
both pressure and flow. At idle, the regulator may be able to maintain
pressure in Zones 1 and 2, but doing so will severely reduce the flow.
Performing pressure and flow demand tests should clearly indicate a
pump problem.
If the FST indicates a pump is under performing, be sure to verify that
the vehicle does not use a multiple speed pump (see Fuel System
Components/Fuel Pump). To properly test a fuel system with a multiple speed pump, a scanner must be used to operate the pump at
high speed while the vehicle idles.
NOTE: Insufficient pressure and flow are an indication that a fuel
pump is under-performing, but do not necessarily mean that it is failing. Low voltage or a bad connection or ground will cause a pump to
under-perform, producing the same test results as if the pump were
bad. Before replacing any fuel pump based on the FST test results,
always follow the vehicle manufacturer’s recommended procedure for
testing all electrical connections and the electrical system charge. A
minor issue such as a loose ground can cause many problems that
resemble more serious malfunctions.
Form 824127
Page Number - 25
Returnless Fuel Delivery Systems
(Mechanically Regulated)
At this point, it is assumed that the FST has been properly installed
inline with the fuel delivery system as recommended, and that it has
been primed to ensure no leaks are present (See FST Pro Setup and
Installation). The following procedure will ensure the most effective
diagnostic use of the FST:
Test Procedure
Operational Test
1. Check the operating position of the flow control valve on the side
of the flowmeter to ensure the knob is in the OPEN position pointing down (Fig. 45). This will allow normal fuel system operation.
2. Start the car and allow it to idle.
Cranking or starting the engine should activate the ECM’s electric
fuel pump controls to turn on and run the fuel pump. If the fuel
pump does not operate, refer to the vehicle service information for
electrical diagnosis and repair of the fuel pump and associated
controls.
Fig. 45
After connecting the FST, it is normal to have air trapped in the
fuel lines and flowmeter. Cycling the ignition switch (or cranking
the engine briefly) with the flow control valve in the BYPASS position can help purge air from the system. Once fuel fills the
flowmeter and flows through the bypass hose, return the valve to
the OPEN position. The bypass hose must be routed and secured
into an approved fuel container before operating the flow control
valve in BYPASS mode.
To perform an accurate diagnosis using the FST, the car must be
running in order to provide the correct operating voltage to the
fuel pump. Testing the fuel system by activating the fuel pump
using a scan tool, will cause the fuel pump to severely under-perform.
3. If the vehicle utilizes a multiple speed fuel pump, use a scanner or
manufacturer’s recommended procedure to operate the pump at
the highest speed.
Fig. 46
4. Note the fuel system pressure indicated on the pressure gauge,
and compare it with the vehicle manufacturer’s specification (Fig.
46). If it is out of spec, this is an indication of a problem with one
or more components of the fuel system. However, performing a
Flow Demand Test and Capability Test as outlined below, are
required to reach an accurate diagnosis of the fuel system, and to
pinpoint the cause of the malfunction.
NOTE: The flow of fuel passing through the tester represents only
what the engine is using at idle. It will be negligible and most likely
not even register on the flowmeter.
Flow Demand Test
5. With the car idling, rotate the flow control valve past the CLOSED
position to the BYPASS position pointing up (Fig. 47).
With the valve in the BYPASS position, the flow of fuel is routed
through the bypass port located above the valve, through the
bypass hose, and into the reservoir. All restriction to the flow of
fuel is removed. This allows the pump to output its maximum flow,
the value of which can be read on the flowmeter. The free flow
output of a typical fuel pump is between .7 and 1.0 GPM (2.5 and
4 LPM).
Fig. 47
NOTE: Turning the valve to the CLOSED or BYPASS position will
prevent fuel from flowing to the engine. If left in either of these
positions for too long, the engine will stall. If this happens, simply
return the valve to the OPEN position and restart the vehicle.
6. After noting the peak flow, return the flow control valve to the
Page Number - 26
Form 824127
OPEN position.
Peak Demand Test
7. Note the vehicle’s engine size and maximum engine speed (RPM).
Refer to the Maximum Engine Fuel Volume Requirements table
(Appendix A), and use the size and speed values to determine the
maximum fuel volume requirement of the engine.
8. With the car idling, rotate the flow control valve past the 90°
CLOSED position towards BYPASS (Fig. 48). Adjust the valve until
the flowmeter indicates an amount of fuel flow equivalent to the
value for the maximum engine fuel volume taken from the table
(Fig. 49).
9. Note the pressure reading on the gauge.
10. After noting the capability pressure, return the flow control valve to
the OPEN position. Testing is complete.
Diagnosing the Results
The values for three critical fuel system performance indicators should
have been noted while following the procedures and performing the
tests outlined above:
•
•
•
Fig. 48
Idle Pressure
Peak (Bypass) Flow
Peak Demand Pressure
These indicators are the key to properly diagnosing a malfunctioning
fuel delivery system, and pinpointing the cause.
Compare the three values to the Returnless (mechanically regulated)
Fuel System Diagnostics Chart (Appendix C). If according to the
chart, the FST test values indicate a normal operating fuel delivery
system, then the engine is receiving the proper pressure and flow of
fuel, even under maximum load conditions. If the FST indicates a normal operating fuel delivery system, yet the vehicle continues to experience symptoms of a fuel delivery malfunction, it could be caused by
contaminated fuel, faulty fuel injector(s), or an intermittent component
malfunction such as a sticking pressure regulator or loose electrical
connection.
Maximum fuel
volume
requirement
(Appendix A)
Fig. 49
If the FST test results are inconclusive as to whether there is a fuel
delivery system malfunction, or if a malfunction is evident but the
diagnostic chart does not clearly indicate the cause, additional testing
may be performed to provide more insight into the performance of the
system. Extended test procedures are outlined below, and provide a
more in-depth understanding of how the components of the fuel system affect its performance.
Additional Testing and Diagnostics
Blocked Inline Fuel Filter
Not all mechanically regulated returnless fuel systems utilize an externally mounted fuel filter (see Types of Fuel Delivery
Systems/Mechanically Regulated). If the vehicle has an accessible
fuel filter, and initial test results indicate it may be partially blocked,
retest the fuel system with the FST connected at the inlet of the fuel
filter. If the peak flow and peak demand pressure are higher then in
the initial test, replace the fuel filter and retest. If the peak flow and
peak demand pressure remain the same, this would indicate a
clogged inlet strainer/sock.
Clogged Inlet Strainer/Sock
The test results for pressure and flow of a clogged inlet strainer will
closely match those of a clogged inline filter. The peak demand pressure of a clogged inlet strainer will be slightly lower than that of a
clogged inline filter, and the current draw will also be lower.
Form 824127
Page Number - 27
A clogged inlet strainer can cause the fuel pump to cavitate because
it is starved for fuel. Cavitation will create rapid changes in fuel density, causing the float in the FST flowmeter to bounce up and down
during the peak flow and/or capability test. It can also cause the needle on the pressure gauge to bounce. In addition, as the pump tries to
pull gas through the clogged strainer, it creates a pressure drop that
may cause air bubbles to form and become visible.
These indications of a clogged inlet strainer may or may not be evident during testing. If the results are inconclusive, and the fuel system
has an accessible inline filter, follow the procedure above to rule out a
clogged filter. If it is determined that the inline filter is not the problem,
replace the strainer or the pump module, and retest.
Over- or Under-restricting Pressure Regulator
Because mechanically regulated returnless fuel systems incorporate
the pressure regulator into the fuel pump module, it is not possible to
perform additional on-car testing to determine if the pressure regulator is malfunctioning. If the pressure regulator and/or fuel pump is
replaceable within the module, the FST test results may be beneficial
in determining how to approach a repair.
Fuel Pump Malfunction
A malfunction at the fuel pump is typically indicated by a reduction in
both pressure and flow. At idle, the regulator may be able to maintain
pressure in the system, but the pressure will drop as soon as the
engine requires a greater volume of fuel. Performing flow demand and
capability tests should clearly indicate a pump problem.
If the FST indicates a pump is under performing, be sure to verify that
the vehicle does not use a multiple speed pump (see Fuel System
Components/Fuel Pumps). To properly test a fuel system with a multiple speed pump, a scanner must be used to operate the pump at
high speed while the vehicle idles.
NOTE: Insufficient pressure and flow are an indication that a fuel
pump is under-performing, but do not necessarily mean that it is failing. Low voltage or a bad connection or ground will cause a pump to
under-perform, producing the same test results as if the pump were
bad. Before replacing any fuel pump based on the FST test results,
always follow the vehicle manufacturer’s recommended procedure for
testing all electrical connections and the electrical system charge. A
minor issue such as a loose ground can cause many problems that
resemble more serious malfunctions.
Returnless Fuel Delivery Systems
(Electronically Regulated)
At this point, it is assumed that the FST has been properly installed
inline with the fuel delivery system as recommended, and that it has
been primed to ensure no leaks are present (see FST Pro Setup and
Installation). The following procedure will ensure the most effective
diagnostic use of the FST:
Operational Test
1. Check the operating position of the flow control valve on the side
of the flowmeter to ensure the knob is in the OPEN position pointing down (Fig. 50). This will allow normal fuel system operation.
2. Start the car and allow it to idle.
Cranking or starting the engine should activate the ECM’s electric
fuel pump controls to turn on and run the fuel pump. If the fuel
pump does not operate, refer to the vehicle service information for
electrical diagnosis and repair of the fuel pump and associated
controls.
Fig. 50
Page Number - 28
Form 824127
After connecting the FST, it is normal to have air trapped in the
fuel lines and flowmeter. Cycling the ignition switch (or cranking
the engine briefly) with the flow control valve in the BYPASS position can help purge air from the system. Once fuel fills the
flowmeter and flows through the bypass hose, return the valve to
the OPEN position. The bypass hose must be routed and secured
into an approved fuel container before operating the flow control
valve in BYPASS mode.
To perform an accurate diagnosis using the FST, the car must be
running in order to provide the correct operating voltage to the
fuel pump. Testing the fuel system by activating the fuel pump
using a scan tool will cause the fuel pump to severely under-perform.
3. Note the fuel system pressure indicated on the pressure gauge,
and compare it with the vehicle manufacturer’s specification
(Fig. 51).
Typical electronic fuel injection system pressures range from 30 to
60 PSI (205 to 410 kpa) depending on the vehicle being tested.
Always use the recommended vehicle service information, procedures, and pressure specifications for the specific vehicle being
tested.
Fig. 51
NOTE: The flow of fuel passing through the tester represents only
what the engine is using at idle. It will be negligible and most likely
not even register on the flowmeter.
Pressure Demand (Dead-head) Test
4. With the car idling, rotate the flow control valve on the side of the
flowmeter towards the 90° CLOSED position (Fig. 52).
Rotating the valve to CLOSED creates a restriction to the flow of
fuel through the tester. Watch the pressure gauge, as the valve is
rotated, the pressure should increase. Note the pressure when the
valve is fully closed. A good fuel pump should be capable of producing pressure 50% to 100% higher than the rating of the fuel
system.
Caution: Never rotate the valve to the closed position for longer
than a brief instant. This is referred to as “dead-heading” the
pump, and can cause serious damage to the fuel system or
pump.
Fig. 52
5. After noting the peak pressure, rotate the flow control valve back
to the OPEN position, and proceed to the flow demand test.
Flow Demand Test
6. With the car idling, rotate the flow control valve past the CLOSED
position to the BYPASS position pointing up (Fig. 53).
With the valve in the BYPASS position, the flow of fuel is routed
through the bypass port located above the valve, through the
bypass hose, and into the reservoir. All restriction to the flow of
fuel is removed. This allows the pump to output its maximum flow,
the value of which can be read on the flowmeter. The free flow
output of a typical fuel pump is between .7 and 1.0 GPM (2.5 and
4 LPM).
NOTE: Turning the valve to the full BYPASS position will prevent
fuel from flowing to the engine. If left in the BYPASS position for
too long, the engine will stall. If this happens, simply return the
valve to the OPEN position and restart the vehicle.
7. After noting the peak pressure, return the flow control valve to the
OPEN position, and proceed to the capability test.
Fig. 53
Peak Demand Test
8. Note the vehicle’s engine size and maximum engine speed (RPM).
Refer to the Maximum Engine Fuel Volume Requirements table
(Appendix A), and use the size and speed values to determine the
maximum fuel volume requirement of the engine.
Form 824127
Page Number - 29
9. With the car idling, rotate the flow control valve past the 90°
CLOSED position towards BYPASS (Fig. 54). Adjust the valve until
the flowmeter indicates an amount of fuel flow equivalent to the
value for the maximum engine fuel volume taken from the table
(Fig. 55).
10. Note the pressure reading on the gauge.
11. After noting the capability pressure, return the flow control valve to
the OPEN position. Testing is complete.
Diagnosing the Results
The values for four critical fuel system performance indicators should
have been noted while following the procedures and performing the
tests outlined above:
•
•
•
•
Idle Pressure
Peak Demand Pressure
Peak (Dead-head) Pressure
Peak (Bypass) Flow
Fig. 54
These indicators are the key to properly diagnosing a malfunctioning
fuel delivery system, and pinpointing the cause.
Compare the four values to the Returnless (electronically regulated)
Fuel System Diagnostic Chart (Appendix D). If according to the chart,
the FST test values indicate a normal operating fuel delivery system,
then the engine is receiving the proper pressure and flow of fuel, even
under maximum load conditions. If the FST indicates a normal operating fuel delivery system, yet the vehicle continues to experience
symptoms of a fuel delivery malfunction, it could be caused by contaminated fuel, faulty fuel injector(s) or electronic control system, or an
intermittent component malfunction such as a loose electrical connection.
If the FST test results indicate a fuel delivery system malfunction, and
the diagnostic chart clearly pinpoints the cause, follow the vehicle
manufacturer’s repair procedures to correct the malfunction. After
performing the repairs, re-test the fuel delivery system with the FST to
ensure it is operating normally.
Maximum fuel
volume
requirement
(Appendix A)
Fig. 55
If the FST test results are inconclusive as to whether there is a fuel
delivery system malfunction, or if a malfunction is evident but the
diagnostic chart does not clearly indicate the cause, additional testing
may be performed to provide more insight into the performance of the
system. Extended test procedures are outlined below, and provide a
more in-depth understanding of how the components of the fuel system affect its performance.
Additional Testing and Diagnostics
Blocked Inline Fuel Filter
If the vehicle has an accessible fuel filter, and initial test results indicate it may be partially blocked, retest the fuel system with the FST
connected between the fuel tank and the filter, preferably at the filter
inlet. If the peak flow and peak demand pressure are higher then in
the initial test, replace the fuel filter and retest. If the peak flow and
peak demand pressure remain the same, this would indicate a
clogged inlet strainer/sock.
Clogged Inlet Strainer/Sock
The test results for pressure and flow of a clogged inlet strainer will
closely match those of a clogged inline filter. The peak demand pressure of a clogged inlet strainer will be slightly lower than that of a
clogged inline filter, and the current draw will also be lower.
A clogged inlet strainer can cause the fuel pump to cavitate because
it is starved for fuel. Cavitation will create rapid changes in fuel densiPage Number - 30
Form 824127
ty, causing the float in the FST flowmeter to bounce up and down
during the peak flow and/or capability test. It can also cause the needle on the pressure gauge to bounce. In addition, as the pump tries to
pull gas through the clogged strainer, it creates a pressure drop that
may cause air bubbles to form and become visible.
These indications of a clogged inlet strainer may or may not be evident during testing. If the results are inconclusive, and the fuel system
has an accessible inline filter, follow the procedure above to rule out a
clogged filter. If it is determined that the inline filter is not the problem,
replace the strainer or the pump module, and retest.
Fuel Pump/Electronic Control Failure
If testing with the FST indicates the engine is not receiving the proper
fuel pressure and volume, and a clogged inline filter or fuel line are
determined not to be the cause, then a failure of the electronic control
system or the fuel pump is the most likely cause. Follow the vehicle
manufacturer’s recommended procedure for troubleshooting these
components to determine the malfunction. Once repairs are complete, retest the system for proper fuel delivery system performance.
Fuel Visualization
Visualizing the fuel as it passes through the flowmeter can provide
hints of fuel system problems or fuel contamination. A rapid drop in
pressure possibly caused by a clogged inlet strainer can cause the
fuel to boil, even at normal temperatures. Air released by the fuel
forms bubbles that are visible as they pass through the flowmeter. Air
bubbles can also be caused by a bad swirl pot or leaking fuel pickup
line in the tank, which allow air to be sucked into the fuel pump.
Performing flow demand tests can sometimes cause air to form in the
fuel lines, but air bubbles should never be present once the FST is
connected, air is bled off, and fuel is flowing normally to the engine.
Fuel contaminated with water may appear discolored or cloudy. Rust
or scale will typically be filtered out before reaching the tester, but
additives can cause discoloration. Don’t be fooled by gas that
appears normal. Many chemical impurities are not visible, but can
cause the engine to run poorly.
Pressure Leakdown Test
To facilitate hot starts, modern fuel delivery systems should maintain
some pressure for several hours after the engine is turned off. Once
the fuel pump is no longer operating, the pressure is trapped in the
fuel system by a check valve in the fuel pump, and closing of the
pressure regulator and fuel injectors.
With the FST connected inline, before the fuel rail, turn off the engine
and watch the pressure gauge. If the pressure drops more than 5 psi
in 5 minutes, a leak exists somewhere in the system.
Return Fuel Systems
1. Start the engine to build pressure.
2. Turn off the engine and immediately clamp off the FST outlet hose
running from the tester to the fuel rail. This will trap the pressure
gauge between the clamp and the fuel pump.
3. If the pressure gauge indicates a leak, check the fuel supply line
from the tank to the tester. If no leaks are evident, replace the fuel
pump due to a faulty check valve.
4. Remove the clamp from the fuel line, and restart the engine to
build pressure.
Form 824127
Page Number - 31
5. Turn off the engine and immediately clamp off the FST inlet hose
running to the tester from the fuel supply line. This will trap the
pressure gauge between the clamp, the fuel rail, the pressure regulator, and the fuel return line.
6. If the pressure drops, either the injectors or the pressure regulator
is leaking.
7. With the second scissor clamp, pinch off the fuel return line
between the pressure regulator and the fuel tank.
8. If the pressure continues to drop, the cause is a leaking injector(s).
If the pressure holds steady, the cause is a leaking pressure regulator.
Returnless Fuel Systems
1. Start the engine to build pressure.
2. Turn off the engine and immediately clamp off the FST outlet hose
running from the tester to the fuel rail. This will trap the pressure
gauge between the clamp and the fuel pump module.
3. If the pressure gauge indicates a leak, check the fuel supply line
from the tank to the tester. If no leaks are evident, replace the fuel
pump module due to a faulty pump check valve or leaking regulator.
4. Remove the clamp from the fuel line, and restart the engine to
build pressure.
5. Turn off the engine and immediately clamp off the FST inlet hose
running to the tester from the fuel supply line. This will trap the
pressure gauge between the clamp and the fuel rail.
6. If the pressure drops, the cause is a leaking injector(s).
Disconnecting the FST
The FST Pro contains features and components to safely disconnect
with a minimal release of fuel. Follow the procedures below and
always observe the safety precautions listed in the front of this manual. Carefully read the warning below concerning disconnecting from a
hot returnless fuel system.
Fig. 56
1. When vehicle testing is completed, turn off engine and relieve
pressure on the fuel system by pressing the pressure relief valve
located on the stem of the pressure gauge (Fig. 56). Watch the
pressure gauge readings and fuel being released through the
small clear hose to the collecting container.
2. The flow control valve must remain in the OPEN position during
pressure relief. When fuel pressure is not shown on the gauge,
and fuel stops flowing through the relief hose, proceed to step 3.
3. Place shop towels under the connections to capture any fuel that
may spill out when the hoses are disconnected.
4. Using the two scissor hose clamps supplied in the FST Pro kit,
clamp both of the connecting hoses near the end where they connect to the vehicles fuel system (Fig. 57). Lock them securely to
prevent fuel from leaking out of the tester when the hoses are disconnected.
WARNING: After testing a returnless fuel system, use extreme
caution when disconnecting the outlet hose connecting the FST
to the fuel rail. If the engine is hot, releasing the pressure from a
returnless fuel system will cause the fuel to boil in the fuel rail.
Even though the pressure has been released, the boiling fuel will
cause it to build up again once the hose is clamped. To reduce
the risk of fuel spray it is best to allow the engine to cool before
disconnecting the hose. Otherwise, use the FST pressure relief
valve to relieve the pressure just before clamping the hose. Once
Page Number - 32
Fig. 57
Form 824127
the hose is clamped, quickly disconnect the hose from the fuel
system before the pressure has time to build. Try to keep a shop
towel wrapped around the connection to catch any fuel spray.
4. Rotate the flow control valve to the CLOSED position to help prevent fuel leakage.
5. With the scissor clamps locked in place on the connecting hoses,
disconnect the FST adapters and fitting connectors from the vehicle’s fuel system (Fig. 58).
6. Reconnect the vehicle fuel lines and check for possible fuel connection leaks before starting the engine (Fig. 59). Cycling the ignition ON and OFF without starting the engine, will run the fuel
pump briefly to prime the fuel system on most vehicles. Always
check fuel line connections to ensure they are securely fastened
and do not leak.
7. Place the disconnected ends of the connection hoses into an
approved fuel container with the bypass and pressure relief hoses.
Drain fuel from the FST flowmeter, gauge and hoses by releasing
the scissor clamps. Rotate the flow control valve and press the
pressure relief valve as necessary to ensure all fuel is drained from
the tester.
Fig. 58
8. Use the plastic hose plugs supplied in the FST kit, to temporarily
cap the open ends of the flowmeter connecting hoses (Fig. 60).
9. If testing is complete, disassemble and store all components of
the FST Pro in the original case.
Fig. 59
Fig. 60
Form 824127
Page Number - 33
Appendix A
Maximum Engine Fuel Volume Requirements (Gallons/Minute)
liters
Engine Size
CID
3000
4000
Engine Speed (RPM)
5000
6000
7000
8000
1.0
61
0.05
0.06
0.07
0.09
0.10
0.12
1.2
73
0.06
0.07
0.09
0.11
0.12
0.14
1.4
85
0.06
0.08
0.10
0.12
0.15
0.17
1.6
98
0.07
0.10
0.12
0.14
0.17
0.19
1.8
110
0.08
0.11
0.13
0.16
0.19
0.21
2.0
122
0.09
0.12
0.15
0.18
0.21
0.24
2.2
134
0.10
0.13
0.16
0.20
0.23
0.26
2.4
146
0.11
0.14
0.18
0.21
0.25
0.29
2.6
159
0.12
0.15
0.19
0.23
0.27
0.31
2.8
171
0.12
0.17
0.21
0.25
0.29
0.33
3.0
183
0.13
0.18
0.22
0.27
0.31
0.36
3.2
195
0.14
0.19
0.24
0.29
0.33
0.38
3.4
207
0.15
0.20
0.25
0.30
0.35
0.40
3.6
220
0.16
0.21
0.26
0.31
0.36
0.42
3.8
232
0.17
0.23
0.28
0.34
0.40
0.45
4.0
244
0.18
0.24
0.30
0.36
0.42
0.48
4.2
256
0.19
0.25
0.31
0.37
0.44
0.50
4.4
268
0.20
0.26
0.33
0.39
0.46
0.52
4.6
281
0.20
0.27
0.34
0.41
0.48
0.55
4.8
293
0.21
0.29
0.36
0.43
0.50
0.57
5.0
305
0.22
0.30
0.37
0.45
0.52
0.59
5.2
317
0.23
0.31
0.39
0.46
0.54
0.62
5.4
330
0.24
0.32
0.40
0.48
0.56
0.64
5.6
342
0.25
0.33
0.42
0.50
0.58
0.66
5.8
354
0.26
0.35
0.43
0.52
0.60
0.69
6.0
366
0.27
0.36
0.45
0.53
0.62
0.71
6.2
378
0.28
0.37
0.46
0.55
0.64
0.71
6.4
391
0.29
0.38
0.48
0.57
0.66
0.76
6.6
403
0.29
0.39
0.49
0.59
0.69
0.78
6.8
415
0.30
0.40
0.50
0.61
0.71
0.81
7.0
427
0.31
0.42
0.52
0.62
0.73
0.83
7.2
439
0.32
0.43
0.53
0.64
0.75
0.85
7.4
452
0.33
0.44
0.55
0.66
0.77
0.88
7.6
464
0.34
0.45
0.56
0.68
0.79
0.90
7.8
476
0.35
0.46
0.58
0.70
0.81
0.93
8.0
488
0.36
0.48
0.59
0.71
0.83
0.95
8.2
500
0.36
0.49
0.61
0.73
0.85
0.97
8.4
513
0.37
0.50
0.62
0.75
0.87
1.00
Values for maximum engine fuel volume requirements are calculated based on 100% engine efficiency. Many factors can affect engine
performance, such that no engine may perform at 100% efficiency. These values are to serve as reference only.
Page Number - 34
Form 824127
Appendix A
Maximum Engine Fuel Volume Requirements (Liters/Minute)
liters
Engine Size
CID
3000
4000
Engine Speed (RPM)
5000
6000
7000
8000
1.0
61
0.19
0.23
0.26
0.34
0.38
0.45
1.2
73
0.23
0.26
0.34
0.42
0.45
0.53
1.4
85
0.23
0.30
0.38
0.45
0.57
0.64
1.6
98
0.26
0.38
0.45
0.53
0.64
0.72
1.8
110
0.30
0.42
0.49
0.61
0.72
0.79
2.0
122
0.34
0.45
0.57
0.68
0.79
0.91
2.2
134
0.38
0.49
0.61
0.76
0.87
0.98
2.4
146
0.42
0.53
0.68
0.79
0.95
1.10
2.6
159
0.45
0.57
0.72
0.87
1.02
1.17
2.8
171
0.45
0.64
0.79
0.95
1.10
1.25
3.0
183
0.49
0.68
0.83
1.02
1.17
1.36
3.2
195
0.53
0.72
0.91
1.10
1.25
1.44
3.4
207
0.57
0.76
0.95
1.14
1.32
1.51
3.6
220
0.61
0.79
0.98
1.17
1.36
1.59
3.8
232
0.64
0.87
1.06
1.29
1.51
1.70
4.0
244
0.68
0.91
1.14
1.36
1.59
1.82
4.2
256
0.72
0.95
1.17
1.40
1.67
1.89
4.4
268
0.76
0.98
1.25
1.48
1.74
1.97
4.6
281
0.76
1.02
1.29
1.55
1.82
2.08
4.8
293
0.79
1.10
1.36
1.63
1.89
2.16
5.0
305
0.83
1.14
1.40
1.70
1.97
2.23
5.2
317
0.87
1.17
1.48
1.74
2.04
2.35
5.4
330
0.91
1.21
1.51
1.82
2.12
2.42
5.6
342
0.95
1.25
1.59
1.89
2.20
2.50
5.8
354
0.98
1.32
1.63
1.97
2.27
2.61
6.0
366
1.02
1.36
1.70
2.01
2.35
2.69
6.2
378
1.06
1.40
1.74
2.08
2.42
2.69
6.4
391
1.10
1.44
1.82
2.16
2.50
2.88
6.6
403
1.10
1.48
1.85
2.23
2.61
2.95
6.8
415
1.14
1.51
1.89
2.31
2.69
3.07
7.0
427
1.17
1.59
1.97
2.35
2.76
3.14
7.2
439
1.21
1.63
2.01
2.42
2.84
3.22
7.4
452
1.25
1.67
2.08
2.50
2.91
3.33
7.6
464
1.29
1.70
2.12
2.57
2.99
3.41
7.8
476
1.32
1.74
2.20
2.65
3.07
3.52
8.0
488
1.36
1.82
2.23
2.69
3.14
3.60
8.2
500
1.36
1.85
2.31
2.76
3.22
3.67
8.4
513
1.40
1.89
2.35
2.84
3.29
3.79
Values for maximum engine fuel volume requirements are calculated based on 100% engine efficiency. Many factors can affect engine
performance, such that no engine may perform at 100% efficiency. These values are to serve as reference only.
Form 824127
Page Number - 35
Appendix B – Return Fuel System Diagnostic Guide
Results
Idle
Scenario Pressure
Idle Flow
Peak Pressure
Peak Flow
Normal
Greater than
maximum fuel
volume requirement*
Normal
50% to
100% higher
than spec
Normal
Normal
50% to
100% higher
than spec
Low
Potential Causes
.7 to 1.0 GPM
Fuel system is operat(2.5 to 4.0 LPM) ing normally
1
Normal
2
Normal to
slightly low
Low
Less than maximum fuel volume requirement*
3
Low
High
Greater than .7
GPM (2.5 LPM)
Normal
50% to
100% higher
than spec
Normal
.7 to 1.0 GPM
Under-restricting
(2.5 to 4.0 LPM) pressure regulator
Low
Less than maximum fuel volume requirement*
Normal
50% to
100% higher
than spec
Normal
.7 to 1.0 GPM
Over-restricting pres(2.5 to 4.0 LPM) sure regulator
Low
Less than maximum fuel volume requirement*
Low
Less than
50% higher
than spec
Low
4
High
5
Low
Less than .7
GPM (2.5 LPM)
Less than .7
GPM (2.5 LPM)
Blocked fuel filter, inlet
strainer or pinched
supply line
Failing fuel pump or
insufficient power
supply
*See Appendix A for maximum engine fuel volume requirement
To manifold vacuum
or atmosphere
Pressure Regulator
Fuel Rail
Fuel Supply Line
Fuel Filter
Fuel return line
Inlet strainer/sock
Fuel Pump
Page Number - 36
Form 824127
Appendix B
Return Fuel System Diagnostic Guide
Scenario 2
Diagnosis:
A restriction to the supply of fuel to the engine such as a
clogged inlet strainer, inline filter, or pinched fuel supply line will
reduce the flow of fuel. However, pressure will remain normal or
drop only 1 or 2 psi below spec. If the flow at idle is less than
the calculated maximum fuel volume requirement, then the
engine will be starved of fuel in a heavy-load condition such as
wide-open throttle.
Additional Action:
Inspect the fuel supply line for damage. Connect FST between
fuel tank and inline filter, and retest. If flow is normal, replace
inline filter. If flow is still low replace inlet strainer/sock.
Scenario 3
Diagnosis:
High flow and low pressure at idle are a sure indication of an
under-restricting pressure regulator. If values for peak pressure
and flow remain normal, replace the pressure regulator.
Scenario 4
Diagnosis:
High pressure and low flow at idle indicates too much restriction
in the path of the fuel as it returns from the fuel rail to the fuel
tank. The cause can be an over-restricting pressure regulator or
pinched return line.
Additional Action:
Inspect the fuel return line for damage. If the regulator is vacuum
modulated, check the level of vacuum at the regulator. If it is
low, repair the cause. Connect the FST after the pressure
regulator and retest. If pressure remains high, the return line
is restricted. If it drops off to near zero, replace the pressure
regulator.
Scenario 5
Diagnosis:
Low values for idle and peak pressure and flow are an indication
that the output of the fuel pump is not adequate.
Additional Action:
Verify that the vehicle is not using a multiple speed pump. If so,
a scanner must be used to operate the pump at its highest
speed. Before replacing pump, follow the vehicle manufacturer’s
proper procedure to check for low voltage or a bad connection
or ground.
Form 824127
Page Number - 37
Appendix C – Returnless (mechanically regulated) Fuel System Diagnostic Guide
Results
Scenario
Idle
Pressure
1
Normal
Normal
2
Normal
Low
Peak Flow
.7 to 1.0 GPM
(2.5 to 4.0 LPM)
Less than .7 GPM
(2.5 LPM)
3
Low
Normal
.7 to 1.0 GPM
(2.5 to 4.0 LPM)
4
High
Normal
.7 to 1.0 GPM
(2.5 to 4.0 LPM)
5
Low
Low
Peak Demand Pressure
Less than .7 GPM
(2.5 LPM)
Potential Causes
Normal
Less than
10% below
idle pressure
Fuel system is operating
normally
Low
Greater than
10% below
idle pressure
Blocked fuel filter, inlet
strainer or supply line
Low
Greater than
10% below
manufacturer’s
specification
Under-restricting pressure
regulator
High
Above
manufacturer’s
specification
Over-restricting pressure
regulator
Low
Greater than
10% below
manufacturer’s
specification
Failing fuel pump or
insufficient power supply
Return/Filtration Methods for Mechanically Regulated Returnless Fuel Systems
Fuel Rail
Fuel Supply Line
Fuel Filter
Fuel Filter
Pressure Regulator
Fuel Return
Fuel Pump
Inlet Strainer/Sock
Method 1
In-Tank Filtering/In-Tank Return
Page Number - 38
Method 2
External Filtering/In-Tank Return
Method 3
External Filtering/External Return
Form 824127
Appendix C
Returnless (Mechanically Regulated)
Fuel System Diagnostic Guide
Scenario 2
Diagnosis:
A restriction to the supply of fuel to the engine such as a
clogged inlet screen, inline filter, or pinched fuel supply line will
reduce the flow of fuel. This will be evident by the reduction in
peak flow. Idle pressure will remain normal or drop only 1 or 2
psi below spec. Capability pressure will be low, depending on
the amount of restriction and the type of return/filtration method
used.
Additional Action:
Inspect the fuel supply line for damage. If the return/filtration
method is type 1 or 2, connect FST between fuel tank and inline
filter, and retest. If peak flow is normal, replace inline filter. If flow
is still low replace inlet screen/sock.
Scenario 3
Diagnosis:
Low idle and capability pressure, combined with normal peak
flow is a sure indication of an under-restricting pressure
regulator.
Scenario 4
Diagnosis:
High idle and capability pressure, combined with normal peak
flow is a sure indication of an over-restricting pressure regulator.
Scenario 5
Diagnosis:
Low values for all three indicators are an indication that the
output of the fuel pump is not adequate.
Additional Action:
Verify that the vehicle is not using a multiple speed
pump. If so, a scanner must be used to operate the
pump at its highest speed. Before replacing pump, follow
the vehicle manufacturer’s proper procedure to check for
low voltage or a bad connection or ground.
Form 824127
Page Number - 39
Appendix D – Returnless (Electronically Regulated) Fuel System Diagnostic Guide
Results
Idle
Peak Demand Pressure
Scenario Pressure
Peak Pressure
Peak Flow
Potential Causes
1
Normal
Normal
Less than
10% below
idle pressure
Normal
50% to
100% higher
than spec
Normal
2
Normal
Low
Greater than
10% below
idle pressure
Normal
50% to
100% higher
than spec
Low
Less than .7
GPM (2.5 LPM)
3
Low
Low
Greater than
10% below
idle pressure
Low
50% to
100% higher
than spec
Normal
.7 to 1.0 GPM
(2.5 to 4.0 LPM)
High
Less than
maximum
fuel volume
requirement*
High
50% to
100% higher
than spec
High
Electronic control
failure, failing fuel
.7 to 1.0 GPM
(2.5 to 4.0 LPM) pump or insufficient
power supply
Low
Less than
maximum
fuel volume
requirement*
Low
Less than
50% higher
than spec
Low
Less than .7
GPM (2.5 LPM)
4
High
5
Low
.7 to 1.0 GPM
Fuel system is
(2.5 to 4.0 LPM) operating normally
Blocked fuel filter,
inlet strainer or
pinched supply line
*See Appendix A for maximum engine fuel volume requirement
Pressure Transducer/Sensor
Fuel Rail
Fuel Filter
Fuel Supply Line
ECM/PCM
Inlet strainer/sock
Fuel Pump
Page Number - 40
Form 824127
Appendix D
Returnless (Electronically Regulated)
Fuel System Diagnostic Guide
Scenario 2
Diagnosis:
A restriction to the supply of fuel to the engine such as a
clogged inlet strainer, inline filter, or pinched fuel supply line will
reduce the flow of fuel. However, idle and peak pressure will
remain normal or drop only 1 or 2 psi below manufacturer’s
specification. If the peak flow at idle is less than the calculated
maximum fuel volume requirement, and the capability pressure
is low then the engine will be starved of fuel in a heavy-load
condition such as wide-open throttle.
Additional Action:
Inspect the fuel supply line for damage. Connect FST between
fuel tank and inline filter, and retest. If the peak flow and
capability pressure are normal, replace inline filter. If still low,
replace inlet screen/sock.
Scenario 3, 4, 5
Diagnosis:
If testing with the FST indicates the engine is not receiving the
proper fuel pressure and volume, and a clogged inline filter or
fuel line are determined not to be the cause, then a failure of
the electronic control system or the fuel pump is the most likely
cause. Follow the vehicle manufacturer’s recommended
procedure for troubleshooting these components to determine
the malfunction.
Form 824127
Page Number - 41
Lincoln Industrial Standard Warranty
LIMITED WARRANTY
Lincoln warrants the equipment manufactured and supplied by Lincoln to be free from defects in material and workmanship for a
period of one (1) year following the date of purchase, excluding therefrom any special, extended, or limited warranty published by
Lincoln. If equipment is determined to be defective during this warranty period, it will be repaired or replaced, within Lincoln’s sole
discretion, without charge.
This warranty is conditioned upon the determination of a Lincoln authorized representative that the equipment is defective. To obtain
repair or replacement, you must ship the equipment, transportation charges prepaid, with proof of purchase to a Lincoln Authorized
Warranty and Service Center within the warranty period.
This warranty is extended to the original retail purchaser only. This warranty does not apply to equipment damaged from accident,
overload, abuse, misuse, negligence, faulty installation or abrasive or corrosive material, equipment that has been altered, or equipment
repaired by anyone not authorized by Lincoln. This warranty applies only to equipment installed, operated and maintained in strict
accordance with the written specifications and recommendations provided by Lincoln or its authorized field personnel.
THIS WARRANTY IS EXCLUSIVE AND IS IN LIEU OF ANY OTHER WARRANTIES, EXPRESSED OR IMPLIED, INCLUDING, BUT NOT
LIMITED TO, THE WARRANTY OF MERCHANTABILITY OR WARRANTY OF FITNESS FOR A PARTICULAR PURPOSE.
In no event shall Lincoln be liable for incidental or consequential damages. Lincoln’s liability for any claim for loss or damages arising
out of the sale, resale or use of any Lincoln equipment shall in no event exceed the purchase price. Some jurisdictions do not allow
the exclusion or limitation of incidental or consequential damages, therefore the above limitation or exclusion may not apply to you.
This warranty gives you specific legal rights. You may also have other rights that vary by jurisdiction.
Customers not located in the Western Hemisphere or East Asia: Please contact Lincoln GmbH & Co. KG, Walldorf, Germany, for your
warranty rights.
Lincoln Industrial Contact Information:
To find Lincoln Industrial’s Nearest Service Center call the following numbers, or you may also use our website.
Customer Service
314-679-4200
Website: lincolnindustrial.com
Americas:
One Lincoln Way
St. Louis, MO 63120-1578
USA
Phone +1.314.679.4200
Fax +1.800.424.5359
© Copyright 2007
Page Number - 42
Europe/Africa:
Heinrich-Hertz-Str 2-8
D-69183 Walldorf
Germany
Phone +49.6227.33.0
Fax +49.6227.33.259
www.lincolnindustrial.com
Asia/Pacific:
25 Int’l Business Park
#01-65 German Centre
Singapore 609916
Phone +65.562.7960
Fax +65.562.9967
Printed in Taiwan
Form 824127