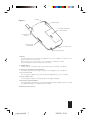
1
ENGLISH
Directions for use
This guide describes the operation of GSM or GSM/GPRS Trium Mondo telephones.
Edition 1, 2001.
© Mitsubishi Electric Telecom Europe, 2001
Whilst every effort has been made to ensure the accuracy of the instructions contained in this guide, Mitsubishi Electric
reserves the right to make improvements and changes to the product described in this guide and/or to the guide itself,
without prior notice.
Microsoft® Windows® Powered Pocket PC
Microsoft, ActiveSync, Outlook, Pocket Outlook, Expedia, AutoRoute Express, MapPoint, Windows, and the Windows logo are
either registered trademarks or trademarks of Microsoft Corporation in the United States and/or other countries. Microsoft
products are licensed to OEMs by Microsoft Licensing, Inc., a wholly owned subsidiary of Microsoft Corporation.
papier-gb.indd
1
30/07/01, 15:19
2
papier-gb.indd
2
30/07/01, 15:19
Table of contents
• Composition of the Mondo pack
4
• Presentation of the unit
5
• Introduction
• General safety
8
- Regular use of the stylus
- Additional uses of the stylus
- Use of the jog wheel
17
17
18
8
• Power supply - Batteries
19
• Vehicle safety
9
• Care and maintenance
9
• Your responsibility
9
• Security codes
10
• Code supplied
by the airtime service provider
Conception et réalisation du manuel : Qualimédia, Rennes (France).
-
• Emergency calls
11
• Disposing of waste packaging
11
• Battery use and safety information
11
• Battery disposal
11
• Commissioning
12
-
12
13
14
15
15
16
Battery charge indicators
19
Recharging the battery
19
Replacing a discharged or used battery
21
Replacing the backup battery
22
Use of the batteries and safety instruction 23
• The Telephone Application
1- First steps
2- Data transfer
3- SMS
10
• Code supplied by the manufacturer 10
Insertion of the SIM card and the battery
Insertion of the backup battery
Initial charging of the battery
Alignment of the touch screen
Use of the stylus
Location and time zone
Opening / closing
the Telephone application
- Standby / reactivation of the screen
• Use of the stylus and the jog wheel 17
24
24
30
35
• MICROSOFT Applications
43
- Addition and deletion of Applications
- Connection to the Internet
- Infrared data transfer
44
44
44
• Appendix
45
-
45
46
46
48
Accessory: The Personal Handsfree
Trouble shooting
Guarantee
Declaration of compliance
16
16
3
papier-gb.indd
3
30/07/01, 15:19
Composition of the Mondo pack
1- The Mondo and its stylus.
2- Backup battery.
3- Battery.
4- AC adaptor.
5- Desk top support.
6- Personal Handsfree.
7- Protective carry case.
4
1
2
3
5
7
6
4
papier-gb.indd
4
30/07/01, 15:20
Presentation of the unit
Figure 1 :
1- Aerial
13- Infrared port
12- Earpiece
2- Luminous indicator
of battery charge
and alarm signal
11- Connector for the
personal hands free
3- Luminous indicator
of network signal
and call indicator
4- Touch screen
10- "Record" button
9- Jog wheel
not programmable
5- Program buttons
6- Microphone
8- "On / Off" button
7- "Telephone" button fixed not programmable
1- Aerial.
2- Luminous indicator of battery charge and alarm signal:
Ø Flashing orange (rapid): battery recharging in progress.
Ø Continuous orange: recharging finished.
Ø Flashing green (rapid): alarm signal from the diary (wake-up, reminder, etc.).
3- Luminous indicator of network signal and call indicator:
Ø No light: the Telephone application is closed.
Ø Flashing red (slowly):
the Telephone application is open, but you are not receiving any signals from the GSM network.
It is impossible to make or receive a call from where you are.
Ø Flashing green (slowly):
the Telephone application is open. You are receiving a network signal. You may make or
receive a call.
Ø Flashing orange (slowly):
a person is calling you, you have not replied to the call, or you have received a message
(voice or SMS).
5
papier-gb.indd
5
30/07/01, 15:20
4- Touch screen.
5- Program buttons:
These buttons enable you to have rapid access to your three favourite applications. The
applications programmed by default are Microsoft Inbox (left hand button), Microsoft Diary
(centre button) and Microsoft Contacts (right hand button).
If you wish, you may modify the initial programming of these three buttons.
6- Microphone.
7- "Telephone" button fixed not programmable:
Ø When the telephone is not in use:
Press for a short time to open the Telephone application.
Press for a long time to close the Telephone application.
Ø When you receive a call (whether password protection is enabled or disabled):
Press briefly to take the call.
Ø When connected:
Press briefly to hang up.
8- "On / Off" button:
To close down or reactivate the screen of your Mondo.
9- Jog wheel not programmable:
Ø When you receive a call:
Press the wheel to take the call if you want to.
Push the wheel upwards to refuse the call.
Push the wheel downwards to stop the ringing tone before answering.
Ø During the call:
Press the wheel to hang up when you want to end the call.
Push the wheel upwards to increase the volume of reception.
Push the wheel downwards to decrease the volume of reception.
Ø When the screen saver of the telephone application is displayed (outside of a call):
Press the jog wheel to see the list of the last 10 numbers dialled.
Ø In all other cases:
Push the jog wheel upwards or downwards to scroll through the menus or the folders.
Press the wheel to make your selection or to call the telephone number entered or selected.
10- "Record" button:
Ø Press the button for a short time to take written notes.
Ø Keep the button pressed down to carry out a voice recording, or to record a telephone call
(recording stops when you release the button).
11- Connector for the Personal Handsfree:
Allows your Mondo to be connected to a personal hands free.
12- Earpiece.
13- Infrared port:
To exchange data with other Windows applications at the speed of 115.2 Kb per second.
6
papier-gb.indd
6
30/07/01, 15:20
14- Stylus
Figure 2 :
15- "RESET" button
16- Housing for the battery
and the SIM card
20- External aerial
connector
19- Housing of the
backup battery
17- PC connection port
18- Power supply socket
14- Stylus:
For selecting items in the lists which are displayed on the screen, validate your selections, move
objects or write on the touch screen.
When the stylus is in its housing, the cover of the battery compartment is locked.
Use your fingernail to extract the stylus from its housing.
15- "RESET" button:
If required, press on this button with the point of the stylus to re-initialise your Mondo.
16- Housing for the battery and the SIM card:
Remove the stylus from its housing to unlock the cover and gain access to the battery.
17- PC connection port:
For connecting your Mondo to the desk top support (supplied) and / or to your computer.
18- Power supply socket:
For recharging the battery of your Mondo with an AC adaptor (supplied).
19- Housing of the backup battery:
If your main battery should become completely discharged, this backup battery avoids you losing
your data while waiting to re-establish the power supply.
20- External aerial connector.
7
papier-gb.indd
7
30/07/01, 15:20
Introduction
Thank you for purchasing a GSM or GSM/GPRS Trium Mondo telephone. The mobile
telephone described in this guide is approved for use on both the GSM 900 and 1800
networks. Services and display messages may be different dependant upon your operators
implementation.
As with all types of radio transceivers this mobile telephone and PDA emits electromagnetic
waves and conforms to international regulations if it is used under normal conditions
and in accordance with the safety and warning messages given below and on pages
10, 11, 12 and 17.
General safety
It is important to follow any special regulations regarding the use of radio equipment, due
to the possibility of radio frequency, RF, interference.
Please follow the safety advice given below.
Before boarding an aircraft, close the Telephone application of your Mondo and
activate the Safety mode (for more details, see page 29). The use of mobile
telephones in an aircraft may endanger the operation of the aircraft, disrupt the
cellular mobile phone network and is illegal. Failure to observe this instruction
may lead to suspension or denial of mobile telephone services to the offender,
or legal action, or both.
Close the Telephone application of your Mondo when at any refuelling point or
near inflammable material.
Close the Telephone application of your Mondo and activate the Safety mode
(see page 29) in hospitals and any other place where medical equipment may
be in use.
Respect restrictions on the use of radio equipment in fuel depots, chemical plants
or where blasting operations are in progress.
There may be a hazard associated with the operation of your Mondo (with
the Telephone application activated) close to inadequately protected personal
medical devices such as hearing aids and pacemakers. Consult your doctor or the
manufacturers of the medical device to determine if it is adequately protected.
The use of the Telephone application of your Mondo close to other electronic
equipment may also cause interference if the equipment is inadequately protected.
Observe any warning signs and manufacturers recommendations.
Avoid prolonged contact between the aerial and your skin while the Telephone
application of your Mondo is open.
This apparatus is intended for use only when supplied with power from AC/DC adaptor
chargers (MA0506, MA0567), desk top charger (MA0519), and cigar lighter charger
(MA0566).
Use of any other charger or adaptors will invalidate any approval given to this apparatus
and may be dangerous.
8
papier-gb.indd
8
30/07/01, 15:20
Vehicle safety
• Respect national regulations on the use of mobile telephones in vehicles.
• Road safety always comes first! Always give your full attention to driving.
• Do not use a handheld phone whilst driving. If you don’t have a handsfree car kit, stop
and park your vehicle safely before using your phone.
• If incorrectly installed in a vehicle the operation of mobile telephones could interfere with
the correct operation of the vehicle electronics, such as ABS anti-lock brakes or air bags.
To avoid such problems ensure that only qualified personnel carry out the installation.
Verification of the protection and operation of the vehicle electronics should form part of
the installation. If in doubt consult with the manufacturer.
• Do not place the phone on the passenger seat or where it could break loose during
sudden breaking or a collision. Always use the holder.
• The use of an alert device to operate a vehicle’s lights or horn on public roads is
not permitted.
Care and maintenance
This mobile telephone and PDA is the product of advanced engineering, design and
craftsmanship and should be treated with care. The suggestions below will help you to
enjoy this product for many years.
• Do not expose the phone to any extreme environment where the temperature or
humidity is high.
• Do not expose or store in cold temperatures. When the phone warms up after switch
on, to its normal temperature, moisture can form inside where it may damage the
electrical parts.
• Do not attempt to disassemble the phone. There are no user serviceable parts inside.
• Do not expose the phone to water, rain or spilt beverages. It is not waterproof.
• Do not abuse this phone by dropping, knocking or violent shaking. Rough handling
can damage it.
• Do not clean the phone with strong chemicals or solvents. Wipe it only with a soft,
slightly dampened cloth.
• Do not place the telephone alongside computer discs, credit or travel cards or other
magnetic media. The information contained on discs or cards may be affected by
the phone.
• Do not connect incompatible products. The use of third party equipment or accessories,
not made or authorised by Mitsubishi Electric, may invalidate the warranty of your phone
and may be a safety risk.
• Do not remove the labels. The numbers on it are important for service and other
related purposes.
• Do contact an authorised service centre in the unlikely event of a fault.
Your responsibility
This GSM mobile telephone and PDA is under your responsibility. Please treat it with care
respecting all local regulations. It is not a toy therefore keep it in a safe place at all times
and out of the reach of children.
9
papier-gb.indd
9
30/07/01, 15:20
Try to remember the phonelock and PIN codes associated with the use of this phone.
Become familiar with and use the security features to block unauthorised use if your
phone and/or SIM card are lost or stolen. Call your service provider immediately to
prevent illegal use.
When you are not using the telephone, close the Telephone application of your Mondo and
activate the Safety mode if necessary.
Security codes
The phone and SIM card are delivered to you pre-programmed with codes that protect the
phone and SIM card against unauthorised use.
When requested to enter any of the codes, key in the number (appears as * asterisks
in the display) and click on ok.
Keying mistakes can be erased by pressing Clear.
If you enter the wrong code an appropriate message will be displayed.
Codes supplied with the SIM card are:
Ø PIN and PIN2 codes (4-8 digits)
The PIN (Personal Identity Number) is supplied with all SIM cards and protects the
card against unauthorised use.
The PIN2 code, supplied with some SIM cards, is required to gain access to some
features in the phone (such as fixed dialling numbers) for which another level of
security is required.
If Enter PIN: appears in the display, enter the code and click on ok.
Entering the wrong PIN code three times in succession will disable the SIM card
and the message SIM Blocked. Enter PUK: will appear in the display. To unblock
the SIM you will need the PUK (PIN Unblock Key) code, obtainable only from your
service provider.
Ø PUK and PUK2 codes (8 digits)
The PUK code is supplied with the SIM card and is used to unblock a disabled
SIM card.
When requested enter the PUK code and click on ok. You will be requested to reset
the PIN code. Follow the instruction in the display.
The PUK2 code is required to unblock the PIN2 code.
Code supplied by the airtime service provider
Ø Call barring password (4 digits)
This password is used to bar various types of calls, made or received, from the
phone.
Ø Voice mail password
This password protects you against unauthorised access to your voice mail.
Code supplied by the manufacturer
Ø Phonelock code (4 digits)
This code is set to all zeros on delivery and is user re-settable. Once changed it cannot
be identified by the manufacturer over the phone.
It is strongly recommended that you remember and make yourself familiar with the purpose
and operation of these codes.
10
papier-gb.indd
10
30/07/01, 15:20
Emergency calls
In Europe, provided the phone has GSM service, emergency calls can be made using the
European standard emergency number, 112. Emergency calls can even be made if the
phone is PIN or electronically locked or call barred. In some countries local emergency
numbers can still be used for emergency purposes but the phone may have to contain
a valid SIM card.
When making an emergency call remember to give all the necessary information as
accurately as possible. The phone may be the only means of communication at the scene of
an emergency therefore do not cut off the call until told to do so.
Mobile phones rely on wireless and landline networks which cannot be guaranteed in
all conditions. Therefore you should never rely solely on wireless phones for essential
emergency communications.
Disposing of waste packaging
The packaging used for this phone is made of recyclable materials and as such should
be disposed of in accordance with your national legislation on the protection of the
environment.
Please take care to separate the cardboard and plastic elements and to dispose of them
in the correct manner.
Battery use and safety information
• A battery can be charged hundreds of times but will gradually wear out. When the
operating time (standby and talk time) is noticeably shorter than normal it is time to
buy a new battery.
• Do not leave batteries connected to a charger longer than necessary, overcharging will
shorten battery life.
• Disconnect battery chargers from the power source when not in use.
• Do not expose batteries to high temperatures or humidity.
• Do not dispose of the batteries in fire. They may explode.
• Avoid putting the batteries into contact with metal objects which may short circuit the
battery terminals (e.g. keys, paper clips, coins, chains etc).
• Do not drop or subject the batteries to strong physical shocks.
• Do not try to disassemble any of the battery packs.
• Use only the recommended battery chargers (see page 8).
• If the battery terminals become soiled, clean them with a soft cloth.
• It is normal for batteries to become warm during charging.
• Old batteries must be returned to the place of sale or to a place where used batteries are
properly disposed of. Do not dispose of old batteries together with household waste.
Battery disposal
In compliance with European environmental protection directives, used batteries must be
returned to the place of sale, where they will be collected free of charge.
Don’t throw away your batteries in your household waste.
Mitsubishi Electric is not responsible for the data stored in the product and is not
responsible for the loss of data stored in the product during repairs.
You must save your data before sending the product for After Sales Service.
11
papier-gb.indd
11
30/07/01, 15:20
Commissioning
You have just acquired your Mondo.
Before using it, you must first carry out the following operations, in the order in which
they are listed below:
• Insertion of the SIM card and the battery
1- Remove the stylus from its housing (fig.1).
This operation is necessary to unlock the cover of the battery housing.
2- Remove the battery housing cover (fig.2).
3- Open the SIM card holder (fig.3).
4- Insert the SIM card into its holder (fig.4).
PLEASE NOTE: The SIM card must be positioned in its holder with the gold contacts
downwards and the cut corner on the right, as shown in figure 3.
5- Close the SIM card holder (fig.5).
6- Insert the battery in its housing (fig.6).
7- Replace the battery housing cover (fig.7).
fig.2
fig.1
12
papier-gb.indd
12
30/07/01, 15:20
fig.3
fig.5
fig.4
fig.6
fig.7
• Insertion of the backup battery
IMPORTANT: This operation must only be carried out after the insertion of the battery
(see above).
1- With the point of the stylus, lift up the cover of the backup battery housing (fig.1).
2- Insert the backup battery in its housing (fig.2).
PLEASE NOTE: The positive pole (+) of the battery must be turned towards the
front face of the Mondo.
3- Close the cover and return the stylus to its housing.
fig.2
fig.1
13
papier-gb.indd
13
30/07/01, 15:20
• Initial charging of the battery
PLEASE NOTE: The instructions below only apply to the first time the battery is charged.
To find out how to proceed for later recharges, see the corresponding section of this
manual, on page 19.
The initial charging of the battery may be carried out by means of the AC adaptor on its
own, or with the desk top support (supplied).
We recommend that you wait for the battery to be fully charged (3 to 4 hours) before
using your Mondo for the first time.
- To charge the battery of your Mondo using the AC adaptor on its own:
1- Insert the plug (a) of the AC adaptor into the power supply socket (b) of the
Mondo (fig.1).
fig.1
b
a
2- Connect the AC adaptor to a mains socket and switch on.
The luminous battery charge indicator will flash orange.
3- When the indicator becomes continuous orange, the battery is charged.
Do not forget to switch off the mains and unplug the AC adaptor from the mains.
- To charge the battery of your Mondo using the desk top support:
1- Insert the plug (a) of the AC adaptor into the power supply socket (b) of the
desk top support (fig.2).
2- Insert your Mondo into the desk top support (fig.3).
PLEASE NOTE: The desk top support supplied is fitted with a serial cable and plug
which you may connect to your computer to exchange data (for more details, see
page 43). For the moment, there is no need to make this connection.
fig.2
fig.3
3- Connect the AC adaptor to a mains socket and switch on.
The luminous battery charge indicator will flash orange.
4- When the indicator becomes continuous orange, the battery is charged.
Do not forget to switch off the mains and unplug the AC adaptor from the mains.
14
papier-gb.indd
14
30/07/01, 15:21
- States of the charge indicator of the Mondo (reminder):
Ø Flashing orange: Charging is in progress.
Ø Continuous orange: Charging is finished.
Safety instructions:
•
•
•
•
•
•
•
•
Do not leave your Mondo connected to the AC adaptor any longer than necessary.
Unplug the AC adaptor from the mains when you are no longer using it.
Do not expose the battery to extremes of temperature and humidity.
Avoid putting the battery into contact with metal objects (such as keys, paper clips,
coins, chains, etc.). These might cause short circuits across the battery terminals.
Avoid dropping the battery or subjecting it to violent physical shocks.
Do not try to open or disassemble the battery itself.
Only use the recommended AC adaptors (MA0506 or MA0567).
If the battery terminals are stained, clean them with a soft cloth.
PLEASE NOTE: It is normal for the battery to heat up during charging.
• Alignment of the touch screen
After the initial charging of the battery is finished. The battery indicator light will be
on (continuous orange).
1- Press the button
situated in the lower part of your Mondo, to activate the
screen.
2 - Tap with your stylus on any area of the screen.
If you are using your Mondo for the first time, a message will appear asking you to carry
out the alignment of the touch screen.
3- Tap in the centre of the crosses which appear in turn, firstly in the middle of the
screen, then in each corner of the display zone.
• Use of the stylus
When you have finished the screen alignment procedure, your Mondo offers to teach
you how to use the stylus.
Take the time to read the information displayed, then click on the Next key at the
bottom of the screen.
Follow the instructions which are displayed on the screen to carry out a short exercise.
In the event, it involves learning how to move text in a diary.
1- Tap and hold your stylus on the zone indicated by the arrow to select the text to be
moved and display the menu of possible operations.
2- Lift up your stylus, then tap on Cut in the menu displayed.
The text is placed in memory and is temporarily deleted from the screen.
3- Tap and hold your stylus on the zone indicated by the arrow to select the position to
which you wish to transfer the text and display the menu of possible operations.
4- Lift up your stylus, then tap on Paste in the menu displayed.
The text is displayed in the required position.
5- Tap on the Next key at the bottom of the screen.
15
papier-gb.indd
15
30/07/01, 15:21
• Location and time zone
A town will be selected by default. Its name will appear in the first field.
If this town corresponds to your country or your region, just tap on the Next key at the
bottom of the screen to validate the selection.
If not :
1- Tap with your stylus on the arrow at the right hand edge of the Town field to
display the list of towns.
2- Tap and hold your stylus on the up or down black arrows to scroll through the
list of towns.
3 - Tap on the town which corresponds to your country or your region.
The time zone of the selected town will be displayed automatically in the lower field. You
do not have to change it.
4- Tap on the Next key at the bottom of the screen.
5 - To quit, tap with your stylus on any zone of the screen.
The screen saver for the Telephone application will appear (for more details about this
screen, see page 25).
PLEASE NOTE: If your SIM card is protected by a PIN code, the message Enter the PIN
code: will appear on the screen before the Telephone application is opened.
In this case you must :
a- Enter your PIN code using the alphanumeric keys of the virtual keyboard.
b- Then tap on the Validate function key (for more details about the PIN code, see
page 10).
You may now use your Mondo.
To discover all the functions of your Mondo and know how to use them, see the
table of contents or go directly to the sections of this manual which follow.
• Opening / closing the Telephone application
To open the Telephone application:
Ø Press again (briefly) on the program button
.
If your PIN code is requested, enter it, then tap on the Validate function key.
If you wish to close the Telephone application:
Ø Press for a long time on the program button
your Mondo.
situated in the lower part of
• Standby / reactivation of the screen
If you wish to put the screen of your Mondo on standby:
Ø Press the button
situated in the lower part of your Mondo.
WARNING: The applications opened remain active, even when the screen of your Mondo
is on standby. Don’t forget to close the Telephone application in places where it is
requested that mobile telephones are switched off (such as aircraft, hospitals, etc.).
To reactivate the screen of your Mondo:
Ø Press once more on the button .
16
papier-gb.indd
16
30/07/01, 15:21
Use of the stylus and the jog wheel
• Regular use of the stylus
Use your fingernail to extract the stylus from its housing (situated on the back of
your Mondo).
The stylus is specially designed not to dirty or damage the touch screen of your Mondo.
You are strongly recommended to use it for navigating through the menus or tapping
on the keys of the virtual keyboard.
There are many ways of using the stylus:
Ø Tap on the touch screen with the stylus, briefly touch a determined zone of the
touch screen with the point of the stylus.
For example, this operation enables you to open menus, select items from the menus, validate
your selections, enter telephone numbers, etc.
Ø Tap and hold the stylus pressed on the touch screen, apply the point of the
stylus for 2 to 3 seconds on a determined zone of the touch screen, before
lifting it off.
For example, this operation enables you to exit from the Telephone application menus in one
gesture, to make a call using rapid dialling, to display context menus in diary applications, etc.
Ø Tap and drag the stylus over the touch screen, apply the point of the stylus
to a determined zone of the touch screen, then drag the stylus over the screen
without lifting it off.
For example, this operation enables you to select several items simultaneously from a list
or from a text zone.
Ø Write or draw on the touch screen.
• Additional uses of the stylus
- To re-initialise your Mondo (if necessary):
Ø Press with the point of your stylus on the "Reset" button situated on the back
of the unit.
- To change the backup battery (if necessary):
Ø Use the point of your stylus to lift up the cover of the backup battery housing.
- To lock the cover of the battery housing:
Ø You must withdraw the stylus from its housing to be able to remove the cover
and gain access to the battery.
17
papier-gb.indd
17
30/07/01, 15:21
• Use of the jog wheel
1- When you receive a call (Telephone application open):
Ø Press on the wheel to answer if you want to take the call.
You may also tap with your stylus on the
key of the virtual keyboard in the Telephone
application or press briefly the
button on your Mondo.
Ø Push the wheel upwards to refuse the call.
You may also tap with your stylus on the
application.
key of the virtual keyboard in the Telephone
Ø Push the wheel downwards to cut off the ringing tone before answering.
You may also tap with your stylus on the Silence function key of the virtual keyboard in
the Telephone application.
2- During a call:
Ø Press the wheel to hang up when you want to end the call.
You may also tap with your stylus on the
key of the virtual keyboard in the Telephone
application or press briefly the
button on your Mondo.
Ø Push the wheel upwards or downwards to increase or decrease the volume.
You may also tap with your stylus on the
Telephone application.
ou
arrows of the virtual keyboard in the
3- When the Telephone application screen saver is displayed (outside of a call):
Press the jog wheel to see a list of the last 10 numbers dialled.
4- In all other cases:
Ø Push the jog wheel upwards or downwards to scroll through menus or folders.
When you are using the Telephone application, you may also tap on the
ou
arrows.
Ø Press the wheel to make your selections or call the telephone number entered
or selected.
To make your selections, you may also tap with your stylus on the selected item (whatever
the application being used), or use the Ok or Validate function keys (when you are using
the Telephone application).
To call the telephone number entered or selected, you may also tap on the
key.
18
papier-gb.indd
18
30/07/01, 15:21
Power supply - Batteries
• Battery charge indicators
When the battery is almost discharged, your Mondo will warn you in several ways
at once:
• The message Battery low! will appear on the screen.
• A warning tone will sound.
• The
symbol flashes on the screen (depending on the model).
If you are using your Mondo (for example, you are having a telephone conversation or
you are consulting your diary):
1- Close the applications in use immediately.
If you are connected to a computer, don’t forget to save your data before closing the applications
in use.
2- Then recharge the battery or replace it with a charged battery (see the instructions
below).
WARNING:
Ø If you must replace the battery, make sure that all the applications have really
been closed before removing the used battery from its housing. Otherwise, you
risk losing the data recorded in the SIM card.
Ø Do not try to use your Mondo before starting to recharge its battery or replacing
it with a charged battery.
Ø To extend the life of your battery, we recommend that you wait until the warning
Battery low! appears on the screen before recharging it.
Ø When the message Battery low! is displayed, the battery of your Mondo
is still able to save your data for 24 hours. After this, you risk losing your
recorded data.
• Recharging the battery
The battery may be recharged using the AC adaptor on its own, or with the desk
top support (supplied).
PLEASE NOTE:
• The average time for recharging a battery is three and a half hours.
• You can still use your Mondo while its battery is being charged, but this will extend
the time taken for recharging.
• It is normal for the battery to become warm during recharging.
19
papier-gb.indd
19
30/07/01, 15:21
- To recharge the battery of your Mondo using the AC adaptor on its own:
1- Insert the plug (a) of the AC adaptor into the power supply socket (b) of the
Mondo (fig.1).
b
a
fig.1
2- Connect the AC adaptor to a mains socket and switch on.
The luminous battery charge indicator will flash orange.
3- When the charge indicator becomes continuous orange, the battery is charged.
Do not forget to switch off the mains and unplug the AC adaptor from the mains.
- To recharge the battery of your Mondo using the desk top support supplied:
1- Insert the plug (a) of the AC adaptor into the power supply socket (b) of the
desk top support (fig.2).
fig.2
fig.3
2- Insert your Mondo into the desk top support (fig.3).
3- Connect the AC adaptor to a mains socket and switch on.
The luminous battery charge indicator will flash orange.
4- When the indicator becomes continuous orange, the battery is charged.
Do not forget to switch off the mains and unplug the AC adaptor from the mains.
- States of the charge indicator of the Mondo (reminder):
Ø Flashing orange: Charging is in progress.
Ø Continuous orange: Charging is finished.
20
papier-gb.indd
20
30/07/01, 15:21
• Replacing a discharged or used battery
WARNING: Make sure that all the applications have properly been closed before removing
the battery from your Mondo. If you are connected to a computer, don’t forget to save your
data before closing the applications in use.
1- Remove the stylus from its housing (fig.1).
This operation is necessary to unlock the cover of the battery housing.
2- Remove the battery housing cover (fig.2).
3- Remove the discharged battery from its housing (fig.3).
4- Insert the charged battery (fig.4).
5- Replace the battery housing cover (fig.5).
6- Return the stylus to its housing.
fig.2
fig.1
fig.4
fig.3
fig.5
21
papier-gb.indd
21
30/07/01, 15:21
• Replacing the backup battery
IMPORTANT : To carry out this operation, it is essential for the main battery of your Mondo
to be in position and sufficiently charged.
When the backup battery is used up, a message will appear on the screen inviting you
to replace it. When this occurs:
1- Close all the applications in use.
2- Remove the stylus from its housing (fig.1).
3- With the point of the stylus, lift up the cover of the backup battery housing (fig.2).
4- Remove the used battery from its housing.
5- Insert the new battery in its housing (fig.3).
PLEASE NOTE: The positive pole (+) of the battery must be turned towards the front
face of the Mondo.
6- Close the cover of the backup battery housing and return the stylus to its housing.
fig.1
fig.2
fig.3
22
papier-gb.indd
22
30/07/01, 15:22
• Use of the batteries and safety instructions
- Batteries compatible with your Mondo:
The Mondo will only operate with standard Lithium ion batteries (MA0570).
- Lifetime of the batteries:
A battery may be recharged several hundred times. However, it will wear out
progressively. If you find that its performance (on standby or in communication)
has clearly decreased compared to normal operation, you must consider replacing
it with a new battery.
Safety instructions:
• Do not leave the Mondo connected to the AC adaptor any longer than necessary;
overcharging decreases the lifetime of the batteries.
• Unplug the AC adaptor from the mains when you are no longer using it.
• Do not expose the batteries to extremes of temperature and humidity.
• Do not throw a battery into a fire, as it may explode.
• Avoid putting the batteries into contact with metal objects (such as keys, paper clips,
coins, chains, etc.). These might cause short circuits across the battery terminals.
• Avoid dropping the batteries or subjecting them to violent physical shocks.
• Do not try to disassemble or open the batteries.
• Only use the recommended AC adaptors (MA0506 or MA0567).
• If the battery terminals are stained, clean them with a soft cloth.
PLEASE NOTE: It is normal for the batteries to heat up during recharging.
- Disposal of used batteries:
• Don’t throw away your batteries in your household waste.
• In compliance with European environmental protection directives, used batteries
must be returned to the place of sale, where they will be collected free of charge, or
to any other service capable of destroying them in an appropriate manner.
23
papier-gb.indd
23
30/07/01, 15:22
The Telephone Application
1- First steps
• Opening the Telephone application
To open the Telephone application, just press the program button
lower part of your Mondo.
, situated in the
Ø If the screen of your Mondo is on standby, it activates itself automatically when you
press the program button ; you do not need to press the button .
Ø If another application is already open on the screen, you may also launch the
Telephone application by selecting it with your stylus from the ÿ Start menu.
Ø Your Mondo always keeps in memory the last application that you used before
putting it on standby. If this was the Telephone application, it will automatically
reappear when you press the button .
If your SIM card is protected by a PIN code, the message Enter the PIN code: will appear
on the screen when you open the Telephone application. In this case you must:
1- Enter your PIN code using the alphanumeric keys of the virtual keyboard.
2- Then tap on the Validate function key (for more details about the PIN code,
see page 10).
PLEASE NOTE: If you are launching the Telephone application for the first time, the
message Import SIM directory will appear in the standby screen.
Tap on YES if you want to copy the numbers in the directory of your SIM card to the
directory of your Mondo. If you do not, tap on NO.
• Presentation of the Telephone application screen saver
The Telephone application screen saver will be displayed in the following cases:
Ø When you open the Telephone application by pressing the
in the lower part of your Mondo.
program button situated
Ø When you select the Telephone application with your stylus from the ÿ Start
menu.
Ø When you reactivate the screen of your Mondo by pressing the button , if the last
application used was the Telephone application.
Ø When you receive a telephone call (whatever the application being used, provided
that the telephone application was opened beforehand).
24
papier-gb.indd
24
30/07/01, 15:22
- The normal appearance of this screen is as follows:
A
B
C
5
4
4
1
PLEASE NOTE*: If the Mode of Operation
is set at Modem and if your Mondo is
connected to a GPRS network, the small
Telephone screen situated in the upper left
hand corner of the screen of your Mondo
will be presented with the following appearance:
A
C
2
6
3
1- "Answer" key.
2- "Hang up" key.
3- "Hands free" key.
WARNING: Do not put the receiver to
your ear when you are telephoning in
hands-free mode.
4- Function keys:
The function of these keys may vary
depending on the information displayed in the screen situated above.
These function keys enable a WAP
connection to be launched directly,
or access to the main Telephone
application menu.
5- "Up / Down" and "Right / Left" navigation arrows:
Ø Tap on the or arrows to scroll
vertically through the menus or
folders displayed on the screen.
You may also use the jog wheel,
or your stylus (for more details,
see page 17).
Ø Tap on the
arrow to go to the
main menu of the telephone application or make your selections.
Ø Tap on the
arrow to go to your folder or return to the previous screen.
6- Alphanumeric keys:
Tap on these keys to enter figures,
symbols or letters, or display prerecorded telephone numbers.
* Mondo GSM/GPRS only.
papier-gb.indd
25
B
* Mondo GSM/GPRS only.
A- GSM signal quality indicator (or
GPRS*).
A high number of vertical bars (maximum 4) shows you that the reception
of the signal is of good quality. This
indicator does not appear if the zone in
which you are situated is not covered
by the network.
B- Name of the network and / or the
operator.
C- Battery charge indicator (depending
on the model).
The battery charge indicator is displayed
continuously to indicate the battery charge when the Telephone application is
started.
Four levels may be displayed:
fully
charged,
medium charge,
battery
low. When your battery is nearly flat, the
symbol flashes on the screen.
PLEASE NOTE: The Telephone application may close automatically if the
battery is too low.
Symbols can appear in the navigation bar
to show you the connection state of your
Mondo*:
: Appears when your Mondo is connected
to the GPRS network.
: Appears when communication is in progress (voice calls or data transfer).
: Appears when your Mondo is connected
to the GPRS network via one of the GPRS
1, GPRS 2 or GPRS 3 remote connections,
or even via a WAP connection with a
Data type profile.
25
30/07/01, 15:22
Depending on individual cases, special symbols may be displayed on the
Telephone screen saver:
: SIM memory used.
: Mondo memory used.
: Roaming. This appears when your Mondo is connected to a network other than
its local network.
: Short text messages (SMS). This appears when one or more short text
messages ( SMS ) have been received and have not been read.
flashes when
the storage capacity of the SIM card is not sufficient for recording new
messages. Access to the SMS function depends on your operator.
: Voice mail. This appears when one or more voice messages have been received
and recorded by the voice message centre of the network. Access to the Voice
mail function depends on your operator.
: Call diverting. This appears when the calls received are diverted permanently.
Access to the Call diverting function depends on your operator.
: Cursor arrows. These appear during the consultation of menus to indicate that
you may have access to additional options by dragging your stylus towards the
top or the bottom of the menu displayed on the screen, or by tapping on the
or
arrow on the virtual keyboard. The screen may display both arrows at
once.
: Line 2. This appears when communication is established on your second line.
Access to the Second line function depends on your operator and your
subscription.
: Unanswered call. This tells you that a call received has remained unanswered.
: Vibrate alert icon. This appears when the vibrate alert mode is activated.
: Silent mode. This appears when all the modes of alert by ringing tone have been
de-activated.
: Mute icon. This appears when the microphone of your Mondo has been
de-activated. It allows you to confer privately with people nearby without being
heard by the other party.
: WAP
TM
connection activated (this symbol only appears in the WAP screen).
: WAP connection activated, in secure mode (this symbol only appears in the
WAP screen).
TM
: GPRS service. This appears on the screen of your Mondo (GSM/GPRS only)
when the data parcel (GPRS) services are available.
• Making a telephone call
- Required conditions:
Ø The battery of your Mondo must be sufficiently charged.
When the level of charge is too low, the message Battery low! is displayed on the screen and
you hear a warning sound. If this happens, close the Telephone application and recharge the
battery (for more details, see page 19).
Ø Your Mondo must be fitted with a valid SIM card.
26
papier-gb.indd
26
30/07/01, 15:22
Ø Your Mondo must be in a zone that is covered by the GSM network.
If the place in which you find yourself is covered by the GSM network, the network signal
indicator light will flash green (slowly). If not, this indicator will flash red (slowly) and
the telephone screen (situated in the upper right part of the screen of your Mondo) will
remain blank.
- Making a call:
1- If the telephone application is closed, press the
lower part of your Mondo.
program button situated in the
An animated display will appear on the screen and a warning sound lets you know that the
connection to the GSM network is established. Then the Telephone application screen saver is
displayed (for more details about this screen, see page 25).
PLEASE NOTE: If another application is open on the screen, you may also open the
Telephone application by selecting it with your stylus from the ÿ Start menu.
Ø If your SIM card is protected by a PIN code.
The message Enter the PIN code: will appear on the screen as soon as the
telephone application is opened. In this case :
1- Enter your PIN code using the alphanumeric keys of the virtual keyboard.
2- Then tap on the Validate function key.
For more information about the PIN code, see the corresponding section of this manual,
on page 10.
2- Enter the telephone number you wish to call using the alphanumeric keys of the
virtual keyboard.
If you make an error during entry:
Ø To delete the last number entered, tap on the Delete function key.
Ø To delete all of the numbers entered, tap and hold your stylus pressed on the
Delete function key.
PLEASE NOTE: International calls may be preceded by 00 or by +. To enter the sign +
in front of a number, tap and hold your stylus pressed on the
key. You may enter
a maximum of 47 figures and / or symbols.
3- Tap on the
key of the virtual keyboard or press the jog wheel of your Mondo.
The number you have entered is displayed on the screen, as well as
.
Ø If the number you have entered corresponds to a number recorded in the folder of
your Mondo, the name will be displayed instead of a telephone number.
Ø If the number you have entered is not authorised in the fixed list numbers to call,
the message Prohibited (Fixed numbers) is displayed on the screen.
4- If the caller’s line is engaged, the message Engaged is displayed on the screen. If you
have activated the Automatic recall function, your Mondo will try to recall the
number.
5- If your call is successful, you will hear a ringing tone in the earpiece of your Mondo
and a call time counter will appear on the screen.
Ø If your caller answers, the duration of your call will be displayed on the screen.
Continue your call normally.
Ø If the call is established on your second line, the symbol
the screen (for more details, see page 26).
will be displayed on
27
papier-gb.indd
27
30/07/01, 15:22
- To end the call:
Ø Press the jog wheel of your Mondo. You can also click on the
keyboard or press briefly the
button on your Mondo.
key on the soft
The call time counter will stop, and then disappear, as will the symbol
. After a few seconds,
the Telephone application screen saver will be displayed once more.
You can speed up the display of the screen saver by tapping on the Exit function key as
soon as you hang up.
• Receiving of a telephone call
- Required conditions:
Ø The battery of your Mondo must be sufficiently charged.
When the level of charge is too low, the message Battery low! is displayed on the screen and
you hear a warning sound. If this happens, close the Telephone application and recharge the
battery of your Mondo (for more details about the procedure to follow, see the corresponding
section of this manual, on page 19).
Ø Your Mondo must be fitted with a valid SIM card.
Ø Your Mondo must be situated in a zone that is covered by the GSM network.
If the place in which you find yourself is covered by the GSM network, the network signal
indicator light will flash green (slowly). If not, this indicator will flash red (slowly) and
the telephone screen (situated in the upper right part of the screen of your Mondo) will
remain blank.
Ø The telephone application must be open (whether or not the screen of your Mondo
is on standby).
- When you receive a call:
Ø Your Mondo will ring (unless you have set the volume of the ringing tone to zero, or
activated the Vibrate alert mode).
Ø The screen backlight lights up for a short time.
Ø The indicator light situated at the top of the Mondo will flash orange.
Ø The incoming call screen of the telephone application will be displayed automatically.
Ø The symbol
will flash on the screen.
From this moment, you may:
ð Answer the call immediately by pressing the jog wheel of your Mondo or tapping
on the
key on the virtual keyboard.
ð Stop the ringing tone (for example, to take the time to leave a room) by pushing
the jog wheel downwards, or by tapping on the Silence function key on the
virtual keyboard, before taking the call as shown below.
ð Refuse the call (and send the caller an engaged tone) by pushing the jog wheel
upwards or by tapping on the
key on the virtual keyboard.
- To answer a call:
Press the jog wheel of your Mondo. You can also click on the
key on the soft
keyboard or press briefly the
button on your Mondo.
The symbol
will be displayed on the screen, as well as the duration of the call.
Continue the call normally.
PLEASE NOTE: if you want to stop the ringing tone (for example, to take the time to
leave a room), turn the jog wheel downwards or tap on the Silence function key on the
virtual keyboard before answering.
28
papier-gb.indd
28
30/07/01, 15:23
Ø If the caller’s number is accessible, and if it corresponds to a number recorded
in the folder of your Mondo, the name associated with this number will be
displayed on the screen.
Ø If the caller’s number is accessible, and if it does not correspond to any number
recorded in the folder of your Mondo, the number will be displayed on the screen.
Ø If the caller’s number cannot be determined, the message Number unknown will
be displayed on the screen during the presentation of the call. The message Call 1
will then be displayed when you answer.
Ø If the caller does not want his number to be known, the message Number withheld
will be displayed on the screen during the presentation of the call. The message
Call 1 will then be displayed when you answer.
Ø If the call is established on your second line, the symbol
screen (for more details, see page 26).
will be displayed on the
- To end the call:
Ø Press the jog wheel of your Mondo. You can also click on the
keyboard or press briefly the
button on your Mondo.
key on the soft
The symbol
will disappear. After a few seconds, the Telephone application screen saver
will be displayed once more. You may speed up the display of the screen saver by tapping
on the Exit function key.
If it is accessible, the number of the caller will be automatically recorded in the journal
of calls received.
- To refuse the call:
PLEASE NOTE: This action sends an engaged tone back to the caller.
When your Mondo indicates an incoming call (by presenting you, possibly, with the
number or the name of the caller), you may refuse the call as follows:
Ø Push the jog wheel upwards or tap on the
key on the virtual keyboard.
• Emission of sound recordings during communication
To play a recording to your correspondent, select a sound file (Wave, MP3 or WMA)
from the file explorer, then validate the operation. The recording is emitted and the
microphone on your Mondo is cut (it is recommended to set the volume to 3/4). To
resume the conversation with your correspondent, click on .
• Closing the Telephone application
WARNING: If the telephone application is open, it remains active even when you press the
button to put the screen of your Mondo on standby.
It is essential that you close the Telephone application in places where it is requested to
switch off mobile telephones (such as aircraft, hospitals, etc.).
To close the Telephone application:
Ø Press for a long time on the
program button situated in the lower part of
your Mondo.
29
papier-gb.indd
29
30/07/01, 15:23
• Safety mode
In places where it is requested to switch off mobile telephones, you can lock the closure
of the telephone application by activating Safety mode.
When Safety mode is activated, you can use other applications or manipulate your
Mondo without any risk of opening the Telephone application by mistake.
- To activate Safety Mode:
1- Tap on ÿ Start in the navigation bar.
2- Tap on Parameters in the list proposed to you.
3- Tap on Safety mode in the list of parameters.
4- Tap on Activated to activate the Safety mode.
- To de-activate the Safety mode:
1- Press the
program button.
A message will immediately be displayed on the screen to ask you if you want to de-activate the
Safety mode.
2- Tap on YES to de-activate safe mode (or on NO to cancel).
PLEASE NOTE: You may also de-activate the safety mode by means of the ÿ Start
menu, using the same procedure as that described above.
2- Data transfer
For data transfer on the GPRS network, refer to the CD-ROM or online help
section "Your Mondo and the GPRS".
• Using your Mondo’s built-in modem
Your Mondo has a built-in modem and a telephone application which enables you to send
and receive telephone calls via your GSM operator’s network.
This built-in modem can also be used to surf on Internet or send e-mails using other
applications such as Microsoft Internet Explorer and Microsoft Inbox.
In order to use your Mondo’s modem with these applications, you must first set
the parameters for the pre-programmed Mondo GSM connection. The procedure is
described in the section Setting the pre-programmed Mondo GSM connection
parameters.
To find out how to run the Mondo GSM connection from the ÿ Start menu or
from Microsoft Internet Explorer or Microsoft Inbox, refer to the section Using the
pre-programmed Mondo GSM connection.
• Setting the pre-programmed Mondo GSM connection
parameters
Your Mondo has a modem connection pre-programmed for the built-in GSM telephone.
This connection is called Mondo GSM. The name of the modem used for this connection
is Trium Mondo.
Before you can use this connection, you must set the parameters using the information
provided by your Internet Service Provider (ISP).
Ask your ISP for the following details:
Ø The server telephone number.
Ø Your user name and your password for connecting to the network.
30
papier-gb.indd
30
30/07/01, 15:23
Ø The name of the incoming mail server.
Ø The name of the outgoing mail server.
Ø Your e-mail user name and password.
When you have these details, you can start to set the parameters for the Mondo GSM
connection, following the instructions given below.
Ø Stage 1: Setting the ISP telephone number parameters.
1- Click on ÿ Start to access the main menu.
2- Click on Parameters.
3- Click on the Connections tab at the bottom of the screen.
4- Click on Modem.
5- Click on Mondo GSM.
6- Click on Next.
7- Type in the your ISP’s Telephone number (NB: use the international format "+…"
to avoid any connection problems when you call from abroad).
8- Click on Next.
9- Click on End.
The basic connection parameters have now been defined.
We strongly recommend that you do not change the other parameters.
Ø Stage 2: Selecting the Dial from location.
1- Click on ÿ Start to access the main menu.
2- Click on Parameters.
3- Click on the Connections tab at the bottom of the screen.
4- Click on Modem.
5- Click on the Dial tab at the bottom of the screen.
6- Select Mondo in the Dial from field.
PLEASE NOTE: The Mondo location must be selected when setting the parameters
for any connection using the built-in GSM telephone as a modem.
7- Click on ok.
Ø Stage 3: Recording the user name and password.
1- Click on ÿ Start to access the main menu.
2- Click on Programs.
3- Click on Connections.
4- Click on Mondo GSM.
5- Type in your User name.
6- Type in your Password.
WARNING: Leave the Domain field blank.
7- Check the Save password box if you wish (if you do not check this box you will
be asked for the password each time you connect).
PLEASE NOTE: If you want to save your user name and password, you must
confirm this by clicking on Connect to connect and then disconnect by clicking
on Cancel.
Ø Stage 4: Selecting the Mondo GSM connection as default connection for
Microsoft Internet Explorer.
1- Click on ÿ Start to access the main menu.
31
papier-gb.indd
31
30/07/01, 15:23
2- Click on Internet Explorer.
3- Click on Tools at the bottom of the screen.
4- Click on Options.
5- Click on the Connections tab at the bottom of the screen.
6- Select Mondo GSM in the Type field.
The Mondo GSM connection will be selected automatically when you connect to Internet.
7- Click on ok.
PLEASE NOTE: If you do not set the Mondo connection as the default connection,
you cannot disconnect from Internet Explorer.
Ø Stage 5: Setting the Inbox application parameters for Mondo GSM connection.
1- Open the Inbox application.
2- Click on Tools.
3- Click on Options.
4- Click on the service required (other than SMS).
If you wish to create a new service, click on New…
5- In the Server frame: type in the POP server name or IMAP given to you by the
ISP associated with the Mondo GSM connection.
6- In the User name field, type in your e-mail User name.
7- In the Password field, type in your e-mail Password.
8- Check Save password (if required).
9- Click on Next.
WARNING: Leave the Domain (Windows NT) field blank.
10- In the SMTP host field for sending the message, type in the details provided
by your ISP.
11- In the Return address field: Type in a second e-mail address if you wish
to receive replies to your messages or messages to be sent to another e-mail
address.
12- Click on Next.
If necessary, change the parameters in the window which is displayed.
13- Click on Next.
If necessary, change the parameters in the window which is displayed.
14- Click on End.
The parameters for your Mondo GSM connection have now been set and stored in
your Mondo. You can surf on Internet and send and receive e-mails.
If you wish, you can create several Mondo GSM connections. You just need to
set the parameters for other connections as described above, giving them different
names.
PLEASE NOTE: Make sure that the back-up battery is fitted and is operating correctly. If
it is not you may lose all the information on the connection parameters if your Mondo
battery goes flat or if the battery is overcharged.
• Using the pre-programmed Mondo GSM connection
The Mondo GSM connection may be established in several ways.
PLEASE NOTE: The modem can only used if the Telephone application is open and
connected to your telephone operator’s network.
32
papier-gb.indd
32
30/07/01, 15:23
- From the ÿ Start menu:
1- Click on ÿ Start to access the main menu.
2- Click on Programs.
3- Click on Connections.
4- Click on Mondo GSM.
5- Click on Connect.
An information window is displayed during connection. When connection has been established,
click on Hide status to close the information window.
To disconnect from the ÿ Start menu:
1- Click on ÿ Start to access the main menu.
2- Click on Today.
3- Click on
at the bottom right of the screen to display the connection status.
4- Click on Disconnect to disconnect.
An audible signal indicates that your Mondo is no longer connected.
- From Microsoft Inbox :
1- Run Microsoft Inbox.
2- Click on Services.
3- Select the service required, other than SMS.
4- Click on Connect.
The name of the connection used (Mondo GSM) is displayed.
5- Type in your User name and your Password, if necessary.
6- Click again on Connect.
An audible signal indicates that communications have been established.
To disconnect:
1- Click on Services.
2- Click on Disconnect.
An audible signal indicates that your Mondo is no longer connected.
- From Microsoft Internet Explorer :
1- Run Microsoft Internet Explorer.
2- Click on Tools.
3- Click on Connect.
The name of the connection used (Mondo GSM) is displayed.
4- Type in your User name and your Password, if necessary.
5- Click again on Connect.
An audible signal indicates that communications have been established.
To disconnect:
1- Click on Tools.
2- Click on Disconnect.
An audible signal indicates that your Mondo is no longer connected.
NB : When the connection has been established, using any application, you can no
longer make or receive telephone calls. Your callers will be redirected to your ansaphone
(depending on the operator). You can disconnect at any time by clicking on
in the
telephone application.
33
papier-gb.indd
33
30/07/01, 15:23
• Restoring the Mondo GSM connection
If you accidentally delete the Mondo GSM connection, it can be restored as follows:
1- Close the Telephone application.
2- Open it again.
This simple operation is all that is required to restore the Mondo GSM connection.
However, you then need to reset the parameters for this connection using the
information supplied by your ISP.
The procedure is described in the section "Setting the pre-programmed Mondo
GSM connection parameters".
• Trouble shooting
Problem
It is not possible to connect.
Solution
Check that the Telephone application is enabled and that you
are in an area covered by your operator’s network.
Check the modem connection parameters, in particular the
number dialled.
Check the dialling mode.
Check the user name and connection password.
Check that the "domain" field is blank.
I have accidentally deleted
Close the Telephone application. Then open it again.
my Mondo GSM connection. The Mondo GSM connection is restored immediately.
However, you need to reset the parameters for this connection following the instructions in the section "Setting the
parameters for the Mondo GSM connection".
My user name and password You have not checked the Save password box.
Or you clicked on [Cancel] immediately afterwards.
have not been saved.
Refer to the section "Setting the Mondo GSM connection
parameters" to find out how to save your password.
All my connection parameters You do not have a back-up battery and you have removed the
have disappeared.
battery from your Mondo for too long a time. Reconnect the
supply to your Mondo, then reset the Mondo GSM connection
parameters following the instructions in the section "Setting
the Mondo GSM connection parameters").
When I click on "Disconnect", Check that you are disconnecting using the application you
the system does not discon- used to connect. Otherwise:
nect.
1- Select the application Today in the ÿ Start menu.
2- Click on
at the bottom of the screen to display the
connection status.
3- Click on Disconnect.
An audible signal indicates that your Mondo is no longer connected.
34
papier-gb.indd
34
30/07/01, 15:24
3- SMS
• Description of the SMS service
The SMS service allows you to send and receive "mini-messages" (or "short messages").
These messages are forwarded to other subscribers to the GSM network or are received
from various sources, depending on the operators of the network.
To access this service, you must use the Microsoft Mailbox application (in order to
configure, write, read and store the messages) and the Telephone application (in order
to be able to send and receive messages via the GSM network). These two applications
are pre-installed in your Mondo.
PLEASE NOTE: Due to the fact that the SMS service operates in conjunction with the GSM
network, it is only possible to send and receive messages if:
• the Telephone application of your Mondo is active and
• you are situated in the area covered by your operator’s GSM network.
Before you can send or receive SMS messages on your Mondo, you must configure the
SMS service (for details of the procedure, refer to the relevant section in this Manual).
• Opening the mailbox application
You can do this in various ways:
Ø Direct access:
Press the
program button on the lower part of your Mondo.
Ø Access from the main menu of your Mondo:
1- Click on ÿ Start in the navigation bar.
2- Click on Programs.
3- Click on Mailbox.
Ø Access from the Telephone application (only if you have received new SMS
messages):
Click on the Read function key of the Telephone application.
• Configuring the SMS service
1- Composition of a message template (Microsoft "stationery"):
Certain information relating to the messages to be sent (Message template,
Acknowledgement and Reply requested) must be defined beforehand in order to
ensure that the messages are correctly handled.
Each message template contains the following information:
Ø The number of the messaging centre: This information is provided by your
operator. The messaging centre is a transit area where your messages are
temporarily stored if the contact cannot be contacted (either because his telephone
is switched off or because he is outside the area covered by the network or for
other reasons).
Ø The message format: This information is used by the network in order to adjust the
format of the message to the capacities of the receiver. The predefined formats are:
Text (the default format), Voice, Fax G3, X-400 and Paging. Use of the Text format
(the most commonly used format) is strongly recommended.
Ø The period of validity of the message: This information is used by the network in
order to delete messages which have been stored in the messaging centre for an
excessive long time. At the end of the indicted period, the message is considered to
be obsolete and it is discarded.
35
papier-gb.indd
35
30/07/01, 15:24
The predefined periods are 12 hours, 1 day, 2 days and Maximum (the maximum
period permitted by the operator).
PLEASE NOTE: By creating a number of different templates, you can send messages
in different formats by using different messaging centres.
2- Viewing or modifying a template from the SIM card:
Message templates can be pre-programmed by your operator on your SIM card. In
this case, the templates are displayed under the names "SIM card Template 1", "SIM
card Template 2", etc. (according to the information displayed on the SIM) and are
preceded by the
symbol.
- To view or modify these templates:
1- Open the Mailbox application.
2- Click on Tools.
3- Click on Options.
4- Click on SMS* in the list of services.
5- Click on the SIM card template you wish to view or modify.
The Modify/View screen for this template is displayed.
PLEASE NOTE: You cannot change the Name of the SIM card templates (they are
always Template 1, Template 2, etc..).
6- If necessary, change the Number of the messaging centre.
7- If necessary, select a different message Format from the displayed list of
options.
8- If necessary, select a different Period of validity from the displayed list of
options.
9- Click on ok.
The display then reverts to the Short message settings screen.
If you have made any changes, they are now stored in the SIM card.
3- Viewing or modifying a template from the Mondo:
The message templates defined in your Mondo are displayed under their name,
preceded by the
symbol.
- To view or modify these templates:
1- Open the Mailbox application.
2- Click on Tools.
3- Click on Options.
4- Click on SMS* in the list of services.
5- Click on the Mondo template you wish to view or modify.
The Modify/View screen for this template is displayed.
6- If necessary, change the Name of the template.
7- If necessary, change the Number of the messaging centre.
8- If necessary, select a different message Format from the displayed list of options.
9- If necessary, select a different Period of validity from the displayed list of
options.
10- Click on ok.
The display then reverts to the Short message settings screen.
If you have made any changes, they are now stored in your Mondo.
36
papier-gb.indd
36
30/07/01, 15:24
4- Creating a new message template:
1- Open the Mailbox application.
2- Click on Tools.
3- Click on Options.
4- Click on SMS* in the list of services.
5- Click on New….
The Message template screen is displayed.
6- Enter the Name of the template you wish to create.
PLEASE NOTE: You must choose a different name from the names already allocated
to the existing templates.
7- Enter the Number of the messaging centre.
8- Select a message Format from the displayed list of options.
9- Select a Period of validity from the displayed list of options.
10- Click on ok.
The display then reverts to the Short message settings screen. Your new message
template has been stored and its name will appear in the list of templates.
5- Choosing a template for sending messages:
The template which has been most recently modified or viewed is selected by default
for sending messages. This template remains active until you decide to select a
different one.
- If you wish you use a different template:
1- Open the Mailbox application.
2- Click on Tools.
3- Click on Options.
4- Click on SMS*in the list of services.
5- Click on the template of your choice.
Details of the template are displayed.
6- Click on ok.
The display then reverts to the Short message settings screen.
The template of your choice is now selected in the list of templates.
7- Click on ok.
The display then reverts to the Services tab on the Options screen.
8- Click on ok.
The display reverts to the Mailbox screen.
6- Deleting a message template:
1- Open the Mailbox application.
2- Click on Tools.
3- Click on Options.
4- Click on SMS*in the list of services.
5- Click and hold on the name of the template you wish to delete.
The prompt Delete is displayed.
6- Click on Delete.
You will be asked to confirm that you wish to delete the template.
7- Click on YES to confirm.
The display then reverts to the Short message settings screen.
The selected template has now been deleted from the list of templates.
PLEASE NOTE: For security reasons, it is not possible to delete a message from the SIM card.
37
papier-gb.indd
37
30/07/01, 15:24
7- The "Acknowledgement" and "Reply requested" options:
These options are common to all template messages:
Ø Acknowledgement: This option is used to obtain information about the result of
your transmission. The message may have been forwarded to the contact or it may
have been discarded by the network if its period of validity has expired or due to an
overload in the network.
Ø Reply requested: This option is used to ask the contact to reply to the message
you have forwarded to him. In this case, the cost of the reply will be charged to you.
- To activate or deactivate these options:
1- Open the Mailbox application.
2- Click on Tools.
3- Click on Options.
4- Click on SMS* in the list of services.
5- Use the checkboxes to activate or deactivate Reply requested and
Acknowledgement options.
PLEASE NOTE: Your choice is applicable to all your SMS messages, regardless
of which template you have used.
• Receiving and reading new incoming messages
You can be notified of the arrival of new SMS messages in several different ways:
Ø Your Mondo emits an audible signal (bleep).
Ø The screen back-lighting is temporarily activated.
Ø The message indicator lamp at the top of the Mondo emits a series of (slow)
orange flashes.
Ø The standby screen of the Telephone application is displayed (if it is open).
Ø The
symbol is displayed on the screen. This symbol is followed by a figure
indicating the number of SMS messages received.
- To read the new received SMS messages:
1- Click on the Read function key in the standby screen of the Telephone application.
2- Click on the header of the message you wish to read.
• Composing and sending a new SMS message
- To compose a new message:
1- Open the Mailbox application.
2- If the SMS message mailbox does not automatically open on the screen, click on
Services at the base of the screen, then click on SMS in the list of optional services.
3- Click on New, on the left at the base of the screen, in order to display the screen for
composing the new message.
4- Either enter the telephone number of the contact in the To: field or select the
number from your address book by clicking on
at the base of the screen (the
address book only shows contacts with one or more completed e-mail fields. Select
the contacts who have a mobile telephone number in the E-mail3 field).
PLEASE NOTE: If you wish to send your message to a number of contacts, insert a
semicolon between their telephone numbers.
5- If you wish, enter the subject of your message in the Subj: field (if it is left blank,
the beginning of your message will automatically be entered in the field).
38
papier-gb.indd
38
30/07/01, 15:24
6- If you wish to send copies of your message to other contacts, click on the arrow
on the right of the screen to display the Cc: and Cci: fields.
PLEASE NOTE: In this case, the message will be forwarded in successive transmissions (as many transmissions as there are contacts).
7- Click on the text area, then enter the text of your message.
PLEASE NOTE: The maximum length of a message text is 160 characters. If you enter
a longer text, it will be separated into as many messages as necessary, which will
then be transmitted in succession.
- To send your message:
When you have finished composing your message, click on Send in the top left corner
of the screen.
PLEASE NOTE:
• If the Telephone application is closed or if you have not received a signal from the
network, your message is stored in the Outbox folder.
• If the Telephone application is open and if you are situated in an area which is covered
by the network, your message is sent immediately. An information window opens to
indicate the progress of the transmission.
• If several contacts have been selected and/or if the message text contains more
than 160 characters, your message will be forwarded in a series of successive
transmissions.
• In order to avoid overloading the network, try to limit the number of contacts and
the size of your messages.
- To save your message without sending it:
When you have finished composing your message, click on ok in the top right corner of
the screen.
Your message is then saved in the Inbox folder.
If you wish, you can view the message, amend it and send it at a later time or date.
• Selecting contacts from the address book
When you are ready to send a message, you can select the mobile telephone number of
the contact from your address book, instead of entering it manually in the To: field.
1- Click on New in the bottom left corner of the screen to open the page for composing
a new message.
2- Click on
at the base of the screen.
The list of contacts stored in your address book which have entries in the E-mail field are
displayed on the screen.
3- Use the checkboxes to select the number of the contact.
If you wish to send your message to several contacts, check as many boxes as necessary.
4- Click on ok.
The display now reverts to the page for composing your message. The telephone number of
the recipient of your message is displayed in the To: field.
• Replying to a received message
There are ways of replying to a message.
- From the list of received messages:
1- Click and hold on the header of the message to which you wish to reply.
2- Click on Reply to send your reply only to the originator of the received message or
on Reply to All to send your reply to the originator of the received message and to
all the contacts listed under Copy to: (if any are listed).
39
papier-gb.indd
39
30/07/01, 15:24
- From the Read screen of the opened message:
1- Click on
at the base of the screen.
2- Click on Reply or on Reply to All.
In both cases, the page for composing your message is displayed on the screen. The telephone
number of the contact is displayed in the To: field, so you do not have to enter it manually. The
header and the text of the original message are displayed in the text field (you can hide these if
you wish).
3- Input your reply.
4- Click on Send in the top left corner of the screen if you wish to send your reply
immediately.
If you are not ready to send your reply, click on ok to save it in the Inbox folder.
• Forwarding a received message
There are two ways of forwarding a message.
- From the list of received messages:
1- Click and hold on the header of the message to which you wish to transfer.
2- Click on Next to forward the message to one or more contact(s) of your choice.
- From the Read screen of the opened message:
1- Click on
at the base of the screen.
2- Click on Next.
In both cases, the page for composing your message is displayed on the screen. The text of
the message to be forwarded is displayed in the text field (you can supplement or amend the
text if you wish).
3- Enter the mobile telephone number of the contact(s) in the To: field or select it (or
them) in your address book.
4- Click on Send in the top left corner of the screen if you wish to forward the message immediately.
If you are not ready to forward the message, click on ok to save the message to be forwarded in the Inbox folder.
• Managing messages
1- The folders used in the SMS service
- The "SMS" folder:
This is the general folder of the SMS service.
Initially, it comprises five folders which can neither be renamed nor deleted:
Ø Inbox.
Ø Outbox.
Ø Sent Items.
Ø Deleted Items.
Ø SIM SMS.
In order to ensure that your messages are managed efficiently, you can create other
folders (which you can delete). All the messages contained in the SMS service
folders can be copied or moved as you wish.
- The "Inbox" folder:
This folder contains all the received messages which have not been deleted or
moved, together with the message you have composed but which you have not yet
sent. Of course, any new incoming messages will be stored in this folder.
40
papier-gb.indd
40
30/07/01, 15:24
- The "Outbox" folder:
This folder contains all the messages which are currently been transmitted or are
ready to be sent.
If the Telephone application is open when a message is being sent, it is only
temporarily stored in the Outbox folder. It is then transferred to the Sent Items
folder as soon as the transmission has been completed.
If the Telephone application is closed when a message is being sent, the message
cannot be sent. It is then stored in the Outbox folder and must be sent at a later
time or date (when the Telephone application is open).
- The "Sent Items" folder:
This folder contains all the messages you have already sent and which have either
been deleted nor moved.
- The "Deleted Items" folder:
This folder contains all the messages you have deleted from the other folders.
- The "SIM SMS" folder:
This folder contains copies of all the SMS messages stored in your SIM card. Any
message copied in this folder is also copied in the SIM card. Any message moved or
deleted from this file is also deleted from the SIM card.
2- To access the folder of your choice
1- Open the Microsoft Mailbox application by pressing the corresponding program
button or by clicking on Mailbox in the Programs menu.
By default, an SMS folder opens. Its name is displayed in the top left corner of the screen,
just below the navigation bar. This name may not be displayed in full: for example, "Outb…"
signifies Outbox.
2- If the folder opened by default is not the folder you wish to access, click on the
arrow to the right of the name of the folder.
3- Then click on the name of the folder you wish to access.
3- To copy or move a message
In the list of messages (regardless of which folder is open):
1- Click and hold on the header of the message you wish to copy or move.
2- Click on Copy To… or on Move To … to copy or move your message to another
folder.
PLEASE NOTE: Unlike the moved message, the copied message is not deleted
from the original folder.
3- Click on the name of the folder to which you wish to copy or move the
message.
4- Click on ok to confirm your choice.
PLEASE NOTE: If you move a message to the Outbox folder, if this message
contains more than one contact in the To: field and if the Telephone application
is open and connected to the network, the message is transmitted as soon as
you click on ok.
4- Deleting a message
- To delete a message from a folder while keeping the option of retrieving it at
a later date:
PLEASE NOTE: This operation does not apply to messages stored in the Deleted
Items folder.
41
papier-gb.indd
41
30/07/01, 15:24
1- Click and hold on the header of the message you wish to delete.
2- Click on Delete to move the message to the Deleted Items folder.
PLEASE NOTE: The messages stored in the Deleted Items folder can be viewed,
amended, moved or sent, just like the other messages.
- To permanently delete a message:
1- Open the Deleted Items folder.
2- Click and hold on the header of the message you wish to permanently delete.
A prompt is displayed, asking you to confirm that you wish to permanently delete the
selected message.
3- Click on Yes to permanently delete the message of No to save it.
• Trouble shooting
Ø An audible signal (bleep) has notified me that a message has arrived, but it does
not appear in my mailbox.
If the Telephone application is open, you can receive SMS messages even if a
connection is in progress (this may be a telephone call, a data download or even an
Internet or WAP™ connection).
These messages, which are temporarily stored in the Telephone application, have not yet
been transferred to your Inbox and this is why you cannot see them.
Once the connection has been terminated, you can transfer these messages to your
Inbox by clicking on the Read function key of the Telephone application.
Ø I can open a message but I cannot amend it.
This happens if you open a message which has been received or already sent. Only
messages which are awaiting transmission or are currently being composed can be
directly amended. To amend received messages or messages which have already been
sent (before re-transmitting them, for example), copy the text and then paste it into the
text area of a new message (you can then amend it as you wish).
Ø I cannot send attachments.
The SMS service does not support the addition of attachments to your messages.
Ø I press on "Send" but the message is not transmitted.
This must be because the Telephone application is closed: the message has been stored
in the Outbox folder. When the Telephone application is open again and connected to
the network, it will offer to send this message for you. Click on Yes to send the message
straight away (it will then be transferred to the Sent Items folder). Click on No to delay
sending the message (you will be able to send this message later from the Outbox
folder).
Ø When I open my address book to select a contact, there are no contacts listed.
The Microsoft Mailbox application can only display contacts for which at least one of the
E-mail fields has been completed. It is possible that you have not completed any of
these fields in your address book. You should therefore manually enter the mobile
telephone number of your contact in the To: field so that you can send your message.
PLEASE NOTE: SMS messages can only be sent to GMS mobile telephones. When you
record a new contact in your address book, do not forget to enter his mobile telephone
number in the Mobile Tel.: field and, where necessary, in the E-mail3: field (the numbers
entered in the Mobile Tel.: fields are automatically coped to the E-mail3: fields when you
open the Telephone application, unless they have already been recorded there).
42
papier-gb.indd
42
30/07/01, 15:24
MICROSOFT Applications
You can access all the Microsoft applications on your Mondo by selecting them from
the menu ÿ, or by pressing the corresponding program buttons. These program buttons
enable you to have rapid access to your three favourite applications.
The applications that are programmed by default are Microsoft Inbox (left hand button),
Microsoft Calendar (centre button) and Microsoft Contacts (right hand button).
PLEASE NOTE: you may personalise the list of applications that you wish to see in the
menu ÿ, and the three program buttons.
Ø Microsoft Inbox
This application enables you to send and receive electronic messages by connecting
directly to a mail server via an Internet Access Provider or a network. You can also carry
out a synchronisation with the Microsoft Exchange or Microsoft Outlook applications
on your desk top computer.
Ø Microsoft Calendar
To monitor your appointments and organise your meetings.
You can view your appointments in a variety of different formats (Diary, Day, Week,
Month and Year) and move easily from one view to another.
Ø Microsoft Contacts
To save and recall easily information concerning your friends and colleagues, and
make telephone calls.
Ø Microsoft Notes
To create handwritten or typed notes, reminders, drawings and voice recordings rapidly.
You can include voice recordings in your notes.
Ø Microsoft Pocket Excel
This application is similar in function to the Microsoft Excel software installed on
your desk top computer. It enables you to have easy access to copies of your files.
You can create new files on your Mondo or copy files from your desk top computer
to your Mondo.
Ø Microsoft Pocket Word
This application is similar in function to the Microsoft Word software installed on
your desk top computer. It enables you to have easy access to copies of your files.
You can create new files on your Mondo or copy files from your desk top computer
to your Mondo.
Ø Microsoft Pocket Internet Explorer
This application enables you to connect to the Internet via an access provider or a
network, and then to browse on the Web.
When not connected to the Internet, you can consult Web pages, favourites or mobiles
channels which have been downloaded to your Mondo.
Ø Microsoft Money
For entering and viewing your financial transactions, check your balances and monitor
your investments.
43
papier-gb.indd
43
30/07/01, 15:25
Ø Microsoft Reader
For reading electronic books on your Mondo.
Download books to your Mondo from your desk top computer or your favourite Web
site for electronic books. Then use Microsoft ActiveSync to copy the book files to your
Mondo, then use Microsoft Reader to read them.
Ø Microsoft Tasks
For monitoring tasks that need completing within a specified time period. Tasks which
have not been done on time are displayed in heavy print within the list.
Ø Microsoft ActiveSync
For synchronising the information contained in the Microsoft Outlook, Microsoft
Schedule+ or Microsoft Exchange applications on your desk top computer with those
contained in the corresponding applications on your Mondo.
At each synchronisation, ActiveSync compares the modifications carried out on your
Mondo and on your desk top computer and updates both units with the most recent
information.
Ø Microsoft File Explorer
For finding files in your Mondo and filing them in directories.
Ø Microsoft Windows Media Player
For listening to your MP3 or Media Player digital audio files which have been downloaded
beforehand from an Internet site or from your computer.
PLEASE NOTE: This list of Microsoft applications is not exhaustive. Other Microsoft
applications may also be installed on your Mondo.
• Addition and deletion of Applications
The applications installed on your Mondo in the factory are stored in ROM ( Read Only
Memory ). You can not delete or modify these applications, and there is no risk of losing
the content of the ROM by accident.
The applications and / or data files that you install yourself on your Mondo after factory
calibration are stored in RAM (Random Access Memory).
You may install any compatible application on your Mondo, if sufficient memory is available.
See the Extras folder on the ActiveSync CD to know what additional applications you
can install on your Mondo.
• Connection to the Internet
You can connect to the Internet using the Trium Mondo modem incorporated in your
Mondo, using one of the pre-installed remote methods, GSM or GPRS.
See the Trium Mondo CD-ROM for further information.
• Infrared data transfer
By means of the infrared port, you can exchange information such as contacts,
appointments, files or documents with other units equipped with an infrared port. You
can also connect to the Internet via an infrared modem.
44
papier-gb.indd
44
30/07/01, 15:25
Appendix
Accessory:
- The Personal Handsfree
Connection (fig.1):
Insert the jack (a) of the Personal Handsfree into the audio socket (b) of your
Mondo.
Use (fig.2):
1- Place the earphones (c) in your ears.
The microphone (d) is then situated at the level of your mouth.
2- Attach the clip (e) to your clothing.
3- Adjust the sound volume of your Mondo, as required.
c
a
e
d
b
PLEASE NOTE: In addition to the jack (a) provided in Personal handsfree, the audio
connector (b) can accept a 2.5 mm male adapter jack to the 3.5 mm female stereo jack.
With this adapter, you can connect your Mondo to a wide range of audio devices which
are compatible with a 3.5 mm stereo connector jack. Devices of this kind include, for
example, hi-fi systems, hi-fi headsets, car radios, etc.
In this application, the entire output from the Mondo is routed to the connected
audio device. During a telephone conversation, the active microphone is the Mondo
microphone. It is recommended that the volume control should be set to 3/4 when an
audio device is connected. You should connect your Mondo to a "Line", "Aux", "CD",
or "Video" input.
45
papier-gb.indd
45
30/07/01, 15:25
Trouble shooting
Problem
Possible cause and solution
Impossible to activate the screen of your Mondo.
Check that the battery is fully charged and correctly
connected to the phone.
The setting of the contrast of the display is perhaps
too low. Adjust the contrast.
The flashing orange charge indicator is not on and
the flashing battery icon is not displayed.
A charging or battery problem. De-activate and
disconnect the charger. Reconnect it and try again.
There may be no mains supply. Check mains supply.
The AC/DC charger may be faulty. Return to your
dealer and try substitution with another Mitsubishi
adaptor. If faulty contact your dealer.
Short standby and talk times.
Cell broadcast is permanently on, using more battery
power. Phone is in a poor signal area and therefore
always on full power. Incorrect charging and discharging. Always charge and discharge your battery fully.
The battery is wearing out. Replace the battery.
Calls cannot be made or received.
Check that you have at least one signal strength bar
([level1]). Try in a stronger signal strength area. If the
name of a network is not displayed, check your SIM
is ok, check registration with your network/service
provider. Call barring option is turned on. Turn it off.
Call cost limit is reached.
Stored telephone numbers cannot be recalled.
Fixed Dialled Number or Call Barring features are
turned on. Check features and turn them off.
Flashing
The storage capacity of the SIM card is not sufficient
to record a new SMS message. You must read your
new messages to free some space.
.
Guarantee
Pan European Service
If you require service, then in the first instance, you should contact your supplier.
Should you experience any difficulty then please contact your nearest MITSUBISHI
location listed below for information on other service centres.
UNITED KINGDOM
Tel.: (0800) 912 00 20
SPAIN
Tel.: (902) 11 68 58
FRANCE
Tel.: (0825) 86 82 83
ITALY
Tel.: (800) 27 59 02
GERMANY
Tel.: (01803) 33 71 84
IRELAND
Tel.: (1800) 92 70 12
To obtain Warranty Service, you will require your original equipment purchase invoice
or irrefutable proof of purchase.
Please see warranty terms and conditions for in warranty service.
46
papier-gb.indd
46
30/07/01, 15:25
Pan-european GSM End-user Guarantee Conditions
1. You can benefit from this guarantee only if you are the original end-user purchaser.
2. MITSUBISHI guarantees that for a period of twelve (12) months from the date
of purchase from your dealer, the Product shall be free from defects in materials
and workmanship. Subject to the conditions below, Mitsubishi will indemnify you
against all cost of parts and labour for repairs to or replacement of the product
or parts (which may include equipment of similar type) where conducted by an
authorised MITSUBISHI GSM service centre. MITSUBISHI shall be entitled to retain
product which has been replaced.
3. Any claims must be made to an authorised MITSUBISHI GSM service centre in
the countries mentioned in the service card enclosed with the product. In case
of difficulty you can contact the Mitsubishi companies listed in the service card
to obtain details of your nearest authorised MITSUBISHI GSM service centre. As
a condition of this guarantee, the date of your purchase must be confirmed by
producing your original invoice from your supplier or your sales receipt, showing
the serial number, together with the service card. Final determination of guarantee
claim eligibility shall be made by MITSUBISHI. MITSUBISHI shall not be liable for
shipment costs to and from an authorised GSM MITSUBISHI service centre ; the
product travels at your risk.
4. This guarantee does not cover:
a) battery defects of any nature;
b) non-compliance with directions for use;
c) installation or removal charges where the product is installed in a vehicle;
d) defects or failures caused by accident, misuse, improper installation or improper
repair by an unauthorised repairer, alteration or modification, neglect, failure
to use for normal purpose, Acts of God, water ingress, use in adverse
environmental conditions (humidity or temperature);
e) cost of or performance of modifications to product to adapt or adjust to conform
to national or local safety laws, where such safety laws go beyond harmonised
European Union standards;
f) loss of use of the product or consequential loss of any nature;
g) loss of use of air-time, loss of use of any loaned equipment or ancillary
equipment;
h) provision of incorrect or insufficient signal on air-time network, upgrading of
product software to changes in network operating parameters, mains supply
voltage fluctuations, incorrect SIM card (memory card) parameters for connection
to airtime retailer;
i) damage caused by non-MITSUBISHI accessories.
5. Any guarantee claim or service does not extend the original guarantee period unless
so required by prevailing national law.
6. This guarantee is valid only if the product is purchased and used in the European
Union, Norway, Iceland or Switzerland.
THIS GUARANTEE DOES NOT AFFECT YOUR STATUTORY RIGHTS.
47
papier-gb.indd
47
30/07/01, 15:25
DECLARATION OF COMPLIANCE
Name
Address
Town
Postal code
: Mitsubishi Electric Telecom Europe S.A.
RCS Nanterre B 307 593 129
: 25, boulevard des Bouvets
: Nanterre Cedex
: 92741
Identification of the product
Nature
Type
Sales reference
Other information
: Mobile Cell Telephone
: Dual band GSM 900/DCS 1800 phase 2+
: MT-750
:
Identification of the notified organization
Name
Identification number
Procedure followed
: Autorité de Régulation des Télécommunications (ART)
: 0165
: Annex III of the directive 1999/5/CE
Declares under its entire responsibility that the product described above complies with the
following basic applicable requirements (and in particular those in the 1999/5/CE directive):
Article 3.1a: (health protection and user safety)
73/23/CEE, ES 59005
Article 3.1b: (protection requirements concerning electromagnetic compatibility)
89/336/CEE, ETS 300 342-1
Article 3.2: (proper use of the radio-electric spectrum so as to avoid damaging interference)
91/263/CEE, CTR/TBR 19, CTR/TBR 20, CTR/TBR 31, CTR/TBR 32
To this effect, declares that all the radio test series have been carried out.
11 October 2000,
FA9M059910-C
Claude Bertin
Directeur Général
48
papier-gb.indd
48
30/07/01, 15:26