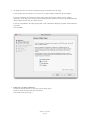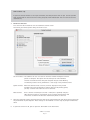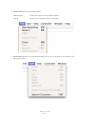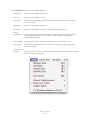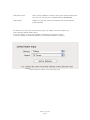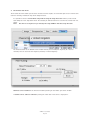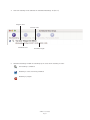
1
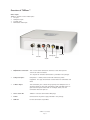
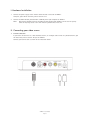
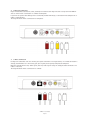
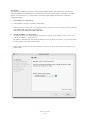
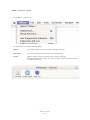
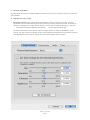
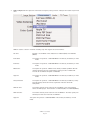
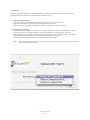
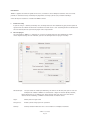
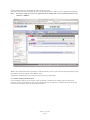
TVMax+
User Guide
Revision 1.0
(c) 2007, Miglia Technology Ltd
Table of contents
Introduction and Overview of TVMax+ . . . . . . . . . . . . . . . . . . . . . . . . . . . . . . . . . . . . . . . . . . . . . . . . . . . . . .1
Introduction and System requirements . . . . . . . . . . . . . . . . . . . . . . . . . . . . . . . . . . . . . . . . . . . . . . . . . . . . . . . .2
Overview of TVMax+ . . . . . . . . . . . . . . . . . . . . . . . . . . . . . . . . . . . . . . . . . . . . . . . . . . . . . . . . . . . . . . . . . . . . . .3
Hardware and Software installation . . . . . . . . . . . . . . . . . . . . . . . . . . . . . . . . . . . . . . . . . . . . . . . . . . . . . . . . .4
Hardware installation . . . . . . . . . . . . . . . . . . . . . . . . . . . . . . . . . . . . . . . . . . . . . . . . . . . . . . . . . . . . . . . . . . . . . . .5
Connecting your video source . . . . . . . . . . . . . . . . . . . . . . . . . . . . . . . . . . . . . . . . . . . . . . . . . . . . . . . . . . . . . . . .5
Software installation . . . . . . . . . . . . . . . . . . . . . . . . . . . . . . . . . . . . . . . . . . . . . . . . . . . . . . . . . . . . . . . . . . . . . . .7
Setting up the TV tuner for viewing and recording . . . . . . . . . . . . . . . . . . . . . . . . . . . . . . . . . . . . . . . . . . . .8
Introduction . . . . . . . . . . . . . . . . . . . . . . . . . . . . . . . . . . . . . . . . . . . . . . . . . . . . . . . . . . . . . . . . . . . . . . . . . . . . . .9
Serial Number and Registration . . . . . . . . . . . . . . . . . . . . . . . . . . . . . . . . . . . . . . . . . . . . . . . . . . . . . . . . . . . . . .9
Setting up TVMax+ for TV reception . . . . . . . . . . . . . . . . . . . . . . . . . . . . . . . . . . . . . . . . . . . . . . . . . . . . . . . . . .9
Using the TVMax+ Menus . . . . . . . . . . . . . . . . . . . . . . . . . . . . . . . . . . . . . . . . . . . . . . . . . . . . . . . . . . . . . . . . . .12
TVMax+ Menus . . . . . . . . . . . . . . . . . . . . . . . . . . . . . . . . . . . . . . . . . . . . . . . . . . . . . . . . . . . . . . . . . . . . . . . . . . .13
Using the TVMax+ Onscreen Remote . . . . . . . . . . . . . . . . . . . . . . . . . . . . . . . . . . . . . . . . . . . . . . . . . . . . . . . .18
TVMax+ onscreen remote . . . . . . . . . . . . . . . . . . . . . . . . . . . . . . . . . . . . . . . . . . . . . . . . . . . . . . . . . . . . . . . . . . .19
Using the TVMax+ Preferences . . . . . . . . . . . . . . . . . . . . . . . . . . . . . . . . . . . . . . . . . . . . . . . . . . . . . . . . . . . . .20
TVMax+ preferences overview . . . . . . . . . . . . . . . . . . . . . . . . . . . . . . . . . . . . . . . . . . . . . . . . . . . . . . . . . . . . . . .21
The General menu . . . . . . . . . . . . . . . . . . . . . . . . . . . . . . . . . . . . . . . . . . . . . . . . . . . . . . . . . . . . . . . . . . . . . . . . .22
The Video input menu . . . . . . . . . . . . . . . . . . . . . . . . . . . . . . . . . . . . . . . . . . . . . . . . . . . . . . . . . . . . . . . . . . . . . .23
The image sub-menu . . . . . . . . . . . . . . . . . . . . . . . . . . . . . . . . . . . . . . . . . . . . . . . . . . . . . . . . . . . . . . . . . . .23
The Video compression sub-menu . . . . . . . . . . . . . . . . . . . . . . . . . . . . . . . . . . . . . . . . . . . . . . . . . . . . . . . . .24
The Audio sub-menu . . . . . . . . . . . . . . . . . . . . . . . . . . . . . . . . . . . . . . . . . . . . . . . . . . . . . . . . . . . . . . . . . . .25
The TV Tuner sub-menu . . . . . . . . . . . . . . . . . . . . . . . . . . . . . . . . . . . . . . . . . . . . . . . . . . . . . . . . . . . . . . . . .26
The plugins menu . . . . . . . . . . . . . . . . . . . . . . . . . . . . . . . . . . . . . . . . . . . . . . . . . . . . . . . . . . . . . . . . . . . . . . . . . .27
Scheduling a recording with TVMax+ . . . . . . . . . . . . . . . . . . . . . . . . . . . . . . . . . . . . . . . . . . . . . . . . . . . . . . .28
Schedule a recording with TVMax+ . . . . . . . . . . . . . . . . . . . . . . . . . . . . . . . . . . . . . . . . . . . . . . . . . . . . . . . . . . .29
Scheduling a recording with TitanTV . . . . . . . . . . . . . . . . . . . . . . . . . . . . . . . . . . . . . . . . . . . . . . . . . . . . . . . .32
Registering with TitanTV . . . . . . . . . . . . . . . . . . . . . . . . . . . . . . . . . . . . . . . . . . . . . . . . . . . . . . . . . . . . . . . . . . . .33
TitanTV plug-in settings . . . . . . . . . . . . . . . . . . . . . . . . . . . . . . . . . . . . . . . . . . . . . . . . . . . . . . . . . . . . . . . . . . . . .33
Scheduling a recording . . . . . . . . . . . . . . . . . . . . . . . . . . . . . . . . . . . . . . . . . . . . . . . . . . . . . . . . . . . . . . . . . . . . .34
Scheduling a recording with tvtv . . . . . . . . . . . . . . . . . . . . . . . . . . . . . . . . . . . . . . . . . . . . . . . . . . . . . . . . . . .35
Initial setup . . . . . . . . . . . . . . . . . . . . . . . . . . . . . . . . . . . . . . . . . . . . . . . . . . . . . . . . . . . . . . . . . . . . . . . . . . . . . . .36
tvtv plug-in settings . . . . . . . . . . . . . . . . . . . . . . . . . . . . . . . . . . . . . . . . . . . . . . . . . . . . . . . . . . . . . . . . . . . . . . . .36
Using the tvtv service . . . . . . . . . . . . . . . . . . . . . . . . . . . . . . . . . . . . . . . . . . . . . . . . . . . . . . . . . . . . . . . . . . . . . .37
TVMax+ Plug-ins . . . . . . . . . . . . . . . . . . . . . . . . . . . . . . . . . . . . . . . . . . . . . . . . . . . . . . . . . . . . . . .39
Using the Plug-ins . . . . . . . . . . . . . . . . . . . . . . . . . . . . . . . . . . . . . . . . . . . . . . . . . . . . . . . . . . . . . . . . . . . . . . . . .40
Current Plug-ins . . . . . . . . . . . . . . . . . . . . . . . . . . . . . . . . . . . . . . . . . . . . . . . . . . . . . . . . . . . . . . . . . . . . . . . . . . .41
Playing back files created with TVMax+ . . . . . . . . . . . . . . . . . . . . . . . . . . . . . . . . . . . . . . . . . . . . . . . . . . . . .42
Software Video Players . . . . . . . . . . . . . . . . . . . . . . . . . . . . . . . . . . . . . . . . . . . . . . . . . . . . . . . . . . . . . . . . . . . . .43
Codecs . . . . . . . . . . . . . . . . . . . . . . . . . . . . . . . . . . . . . . . . . . . . . . . . . . . . . . . . . . . . . . . . . . . . . . . . . . . . . . . . .43
Warranty agreement . . . . . . . . . . . . . . . . . . . . . . . . . . . . . . . . . . . . . . . . . . . . . . . . . . . . . . . . . . . . . . . . . . . . . .44
Introduction and Overview
of TVMax+
TVMax+™ User Guide
Page 1
Introduction
Thank you for choosing TVMax+™ from Miglia Technology. TVMax+™ allows you to watch and record TV and video
on your Mac. You can record to MPEG-4 in real-time, thus delivering immediate compatibility with Apple’s iPod
Video and Apple TV.
System requirements:
• Mac with USB 2.0 connectivity
• G4/1.25 GHz or higher processor
• 512 MB of RAM
• Mac OS X 10.4.x
• QuickTime 7
Package contents
• TVMax+™
• Infrared Remote Control
• CD-ROM with software and installation guide
• Power Supply
• USB 2.0 Cable (A/B)
• Warranty card
User Guide Overview
This User Guide will guide you through the hardware and software installation as well as explain the functions
and options of the TVMax+™ software.
Technical Support
Should you ever have any questions regarding your product, please do not hesitate to contact Miglia Technology.
The best way to contact technical support, is to fill out a ‘Technical Support Case Form’. Please go to
http://www.miglia.com/Support and click on the TVMax+ link.
TVMax+™ User Guide
Page 2
Overview of TVMax+™
Video inputs
TVMax+™ features several video inputs:
• TV input
• Composite input
• S-Video input
• RCA Stereo audio input
TV
Composite
S-Video
Audio
USB 2.0
Power
•
TV/Antenna connection: This is the TV Tuner connection. Connect a cable from your TV
antenna or cable wall outlet.
An adapter for ‘threaded’ connections is provided in the package.
•
Composite input:
Composite is a widely used standard for connecting video
equipment. This type of connector is often found on camcorders and
VCRs.
•
S-Video input:
This connection gives a better image quality than composite and is
generally found on mid-range camcorders, VCRs and DVD players. If
you intend to capture video from an analogue source, use this
connection whenever you can.
•
Stereo audio IN:
TVMax+™ card uses conventional RCA plugs
•
Power:
Connector for the power supply included in the package.
•
USB 2.0:
For the connection to your Mac
TVMax+™ User Guide
Page 3
Hardware and Software
Installation
TVMax+™ User Guide
Page 4
I. Hardware Installation
1.
Connect the power supply to the “Power” socket located at the back of TVMax+.
Verify the green LED on the front panel of the unit is lit.
2.
Connect the USB 2.0 cable provided from a USB 2.0 port of your computer to TVMax+.
Note: We strongly recommend using the USB 2.0 cable provided with TVMax+. Do not use low quality
cables or very long cables as this will affect the performance of the unit.
II. Connecting your video source
1.
Coaxial connection
If you receive TV channels via a roof-mounted antenna, an analogue cable service or a portableantenna, you
will most likely want to use the TV input on TVMax+.
Connect your coaxial cable as shown on the illustration below
TVMax+™ User Guide
Page 5
2. Composite Connection
Digital TV subscribers (Terrestrial, Cable, Satellite) will interface their digital receiver set top box with TVMax+.
You can either make a connection via S-Video or Composite.
If you wish to capture video footage from a Camcorder, VCR or DVD-Player, a connection with Composite or SVideo is recommended.
The diagram below shows a connection via Composite.
3. S-Video Connection
For digital TV subscribers and users wishing to capture video from an analogue source, an S-Video connection is
strongly recommended as it will usually give you a higher picture quality compared to Composite.
Note that S-Video do not carry audio signals, but only video signals. Using the left/right audio connectors and
cables is necessary.
The diagram below shows a connection via S-Video
TVMax+™ User Guide
Page 6
III. Software Installation
1.
Insert the Installation CD that shipped with TVMax+™ card into your CD/DVD drive.
2.
Before installing the version available on the CD, check for any available updates on the Miglia site. Doubleclick on the icon named ‘Check for software updates now!’ to access the website page.
3.
Open the folder TVMax+ and double-click on the ‘’Install TVMax+™” icon to launch the installer. Select the
startup drive of your choice and click on ‘Install’. Note that you will be asked for your administrator
password when performing the installation.
4.
Once the installation process is finished, quit the installer
5.
The TVMax+ folder will be located in the ‘Applications’ folder of the volume containing
your system software.
TVMax+™ User Guide
Page 7
Setting up TVMax+
for viewing and recording
TVMax+™ User Guide
Page 8
Introduction
This chapter will guide you through the initial setup of TVMax+. Before proceeding, make sure you have
connected TVMax+ to a USB 2.0 port of your Mac. Also ensure the power supply is connected at all times.
Connect your TV antenna via a coaxial cable or your video source (digital TV receiver for example) via
Composite/S-Video.
I.
Serial Number and Registration
1.
Launch TVMax+ located in your Applications folder
2.
You will be asked to enter your serial number located on the CD sleeve or the CD itself. Enter the 32 digits
serial number with the dashes as shown below:
XXXX-XXXX-XXXX-XXXX-XXXX-XXXX-XXXX-XXXX
II.
Setting up TVMax+ for TV reception
The Setup Assistant will launch automatically on the first startup of the software. You can access it at
anytime via TVMax+ > Setup Assistant
The TVMax+ Setup Assistant will guide you through the set up process and create a list of settings based
on your choices and hardware configuration.
1.
Start by selecting your country. If your country is not in the list, select the relevant TV standard via the
‘Other’ option.
TVMax+™ User Guide
Page 9
2.
The Setup Assistant will ask you to choose the type of connection you are using.
If you connect your card directly to an antenna or a cable TV outlet, choose the ‘TV Tuner’option.
If you are subscribing to a premium or digital cable service or to digital satellite, use the S-Video
connection, as this will ensure the best picture quality possible. Channels will have to be switchedwith the
remote control of your cable or satellite receiver.
If you are using TVMax+ for video capture from a VCR, camcorder or DVD player, choose either composite
or S-Video.
Then Click Next
3.
Composite or S-Video Connection
If you have selected TV Tuner as the input, please skip to step 6.
Select the audio input based on your connection.
Click on Next and skip to step 5
TVMax+™ User Guide
Page 10
USA residents only
If you have selected TV Tuner as the input connection, the Setup Assistant will ask you to enter your ZIP
code to download the relevant channel naming templates from TVGuide.com. This will name the channel
automatically.
4.
TV Tuner Connection:
Press the ‘Start Scan’ button to start the automatic channel search.
You will be given three options during the channel scan:
Get all Channels: The software will scan and store all channels without interruption until the
process is complete. This option will not allow you to name individual
channels and some channels with poor reception may be stored. Naming
and deleting stations can be performed at a later stage in the preference menu.
Ignore Channel: When the software finds a channel, it will be displayed in the preview
window leaving you the decision to store or discard it. By clicking ignore,
you skip a channel and enable the scan to continue.
Next Channel:
Once a channel is found you can enter a name (this is optional) and press
‘Next Channel to store it and continue the scan. Repeat the operation until
all channels are found. The Assistant automatically moves to the next
5.
Once this operation finished, the Setup Assistant will create video compression and display settings based on
the performance of your computer. These settings can be modified at a later stage by using the Preferences
menu.
6.
If you wish to view live TV, you can open the TV window via the View menu.
TVMax+™ User Guide
Page 11
Using the TVMax+
Menus
TVMax+™ User Guide
Page 12
I.
TVMax+ Menus
Various functions are accessible via the menu bar:
1.
The TVMax+ Menu lets you access:
About box:
Displays about box with version number
Preferences...
Opens the Preferences menu for the TVMax+ application
Setup Assistant: Launches the Setup Assistant
TitanTV Listings
or tvtv Schedule: Opens your web browser to access the tvtv or TitanTV online guide page.
Software Update: Checks online if a new version is available. This check is also performed automatically once
a week if an internet connection is open.
Hide/Show/Quit: Standard Hide, show and quit options.
TVMax+™ User Guide
Page 13
2.
3.
The File menu contains the following options:
New Recording:
Enables you to create a new scheduled recording.
Record:
Records what is displayed in the live TV window
The Edit menu contain the standard OS provided options as well as the option to clear entries in the
Recordings window
TVMax+™ User Guide
Page 14
4.
The View Menu contains the video related commands.
Quarter Size:
Displays the TV window in Quarter size
Half Size:
Displays the TV window in half size
Actual Size:
Sets the TV window to the original aspect ratio of the broadcast, eg. this is the picture
as it is transmitted.
Double Size:
Displays the TV window in double size
Full Screen:
Displays the TV window in Full Screen mode, covering the entire screen
Picture
Optimization:
There are four levels of picture optimisation. This option determines the quality of the
stream displayed on the screen. The higher the value, the higher the amount of
processor power required.
Overscan Mode: This option will hide the parts of the picture that are usually not seen on a TV
Aspect Ratio:
Sets the aspect ratio of the picture. It’s useful when going to full screen mode with a
Widescreen monitor.
TV window always
in Front:
Puts the TV window in front of all other applications. Useful if you want to watch TV while
doing other tasks with your Mac.
TVMax+™ User Guide
Page 15
5.
The Controller menu contains the commands found on the onscreen remote control This menu lets you
control the timeshift (pausing live TV) feature as well as the TV channel selection.
Play:
If the live TV window is in Pause mode, use this command to return to play mode
Pause:
Lets you pause the live TV window
Jump
Forward:
Lets you jump forward by 10 seconds. This option will only work if you have previously paused
the live TV window.
Replay:
Lets you jump back by 10 seconds. You can access this option at any time, as TVMax+ is
constantly recording the live video stream.
Go to Live:
Jumps to the live TV stream currently received by TVMax+
Jump to
Beginning:
Rewinds the video to the beginning of the cached recording.
TVMax+™ User Guide
Page 16
Channel up/
down:
Changes TV channel
Switch back:
Switches back to the channel you were previously watching
Use Channel
Name as index:
Aligns the channel number with the TV station number.
Video Input:
Lets you select the video input to be used by TVMax+ to receive the video stream.
Toggle Video
Input:
Cycles through the video inputs (TV Tuner, Composite, S-Video)
Volume Up/Down: Increases or decreases the audio volume. This option affects only the live TV, not a
recording
6.
Mute:
Mutes the live TV window. This option affects only the live TV, not a recording.
Stereo:
Enables stereo audio
The Window menu contains commands for the various windows that the TVMax+ software displays.
Minimize, Zoom
Bring all to front: Standard Mac OS X commands found in any application
Controller:
Shows the onscreen remote control
TV window: Shows the TV window
Scheduled
Recordings: Shows the Recordings window, which lists scheduled recordings performed with TVMax+
6.
The Help menu contains the help files and a link to online help
TVMax+™ User Guide
Page 17
Using the TVMax+
Onscreen Remote
TVMax+™ User Guide
Page 18
The TVMax+ Onscreen Remote
1) Channel List
2) Channel up
3) Instant Replay - Jump Backwards 10 seconds through a video and then continue playing foward. Click
repeatedly to jump back in 10 second intervals
4) Play/Pause Live TV
5) Live - Go to Live TV
6) Mute (click on speaker) and volume control
7) Go to EPG (tvtv or TitanTV depending on your location
8) Record
9) Jump Foward - Jump Forward in 10 second intervals
10) Channel Down
TVMax+™ User Guide
Page 19
Using the TVMax+
Preferences
TVMax+™ User Guide
Page 20
I. TVMax+ preferences overview
1.
Select TVMax+ > Preferences
1.
The preferences are divided in three categories:
General:
This category allows you to set the general storage preferences
Video Input:
This menu allows you to set all video and audio preferences.
Plugins:
TVMax+ supports a Plugins architecture for a smooth integration
with other applications or devices. This menu lets you set options for various built-in
and third party plug-ins.
TVMax+™ User Guide
Page 21
I.
The General Sub-menu
1.
The Filename Template allows you to enter pre-defined values for the name of the file that will
be stored onto your hard drive when recording.
<input>: This value will add the input type (TVMax+) to the filename
<channel>: This value will add the channel number to the filename
<name>: This will add the channel name to the filename
<program>: This will add a text string that can be chosen when creating a recording
<date>: This will add the start date of the recording
<time>: This will add the start time of the recording
2.
Filename templates help you to easily identify the files you have recorded with TVMax+.
The capture destination menu enables you to select where you wish to store your recorded video. Click the
‘Browse’ button to modifiy this location.
3.
The disk space option allows you to keep a defined amount of space free on your hard drive.
4.
The TV formats section lets you activate or deactivate supported TV standards.
5.
The Extended Support File lets TVMax+ generate a complete activity log. This should be switched off by
default
TVMax+™ User Guide
Page 22
II.
The Video Input Menu
The Video Input menu contains the most important controls you have over the video you will view or record to
your hard drive.
A. Adjusting the video settings
1.
The image sub-menu allows you to control the brightness, lighting, saturation and hue of the video.
Adjustments can be made by moving the sliders or entering a value on the right hand side. If you wish to
perform an adjustment on a single channel, display it in the preview window by selecting it in the Tuner
sub-menu and ticking the box ‘Use these settings
for the selected channel only’.
The picture optimization setting lets you adjust the display quality on screen, eg. the MPEG-2 stream
settings. The setup assistant will choose the best value automatically, depending on the processor speed of
your Mac. Note that the higher the quality value, the more CPU power will be required.
TVMax+™ User Guide
Page 23
2.
Video Compression will adjust the video codec and quality settings for the video you will record to your hard
drive.
TVMax+ features a built-in hardware encoding chip with support for several formats:
Full Size:
Records a file in MPEG-4. The Video Size is 720x576 (PAL) and 720x480
(NTSC).
iPod Good:
This option will generate a 320x240 MPEG-4 file directly readable by an iPod
Video.
iPod Best:
This option will generate a 640x480 MPEG-4 file directly readable by an iPod
Video.
iMovie HD:
This option will generate a MPEG-4 file directly readable by iMovie HD. No
lengthy conversion will be required when opening the file in iMovie HD.
The size for the iMovie HD option is 640x480.
Apple TV:
This option will generate a 640x480 MPEG-4 file directly readable by an iPod
Video.
Sony PSP Good:
This option will generate a 320x240 MPEG-4 file directly readable by a Sony
PSP. No lengthy conversion will be required to make the movie PSP
Compatible.
DVD Full Size:
This format enables you to record in full size MPEG-2, the most common
format for DVD players. The Video Size is 720x576 (PAL) and 720x480 (NTSC)
DVD Half-Size:
This format enables you to record in half-size MPEG-2. The video quality will
obviously be lower than with full size MPEG-2
Apple TV:
This option will generate a 640x480 MPEG-4 file directly readable by an iPod
Video.
TVMax+™ User Guide
Page 24
DivX Home Theater:
DivX is similar to MPEG-4 and delivers great picture quality combined with
small file sizes. The video size is 720x576 (PAL) or 720x480 (NTSC)
DivX Portable:
TVMax+ lets you create video files compatible with the DivX Portable
profile (352x288).
The Device list let’s you select the desired input device, eg. TVMax+, the built-in audio or any
other compatible USB or FireWire device.
If you are capturing via the TV tuner, TVMax+ and TV Tuner are the correct settings.
If you are capturing via S-Video or Composite, the ‘Audio-IN’ on TVMax+ is preferred.
Audio settings for capture in the video input menu.
TVMax+™ User Guide
Page 25
8.
The TV Tuner Sub-menu
The TV tuner sub-menu allows you to create and select channel layouts. It also enables you to scan and fine-tune
channels manually, without the help of the Setup Assistant.
It is possible to create a new channel setup without using the Setup Assistant. To Do so, select ‘Create
from Template’ in the drop-down menu. The selected pre-defined channel list can then be scanned and fine
tuned.
Note: This will not be required if you already have setup TVMax+ with the Setup Assistant.
The Finetune button at the bottom of the window enables you to modify the frequency of a channel
manually. You can also enter the frequency manually in “Base Frequency”.
Channels can be renamed in the TV Tuner window by clicking on the ‘Name’ part of the window.
A channel can be added or removed by ticking the “Lock” box in the row it is displayed in.
TVMax+™ User Guide
Page 26
III. The Plugins Menu
TVMax+ supports a Plugins architecture allowing a smooth integration with third-party applications and devices.
You may want to check this menu with every update of the application, as new plug-ins are added continuously.
TVMax+™ User Guide
Page 27
Scheduling a recording
with TVMax+
TVMax+™ User Guide
Page 28
I. Schedule a recording with TVMax+
1.
Click on View > Show scheduled recordings.
2.
In the ‘Scheduled Recordings’ window, click ‘New Recording’ to create a new recording.
The Scheduled Recordings window displays the various recordings you have programmed
TVMax+™ User Guide
Page 29
3.
First, enter the date/time information.
Select the start and end times by either entering them with the keyboard or the calendar button.
You can enter several types of repetitions for the recording, which is useful if you are recording several
shows broadcasted at the same time every day/week/month.
4.
Then, enter the channel in the Video Source panel.
You can also schedule a recording over the Composite and S-Video inputs if you are using a digital receiver.
In this case, make sure you have set the decoder to the correct channel as TVMax+ has no ability to
switch channels on external devices.
Select the desired channel and enter the name of the program you wish to record (the name itself does not
affect the recording. You can either use a Filename template or give a unique name to the recorded file.
5.
Finally, in the Movie panel, enter the program name, which will be appended to the file name.
The template function will append other values to the file name. The values are defined in the General panel
in Preferences.
Click ‘Add record’ when you are finished.
TVMax+™ User Guide
Page 30
4.
Your new recording will be added to the ‘Scheduled Recordings’ list (see 2.).
Program name
Channel name
Scheduled start
5.
Scheduled length
Scheduled recordings window list items.Displays the status of the recording via icons.
The recording is scheduled
Recording is active and will be performed.
Recording in progress
TVMax+™ User Guide
Page 31
Scheduling a recording
with TitanTV
TVMax+™ User Guide
Page 32
Introduction
TVMax+ supports Decisionmark’s TitanTV EPG (Electronic Program Guide) to browse, search and schedule
recordings. Note that TitanTV is only functional in the United States.
I.
Registering with TitanTV
In order to access the TitanTV program listings, you will first have to register online.
Open your web browser and enter the address http://www.titantv.com
Click on the “Sign up” button and follow the onscreen instructions to create an account.
II.
TitanTV Plug-in Settings
TitanTV integration in TVMax+ is achieved via a plug-in. The Setup Assistant will automatically adjust all
the required settings for TitanTV. However, you can also configure the TitanTV plug-in manually.
You can change the video input used by the TitanTV plug-in by clicking on ‘Show Settings’. If you receive
your TV channels via the TV Tuner, select ‘TVMax+:TV Tuner:NTSC’ as the input.
If you use a cable or satellite receiver select either Composite or S-Video.
Note:
If you are using a cable or satellite receiver, you will need to select the channel you wish to record
from via the receiver’s remote.
TVMax+™ User Guide
Page 33
III. Scheduling a recording with TitanTV
1.
Select ‘TitanTV TV Listings’ from the TVMax+ menu. This will launch your browser and redirect you to the
TitanTV login page
2.
Enter your username and password you created during TitanTV’s sign up process.
3.
You can now browse or search the local TV listings.
4.
Each individual TV program has a detail window accessible through a hyperlink.
5.
To schedule a recording, simply navigate to the detail window and click on the red record button
A file containing the scheduling information will be downloaded and opened in TVMax+ .
TVMax+™ User Guide
Page 34
Scheduling a recording
with tvtv
TVMax+™ User Guide
Page 35
Introduction
TVMax+ supports the online TV guide service “tvtv”, available in several European countries. The tvtv service
provides an overview of daily and weekly TV programmes and helps you to easily schedule recordings.
A free 30 day trial account is available for TVMax+ owners.
I.
Initial tvtv setup
If you are living in a country covered by tvtv, the Setup Assistant will automatically give you the option to
register with tvtv. Follow the onscreen instructions to either create a tvtv account (you will be redirected to
the tvtv website) or enter your existing login name and password.
II.
The tvtv plug-in
tvtv integration in TVMax+ is achieved via a plug-in. The Setup Assistant will automatically adjust
all the required settings for tvtv. However, you can also configure the tvtv plug-in manually.
Selected Input:
Lets you select the video input. Normally, this will be the TV tuner, but you can also use
Composite or S-Video if TVMax+ is connected to a digital TV receiver (Cable, Satellite,
Digital Terrestrial, etc...). However, the digital receiver will have to be set to the correct
channel for the recording, as TVMax+ cannot control an external device.
Login:
Shows your tvtv login name
Change Pass:
Enables you to change your tvtv password
Country:
Country selection. Note that tvtv is not available in all European countries.
TVMax+™ User Guide
Page 36
Check automatically: Selects the frequency with which the software should check your joblist on tvtv.
Account valid until:
Shows the date when the tvtv account will expire
Get tvtv messages:
Shows the latest messages sent by the tvtv service.
III. Using the tvtv service
3.1. Accessing tvtv
Once you have created your tvtv account, you can access the programme guide and schedule recordings for
TVMax+. When the tvtv plug-in is active and setup, the TVMax+ menu (menu bar) displays two options.
tvtv Programme Schedule: This option will launch your web browser and open the tvtv page.
Check tvtv job list:
This option will synchronise TVMax+’s scheduled recordings list with the tvtv
job list. tvtv’s job list contains the list of recordings you have selected.
3.2. The tvtv job list and scheduling a recording
The tvtv service uses a joblist, which contains the list of recordings you have selected on the tvtv page.
Start by getting the overview of today’s programmes and select a programme you wish to record. A new ‘details’
window will open. Press the ‘REC OFF’ button and it will switch to ‘REC ON’ signifying the programme is added to
your joblist
TVMax+™ User Guide
Page 37
Click on Joblist located in the bottom left corner of the tvtv page.
Your joblist will now show the recordings you have scheduled. Click on “Process now” to confirm the recordings.
Note: You need to click on process now, otherwise the recordings will not be confirmed and will not be
available to TVMax+.
TVMax+ will automatically check the joblist at defined intervals. You can also manually check the joblist by using
the “Check tvtv job list” option in the TVMax+ menu.
Programmes scheduled with tvtv will then be taken over by the application.
3.3. Channel naming synchronisation
tvtv and TVMax+ compare the TV station names to schedule a recording. This requires you to name the TV
channels as they are named by the tvtv service. Should there be a discrepancy, a window asking you to rename
the channels will appear when you check the tvtv joblist.
TVMax+™ User Guide
Page 38
TVMax+
Plug-ins
TVMax+™ User Guide
Page 39
I.
Using the plug-ins
1.1 Plug-in Settings
Plug-ins settings are available in Preferences > Video Input > Plug-ins > Show settings
Note that some plug-ins do not have any settings.
1.2 Using the plug-ins
To access a plug-in, highlight a finished recording and select Post-Process Movie. A drop down menu will give
you access to the installed plug-ins.
Note: the recording must have been completed before you can use a plug-in.
Plug-in drop
down menu
Detail Window
TVMax+™ User Guide
Page 40
II.
Current Plug-ins
2.1 Built-in Plug-ins
Post-Processing Plug-ins :
TVMax+ Reveal in Finder: Shows a recorded file in the Finder.
TVMax+ Movie Player:
Enables you to play a recorded movie from within TVMax+
TVMax+ Movie Opener:
Lets you launch a movie file via the Finder. This will most likely open
QuickTime Player
MovieGate:
Lets you burn DVD’s from within the application.
Add to iTunes:
Lets you add a recording to your iTunes Playlist.
Communication Plug-ins:
Schedule with TitanTV:
Schedule with tvtv:
Provides the TitanTV web scheduling functionality. Note that this plug-in is
activated by default if USA is selected as a country by the Setup Assistant.
User Options:
Video Input: Lets you select the desired video input for TitanTV recordings.
Provides the tvtv web scheduling functionality. This plug-in is activated by
the Setup Assistant (or manually) and will work in several European
countries.
TVMax+™ User Guide
Page 41
Playing back files
created by TVMax+
TVMax+™ User Guide
Page 42
Introduction
TVMax+ supports various capture formats, which can be played back by most if not all software video
applications. However, you may need to install additional video codecs in order to play back some formats. A
Video codec is an extenstion, which enables a software video player (like QuickTime Player) to read a video file.
I.
Software Video Players
Miglia currently recommends two software video players:
•
QuickTime Player:
QT Player is part of a standard Mac OS X installation. You will find the software in the
Applications folder on your hard drive.
•
FrontRow;
FrontRow comes with Macs that have a built-in IR rev
•
VLC Media Player:
VLC (Video Lan Client) Media Player is an open source project available on several
platforms. VLC provides broad compatibility and excellent performance.
II. Required Codecs
You may need to install a video codec to playback some formats. The requirements are listed below:
•
MPEG-2 (DVD):
MPEG-2 playback is directly supported by VLC, without any additional software
installation. If you wish to play back an MPEG-2 file in QuickTime Player, you will need to
install the MPEG-2 Playback component available from Apple’s website (Note: The MPEG-2
Playback component is not free of charge).
•
MPEG-4:
No additional codecs are required to playback an MPEG-4 file. Simply open the file in
QuickTime Player, FrontRow or VLC. This applies to files recorded for iPod, iMovie HD,
AppleTV, PSP and Full size (MPEG-4).
•
DivX:
To playback DivX files, you will need to download the free of charge DivX component
available from http://www.divx.com
This is not required if you use VLC.
TVMax+™ User Guide
Page 43
Warranty Agreement
Hardware Products:
Miglia Technology warrants your hardware product against any defect in material and workmanship, under
normal use, for the designated warranty period. The warranty becomes effective from the date of purchase by the
end user.
If the product is found to be defective within the warranty period, Miglia Technology Ltd will, at its sole option,
repair or replace the defective product.
Miglia Technology Ltd will not, under any circumstances, be liable for direct, special or consequential damages
such as, but not limited to, damage or loss of property or equipment, loss of profits or revenues, cost of
replacement goods, or expense or inconvenience caused by service interruptions.
This warranty is void if:
• The product was operated or stored in abnormal use or maintenance conditions.
• The product was repaired, modified or altered or undergone attempted repair by non-authorised personel,
unless Miglia Technology Ltd has authorised such repair, modification or alteration.
• The product was damaged, abused or misused
• The product was installed without following the supplied installation instructions.
• The serial number of the product is defaced, modified or missing.
• The “Warranty Void” seal on the casing has been modified, removed or broken.
The decision of Miglia Technology shall be final and binding with regards to the condition of product return and
eligibility of repair or replacement.
Software Products:
Software Products are covered specifically for defective media or manuals only, for a 14 day period. The software
license you acquired cannot under any circumstance by transferred back to Miglia Technology Ltd.Miglia does
not warrant or represent that all third-party software or hardware will function error-free when used in
conjunction with its products.
How to obtain warranty service:
To obtain warranty service, within 30 days of the date of purchase, please contact the retailer from whom you
made your purchase. To obtain warranty service, after 30 days of the date of purchase contact Miglia Technology
Ltd’s Technical Support Service. A proof of purchase will be required to confirm that the product is still under
warranty. Should Miglia Technology Ltd’s Technical Support diagnose a fault on your product, a Return to
Manufacturer Authorisation (RMA) number will be issued to you.
All products returned to Miglia Technology Ltd must be securely packaged in their original box and shipped at
the customer’s cost inclusive of any requested documentation. Return shipment of repaired or replaced product
will be covered by Miglia Technology Ltd.
Any product returned without an RMA number issued by Miglia Technology Ltd’s Technical Support Service will
be refused.
TVMax+™ User Guide
Page 44