1
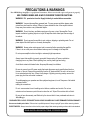
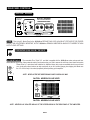
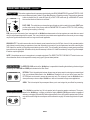
MESA BOOGIE
Owner's Manual
Greetings from the Home of Tone
Congratulations on your choice of the WalkAbout as your Bass amplifier and welcome
to the MESA/Boogie family! As a discriminating player you probably know that you
have purchased the most comprehensive instrument for amplifying Bass that is
available. What you might not realize is that this entitles you to all the experience,
resources and commitment our twenty-five years of service to musicians world wide
has to offer. Our responsibility is to help you sound great! So, if at any time you feel
you need help or direction, we are here for you...a phone call away.
PRECAUTIONS & WARNINGS
Your MESA/Boogie Amplifier is a professional instrument. Please treat it with respect and operate it properly.
USE COMMON SENSE AND ALWAYS OBSERVE THESE PRECAUTIONS:
WARNING: EU: permission from the Supply Authority is needed before connection.
WARNING: Vacuum tube amplifiers generate heat. To insure proper ventilation always make
certain there is at least four inches (100mm) of space behind the rear of the amplifier cabinet.
Keep away from curtains or any flammable objects.
WARNING: Do not block any ventilation openings on the rear or top of the amplifier. Do not
impede ventilation by placing objects on top of the amplifier which extend past the rear edge of
its cabinet.
WARNING: Do not expose the amplifier to rain, moisture, dripping or splashing water. Do not
place objects filled with liquids on or nearby the amplifier.
WARNING: Always make certain proper load is connected before operating the amplifier.
Failure to do so could pose a shock hazard and may result in damage to the amplifier.
Do not expose amplifier to direct sunlight or extremely high temperatures.
Always insure that amplifier is properly grounded. Always unplug AC power cord before
changing fuse or any tubes. When replacing fuse, use only same type and rating.
Avoid direct contact with heated tubes. Keep amplifier away from children.
Be sure to connect to an AC power supply that meets the power supply specifications listed on
the rear of the unit. Remove the power plug from the AC mains socket if the unit is to be stored
for an extended period of time. If there is any danger of lightning occurring nearby, remove the
power plug from the wall socket in advance.
To avoid damaging your speakers and other playback equipment, turn off the power of all related
equipment before
making the connections.
Do not use excessive force in handling control buttons, switches and controls. Do not use
solvents such as benzene or paint thinner to clean the unit. Wipe off the exterior with soft cloth.
Be sure to have the warranty card filled out by the store at which it was purchased and return to
Mesa/Boogie.
YOUR AMPLIFIER IS LOUD! EXPOSURE TO HIGH SOUND VOLUMES MAY CAUSE PERMANENT HEARING DAMAGE !
No user serviceable parts inside. Refer service to qualified personnel. Always unplug AC power before removing chassis.
EXPORT MODELS: Always insure that unit is wired for proper voltage. Make certain grounding conforms with local standards.
READ AND FOLLOW INSTRUCTIONS OF PROPER USAGE.
Table of Contents
Precautions
Overview
Instant Gratification
Helpful Hints
0
1/2
2
2/3
FRONT PANEL:
Instrument Inputs: ACTIVE & PASSIVE
CONTROLS:
GAIN
BASS
MID
TREBLE
DI LEVEL
MASTER
PARAMETRIC EQUALIZER
FREQUENCY CONTROLS
3
4
4
5
5
6
6
6/7
7
REAR PANEL:
FUSE
A.C. RECEPTACLE
DIRECTOUT: Post / Pre - Ground Lift - XLR Jack
EFFECTS LOOP: Send & Return
SPEAKER OUTPUT
FACTORY SAMPLE SETTINGS
PERSONAL SETTINGS PAGE
TUBE NOISE and DIAGNOSING PRE-AMP TUBE PROBLEMS
PARTS SHEET
8
8
8
9
9
10
11
12
13
Operating Instructions
OVERVIEW:
Congratulations on your choice of the M-Pulse WalkAbout Bass Amplifier! This compact and powerful little brother to the M-Pulse
600 and 360 delivers all the tone and most of the features in a package thats bound for the open road.
At the heart of this giant killer is a robust 300 watt Simul-State power section that will handle most clubs and smaller venues with
surprising headroom. This tube driven mosfet design combines the best qualities of both tube and solid state technology to achieve a
lightweight, reliable platform that is supremely musical. This toneful power is metered out with the MASTER control, and can be used
to drive any two speaker cabinets via the two SPEAKER OUTPUT jacks, with a combined overall load of 4 Ohms being the preferred
impedance. Should you find yourself in larger venues, an XLR Balanced Direct output with a convenient Front Panel DI LEVEL control
enables you to send your choice of pre or post signals to the board for Front Of House reinforcement.
TheWalkAbout Preamp is a four stage, all-tube, finely-tuned instrument of shaping power for bass. The signal path begins with the
Input jacks and both ACTIVE and PASSIVE instruments have been provided for with a dedicated jack. The front end GAIN control
determines the amount and color of preamp signal and/or drive you wish to push through the rotary Tone Controls. Active shelving
FRONT VIEW: WalkAbout
ACTIVE
S I M U L S T A T E TM
ENGINEERING
B A S S A M P L I F I E R
0 db
-15
INSTRUMENT
INPUTS
GAIN
BASS
+
-
60 Hz
MID
30
PASSIVE
0
FOUR - STAGE VACUUM TUBE PREAMPLIFIER
0
+
-
340Hz
300
200
+15
2K
2K
1.2K
TREBLE
M-PULSE TM WALKABOUT
DIRECT OUT
FUSE
FUSE
POWER
120 V~
60 Hz
6A
POST
PRE
GROUND
LIFT
SIMUL STATE BASS AMPLIFIER
TUBE DRIVEN-MOSFET POWER
HANDBUILT IN PETALUMA , CALIFORNIA
EFFECTS LOOP
FUSE
6A
SLO
BLO
RETURN
SEND
SPEAKER OUTPUT
SUGGESTED LOAD
4 OHMS
WARNING: To reduce risk of fire or
electric shock, replace fuse with
same type and rating only. Do not
expose this unit to rain or moisture.
ENGINEERING
WARNING: To reduce risk of fire or electric
shock, Do not remove cover. No userserviceable parts inside. Refer
servicing to qualified personnel.
PAGE 1
MASTER
ON
12K
PARAMETRIC EQUALIZER
REAR VIEW: WalkAbout
CAUTION:Unplug power
before removing fuse or
bolts holding chassis
DI LEVEL
POWER
OVERVIEW:
Continued
type BASS and TREBLE controls are combined with a passive style MID to produce a powerful string of musically interactive and
comprehensive tone controls. If even further tweaking is desired, we have included a 3 Band Semi-Parametric Equalizer that covers
frequencies between 30Hz and 12Khz. This in-line EQ assures that any sound you can dream of can be dialed in quickly and
accurately. The three bands sensible Q points make for ease of understanding and the FREQUENCY controls overlap to allow
pinpoint accuracy in the regions where the controls meet. And finally, a series EFFECTS LOOP patch point between the preamp and
the power section.
Now that you have an overview of the controls and features of your new WalkAbout, let’s move on to understanding each of them
individually so that you can dial in your own personal sound quickly and easily.
Instant Gratification:
ACTIVE
S I M U L S T A T E TM
ENGINEERING
B A S S A M P L I F I E R
0 db
-15
INSTRUMENT
INPUTS
GAIN
BASS
MID
+
60 Hz
30
PASSIVE
FOUR - STAGE VACUUM TUBE PREAMPLIFIER
0
-
0
+
-
340Hz
300
200
+15
2K
2K
1.2K
PARAMETRIC EQUALIZER
TREBLE
DI LEVEL
MASTER
ON
12K
POWER
HELPFUL HINTS:
1. Connect your A.C. Power Cable to a grounded outlet. Avoid ground lifts (3 to 2 prong adapter) whenever possible.
2. The optimum speaker load for your WalkAbout is 4 Ohms. You may use a cabinet (s) of a higher rating safely (8 Ohm) with no
degradation in tone, however the amplifier will not produce its full rated wattage. Minimum load rating is 2 Ohms and while the
WalkAbout will handle this lower load condition - and in fact produce more than its rated power, it is not recommended. Prolonged
use of a 2 Ohm load will cause the power mosfets to run hot causing the protection circuit to trigger and mute the output signal until
such time as the mosfets can return to a safe operating temperature. Avoid using 2 Ohm loads whenever possible.
3. Use high quality cable from your instrument to the WalkAbout and from the WalkAbout to your speaker. Instrument
cable should be relatively low capacitance shielded cable. Whenever possible use lengths of 15 feet or shorter. Longer than 15’ tends
to introduce too much capacitance resulting in reduced punch and top end clarity. Speaker cable should be at least 14 gauge (or
thicker) unshielded cable and again try to keep the length of cable as short as possible for the best tonal results.
4. The BASS and TREBLE controls are active shelving type controls with a broad response even though they are acting primarily
on their center frequency Q point. This broader response works extremely well with the passive, broad-band MID control. Because
BASS and TREBLE are active controls, they actually cut (or notch) the region around the Q point when the control is set below 12:00,
PAGE 2
HELPFUL HINTS:
(Continued)
and boost these frequencies when the control is set above 12:00. The MID works like a normal passive control and boosts a broad
band of frequencies as it is increased.
5. When using the Parametric EQ keep in mind that cutting (notching) undesirable frequencies is often preferable to boosting desirable ones. By using this technique you will keep noise to a minimum and ensure ample headroom at all times. The Parametric is a powerful tone shaping tool when used tastefully, but all too often they are abused and set to their extremes which can result in
an unbalanced tone that is “full of holes” or excessive noise.
6. When using Outboard Signal Processors, the best results are usually found by inserting them into the Effects Loop which provides
a patch point between the preamp and the power section of your WalkAbout. The processors’ Input should be connected to the
SEND jack and its Output should be connected to the RETURN jack. Always use the shortest length possible (1-3 feet) of good quality
low capacitance cable to preserve the integrity of your sound.
7. The DIRECT OUTPUT circuit provides a GROUND LIFT that disconnects chassis ground from circuit ground. Should you encounter a hum or buzz when interfacing to live or recording consoles, try flipping this ground lift after you have muted that channels’ input
or zero’ed the fader. Many times (but not all) the hum is created by a ground loop between the WalkAbout and the console and lifting
the WalkAbout chassis to circuit ground will remedy the situation.
Hopefully these hints have helped get you up and running with your newWalkAbout and you are well on your way to having the best
tone you have ever heard! Now that you have a better idea of the layout and features, we are ready to move on to understanding the
individual controls and circuits in more detail.
FRONT PANEL:
INSTRUMENT INPUTS: ACTIVE / PASSIVE
These are the Instrument Input jacks and between them you can match the
signal output level of virtually any instrument.
ACTIVE
INSTRUMENT
INPUTS
PASSIVE
The ACTIVE Input is padded down for greater input stage headroom and this works well
with basses that use an on-board pre-amp with an active tone control circuit. Usually these
instruments put out a much hotter signal than conventional basses, even when their tone
controls are set “flat”. The added headroom is needed to prevent clipping in the first stage
of the pre-amp and the ACTIVE Input should be used whenever instruments that utilize
active style pickup/EQ harnesses are used.
You can use the ACTIVE Input for conventional passive instruments also, for heavy handed
players needing extra headroom or simply a “cleaner” sound. However, note that unless
you have Kong size hands it may be difficult to bring the amplifier to full power with this
reduced front end sensitivity.
ACTIVE
INSTRUMENT
INPUTS
PASSIVE
The PASSIVE Input is set up for more conventional basses with passive pickups that produce lower output signal levels. This jack is
more sensitive than the ACTIVE Input and therefore can drive the first stage to clip with a much lower signal. Keep this in mind if you
play with a heavy touch or want a little bit of growl or front end clip. In those scenarios this jack can be quite useful to push the first
stage of the pre-amp.
PAGE 3
FRONT PANEL CONTROLS:
(Continued)
GAIN:
This control determines the overall character of the input sensitivity. The lower regions of the control (below 12:00) lend
greater headroom and provide a scooped, brighter personality. The upper harmonics come through more prominently in this area of
the control making the top end sound more transparent and sweet. This region is especially
useful for funkier stuff when thumbing is in order. It keeps the rubber- band feel intact in the
lows and mids while voicing the snap just high enough to avoid harshness, or the dreaded
ACTIVE
“gak” when the G string is plucked.
INSTRUMENT
INPUTS
GAIN
BASS
PASSIVE
As the GAIN control is increased past 12:00 a richer, more “well-rounded” voice becomes
dominant and headroom starts to diminish in increments until eventually, a tube overdrive
sound appears as the 12AX7 input tube is driven into saturation.
FOUR - STAGE VACUUM TUBE
The region between 12:00 and 2:30 is where the classic, warm tube sound resides and
within this narrow band you will discover a world of tone. Tiny increments here produce
subtle, but important differences in the attack characteristic which in turn, feel like changes in the time domain. By experimenting with
the amount of gain, you can actually voice the amp to feel as if it bounces just ahead of the groove - or lays back a little deeper to
produce a more Fatback feel. The difference in attack and sustain produces striking results as to how the bassist - and in fact the
whole band - perceives things in the time domain.
BASS: This control is responsible for the basic mix of low frequencies in the tube pre-amp. As mentioned earlier in the Helpful
Hints section, the BASS control is an active shelving type as opposed to a passive style control. This means that a center Q point has
been chosen and this control allows you to either boost or cut that frequency. This control differs from the low band of the PARAMETRIC in that it has a broader Q point with a more gentle ramp as opposed to the PARAMETRICS’
narrow Q that is used with a separate GAIN control.
ACTIVE
INSTRUMENT
INPUTS
GAIN
BASS
PASSIVE
The BASS control is actually a gain and frequency control all rolled into one with the Q
center at 55Hz and harmonics in both low and high directions are affected because of its
broader band nature. As the control is increased past 12:00 there is a 6db per octave rise in
gain with the frequency topping out at 321Hz. With 12:00 straight-up representing “flat” (a
no boost/no cut setting).
FOUR - STAGE VACUUM
As the BASS control is dialed below 12:00, 55Hz and all associated harmonics are reduced
and eventually notched completely out of the signal. Conversely, there is a 6db per octave
cut beginning at 55Hz going down to 20Hz where the shelving ends with a cut gain of -20db as the control approaches 7:30 (off).
This type of broad band, active rotary control makes it possible to achieve bass characteristics far beyond that of a conventional
passive type control. It can increase the low end to an almost absurd level and with a flick of the wrist, dip it to near transitor radio
skinniness. Needless to say, with any control this powerful a certain amount of finesse must be applied to achieve musical results. Be
especially mindful of this when using the 3 Band Semi-Parametric in conjunction with the BASS control.
PAGE 4
FRONT PANEL CONTROLS:
(Continued)
MID:
This is the only passive style control in the string of rotary tone controls. This scheme was chosen for its inherently musical
blend and for the way the passive style midrange control, with its wide spread and smooth taper, fills in the holes. Unlike the BASS,
this control is a boost only, and while it can competently remove this broad
spectrum of midrange from the mix, it cannot provide the extreme attenuation of
an active style control.
ACTIVE
You will find, as we did, that this control works amazingly well for shaping the
midrange frequencies with a natural earthiness and character that is a perfect
counterpart to its active neighbors. It is hard to dial wrong with this more forgivPASSIVE
ing control, as it seems to give you just enough and no more. This simplicity can
FOUR - STAGE VACUUM TUBE PREAMPLIFIER
be a welcome respite from the higher tech power of the adjacent tone controls...not
to mention the 3 Band SEMI-PARAMETRIC EQ For radical and specific scooping of the midrange frequencies for modern R&B and Funk styles, there is plenty
of notching power that is infinitely more accurate to be found in the 3 Band SEMI-PARAMETRIC. Because of this, we opted for the
tried and true passive style midrange control that has been working great in all of our amplifiers for decades. It’s hard to improve on
a classic.
INSTRUMENT
INPUTS
GAIN
BASS
MID
TREBLE: The TREBLE is also an active shelving style control like that found in the BASS and again, it was chosen for its ability
to radically shape the upper harmonic region. Like the BASS, it also has a center Q point with harmonics above and below responding
in harmony as it is dialed for either cut or boost.
TREBLE
DI LEVEL
MASTER
ON
As the control is increased past 12:00, it produces a 6db per octave rise in gain
starting at 723Hz until +20db is reached. From this point, gain remains constant
at +20db for all frequencies above 723Hz all the way out to 20Khz. This scheme
lends a sweetness of sound while retaining all the necessary cut and focus
associated with a traditional passive TREBLE control.
POWER
As the control is dialed below 12:00, it begins a 6db per octave cut from 3.2Khz
to the shelving point at 723Hz, where it continues to attenuate all frequencies
above 723Hz until - 20db is reached where cut gain remains constant until the
control reaches 7:30 (off). The ability to cut these frequencies more radically makes it possible to obtain incredibly rich and warm oldschool R&B and Jazz sounds that rival any recordings of the day.
This active shelving TREBLE control completes the rotary tone control string to create a powerful and extremely accurate network to
use as your fundamental platform. It’s no wonder many first time WalkAbout players make the comment that just these controls
combined with the GAIN create the best tone they have ever heard!
NOTE: As with the BASS control, may we remind you that a control of this type with its increased power should be used with finesse.
In the TREBLE’S case, almost more so, because higher frequencies seem louder to the ear and are generally more painful when set
to extremes. Another reason to use care is that high frequencies tend to increase the ambient noise floor when set too high. This is
then exacerbated if the 3 Band SEMI-PARAMETRIC EQ is combined for added top end boost. Dial with care and music in mind.
PAGE 5
FRONT PANEL CONTROLS:
DI LEVEL:
DI LEVEL
(Continued)
This rotary control determines the amount of signal present at the Rear Panel DIRECT OUT XLR jack. You will find
ample gain here and should be able to dial in the appropriate amount of signal for most any
live or recording console. It is a good idea to get in the habit of powering up your WalkAbout
with the DI LEVEL control Zeroed out, to avoid damaging the console, speakers or an unprepared set of ears in the event you strike a big note or chord before the console input level has
been set.
MASTER
ON
POWER
MASTER:
DI LEVEL
This basic control determines the overall final output level of your WalkAbout so that you can adjust the front end
GAIN control to your tonal needs and then push the SIMUL-STATE power section to the
desired listening level.
MASTER
ON
POWER
NOTE: Use the MASTER output level control with care. The WalkAbout is capable of very
loud output volumes that could potentially cause damage to your hearing or the hearing of
others. May we suggest always beginning your set-up by zeroing-out the MASTERoutput
level control to avoid accidental volume attacks on unsuspecting bandmates, engineers or
audiences.
PARAMETRIC EQUALIZER: Your WalkAbout is equipped with a powerful in-line 3 BAND SEMI-PARAMETRIC EQUALIZER that allows you to shape your signal to achieve virtually any sound. Anything from subtle enhancement to extreme notching or
boosting is possible with the only limit being your imagination. As mentioned earlier, the EQ is an in-line type, which means that it is
in the signal path at all times. If you do not wish to shape your signal with the EQ section of the preamp,
simply leave all the controls set to 12:00 (straight up) and the EQ will pass the signal unaffected. This
12:00 setting would be considered “flat” or in other words, basically bypassed.
0 db
-15
0
+
60 Hz
30
300
-
0
+
-
340Hz
200
+15
2K
2K
1.2K
PARAMETRIC EQUALIZER
12K
GAIN: These 3 GAIN controls adjust the amount of whatever frequency has been zeroed-in on for
manipulation with the FREQUENCY control. Each of the 3 GAIN controls allows a full 30db of gain
adjustment with 15db of cut and 15db of boost from the center 12:00 (0db) position. When searching for
sounds it is sometimes faster to either notch or boost the respective GAIN control radically and then
sweep for the desired frequency with the FREQUENCY control. This way it will be very apparent what
you are doing to the sound.
This is a good place to mention that, because of the strength of the 3 GAIN controls, it is possible to very quickly go beyond the realm
of balanced musical tone and blow holes in your mix. Therefor, start by building a great sound using the standard rotary TONE
controls and then begin with subtle tweaking of the frequencies using the PARAMETRIC EQ. Don't start boosting everything all over
PAGE 6
FRONT PANEL CONTROLS:
(Continued)
PARAMETRIC EQUALIZER: (Continued) the bandwidth and expect to have a great sound. Make small moves and then
allow your ears time to adjust to the difference. With controls this powerful EQ Hangover is part of the buzz. Don't be surprised if after
tweaking for an hour with the PARAMETRIC, you go back to your starting point and think the amp is broken it's not, your ears are
suffering from an overdose of EQ.
May we suggest that the old saying “less is more”, applies here beautifully. More often than not a better sound is achieved by notching
(cutting) frequencies that you want less of with the respective GAIN control, than boosting desirable frequencies. In this way your ears
can evaluate the differences better and get a bead on the next adjustment because you are not escalating the volume level as you go.
More importantly, you are less likely to create a sound with excess noise.
FREQUENCY CONTROLS: These 3 rotary controls divide up the frequency spectrum into three sweepable Q bands that allow
you to center-in on any frequency within each band and then cut or boost each with its accompanying GAIN control. As you may have
noticed, the bands overlap so that you can use adjacent bands to manipulate frequencies that are very close to each other frequency
wise. One great thing about a 3 Band PARAMETRIC is in its ease of use. Because of the limited number of bands, each of them fall
into the immediately recognizable regions of Low, Mid and High. While some say that this limits shaping
power by offering divisions that are too broad for accurate equalization, others greatly prefer this more
straight forward approach - citing its more direct line to a great sound. Because there is truth in both
these lines of thinking, we build both styles of EQ (M-PULSE 600 and 360 offer 5 Band PARAMET0 db
0
0
RIC EQ). However, the WalkAbout certainly doesn't suffer from its 3 Band SEMI-PARAMETRIC EQ
simplicity. Its quite the opposite, many players actually prefer this style and are able to get everything
-15
+
+
+15
they need quickly and accurately. The bands are labeled in order from low to high frequency at their
60 Hz
340Hz
2K
center (12:00) point as 60Hz, 340Hz and 2Khz. These numbers represent the bands center point and
the FREQUENCY control sweeps the range from the two numbers at opposing ends of the control
30
300
200
2K
1.2K 12K
PARAMETRIC EQUALIZER
range. For example, the 60Hz band can be set to focus on frequencies between 30Hz and 300Hz with
60Hz being the control Center at 12:00 (straight up). The 340Hz band is especially powerful as it can
sweep between the high-bass/low-mid region of 200Hz and the high-mid/low-high region of as high as
2Khz. You will come to find this band possibly the most useful as it affects the most used and audibly sensitive regions.
Certain frequencies are heard by the ear differently, and it is a fair assumption that the majority of us are much more sensitive to
midrange and lower treble frequencies, while we are more “tolerant” of sub-low and super-high frequencies. Because we all hear
differently and this frequency sensitivity exists in all of us to some degree, it is normal for some FREQUENCY control settings within
the bands to seem more powerful and others to seem weaker for the same relevant GAIN setting. This is normal and no, your
WalkAbout is not misbehaving. Usually the lowest (60Hz) and highest (2Khz) are the most susceptable to this with the most
extreme low and extreme high showcasing this phenomenon. These settings may require a slightly higher GAIN setting than you are
used to seeing to achieve the desired shaping result.
NOTE: The highest band (2Khz) of the SEMI-PARAMETRIC EQUALIZER can be extremely powerful. For this reason use care with
the GAIN controls in these ranges as high settings will produce unwanted background noise in the form of hiss or white noise. This is
made worse if the TREBLE control is set in its higher range. If you need a sound with a large amount of these Treble frequencies in
your mix, approach it from a different angle. Begin by notching lower frequencies in the other bands, as opposed to boosting the
higher bands with the lower bands set more flat. This scheme will greatly improve the noise floor and still allow you to achieve the
desired boost in higher frequencies.
NOTE: May we again humbly suggest using the PARAMETRIC EQ to fine-tune your sound with subtle adjustments. Much like a car
with an engine capable of ridiculous speeds, the WalkAbout incorporates this shaping device capable of ruining a great tone in the
hands of the unwary driver. Use this powerful tool with taste and music in mind and avoid settings that are so extreme that they blow
holes in what could otherwise be a great sound.
PAGE 7
REAR PANEL CONTROLS:
REAR VIEW: WalkAbout
CAUTION:Unplug power
before removing fuse or
bolts holding chassis
M-PULSE TM WALKABOUT
DIRECT OUT
FUSE
FUSE
POWER
120 V~
60 Hz
6A
POST
SIMUL STATE BASS AMPLIFIER
TUBE DRIVEN-MOSFET POWER
PRE
HANDBUILT IN PETALUMA , CALIFORNIA
GROUND
LIFT
EFFECTS LOOP
FUSE
6A
SLO
BLO
RETURN
SPEAKER OUTPUT
SUGGESTED LOAD
SEND
4 OHMS
WARNING: To reduce risk of fire or
electric shock, replace fuse with
same type and rating only. Do not
expose this unit to rain or moisture.
ENGINEERING
WARNING: To reduce risk of fire or electric
shock, Do not remove cover. No userserviceable parts inside. Refer
servicing to qualified personnel.
FUSE: This is the A.C. Mains Fuse for the WalkAbout REPLACE ONLY WITH A SLO-BLO TYPE FUSE OF THE PROPER
RATING. THIS IS EXTREMELY IMPORTANT, AS THE WalkAbout DRAWS A SUBSTANTIAL AMOUNT OF CURRENT AT HIGH
OUTPUT LEVEL SETTINGS.
CAUTION:Unplug power
before removing fuse or
bolts holding chassis
FUSE RATING (USA) 6 A S.B. / 120 VOLTS
FUSE
FUSE
AC RECEPTACLE:
The removable “Euro” Style” A.C. cord that is supplied with the WalkAbout makes set-ups and teardowns after the gig a snap. It also makes de-racking much easier when you wish to remove the unit from a hard wired rack system
where all the A.C. cords have been cable-tied in. Additional heavy duty cords are available should you ever need
one...simply call us direct and we can ship one directly to you for a nominal charge, plus shipping cost. Make sure
S
FU E
the A.C. cord is firmly in its socket (receptacle) before powering up the amplifier.
FUSE
POWER
120 V~
60 Hz
12 A
FUSE
12A
SLO
BLO
NOTE: NEVER ALTER THE THREE PRONG POWER CORD IN ANY WAY.
CAUTION: NEVER BLOCK AIR VENTS
CAUTION:Unplug power
before removing fuse or
bolts holding chassis
M-PULSE TM SIMUL STATE BASS AMPLIFIER
TUBE DRIVEN-MOSFET POWER
HANDBUILT IN PETALUMA, CALIFORNIA
FUSE
FUSE
POWER
120 V~
60 Hz
12 A
FUSE
12A
SLO
BLO
WARNING: To reduce risk of fire or
electric shock, replace fuse with
same type and rating only. Do not
expose this unit to rain or moisture.
WARNING: To reduce risk of fire or electric
shock, Do not remove cover. No userserviceable parts inside. Refer
servicing to qualified personnel.
CAUTION: NEVER BLOCK AIR VENTS
NOTE: NEVER BLOCK OR ALTER AIR ANY OF THE VENTED AREAS ON THE REAR PANEL OF THE AMPLIFIER.
PAGE 8
REAR PANEL CONTROLS:
(Continued
DIRECT OUT: This section captures the entire pre-amp signal including the SEMI-PARAMETRIC EQ and the EFFECTS LOOP
which in turn allows you to send a Balanced signal to either a House Main Board or a Recording console. There are three elements
to this circuit which are; (1) a male XLR jack, (2) a POST / PRE switch and (3) a GROUND LIFT switch.
DIRECT OUT
Here are their functions and how to use them:
PRE
POST
GROUND
LIFT
POST / PRE: This switch lets you choose the type of signal you wish to send to the console. POST gives
you the entire sound of the pre-amp with the PARAMETRIC EQ and the EFFECTS LOOP (including
processing from anything in the loop).
PRE gives you just the sound of your instrument with noWalkAbout enhancement so that an engineer can create their own sound
with your unprocessed signal at the console. This is very handy for sound reinforcement applications as the sound you use on stage
may be too big with enhanced low end for a large venue house application.
GROUND LIFT: This switch removes the circuit-to-chassis ground connection from the XLR jack. Leave it in the grounded position
(switch down) normally unless you experience a hum when connecting to a console. If you do experience a hum when connecting the
XLR Output to a console, try lifting the ground (switch up) on the circuit. This will usually (but not always) remedy most ground loop
type noise from the signal path. Sometimes it may also be necessary to lift the A.C. Cable Ground also by using a 3-2 ground adapter
to achieve a quiet signal path.
NOTE: Ground loops can occur in many places in a complex signal path. The DIRECT OUTPUT GROUND LIFT switch is not a cureall and therefore should not be expected to remedy every type of ground related problem.
EFFECTS LOOP: The EFFECTS LOOP section of the WalkAbout is responsible for handling the interfacing of external signal
processing via its RETURN and SEND jacks located on the Rear Panel.
EFFECTS LOOP
RETURN
RETURN: This is the patch point between the pre-amp and power amp for returning a processed signal
from your outboard effects back to the WalkAbout. Because this is an input to the power amp, the
RETURN jack can be used to access the power amp only. This is handy to use the WalkAbout as a
slave power amp or when multiple WalkAbout units are connected for large venue applications.
SEND
SEND: This is the output of the pre-amp and allows you to send a signal to your effects for processing.
SPEAKER OUTPUT:
The WalkAbout provides two 1/4 inch speaker jacks for powering speaker enclosures. The recommended speaker load impedance for the WalkAbout is 4 Ohms, at which the mighty SIMUL STATE power section is capable of
delivering a whopping 300 watts RMS before clip and peaks of over 400 watts! A speaker load of 8 Ohms
SPEAKER OUTPUT
may also be used though the overall power will be reduced to roughly 150 watts using this rate of impedance.
SUGGESTED LOAD
4 OHMS
PAGE 9
FACTORY SAMPLE SETTINGS
Huge & Round (Parametric EQ Optional)
ACTIVE
S I M U L S T A T E TM
ENGINEERING
B A S S A M P L I F I E R
0 db
-15
INSTRUMENT
INPUTS
GAIN
BASS
+
MID
+
-
+15
340Hz
300
FOUR - STAGE VACUUM TUBE PREAMPLIFIER
0
-
60 Hz
30
PASSIVE
0
200
2K
2K
1.2K
TREBLE
DI LEVEL
MASTER
ON
12K
PARAMETRIC EQUALIZER
POWER
Scooped R & B
ACTIVE
S I M U L S T A T E TM
ENGINEERING
B A S S A M P L I F I E R
0 db
-15
INSTRUMENT
INPUTS
GAIN
BASS
+
-
60 Hz
MID
30
PASSIVE
0
+
-
+15
340Hz
300
FOUR - STAGE VACUUM TUBE PREAMPLIFIER
0
200
2K
2K
1.2K
TREBLE
DI LEVEL
MASTER
ON
12K
PARAMETRIC EQUALIZER
POWER
Articulate Solo
ACTIVE
S I M U L S T A T E TM
ENGINEERING
B A S S A M P L I F I E R
0 db
-15
INSTRUMENT
INPUTS
GAIN
BASS
+
+
-
340Hz
300
FOUR - STAGE VACUUM TUBE PREAMPLIFIER
0
-
60 Hz
MID
30
PASSIVE
0
200
+15
2K
2K
1.2K
TREBLE
DI LEVEL
MASTER
ON
12K
PARAMETRIC EQUALIZER
POWER
Driving Rock (Parametric EQ Optional)
ACTIVE
S I M U L S T A T E TM
ENGINEERING
B A S S A M P L I F I E R
0 db
-15
INSTRUMENT
INPUTS
GAIN
BASS
MID
+
FOUR - STAGE VACUUM TUBE PREAMPLIFIER
-
60 Hz
30
PASSIVE
0
0
+
-
340Hz
300
200
+15
2K
2K
1.2K
PARAMETRIC EQUALIZER
PAGE 10
TREBLE
DI LEVEL
MASTER
ON
12K
POWER
PERSONAL SETTING PAGE
ACTIVE
S I M U L S T A T E TM
ENGINEERING
B A S S A M P L I F I E R
0 db
-15
INSTRUMENT
INPUTS
GAIN
BASS
+
+
-
+15
340Hz
300
FOUR - STAGE VACUUM TUBE PREAMPLIFIER
0
-
60 Hz
MID
30
PASSIVE
0
200
2K
2K
1.2K
TREBLE
POWER
ENGINEERING
-15
INSTRUMENT
INPUTS
BASS
0
+
-
60 Hz
MID
30
PASSIVE
0
+
-
+15
340Hz
300
FOUR - STAGE VACUUM TUBE PREAMPLIFIER
200
2K
2K
1.2K
TREBLE
-15
POWER
0
+
MID
+
-
340Hz
300
FOUR - STAGE VACUUM TUBE PREAMPLIFIER
0
-
60 Hz
30
PASSIVE
200
+15
2K
2K
1.2K
TREBLE
-15
MID
FOUR - STAGE VACUUM TUBE PREAMPLIFIER
0
+
-
60 Hz
30
PASSIVE
ON
POWER
ENGINEERING
INSTRUMENT
INPUTS
BASS
MASTER
12K
B A S S A M P L I F I E R
0 db
GAIN
DI LEVEL
PARAMETRIC EQUALIZER
ACTIVE
S I M U L S T A T E TM
ON
ENGINEERING
INSTRUMENT
INPUTS
BASS
MASTER
12K
B A S S A M P L I F I E R
0 db
GAIN
DI LEVEL
PARAMETRIC EQUALIZER
ACTIVE
S I M U L S T A T E TM
ON
12K
B A S S A M P L I F I E R
0 db
GAIN
MASTER
PARAMETRIC EQUALIZER
ACTIVE
S I M U L S T A T E TM
DI LEVEL
0
+
-
340Hz
300
200
+15
2K
2K
1.2K
PARAMETRIC EQUALIZER
PAGE 11
TREBLE
DI LEVEL
MASTER
ON
12K
POWER
DIAGNOSING PRE AMP TUBES: You may occasionally experience some form of tube noise or microphonics. Certainly no
cause for alarm, this quirky behavior comes with the territory and the Tone. Much like changing a light bulb, you don’t need a
technician to cure these types of minor user serviceable annoyances and in fact, you’ll be amazed at how easy it is to cure tube
problems...by simply swapping out a pre-amp or power tube!
First may we suggest that you set the amplifier up on something so that you can get to the tubes comfortably without having to bend
down. It also helps to have adequate lighting as you will need to see the tube sockets clearly to swap tubes. Use caution and
common sense when touching the tubes after the amplifier has been on as they may be extremely hot! If they are hot and you
don’t want to wait for them to cool off, try grasping them with a rag and also note that the glass down around the bulbous silvery tip is
considerably less hot which makes it easier to handle. Gently rock the tube back and forth as you pull it away from its socket.
TUBE NOISE AND MICROPHONICS: Because your amplifier is an all tube design, it is quite possible that you will at some
point experience minor pre-amp tube noise. Rest assured - this is no cause for alarm and you can take care of the problem yourself
in a matter of minutes by simply swapping tubes.
Let us begin by saying; It is a “very good” idea to keep at least a couple of spare pre-amp tubes on hand at all times to insure
uninterrupted performance. These minor pre-amp tube problems can take many forms but can generally be described in two categories: Noise and Microphonics. Noise can be in the form of crackling, sputtering, white noise/hiss and/or hum. Microphonic problems
usually appear in the form of a ringing or high pitched squealing that gets worse as the gain or volume is increased thus are more
noticeable in the higher gain “HI” modes. Microphonic problems are easily identified because the problem is still present even with the
instruments’ volume off or unplugged altogether - unlike pick-up feedback which ceases as the instrument is turned down. Microphonic noise is caused by mechanical vibration and shock: think of banging a microphone around and you’ll understand where the
word came from.
The best way to approach a pre-amp tube problem is to see if it occurs only in one specific mode or channel. This should lead you to
the tube needing replacement. Then all that remains is to swap the suspect tube for a known good performer. If you cannot narrow
down the trouble to a specific mode or channel, the problem may be the small tube that drives the power tubes which is operational
in all modes and channels. Though rare, a problem with the driver tube would show up in all aspects of performance - so if you can’t
narrow the problem down to being mode or channel specific, you may want to try replacing the driver tube. Driver problems generally
show themselves in the form of crackling or hum in all modes of performance and/or weak overall output from the amplifier. Occasionally an anemic driver tube will cause the amplifier to sound flat and lifeless, but this is somewhat uncommon, as worn power tubes are
a more likely suspect for this type of problem.
MESA BOOGIE
The Spirit of Art in Technology
Thank you
for trusting MESA/Boogie to be your amplifier
company and we wish you many years of toneful enjoyment from
this handbuilt all tube instrument.
The Spirit of Art in Technology
(707) 778-6565
FAX NO. (707) 765-1503
1317 Ross Street Petaluma, CA 94954
USA