1
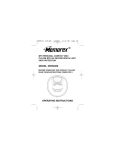
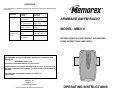
OPERATION
If you experience a problem with this unit, check the chart below before calling
for service.
SYMPTOM
POSSIBLE
CAUSE
No sound.
VOLUME/Power control Rotate clockwise until
not set to ON.
POSSIBLE
SOLUTION
a clock is heard.
ARMBAND AM/FM RADIO
VOLUME/Power control Increase the VOLUME/
at minimum position.
Power control.
Batteries not installed
Install fresh batteries
properly or dead.
properly.
Earbuds not connected. Connect earbuds.
Noise or sound
AM - Interference from
Turn the radio for
distorted on AM
traffic.
better AM reception.
FM - Earbud wire
Extend Earbud wire.
or FM.
not extended.
MODEL: MB210
BEFORE OPERATING THIS PRODUCT, PLEASE READ
THESE INSTRUCTIONS COMPLETELY.
FOR ADDITIONAL SET-UP OR OPERATING ASSISTANCE, PLEASE VISIT OUR
WEBSITE AT:
WWW.MEMCORPINC.COM
OR CONTACT CUSTOMER SERVICE AT 1-800-919-3647.
PLEASE KEEP ALL PACKAGING MATERIAL FOR AT LEAST 90 DAYS IN CASE
YOU NEED TO RETURN THIS PRODUCT TO YOUR PLACE OF PURCHASE OR
MEMOREX.
FOR PARTS AND ACCESSORIES, CONTACT FOX INT’L AT
1-800-321-6993.
Memcorp, Inc.
Weston, FL
Printed in Hong Kong
Visit our website at www.memcorpinc.com
OPERATING INSTRUCTIONS
LOCATION OF CONTROLS
1
OPERATION
5
EARBUDS:
Included with this unit are earbuds. Make sure the VOLUME/Power control is
at minimum and insert the earbud plug into the earbud jack on the top of the
unit. Place the earbuds into your left and right ears, corresponding to the “L”
and “R” mark on each earbud.
2
6
7
3
8
4
ARMBAND STRAP:
You can strap this unit onto your arm using the armband strap. Simply
unfasten the velcro and put around arm and then refasten velcro.
TO LISTEN TO THE RADIO
9
1.
2.
3.
4.
5.
FM/AM Switch
Power Indicator
VOLUME/Power Control
Armband Strap
Earbud Jack
1
6. Armband Strap Holder (Rear
of Unit)
7. TUNING Control
8. AM/FM Dial Scale
9. Battery Compartment (Rear
of Unit)
BATTERY OPERATION
1. Remove the Armband Strap holder by sliding it downward, then remove the
Battery Compartment cover by pressing in on the tab and lifting it out.
2. Insert two (2) “AAA” size batteries following the diagram.
3. Replace the Battery Compartment cover and make sure it snaps shut securely.
+
BATTERY PRECAUTIONS
Follow these precautions when using batteries in this device:
1. Use only the size and type of batteries specified.
2. Be sure to follow the correct polarity when installing the batteries as indicated in the battery
compartment. Reversed batteries may cause damage to the device.
3. Do not mix different types of batteries together (e.g. Alkaline and Carbon-zinc) or old
batteries with fresh ones.
4. If the device is not to be used for a long period of time, remove the batteries to prevent
damage or injury from possible battery leakage.
5. Do not try to recharge batteries not intended to be recharged; they can overheat and
rupture. (Follow battery manufacturer’s directions.)
1
2
1
Insert the earbuds into the Earbud
jack and rotate the VOLUME/Power
control ❶ clockwise until a click is
heard to turn the unit on; the Power
indicator will light. Slide the AM/FM
switch ❷ to the AM or FM position.
1
Tune a station by turning the TUNING
control ❶. Adjust the VOLUME/Power
control ❷ as desired.
3
+
—
—
2
2
When done listening, rotate the
VOLUME/Power control counterclockwise until a click is heard to turn the
unit off; the Power indicator will go out.
Antennas
FM: Extend the earbud wire for best reception.
AM: Turn the unit for better AM reception.
2