1
E
T
BU
I
R
T
E
ID
{
GU
D
Z
RT
A
{
ST
m
T
R
9
A
M
0
S
20
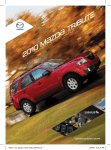
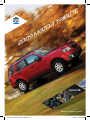
Optional equipment shown.
162128_09a_Tribute_SSG_073008.indd 1
7/30/08 6:12:15 PM
Key
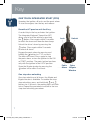
ONE TOUCH INTEGRATED START (OTIS)
Operates the ignition, all locks and the panic alarm.
To start the engine, turn the key and release.
SecuriLock™ passive anti-theft key
A coded chip in the key activates the ignition.
The Integrated Keyhead Transmitter (IKT)
allows you to lock the vehicle by pressing
the
button. Press again within 3 seconds
to relock the doors and hear the horn beep.
Lock
Unlock
Unlock the driver’s door by pressing the
button. Press again within 3 seconds
to unlock all doors.
Engage the panic alarm by pressing and
button for 1-1/2 seconds.
holding the
The horn will sound. Press again to stop
the panic alarm, or turn the ignition to the ON
or START position. The panic button functions
only with the ignition in the LOCK position.
Open the liftgate window by pressing the
button twice within 3 seconds.
Panic
Alarm
Open
Liftgate
Window
One step door unlocking
One step unlocking of all doors, the liftgate and
liftgate window is available. To enable one step
door unlocking, press and hold both
and
buttons for 4 seconds; the parking lights will flash
twice. Repeat the procedure to return to the two
step door unlocking procedure.
1
162128_09a_Tribute_SSG_073008.indd 2
7/30/08 6:12:22 PM
Perimeter lamps illuminated entry
This feature turns on headlamps, park lamps and tail lamps when the
button is pressed using the Integrated Keyhead Transmitter (IKT). Lamps
automatically turn off if the ignition is turned on, after a 25-second time
delay, or if the IKT
button is pressed.
Note: Use the key number sticker on the key to purchase a new key; store the
sticker in safe place, away from the vehicle.
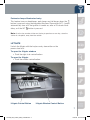
LIFTGATE
Unlock the liftgate with the keyless entry transmitter or the
power door lock.
To open the liftgate window
• Push the right side control button.
To open the liftgate
• Push the middle control button.
Liftgate Control Button
Liftgate Window Control Button
2
162128_09a_Tribute_SSG_073008.indd 3
7/30/08 6:12:37 PM
Seats
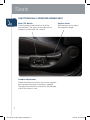
ELECTRONICALLY OPERATED driver SEAT
Slide/Tilt Switch
Push forward or backward to slide the
seat bottom. The seat can also be raised,
lowered or tilted with this control.
Recline Lever
Pull the lever up to adjust
the seatback angle.
Lumbar Adjustment
Rotate the knob clockwise to increase support
and counterclockwise to decrease support.
The adjustment knob is located on the inboard
side of the driver’s seat.
3
162128_09a_Tribute_SSG_073008.indd 4
7/30/08 6:12:53 PM
Seat Cushion
Release Strap
Split-Folding Rear Seatbacks
Seatback
Release Lever
The rear seatbacks can be folded down to provide more space in
the cargo area
Folding down the seatbacks
1 After checking that the rear seats are clear, remove the rear seat
head restraints and store under the front seat.
2Pull the seat cushion release strap, and flip the seat cushion forward.
3Pull the seatback release lever (on top of the outboard side of the
seat) toward the front seat and rotate the seatback down to the
flat position.
Returning the seatbacks to the upright position
1Lift the seatbacks upright until they lock into position and the
RED seat unlatched indicator on the seatback release lever is
not visible.
2Rotate the seat cushion down into the seating position, making
sure that the seat cushion is locked.
3Reinstall the head restraints to the original position on
the seatbacks.
4
162128_09a_Tribute_SSG_073008.indd 5
7/30/08 6:13:19 PM
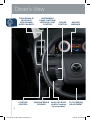
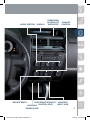
Driver’s View
Turn signals/
headlight
high beams/
wiper/washer
lighting
control
5
162128_09a_Tribute_SSG_073008.indd 6
instrument
panel lighting/
interior light
control
cruise
control
parking brake hood release
release
handle (behind
steering wheel)
hazard
warning
tilt steering
adjustment
7/30/08 6:13:28 PM
audio system
display
passenger
air bag off
indicator
climate
control
heated seats
electronic stability auxiliary
control (ESC)
input jack
auxiliary
power point
162128_09a_Tribute_SSG_073008.indd 7
6
7/30/08 6:13:39 PM
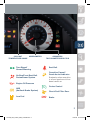
Instrument Cluster
tachometer
Fuel Gauge
ODOMETER/
trip odometer
glossary of Warning and indicator lights
Please see Owner’s Manual for more details and explanations
Electronic Stability
Control (ESC) Active
Charging System
Check Engine
Throttle Control/
Powertrain
Headlight High Beam
Security Indicator
Door Ajar
Tire Pressure
Monitoring System (TPMS)
7
162128_09a_Tribute_SSG_073008.indd 8
7/30/08 6:13:47 PM
coolant
Temperature gauge
speedometer
Odometer/
trip odometer selector
Turn Signal/
Hazard Warning
Seat Belt
Overdrive Cancel/
Grade Assist Indicator
Illuminates when overdrive
is off and grade assist has
been turned on.
Air Bag/Front Seat Belt
Pretensioner System
Engine Oil Pressure
Cruise Control
ABS
(Antilock Brake System)
Low Fuel
Check Fuel Filler Door
!
P
BRAKE
Brake
8
162128_09a_Tribute_SSG_073008.indd 9
7/30/08 6:13:59 PM
Feature Highlights
TURN SIGNALS/HEADLIGHT HIGH BEAMS/
WIPER/WASHER LEVER
Headlight High Beam Operation
To turn high beams ON, push the lever forward.
To turn high beams OFF, pull the lever back one position.
To flash high beams, pull the lever back all the way and release.
Windshield Wiper/Washer
Rotate the end of the control away from you to increase the speed of
the wipers; rotate toward you to decrease the speed of the wipers.
Pushing the end of the stalk inward will dispense washer fluid and
the wipers will make several passes across the windshield.
Rear Window Wiper/Washer
Rotate the rear window wiper/washer inner control to the
desired speed.
0 = OFF
1 = Intermittent
2 = Normal speed
= Rear wash/wiper cycle, hold as desired
Windshield Wiper/
Washer Control
Rear Window Wiper/
Washer Control
9
162128_09a_Tribute_SSG_073008.indd 10
7/30/08 6:14:07 PM
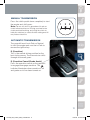
Manual Transmission
Press the clutch pedal down completely to start
the engine and shift gears.
Note: Do not shift into 1st gear above 20 mph or
clutch failure could occur. Resting your foot on the
clutch pedal while driving, and using the clutch to
hold your vehicle at a standstill while waiting on a hill
may reduce clutch life.
1
3
5
2
4
R
AUTOMATIC Transmission
The gearshift must be in Park or Neutral
to start the engine and must be in Park to
remove the ignition key.
D (Overdrive)
This is the normal driving position for the
best fuel economy. The transmission shifts
through all forward gears.
D (Overdrive Cancel/Grade Assist)
Press the overdrive switch on the gearshift
to engage/disengage overdrive. The
indicator illuminates when overdrive is off
and grade assist has been turned on.
10
162128_09a_Tribute_SSG_073008.indd 11
7/30/08 6:14:21 PM
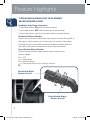
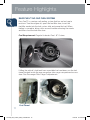
Feature Highlights
EASY FUEL™ NO CAP FUEL SYSTEM
Easy Fuel™ is a unique self-sealing system that has no fuel cap to
unscrew. Turn the engine off, open the fuel-filler door, insert the
fuel-filler nozzle into the fuel system inlet and pump the fuel. When
fueling is complete, allow a few seconds before removing the nozzle
and then close the fuel-filler door.
Fuel Requirement: Regular Unleaded Fuel - 87 Octane
If filling the vehicle’s fuel tank from a portable fuel container, use the fuel
funnel located inside the rear passenger side cargo compartment access
door. See Passenger Side Cargo Compartment.
Fuel Funnel
11
162128_09a_Tribute_SSG_073008.indd 12
7/30/08 6:14:34 PM
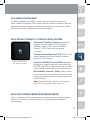
all wheel drive (AWD)
A Tribute equipped with AWD is always active and requires no driver
input. Tribute’s intelligent AWD system monitors vehicle conditions and will
automatically adjust power distribution between the front and rear wheels.
Refer to the Owner’s Manual for further information.
ELECTRONIC STABILITY CONTROL (ESC) SYSTEM
Electronic Stability Control automatically
enables Traction Control (TCS), Dynamic
Stability Control (DSC), and Roll Stability
Control™ (RSC) each time the engine
is started.
Traction Control System (TCS) detects drive
wheel slippage and lowers engine torque to
prevent loss of traction.
See “Driver’s View”
for button location.
Dynamic Stability Control (DSC) regulates
braking and engine torque in conjunction with
the ABS and TCS to help control skids or lateral
slides during sudden or evasive maneuvering.
Roll Stability Control™ (RSC) detects when
corrective action is needed and controls engine
torque and braking on each wheel to prevent a
vehicle rollover.
Note: Electronic Stability Control system will only
intervene if the driving situation requires it.
ELECTRIC POWER-ASSISTED STEERING (EPAS)
Electric power-assisted steering offers more assistance at slower speeds
and less assistance at greater speeds, for additional road feedback
and handling.
12
162128_09a_Tribute_SSG_073008.indd 13
7/30/08 6:14:39 PM
Feature Highlights
DAYTIME RUNNING LAMPS (DRL)
Operates the low beam headlamps with a reduced output.
To activate, turn the ignition on and turn the headlamp control to off,
or select the park lamps or autolamp position.
Note: A vehicle equipped with an automatic transmission must be shifted out
of P (Park) for the DRL to activate. A vehicle equipped with a manual transmission
must have the parking brake released for the DRL to activate.
Lighting Control Knob
= Lights off
= Rotate knob to turn on tail, park and dashboard lights.
= Rotate knob to turn on tail, park, dashboard and headlights.
= W
ith the ignition on, autolamp control manages your
headlamps and exterior lighting automatically, depending on
the surrounding darkness/lightness.
= P
ull the headlamp control knob toward you while in ,
or
for the fog lamps to operate. The fog lamp indicator
will illuminate.
13
162128_09a_Tribute_SSG_073008.indd 14
7/30/08 6:14:53 PM
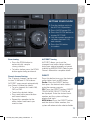
Climate Control
•
Fan Speed: Rotate the dial to set desired fan speed (1-4).
• Power: Press this dial to turn the Climate Control system
ON and OFF.
• Rotate the dial to select a warmer (red area) or cooler
(blue area) air temperature.
• Push the appropriate button to select desired airflow mode:
Defroster and
floor vents
Windshield defroster
Rear window defroster
Dashboard vents
Dashboard and
floor vents
Floor vents
• A /C: Push buttons to turn the air conditioning system ON
and OFF.
• Press to recirculate cabin air, reduce exhaust odors
and increase cooling.
• M AX A/C: Press this button for maximum cabin cooling in
recirculation mode.
• Heated Seats: Press these buttons to turn heated seats
ON and OFF.
Note: Applies to all Climate Control Systems: With any type of defroster
operation (even in the FLOOR mode where some air is used to keep the
windows defrosted), the system turns on the A/C and selects the FRESH AIR
mode. This helps defrost the windows more efficiently by dehumidifying the air.
The A/C will always be on when front windshield defrost is selected, but the
defroster (and floor) will deliver warm air when the temperature dial is set to a
warmer temperature and the engine warms up.
162128_09a_Tribute_SSG_073008.indd 15
14
7/30/08 6:15:03 PM
Audio Controls
Audio System On
• Press the VOL (Power/Volume)
button to turn the radio on.
Media selection
Press the appropriate button:
AM/FM, CD, AUX (to switch to
AUX jack input) and SIRIUSTM
(Satellite radio).
Note: If the FM broadcast signal becomes
Tuning
The radio has the following
tuning controls:
• Manual
• Seek/TRACK • Scan
• Preset channel
• AutOSET
weak, reception automatically changes
from STEREO to MONO for reduced noise,
and the “ST” indicator will go out.
Manual tuning
• Turn the TUNE dial to change the
frequency higher or lower.
SIRIUSTM Satellite radio will deliver
the broadest, deepest mix of radio
entertainment. See the Owner’s
Manual for more details.
Note:
PHONE (Not available
Seek tuning
• Press the SEEK/TRACK tune
buttons to seek a higher or lower
frequency automatically.
on Tribute)
15
162128_09a_Tribute_SSG_073008.indd 16
7/30/08 6:15:09 PM
setting your clock
1. T
urn the ignition switch to
the ACC or ON position.
2. P
ress AUDIO power ON.
3. P
ress the CLOCK button to
display SET TIME.
4. U
se the memory presets to
set hours (buttons 0-9)
and minutes.
5. Press the OK button
to confirm.
Scan tuning
• Press the scan button to
automatically sample
strong stations.
• To hold a station, press the SCAN button again during an interval.
AUTOSET tuning
AUTOSET allows you to set the
strongest local radio stations without
losing your original manually set preset
stations for AM/FM1/FM2. Refer to your
Owner’s Manual for complete details.
Preset channel tuning
The 10 preset channels can be used
to store 10 AM and 20 FM stations.
AUTOSET saves presets automatically
(see Owner’s Manual for details).
• To set a channel, first select AM,
FM1, or FM2.
• Tune to the desired station.
• Press and hold a preset button
until sound returns.
• Repeat this operation for the
other stations and bands you
want to store.
DIRECT
Press this button to access the desired
radio station, track or MP3 folder.
Radio: Press the DIRECT button,
then press the desired radio station
using the memory presets.
CD: Press the DIRECT button; DIRECT
TRACK MODE SELECT TRACK will
be displayed. Enter the desired track
number and the system will begin
playing that track.
MP3 folder: Press the DIRECT button
and the desired folder number; the
system will advance to the selected folder.
16
162128_09a_Tribute_SSG_073008.indd 17
7/30/08 6:15:15 PM
Notes
17
162128_09a_Tribute_SSG_073008.indd 18
7/30/08 6:15:16 PM
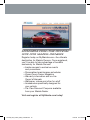
MyMazda.com—The Official
Site for Mazda Owners
Register today on MyMazda.com—the ultimate
destination for Mazda Owners. Once registered,
you’ll be able to take advantage of benefits
exclusively for Mazda Owners:
•Insider access to exclusive events
and promotions
•Personalized maintenance schedules
•Zoom-Zoom Owner Magazine
•Warranty information and on-line
Owner’s Manuals
•Wallpaper, videos and other fun stuff
•Accessories specifically designed for
your vehicle
• Car Care Discount Coupons available
from your Mazda Dealer
Visit and register at MyMazda.com today!
162128_09a_Tribute_SSG_073008.indd 19
7/30/08 6:15:18 PM
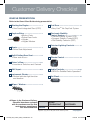
Customer Delivery Checklist
Vehicle presentation:
Refer to the Smart Start Guide during presentation
Starting the Engine......................... 1
• One-Touch Integrated Start (OTIS)
Keyless Entry.................................. 1
• Keyless Entry
• Power Door Locks
• Liftgate
• Liftgate Window
Fuel Door....................................... 11
• Easy FuelTM No Cap Fuel System
Electronic Stability
Control System . ........................... 12
• Traction Control System (TCS)
• Dynamic Stability Control (DSC)
• Roll Stability ControlTM (RSC)
Exterior Lighting Controls........... 13
Seats............................................... 3
• Driver Seat Adjustment
S plit-Folding Rear Seat..................4
• Rear seat access
Driver’s View................................ 5-6
• Location of Switches and Controls
AUX Input...................................... 6,15
Climate Control.............................. 14
Instrument Cluster........................ 7-8
• Review indicator light function
and location
Audio Controls........................... 15-16
• SIRIUSTM Satellite Radio Operation*
S et Clock....................................... 16
Wiper / Washer............................... 9
All items in the Customer Delivery
Checklist have been reviewed
with the customer and the first
maintenance appointment
has been scheduled:
SALES
CONSULTANT
CUSTOMER
Initials
Signed copy must be placed in dealer jacket
162128_09a_Tribute_SSG_073008.indd 20
*if equipped
7/30/08 6:15:40 PM
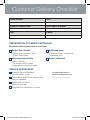
Customer Delivery Checklist
DEALERSHIP
DATE
SALES CONSULTANT
CUSTOMER’S NAME
VIN
E-MAIL
Presentation of Owner’s Materials:
Review the following items with the customer
Smart Start Guide
• Remove this checklist from
Smart Start Guide
MyMazda.com
Warranty Information
• Basic Vehicle –
36 months/36,000 miles
• Roadside assistance program
Service Department
Introduce Service Manager;
• O ffer to register customer on
MyMazda.com
Owner’s Manual
Scheduled Maintenance
Provide business cards
Windshield Cling Reminder
Review Service and Parts Department
hours of operation
Affix to inside windshield
E xplain free Full Circle
Service Inspection
Schedule first maintenance service
162128_09a_Tribute_SSG_073008.indd 21
7/30/08 6:15:40 PM
Genuine mazda service
Because you and your Mazda deserve the best
Your new Mazda deserves nothing less than the very best. To keep it running
like new for years to come, trust the experts at your local authorized Mazda
Dealer. Simply bring your vehicle in for your scheduled maintenance and any
needed repairs.*
At Mazda Full Circle Service Centers,** our technicians will automatically
perform a complimentary Full Circle inspection on your vehicle and issue
a detailed report card at every visit. This is designed to help you keep
track of your Mazda’s critical operating condition. Our factory-trained
technicians know your vehicle inside out and use Genuine Mazda Parts,
giving your vehicle the optimum care and maintenance it requires to run
with flawless precision.
Remember, to further enhance your driving experience, visit your local
Mazda Service Center for your scheduled maintenance. It’s also the place
where you can find a wide variety of tires, parts, and accessories that are
just right for your vehicle.
* See vehicle’s scheduled-maintenance program for details.
** Visit MyMazda.com/fullcircle for a list of Full Circle Service Centers
Customer Assistance Center: 1-800-222-5500
Roadside Assistance Contact: 1-800-866-1998
FREE FULL CIRCLE SERVICE INSPECTION
We’re committed to providing expert Mazda service.
You love to drive your Mazda, and we love to service your
Mazda. With our Full Circle Service, we’ll give your vehicle a
COMPLIMENTARY MULTI-POINT INSPECTION. Your Mazda
will receive a thorough review of its most crucial components.
This easy-to-use Smart Start Guide is intended to help you more fully appreciate some
of the unique features and functions of your new vehicle. However, it is not intended to
replace your Owner’s Manual. The Owner’s Manual contains more detailed information
to help you better understand the important safety warnings, features, operation, and
maintenance of your vehicle. All information, specifications, photographs and illustrations
in this publication are those in effect at the time of printing. Mazda reserves the right to
change specifications or design without obligation.
© Mazda North American Operations
Printed in U.S.A. 07/08
9999 95 014C 09SS
162128_09a_Tribute_SSG_073008.indd 22
7/30/08 6:15:42 PM