1
B2END08
07_PS [미국_영어]UVO2_표지.indd 1-2
UVO SYSTEM USER'S MANUAL
2013-08-05 오후 2:11:00
Preface
Congratulations on the Purchase of
your new UVO system!
Please read this manual to get the full benefit of
iPod
the system.
iPod is a registered trademark of Apple, Inc.
These operating instructions are designed to
Ⓡ
Ⓡ
Your new UVO system allows you to enjoy
ensure that you can operate the UVO system in
Bluetooth
various audio and multimedia features through
a safe and convenient way.
The Bluetooth word mark and logos are
the main audio system.
We recommend that this manual be kept in the
registered trademarks owned by Bluetooth SIG,
For the latest information about this product
car so that it will be easier for you to find
Inc. and any use of such marks by Kia is under
or other kia products and accessories, visit
information in case of an emergency.
license. A Bluetooth enabled cell phone is
http://www.kia.com
If you cannot find the information you need in
required to use Bluetooth wireless technology.
this manual or in the “Troubleshooting” section,
Ⓡ
Ⓡ
Ⓡ
Ⓡ
Ⓡ
your local authorized retailer will pleased to
HD Radio Technology
help you with the system or operations.
HD Radio Technology manufactured under
TM
TM
license from iBiquity Digital Corp. U.S. and Foreign
Kia Motors recommends the use of only parts
and accessories that have been tested and
Patents. HD Radio and the HD and HD Radio
logos are proprietary trademarks of iBiquity.
TM
approved by Kia Motors in terms of function,
safety and suitability.
Microsoft is a registered trademark of Microsoft
Corporation in the United States and/or other
countries.
zune
Ⓡ
Copyright(c) 2011 Kia Motors America, Inc. All Rights Reserved.
Warning :The making of unauthorized copies of copy-protected material, including computer programs,
files, broadcasts and sound recordings, may be an infringement of copyrights and constitute a
criminal offense. This equipment should not be used for such purposes.
07_PS [미국_영어]UVO2_표지.indd 3-4
zune is a registered trademark of Microsoft
Ⓡ
Corporation in the United States and or other
countries.
2013-08-05 오후 2:11:02
Table of contents
WARNING & SAFETY INFORMATION
PART 1 GETTING STARTED
Setting the Clock…
FCC Information … ………………………………………………… 8
Warning
… …………………………………………………………………
9
Caution ……………………………………………………………………… 9
…………………………………………
1-14
1. Time Setting… …………………………………………… 1-14
Safety Symbols ……………………………………………………… 8
Controls and Features
Control Panel
………………………………………………………
2. Clock Type… ……………………………………………… 1-14
1-2
Steering Wheel…………………………………………………… 1-4
Basic Features
3. Clock Display…………………………………………… 1-14
●
Analog Clock… ………………………………………… 1-14
●
Digital Clock……………………………………………… 1-14
System Power… ………………………………………………… 1-6
1. Turning System Power On……………………… 1-6
PART 2 AUDIO FEATURES
2. Turning System Power Off……………………… 1-6
Select Display Language…
……………………………
1-7
Resetting and Initializing UVO system……… 1-7
1. Resetting the system
FM/AM MODE
FM/AM Mode Screens and Features………… 2-2
1-7
Listening to the FM/AM radio………………………… 2-3
2. Initializing the system………………………………… 1-8
Sound and Display Settings
1. Selecting a broadcast frequency…………… 2-3
…………………………………
Sound Settings…………………………………………………… 1-9
1. FADER/BALANCE
……………………………………
1-9
2. TONE… ………………………………………………………… 1-10
●
Selecting through SEEK………………………… 2-3
●
Selecting through manual search… …… 2-3
●
Selecting through preset………………………… 2-3
2. Storing presets… ………………………………………… 2-4
3. Touch Screen Beep………………………………… 1-10
3. Scanning FM/AM broadcast frequencies…… 2-4
4. Speed Dependent Volume Control…… 1-10
4. Preset Scan…………………………………………………… 2-4
Display Settings… …………………………………………… 1-11
1. Setting Brightness… ………………………………… 1-11
5. Listening to HD RadioTM Stations(Optional)
…………………………………………………………………………………
Automatic Brightness Control… ………… 1-11
●
Manual Brightness Control… ……………… 1-11
6. Viewing FM/AM Station information… … 2-5
SIRIUS TM MODE
Turning Display On and Off………………………… 1-12
SIRIUSTM Mode Screen and Features… …… 2-6
Turn Text Scroll On and Off………………………… 1-13
Listening to the SIRIUSTM radio… ………………… 2-6
Table of contents
00_PS [미국_영어]UVO2_Contents.indd 3
2-5
●
3
2013-08-05 오후 6:57:45
Table of contents
1. Selecting a SIRIUSTM channel………………… 2-6
2. Selecting through manual search……… 2-15
1. Trademark…………………………………………………… 2-23
●
Selecting through SEEK………………………… 2-6
3. Selecting from the list……………………………… 2-16
2. Connecting your zune® device… ………… 2-23
●
Selecting through manual search… …… 2-6
4. by Folders, Artists, Albums, Genres
●
Selecting through preset………………………… 2-6
Songs, Composers… ……………………………… 2-16
Listening to your zune®… ……………………………… 2-24
●
Selecting through channel search……… 2-6
Explore USB……………………………………………………… 2-16
Selecting zune® music…………………………………… 2-24
●
Selecting through SIRIUS category list… … 2-8
Viewing song information… ………………………… 2-17
1. Selecting through song Up/Down……… 2-24
2. Using Skip……………………………………………………… 2-8
Copying songs into JUKEBOX… ……………… 2-17
2. Selecting through manual search……… 2-24
TM
3. Storing presets
… …………………………………………
2-9
1. Copying the current song
………………………
zune® Mode Screen and Features…………… 2-23
2-17
4. Viewing SIRIUS channel information… 2-9
MEDIA MODE
2. Copying songs from list… ……………………… 2-18
iPod® MODE
Common Features… ……………………………………… 2-10
About iPod®… …………………………………………… 2-19
TM
4. By Songs, Genres, Albums, Artists,
Playlists……………………………………………………… 2-25
●
Play/Pause…
2-10
1. Trademark…………………………………………………… 2-19
Viewing song information…………………………… 2-25
AUX MODE
●
REW/FF……………………………………………………… 2-10
2. Connecting your iPod® device……………… 2-19
AUX Mode Screen… ……………………………………… 2-26
●
Jump………………………………………………………………2-11
iPod® Mode Screen and Features… ………… 2-20
Connecting an AUX media device…………… 2-26
Using Repeat………………………………………………2-11
● Using Shuffle… ……………………………………………2-11
Listening to your iPod®… ……………………………… 2-20
………………………………………………
2-21
Listening to AUX media………………………………… 2-26
BT AUDIO MODE
1. Selecting through song Up/Down……… 2-21
BT Mode Screen and Features………………… 2-27
Cautions upon handling USB MP3… ……… 2-12
2. Selecting through manual search……… 2-21
Listening to music from your Bluetooth®
Precautions upon handling USB… …………… 2-13
3. Selecting from the list……………………………… 2-21
wireless technology enabled device………… 2-28
Connecting your USB device
4. By Artists, Albums, Genres, Songs,
Selecting a song……………………………………………… 2-28
●
USB MODE
………………………
2-14
Selecting iPod music
®
……………………………………
USB Mode Screen and Features……………… 2-14
Podcasts, Composers, Audiobooks… 2-21
Listening to USB music………………………………… 2-15
Viewing song information………………………… 2-22
zune® MODE
Selecting USB music… ………………………………… 2-15
1. Selecting through song Up/Down
………
4
3. Selecting from the list……………………………… 2-24
2-15
About zune
®
… ……………………………………………………
2-23
REW/FF a song… …………………………………………… 2-28
JUKEBOX MODE
JUKEBOX Mode Screen and Features… 2-29
Listening to JUKEBOX… ……………………………… 2-30
Table of contents
00_PS [미국_영어]UVO2_Contents.indd 4
2013-08-05 오후 6:57:45
Selecting a JUKEBOX song… …………………… 2-30
PART 3 PHONE FEATURES
1. By dialing a number………………………………… 3-11
1. Selecting through song Up/Down……… 2-30
2. By contact list… ………………………………………… 3-12
2. Selecting through manual search……… 2-30
Using your Bluetooth® wireless
3. By recent calls…………………………………………… 3-12
3. Selecting from the list
technology Handsfree system
Contact list………………………………………………… 3-13
………………………………
2-30
4. By Artists, Albums, Genres, Song,
………………………………………………………………… 3-2
Composers… ……………………………………………… 2-31
Smart driving practices
1.Downloading contact list
(from mobile phone)……………………………… 3-13
Adding Favorites……………………………………………… 2-31
………………………………………………………………… 3-3
Searching your contacts… ……………………… 3-14
Playing Favorites… ………………………………………… 2-32
Memory Management
Pairing your handset device to the
1. By name… …………………………………………………… 3-14
handsfree system
2. By number…………………………………………………… 3-15
Checking System Information… ………………… 2-33
Pairing a Bluetooth® wireless technology
Checking missed calls…
Deleting JUKEBOX………………………………………… 2-33
enabled device for the first time… ……………… 3-4
Favorites… ………………………………………………………… 3-16
1. Deleting JUKEBOX… ……………………………… 2-33
Deleting a paired handset device……………… 3-5
1. Placing a call by favorites……………………… 3-16
2. Deleting all files………………………………………… 2-34
PANDORA MODE
Connecting a handset device……………………… 3-6
2. Adding favorites………………………………………… 3-17
About PANDORA…………………………………………… 2-35
1. Trademark
Setting Priority…………………………………………………… 3-7
Using the phone features
………………………………
3-16
3. Deleting favorites……………………………………… 3-17
SMS…
………………………………………………………
3-18
1. Downloading SMS messages
2-35
Phone Mode Screens and Features… ……… 3-8
2. Before Starting PANDORA…………………… 2-35
1. When a mobile phone is connected… … 3-8
(from mobile phone)………………………………… 3-18
PANDORA Mode Screen and Features… …… 2-36
2. When making a call…………………………………… 3-8
2. Checking an SMS message………………… 3-18
Listening to your PANDORA……………………… 2-36
3. When receiving an incoming call… ……… 3-9
3. Sending an SMS message
Selecting PANDORA station
4. When on a call
……………………………………………………
………………………
2-37
Bookmark Track or Artist……………………………… 2-35
………………………………………………
3-9
(Custom Messages)………………………………… 3-18
Answering an incoming call… ………………… 3-10
4. Editing Custom Messages… ………………… 3-18
Rejecting an incoming call… …………………… 3-10
Switching the call …………………………………………… 3-19
Call waiting… …………………………………………… 3-10
Placing a call… ………………………………………… 3-11
1. Switching the call between handsfree
and handset device… ……………………………… 3-19
Table of contents
00_PS [미국_영어]UVO2_Contents.indd 5
5
2013-08-05 오후 6:57:45
Table of contents
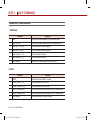
Voice Command List
2. Transferring the handsfree call to your
Handset device… ……………………………………… 3-19
3. Transferring a call on your Handset
Connecting Bluetooth® wireless
Command List - General Commands……… 4-9
technology… ………………………………………………………… 5-6
Command List - Audio Commands… ……… 4-10
4-10
Activating UVO eServices……………………………… 5-7
Vehicle Diagnostics
2. SIRIUSTM……………………………………………………… 4-10
Conducting Vehicle Diagnostics… ……………… 5-8
Setting Phone Volume………………………………… 3-20
3. MEDIA… ……………………………………………………… 4-11
Scheduled Diagnostics…………………………………… 5-9
Turn Streaming Audio On and Off… ……… 3-20
4. JUKEBOX…………………………………………………… 4-12
Contacts Sync
5. PANDORA Radio
device to handsfree
Phone settings
…………………………………
…………………………………………………
3-19
3-21
1. FM/AM Radio
… …………………………………………
… …………………………………
4-13
SMS…………………………………………………………………… 3-22
Command List - UVO eServices
Changing passkey………………………………………… 3-22
Commands………………………………………………………… 4-13
Command List - Phone Commands………… 4-14
PART 4 VOICE COMMANDS
PART 5 UVO eServices
4-2
Using Voice Command…………………………………… 4-3
Voice Command Help……………………………………… 4-3
Turning Command Feedback On and Off……… 4-4
4-5
About UVO eServices
………………………………
4-6
Before using UVO eServices
… …………………………………………………………………
5-3
Installing the UVO eServices App on your
Deleting a Voice Profile
Smartphone………………………………………………………… 5-6
4-8
Sending Parking Location………………………………5-10
Roadside Assist
Roadside Assist… ………………………………………………5-11
eServices Guide
Making a 9-1-1 Call………………………………………… 5-13
UVO eServices Settings
UVO eServices Activation………………………………5-14
Crash Notification Assist Setting… …………… 5-14
5-4
Selecting a Previous Voice Profile……………… 4-7
……………………………………
6
… ………………………………………………………………………………
5-9
Crash Notification Assist……………………………… 5-13
… ……………………………………………………………………………… 5-2
Using UVO eServices and Cautions
……………
Adjusting Voice Command Volume
Speaker Adaptation
Creating a Voice Profile…
The Crash Notification Assist feature
may not operate in the following situations
Operating Voice Command
……………………
eServices Guide……………………………………………… 5-12
Crash Notification Assist
Conditions for voice command system
… ………………………………………………………………………………
Conducting Auto Diagnostics…
Parking Minder
Table of contents
00_PS [미국_영어]UVO2_Contents.indd 6
2013-08-05 오후 6:57:45
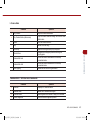
PART 6 Rear Camera Display
Rear camera display
… …………………………………………………………………
6-2
PART 7 TROUBLESHOOTING GUIDE
Troubleshooting guide
Before thinking the product has
malfunctioned……………………………………………………… 7-2
Troubleshooting…
…………………………………… 7-3
PART 8 INDEX
INDEX
………………………………………………………………… 8-2
WARNING & SAFETY INFORMATION
00_PS [미국_영어]UVO2_Contents.indd 7
7
2013-08-05 오후 6:57:45
WARNING & SAFETY INFORMATION
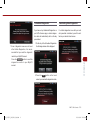
Safety Symbols
Warning
When encountering this symbol in the manual, you must follow these
● FCC Information
This device complies with part 15 of the FCC Rules. Operation is subject
to the following two conditions:
recommendations to avoid accidents that might cause serious injury
1.This device may not cause harmful interference, and
or death, irreparable damage to your car, system or connected
2.T his device must accept any interference received, including
devices or to avoid accidents with injuries or death.
Caution
interference that may cause undesired operation.
FCC notification to users
When encountering this symbol in the manual, you must be very
This equipment has been tested and found to comply with the limits for a
careful and follow the recommendations to avoid being injured,
CLASS B digital device, pursuant to Part 15 of the FCC Rules. These
damaging your car, system or connected devices.
limits are designed to provide reasonable protection against harmful
● interference when the equipment is operated in a commercial
environment. This equipment generates, uses, and can radiate radio
Note
frequency energy and, if not installed and used in accordance with the
instructions, may cause harmful interference to radio communications.
Information which you must be aware of or recommendations for your
However, there is no guarantee that interference will not occur in a
convenience and for optimal operation of your system.
particular installation. If this equipment does cause harmful interference,
● the user is encouraged to try to correct the interference by consulting
with a KIA dealer or an experienced technician for technical assistance.
8
WARNING & SAFETY INFORMATION
00_PS [미국_영어]UVO2_Contents.indd 8
2013-08-05 오후 6:57:46
WARNING & SAFETY INFORMATION
Warning
Caution
Driving while distracted can result in a loss of vehicle control, that may
lead to an accident, severe personal injury, and/or death. The driver’s
primary responsibility is in the safe and legal operation of a vehicle, and
use of any handheld devices, other equipment, or vehicle systems
which take the driver’s eyes, attention and focus away from the safe
operation of a vehicle or which are not permissible by law should never
be used during operation of the vehicle.
ead and understand all instructions before
R
you use the system. If damage is caused by
failure to follow instructions, the warranty will
not apply.
● D o not operate the audio system in an
unsafe manner while driving.
●
not operate the audio system for prolonged
Do
periods of time with the vehicle ignition in ACC.
Such operations may lead to battery discharge.
●
not expose the device to water.
Do
Never insert foreign objects into the slots or other
openings on the device.
●
●
●
o not dismantle, assemble, or modify the
D
audio system.
●
o not cause severe shock to the device. Direct
D
pressure to the front side of the monitor may
cause damage to the LCD or touch panel.
●
I n case of product malfunction, contact your
nearest, or preferred, Kia dealer or service
center.
●
hen cleaning the touch screen, make sure to
W
turn off the device and use a dry and smooth
cloth. Never use abrasive materials, chemical
cloths, or solvents, such as alcohol, ammonia,
benzene, thinners, etc. Such materials may
damage the touch panel or cause color and
quality deterioration.
●
o not look at the screen for long periods of
D
time while driving.
o reduce the risk of traffic accidents, do not
T
watch the screen when driving.
● Set the volume to a level which allows you to
be aware of external conditions.
● Use only the supplied mounting hardware for
safe operation.
●
WARNING & SAFETY INFORMATION
00_PS [미국_영어]UVO2_Contents.indd 9
9
2013-08-05 오후 6:58:00
WARNING & SAFETY INFORMATION
●
iriusXM service requires a subscription,
S
sold separately, after 3-month trial included
with vehicle purchase. If you decide to
continue your SiriusXM service at the end of
your trial subscription, the plan you choose
will automatically renew and bill at thencurrent rates until you call us at 1-866-6352349 to cancel. See our Customer
Agreement for complete terms at www.
siriusxm.com. Other fees and taxes apply.
All fees and programming are subject to
change. Sirius satellite service is available
only to those at least 18 and older in the 48
contiguous USA, D.C., and PR (with
coverage limitations). Our Internet radio
service is available throughout our satellite
service area and in AK and HI. Certain
channels are not available on our Internet
radio service or on mobile devices. SiriusXM
Traffic available in select markets. See
siriusxm.com/traffic for more information. ©
2013 Sirius XM Radio Inc. Sirius, XM and all
related marks and logos are trademarks of
Sirius XM Radio Inc.
10
Warning
Driving while distracted can result in a loss of
vehicle control that may lead to an accident,
severe personal injury, and death. The
driver’s primary responsibility is in the safe
and legal operation of a vehicle, and use of
any handheld devices, other equipment, or
vehicle systems which take the driver’s eyes,
attention and focus away from the safe
operation of a vehicle or which are not
permissible by law should never be used
during operation of the vehicle.
● Infinity is a trademark of Harman
International Industries, Inc.
● At launch, the Apple iPhone® will be the only
UVO eServices compatible device. iPhone®
is a registered trademark of Apple Inc. Apple
iOS6 compatibility expected early 2013.
Additional compatible devices expected late
2013.
● App Store is a service mark of Apple Inc. No
charge for the UVO eServices app. App runs
on your smartphone cellular data service.
Normal data rates will apply.
●
HD Radio TM and the HD Radio TM logo are
proprietary trademarks of iBiquity Digital
Corporation.
● 24-hour Roadside Assistance is a service
plan provided by Kia Motors America, Inc.
Certain limitations apply. Coverage details
are available in the Kia Warranty and
Consumer Information Manual. For access to
Enhanced Roadside Assistance, a connected
mobile phone via Bluetooth within the cellular
service coverage area is required.
● Vehicle
Diagnostics do not take the place of
regularly scheduled maintenance. Feature
checks powertrain, chassis, and airbag
systems only. For factory-recommended
maintenance schedule, see the Maintenance
Feature of UVO eServices or the Owner's
Manual.
● 911
Connect activates after an airbag
deployment. Feature requires a connected
mobile phone via Bluetooth. Dependant on
cellular service coverage.
● The
rear-camera display is not a substitute
for proper and safe backing-up procedures.
The rear-camera display may not display
every object behind the vehicle. Always drive
safely and use caution when backing up.
●
WARNING & SAFETY INFORMATION
00_PS [미국_영어]UVO2_Contents.indd 10
2013-08-05 오후 6:58:00
PART 1
01_RP [미국_영어]UVO2_Part1.indd 1
GETTING STARTED
2013-08-05 오후 2:14:15
PART 1
GETTING STARTED
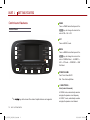
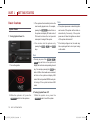
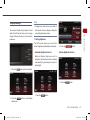
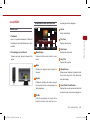
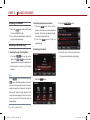
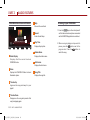
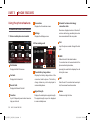
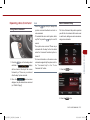
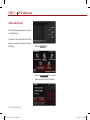
Controls and Features
1
FM/AM
Turns on FM/AM mode. Each press of the
Control Panel
key will change the band in the
order of FM → AM → FM.
FM/AM
2
SAT
Turns on SIRIUS mode.
TM
1
9
2
10
3
11
3
MEDIA
Turns on MEDIA mode. Each press of the
key will change the mode in the
order of USB/iPod /zune →JUKEBOX →
AUX → BT Audio → PANDORA → USB/
MEDIA
®
12
®
iPod /zune .
®
4
®
8
5
6
7
4
POWER/VOLUME
Push : Turns Power On/Off.
Dial : Turns Volume Up/Down.
5
∨ SEEK/TRACK ∧
Short (under 0.8 seconds)
In FM/AM mode, automatically searches
and plays the previous or next frequency.
※No
logo will be shown if the exterior Amplifier feature is not supported.
In SIRIUS mode, automatically searches
TM
and plays the previous or next channel.
1-2
PART 1. GETTING STARTED
01_RP [미국_영어]UVO2_Part1.indd 2
2013-08-05 오후 2:14:16
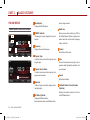
In MEDIA mode (USB, iPod , zune , BT
®
®
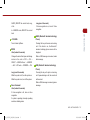
7
∨ CATEGORY ∧
10
PHONE
AUDIO), plays the previous or next track,
In SIRIUS mode, moves to the previous or
Displays Bluetooth wireless technology
song, or file.
next SIRIUS category.
Phone mode.
TM
Ⓡ
TM
skip (Seek up).
8
TUNE
In FM/AM mode, turn the knob to manually
next track.
search for frequencies.
I n SIRIUS
TM
mode, turn the knob to
SETUP
Displays SETUP mode.
12
RESET
Long (over 0.8 seconds)
manually search for channels. Press the
Reset the system to be used if system is
In FM/AM mode, quickly moves through
knob to receive the selected channel.
acting abnormally.
the frequencies when the button is pressed
In MEDIA mode (USB, iPod , zune ), turn
and held. Once released, automatically
the knob to manually search for the
searches and plays the previous or next
previous or next track, song, or file. Press
frequency.
the knob to receive the selected track,
®
®
In SIRIUS mode, quickly moves to the
song, or file.
previous or next channel.
In PANDORA Radio, searches PANDORA
TM
In MEDIA mode (USB, iPod , zune , BT
Radio stations.
AUDIO), REW/FF the current track, song,
In JUKEBOX mode, turn the knob to
or file.
manually search for the previous or next
In JUKEBOX mode, REW/FF the current
track. Press the knob to receive the
track.
selected track.
®
6
11
In JUKEBOX mode, plays the previous or
CLOCK
Displays the clock setting screen.
®
9
eServices
Displays UVO eServices mode.
PART 1. GETTING STARTED
01_RP [미국_영어]UVO2_Part1.indd 3
GETTING STARTED
In PANDORA Radio, PANDORA Radio
1-3
2013-08-05 오후 2:14:16
PART 1
GETTING STARTED
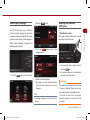
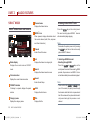
Steering Wheel
1
∨ SEEK/TRACK ∧
Short (under 0.8 seconds)
In FM/AM mode, automatically searches
and plays the previous or next preset
frequency.
2
In SIRIUS mode, automatically searches
TM
1
1
and plays the previous or next preset
3
channel.
2
In MEDIA mode (USB, iPod , zune , BT
®
®
AUDIO), plays the previous or next track,
song, or file.
In PANDORA Radio, PANDORA Radio
skip (Seek up).
In JUKEBOX mode, plays the previous or
next track.
4
Long (over 0.8 seconds)
5
6
In FM/AM mode, quickly moves through
the frequencies when the button is pressed
and held. Once released, automatically
searches and plays the previous or next
frequency.
In SIRIUS mode, quickly moves to the
TM
previous or next channel. In MEDIA mode (USB, iPod , zune , BT
®
1-4
®
PART 1. GETTING STARTED
01_RP [미국_영어]UVO2_Part1.indd 4
2013-08-05 오후 2:14:17
AUDIO), REW/FF the current track, song,
Long (over 0.8 seconds)
or file.
If Voice recognition is on, turns off Voice
recognition.
In JUKEBOX mode, REW/FF the current
+ VOLUME -
END (Bluetooth wireless technology
S
Phone)
Turns Volume Up/Down.
Pressing this key will receive an incoming
5
2
Ⓡ
call. If the Audio is on, the Bluetooth
3
Ⓡ
MODE
wireless technology phone screen will be
Short (under 0.8 seconds)
displayed.
Changes the mode. Each press will change
modes in the order of FM → AM →
When a SMS message is received, reads
SIRIUS → USB/iPod /zune → JUKEBOX
→ AUX → BT Audio → PANDORA → FM.
TM
®
GETTING STARTED
track.
back message.
®
6
ND (Bluetooth wireless technology
E
Phone)
Ⓡ
Long (over 0.8 seconds)
Pressing this key will reject an incoming
While the system is off, turn the system on.
call. If pressed during a call, the current call
While the system is on, turn off the system.
will be ended. When a SMS message is received, ignores
4
Voice Command
message.
Short (under 0.8 seconds)
If Voice recognition is off, turns on Voice
recognition.
If system is speaking, interrupts speaking
and enters listening mode.
PART 1. GETTING STARTED
01_RP [미국_영어]UVO2_Part1.indd 5
1-5
2013-08-05 오후 2:14:17
PART 1
GETTING STARTED
Basic Features
3. The system will automatically restore the
most recently played mode. For example,
System Power
1. Turning System Power On
Note
●
If the system power was on when the ignition
pressing the POWER/VOL knob will turn on
was turned off, the system will turn back on
the system and display FM radio mode if
automatically. Conversely, if the system
FM mode had been the last operated
power was off when the ignition was turned
off, the system will remain off.
mode prior to turning off the system.
4. Y ou can also turn the system on by
pressing the
FM/AM
,
SAT
●
If the battery voltage is low, the audio may
take a prolonged time to boot upon turning
and MEDIA
on the vehicle.
keys.
Note
●
Pressing any one of the FM/AM ,
MEDIA
1. Turn on the ignition.
SAT
,
keys will turn on the system and
display the last mode corresponding to each
key. For example, pressing the MEDIA key
while a USB or other media source is loaded,
will turn on the system and display USB
mode if the last operated MEDIA mode prior
to turning off the system had been USB
mode.
2. Turning System Power Off
2. W h i l e th e syste m i s o ff, p re ss th e
POWER/VOL
1-6
knob to turn the system on.
1.W h i l e t h e s y s t e m i s o n , p r e s s t h e
POWER/VOL
knob to turn off the system.
PART 1. GETTING STARTED
01_RP [미국_영어]UVO2_Part1.indd 6
2013-08-05 오후 2:14:17
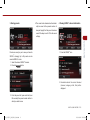
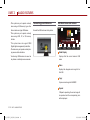
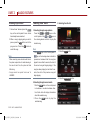
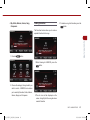
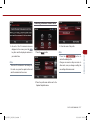
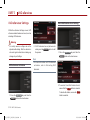
Select Display Language
2. Press the
Main
button.
Resetting and Initializing UVO system
The UVO system allows you to select the
1. Resetting the system
convenience and system usability. The system
If the system is behaving abnormally, press the
provides you with options of three languages -
reset button to reset the system.
English, French (Canadian) and Spanish. The
default language is English.
3. P ress the
English
button next to the
Language menu.
GETTING STARTED
preferred display language for maximum
1. Use a ball-point pen or similar object to
press the RESET key.
2. The system will reboot and automatically
1. Press the SETUP key on the control panel.
restore the most recent mode.
4. Select the desired language.
Caution
5. The system will reboot and automatically
restore the most recent mode in the new
language.
Note
●
The reset button should only be used in case
● of system malfunction. Never use the reset
key while the system is operating normally.
If you wish to reset while the system is
● C hanging language will delete all paired
operating normally, turn the power off first
phones.
then reset.
PART 1. GETTING STARTED
01_RP [미국_영어]UVO2_Part1.indd 7
1-7
2013-08-05 오후 2:14:18
PART 1
GETTING STARTED
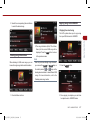
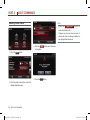
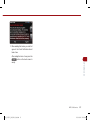
2. Initializing the system
3. Press the
1. Press the SETUP key on the control panel.
System
button.
Note
●
2. Press the
Factory defaults
Initializing the system will erase all Phone
settings, and other changes which you have
button.
made to the system.
●
Some songs in the USB may be misrecognized
during the indexing process. If such problems
persist, reset the device using the Factory
Defaults button in SETUP > System.
●
1-8
For updating the system, visit http://www.kia.com
PART 1. GETTING STARTED
01_RP [미국_영어]UVO2_Part1.indd 8
2013-08-05 오후 2:14:19
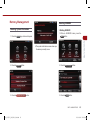
Sound and Display Settings
JUKEBOX) to enter Sound Setup.
Note
Sound Settings
Changes are saved as they are made. In
● other words, once you change a setting, the
mode. The system allows you to optimize
new setting will become saved.
various sound settings to add convenience
1. FADER/BALANCE
when listening to the system.
2. U se the
of sound within the vehicle. For instance,
3. Press the
adjusting the sound so that it is closer to the
Setup.
volume in the passenger-side and rear seats.
,
▼
,
◀
,
▶
buttons to
make adjustments to the sound position.
Fader/Balance allows you to adjust the position
driver-side seat will proportionally lower the
▲
button to return to Sound
GETTING STARTED
Sound settings can be adjusted from any audio
Note
●
Press the
Default
button to restore the
default setting.
1. Press the Fader/Balance setting button.
Press the
Sound
button on the main screen of
each audio mode (FM/AM, SIRIUS , MEDIA,
TM
PART 1. GETTING STARTED
01_RP [미국_영어]UVO2_Part1.indd 9
1-9
2013-08-05 오후 2:14:20
PART 1
GETTING STARTED
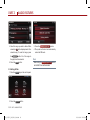
2. TONE
Note
Tone allows you to make changes to the
● Press the
Treble, Middle and Bass settings.
4. Speed Dependent Volume Control
Default
button to restore the
default setting.
Speed Dependent Volume Control allows you
to automatically control the volume according
to the speed of the vehicle. This feature will
3. Touch Screen Beep
gradually increase the volume as speed
Touch Screen Beep allows you to turn on/off
increases to offset outside noise.
the beep that sounds when you touch the
screen.
1. Press the Tone setting button.
1. Press the
On
or
Off
button next to
the Speed Dependent Volume Control
1. I n Sound Setup, press the
Off
On
or
menu to turn the feature on or off.
button next to the Touch Screen
Beep menu to turn the feature on or off.
2.U s e t h e
◀
,
▶
buttons to make
adjustments to the Treble, Middle and
Bass. Press the
button to return to
Sound Setup.
1-10
PART 1. GETTING STARTED
01_RP [미국_영어]UVO2_Part1.indd 10
2013-08-05 오후 2:14:20
Note
Display Settings
Changes are saved as they are made. In
● other words, once you change a setting, the
within the UVO system allow you to change
new setting will become saved.
GETTING STARTED
The various Display setup options offered
display settings according to your personal
1. Setting Brightness
preference.
The UVO system allows you to control the
screen brightness automatically and manually.
●
Automatic Brightness Control
2. Press the
●
Automatic
button.
Manual Brightness Control
When the Display brightness is set to
automatic, the brightness will be controlled
automatically by assessing the amount of
ambient light.
1. Press the SETUP key on the control panel.
1. Press the
1. Press the
2. Press the
Display
button to enter Display
Display
Display
button.
button.
Setup mode.
PART 1. GETTING STARTED
01_RP [미국_영어]UVO2_Part1.indd 11
1-11
2013-08-05 오후 2:14:21
PART 1
GETTING STARTED
Note
Turning Display On and Off
When Brightness control is set to Automatic
, the manual ◀ , ▶ buttons are not active.
This feature turns off the display, allowing you
Press the
to listen only to the audio. It is a useful feature
● ● Default
default setting.
button to restore the
when you are driving at night and wish to
eliminate glare from the display. Even when
the display is off, audio will still be played.
2. P ress the
Daylight
or
Night
buttons.
3. U s e t h e
◀
,
▶
1. Press the
Display
2. Press the
Display off
button.
buttons to make
adjustments to the display brightness.
1-12
button.
PART 1. GETTING STARTED
01_RP [미국_영어]UVO2_Part1.indd 12
2013-08-05 오후 2:14:22
3. P ress any key on the control panel or
Turn Text Scroll On and Off
steering wheel controller to turn the display
back on.
●
Turning on this feature is helpful when viewing
long lines of text on the screen.
Touching any place on the screen will also
turn on the display.
3. Press the
On
or
Off
button next to
the Text Scroll menu to turn the feature on
or off.
GETTING STARTED
Note
Text shown on the screen can be scrolled.
1. Press the SETUP key on the control panel.
2. Press the
Main
button.
PART 1. GETTING STARTED
01_RP [미국_영어]UVO2_Part1.indd 13
1-13
2013-08-05 오후 2:14:22
PART 1
GETTING STARTED
Setting the Clock
2. Clock Type
Digital Clock
●
Selects the clock type shown as the entire
Press the CLOCK on the front panel to display
screen when the system power is turned off.
the Clock setting screen.
1. Time Setting
The time can be set by pressing the hour, min
up/down buttons.
Note
●
3. Clock Display
Press the
OFF
on the Clock Screen to turn
off the screen.
When set to “On”, the clock will be displayed
when the Power is Off.
●
1-14
Analog Clock
PART 1. GETTING STARTED
01_RP [미국_영어]UVO2_Part1.indd 14
2013-08-05 오후 2:14:23
PART 2
02_PS [미국_영어]UVO2_Part2.indd 1
AUDIO FEATURES
2013-08-06 오후 6:33:56
PART 2
AUDIO FEATURES
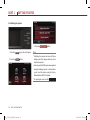
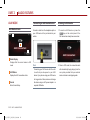
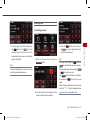
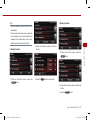
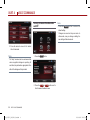
FM/AM MODE
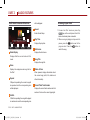
1 Mode display
FM/AM Mode Screens and Features
8 Radio Icon
If listening to a preset, displays the preset
8
mation about the current station (frequency,
station, artist, title).
13
3 Frequency
14
15
9 Presets
Displays the current frequency.
7
10
W hen pressed while listening to RDS or
HD Radio(Optional) stations, displays infor-
number.
12
3
9
cast is being received.
Displays the FM /AM mode.
2 PRESET indicator
1
2
Enters Preset list screen.
4 Program Type
11
If data is being transmitted, displays the
program type.
5
4
10 Scan
Scans all frequencies and plays only frequencies with high quality reception for 5
5 Program Service Name
seconds each.
If data is being transmitted, displays the
program service name.
6
11 Sound
Enters Sound Setup.
6 Radio text
If data is being transmitted, displays radio
text information.
12 HD Radio Station Channel Number
(Optional)
Displays the channel number for the cur-
7 HD Radio (Optional)
rent HD Radio station.
Changes HD Radio stations.
Becomes active when an HD Radio broad-
2-2
PART 2. AUDIO FEATURES
02_PS [미국_영어]UVO2_Part2.indd 2
2013-08-06 오후 6:33:57
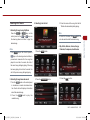
13 HD Radio Station name (Optional)
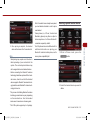
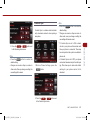
Listening to the FM/AM radio
ways to search for radio broadcasts. There
are 3 ways to select radio broadcasts- select-
Displays the name of the HD Radio
ing through SEEK, selecting through manual
Station.
search, and selecting through presets.
14 Artist name (Optional)
Displays the artist name.
Selecting through SEEK
●
Press the
15 Song Title (Optional)
SEEK ∧
TRACK
or
SEEK
∨ TRACK
keys on the
control panel for under 0.8 seconds or
or
Displays the title name.
∨
∧
keys on the steering wheel control-
1. P ress the FM/AM key on the control
ler for over 0.8 seconds. As SEEK operates,
panel. The most recently played FM/AM
the previous or next radio broadcasts with
radio band will automatically begin playing.
high quality reception will automatically be
AUDIO FEATURES
searched and played.
2. P ress the FM/AM key to switch to the
desired radio band.
Note
Note
Each press of the FM/AM key will change
the band in the order of FM → AM → FM.
Even when the system power is off, press
● the
While SEEK is operating, pressing the same
SEEK ∧
∨
key will terminate SEEK. Pressing
TRACK
● ● FM/AM
key to turn on the most recently
the opposite key will operate SEEK in the
reverse direction.
Press and hold the
● SEEK ∧
TRACK
or
SEEK
∨ TRACK
keys
played FM/AM mode.
(over 0.8 seconds) to quickly move through
The RDS (Radio Data System) operates in areas
the frequencies while the button is pressed
with FM stations broadcasting RDS signals.
and held. Once released, the system will
● automatically search and play the previous
1. Selecting a broadcast frequency
or next frequency.
The UVO system provides you with various
PART 2. AUDIO FEATURES
02_PS [미국_영어]UVO2_Part2.indd 3
2-3
2013-08-06 오후 6:33:57
PART 2
●
AUDIO FEATURES
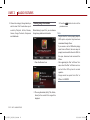
Selecting through manual search
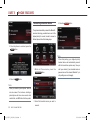
1. Select the desired radio broadcast.
2. Press the Presets button.
1. Turn the TUNE knob on the control
panel in clockwise or counter-clockwise
direction. Each click will increase or
decrease the frequency by 1 step (FM:
0.2MHz, AM: 10kHz).
2. When you find the desired radio broadcast, stop turning the TUNE knob to lis-
2. Select the desired preset and press the
button to start listening.
ten to the selected frequency.
●
Selecting through preset
1. Press the
Presets
button.
Note
Press the
● 3. From the preset list, press and hold (over
∧
,
keys (under 0.8 sec-
∨
onds) on the steering wheel controller to flip
through the presets sequentially.
●
0.8 seconds) the preset number button to
which you wish to save.
4. The current radio broadcast will automati-
keys (over 0.8
cally be saved to the preset number. A
seconds) on the steering wheel controller to
beep will signify that the preset has been
operate SEEK.
saved if the beep is set to ON in the sound
Press and hold the
∧
,
∨
settings.
2. Storing presets
Presets are a way for you to save your favorite
radio broadcasts. Up to 12 presets can be
saved in FM mode while up to 6 frequencies
can be saved in AM mode.
2-4
PART 2. AUDIO FEATURES
02_PS [미국_영어]UVO2_Part2.indd 4
2013-08-06 오후 6:33:58
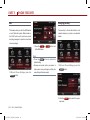
3. Scanning FM/AM broadcast
frequencies
4. Preset Scan
6. Viewing FM/AM Station information
Preset scan will scan presets in the current
When listening to an HD Radio station or RDS
Radio broadcasts can be scanned to conve-
band (FM -12 presets, AM - 6 presets)in
radio station, you will be able to view station
niently find radio broadcasts with high quality
sequential order. Each preset will be played
information.
reception. Each radio broadcast will be played
for 5 seconds.
ful when traveling in new areas.
AUDIO FEATURES
for 5 seconds. This feature is particularly useTM
5. Listening to HD Radio Stations
(Optional)
HD Radio Technology is a digital radio technology used by AM and FM radio stations to
transmit audio and data via a digital signal in
conjunction with their analog signals.
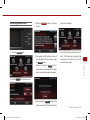
1. Press the Radio icon.
1. Press the
Scan
button.
Note
When scanning has completed an entire
● revolution, the scan function will terminate
automatically and the previously played frequency will be restored.
1. While listening to the radio, the HD Radio
icon will become displayed if receiving an
2. Information about the current station (fre-
HD Radio broadcast.
2. Press the HD▶ button to change to a dif-
quency, station, ar tist, title) will be
displayed.
ferent HD Radio station.
PART 2. AUDIO FEATURES
02_PS [미국_영어]UVO2_Part2.indd 5
2-5
2013-08-06 오후 6:33:58
PART 2
AUDIO FEATURES
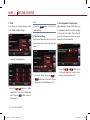
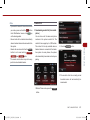
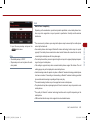
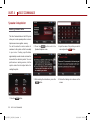
SIRIUS MODE
TM
5 Channel name
SIRIUS Mode Screen and Features
TM
Press the
TM
6
When pressed, displays information about
2
TM
Displays the channel name.
6 SIRIUS Icon
1
Listening to the SIRIUS radio
key on the control panel.
SAT
TM
The most recently played SIRIUS channel
will automatically begin playing.
the current channel (artist, title, composer
4
5
and other information).
Note
Even when the system power is off, pressing
the SAT key will turn on the most recently
● 11
12
3
7
7 Presets
8
9
10
8 List
1 Mode display
Displays the current mode as SIRIUS
TM
played SIRIUS channel.
Enters Preset list screen.
Displays the channel or category list.
1. Selecting a SIRIUS channel
● Selecting through SEEK
Press the
TM
9 Search
mode.
Displays the current channel number.
keys on the
nel will automatically be searched and played.
10 Sound
number.
SEEK
∨ TRACK
TM
Displays the channel search screen.
Enters Sound Setup.
3 PRESET indicator
If listening to a preset, displays the preset
or
control panel for under 0.8 seconds. As SEEK
operates, the previous or next SIRIUS chan-
2 Channel number
SEEK ∧
TRACK
Note
●
Press and hold the
SEEK ∧
TRACK
or
SEEK
∨ TRACK
keys
11 Artist
(over 0.8 seconds) to quickly move through
the channels while the button is pressed and
Displays the artist name.
held. Once released, the system will automati4 Category name
Displays the category name.
2-6
12 Title
cally search and play the previous or next
channel.
Displays the title.
PART 2. AUDIO FEATURES
02_PS [미국_영어]UVO2_Part2.indd 6
2013-08-06 오후 6:33:59
●
Selecting through manual search
●
Selecting through preset
●
Selecting through channel search
1. Turn the TUNE knob on the control panel
in clockwise or counter-clockwise direction. Each click will display the corresponding channel information.
2. When you find the desired SIRIUS channel, press the TUNE knob to listen to the
TM
1. Press the
Presets
button.
1. Press the
2. Select the desired preset and press the
button to start listening.
Press the
entries, press the
∧
,
∨
button. The channel
2. I nput the desired channel number and
p r e s s t h e Done b ut to n. To d e l ete
Note
●
Search
search screen will be displayed.
Delete
AUDIO FEATURES
selected channel.
button.
keys (under 0.8 sec-
onds) on the steering wheel controller to flip
Note
through the presets sequentially.
●
If you input a number where there is no
channel, the Done button will become
inactive.
PART 2. AUDIO FEATURES
02_PS [미국_영어]UVO2_Part2.indd 7
2-7
2013-08-06 오후 6:33:59
PART 2
●
AUDIO FEATURES
Selecting through SIRIUS category list
2. Using Skip
3. S elect the channels you wish to skip.
When selected, an
1. Press the
button.
1. Press the
2. Select the desired channel to start listening or press the Category List button to
2. Press the
List
List
button.
Skip Setting
will be displayed
next to the selected channel.
button.
display the channels in the selected
category.
2-8
PART 2. AUDIO FEATURES
02_PS [미국_영어]UVO2_Part2.indd 8
2013-08-06 오후 6:34:00
3. Storing presets
4. The current radio broadcast will automati-
TM
4. Viewing SIRIUS channel information
cally be saved to the present number. A
beep will signify that the preset has been
saved if the beep is set to ON in the sound
settings.
AUDIO FEATURES
Presets are a way for you to save your favorite
SIRIUS channels. Up to 18 presets can be
TM
1. Press the SIRIUS icon.
TM
TM
saved in SIRIUS mode.
TM
1. Select the desired SIRIUS channel.
2. Press the Presets button.
2. I nformation about the current channel
(channel, category, artist, title) will be
displayed.
3. From the preset list, press and hold (over
0.8 seconds) the preset number button to
which you wish to save.
PART 2. AUDIO FEATURES
02_PS [미국_영어]UVO2_Part2.indd 9
2-9
2013-08-06 오후 6:34:00
PART 2
AUDIO FEATURES
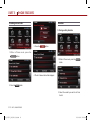
MEDIA MODE
Common Features
The MEDIA mode within your UVO system
●
●
REW/FF
Play/Pause
offers a variety of media modes which allow
you convenience and ease in operating your
system. Media mode includes a variety of
®
®
modes, such as USB, iPod , zune , BT audio,
Aux and Pandora. The features listed below
describe common features which you will
®
1. Press and hold the
®
encounter when operating USB, iPod , zune ,
and JUKEBOX modes.
SEEK ∧
TRACK
or
∨
SEEK
TRACK
keys (over 0.8 seconds) on the control
panel or the
,
keys (over 0.8
1. Insert or connect the desired media (USB,
iPod , zune ) or press the MEDIA key on
seconds) on the steering wheel controller.
the control panel if the desired media has
2. The song will rewind or fast-forward at a
already been inserted or connected.
2. Each press of the MEDIA key will change
rate 20 times faster than normal while the
®
®
®
3. Release the key to play from the current
3. When a desired media is playing and you
wish to pause, press the ll button next
to restart the song.
position.
Note
®
iPod /zune .
to the progress bar. Press the
∨
key is being held.
®
the mode in the order of USB/iPod /zune
→ AUX → BT Audio → Pandora → USB/
®
∧
▶
●
If you rewind to the beginning of the current
song, the current song will automatically
button
begin playing.
●
If you fast-forward to the end of the current
song, the next song will automatically begin
playing.
2-10
PART 2. AUDIO FEATURES
02_PS [미국_영어]UVO2_Part2.indd 10
2013-08-06 오후 6:34:00
●
Jump
●
Using Repeat
●
Using Shuffle
The repeat setting can be used to repeat
The Shuffle setting can be used to play all
the song that is currently playing.
song in the current mode randomly.
by touching the position on the progress
bar.
1. P ress the
Repeat
button. The 'Repeat'
icon will be displayed.
2. Press once to turn on the Repeat setting
and again to turn off.
1. P ress the
Shuffle
button. The 'Shuffle'
icon will be displayed.
2. Press once to turn on the Shuffle setting
and again to turn off.
PART 2. AUDIO FEATURES
02_PS [미국_영어]UVO2_Part2.indd 11
AUDIO FEATURES
1. You can jump to different points in a song
2-11
2013-08-06 오후 6:34:01
PART 2
AUDIO FEATURES
USB MODE
3. Supported media formats
This device supports ISO9660 LEVEL1
●
Cautions upon handling USB MP3
and LEVEL2. Detailed specification is as
below.
1. T
he MP3 file standards supported by
the device are as follows.
Maximum directory layers: 16 layers
●
LAYER 3
4. P
recautions upon formatting USB &
downloading MP3 files
Acceptable sampling frequency: 32, 44.1,
Acceptable standard: MPEG1 AUDIO
●
●
The device only supports FAT type USB
●
48 (kHz)
file system. The device will not play USB
Acceptable bit rate: 32, 40, 48, 56, 64,
media content if the USB is NTFS type.
●
80, 96, 112, 128, 160, 192, 224, 256, and
320 (kbps)
5. Precautions
Recommended bit rate & reference sam-
●
Use an MP3 bit rate which is less than
●
pling frequency: 96,128, 192 kbps fixed
192kbps and a fixed bit rate. The sound
bit rate /44.1kHz
quality cannot be guaranteed for MP3s
exceeding 192Kbps. Certain features
2. ID3 tag
2-12
may operate abnormally when playing
This device supports ID3v1.0, ID3v1.1,
MP3 formats with variable bit rates, such
ID3v2.2, ID3v2.3, and ID3v2.4 ID3 tags.
as being limited to FF/REW.
●
PART 2. AUDIO FEATURES
02_PS [미국_영어]UVO2_Part2.indd 12
2013-08-06 오후 6:34:01
Precautions upon handling USB
Caution
●
●
used to play music files.
Do not use the USB I/F to charge batteries
properly due to compatibility issues.
or USB accessories that generate heat.
Verify that the external device is sup-
This may lead to worsened performance or
Avoid contact between the USB connec-
●
system damage.
This system may not recognize the USB
●
formats.
tor with bodily parts and foreign
device if a separately purchased USB
Only MP3 files with compression rates
substances.
hub or extension cable is used. Connect
Repeatedly connecting/disconnecting the
the USB device directly to the terminal in
●
●
Only WMA files with compression rates
USB in a short period of time may dam-
between 8kbps~320kbps are supported.
age the system.
●
Be cautious of static electricity when con-
●
device.
Some USB devices may not operate
ported by the system before use.
necting/disconnecting an external USB
●
devices formatted in FAT 12/16/32.
The USB device may fail to operate when
between 8kbps~320kbps are supported.
system becomes recognized.
This system supports only USB devices
the vehicle.
Some mass storage USB devices may
●
A sound may occasionally occur when
have multiple logical drives partitioned for
disconnecting the USB device.
user convenience. In such cases, only
Do not disconnect a USB device when it
music files within the top-level logical
●
●
drive will be supported.
Encoded MP3 Players will not be recog-
is operating. Make sure to disconnect the
nized when connected as an external
USB device only after the audio power is
device.
turned off or when operating a different
the USB terminal is used to connect MP3
When connecting a USB device, the sys-
mode.
Players, mobile phones, digital cameras,
The time required to recognize a USB
or other electronic devices (USB devices
device may differ depending on the type,
not recognized as portable disk drives).
●
●
tem may not properly recognize some
USB states.
●
This system may not operate normally if
●
PART 2. AUDIO FEATURES
02_PS [미국_영어]UVO2_Part2.indd 13
AUDIO FEATURES
The device will recognize only USB
●
playing formats other than MP3 or WMA
tions of malfunction. Please wait until the
●
is turned on.
Such differences in time are not indica-
byte/sector selections other than 512Byte
turning on the ignition. The USB device may
be damaged if connected before the ignition
size, or file formats stored on the USB.
the system may not properly recognize
or 2048Byte.
When using an external USB device, make
● sure to connect the device some time after
When formatting an external USB device,
●
2-13
2013-08-06 오후 6:34:01
PART 2
AUDIO FEATURES
This system may not operate normally
●
Connecting your USB device
USB Mode Screen and Features
when using a USB memory type other
than a metal cover type USB device.
1
Connect the USB as shown in the picture.
11
This system may not operate normally
●
10
when using HDD, CF, or SD memory
8
formats.
This system does not support DRM
9
●
(Digital rights management) locked files.
2
3
4
5
6
7
The device may not operate normally dur-
●
●
ing severe vehicle vibrations.
Avoid using USB devices also used as
key chains or mobile phone accessories.
1 Mode Display
Displays that the current mode is USB
mode.
2 Menu
Displays the categories and song lists for
the USB.
3 Copy
Copies current song into JUKEBOX.
4 Repeat
If Repeat is operating, the current song will
be repeated and the corresponding icon
will be displayed.
2-14
PART 2. AUDIO FEATURES
02_PS [미국_영어]UVO2_Part2.indd 14
2013-08-06 오후 6:34:01
5 Shuffle
Listening to USB music
Selecting USB music
If Shuffle is operating, the songs will be
played in random order and the corre-
1. Selecting through song Up/Down
sponding icon will be displayed.
Press the
SEEK ∧
TRACK
control panel or the
keys on the
keys on the
Note
Displays the play time.
1. C onnect a USB device or press the
8 Artist name
key on the control panel if a USB
device has already been connected.
●
If the
∨
SEEK
∨ TRACK
key on the Control panel or
key on the steering wheel controller is
pressed and released after the song has
played for more than 3 seconds, the start of
Displays the artist name.
2. When a song is playing and you wish to
9 Song Title
∨
song.
Enters Sound Setup.
MEDIA
or
steering wheel controller to play the desired
7 Play Time
SEEK
∨ TRACK
∧
AUDIO FEATURES
6 Sound
or
pause, press the
ll
button next to the
progress bar. Press the
Displays the song title.
▶
button to
restart the song.
the current song will begin playing. If the
song has been playing for less than 3 seconds, the start of the previous song will
begin playing.
10 Album Art Icon
When pressed, displays information about
the current song (artist, title, album and
other information).
11 Current/Total Track Number
Displays the current track number and total
number of tracks on the current playing list.
Note
●
2. Selecting through manual search
For some media formats, the system requires
1. Turn the TUNE knob on the control panel
time for media indexing. In the case of USB
in clockwise or counter-clockwise direc-
mp3 songs, the system will take 1.5ms/song
tion. Each click will display information
(Flash/HDD) or 40ms/song (mp3 players).
about the selected song.
2. P r e s s t h e TUNE k n o b t o p l ay t h e
selected song.
PART 2. AUDIO FEATURES
02_PS [미국_영어]UVO2_Part2.indd 15
2-15
2013-08-06 오후 6:34:02
PART 2
AUDIO FEATURES
3. Selecting from the list
3. Press the name of the song from the list.
The song will automatically start playing.
2. Choose the category through which you
wish to select a song. USB Mode allows
you to select by Playlists, Artists, Albums,
Note
●
Genres, Songs, and Composers.
If in the MP3 list screen, the TUNE knob can
also be used to select songs.
1. Press the
Menu
button.
2. Press the
Now Playing
button.
4. By Folders, Artists, Albums, Genres,
Songs, Composers
Explore USB
Explore USB is a feature which allows you to
browse files and folders of the USB by the
names of categories.
1. Press the
Menu
button.
1. While in the USB Menu screen, press the
Explore USB
2-16
button.
PART 2. AUDIO FEATURES
02_PS [미국_영어]UVO2_Part2.indd 16
2013-08-06 오후 6:34:02
Copying songs into JUKEBOX
2. Search the corresponding files and folders
to select the desired song.
1. Copying the current song
The UVO system allows you to copy songs
from your USB device into JUKEBOX.
AUDIO FEATURES
2. The song information (Artist, Title, Album,
Genre) for the current USB song will be
displayed. Press the
Viewing song information
button to return
to the previous screen.
Note
When listening to USB music songs, you can
browse through song details and information.
●
Even as you browse through song information,
you can use the
SEEK ∧
TRACK
the control panel or
∧
or
SEEK
∨ TRACK
or
∨
keys on
1. Press the
Copy
button.
keys on the
steering wheel controller to select different USB
songs. For more information, refer to the
'Selecting music songs' section.
1. Press the Album art icon.
2. Once copying is complete, you can listen
to copied music in JUKEBOX mode.
PART 2. AUDIO FEATURES
02_PS [미국_영어]UVO2_Part2.indd 17
2-17
2013-08-06 오후 6:34:03
PART 2
AUDIO FEATURES
2. Press the
Now Playing
button.
2. Copying songs from list
6. Once copying is complete, you can listen
to copied music in JUKEBOX mode.
Copying USB music songs from lists allows
you to simultaneously select several songs
3. Press the
Edit
button.
Note
to copy into JUKEBOX.
●
If memory is already full and songs can no
longer be copied, the “Memory full! Please
delete music from your JUKEBOX” message
will be displayed and you must delete songs
from JUKEBOX. For more information on
deleting JUKEBOX songs, refer to the
‘Managing JUKEBOX’ section.
1. Press the
Menu
button.
4. Select the songs you wish to copy. When
selected, a
will be displayed next to the
song. To select all songs in the list, press
the
Select All
button.
5. After selecting the desired songs, press
the
2-18
Copy
button.
●
When copying USB songs, you can listen to
all modes except USB mode and JUKEBOX
mode.
Copying can be canceled at anytime. While
copying is in progress, press the Cancel
● button.
PART 2. AUDIO FEATURES
02_PS [미국_영어]UVO2_Part2.indd 18
2013-08-06 오후 6:34:04
iPod MODE
Caution
●
About iPod®
®
If a playing iPod is connected to the audio
system, a high-pitched tone may occur for
approximately 1-2 seconds. Please pause/
1. Trademark
®
stop the iPod device prior to connecting it to
2. Connecting your iPod Device
Ⓡ
Connect your iPod device as shown in the
Ⓡ
picture.
AUDIO FEATURES
the vehicle.
iPod is a registered trademark of Apple, Inc.
Ⓡ
Note
●
Supp or ted iPod devic es: iPod Nano
Ⓡ
2G/3G/4G/5G/6G, iPod Classic 5G/6G, iPod
Touch 1G/2G/3G/4G, iPhone 3G/3GS/4/4S
The identification of the iPod device, battery
Ⓡ
recharge, and other functions provided by
the iPod device is normally supported by
Ⓡ
using your iPod connector cable.
Ⓡ
PART 2. AUDIO FEATURES
02_PS [미국_영어]UVO2_Part2.indd 19
2-19
2013-08-06 오후 6:34:04
PART 2
AUDIO FEATURES
iPod Mode Screen and Features
Ⓡ
will be displayed.
1
5 Sound
10
9
7
2
3
4
Enters Sound Setup.
Listening to your iPod
Ⓡ
1. C onnect an iPod device or press the
Ⓡ
MEDIA
key on the control panel if an iPod
Ⓡ
device has already been connected.
6 Play Time
8
5
6
Displays the play time.
pause, press the
ll
button next to the
progress bar. Press the
7 Artist name
1 Mode Display
Displays that the current mode is iPod
2. W hen a song is playing and you wish to
▶
button to
restart the song.
Displays the artist name.
Ⓡ
8 Song Title
mode.
Displays the song title.
2 Menu
Displays the categories and song lists for
the iPod .
Ⓡ
9 Album Art Icon
When pressed, displays information about
the current song (artist, title, album and
3 Repeat
other information).
If Repeat is operating, the current song will
be repeated and the corresponding icon
10 Current/Total Track Number
will be displayed.
Displays the current track number and total
number of tracks on the current playing list.
4 Shuffle
If Shuffle is operating, the song will be played
in random order and the corresponding icon
2-20
PART 2. AUDIO FEATURES
02_PS [미국_영어]UVO2_Part2.indd 20
2013-08-06 오후 6:34:04
Selecting iPod music
Ⓡ
3. Selecting from the list
3. Press the name of the song from the list.
The file will automatically start playing.
1. Selecting through song Up/Down
Press the
SEEK ∧
TRACK
or
control panel or the
SEEK
∨ TRACK
∧
or
Note
keys on the
∨
keys on
In the iPod list screen, the TUNE knob can
● Ⓡ
desired song.
Note
●
If the
∨
SEEK
∨ TRACK
key on the Control panel or
1. Press the
Menu
2. Press the
Now Playing
button.
4. By Artists, Albums, Genres, Songs,
Podcasts, Composers, Audiobooks
key on the steering wheel controller is
pressed and released after the song has
AUDIO FEATURES
also be used to select the desired song.
the steering wheel controller to play the
played for more than 3 seconds, the start of
the current song will begin playing. If the song
has been playing for less than 3 seconds, the
start of the previous song will begin playing.
2. Selecting through manual search
button.
1. Press the
Menu
button.
1. Turn the TUNE knob on the control panel
in clockwise or counter-clockwise direction. Each click will display information
about the selected song.
2. P r e s s t h e TUNE k n o b t o p l ay t h e
selected song.
PART 2. AUDIO FEATURES
02_PS [미국_영어]UVO2_Part2.indd 21
2-21
2013-08-06 오후 6:34:05
PART 2
AUDIO FEATURES
2. Choose the category through which you
Viewing song information
3. Press the
wish to select. iPod mode allows you to
button to return to the
previous screen.
Ⓡ
select by Playlists, Ar tists, Albums,
When listening to your iPod , you can browse
Genres, Songs, Podcasts, Composers
through song details and information.
Ⓡ
and Audiobooks.
Note
Songs in the iPod can be properly played in
Ⓡ
● UVO system only when they have been
downloaded through iTunes .
Ⓡ
If you receive a call or SMS while playing
● music from an iPhone , the music may not
Ⓡ
properly be restored after the call or SMS. In
this case, disconnect and reconnect the
iPhone .
Ⓡ
1. Press the Album art icon.
®
®
After upgrading the iPod or iPhone firm-
● ®
®
ware, reboot the iPod or iPhone and connect with the UVO system for normal
operation.
®
Songs cannot be copied from iPod or
● ®
iPhone to JUKEBOX.
2. The song information (Artist, Title, Album,
Genre) for the current iPod song will be
Ⓡ
displayed.
2-22
PART 2. AUDIO FEATURES
02_PS [미국_영어]UVO2_Part2.indd 22
2013-08-06 오후 6:34:05
zune MODE
zune Mode Screen and Features
About zune
sponding icon will be displayed.
1
Ⓡ
5 Sound
10
9
1. Trademark
7
®
Corporation in the United States and or other
countries.
6 Play Time
8
2
3
4
5
6
AUDIO FEATURES
zune is a registered trademark of Microsoft
Enters Sound Setup.
Displays the play time.
7 Artist name
2. Connecting your zune Device
Connect your zune device as shown in the
Ⓡ
picture.
1 Mode Display
Displays that the current mode is zune
Displays the artist name.
Ⓡ
8 Song Title
mode.
Displays the song title.
2 Menu
Displays the categories and song lists for
the zune .
Ⓡ
9 Album Art Icon
When pressed, displays information about
the current song (artist, title, album and
3 Repeat
other information).
If Repeat is operating, the current song will
be repeated and the corresponding icon
10 Current/Total Track Number
will be displayed.
Displays the current track number and total
number of tracks on the current playing list.
4 Shuffle
If Shuffle is operating, the songs will be
played in random order and the correPART 2. AUDIO FEATURES
02_PS [미국_영어]UVO2_Part2.indd 23
2-23
2013-08-06 오후 6:34:06
PART 2
AUDIO FEATURES
Listening to your zune®
Selecting zune® music
1. Connect zune device or press the MEDIA
Ⓡ
1. Selecting through song up/down
key on the control panel if zune device
Press the
has already been connected.
control panel or the
Ⓡ
2. When a song is playing and you wish to
pause, press the ll button next to the
progress bar. Press the
▶
or
SEEK
∨ TRACK
∧
or
keys on the
∨
keys on
the steering wheel controller to play the
desired song.
Note
●
Note
If the
∨
SEEK
∨ TRACK
key on the Control panel or
pressed and released after the song has
the system requires time for media indexing. In
played for more than 3 seconds, the start of
the case of zune files, the system will take
60ms/song.
the current song will begin playing. If the
Son gs c ann ot b e c o p ie d from zune to
onds, the start of the previous song will
JUKEBOX.
begin playing.
Ⓡ
1. Press the
Menu
button.
2. Press the
Now Playing
key on the steering wheel controller is
When connecting some external media formats,
Ⓡ
●
SEEK ∧
TRACK
button to
restart the song.
●
3. Selecting from the list
song has been playing for less than 3 sec-
button.
2. Selecting through manual search
1. Turn the TUNE knob on the control panel
in clockwise or counter-clockwise direction. Each click will display information
about the selected song.
2. P r e s s t h e TUNE k n o b t o p l ay t h e
selected song.
2-24
PART 2. AUDIO FEATURES
02_PS [미국_영어]UVO2_Part2.indd 24
2013-08-06 오후 6:34:06
3. Press the name of the song from the list.
Viewing song information
The song will automatically start playing.
3. Press the
button to return to the pre-
vious screen.
When listening to your zune , you can browse
Ⓡ
4. By Songs, Genres, Albums, Artists,
Playlists
through song details and information.
AUDIO FEATURES
1. Press the
Menu
button.
1. Press the Album art icon.
2. Choose the category through which you
2. The song information (Artist, Title, Album,
wish to select. zune mode allows you to
Genre) for the current MP3 song will be
select by Songs, Genres, Albums, Artists,
displayed.
Ⓡ
and Playlists.
PART 2. AUDIO FEATURES
02_PS [미국_영어]UVO2_Part2.indd 25
2-25
2013-08-06 오후 6:34:06
PART 2
AUDIO FEATURES
AUX MODE
Connecting an AUX media device
AUX Mode Screen
Connect a cable from the headphone jack on
your AUX device to the jack located in your
1
vehicle.
Listening to AUX media
1. C onnect an AUX device or press the
MEDIA key on the control panel if the
AUX device has already been connected.
2
3
1 Mode Display
Displays that the current mode is AUX
mode.
Note
●
2 AUX Status
Displays the AUX connection status
2. Once in AUX mode, the connected audio
Connecting your AUX device with the vehi
will automatically begin playing from the
cle will not provide power to your AUX
car system provided that your external
device. If you plan on using your AUX device
device is turned on and playing audio.
for long periods of time, make sure to charge
3 Sound
Enters Sound Setup.
2-26
the device using an A/C power adapter or a
separate USB cable.
PART 2. AUDIO FEATURES
02_PS [미국_영어]UVO2_Part2.indd 26
2013-08-06 오후 6:34:07
BT AUDIO MODE
BT Mode Screen and Features
1
BT Audio mode is a feature which allows you
6 Phone Battery charge status
Displays the battery charge status of the
6 7 8
connected mobile phone. The battery
charge status may not be displayed in
to stream music stored in your handset device
via a Bluetooth wireless technology connecⓇ
some mobile phones.
3
Ⓡ
2
less technology audio streaming. BT audio
4
7 Signal Strength
5
Displays the mobile phone signal strength.
The signal strength may not be displayed
can be played only when a handset device
has been connected. To play BT audio, pair a
handset device with the system. If Bluetooth
Ⓡ
1 Mode Display
in some mobile phones.
Displays the current mode as BT Audio
8 Bluetooth wireless technology
Ⓡ
mode.
wireless technology is disconnected while
connection state
playing BT audio, music play will be discontin2 Bluetooth wireless technology
Ⓡ
ued. The audio streaming function may not be
Becomes displayed when a Bluetooth
enabled device information
supported in some handset devices. Only one
function can be used at a time between the
Bluetooth wireless technology handsfree or
AUDIO FEATURES
tion. Music saved in the handset device can
be played in the car through Bluetooth wire-
Displays information about the Bluetooth
Ⓡ
Ⓡ
wireless technology enabled phone has
Ⓡ
been connected with the car system.
wireless technology enabled device
BT audio function. Playing music from the car
3 Song Title
is not possible when there are no music files
stored in the handset device.
Displays the song title.
4 Play/Pause
Plays/pauses the song.
5 Sound
Enters Sound Setup.
PART 2. AUDIO FEATURES
02_PS [미국_영어]UVO2_Part2.indd 27
2-27
2013-08-06 오후 6:34:07
PART 2
AUDIO FEATURES
Listening to music from your
Bluetooth wireless technology
enabled device
●
Ⓡ
If music does not begin playing even after
REW/FF a song
displaying the Phone music screen, try starting the music directly from the Bluetooth
1. P ress and hold the
Ⓡ
wireless technology enabled device.
panel or the
Ⓡ
For more information on pairing your
Selecting a song
∧
,
∨
keys (over 0.8
2. The track will rewind or fast-forward at a
rate 20 times faster than normal while the
Bluetooth wireless technology enabled
1. Press the
devices, refer to the 'Pairing your handset
device to the handsfree system' section.
2. Press the MEDIA key on the control panel
SEEK ∧
TRACK
or
control panel or the
SEEK
∨ TRACK
∧
or
keys on the
∨
key is being held.
3. Release the key to play from the current
keys on
position.
the steering wheel controller to play the
to turn on BT audio mode.
desired song.
3. When streaming music from your Bluetooth
2. T he previous or next song will begin
Ⓡ
playing.
wireless technology enabled device and you
wish to pause, press the ▶ll button next on
the screen. Press the ▶ll button to restart
music.
Note
The play/pause, song selection and REW/FF
● features are supported only in handset
Note
●
devices with AVRCP Ver. 1.3 or higher. If
File selection may not be supported in some
play control features are not working, first
Bluetooth wireless technology enabled
check the AVRCP version of your Bluetooth
Ⓡ
Note
devices.
While music saved in the Bluetooth wireless
Ⓡ
SEEK
∨ TRACK
seconds) on the steering wheel controller.
Ⓡ
●
or
keys (over 0.8 seconds) on the control
1. Pair your Bluetooth wireless technology
enabled device to the handsfree system.
SEEK ∧
TRACK
Ⓡ
wireless technology enabled device.
●
When such operations are not supported,
technology enabled device will automatically
use the handset device to perform these
begin playing after converting to the BT
functions.
Audio screen, this music player function may
not be supported in some Bluetooth wireⓇ
less technology enabled devices.
2-28
PART 2. AUDIO FEATURES
02_PS [미국_영어]UVO2_Part2.indd 28
2013-08-06 오후 6:34:07
JUKEBOX MODE
JUKEBOX Mode Screen and
Features
The UVO system offers you maximum conve-
5 Shuffle
If Shuffle is operating, the songs will be
played in random order and the corre-
1
nience by allowing you to copy songs from
sponding icon will be displayed.
11
your USB and store them to the JUKEBOX
10
6 Sound
8
copying songs into JUKEBOX, refer to the
9
‘Copying songs into JUKEBOX’ section.
2
3
4
5
6
AUDIO FEATURES
within the system. For more information on
Enters Sound Setup.
7
7 Play Time
Displays the play time.
1 Mode Display
8 Artist name
D i s p l a y s t h a t t h e c u r r e n t m o d e i s
JUKEBOX mode.
2 Menu
Displays the JUKEBOX folder and file lists.
3 Favorite
Adds/removes current song to Favorites
list.
Displays the artist name.
9 Song Title
Displays the song title.
10 Album Art Icon
When pressed, displays information about
the current song (artist, title, album and
other information).
4 Repeat
If Repeat is operating, the current song will
be repeated and the corresponding icon
will be displayed.
11 Current/Total Track Number
Displays the current track number and total
number of tracks on the current playing list.
PART 2. AUDIO FEATURES
02_PS [미국_영어]UVO2_Part2.indd 29
2-29
2013-08-06 오후 6:34:07
PART 2
AUDIO FEATURES
Listening to JUKEBOX
2. Selecting through manual search
2. Press the
Now Playing
button.
1. Turn the TUNE knob on the control
1. Press the MEDIA key on the control panel
to turn to JUKEBOX mode.
2. The system will automatically restore the
most recently played song.
Selecting a JUKEBOX song
panel in clockwise or counter-clockwise
direction. Each click will display information about the selected song.
2. P re s s t h e TUNE k n o b to p l ay t h e
selected song.
3. Selecting from the list
1. Selecting through Track Up/Down
1. Press the
panel or the
∨
SEEK ∧
TRACK
∧
or
3. Press the name of the song from the list.
The song will automatically start playing.
keys on the control
∨
keys on the steer-
ing wheel controller to play the desired track.
2. T he previous or next song will begin
playing.
Note
●
If the
∨
SEEK
∨ TRACK
key on the Control panel or
1. Press the
Menu
button.
key on the steering wheel controller is
pressed and released after the track has
played for more than 3 seconds, the start of
the current track will begin playing. If the
song has been playing for less than 3 seconds, the start of the previous song will
begin playing.
2-30
PART 2. AUDIO FEATURES
02_PS [미국_영어]UVO2_Part2.indd 30
2013-08-06 오후 6:34:08
4. By Artists, Albums, Genres, Song,
Composers
Adding Favorites
3. To delete a song from Favorites, press the
button.
The Favorites feature allows you to create a
separate Favorites list of songs.
Menu
AUDIO FEATURES
1. Press the
button.
1. W hile listening to JUKEBOX, press the
button.
2. Choose the category through which you
wish to select. JUKEBOX mode allows
you to select by Favorites, Artists, Albums,
Genres, Songs, and Composers.
2. T he star icon will be displayed on the
screen to signify that the song has been
saved in Favorites.
PART 2. AUDIO FEATURES
02_PS [미국_영어]UVO2_Part2.indd 31
2-31
2013-08-06 오후 6:34:08
PART 2
AUDIO FEATURES
Playing Favorites
3. Press the name of the song from the list.
The song will begin playing.
1. While playing JUKEBOX, press the
Menu
Note
button.
The Favorites button will be inactive when there
● are no songs saved as Favorites.
When deleting favorites from the Favorites list,
● the deleted favorites will be removed from the
favorites list. The songs will not be deleted from
the system.
2.In the JUKEBOX Menu screen, press the
Favorites
2-32
button.
PART 2. AUDIO FEATURES
02_PS [미국_영어]UVO2_Part2.indd 32
2013-08-06 오후 6:34:09
Memory Management
Deleting JUKEBOX
Checking System Information
1. Deleting JUKEBOX
1. W hile in JUKEBOX mode, press the
Menu button.
1. Press the SETUP key on the control panel.
AUDIO FEATURES
4. The system information screen shows you
the memory currently in use.
button.
2. Press the
System
3. Press the
System Information
2. Press the
button.
3. Press the
Now Playing
Edit
button.
button.
PART 2. AUDIO FEATURES
02_PS [미국_영어]UVO2_Part2.indd 33
2-33
2013-08-06 오후 6:34:09
PART 2
AUDIO FEATURES
4. Select the songs you wish to delete. When
selected, a
will be displayed next to the
3. Press the
button.
restore the FM mode.
selected song. To select all songs, press
the Select All button. All of the songs in
the play list will be selected.
5. Press the Delete button.
Delete all copied files
4. The system will reboot and automatically
Note
When using the
● Delete all copied files
feature,
all JUKEBOX files will be deleted.
2. Deleting all files
1. Press the SETUP key on the control panel.
2. Press the
2-34
System
button.
PART 2. AUDIO FEATURES
02_PS [미국_영어]UVO2_Part2.indd 34
2013-08-06 오후 6:34:09
PANDORA MODE
2. Start the PANDORA Radio application.
Note
Suppor ted iPod devices: iPod Touch
●
●
About PANDORA
Ⓡ
2G/3G/4G, iPhone 3G/3GS/4/4S
1. Trademark
PANDORA Radio is supported only in iOS
devices.
iPod is a registered trademark of Apple, Inc.
Ⓡ
AUDIO FEATURES
2. Before Starting PANDORA
1. Connect your iPod or iPhone device as
shown in the picture.
3. Log into PANDORA Radio.
(This step can be omitted if you are already
logged in.)
The identification of the iPod device, battery
Ⓡ
recharge, and other functions provided by
the iPod device is normally supported by
Ⓡ
using your iPod connector cable.
Ⓡ
PART 2. AUDIO FEATURES
02_PS [미국_영어]UVO2_Part2.indd 35
2-35
2013-08-16 오후 4:32:53
PART 2
AUDIO FEATURES
PANDORA Mode Screen and Features
5 Skip
1
1. Press the MEDIA key on the control panel if
6 Sound
8
9
10
7
3
4
5
Enters Sound Setup.
7 Play Time
2
Listening to your PANDORA
Moves to the next track.
Displays the play time.
6
and the PANDORA application is activated.
2. W hen a song is playing and you wish to
pause, press the
ll
button next to the
progress bar. Press the
8 Station Name
1 Mode Display
an iPod device has already been connected
▶
button to
restart the song.
Displays the station name.
D i s p l a y s t h a t t h e c u r r e n t m o d e i s
9 Artist name
PANDORA mode.
2 Menu
Displays the PANDORA Station lists and
Bookmark options.
Displays the artist name.
10 Song Title
Displays the song title.
3 Thumbs Up
Approves the song and keep it in your
playlist.
4 Thumbs Down
Disapproves the song and prevents that
song from playing again.
2-36
PART 2. AUDIO FEATURES
02_PS [미국_영어]UVO2_Part2.indd 36
2013-08-06 오후 6:34:12
Selecting PANDORA station
Bookmark Track or Artist
AUDIO FEATURES
3. Press the name of the station from the list.
The station will automatically start playing.
1. Press the
Menu
button.
1. Press the
Menu
button.
2. Press the
Bookmark this track
Note
In the station list screen, the TUNE knob can
●
●
also be used to find the desired station.
Upon selecting “Shuffle” from the Station list
screen, stations are selected randomly and
played.
2. Press the
Station List
button.
Bookmark this artist
or
button.
3. The current track or artist is bookmarked
on the currently connected device.
PART 2. AUDIO FEATURES
02_PS [미국_영어]UVO2_Part2.indd 37
2-37
2013-08-06 오후 6:34:12
2-38
PART 2. AUDIO FEATURES
02_PS [미국_영어]UVO2_Part2.indd 38
2013-08-06 오후 6:34:12
PART 3
03_PS [미국_영어]UVO2_Part3.indd 1
PHONE FEATURES
2013-08-06 오후 6:42:32
PART 3
PHONE FEATURES
Using your Bluetooth
wireless technology
Handsfree system
®
The Bluetooth wireless technology
handsfree system offers:
Ⓡ
Pairing mobile phones (Up to 5 phones)
●
Welcome to KIA’s connected world of wireless
●
personal networking. The UVO system with
●
Making/Answering phone calls
Bluetooth wireless technology allows you to
●
Downloading Contacts
safely and conveniently use various
Bluetooth wireless technology enabled phone
●
Downloading Call history lists
Playing music saved in a Bluetooth wireless
Ⓡ
Ⓡ
features as you drive your vehicle.
3-2
Connecting/disconnecting mobile phones
●
Ⓡ
technology enabled phone in the vehicle
PART 3. PHONE FEATURES
03_PS [미국_영어]UVO2_Part3.indd 2
2013-08-06 오후 6:42:32
Smart driving practices
●
Warning
Place your mobile device in easy reach.
Be able to access your mobile device with
Driving while distracted can result in a loss
● of vehicle control that may lead to an acci
Do not search for phone numbers while
dent, severe personal injury, and death. The
ries and always make sure to obey them.
driving.
driver's primary responsibility is in the safe
The use of such devices may be prohibited
Searching through your address book may
and legal operation of a vehicle, and use of
or restricted in certain areas.
be distracting takes attention away from driv
any handheld devices, other equipment, or
Your mobile device lets you communicate
ing safely.
vehicle systems which take the driver's
Let the other person know you are driv-
eyes, attention and focus away from the safe
anytime. When driving a car, driving comes
ing; when necessary, suspend the call in
operation of a vehicle or which are not per
first. If you choose to use your mobile device
heavy traffic or inclement weather.
missible by law should never be used during
while driving, remember the following:
Rain, sleet, snow, ice or heavy traffic may
operation of the vehicle.
using mobile devices and their accesso-
through voice and data almost anywhere and
●
●
increase the risks of driving.
Some laws do not allow the use of hand-
●
●
Use your mobile device to call for help.
held devices while driving.
Dial 911 or other local emergency number in
Always obey local laws and, even if permit
case of fire, traffic accident, or medical
ted, do not use your handheld device unless
emergencies*
PHONE FEATURES
out removing your eyes from the road.
Check related laws and regulations on
it is safe to do so.
Get to know your mobile device and
●
features.
Knowledge of your mobile device and its fea
tures will help you to use the features more
easily.
PART 3. PHONE FEATURES
03_PS [미국_영어]UVO2_Part3.indd 3
3-3
2013-08-06 오후 6:42:32
PART 3
PHONE FEATURES
Pairing your handset
device to the handsfree
system
Before you can use the Bluetooth wireless
Pairing a Bluetooth wireless
technology enabled device for the
first time
Ⓡ
technology handsfree system to make hands
button on the steering
wheel or the PHONE key on the control
free calls, you must create a Bluetooth wire
panel.
Ⓡ
Ⓡ
1. Press the
less technology connection between your
Non SSP(Secure Simple Pairing) sup-
handsfree system and handset device. A
ported device
Bluetooth wireless technology connection is
4. Once the device is discovered, input the
Ⓡ
passkey in the handset device.
made between your handsfree system and
handset device with a paired link.
After setting up a paired link, the handsfree
system will always remember your handset
device. Once the system is paired with the
2. Press the
device, your hand-free system can be set so
3. P erform a device discovery from the
that it automatically connects to your handset
handset device. For details on device dis
each time you start your vehicle.
covery for your handset device, refer to
Caution
●
Yes
button.
the handset device user's manual.
SSP(Secure Simple Pairing) supported
device
For safety, make pairings between your
4. Once the device is discovered, check the
handsfree system and handset only while
passkey on your handset device and
the vehicle is parked.
confirm.
3-4
PART 3. PHONE FEATURES
03_PS [미국_영어]UVO2_Part3.indd 4
2013-08-06 오후 6:42:33
After 5 handsets have already been paired,
Deleting a paired handset device
you must delete a handset in order to pair a
new handset.
●
Some phones (i.e., iPhone , Android and
®
Blackberry phones) may offer an option to
allow acceptance of all future Bluetooth
®
connection requests by default.
5. Once pairing is complete, the handset
Visit http://www.kia.com/us/#/bluetooth for
addit ional information on pairing your
Bluetooth enabled mobile phone, and to
®
Note
●
view a phone compatibility list.
1. W h i l e i n P h o n e m o d e , p r e s s t h e
Connections
button.
Initial pairing may require some time due to
initial uploading of your contacts into the
system. The contacts upload feature may
PHONE FEATURES
device will be shown in the Connections list.
●
not be supported in some handset devices.
●
Before connecting the Bluetooth wireless
Ⓡ
technology handsfree system with the hand
set device, check to see that the handset
device supports Bluetooth wireless technol
Ⓡ
ogy handsfree and Bluetooth wireless tech
Ⓡ
nology is turned on.
●
2. S elect the handset device you want to
delete.
The process for initiating Bluetooth wireless
Ⓡ
technology connections may vary depending
on the manufacturer. Use the handset
device user's manual as a reference guide.
The UVO system supports up to 5 pairings.
● PART 3. PHONE FEATURES
03_PS [미국_영어]UVO2_Part3.indd 5
3-5
2013-08-06 오후 6:42:33
PART 3
PHONE FEATURES
Connecting a handset device
The system automatically connects the Bluetooth
3. Press the
Connect
button.
Ⓡ
wireless technology enabled device set at the
highest priority. As a result, in order to connect a
different phone, follow the following steps.
3. O nce the phone is selected, press the
Delete
button.
Note
●
After initial pairing, your highest priority
handset device will automatically connect
with the handsfree system every time you
1. W h i l e i n P h o n e m o d e , p r e s s t h e
Connections
button.
start your vehicle (if your handset device is
powered on and the relevant Bluetooth pri
Ⓡ
ority settings are not changed).
4. Press the
Yes
button.
Note
●
When you delete a paired phone, data will
also be erased. For instance, deleting a
paired phone will also erase recent calls,
contact lists, and SMS data from the system.
2. S elect the handset device you want to
connect.
3-6
PART 3. PHONE FEATURES
03_PS [미국_영어]UVO2_Part3.indd 6
2013-08-06 오후 6:42:33
Setting Priority
2. Press the
Set Priority
button.
When more than one device has been paired
to the system, you can set the connection pri
ority so that a certain phone is connected with
priority starting from the next time you turn on
the system.
PHONE FEATURES
3. Select the phone you wish to set as pre
ferred priority.
1. W h i l e i n P h o n e m o d e , p r e s s t h e
Connections
button.
PART 3. PHONE FEATURES
03_PS [미국_영어]UVO2_Part3.indd 7
3-7
2013-08-06 오후 6:42:34
PART 3
PHONE FEATURES
Using the phone features
Phone Mode Screens and Features
3 Bluetooth wireless technology
5 Connections
Ⓡ
Displays the Connections screen.
6 Settings
1. When a mobile phone is connected
2
3
5
been connected with the car system.
4 Dial
1 2 3
4
4
Ⓡ
wireless technology enabled phone has
Displays the Settings screen.
2. When making a call
1
connection state
B ecomes displayed when a Bluetooth
6
Input the phone number through the dial
pad.
5 SEND
5
Makes the call to the dialed number.
6
If a number has not been entered into the
1 Dial Number
7
1 Phone Battery charge status
2 Contacts
Displays the Contacts list
3 Recent Calls
phone number input window,
pressing the send button displays the call
Displays the Dial Pad screen.
history list screen.
Displays the battery charge status of the
connected mobile phone. The battery
6 END
charge status may not be displayed in
Ends the call. If a number has been input
some mobile phones.
ted, then erases the entire number.
Displays the Recent Calls list.
2 Signal Strength
4 Favorites
3-8
Displays the mobile phone signal strength.
Up to 20 frequently used contact saved so
The signal strength may not be displayed
help your fast call.
in some mobile phones.
7 Delete
Deletes one digit at a time.
PART 3. PHONE FEATURES
03_PS [미국_영어]UVO2_Part3.indd 8
2013-08-06 오후 6:42:34
3. When receiving an incoming call
5 PRIVATE
4. When on a call
When talking on the car handsfree, use
this function to switch the call to the mobile
3
4
1
1
2
6 MUTE
2
Mutes the sound of the call. The caller will
6
not be able to hear the conversation taking
PHONE FEATURES
5
phone.
place in the car.
1 Accept
1 Call state
Accepts the incoming call.
Displays the call state, such as talk time,
phone connection, and end time.
2 Reject
2 END
Rejects the incoming call.
Ends the call.
3 Name of the other party
Displays the name of the other party. The
name of the caller will not be displayed if
the caller's phone number has not been
saved in contacts.
4 Number of other party
Displays the number of the other party
PART 3. PHONE FEATURES
03_PS [미국_영어]UVO2_Part3.indd 9
3-9
2013-08-06 오후 6:42:34
PART 3
PHONE FEATURES
Answering an incoming call
Rejecting an incoming call
Call waiting
Call waiting is a feature which allows you to
place the current call on hold in order to
receive a second call. When you are in a
call, the incoming call window will be dis
played to the sound of a beep to signal a
second incoming call.
1. When there is an incoming call, an incom
ing call window will be displayed on the
screen. Press the
Accept
screen or the
button on the
key on the steering
1. Press the
the
button on the screen or
1. If a second call is received while already
key on the steering wheel
on a call, the incoming call window will be
Reject
controller.
displayed on the screen.
2. The call will be rejected.
wheel controller to answer the call.
2. The call will be connected.
Note
●
You can also accept an incoming call using
your handset device if you wish to talk in pri
vate mode.
2. Press the
Accept
button or the
key
on the steering wheel controller to take
the second incoming call. Press the
Reject
button to reject the second incom
ing call.
3-10
PART 3. PHONE FEATURES
03_PS [미국_영어]UVO2_Part3.indd 10
2013-08-06 오후 6:42:35
Placing a call
1. By dialing a number
3. To switch again to the other caller, press
button or the
3. Press the
the
key on the
steering wheel. The other call will be
button on the screen or
key on the steering wheel con
troller to connect the call.
received and the previous call will switch
back to call waiting.
1. W h i l e i n P h o n e m o d e , p r e s s t h e
Dial Number
button.
Note
●
Pressing and holding the
Note
button or
key will redial the most recent number.
The call waiting function may not be sup
● ●
ported in some handset devices.
You can delete digits by pressing the
or
The
● PHONE FEATURES
the
Delete
button on the screen.
Delete
button will delete one digit at a
time while the
button will erase all
digits.
●
When placing international calls, press and
hold the “ * ”. A “ +” sign is displayed, allow
2. Use the dial pad on the right side of the
ing you to place an international call.
screen to enter the phone number.
PART 3. PHONE FEATURES
03_PS [미국_영어]UVO2_Part3.indd 11
3-11
2013-08-06 오후 6:42:35
PART 3
PHONE FEATURES
2. By contact list
3. Press the
the
1. While in Phone mode, press the
Contacts
button on the screen or
key on the steering wheel con
2. Select the contact you want to call from
the list.
troller to connect the call.
button.
3. By recent calls
3. Press the
the
troller to connect the call.
2. Select the contact you want to call from
the list.
1. W h i l e i n P h o n e m o d e , p r e s s t h e
Recent Calls
3-12
button on the screen or
key on the steering wheel con
button.
PART 3. PHONE FEATURES
03_PS [미국_영어]UVO2_Part3.indd 12
2013-08-06 오후 6:42:36
Contact list
Note
●
If you want to connect to the most recent call
you made, press and hold the
in the 'Dial Number' screen or the
●
on the steering wheel.
You can store a list of names and phone
Recent calls will be deleted automatically
numbers in the system contact list. The
when a handset device is disconnected from
contact list can support up to 2,000 entries.
the system.
The contact list is only available when a
Recent calls can be sorted. Use the
button to sort recent calls by
Received
●
key
1. Downloading contact list (from mobile
phone)
and
Missed
,
calls.
The recent calls function may not be sup
Download
button.
handset device is connected to the hands
Sort by
Dialed
2. Press the
PHONE FEATURES
●
button
free system. In some phones, the system
will automatically download contacts upon
pairing.
ported in some handset devices.
3. T he contacts from the currently paired
handset device will automatically be
downloaded.
1. While in Phone mode, press the
Contacts
button.
PART 3. PHONE FEATURES
03_PS [미국_영어]UVO2_Part3.indd 13
3-13
2013-08-06 오후 6:42:37
PART 3
PHONE FEATURES
Searching your contacts
Note
●
You can search your contacts to conve
niently find the desired person.
If you have many contacts downloaded in the
device from your handset device, you can
make searches of your contacts to conve
niently find the desired person.
1. By name
1. While in Phone mode, press the
Contacts
2. Press the
Search
3. Press the
Search by name
button.
button.
button.
3-14
PART 3. PHONE FEATURES
03_PS [미국_영어]UVO2_Part3.indd 14
2013-08-06 오후 6:42:37
2. By number
4. Enter the name you wish to find and press
Done
3. Press the
Search by number
button.
PHONE FEATURES
the
button.
1. While in Phone mode, press the
Contacts
button.
4. Enter the number you wish to find and
press the
5. Press the contact you want to connect the
Done
button.
5. Press the contact you want to connect the
call.
2. Press the
Search
call.
button.
Note
●
When searching contacts by name, you do
Note
not need to enter the entire name to conduct
●
the search.
When searching contacts by number, you do
not need to enter the entire number to con
duct the search.
PART 3. PHONE FEATURES
03_PS [미국_영어]UVO2_Part3.indd 15
3-15
2013-08-06 오후 6:42:38
PART 3
PHONE FEATURES
Checking missed calls
Favorites
1. Placing a call by favorites
3. Press the
Missed
button.
1. W h i l e i n P h o n e m o d e , p r e s s t h e
Recent Calls
button.
1. While in Phone mode, press the
Favorites
button.
4. The list of missed calls will be displayed.
2. Press the
Sort by
button.
2. Select the contact you want to call from
the list.
3-16
PART 3. PHONE FEATURES
03_PS [미국_영어]UVO2_Part3.indd 16
2013-08-06 오후 6:42:38
Note
●
3. Deleting favorites
To save a favorite, contacts should first be
downloaded.
●
Contact saved in Favorites are not automati
cally changed even if the information was
changed in the mobile phone. In this case,
delete it and save the new information.
2. Select the contact you want to add from
the list.
1. W hile in Favorites screen, press the
Edit
1. W hile in Favorites screen, press the
Add
3. Press the
button.
PHONE FEATURES
2. Adding favorites
button to add favorite.
button.
2. Select the contact you want to delete from
the list.
3. Press the
Delete
button.
PART 3. PHONE FEATURES
03_PS [미국_영어]UVO2_Part3.indd 17
3-17
2013-08-06 오후 6:42:39
PART 3
PHONE FEATURES
SMS
the sender, say ‘Call’.
●
1. D ownloading SMS messages (from
mobile phone)
3. Select the desired message to send a
response.
When a mobile phone has been paired with the
system, new incoming messages will automati
cally be notified through the system.
When a mobile phone is paired with the
Note
●
system, unread messages will automatically
You can modify custom messages through
Phone Settings.
be downloaded to the system. While you will
●
not be able to check SMS messages
The SMS read back function may not be
supported in some handset devices.
through the system due to legal regulations,
4. Editing Custom Messages
the system will read back messages for you
1. In the ‘Phone’ Screen, press the
for added convenience. The SMS read back
is also possible when the vehicle is in
motion.
●
press the
2. Checking an SMS message
1. P ress the
Yes
2. Say the command ‘Read SMS’.
3. T he system will read back the new
message.
Note
To listen to the message again, say ‘Read
● Edit
but ton nex t to the
Custom Messages menu.
button to check the new
3. From the 6 messages, select the mes
incoming message.
sage you wish to edit.
key on the steering
wheel.
3. S ending an SMS message (Custom
Messages)
The UVO system allows you to respond to
Caution
●
The Editing Custom Messages feature is
incoming messages through voice
supported only when the vehicle is parked. If
commands.
you need to edit custom messages, first park
1. After listening to a received message, say
your vehicle in a safe location.
‘Reply’.
again’. To listen to the next message, say
2. The UVO system will provide information
‘Next’. To send a reply, say ‘Reply’. To call
pertaining to the 6 Custom Messages.
3-18
button.
2. P ress the
When the notification window is displayed,
Settings
PART 3. PHONE FEATURES
03_PS [미국_영어]UVO2_Part3.indd 18
2013-08-06 오후 6:42:40
Switching the call
Note
●
1. Switching the call between handsfree
and handset device
Accepting a call with the handset device will
automatically connect the call in Private
mode.
When you receive an incoming call, you
have the option of using the handsfree or
talking privately by using the handset
device.
3. Transferring a call on your Handset
device to handsfree
1. If an incoming call is accepted with the
PHONE FEATURES
handset device, the call will be connected
2. Transferring the handsfree call to your
Handset device
1. After pressing the
Accept
button for an
incoming call, the following screen will be
with the handset device while the UVO
system will display the following screen.
2. Press the Use handsfree button to transfer
the call to the handsfree.
displayed.
2. Press the
Private
button. The call will be
transferred to the handset device.
PART 3. PHONE FEATURES
03_PS [미국_영어]UVO2_Part3.indd 19
3-19
2013-08-06 오후 6:42:40
PART 3
PHONE FEATURES
Phone settings
Turn Streaming Audio On and Off
Note
Press the
● Setting Phone Volume
●
1. Press the PHONE key.
●
Default
button to restore the
default setting.
Streaming Audio is a feature which turns On/
Although the call volume can be changed
Off BT Audio Mode. For more information on
during a call, the volume will return to its ini
BT Audio, refer to the ‘BT AUDIO MODE’
tial level as saved in Setup.
section in the Audio Features chapter of the
Call volume can be operated separately
user's manual.
from the audio volume, allowing you to
change the call volume without changing the
audio volume.
When call volume is changed, ring volume is
● also changed.
2. Press the
Settings
button.
1. W hile in Phone Set tings, press the
Settings
3. Use the
◀
,
▶
button.
buttons to control the
volume to the desired level.
3-20
PART 3. PHONE FEATURES
03_PS [미국_영어]UVO2_Part3.indd 20
2013-08-06 오후 6:42:40
Contacts Sync
Note
●
Contacts Sync is a feature which automati
cally downloads contacts when pairing a
new phone.
Press the
Default
button to restore the
default setting.
Changes are saved as they are made. In
● other words, once you change a setting, the
new setting will become saved.
If Contacts Sync is set to ON, contacts
● 2. Press the
On
or
Off
stored in your phone will download each
button next
be a delay before the system is available to
Note
●
Press the
place a call.
Default
button to restore the
If Contacts Sync is set to OFF, your phone
● default setting.
●
Changes are saved as they are made. In
other words, Once you change a setting, the
contacts will download only at the initial pair
1. W hile in Phone Set tings, press the
Settings
ing. This allows you to make calls without
PHONE FEATURES
time your phone is connected. There may
to the Streaming Audio menu.
waiting for your phone contact list to
button.
download.
new setting will be saved.
2. Press the
On
or
Off
button next
to the Contacts Sync menu.
PART 3. PHONE FEATURES
03_PS [미국_영어]UVO2_Part3.indd 21
3-21
2013-08-06 오후 6:42:40
PART 3
PHONE FEATURES
SMS
Changing passkey
This feature allows you turn the SMS feature
The passkey is the authentication code
on or off within the system. When turned on,
needed whenever you pair a new handset
the SMS feature will download unread
device.
incoming messages to provide a read back
of new messages.
2. Press the
On
or
Off
button next
to the SMS menu.
Note
●
Press the
Default
button to restore the
default setting.
●
Changes are saved as they are made. In
other words, once you change a setting, the
1. W hile in Phone Set tings, press the
Settings
1. W hile in Phone Set tings, press the
Settings
button.
new setting will become saved.
button.
2. Press the
0000
button next to the pass
key menu.
3-22
PART 3. PHONE FEATURES
03_PS [미국_영어]UVO2_Part3.indd 22
2013-08-06 오후 6:42:41
Note
Mobile Phone Compatibility
Depending on the manufacturer, product and product specification, some mobile phones func
tions may not be supported or may not operate to specification. Carefully read the cautions
listed below.
●
and not by the Audio unit.
●
Even mobile phones which support Bluetooth wireless technology function may not operate
®
properly if the mobile phone connection has been locked. Release the connection lock and try
Note
The default passkey is “0000” .
●
●
connecting the mobile phone with the system again.
●
ing on the type of mobile phone.
The passkey can be set only when the vehi
cle is parked.
The mobile phone battery icon and signal strength icon may not be properly displayed depend
●
Call waiting is supported only when connected mobile phones support this feature. The call
PHONE FEATURES
3. I nput the new passkey and press the
Done button to save.
The occurrence of problems upon using mobile phones may be caused by the mobile phone
waiting pop-up may not be displayed in some mobile phones.
Audio streaming mode will operate only when a Bluetooth wireless technology enabled phone
®
● has been connected. Connecting or disconnecting a Bluetooth wireless technology enabled
®
phone while audio streaming is operating will stop music play.
The audio streaming function may not be supported in some mobile phones.
● The phonebook may take a prolonged period of time to download or may not operate in some
● mobile phones.
●
The quality of Bluetooth wireless technology handsfree calls may differ depending on the
®
mobile phone.
SMS read back function may not be supported in some handset devices.
● PART 3. PHONE FEATURES
03_PS [미국_영어]UVO2_Part3.indd 23
3-23
2013-08-06 오후 6:42:41
3-24
PART 3. PHONE FEATURES
03_PS [미국_영어]UVO2_Part3.indd 24
2013-08-06 오후 6:42:41
PART 4
04_PS [미국_영어]UVO2_Part4.indd 1
VOICE COMMANDS
2013-08-05 오후 7:10:24
PART 4
VOICE COMMANDS
Conditions for voice
command system
As the handsfree microphone is positioned
●
D o not use abbreviations (i.e., use
●
to pick up the driver's voice, commands by
"Lieutenant" instead of "Lt.") or acronyms
The voice control system includes a special
other occupants may be understood with
(i.e., use "County Finance Department"
handsfree microphone mounted above the
less accuracy, and passengers are advised
instead of "C. F. D.". Be sure to say the
driver's seat of your car which filters out
to use the handset when making calls.
name exactly as it is entered in the contacts
list.
ambient noise and allows you to operate
system features through voice commands
The Kia Voice Recognition System may have
while maintaining proper posture.
difficulty understanding some accents or
uncommon names. When using Voice
Keep doors, windows and the sunroof
Recognition to place a call, speak in a
closed to avoid noise interference from
moderate tone, with clear pronunciation To
outside the car. Voice command
maximize the use of Voice Recognition,
performance can be improved if the cabin
consider these guidelines when storing
●
environment is quiet.
contacts:
Press the voice recognition button and say
●
●
D o not store single-name entries (e.g.,
the voice command after the sound of the
"Bob", "Mom", etc.). Instead, always use full
beep.
names (including first and last names) for
Speak continuously and at normal volume,
●
avoiding unnatural emphasis and pauses
between words
these contacts
Do not use special characters (e.g., `@', `-',
●
`*', `&', etc.)
Avoid causing background noise in the car
●
while you are speaking, and ask your
passengers not to speak while you are
giving voice commands.
4-2
PART 4. VOICE COMMANDS
04_PS [미국_영어]UVO2_Part4.indd 2
2013-08-05 오후 7:10:24
Operating Voice Command
Voice Command Help
Note
●
Using Voice Command
●
Press the
key shortly to interrupt the
system command feedback and enter a
The Voice Command Help section provides
voice command.
you with lists of commands that can be used
To terminate the voice control system, either
in each mode, adding ease and convenience
say “Exit” or press the
using voice commands.
key for over 0.8
second.
●
The system voice comment “Please say a
command after the beep” will not be stated
when the Command Feedback option is
1. Press the
For more information on the various voice
key on the steering wheel
commands supported by the system, refer to
display
the “Command Help” or the “Voice
Command List” section.
controller. A
will be shown at the top of the screen
VOICE COMMANDS
turned off.
●
1. Press the Voice button.
followed by a “Please say a command
after the beep” system comment.
2. O nce the
icon becomes
displayed, say the desired voice command
(ex: “What's Playing”)
2. Press the Help button.
PART 4. VOICE COMMANDS
04_PS [미국_영어]UVO2_Part4.indd 3
4-3
2013-08-05 오후 7:10:25
PART 4
VOICE COMMANDS
Turning Command Feedback On
and Off
Note
●
Press the Default button to restore the
default setting.
Changes are saved as they are made. In
● other words, once you change a setting, the
new setting will become saved.
3. Press the mode to view a list of related
Voice Commands.
Note
●
1. Press the Voice button.
The “help” command can be used even while
voice recognition dialogue is operating. At
such time, help instructions appropriate to the
state of the dialogue will be provided.
2. Press the
On
or
Off
button next to
the Command Feedback menu.
4-4
PART 4. VOICE COMMANDS
04_PS [미국_영어]UVO2_Part4.indd 4
2013-08-05 오후 7:10:26
Adjusting Voice Command
Volume
Note
●
P ress the Default button to restore the
default setting.
●
Changes are saved as they are made. In
other words, once you change a setting, the
new setting will become saved.
2. Use the
◀
,
▶
VOICE COMMANDS
1. Press the Voice button.
buttons to adjust the
voice command volume.
3. P ress the
button to return to the
Setup screen.
PART 4. VOICE COMMANDS
04_PS [미국_영어]UVO2_Part4.indd 5
4-5
2013-08-05 오후 7:10:26
PART 4
VOICE COMMANDS
Speaker Adaptation
Creating a Voice Profile
The Voice Command feature in the UVO system
allows you to create speaker profiles in order to
help increase voice recognition accuracy.
You will be asked to read a number of
sentences to the system so that it can adapt
2. P ress the Default button next to the
Speaker Adaptation menu.
4. Input the name of the profile you wish to
use and press the Done button.
to your voice. Creating a profile takes
approximately several minutes and must be
done while the vehicle is parked. You can
quit/resume a reading session, but the
system cannot be interrupted while it is
creating the profile.
3. After reading the instructions, press the
Start
button.
5. Follow the training set as shown on the
screen.
1. Press the Voice button.
4-6
PART 4. VOICE COMMANDS
04_PS [미국_영어]UVO2_Part4.indd 6
2013-08-05 오후 7:10:27
Selecting a Previous Voice Profile
6. A s each of the 10 commands become
3. Press the name of the profile.
displayed on the screen, press the
key then read the displayed sentence in
1. Press the Voice button.
Note
Press the
● None(Default)
button to
restore the default profile.
Note
●
Changes are saved as they are made. In
● There are 10 commands in the training set.
other words, once you change a setting, the
For each one, press the speak button and
new setting will become saved.
read the command on the screen.
VOICE COMMANDS
your natural tone.
2. Press the profile name button next to the
Speaker Adaptation menu.
PART 4. VOICE COMMANDS
04_PS [미국_영어]UVO2_Part4.indd 7
4-7
2013-08-05 오후 7:10:28
PART 4
VOICE COMMANDS
Deleting a Voice Profile
Note
●
Press the
None(Default)
button to
restore the default profile.
●
Changes are saved as they are made. In
other words, once you change a setting, the
new setting will become saved.
3. Press the Delete button next to the name
of the profile.
1. Press the Voice button.
4. Press the Yes button.
2. Press the profile name button next to the
Speaker Adaptation menu.
4-8
PART 4. VOICE COMMANDS
04_PS [미국_영어]UVO2_Part4.indd 8
2013-08-05 오후 7:10:28
Voice Command List
Command List - General Commands
Command
The voice commands for this system are
Operation
Exit / Quit / Cancel
Terminate the voice control system
commands.
○
Go back
Returns to the previous step.
●
Repeat
Repeats the system prompt.
●
Help
rovides instruction on the voice command
P
necessary for the current situation.
●
Voice command feedback {on, o ff}
Turns command feedback on/off.
●
Tutorial
●
●
Global commands (●) : Commands that
operate in all modes.
L ocal commands (○) : Commands that
operate only in corresponding modes or
when screens of corresponding modes are
displayed.
Provides guidance on how to use voice ㅠ
recognition and Bluetooth connections
PART 4. VOICE COMMANDS
04_PS [미국_영어]UVO2_Part4.indd 9
VOICE COMMANDS
divided into Global commands and Local
●
4-9
2013-08-05 오후 7:10:28
PART 4
VOICE COMMANDS
Command List - Audio Commands
1. FM/AM Radio
Command
Operation
●
Radio
Plays the most recent frequency for the most recent band
●
Radio {FM, AM}
Plays the most recent frequency for the corresponding Band.
●
Radio {87.5 - 107.9} FM
Plays the selected FM band frequency.
●
Radio {530 - 1710} AM
Plays the selected AM band frequency.
●
Radio FM preset {1 - 12}
Plays the selected FM preset.
●
Radio AM preset {1 - 6}
Plays the selected AM preset.
○
What's playing?
Reads back HD Radio(Optional) station information.
2. SIRIUS
Command
●
TM
SIRIUS
Plays the selected SIRIUS preset.
TM
Plays the selected SIRIUS channel.
TM
Plays the channel searched through the SIRIUS channel name.
TM
Plays the channel searched through the SIRIUS category name.
●
SIRIUS preset {1 - 18}
SIRIUS channel {0 - 223}
●
SIRIUS channel {name}
●
SIRIUS category {name}
4-10
TM
TM
●
○
Operation
Plays the most recent SIRIUS channel.
What's playing?
TM
TM
TM
TM
TM
Reads back SIRIUS channel information.
PART 4. VOICE COMMANDS
04_PS [미국_영어]UVO2_Part4.indd 10
2013-08-05 오후 7:10:28
3. MEDIA
Command
®
®
Operation
Play {zune , iPod , USB}
Plays the selected media mode.
●
Play {Bluetooth audio, AUX}
Plays the selected media mode.
●
Play artist {artist name}
Plays songs of the selected artist.
●
Play album {album name}
Plays songs of the selected album.
●
Play track {track name}
Plays the selected track.
●
Play playlist {playlist name}
Plays songs of the selected playlist.
●
Play genre {genre}
Plays songs of the selected genre
●
Play audiobook {title}
(iPod only) Plays the selected audiobook.
●
Play podcast {podcast}
(iPod only) Plays the selected iPod podcast.
●
Play composer {composer}
Plays songs for the selected composer.
○
What's playing?
Reads back the current song information.
○
Repeat {on, off}
Turns the repeat feature on or off.
○
Shuffle {on, off}
Ⓡ
VOICE COMMANDS
●
Turns the shuffle feature on or off.
®
®
Plays songs for the selected artist in the selected media mode.
®
®
Plays songs for the selected album in the selected media mode.
®
®
Plays the selected track in the selected media mode.
®
®
Plays the selected playlist in the selected media mode.
®
®
●
Play {zune , iPod , USB} artist {name}
●
Play {zune , iPod , USB} album {name}
●
Play {zune , iPod , USB} track {name}
●
Play {zune , iPod , USB} playlist {name}
●
Play {zune , iPod , USB} genre {genre}
®
®
Plays songs for the selected genre in the selected media mode.
●
Play {Czune , iPod , USB} composer {name}
Plays songs for the selected composer in the selected media mode.
●
Play iPod audiobook {title}
(iPod only) Plays the selected iPod audiobook.
●
Play iPod podcast {podcast}
(iPod only) Plays the selected iPod podcast.
PART 4. VOICE COMMANDS
04_PS [미국_영어]UVO2_Part4.indd 11
4-11
2013-08-05 오후 7:10:28
PART 4
VOICE COMMANDS
4. JUKEBOX
Command
Operation
●
Play JUKEBOX
Plays the JUKEBOX mode.
●
Play JUKEBOX Favorites
Plays songs of JUKEBOX Favorites
●
Play artist {artist name}
Plays songs of the selected artist
●
Play album {album name}
Plays songs of the selected album.
●
Play track {track name}
Plays the selected track.
●
Play playlist {playlist name}
Plays songs of the selected playlist.
●
Play genre {genre}
Plays songs of the selected genre
●
Play composer {composer}
Plays songs of the selected composer.
○
What's playing?
Reads back the current song information.
○
Add to favorites
Adds the current song to favorites.
○
Remove from favorites
Removes the current song from favorites.
○
Repeat {on, off}
Turns the repeat feature on or off.
○
Shuffle {on, off}
Turns the shuffle feature on or off.
●
Play JUKEBOX artist {artist name}
Plays songs of the selected JUKEBOX artist.
●
Play JUKEBOX album {album name}
Plays songs of the selected JUKEBOX album.
●
Play JUKEBOX track {track name}
Plays the selected JUKEBOX track.
●
Play JUKEBOX playlist {name}
Plays the selected JUKEBOX playlist.
●
Play JUKEBOX genre {genre}
Plays songs of the selected JUKEBOX genre.
●
Play JUKEBOX composer {name}
Plays songs of the selected JUKEBOX composer.
4-12
PART 4. VOICE COMMANDS
04_PS [미국_영어]UVO2_Part4.indd 12
2013-08-05 오후 7:10:28
5. Pandora Radio
Command
Operation
Play Pandora
Plays the Pandora Radio mode
Plays the station searched through the Pandora Radio
●
Play Pandora Station {station name}
○
Shuffle
station name.
Turns the shuffle feature on
○
Skip
Moves to the next song.
○
Thumbs Up
○
Thumbs Down
○
Bookmark this track
○
Bookmark this artist
○
What’s playing
Approves the song and keep it in your playlist.
Disapproves the song and prevents that song from
playing again.
The current track is bookmarked on the currently
connected device.
The current artist is bookmarked on the currently
connected device.
Reads back the current song information.
VOICE COMMANDS
●
Command List - UVO eServices Commands
Command
Operation
●
eServices
Displays UVO eServices mode.
●
Roadside Assist
Makes call to Roadside Assist agent.
●
eServices Guide
Receive guidance on methods of using UVO eServices.
●
Vehicle Diagnostics
Starts the Vehicle Diagnostics process.
PART 4. VOICE COMMANDS
04_PS [미국_영어]UVO2_Part4.indd 13
4-13
2013-08-05 오후 7:10:28
PART 4
VOICE COMMANDS
Command List - Phone Commands
Command
Operation
●
Call {name}
Calls the desired name.
●
Dial {number}
Dials the desired number.
●
Call {name} at home
Calls the desired person at the home number.
●
Call {name} at office
Calls the desires person at the office number.
●
Call {name} on mobile
Calls the desires person on the mobile number.
●
Dial by number
Starts dial by number operation.
●
Call a contact
Starts call by name operation.
●
Phone
Turns on Phone mode screen.
●
Dial international
Starts international call operation.
●
Phone connections
Turns on Phone connections screen.
●
Phone settings
●
SMS
●
Read SMS
●
Recent calls
Turns on Phone settings screen.
Reads back new SMS message
for Bluetooth wireless technology SMS capable phones.
Reads back new SMS message
for Bluetooth wireless technology SMS capable phones.
Turns on Recent Calls list screen.
●
Redial
Calls the last dialed call.
4-14
Ⓡ
Ⓡ
PART 4. VOICE COMMANDS
04_PS [미국_영어]UVO2_Part4.indd 14
2013-08-05 오후 7:10:28
PART 5.
05_PS [미국_영어]UVO2_Part5.indd 1
UVO eServices
2013-08-06 오후 6:46:02
PART 5
UVO eServices
The Crash Notification Assist feature
may not operate in the following situations.
When the vehicle ignition is not turned on
When the phone Bluetooth® feature is set to off
hen the phone Bluetooth® cannot be connected or becomes
W
disconnected
When there are no phones paired with the vehicle
When the system power supply is unstable
When the attempted call is blocked due to user operations
hen the 9-1-1 call is unstable due to phone or other commu W
nication network issues
hen the call feature is not operating due to phone settings set
W
by the user
When cellular service is unavailable
When the power turns off due to phone power (battery) issues
hen the phone cannot be controlled via Bluetooth® due to
W
phone specifications or characteristics
hen a Bluetooth® device without phone feature support has
W
been connected, such as an MP3 device
When the system is booting
5-2
PART 5. UVO eServices
05_PS [미국_영어]UVO2_Part5.indd 2
2013-08-06 오후 6:46:02
Using UVO eServices and Cautions
ownload the UVO eServices App and install it on your smartD
phone. The app can be downloaded from your smartphone's
app store.
air and connect your smartphone with the vehicle. For inforP
mation on connecting your Bluetooth device, refer to the smartphone user's manual and instructions on the Phone Help
screen on your radio. Up to 5 Bluetooth devices can be paired
with the vehicle.
VO eServices is fully compatible within some smartphones but
U
may not operate properly within incompatible smartphones. To view the list of compatible smartphones, please visit
MyUVO.com.
ome services use the customer’s mobile phone data plan for
S
data communication. and thus the features will function in
accordance with the cellular plan.
UVO eServices
Login
and activate the UVO eServices App on your smartphone.
If the feature is not operating properly, you may need to reset
the UVO eServices App or the smartphone to try again according to the following steps.
1. Try again
2. Reset smartphone app
3. Re-connect BT 4. Reset smartphone
5. Delete BT and pair again
Use of the most up-to-date app version is recommended.
For smartphone related inquiries, please visit MyUVO.com.
ommunication between the vehicle and smartphone app may
C
temporarily disconnect depending on the phone state.
PART 5. UVO eServices
05_PS [미국_영어]UVO2_Part5.indd 3
5-3
2013-08-06 오후 6:46:03
PART 5
UVO eServices
About UVO eServices
UVO eServices provides the following features through Bluetooth® wireless technology communication between the the vehicle and your
Smartphone.
At launch, the Apple iPhone® will be the only UVO eServices compatible
1
2
device. iPhone® is a registered trademark of Apple Inc. Apple iOS6
compatibility expected early 2013. Additional compatible devices
expected late 2013.
3
4
5
5-4
Name
Roadside
Assist
Details
If a diagnostic issue exists, you can connect with a
Roadside Assist agent.
Informs you if a diagnostic issue is found in your
vehicle. If an issue is found, you can contact a call
Vehicle
center through Roadside Assistance or reserve an
Diagnostics
appointment with your preferred Kia dealer through
Schedule Service.
Save the location of your parked vehicle on your
UVO eServices app.
Parking
You can check where your vehicle is parked through
Minder
the UVO eServices App on your smartphone.
eServices
Receive guidance on how to use UVO eServices.
Guide
If an airbag deploys, your vehicle automatically
Crash
Notification initiates a call to 9-1-1 and sends your vehicle’s
location information to the 9-1-1 Operator.
Assist
PART 5. UVO eServices
05_PS [미국_영어]UVO2_Part5.indd 4
2013-08-06 오후 6:46:03
To use UVO eServices, the following conditions
must be met.
1. The UVO eServices smartphone app must be installed and you
must log in using your MyUVO account credentials.
2. T he smartphone must be connected via Bluetooth ® wireless
Vehicle Diagnostics do not take the place of regularly scheduled
maintenance. Feature checks powertrain, chassis, and airbag
systems only. For factory-recommended maintenance schedule,
see the Maintenance Feature of UVO eServices or the Owner’s
Manual.
technology.
3. Once this is complete, eServices must be activated (from the eServices
Settings screen).
911 Connect activates after an airbag deployment. Feature
requires a connected mobile phone via Bluetooth®. Dependent on
cellular service coverage.
Driving while drowsy or distracted is dangerous and
should be avoided. Drivers should remain attentive to
driving and exercise caution when using vehicle systems while driving.
UVO eServices
The Bluetooth® word mark and logos are registered trademarks owned
by Bluetooth SIG, Inc. and any use of such marks by Kia is under
license. A Bluetooth® enabled cell phone is required to use Bluetooth®
wireless technology.
24-hour Roadside Assistance is a service plan provided by Kia Motors
America, Inc. Certain limitations apply. Coverage details are available in
the Kia Warranty and Consumer Information Manual. For access to
Enhanced Roadside Assistance, a connected mobile phone via
Bluetooth® within the cellular service coverage area is required.
PART 5. UVO eServices
05_PS [미국_영어]UVO2_Part5.indd 5
5-5
2013-08-06 오후 6:46:03
PART 5
UVO eServices
Before using UVO
eServices
Connecting Bluetooth® wireless
technology
Installing the UVO eServices App
on your Smartphone
1. Download and install the UVO eServices
App on your smartphone. 4. Turn on the Bluetooth ® wireless technol-
The app can be downloaded from your
o g y fe a t u r e o n yo u r s m a r t p h o n e’s
smartphone App Store.
Bluetooth® settings screen.
2. R egister your vehicle and account at
MyUVO.com. 1. Press the PHONE
key on the UVO eSer-
5. Wait for “KIA MOTORS” to appear on your
smartphone’s Bluetooth® settings screen.
vices system.
Note: MyUVO.com is accessible from your
6. Select “KIA MOTORS” from your phone
smartphone's browser.
and enter the passkey shown on the touch
3. S tart the UVO eServices App on your
screen. The default passkey is “0000”.
smartphone and log in.
Note
Download and install the UVO
eServices App on your smartphone.
●
To learn more about Bluetooth ® wireless
technology features, refer to the ‘PART 3
PHONE’ section.
2. Press the
Connections
icon on the touch
Add Device
button to display
screen.
3. Press the
the Add Device screen.
5-6
PART 5. UVO eServices
05_PS [미국_영어]UVO2_Part5.indd 6
2013-08-06 오후 6:46:04
Activating UVO eServices
3. Press the
Activate
button on the touch
tion process will begin.
screen.
1. Press the eServices key.
6. Once UVO eServices activation is complete, ‘UVO eServices activated’ will be
use displayed on the touch screen, press
displayed at the bottom of the UVO
the
eServices main screen.
Activate
button.
Before pressing the
Activate
UVO eServices
4. A
fter reading the UVO eServices terms of
but ton,
ensure that you are running UVO eServices
app on your smartphone and are logged in.
2. P
ress the
Settings
icon on the touch screen.
5. After pressing the
Activate
button on the
touch screen, the UVO eServices activaPART 5. UVO eServices
05_PS [미국_영어]UVO2_Part5.indd 7
5-7
2013-08-06 오후 6:46:05
PART 5
UVO eServices
Vehicle Diagnostics
Conducting Vehicle Diagnostics
2. Press the
Vehicle Diagnostics
icon on the
touch screen.
5. If diagnostic issues are found, press the
Roadside Assist
button to speak to a road-
side assistance operator or press the
Schedule Service
button to schedule an
Vehicle Diagnostics is available only when the
appointment with your preferred or nearby
ignition is turned on and the vehicle is parked.
Kia dealer.
It also requires that UVO eServices is activated, and the Phone is connected through
Bluetooth® wireless technology before starting
Vehicle Diagnostics.
3. T
he Vehicle Diagnostics process will begin.
When a diagnostics check is in progress,
keep the vehicle in park with the ignition on.
To cancel diagnostics, press the
Cancel
button on the touch screen or any key.
6. When scheduling an appointment using
the
Schedule Service
Preferred Dealer
1. Press the eServices key.
button, pressing the
button will allow you to
request an appointment with your preferred Kia dealer and send your vehicle’s
diagnostics information.
Pressing the
Nearest Dealer
button will
allow you to request an appointment with
the nearest Kia dealer and your vehicle’s
4. Once vehicle diagnostics is complete, the
diagnostics information.
diagnostic results are displayed on the
screen.
5-8
PART 5. UVO eServices
05_PS [미국_영어]UVO2_Part5.indd 8
2013-08-06 오후 6:46:05
Scheduled Diagnostics
Conducting Auto Diagnostics
If you have set up Scheduled Diagnostics on
If a critical diagnostics issue with your vehi-
your UVO eServices app, a vehicle diagnos-
cle’s powertrain is detected, you will be noti-
tics check will automatically start on the day
fied on your vehicle’s touch screen.
you selected.
1. On the day of the Scheduled Diagnostics,
7. Even if diagnostic issues are not found
the following window will be displayed.
after Vehicle Diagnostics, it is recommended that you send the diagnostic
results to your MyUVO account.
Press the
Send Data
button to send the
UVO eServices
diagnostic s results to your MyUVO
account.
2. P ress the
Yes
button on the touch
screen to proceed with a diagnostics check.
PART 5. UVO eServices
05_PS [미국_영어]UVO2_Part5.indd 9
5-9
2013-08-06 오후 6:46:06
PART 5
UVO eServices
Parking Minder
Sending Parking Location
The location where your vehicle is currently
parked can be sent to your smartphone.
The Parking Minder feature is only available
2. Press the
Parking Minder
icon on the touch
when the ignition is turned on and the vehicle
screen to send the vehicle’s location to
Note
is parked.
your smartphone.
●
Ensure that the UVO eServices system is acti-
When the parking location is being sent, do
not drive the vehicle or turn off the ignition.
vated and the Phone is c onnec ted via
Bluetooth® wireless technology with the UVO
eServices app running on your smartphone
before using this feature.
3. Once the parking location has been sent,
you can view your vehicle’s location from
the UVO eSer vices app on your
smartphone.
1. A f ter parking the vehicle, press the
eServices key.
5-10
PART 5. UVO eServices
05_PS [미국_영어]UVO2_Part5.indd 10
2013-08-06 오후 6:46:06
Roadside Assist
If a diagnostics issue is found, you can connect with a Roadside Assist agent.
Enhanced Roadside Assistance feature can
be used only when your phone is connected
via Bluetooth® wireless technology.
1. Press the eServices key.
UVO eServices
2. Press the
Roadside Assist
icon on the touch
screen to connect with a Roadside Assist
agent.
PART 5. UVO eServices
05_PS [미국_영어]UVO2_Part5.indd 11
5-11
2013-08-06 오후 6:46:07
PART 5
UVO eServices
eServices Guide
eServices Guide provides guidance on how to
use UVO eServices.
This feature is only available when the mobile
phone is connected via Bluetooth ® wireless
technology.
1. Press the eServices key.
2. Press the
eServices Guide
icon to receive
guidance on how to use UVO eServices.
5-12
PART 5. UVO eServices
05_PS [미국_영어]UVO2_Part5.indd 12
2013-08-06 오후 6:46:08
Crash Notification Assist
Note
3. T
he 9-1-1 Operator may request information
For more information on setting the Crash
on the current location of your vehicle. When
If an airbag deploys, your vehicle can automati-
Notification Assist feature, refer to ‘Crash
the 9-1-1 Operator requests your vehicle
cally initiate a call to 9-1-1 and will read your vehi-
Notification Assist Setting’.
location, the following icon is displayed on
●
cle's location information to the 9-1-1 Operator.
Making a 9-1-1 Call
the screen and the vehicle location is automatically sent to the 9-1-1 Operator.
The Crash Notification Assist feature is available
only when the mobile phone is connected via
1. If an airbag deploys due to an accident,
Bluetooth® wireless technology. By default, this
the following screen is displayed and a call
feature is turned off. To turn it on, you must turn it
is automatically placed to 9-1-1 after 10
on in the eServices Settings menu. By enabling
seconds.
this feature, you are agreeing the Crash
An icon is displayed at the top of the touch
4. If the 9-1-1 Operator attempts to call the
screen as shown below when Crash Notification
driver again, the following icon is dis-
Assist is enabled and a mobile phone is con-
played and allows the driver to speak with
nected via Bluetooth® wireless technology.
the 9-1-1 Operator.
UVO eServices
Notification Assist terms of use.
2. O nce a call is connected with a 9-1-1
Operator, it is possible to request emergency services to be dispatched to your
location.
PART 5. UVO eServices
05_PS [미국_영어]UVO2_Part5.indd 13
5-13
2013-08-06 오후 6:46:08
PART 5
UVO eServices
UVO eServices Settings
Crash Notification Assist Setting
Within the eServices Settings screen, UVO
This feature is used to turn on or off the Crash
eServices related features can be set, such as
Notification Assist feature.
activating UVO eServices.
Warning
●
For safety reasons, settings can not be
2 . If UVO eServices has not yet been acti-
adjusted while driving. Park the vehicle in a
vated, press the
safe and legal location before making any
the process.
Activate
button to start
changes to your Settings.
1. P ress the eServices key and then the
Settings
button on the touch screen.
Note
●
UVO eServices Activation
For more information on UVO eServices
a c t i va t i o n , r e f e r t o ‘A c t i va t i n g U VO
eServices’.
2. To enable Crash Notification Assist,
ensure that the
On
button is selected.
To disable this feature, ensure the
1. P ress the eServices key and then the
Settings
5-14
Off
button is selected.
button on the touch screen.
PART 5. UVO eServices
05_PS [미국_영어]UVO2_Part5.indd 14
2013-08-06 오후 6:46:09
3. When enabling this feature, you must first
agree to the Crash Notification Assist
terms of use. After reading the terms of use, press the
Agree
button on the touch screen to
UVO eServices
accept.
PART 5. UVO eServices
05_PS [미국_영어]UVO2_Part5.indd 15
5-15
2013-08-06 오후 6:46:09
5-16
PART 5. UVO eServices
05_PS [미국_영어]UVO2_Part5.indd 16
2013-08-06 오후 6:46:09
PART 6
06_PS [미국_영어]UVO2_Part6-7-8.indd 1
Rear Camera Display
2013-07-25 오전 10:49:17
PART 6
Rear Camera Display
Rear Camera Display
●
1. Place the transmission in Reverse “ R ”.
2. The rear-camera display will activate.
The UVO system is equipped with a rear
camera display.
●
The rear-camera display System uses an
exterior camera integrated to the rear of the
vehicle that sends video to the UVO
system.
●
Regardless of the mode you are in, placing
Warning
the transmission in Reverse, or "R", will
automatically display the rear view camera
Check your surroundings for safety.
screen.
●
The rear-camera display is equipped with an
optical lens necessary to acquire a wider field
of vision and may result in a display which
differs from the actual distance.
Always check the rear and left/right
directions when driving in reverse.
●
T h e r e a r - c a m e r a d i s p l a y i s n o t
a substitute for proper and safe backing-up
procedures. The rear-camera display may
not display every object behind the vehicle.
Always drive safely and use caution when
backing up.
6-2
PART 6. Rear Camera Display
06_PS [미국_영어]UVO2_Part6-7-8.indd 2
2013-07-25 오전 10:49:17
PART 7
06_PS [미국_영어]UVO2_Part6-7-8.indd 1
Troubleshooting guide
2013-07-25 오전 10:49:17
PART 7
Troubleshooting guide
Troubleshooting guide
Before thinking the product has malfunctioned
1. Errors which occur during the operation or installation of the device may be mistaken as a malfunction of the actual device.
2. If you are having problems with the device, try the suggestions listed below.
3. If the problems persist, contact your point of purchase or the nearest service center.
Problem
Function
There are small red, blue, or green dots on
Because the LCD is manufactured with technology requiring high point density, a pixel
the screen
deficiency or lighting may occur within 0.01% of total pixels.
The sound or image is not working
The sound is not working
When the power is turned on, the
●
Has the Switch for the vehicle been turned to [ACC] or [ON]?
●
Has the SYSTEM been turned OFF?
●
Has the volume been set to a low level?
●
Has the volume been set on mute?
The display looking somewhat darker after prolonged periods of use is normal with LCD
● panels.
corners of the screen are dark
●
If the screen is very dark, contact your point of purchase or the nearest service center.
Sound is working from only one speaker
●
Is the position of FAL/BAL sound controls or volume adjusted to only one side?
Sound does not work in AUX mode
Is the audio connector jacks fully inserted into the AUX terminal?
7-2
PART 7. Troubleshooting guide
06_PS [미국_영어]UVO2_Part6-7-8.indd 2
2013-07-25 오전 10:49:17
Troubleshooting
Problem
The power does not turn on.
Possible Cause
The fuse is disconnected.
Solution
Replace with a suitable fuse. If the fuse is disconnected again,
please contact your point of purchase or service center.
Device is not properly connected.
The sound does not work.
●
●
The volume level is set the lowest level.
Adjust the volume level.
The connector is not properly connected.
●
Check the connection state.
The device is currently fast-forwarding,
● ● rewinding, scanning, or playing in slow mode.
The sound quality is low.
Check to see that the device has been properly connected.
●
Vibration is occurring from the position in which
● the conversion switch has been installed.
The sound will not work when the device is fast-forwarding,
rewinding, scanning, or playing in slow mode.
The sound may be short-circuited and the image distorted if
● the device begins to vibrate. The device will return to normal
operation once the vibration has stopped.
PART 7. Troubleshooting guide
06_PS [미국_영어]UVO2_Part6-7-8.indd 3
7-3
2013-07-25 오전 10:49:17
PART 6
Troubleshooting guide
Problem
The USB does not work.
Possible Cause
Solution
●
USB memory is damaged.
● Please use after formatting the USB into FAT 12/16/32 format.
●
USB memory has been contaminated.
● A separately purchased USB HUB is being
● Remove any foreign substances on the contact surface of the
USB memory and multimedia terminal.
● Directly connect the USB memory with the multimedia
used.
●
terminal on the vehicle.
A USB extension cable is being used.
● Directly connect the USB memory with the multimedia
A USB which is not a Metal Cover Type USB
●
Use a standard USB Memory.
Use a standard USB Memory.
terminal on the vehicle.
● Memory is being used.
●
A HDD type, CF, SD Memory is being used.
●
●
There are no music files which can be played.
● ●
There are no titles which can be played.
●
Use iTunes® to download and save MP3 files into the iPod®.
●
Use iTunes® to update the firmware version and reconnect the
Only MP3,WMA file formats are supported. Please use only
the supported music file formats.
The iPod® is not
recognized even though
®
The iPod firmware version has not been
● it has been connected.
iPod® with the device.
properly updated.
The iPod® device does not recognize
● ●
Reset the iPod® and reconnect with the device.
downloads.
7-4
PART 7. Troubleshooting guide
06_PS [미국_영어]UVO2_Part6-7-8.indd 4
2013-07-25 오전 10:49:17
PART 8
06_PS [미국_영어]UVO2_Part6-7-8.indd 1
INDEX
2013-07-25 오전 10:49:17
PART 8
INDEX
INDEX
By Artists, Albums, Genres, Song,
Composers…
A
®
… ……………………………………………………
About iPod
2-19
……………………………………………………
Command List - Phone Commands… ………… 4-14
2-31
Command List - UVO eServices ………………… 4-13
By Artists, Albums, Genres, Songs,Podcasts,
Common Features………………………………………… 2-10
Composers, Audiobooks…
Conditions for voice command system… …… 4-2
……………………………
2-21
About PANDORA… ………………………………………… 2-35
By contact list…………………………………………………… 3-12
Conducting Auto Diagnostics…
About UVO eServices… ………………………………… 5-4
By dialing a number………………………………………… 3-11
Conducting Vehicle Diagnostics…………………… 5-8
About zune®……………………………………………………… 2-23
By Folders, Artists, Albums, Genres, Songs,
Connecting a handset device… …………………… 3-6
Activating UVO eServices……………………………… 5-7
Composers…
2-16
Connecting an AUX media device… …………… 2-26
Adding Favorites……………………………………………… 2-31
By name… ………………………………………………………… 3-14
Connecting Bluetooth® wireless technology…… 5-6
Adding favorites… …………………………………………… 3-17
By number………………………………………………………… 3-15
Connecting your iPod® device……………………… 2-19
Adjusting Voice Command Volume… ………… 4-5
By recent calls…
Connecting your USB device……………………… 2-14
Analog Clock… ………………………………………………… 1-14
By Songs, Genres, Albums, Artists, Playlists
Answering an incoming call…………………………… 3-10
…………………………………………………………………………
Automatic Brightness Control… …………………… 1-11
C
Contacts Sync…
AUX MODE… …………………………………………………… 2-26
Call waiting………………………………………………………… 3-10
Control Panel… ………………………………………………… 1-2
AUX Mode Screen………………………………………… 2-26
Caution …………………………………………………………………… 9
Controls and Features… ………………………………… 1-2
B
Cautions upon handling USB MP3……………… 2-12
Copying songs from list… ……………………………… 2-18
Basic Features… ……………………………………………… 1-6
Changing passkey…………………………………………… 3-22
Copying songs into JUKEBOX…
Before Starting PANDORA…………………………… 2-35
Checking an SMS message… ……………………… 3-18
Copying the current song… …………………………… 2-17
Before thinking the product has
Checking missed calls… ………………………………… 3-16
Crash Notification Assist………………………………… 5-13
malfunctioned…………………………………………………… 7-3
Checking System Information… …………………… 2-33
Crash Notification Assist Setting… ……………… 5-14
Before using UVO eServices………………………… 5-6
Clock Display… ………………………………………………… 1-14
Creating a Voice Profile… ……………………………… 4-6
Bookmark Track or Artist… …………………………… 2-35
Clock Type………………………………………………………… 1-14
D
BT AUDIO MODE…………………………………………… 2-27
Command List - Audio Commands……………… 4-10
Deleting a paired handset device………………… 3-5
BT Mode Screen and Features… ………………… 2-27
Command List - General Commands… ……… 4-9
Deleting a Voice Profile… ……………………………… 4-8
8-2
……………………………………………………
………………………………………………
3-12
2-25
……………………
5-9
Connecting your zune® device……………………… 2-23
Contact list………………………………………………………… 3-13
………………………………………………
…………………
3-21
2-17
PART 8. INDEX
06_PS [미국_영어]UVO2_Part6-7-8.indd 2
2013-07-25 오전 10:49:17
Deleting all files………………………………………………… 2-34
Smartphone… …………………………………………………… 5-6
MEDIA MODE… ……………………………………………… 2-10
Deleting favorites…
3-17
iPod® MODE…………………………………………………… 2-19
Memory Management… ………………………………… 2-33
Deleting JUKEBOX… ……………………………………… 2-33
iPod® Mode Screen and Features… …………… 2-20
O
Deleting JUKEBOX… ……………………………………… 2-33
J
Operating Voice Command…………………………… 4-2
Digital Clock……………………………………………………… 1-14
JUKEBOX… ……………………………………………………… 4-12
P
Display Settings… …………………………………………… 1-11
JUKEBOX MODE… ………………………………………… 2-29
Pairing a Bluetooth® wireless technology
Downloading contact list(from mobile
JUKEBOX Mode Screen and Features……… 2-29
enabled device for the first time…………………… 3-4
phone)………………………………………………………………… 3-13
Jump…………………………………………………………………… 2-11
Pairing your handset device to the handsfree
Downloading SMS messages(from mobile
L
system………………………………………………………………… 3-4
phone)………………………………………………………………… 3-18
Listening to AUX media… ……………………………… 2-26
PANDORA MODE…………………………………………… 2-35
E
Listening to HD RadioTM Stations
PANDORA Mode Screen and Features… … 2-36
…………………………………………
Editing Custom Messages… ………………………… 3-18
(Optional)…………………………………………………………… 2-5
Pandora Radio… ……………………………………………… 4-13
eServices Guide… …………………………………………… 5-12
Listening to JUKEBOX…………………………………… 2-30
Parking Minder… ……………………………………………… 5-10
Explore USB……………………………………………………… 2-16
Listening to music from your Bluetooth®
Phone Mode Screens and Features…………… 3-8
F
wireless technology enabled device…………… 2-28
Phone settings… ……………………………………………… 3-20
Listening to the FM/AM radio………………………… 2-3
Placing a call… ………………………………………………… 3-11
Listening to the SIRIUSTM radio… ………………… 2-6
Placing a call by favorites……………………………… 3-16
FCC Information …………………………………………………… 8
Listening to USB music… ……………………………… 2-15
Play/Pause………………………………………………………… 2-10
FM/AM MODE… ……………………………………………… 2-3
Listening to your iPod®…………………………………… 2-20
Playing Favorites……………………………………………… 2-32
FM/AM Mode Screens and Features… ……… 2-3
Listening to your PANDORA………………………… 2-36
Precautions upon handling USB… ……………… 2-13
FM/AM Radio…………………………………………………… 4-10
Listening to your zune®………………………………… 2-24
Preset Scan… …………………………………………………… 2-4
I
M
R
INDEX………………………………………………………………… 8-2
Making a 9-1-1 Call… ……………………………………… 5-13
Rear camera display… …………………………………… 6-2
Initializing the system……………………………………… 1-8
Manual Brightness Control… ………………………… 1-11
Rejecting an incoming call…
Installing the UVO eServices App on your
MEDIA………………………………………………………………… 4-11
Resetting and Initializing UVO system…
FADER/BALANCE…
………………………………………
06_PS [미국_영어]UVO2_Part6-7-8.indd 3
…………………………
INDEX
1-9
Favorites… ………………………………………………………… 3-16
3-10
……
1-7
PART 8 . INDEX
8-3
2013-07-25 오전 10:49:17
PART 8
INDEX
Resetting the system……………………………………… 1-7
Selecting USB music……………………………………… 2-15
operate in the following situations…
REW/FF…
Selecting zune® music… ………………………………… 2-24
Time Setting……………………………………………………… 1-14
Sending an SMS message(Custom
TONE… ……………………………………………………………… 1-10
Roadside Assist… …………………………………………… 5-11
Messages)………………………………………………………… 3-18
Touch Screen Beep………………………………………… 1-10
S
Sending Parking Location……………………………… 5-10
Trademark…………………………………… 2-19, 2-23, 2-35
Safety Symbols … ………………………………………………… 8
Setting Brightness…………………………………………… 1-11
Transferring a call on your Handset device to
Scanning FM/AM broadcast frequencies…… 2-4
Setting Phone Volume…………………………………… 3-20
handsfree…………………………………………………………… 3-19
Scheduled Diagnostics…………………………………… 5-9
Setting Priority…
3-7
Transferring the handsfree call to your Handset
Searching your contacts………………………………… 3-14
Setting the Clock……………………………………………… 1-14
device… ……………………………………………………………… 3-19
Select Display Language… …………………………… 1-7
SIRIUSTM MODE……………………………………………… 2-6
Troubleshooting… …………………………………………… 7-3
Selecting a broadcast frequency… ……………… 2-3
SIRIUSTM Mode Screen and Features…
TROUBLESHOOTING GUIDE… ………………… 7-3
…………………………………………………………
2-10
REW/FF a song… …………………………………………… 2-28
………………………………………………
……
2-6
……………
5-2
Selecting a JUKEBOX song… ……………………… 2-30
Smart driving practices…………………………………… 3-3
Turn Streaming Audio On and Off… …………… 3-20
Selecting a Previous Voice Profile… …………… 4-7
SMS… ……………………………………………………… 3-18, 3-22
Turn Text Scroll On and Off…
Selecting a SIRIUSTM channel…………………… 2-6
Sound and Display Settings… ……………………… 1-9
Turning Command Feedback On and Off…… 4-4
Selecting a song… …………………………………………… 2-28
Sound Settings………………………………………………… 1-9
Turning Display On and Off…………………………… 1-12
Selecting from the list……… 2-16, 2-21,2-24,2-30
Speaker Adaptation………………………………………… 4-6
Turning System Power Off… ………………………… 1-6
Selecting iPod® music… ………………………………… 2-21
Speed Dependent Volume Control……………… 1-10
Turning System Power On… ………………………… 1-6
Selecting PANDORA station………………………… 2-37
Steering Wheel………………………………………………… 1-4
U
Selecting through channel search
Storing presets… ……………………………………… 2-4, 2-9
USB MODE… …………………………………………………… 2-12
………………………
1-13
Switching the call … ………………………………………… 3-19
USB Mode Screen and Features………………… 2-14
Selecting through preset………………………… 2-3, 2-6
Switching the call between handsfree and
Using Repeat… ………………………………………………… 2-11
Selecting through SEEK………………………… 2-3, 2-6
handset device… ……………………………………………… 3-19
Using Shuffle… ………………………………………………… 2-11
Selecting through SIRIUSTM category list… 2-8
System Power…
Using Skip… ……………………………………………………… 2-8
Selecting through song Up/Down
T
Using the phone features… …………………………… 3-8
The Crash Notification Assist feature may not
Using UVO eServices and Cautions…………… 5-3
……………………
2-6, 2-3, 2-6, 2-15, 2-2, 2-24, 2-30
……………………………………………
8-4
2-15, 2-21, 2-24, 2-30
………………………………………………
1-6
PART 8. INDEX
06_PS [미국_영어]UVO2_Part6-7-8.indd 4
2013-07-25 오전 10:49:17
Using Voice Command…
………………………………
4-3
Using your Bluetooth® wireless technology
Handsfree system…………………………………………… 3-2
UVO eServices Activation……………………………… 5-14
UVO eServices Settings………………………………… 5-14
V
Vehicle Diagnostics………………………………………… 5-8
Viewing FM/AM Station information… ………… 2-5
Viewing SIRIUSTM channel information… … 2-9
Viewing song information… …………………………… 2-17
Viewing song information… …………………………… 2-22
Viewing song information… …………………………… 2-25
Voice Command Help… ………………………………… 4-3
Voice Command List… …………………………………… 4-9
W
INDEX
Warning … ……………………………………………………………… 9
When a mobile phone is connected… ………… 3-8
When making a call………………………………………… 3-8
When on a call… ……………………………………………… 3-9
When receiving an incoming call… ……………… 3-9
Z
zune® MODE… ………………………………………………… 2-23
zune® Mode Screen and Features… …………… 2-23
PART 8 . INDEX
06_PS [미국_영어]UVO2_Part6-7-8.indd 5
8-5
2013-07-25 오전 10:49:17
MEMO
06_PS [미국_영어]UVO2_Part6-7-8.indd 6
2013-07-25 오전 10:49:17
MEMO
06_PS [미국_영어]UVO2_Part6-7-8.indd 7
2013-07-25 오전 10:49:17
MEMO
06_PS [미국_영어]UVO2_Part6-7-8.indd 8
2013-07-25 오전 10:49:17
B2END08
07_PS [미국_영어]UVO2_표지.indd 1-2
UVO SYSTEM USER'S MANUAL
2013-08-05 오후 2:11:00