1
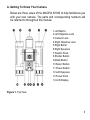
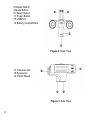
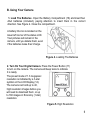
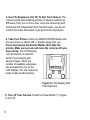
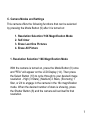
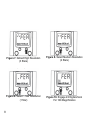
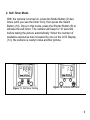
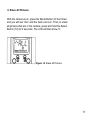
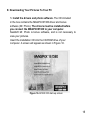
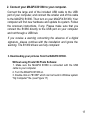
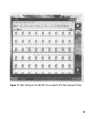
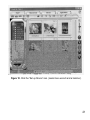
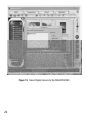
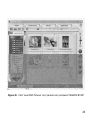
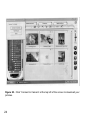
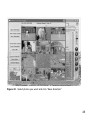
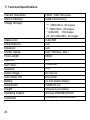
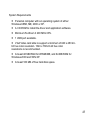
MAGPIX B1380
Digital Camera Binocular
User’s Manual
1
Introduction
The MAGPiX B1380 is a digital camera with a specially designed 8X
optical telescopic lens. Combined with its 2X digital zoom and very highspeed shutter, the MAGPiX B1380 produces amazing freeze-frame action
pictures of up to 16X magnification.
These images can be downloaded and viewed on your personal computer
through the USB port after installing the software included in this package.
To get the most out of your camera, please read this manual carefully.
This manual is divided into seven parts:
A. Getting To Know Your Camera
B. Using Your Camera
C. Camera Modes and Settings
D. Viewfinding and Taking Better Picture Tips
E. Downloading Your Pictures To Your PC
F. Technical Specifications
G. Troubleshooting and Frequently Asked Questions
2
A. Getting To Know Your Camera
Below are three views of the MAGPiX B1380 to help familiarize you
with your new camera. The parts and corresponding numbers will
be referred to throughout this manual.
1 Left Barrel
2 Left Objective Lens
3 Camera Lens
4 Right Objective Lens
5 Right Barrel
6 Right Eyepiece
7 Dioptric Knob
8 Shutter Button
9 Mode Button
10 Select Button
11 Power Button
12 Left Eyepiece
13 Focus Knob
14 LCD Display
Figure 1. Top View
3
8 Shutter Button
9 Mode Button
10 Select Button
11 Power Button
15 USBPort
16 Battery Compartment
Figure 2. Back View
17 Camera Lens
18 Eyepieces
19 Tripod Mount
Figure 3. Side View
4
B. Using Your Camera
1. Load The Batteries. Open the Battery Compartment (16) and insert four
AAA batteries (included), paying attention to insert them in the correct
direction. See Figure 4. Close the compartment.
A battery life icon is located on the
lower left corner of the status LCD.
Your pictures will remain in the
camera, until you delete them, even
if the batteries loose their charge.
Figure 4. Loading The Batteries
2. Turn On Your D igital Camera. Press the Power Button (11)
to turn on the camera. The camera will beep twice to indicate
it is ready.
The preset mode of 1.3 megapixel
resolution is indicated by a 3-star
symbol on the LCD Display (14).
The camera can hold up to 40,
high resolution images before you
will need to download them, or up
to 160 images in Economy (1 star)
resolution.
Figure 5. High Resolution
5
3. Use The Eyepieces (6 & 12) To Aim Your Camera. The
camera works best at taking pictures of objects outdoors at
45ft away from you or more. Also, since the camera is point
and shoot and independent from the binoculars, you do not
need to focus the binoculars to get g reat in-focus pictures.
4. Take Your Picture. Hold your MAGPiX B1380 steady and
aim at a scene or object 45ft. or greater away from you.
Press and release the Shutter Button (8) to take the
picture. Make sure you do not move the camera until you
hear a beep. The LCD Display
(14) will blink for 4 seconds
while it is processing and
saving images. When the
number of available exposures ,
has increased by one on the
LCD Display (14), the camera is
ready to take another picture.
Figure 6. LCD Display After
First Exposure
5. Turn off Your Camera. Press the Power Button (11) again
to turn off.
6
C. Camera Modes and Settings
This camera offers the following functions that can be selected
by pressing the Mode Button (9) after it is turned on:
1. Resolution Selection/ 16X Magnification Mode
2. Self-timer
3. Erase Last One Pictures
4. Erase All Picture
1. Resolution Selection/ 16X Magnification Mode
With the camera is turned on, press the Mode Button (9) once
and "FEA" will appear on the LCD Display (14). Then press
the Select Button (10) to cycle through to your desired image
resolution - High (3 Stars), (Medium) 2 Stars, (Economy) 1
Star, or 2X to engage in the camera in the 16x magnification
mode. When the desired number of stars is showing, press
the Shutter Button (8) and the camera will set itself to that
resolution.
7
8
Figure 7. Default High Resolution
(3 Stars)
Figure 8. Select Medium Resolution
(2 Stars)
Figure 9. Select 1 Star Resolution
(1 Star)
Figure 10. Engage 2X Digital Zoom
For 16X Magnification
2. Self-Timer Mode
With the camera is turned on, press the Mode Button (9) two
times (until you see the timer icon), then press the Select
Button (10). Once in this mode, press the Shutter Button (8) to
activate the self-timer. The camera will beep for 10 seconds
before taking the picture automatically. When the number of
available exposures has increased by one on the LCD Display
(14), the camera is ready to take another picture.
Figure 11. Self-timer Setting
Figure 12. Activate Self-timer
9
3. Erase Last One Picture
With the camera is turned on, press the Mode Button (8) three
times and you will see 'ONE' with a trash can icon. Then, to
erase the last picture, press and hold the Select Button (10)
for 2 seconds. The number of available exposure on the LCD
Display (14) will be decreased by 1 exposure after that.
Figure 13. Erase Last One Picture
10
4. Erase All Pictures
With the camera is on, press the Mode Button (9) four times
and you will see "ALL' and the trash can icon. Then, to erase
all pictures that are in the camera, press and hold the Select
Button (10) for 2 seconds. The LCD will then show '0'.
Figure 14. Erase All Pictures
11
D. Viewfinding and Taking Better Picture Tips
How to use the binoculars:
1. Hold the MAGPiX B1380 in a comfortable viewing
position, and adjust the left and right barrels (1 & 5) apart
or together until one single circular field is seen with both
of your eyes at the same time.
2. To adjust the focus, look into the Left Eyepiece (12)
with your left eye (with the right eye closed) to aim at any
object 16ft. away, rotate the Focus Knob (13) clockwise or
anti-clockwise to get the best focus. Then look into the
Right Eyepiece (6) with your right eye (with the left eye
closed), and rotate the Dioptric Knob (7) to the left or to the
right to get the best focus.
3. Now you can look with both eyes into the left and right
eyepieces (2 & 4) and bring nearby or far away objects
into focus by adjusting the Focus Knob (12).
12
Viewfinding
•
•
The function of the binocular is as an aid for viewfinding.
The area seen through the binocular is a circular area,
approximately 10 times magnification of original image.
•
The MAGPiX B1380 lens produces up to a 16X enlarged image
with 4x3 standard shape.
Figure 15. View area difference between binocular and camera
•
You do not need to focus the binoculars for a focused picture.
The camera is auto-focus and is independent from the
binoculars.
13
• Depending upon the amount of available light, the shutter
speed is fast enough that you can capture terrific action shots.
• Try taking a picture of a helicopter in flight. You'll notice
that when you view your picture, you will have stopped the
helicopter's rotor blade in mid-flight.
14
E. Downloading Your Pictures To Your PC
1. Install the drivers and photo software. The CD included
in the box contains the MAGPiX B1380 driver and bonus
software (Mr. Photo). The drivers must be installed before
you connect the MAGPiX B1380 to your computer.
NewSoft Mr. Photo is bonus software, and is not necessary to
view your pictures.
Insert the installation CD into the CD-ROM drive of your
computer. A screen will appear as shown in Figure 16.
Figure 16. B1380 CD start-up screen
15
Click once on "Install B1380 Camera Driver" to start the
installation of the driver, and follow the instructions on the
screen step by step. After the installation is completed, eject the
CD and restart your computer.
Then re-insert the installation CD and click once on "Install
B1380 TWAIN Driver". Follow the instructions on the screen
step by step. After the installation is completed, restart the
computer.
(Go directly to Step 2, if you do not want to install Mr.Photo
on your computer - otherwise continue below to install Mr.
Photo).
After your computer restarts, re-insert the MAGPiX B1380 CD
and click once on "Install Presto'Mr. Photo". Follow the
instructions on the screen step by step. After the installation of
"Presto!Mr. Photo is completed and you see the B1380
installation menu again, click once on "Presto! ImageFolio".
Follow the installation screen instructions. When "Presto!
ImageFolio" has finished installing, restart your computer.
16
2. Connect your MAGPiX B1380 to your computer.
Connect the large end of the included USB cable to the USB
port of your computer, and connect the smaller end of this cable
to the MAGPiX B1380. Then turn on your MAGPiX B1380. Your
computer will find new hardware and update its system. Follow
the onscreen instructions, if any. Please make sure that you
connect the B1380 directly to the USB port on your computer
and not through a USB hub.
If you receive a warning concerning the absence of a digital
signature, please continue with the installation and ignore the
warning. The B1380 drivers are fully compliant.
3. Downloading your pictures from the MAGPiX B1380.
Without using Presto! Mr.Photo Software:
1. Make sure the MAGPiX B1380 is connected with the USB
cable to your computer.
2. Turn the MAGPiX B1380 on.
3. Double click on "B1380" which can be found in Window system
"My Computer" file. (see Figure 17)
17
4. You will see a window that shows all the picture files
stored on your camera.
5. Copy your picture files on your camera to a folder on
your computer. - For example, "My Picture" or "My
Documents"
6. You can now open your pictures with your favorite
imaging/ photo software.
7. To save battery life, please close the 'B1380' folder
and disconnect the camera from the computer after you
have copied the pictures to your computer.
8. You can delete pictures from your camera by
following the instructions on pages 9 and 10.
18
Figure 17. After clicking on the “B1380” icon located in the “My Computer” folder.
19
Using Presto! Mr.Photo to download your photos.
1. Make sure the MAGPiX B1380 is connected with the USB
cable to your computer.
2. Turn the MAGPiX B1380 on.
3. Launch the Presto'Mr.Photo application.
4. Click the "Set up Devices" icon and select "MAGPiX B1380"
as "Digital Camera", then click "Close" to exit. (see Figure 18
and 19).
5. Click the "Load DSC Photos" icon and select "MAGPiX
B1380" from drop down menu. Your photos will begin to
download (see figure 20).
6. If the error message "Your system is low on virtual memory",
appears you will need to download and save your photos using
the method described on page 16. You can then open and
manage your photos with the Mr. Photo software or your
favorite photo/imaging software.
7. Click "Connect to Camera" and select the photos you want to
save and click on "Save Selection" to save to your desired
folder, (see Figures 21 and 22)
8. After the pictures are downloaded, you can review your
pictures using the browse bar on the left of screen.
9. To learn more about the many other features of Presto!
Mr.Photo please visit www.newsoft.com.
20
Figure 18. Click the “Set up Device” icon. (Looks like a wrench and a hammer).
21
Figure 19. Select Digital Camera for the MAGPiX B1380.
22
Figure 20. Click “Load DSC Pictures” icon (camera icon) and select “MAGPiX B1380”
23
Figure 20. Click “Connect to Camera” at the top left of the screen to download your
pictures.
24
Figure 22. Select photos you want and click “Save Selection”
25
F. Technical Specifications
•Sensor Resolution:
•Built-in Memory:
•Image Storage:
Status LCD;
White Balance:
Exposure:
Shutter Speed:
Focal Length:
Aperture;
Self Timer:
Interface:
Delete Image:
Auto Power Off:
Battery:
Dimensions:
Weight:
Operating System:
Veiwfinder
26
CMOS, 1280x1024 pixels
16MB, Flash Memory
*** (1280x1024) -40 images
** (1280x1024) -80 images
* (640x480) -160 images
2X (16X) (640x480) - 80 images
3-digit B/W
Auto
Auto
Auto (1/8000sec, Max.)
58mm
F=5
10 seconds
USB
All / last one
60 seconds
4 x AAA Alkaline Battery
136x96x73 mm
310 grams (w/o battery)
Windows 98SE/ME/2000/XP
Full featured 10x25 binoculars
System Requirements
• Personal computer with an operating system of either
Windows 98SE, ME, 2000 or XP.
•
•
•
•
A CD-ROM to install the driver and application software.
Minimum Penthium II 200 MHz CPU.
1 USB port available.
VGA Video card able to support a minimum of 640 x 480 24bit true color resolution. 1024 x 768 24-bit true color
resolutions is recommended.
• At least 48 MB RAM for WIN98/ME, and 64 MB RAM for
Windows 2000 and WIN XP.
•
At least 180 MB of free hard disk space.
27
G. Troubleshooting and Frequently Asked Questions
Q. The pictures I take seem to be blurred or out of focus.
A. Try taking pictures of objects or activities 45ft. or further
away. Remember, the B1380's lens is focused from 45ft to
infinity. Also, after you press and release the shutter button to
take a picture, make sure that you hold the camera steady until
you hear a beep. After you hear the beep you do not need to
keep the camera still.
Q. When I try to download my pictures with Mr. Photo, I get a
"Your system is low on virtual memory" message.
A. If you have less than 128MB of RAM on your computer, Mr.
Photo may not be able to download your photos, depending
upon your individual computer settings. Please download your
pictures using the method on page 16 of this manual. This
method is optimized for computer systems with less than
128MB of RAM. You can then open your downloaded pictures
using Mr. Photo or any of your favorite photo applications to
view and edit your images.
28
Q. I downloaded my pictures to the computer, but the B1380 LCD still
shows the same number of pictures taken that I had before I
downloaded them - why haven't they been deleted?
A. The B1380 does not automatically delete your pictures off of the
camera after you have downloaded them to your computer. To take
new pictures, you must delete your old pictures by following the
instruction on page 9.
Q. The pictures I downloaded have some purple artifacts or seem to
be distorted or have some black spots and lines on them.
A. Try reconnecting the USB cable to the computer and to the B1380.
Make sure the USB cable to securely inserted into both your computer
and the B1380.
Q. I inserted the CD, but no menu appears automatically.
A. Go to "My Computer" and right click on your CD drive. Then select
"AutoPlay". The menu should now appear. If you do not have an
option for "AutoPlay, select 'open'. Then double click on the 'Drivers'
folder. Inside the driver's folder, is the driver for the MAGPIX B1380.
Double click on that file and the driver will install automatically.
29
Q. When I try to install NewSoft Mr. Photo 3, it keeps asking me for
a serial number - Where do I find it?
A. You do not need a serial number to install NewSoft Mr. Photo.
Just make sure that you fill in the 'Name' box anc/the 'Company'
box. Filling in 'home' or 'none' are good responses if the B1380 is
not being used for a business. After filling in these two lines you
should be able to continue the installation.
Q. How do I learn to use the other functions in Mr. Photo?
A. You can also visit NewSoft's website at www.newsoft.com.
Q. Where can I find more help or information on my MAGPIX
B1380?
A. www.magpix.com
30
FCC Notice
This device complies with Part 15 of the FCC Rules.
Operation is subject to the following two conditions: (1) This
device may not cause harmful interference, and
(2) This device must accept any interference received,
including interference that may cause undesired operation.
Note: This equipment has been tested and found to comply
with the limits for Class B digital devices, pursuant to Part
15 of the FCC rules. These limits are designed to provide
reasonable protection against harmful interference in a
residential installation. This equipment generates, uses, and
can radiate radio frequency energy and, if not installed and
used in accordance with the instructions, may cause
harmful interference to radio communications. However,
there is no guarantee that interference will not occur in a
particular installation. If this equipment does cause harmful
interference to radio or television reception, which can be
determined by running the equipment off and on, the user is
encouraged to try to correct the interference by one or more
of the following measures:
31
•
•
Reorient or relocate the receiving antenna.
Increase the separation between the equipment and the
receiver.
•
Connect the equipment into an outlet on a circuit different
from that to which the receiver is connected.
•
Consult the dealer or an experienced radio/TV technician
for assistance.
The shielded cable with the ferrite core provided with the
digital camera must be used with this equipment in order to
comply with Class B limits in Subpart B of Part 15 of the FCC
rules.
Do not make any changes or modifications to the equipment
unless otherwise specified in the manual. If such changes or
modifications should be made, you could be required to stop
operation of the equipment.
Any questions or comments, please contact the MAGPiX
Service Center:
Telephone: 1-888-3-MAGPIX
Website:
www.magpix.com
32