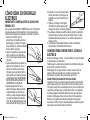
1
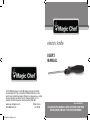
electric knife
USER’S
MANUAL
© 2012 CNA International, Inc. d/b/a MC Appliance Corporation. All rights
reserved. Magic Chef™ logo is a trademark of CNA International, Inc. used
under license. Distributed by Sunbeam Products, Inc. doing business as Jarden
Consumer Solutions, Boca Raton, FL33431. Sunbeam Products, Inc. is a
subsidiary of Jarden Corporation. Jarden Corporation (NYSE: JAH).
www.magicchefappliance.com Printed in China
GCDS-MGC24017-VW
P.N. 156566
FPRVMCEK_12ESM1.indd 1-2
Model FPRVMCEK
PLEASE READ THIS MANUAL CAREFULLY BEFORE USING YOUR
ELECTRIC KNIFE AND KEEP IT FOR FUTURE REFERENCE.
3/28/12 3:38 AM
CONTENTS
IMPORTANT SAFEGUARDS . . . . . . . . . . . . . . . . . . . . . . . . . . . . . . . . . . E1
LEARNING ABOUT YOUR ELECTRIC KNIFE . . . . . . . . . . . . . . . . . . . . . . E3
HOW TO USE YOUR ELECTRIC KNIFE . . . . . . . . . . . . . . . . . . . . . . . . . . . .E4
CARE AND CLEANING. . . . . . . . . . . . . . . . . . . . . . . . . . . . . . . . . . . . . . . . . E7
WARRANTY INFORMATION. . . . . . . . . . . . . . . . . . . . . . . . . . . . . . . . . . . . . E8
READ THIS MANUAL
Inside you will find many helpful hints on how to use and
maintain your electric knife properly. Just a little preventive care
on your part can save you a great deal of time and money over
the life of your electric knife.
IMPORTANT SAFEGUARDS
To reduce the risk of fire, electric shock and/or injury to persons,
basic safety precautions should always be followed when using
electrical appliances, including the following:
1. READ ALL INSTRUCTIONS BEFORE USING THE ELECTRIC KNIFE.
2. Use the electric knife only for its intended use.
3. To protect against risk of electrical shock, do not put power
handle in water or other liquid. DO NOT operate knife in water
or under running water.
4. Children should not use this appliance. Care should be taken
when using this appliance near children.
5. Release “On-Off” switch and unplug from outlet when not in
use, before putting on or taking off parts and before cleaning.
Disconnect power when changing blades.
6. DO NOT touch moving parts.
7. DO NOT operate any appliance with a damaged cord or
plug, or after the appliance malfunctions, or is dropped or
damaged in any manner. Return the appliance to the nearest
authorized service facility for examination, repair or electrical
or mechanical adjustment.
8. The use of attachments not recommended or sold by the
manufacturer, may cause fire, electric shock or injury.
9. DO NOT use outdoors or for commercial purposes.
10.DO NOT let cord hang over edge of table or counter, or touch
hot surfaces.
11. BLADES ARE SHARP. Handle carefully. Always handle blades
with hand away from cutting edge. Always store blades with
cutting edge away from you.
12.DO NOT use on frozen food or ice.
E1
FPRVMCEK_12ESM1.indd 3-4
3/28/12 3:38 AM
NOTE: This knife should not be used to cut bones, frozen foods in
solid form or hard seeds, stones or pits in fruit.
Learning about your
electric knife
This unit is intended for
HOUSEHOLD USE ONLY.
Save these instructions
This appliance is for HOUSEHOLD USE ONLY. No user-serviceable
parts inside. Power unit never needs lubrication. Do not attempt to
service this product.
A short power supply cord is provided to reduce the risk resulting
from becoming entangled in or tripping over a longer cord. An
extension cord may be used if care is exercised in its use. If an
extension cord is used, the marked electrical rating of the extension
cord should be at least as great as the electrical rating of the
Electric Knife.
The cord should be arranged so that it will not drape over the
countertop or tabletop where it can be pulled on by children or
tripped over unintentionally. Do not immerse in water or other
liquids. No liability can be accepted for any damage cause by noncompliance with these instructions or any other improper use or
mishandling.
POLARIZED PLUG
This appliance has a polarized plug (one blade is wider
than the other). To reduce the risk of electric shock,
this plug is intended to fit into a polarized outlet only
one way. If the plug does not fit fully into the outlet,
reverse the plug. If it still does not fit, contact a qualified electrician. Do
not attempt to modify the plug in any way. If the plug fits loosely into
the AC outlet or if the AC outlet feels warm, do not use that outlet.
E2
FPRVMCEK_12ESM1.indd 5-6
a
b c
d
e
a Stainless Steel Blade(s)
b Drip Guard(s)
c Blade Release Control
Button
d On-Off Switch
e Easy-To-Grasp Handle
E3
3/28/12 3:38 AM
HOW TO USE YOUR ELECTRIC KNIFE
IMPORTANT: CLEAN BEFORE USING THE FIRST TIME!
See the CARE AND CLEANING section for more information.
Using youR electRic knife
Be sure the electric cord is not connected to the outlet when
inserting or removing the knife blades.
1. Pick up the knife blades by drip
guards, holding the blades between
the thumb and forefinger. Avoid
touching the sharp, scalloped edges
of the blades. (Figure 1)
2. Insert the raised rivet on one blade
into the key-hole slot on the other
Figure 1
blade. This locks the ends of the
blades. (Figure 2)
3. H
olding both blades with the drip
guards between the thumb and
forefinger, and with the scalloped
edges of the blades facing away
from the hand, slide the ends of
the blades into the opening on the
Figure 2
front of power handle. DO NOT PRESS
THE BLADE RELEASE BUTTON WHEN
INSERTING THE BLADES.
4. P ush gently on each drip guard
towards the electric knife until
the blades “click” into place. Make
sure the blades are firmly engaged.
Cutting edges of the blades should
Figure 3
E4
FPRVMCEK_12ESM1.indd 7-8
be facing downward, away from the
handle. (Figure 3)
5. Plug the electrical cord into an
electrical outlet. Use only voltage
specified on bottom of the unit.
6. Press and hold the On-Off switch
located on top of the handle
Figure 4
to activate the knife and begin
carving. (Figure 4)
7. Guide the knife blades through the food to be sliced, pressing
down lightly. A back and forth sawing motion is unnecessary.
The movement of the blades slices the food for you.
8. When slicing is complete, release the On-Off switch to stop the
blade action. Unplug the cord from the electrical outlet.
TIPS FOR CARVING WITH THE ELECTRIC KNIFE
Use a carving board to avoid scratching china, metal platters or
countertops.
Allow a roast to stand 15 to 20 minutes after roasting. Keep in a
warm place. The meat will be easier to carve. Use a fork to hold
meat when carving.
Remove all skewers from the meat before carving.
CARVING A STANDING RIB ROAST OF BEEF
Suggestions: Have your butcher remove the backbone of the roast
and cut the rib bones short.
Arrange the roast on a cutting board with the largest end of the
roast down and the rib side to your left. The small end of the
roast is nearest the carver. Insert a carving fork between the two
top ribs.
Slice across the roast from the fat edge of the rib bone. Free the
slice from the bone using the special “trimming tip” of the knife.
E5
3/28/12 3:38 AM
CARVING A WHOLE HAM OR ROAST LEG OF LAMB
Place the leg of lamb or whole ham on the carving board with the
shank end to the right of the carver. For a ham, turn the scored,
fat-side up. For the leg of lamb, place the roast so that the meaty
section faces away from the carver.
Insert a meat fork into the heavy part of the meat and cut several
lengthwise slices from the less meaty side.
Turn the ham or leg of lamb so that it rests upright on the cut
surface. Cut a wedge from the shank end by starting at the base of
the bulge and slicing down to the leg bone.
Then, make another cut at an angle to this, close to the shank end.
Lift out the wedge. Starting at the shank end, cut thin, uniform
slices down to the leg bone. To release theslices, run the electric
carving knife under the slices, parallel to the leg bone.
CARVING A ROAST TURKEY OR CHICKEN
Arrange the turkey or chicken on a carving board with the legs
facing right. Starting at the side facing the carver, cut the leg from
the body by grasping the leg with your left hand, pulling gently
while cutting through the meat and the joint at the thigh.
Place the leg on the carving board and cut through the joint to
sever the thigh bone from the drumstick. Slice the meat from the
leg and thigh, carving parallel to the bone.
Insert the meat fork into the breast meat to secure the body.
Sever the wing from the body by carving through the joint.
Start carving the breast just above the joint where the wing was
removed. Cut thin slices of white meat, carving downward and
cutting parallel to the breast bone.
SLICING A LOAF OF BREAD, AN ANGEL FOOD, CHIFFON OR
SPONGE CAKE
To avoid crushing a fresh loaf of bread or sponge-type cakes,
gently guide the electric carving knife through the bread or cake,
cutting slices as thin as desired.
E6
FPRVMCEK_12ESM1.indd 9-10
CARE AND CLEANING
CLEANING INSTRUCTIONS
Release “On-Off” switch and unplug cord from the electrical outlet.
Press the blade eject button and gently remove both blades from
the knife by gripping the drip guards. Slide the blades apart so
the rivet on one blade is disengaged from the keyhole slot on the
other blade.
Hold blades by the drip guards and wash in warm, sudsy water.
Rinse blades and dry thoroughly. Be careful – blades are SHARP.
The blades are dishwasher safe.
Wipe unit with a damp cloth. DO NOT IMMERSE THE UNIT IN
WATER OR OTHER LIQUIDS.
STORAGE
Coil the electrical cord of the knife with a twist fastener. Store
the knife in a clean, dry location such as a cabinet or cupboard
shelf. Slide plastic cover over blades and store blades in a drawer.
MAINTENANCE
Do not attempt to sharpen the knife blades. Under normal use
and care they will provide years of satisfactory use.
The motor of your electric slicing knife has been carefully
lubricated at the factory using selected lubricants. It does not
require any additional oil for the life of the unit.
Other than the recommended cleaning, no further user
maintenance is necessary. Return the electric slicing knife to your
nearest authorized service center for servicing or repairs.
E7
3/28/12 3:38 AM
warranty information
NOTES
service instructions
1. Do NOT attempt to repair or adjust any electrical or mechanical functions on this unit. Doing so will void the Warranty.
2. If you need to exchange the unit, please return it in its original carton, with a sales receipt, to the store where you
purchased it. If you are returning the unit more than 30 days after the date of purchase, please see the enclosed Warranty.
3. If you have any questions or comments regarding this unit’s operation or believe any repair is necessary, please call our
Consumer Service Department at 1-888-474-3178 or visit our website at www.magicchefappliance.com.
1-Year Limited Warranty
Sunbeam Products, Inc. doing business as Jarden Consumer Solutions or if in Canada, Sunbeam Corporation (Canada)
Limited doing business as Jarden Consumer Solutions (collectively “JCS”) warrants that for a period of one year from the
date of purchase, this product will be free from defects in material and workmanship. JCS, at its option, will repair or replace
this product or any component of the product found to be defective during the warranty period. Replacement will be made
with a new or remanufactured product or component. If the product is no longer available, replacement may be made with a
similar product of equal or greater value. This is your exclusive warranty. Do NOT attempt to repair or adjust any electrical or
mechanical functions on this product. Doing so will void this warranty.
This warranty is valid for the original retail purchaser from the date of initial retail purchase and is not transferable. Keep the
original sales receipt. Proof of purchase is required to obtain warranty performance. JCS dealers, service centers, or retail
stores selling JCS products do not have the right to alter, modify or any way change the terms and conditions of this warranty.
This warranty does not cover normal wear of parts or damage resulting from any of the following: negligent use or misuse of
the product, use on improper voltage or current, use contrary to the operating instructions, disassembly, repair or alteration
by anyone other than JCS or an authorized JCS service center. Further, the warranty does not cover: Acts of God, such as fire,
flood, hurricanes and tornadoes.
What are the limits on JCS’s Liability?
JCS shall not be liable for any incidental or consequential damages caused by the breach of any express, implied or statutory
warranty or condition.
Except to the extent prohibited by applicable law, any implied warranty or condition of merchantability or fitness for a
particular purpose is limited in duration to the duration of the above warranty.
JCS disclaims all other warranties, conditions or representations, express, implied, statutory or otherwise. JCS shall not be
liable for any damages of any kind resulting from the purchase, use or misuse of, or inability to use the product including
incidental, special, consequential or similar damages or loss of profits, or for any breach of contract, fundamental or
otherwise, or for any claim brought against purchaser by any other party.
Some provinces, states or jurisdictions do not allow the exclusion or limitation of incidental or consequential damages or
limitations on how long an implied warranty lasts, so the above limitations or exclusion may not apply to you.
This warranty gives you specific legal rights, and you may also have other rights that vary from province to province, state to
state or jurisdiction to jurisdiction.
How to Obtain Warranty Service
In the U.S.A.
If you have any question regarding this warranty or would like to obtain warranty service,
please call 1-888-474-3178 and a convenient service center address will be provided to you.
In Canada
If you have any question regarding this warranty or would like to obtain warranty service,
please call 1-888-474-3178 and a convenient service center address will be provided to you.
In the U.S.A., this warranty is offered by Sunbeam Products, Inc. doing business Jarden Consumer Solutions located in
Boca Raton, Florida 33431. In Canada, this warranty is offered by Sunbeam Corporation (Canada) Limited doing business as
Jarden Consumer Solutions, located at 20B Hereford Street, Brampton, Ontario L6Y 0M1. If you have any other problem or
claim in connection with this product, please write our Consumer Service Department.
PLEASE DO NOT RETURN THIS PRODUCT TO ANY OF THESE ADDRESSES OR TO THE PLACE OF PURCHASE.
E8
FPRVMCEK_12ESM1.indd 11-12
E9
3/28/12 3:38 AM
cuchillo eléctrico
MANUAL DEL
USUARIO
© 2012 CNA 2012 CNA International, Inc. realiza negocios bajo el nombre de
MC Appliance Corporation. El logotipo Magic Chef™ es una marca registrada de
CNA International, Inc. utilizada bajo licencia. Distribuido por Sunbeam Products,
Inc. operando bajo el nombre de Jarden Consumer Solutions, Boca Raton, Florida
33431. Products, Inc. es una subsidiaria de Jarden Corporation (NYSE: JAH).
www.magicchefappliance.comImpreso en China
FPRVMCEK_12ESM1.indd 13-14
Modelo FPRVMCEK
LEA ESTE MANUAL ANTES DE UTILIZAR SU CUCHILLO
ELÉCTRICO Y GUÁRDELO PARA FUTURA REFERENCIA.
3/28/12 3:38 AM
CONTENIDO
PRECAUCIONES IMPORTANTES . . . . . . . . . . . . . . . . . . . . . . . . . . . . . . . . . S1
APRENDA ACERCA DE SU CUCHILLO ELÉCTRICO . . . . . . . . . . . . . . . S3
CÓMO USER SU CUCHILLO ELÉCTRICO . . . . . . . . . . . . . . . . . . . . . . . . . . S4
CUIDADO Y LIMPIEZA . . . . . . . . . . . . . . . . . . . . . . . . . . . . . . . . . . . . . . .S8
INFORMACION DE LA GARANTIA. . . . . . . . . . . . . . . . . . . . . . . . . . . . . . S9
LEA ESTE MANUAL
En el encontrará muchos consejos útiles sobre el uso y
mantenimiento correctos de su cuchillo eléctrico. El cuidado
preventivo pueden ahorrarle mucho tiempo y dinero durante la
vida útil de su cuchillo eléctrico.
PRECAUCIONES IMPORTANTES
Para disminuir el riesgo de un incendio, descarga eléctrica y/o
lesión a las personas, se deben seguir las precauciones básicas
de seguridad al utilizarse equipos eléctricos, incluyendo las
siguientes:
1. LEA TODAS LAS INSTRUCCIONES ANTES DE USAR SU
CUCHILLO ELÉCTRICO.
2. Utilice el cuchillo de trinchar eléctrico sólo para lo que fue diseñado.
3. Para evitar choques eléctricos, NO SUMERGIR el mango del
cuchillo de trinchar eléctrico en agua u otros líquidos.
4. Los niños no deben utilizar este aparato. Tenga extremo
cuidado cuando utilice el aparato en presencia de niños.
5. Libere el interruptor “On-Off” (Encendido-Apagado) y
desconecte del tomacorriente el cuchilllo cuando no lo esté
usando, cuando esté poniendo o quitando alguna parte o
cuando lo esté limpiando. Desconéctelo también cuando esté
cambiando las cuchillas.
6. NO TOQUE las cuchillas mientras funciona el motor.
7. NO OPERE ningún equipo eléctrico que tenga el cordón o enchufe
dañado, si el equipo no funciona correctamente o si se ha caído o
dañado. Devuélvalo al centro de servicio autorizado más cercano
para una inspección, reparación o ajuste.
8. El uso de accesorios no recomendados por el fabricante puede causar
fuego, choques eléctricos o lesiones personales muy severas.
9. NO USARSE a la intemperie ni de forma comercial.
10.NO DEJE que el cordón cuelgue del borde de la mesa o que
toque alguna superficie caliente.
11. LAS CUCHILLAS ESTÁN AFILADAS. Manéjelas con cuidado.
Siempre sujete las cuchillas con el filo hacia afuera y guardelas
de la misma forma.
12.NO USE en alimentos congelados o en el hielo.
S1
FPRVMCEK_12ESM1.indd 15-16
3/28/12 3:38 AM
NOTA: Este cuchillo no debe usarse para cortar huesos, alimentos
congelados en forma sólida o semillas o huesos duros de frutas.
ESTA UNIDAD ESTÁ DISEÑADA
SOLAMENTE PARA USO DOMÉSTICO
CONSERVE ESTAS INSTRUCCIONES
Este aparato es para USO DOMESTICO SOLAMENTE. En el interior
no hay piezas a las que el usuario les pueda dar mantenimiento. El
motor de la unidad no necesita lubricación.
Se provee un cordón eléctrico corto para reducir el riesgo de
enredos o tropiezos que pueda causar un cordón largo. Se puede
utilizar un cable de extensión si lo hace con cuidado. Si usa un cable
de extensión, la capacidad nominal eléctrica del cable de extensión
deber ser al menos del mismo valor que la capacidad eléctrica del
cuchillo eléctrico.
El cordón debe colocarse de manera que no cuelgue del mostrador
o mesa donde los niños puedan jalarlo o tropezarse con él
accidentalmente. No lo sumerja en agua ni en otro líquido. No se acepta
responsabilidad por cualquier daño causado por el incumplimiento de
estas instrucciones o cualquier otro uso o manejo indebido.
ENCHUFE POLARIZADO
Este aparato tiene un enchufe polarizado (una pata
es más ancha que la otra). Para reducir el riesgo de
descarga eléctrica, este enchufe está diseñado para
ajustarse sólo de una forma en un tomacorriente
polarizado. Si el enchufe no se ajusta completamente en el
tomacorriente, dé vuelta al enchufe. Si todavía no se ajusta, contacte a
un electricista calificado. No intente modificar el enchufe de ninguna
manera. Si el enchufe está flojo en el tomacorriente de CA, o si el
tomacorriente se siente caliente, no utilice ese tomacorriente.
S2
FPRVMCEK_12ESM1.indd 17-18
APRENDIENDO ACERCA DE SU
CUCHILLO ELÉCTRICO
a
b c
d
e
a Cuchillas De Acero
Inoxidable
b Protector
c Botón De Control Para
Soltar Las Cuchillas
Interuptor
Encendido/
d
Apagado
e Mango Con Diseño
Ergonómico
S3
3/28/12 3:38 AM
CÓMO USAR SU CHUCHILLO
ELECTRICO
IMPORTANTE: ¡LÍMPIELO ANTES DE USARLO POR
PRIMERA VEZ
Vea la sección de CUIDADO Y LIMPIEZA para más información.
Asegúrese de que el cordón eléctrico no esté conectado al
tomacorriente cuando esté quitando o poniendo la cuchilla.
1. Levante las cuchillas por los
protectores, colocándolas entre el
dedo pulgar y el índice. No toque la
orilla afilada ni los bordes ondulados
de las cuchillas. (Figura 1)
2. Inserte el remache o seguro de una
de las cuchillas en la ranura de la
otra, esto hace que quede cerrado.
(Figura 2)
Figura 1
3. S ujete amba cuchillas apoyando los
dedos en los protectores. Con el
filo de las cuchillas hacia afuera,
coloque la parte posterior dentro
de la cuchilla en la abertura situada
al frente del mango. NO OPRIMA EL
BOTÓN EXPULSOR CUANDO ESTÉ
MONTANDO LAS CUCHILLAS.
Figura 2
4. O
prima cada protector hacia
adentro hasta que sienta el sonido
indicándole que las cuchillas han
caído en su lugar. Asegúrese de que
las cuchillas estén bien insertadas.
El filo de la cuchilla debe estar hacia
abajo retirado del mango. (Figura 3)
Figura 3
S4
FPRVMCEK_12ESM1.indd 19-20
5. Enchufe el ; tet en el tomacorriente.
Utilice solamente el voltaje que se
especifica en la parte inferior de la
unidad.
6. Oprima y sostenga el interruptor
colocado en la parte superior del
Figura 4
mango para activar el cuchillo. (Figura 4)
7. Para rebanar, coloque la cuchilla sobre el alimento y deslícelo
solamente. No es necesario mover el cuchillo hacia los lados,
solamente deslícelo hacia abajo y las cuchillas rebanarán sin
mucha presión.
8. Cuando haya terminado de rebanar, suelte el interruptor.
Desenchufe el cordón del tomacorriente.
CONSEJOS PARA CORTAR CON EL CUCHILLO
ELÉCTRICO
Utilice una tabla para cortar ; asi evitara dañar los platos de metal
o de porcelana o las encimeras.
Permita que los asados reposen durante 15 a 20 minutos después
de la cocción y antes de cortarlos.
Manténgalos en un lugar caliente. La carne será más fácil de
rebanar. Utilice un tenedor para sostener la carne al tallar.
Quite todas los palillos de la carne antes de cortarla.
CÓMO CORTAR UN ASADO DE COSTILLAS DE RES
Sugerencias: Pida a su carnicero que quite el hueso posterior del
asado y que seccione los huesos de las costillas en piezas cortas.
Coloque el asado sobre una tabla para cortar, con el extremo más
largo del asado hacia abajo y el lado del costillar a su izquierda.
El extremo pequeño del asado debe colocarse cerca de usted.
Inserte el trinche para cortar entre las dos costillas superiores.
Rebane a lo largo del asado desde el extremo con grasa del
hueso de la costilla. Corte la rebanada del hueso usando la punta
especial para recortar del cuchillo eléctrico.
S5
3/28/12 3:38 AM
CÓMO CORTAR UN JAMÓN ENTERO O UNA PATA DE CORDERO
ASADA
Coloque la pata de cordero o el jamón entero sobre la tabla
para cortar con el extremo de la pata dirigido a su derecha. Para
cortar un jamón entero, voltee el lado grasoso y marcado hacia
arriba. Para cortar la pata de cordero, coloque la de manera que
la sección con más carne quede dirigida apuntando en sentido
contrario a usted. Inserte el trinche para carne dentro de la parte
con más carne y haga varios cortes a lo largo partiendo desde el
lado menos carnoso.
Voltee el jamón o la pata de manera que descanse verticalmente
sobre la superficie para cortar. Corte una rebanada partiendo
desde el extremo de la pata comenzando en la base de la
protuberancia y rebanando hacia abajo en dirección al hueso de la
pata. Después, haga otro corte en ángulo a éste, cerca del extremo
de la pata. Levante la rebanada.
Comenzando por el extremo de la pata, corte rebanadas delgadas
y uniformes hacia abajo en dirección al hueso de la pata.
Para sacar las rebanadas, pase el cuchillo eléctrico debajo de las
rebanadas, en forma paralela al hueso de la pata.
CÓMO CORTAR UN PAVO O POLLO
Coloque el pavo o el pollo sobre una tabla para cortar, con las
patas hacia la derecha. Comenzando por el lado que da hacia
usted, corte una pata tomándola con su mano izquierda y
jalándola suavemente mientras está cortando a través de la carne
y de la articulación del muslo.
S6
FPRVMCEK_12ESM1.indd 21-22
Coloque la pata sobre la tabla para cortar y corte a través de la
articulación para separar el hueso del muslo de la pata. Rebane la
carne de la pata y del muslo, cortando paralelamente al hueso.
Inserte el trinche en la carne de la pechuga para asegurar el
cuerpo del ave. Separe el ala del cuerpo al cortar a través de la
articulación.
Inicie cortando la pechuga justo debajo de la articulación donde
estaba el ala. Corte rebanadas delgadas de carne blanca, cortando
hacia abajo y en forma paralela al hueso de la pechuga.
CÓMO CORTAR PIEZAS DE PAN Y PASTELES
Para evitar desmoronar una pieza de pan recién hecha, o los
pasteles que tienen consistencia esponjosa, deslice suavemente el
cuchillo eléctrico a través del pastel, cortando rebanadas.
S7
3/28/12 3:38 AM
CUIDADO Y LIMPIEZA
INSTRUCCIONES DE LIMPIEZA
Libere el interruptor “On-Off” (Encendido-Apagado) y desconecte
el cordón del tomacorriente.
Presione el botón para soltar las cuchillas y remueva
cuidadosamente ambas cuchillas agarrando las de los protectores
de goteo. Deslice las cuchillas separadas para que el remache de
una cuchilla se desenganche de la ranura de la otra.
Sujete las cuchillas por los protectores y lávelas en agua tibia
jabonosa. Enjuágelas y séquelas cuidadosamente. Recuerde que
estas cuchillas están sumamente afiladas. Las cuchillas pueden
lavarse en el lavaplatos.
Pásele un paño húmedo al equipo. NO LO SUMERJA EN AGUA O
NINGÚN OTROS LÍQUIDOS.
CÓMO GUARDAR SU CUCHILLO DE
TRINCHAR ELÉCTRICO
Enrolle la cuerda eléctrica del cuchillo con un cierre de torsión.
Almacene el cuchillo en un lugar limpio y seco como una balda
de gabinete o alacena. Deslice cobertura plástica sobre cuchillas y
almacene las cuchillas en un cajón.
MANTENIMIENTO
No trate de afilar las cuchillas del cuchillo eléctrico. Bajo uso
normal y cuidándolas le darán años de uso satisfactorio.
El motor de su cuchillo ha sido lubricado cuidadosamente en la
fábrica usando los mejores lubricantes. Por lo tanto no requiere
ningún lubricante adicional.
Aparte de la limpieza recomendada, ninguna otra limpieza es
necesaria. Devuelva su cuchillo de trinchar eléctrico a un centro
de servicio autorizado para servicio o reparación.
S8
FPRVMCEK_12ESM1.indd 23-24
INFORMACION DE LA GARANTIA
INSTRUCCIONES DE SERVICIO
1. NO intente reparar o ajustar ninguna función eléctrica o mecánica de esta unidad. Al hacerlo eliminaría la garantía.
2. Si necesita cambiar la unidad, devuélvala en su empaque original, con el recibo de compra, a la tienda donde la compró. Si
va a devolverla a más de 30 días después de la fecha de compra, consulte la garantía adjunta.
3. Si tiene alguna pregunta o comentario sobre el funcionamiento de esta unidad o cree que es necesario repararla, llame
a nuestro Departamento de Servicio al Cliente al 1-888 474-3178 o visite nuestro sitio en Internet en www.magicchefappliance.com.
Garantía Limitada de 1 Año
Sunbeam Products, Inc. operando bajo el nombre de Jarden Consumer Solutions, o en Canadá, Sunbeam Corporation
(Canada) Limited operando bajo el nombre de Jarden Consumer Solutions, (en forma conjunta, “JCS”), garantiza que por un
período de un año a partir de la fecha de compra, este producto estará libre de defectos de materiales y mano de obra. JCS,
a su elección, reparará o reemplazará este producto o cualquier componente del mismo que presente defectos durante el
período de garantía. El reemplazo se realizará por un producto o componente nuevo o reparado.
Si el producto ya no estuviera disponible, se lo reemplazará por un producto similar de valor igual o superior. Ésta es su
garantía exclusiva. No intente reparar o ajustar ninguna función eléctrica o mecánica de este producto. Al hacerlo elimínará
ésta garantía.
La garantía es válida para el comprador minorista original a partir de la fecha de compra inicial y la misma no es transferible.
Conserve el recibo de compra original. Para solicitar servicio en garantía se requiere presentar un recibo de compra. Los
agentes y centros de servicio de JCS o las tiendas minoristas que venden productos de JCS no tienen derecho a alterar,
modificar ni cambiar de ningún otro modo los términos y las condiciones de esta garantía.
Esta garantía no cubre el desgaste normal de las piezas ni los daños que se produzcan como resultado de uso negligente
o mal uso del producto, uso de voltaje incorrecto o corriente inapropiada, uso contrario a las instrucciones operativas, y
desarme, reparación o alteración por parte de un tercero ajeno a JCS o a un Centro de Servicio autorizado por JCS. Asimismo,
la garantía no cubre actos fortuitos tales como incendios, inundaciones, huracanes y tornados.
¿Cuál es el límite de responsabilidad de JCS?
JCS no será responsable de daños incidentales o emergentes causados por el incumplimiento de alguna garantía o
condición expresa, implícita o legal.
Excepto en la medida en que lo prohíba la ley aplicable, cualquier garantía o condición implícita de comerciabilidad o aptitud
para un fin determinado se limita, en cuanto a su duración, al plazo de la garantía antes mencionada.
JCS queda exenta de toda otra garantías, condiciones o manifestaciones, expresa, implícita, legal o de cualquier otra
naturaleza.
JCS no será responsable de ningún tipo de daño que resulte de la compra, uso o mal uso del producto, o por la imposibilidad
de usar el producto, incluidos los daños incidentales, especiales, emergentes o similares, o la pérdida de ganancias, ni de
ningún incumplimiento contractual, sea de una obligación esencial o de otra naturaleza, ni de ningún reclamo iniciado contra
el comprador por un tercero.
Algunas provincias, estados o jurisdicciones no permiten la exclusión o limitación de los daños incidentales o emergentes ni
las limitaciones a la duración de las garantías implícitas, de modo que es posible que la exclusión o las limitaciones antes
mencionadas no se apliquen en su caso.
Esta garantía le otorga derechos legales específicos y es posible que usted tenga otros derechos que varían de un estado,
provincia o jurisdicción a otro.
Cómo solicitar el servicio en garantía
En los Estados Unidos
Si tiene alguna pregunta sobre esta garantía o desea recibir servicio de garantía, llame al
1-888-474-3178 y podrá obtener la dirección del centro de servicio que le resulte más conveniente.
En Canadá
Si tiene alguna pregunta sobre esta garantía o desea recibir servicio de garantía, llame al
1-888-474-3178 y podrá obtener la dirección del centro de servicio que le resulte más conveniente.
En los Estados Unidos, esta garantía es ofrecida por Sunbeam Products, Inc. operando bajo el nombre de Jarden
Consumer Solutions, Boca Ratón, Florida 33431. En Canadá, esta garantía es ofrecida por Sunbeam Corporation (Canada)
Limited operando bajo el nombre de Jarden Consumer Solutions, 20 B Hereford Street, Brampton, Ontario L6Y 0M1. Si
usted tiene otro problema o reclamo en conexión con este producto, por favor escriba al Departamento de Servicio al
Consumidor.
POR FAVOR NO DEVUELVA ESTE PRODUCTO A NINGUNA DE ESTAS DIRECCIONES NI AL LUGAR DE COMPRA.
S9
3/28/12 3:38 AM