1
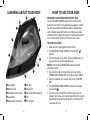
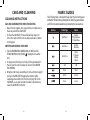
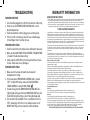
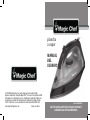
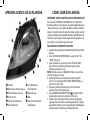
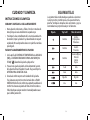
steam
iron
USER’S
MANUAL
© 2012 CNA International, Inc. d/b/a MC Appliance Corporation. All rights
reserved. Magic Chef™ logo is a trademark of CNA International, Inc. used
under license. Distributed by Sunbeam Products, Inc. doing business as Jarden
Consumer Solutions, Boca Raton, FL33431. Sunbeam Products, Inc. is a
subsidiary of Jarden Corporation. Jarden Corporation (NYSE: JAH).
www.magicchefappliance.com Printed in China
GCDS-MGC24013-SZ
P.N. 156558
Model GCRVMC01
PLEASE READ THIS MANUAL CAREFULLY BEFORE USING YOUR
IRON AND KEEP IT FOR FUTURE REFERENCE.
CONTENTS
IMPORTANT SAFEGUARDS . . . . . . . . . . . . . . . . . . . . . . . . . . . . . . . . . . E1
LEARNING ABOUT YOUR IRON . . . . . . . . . . . . . . . . . . . . . . . . . . . . . . .. . . E4
HOW TO USE YOUR IRON. . . . . . . . . . . . . . . . . . . . . . . . . . . . . . . . . . . . . . . .E5
CARE AND CLEANING. . . . . . . . . . . . . . . . .. . . . . . . . . . . . . . . . . . . . . . . . . . .E8
WARRANTY INFORMATION . . . . . . . . . . . . . . . . . . . . . . . . . . . . . . . . . . E11
READ THIS MANUAL
Inside you will find many helpful hints on how to use and
maintain your iron properly. Just a little preventive care on your
part can save you a great deal of time and money over the life of
your iron.
IMPORTANT SAFEGUARDS
To reduce the risk of fire, electric shock and/or injury to persons,
basic safety precautions should always be followed when using
electrical appliances, including the following:
1. READ ALL INSTRUCTIONS BEFORE USING THE IRON.
2. Use iron only for its intended use.
3. To protect against risk of electric shock, do not immerse the
iron in water or other liquids.
4. The iron should always be turned off (“OFF” on the
TEMPERATURE CONTROL DIAL) before plugging or unplugging
from an outlet. Never pull the cord to disconnect it from an
outlet; instead, grasp plug and pull the plug to disconnect.
5. Do not allow the cord to touch hot surfaces. Allow the iron to
cool completely before putting it away. Wrap the cord loosely
around the iron when storing.
6. Always disconnect the iron from the electrical outlet when
filling it with water, emptying the iron and when not in use.
7. Do not operate iron with a damaged cord or if the iron has
been dropped or damaged. To avoid the risk of electrical
shock, do not disassemble the iron. Incorrect reassembly can
cause a risk of electrical shock when the iron is used. Contact
Magic Chef’s Customer Service Department (see back cover),
to return for examination and repair.
8. Close supervision is necessary for any appliance being used
by or near children. Do not leave the iron unattended while
connected or on an ironing board.
9. Burns can occur from touching hot metal parts, hot water, or
steam. Use caution when you turn a iron upside down as there
may be hot water in the reservoir.
E1
10. The iron must not be left unattended while it is connected
to the wall outlets. When you have finished ironing or when
leaving the iron even for short periods:
• Set the ADJUSTABLE STEAM CONTROL to the NO STEAM
position “ ”, and turn the TEMPERATURE CONTROL DIAL
to off by aligning the arrow mark below the temperature
control dial with off.
• Stand the iron upright on its HEEL REST and unplug the iron
from the electrical outlet.
• The iron must be used and rested on a stable surface.
NOTE: The SOLEPLATE may become damaged if the iron is stored
with the SOLEPLATE facing downwards.
THIS UNIT IS INTENDED
FOR HOUSEHOLD USE ONLY
SAVE THESE
INSTRUCTIONS
E2
This appliance is for HOUSEHOLD USE ONLY. No user-serviceable
parts inside. Power unit never needs lubrication. Do not attempt
to service this product.
A short power supply cord is provided to reduce the risk resulting
from becoming entangled in or tripping over a longer cord.
An extension cord may be used if care is exercised in its use. If
an extension cord is used, the marked electrical rating of the
extension cord should be at least as great as the electrical rating
of the iron.
The cord should be arranged so that it will not drape over the
countertop or tabletop where it can be pulled on by children or
tripped over unintentionally. Do not immerse in water or other
liquids. No liability can be accepted for any damage cause by noncompliance with these instructions or any other improper use or
mishandling.
POLARIZED PLUG
This appliance has a polarized plug (one blade is wider
than the other). To reduce the risk of electric shock,
this plug is intended to fit into a polarized outlet only
one way. If the plug does not fit fully into the outlet,
reverse the plug. If it still does not fit, contact a qualified electrician. Do
not attempt to modify the plug in any way. If the plug fits loosely into
the AC outlet or if the AC outlet feels warm, do not use that outlet.
E3
LEARNING ABOUT YOUR IRON
e
d
c
f
b
a
g
h
i
j
a Spray Nozzle
b Water Fill Hole
c Adjustable Steam Control
d Spray Button
e Temperature Control Dial
f Heel Rest
g Power Light
h
i
j
E4
See-through Water Reservoir
Skirt
Iron Soleplate
HOW TO USE YOUR IRON
IMPORTANT: CLEAN BEFORE USING THE FIRST TIME!
See the CARE AND CLEANING section for more information.
During first use of the iron, the appliance may appear to “smoke”.
This will stop and does not indicate a defect or hazard. Steam
vents should be cleared before first use to remove any residue
remaining from the manufacturing process and to ensure that no
stain is transferred to fabric the first time the iron is used.
TO CLEAR STEAM VENTS
1. Make sure iron is unplugged from power outlet.
2. Turn ADJUSTABLE STEAM CONTROL to “NO STEAM” “ ”
position.
3. Fill iron with water to the “MAX” fill line. Overfilling the iron
may cause the iron to spill water during use.
NOTE: Do not overfill the WATER TANK and never fill with
anything but water.
4. Plug cord into a 120 volt AC electrical outlet, and set the
TEMPERATURE CONTROL DIAL to its highest setting “LINEN”.
5. Let the iron preheat for 2 minutes while sitting on the HEEL
REST.
6. Turn ADJUSTABLE STEAM CONTROL clockwise to the heavy
steam setting .
7. Press the iron over an old cloth, and let it steam for a few
minutes. The iron may spit or sputter during the first uses with
tap water. As the Steam Chamber becomes conditioned, this
occurrence will stop.
E5
FILLING WATER TANK
1. Disconnect the iron power cord from electical outlet before
filling the tank.
2. Set the ADJUSTABLE STEAM CONTROL to NO STEAM “ ”
position so that the water enters directly into the tank and in
order to avoid spillage.
3. To fill the tank, remove fill cap and pour water into water fill
hole.
NOTE: Do not overfill the water tank.
4. The water level can be seen through the water tank. If the iron
needs more water during use, first unplug iron from electrical
outlet, then fill with the iron in a vertical position.
IRONING TIPS
1. Sort items to be ironed according to the temperature settings
they require. Begin ironing at the lower settings and increase
temperature as needed. If in doubt about what temperature to
use for any fabric, start at a low temperature setting and iron
on an inside seam allowance. Gradually increase the heat and
steam settings until wrinkles are removed without damaging
the fabric.
2. When changing from a high temperature setting to a
lower setting allow approximately 5 minutes for the lower
temperature to be reached.
SPRAY FUNCTION
Be sure the iron is filled with water. If fabrics are too dry, or have
stubborn creases or wrinkles, the spray feature can be used to
moisten the area. When the SPRAY BUTTON is pressed (while
the iron is in the horizontal position), a fine spray of water will
emit from SPRAY NOZZLE at front. It may be necessary to push
the SPRAY BUTTON a few times before spray starts.
DRY IRONING
Sort items to be ironed according to the temperature settings
on garment labels. Put the iron in a vertical position, set
the ADJUSTABLE STEAM CONTROL to NO STEAM “ ” and
TEMPERATURE CONTROL DIAL in a level suitable for the garments.
Begin ironing with garments that require a lower settings
(synthetic fabrics and silk) and gradually increase heat to iron
garments that require higher temperatures.
When changing from a high temperature setting to a lower setting,
allow approximately 5 minutes for the lower temperature to be reached.
STEAM IRONING
Plug in the iron after filling the water tank, set the ADJUSTABLE
STEAM CONTROL to desired amount of steam, according to the
desired temperature. Put the iron in a vertical position, after
the temperature indicator light has turned off, press the steam
button.
E6
E7
CARE AND CLEANING
CLEANING INSTRUCTIONS
CARE AND CLEANING OF THE NON-STICK COATING
• Never iron over zippers, pins, snaps, buttons, or metal rivets as
these may scratch the SOLEPLATE.
• To clean the SOLEPLATE of occasional build-up, wipe cool
iron with a sudsy cloth. Do not use abrasive cleaners or metal
scouring pads.
EMPTYING AND STORING YOUR IRON
1. Turn the TEMPERATURE CONTROL DIAL to “MIN” and the
STEAM CONTROL to NO STEAM “ ”, unplug the iron and let
cool.
2. To empty water from the iron, slowly tilt the pointed end of
the iron over the sink. The water will run out of the WATER
FILL OPENING.
3. Wrap the cord loosely around the cool iron and store it upright
resting on the HEEL REST. Wrapping the cord too tightly
can damage the cord. Do not store the iron lying flat on the
SOLEPLATE, as any small amount of residue or moisture may
cause the SOLEPLATE to discolor.
E8
FABRIC GUIDES
The following table is designed to help select the best setting and
method for the fabric that you intend to iron. Verify the garment labels
and follow the recommendations provided by the manufacturer.
Position
Textile Type
Fabrics
Synthetics
Acrylic
Polypropylene
Polyurethane
Synthetics
Acetate
Triacetate
Synthetics
Nylon
Polyester
Modal
Rayon
Silk
Silk
Wool
Wool
Cotton
Cotton
Linen
Linen
E9
TROUBLESHOOTING
IRON DOES NOT HEAT
1. Iron should be plugged into a 120 volt AC electrical outlet only.
2. Check to see that TEMPERATURE CONTROL DIAL is set to
desired temperature.
3. Check the electrical outlet by plugging in a working lamp.
4. If the iron still is not heating, check for any visible damage.
Contact Magic Chef’s Customer Service.
IRON DOES NOT STEAM
1. Check to see that the iron contains water. Add water if necessary.
2. Make sure the ADJUSTABLE STEAM CONTROL/STEAM BUTTON
is turned to the desired steam setting.
3. Gently tap the SOLEPLATE on the ironing board once or twice
to clear steam valves of any blockages.
IRON DOES NOT STEAM
1. Make sure iron has been allowed to reach selected
temperature for ironing.
2. If iron leaks when TEMPERATURE CONTROL DIAL is turned
“OFF” or while DRY ironing, make sure that ADJUSTABLE
STEAM CONTROL is turned to NO STEAM “ ”.
3. If steam ironing, turn the TEMPERATURE CONTROL DIAL to a
slightly higher setting and wait until INDICATOR LIGHT goes out.
Check that the higher setting is safe for the fabric being used.
4.Iron should not be overfilled. If iron is overfilled turn iron to
“OFF” and unplug. Allow iron to cool and pour water out of
WATER TANK. Plug iron into electrical outlet and reheat.
E10
WARRANTY INFORMATION
SERVICE INSTRUCTIONS
1. Do NOT attempt to repair or adjust any electrical or mechanical functions on this unit. Doing so will void the Warranty.
2. If you need to exchange the unit, please return it in its original carton, with a sales receipt, to the store where you
purchased it. If you are returning the unit more than 30 days after the date of purchase, please see the enclosed Warranty.
3. If you have any questions or comments regarding this unit’s operation or believe any repair is necessary, please call our
Consumer Service Department at 1-888 474-3178 or visit our website at www.magicchefappliance.com.
1-YEAR LIMITED WARRANTY
Sunbeam Products, Inc. doing business as Jarden Consumer Solutions or if in Canada, Sunbeam Corporation (Canada)
Limited doing business as Jarden Consumer Solutions (collectively “JCS”) warrants that for a period of one year from
the date of purchase, this product will be free from defects in material and workmanship. JCS, at its option, will repair or
replace this product or any component of the product found to be defective during the warranty period. Replacement will
be made with a new or remanufactured product or component. If the product is no longer available, replacement may be
made with a similar product of equal or greater value. This is your exclusive warranty. Do NOT attempt to repair or adjust
any electrical or mechanical functions on this product. Doing so will void this warranty.
This warranty is valid for the original retail purchaser from the date of initial retail purchase and is not transferable. Keep
the original sales receipt. Proof of purchase is required to obtain warranty performance. JCS dealers, service centers, or
retail stores selling JCS products do not have the right to alter, modify or any way change the terms and conditions of
this warranty.
This warranty does not cover normal wear of parts or damage resulting from any of the following: negligent use or
misuse of the product, use on improper voltage or current, use contrary to the operating instructions, disassembly, repair
or alteration by anyone other than JCS or an authorized JCS service center. Further, the warranty does not cover: Acts of
God, such as fire, flood, hurricanes and tornadoes.
What are the limits on JCS’s Liability?
JCS shall not be liable for any incidental or consequential damages caused by the breach of any express, implied or
statutory warranty or condition.
Except to the extent prohibited by applicable law, any implied warranty or condition of merchantability or fitness for a
particular purpose is limited in duration to the duration of the above warranty.
JCS disclaims all other warranties, conditions or representations, express, implied, statutory or otherwise. JCS
shall not be liable for any damages of any kind resulting from the purchase, use or misuse of, or inability to use the
product including incidental, special, consequential or similar damages or loss of profits, or for any breach of contract,
fundamental or otherwise, or for any claim brought against purchaser by any other party.
Some provinces, states or jurisdictions do not allow the exclusion or limitation of incidental or consequential damages or
limitations on how long an implied warranty lasts, so the above limitations or exclusion may not apply to you.
This warranty gives you specific legal rights, and you may also have other rights that vary from province to province, state
to state or jurisdiction to jurisdiction.
How to Obtain Warranty Service
In the U.S.A.
If you have any question regarding this warranty or would like to obtain warranty service,
please call 1-888 474-3178 and a convenient service center address will be provided to you.
In Canada
If you have any question regarding this warranty or would like to obtain warranty service,
please call 1-888 474-3178 and a convenient service center address will be provided to you.
In the U.S.A., this warranty is offered by Sunbeam Products, Inc. doing business Jarden Consumer Solutions located in
Boca Raton, Florida 33431. In Canada, this warranty is offered by Sunbeam Corporation (Canada) Limited doing business
as Jarden Consumer Solutions, located at 20B Hereford Street, Brampton, Ontario L6Y 0M1. If you have any other
problem or claim in connection with this product, please write our Consumer Service Department.
PLEASE DO NOT RETURN THIS PRODUCT TO ANY OF THESE ADDRESSES OR TO THE PLACE OF PURCHASE.
E11
plancha
a vapor
MANUAL
DEL
USUARIO
© 2012 CNA International, Inc. realiza negocios bajo el nombre de MC
Appliance Corporation. El logotipo Magic ChefTM es una marca registrada de CNA
International, Inc. utilizada bajo licencia. Distribuido por Sunbeam Products, Inc.
operando bajo el nombre de Jarden Consumer Solutions, Boca Raton, Florida
33431. Products, Inc. es una subsidiaria de Jarden Corporation (NYSE: JAH).
www.magicchefappliance.comImpreso en China
Model GCRVMC01
LEA ESTE MANUAL ANTES DE UTILIZAR SU PLANCHA Y
GUÁRDELO PARA FUTURA REFERENCIA
CONTENIDO
PRECAUCIONES IMPORTANTES . . . . . . . . . . . . . . . . . . . . . . . . . . . . . . . . . S1
APRENDA ACERCA DE SU PLANCHA . . . . . . . . . . . . . . . . . . . . . . . . . . . . . S4
COMO USAR SU PLANCHA. . . . . . . . . . . . . . . . . . . . . . . . . . . . . . . . . . . . . . .S5
CUIDADO Y LIMPIEZA . . . . . . . . . . . . . . . . . . . . . . . . . . . . . . . . . . . . . . . . . . .S8
INFORMACION DE LA GARANTIA . . . . . . . . . . . . . . . . . . . . . . . . . . . . S11
LEA ESTE MANUAL
En el encontrará muchos consejos útiles sobre el uso y
mantenimiento correctos de su plancha. EL cuidado preventivo
pueden ahorrarle mucho tiempo y dinero durante la vida útil de
su plancha.
PRECAUCIONES
IMPORTANTES
Para disminuir el riesgo de un incendio, descarga eléctrica y/o
lesión a las personas, se deben seguir las precauciones básicas
de seguridad al utilizarse equipos eléctricos, incluyendo las
siguientes:
1. LEA TODAS LAS INSTRUCCIONES ANTES DE USARSU PLANCHA.
2. Use su aparato solamente para los usos a los cuales está destinado.
3. Para protegerse contra el riesgo de electrocución, no sumerja
la plancha en agua o cualquier otro líquido.
4. La plancha siempre debe ser puesta en la posición “MIN”
del control de temperatura antes de que sea conectada o
desconectada del tomacorriente. Nunca estire el cable para
desconectarlo del tomacorriente; en lugar de eso, sostenga el
enchufe y desconéctelo.
5. No permita que el cable toque superficies calientes. Deje que la
plancha se enfríe completamente antes de guardarla. Envuelva
flojamente el cable alrededor de la misma cuando la guarde.
6. Siempre desconécte la plancha del tomacorriente cuando la
llene con agua o cuando la vacíe y cuando no la use.
7. No haga la funcionar con el cable dañado o si la plancha se
ha caído o dañado de alguna manera. Para evitar el riesgo de
electrocución, no la desarme. El armado inapropiado puede causar
el riesgo de electrocución cuando se usa. Póngase en contacto con
el Departamento de servicio al Consumidor de Magic Chef.
8. Una cercana supervisión es necesaria cuando cualquier aparato
es usado por o cerca de niños. No la descuide mientras esté
conectada o sobre una tabla de planchar.
S1
9. Pueden ocurrir quemaduras cuando se toquen piezas metálicas
calientes, agua caliente o vapor. Sea precavido cuando voltee
una plancha a vapor porque puede haber agua caliente en el
tanque de agua
10.La plancha no debe dejarse descuidada mientras está
conectada al tomacorriente de la pared. Cuando usted
haya terminado de planchar o aun cuando deje la plancha
descuidada por un corto tiempo:
• Fije el BOTÓN DE MANDOS DE VAPOR a la posición de NO
VAPOR (NO STEAM) “ ”, y gire la perilla del CONTROL DE
TEMPERATURA a apagado alineando el marcador de flecha
debajo de la perilla del control de temperatura con apagado (off).
• Coloque la plancha parada sobre su tapa trasera y
desenchúfela del tomacorriente eléctrico.
• La plancha se debe usar y dejar descansar sobre una
superficie estable.
NOTA: La SUELA puede dañarse si la plancha se almacena con la
suela mirando hacia abajo.
ESTA UNIDAD ESTÁ DISEÑADA
SOLAMENTE PARA USO DOMÉSTICO
CONSERVE ESTAS
INSTRUCCIONES
S2
Este aparato es para uso doméstico solamente. No contiene partes
que puedan ser reparadas por el usuario. La unidad de energía nunca
necesita lubricación. No intente reparar este producto.
Se provee un cable eléctrico corto para reducir el riesgo que
puede ser causado por el enredo o tropiezo con un cable largo.
Puede usar una extensión de cable si se usa con la debida
precaución. Se puede utilizar un cable de extensión si lo hace
con cuidado. Si usa un cable de extensión, la capacidad nominal
eléctrica del cable de extensión debe ser al menos del mismo
valor que la capacidad eléctrica de la plancha.
El cable debe estar arreglado de forma tal que no cuelgue del
borde de la mesa o tablero de cocina donde pueda ser jalado por
niños o pueda causar tropiezos accidentalmente. No sumerja la
base en agua u otros líquidos. No se aceptará responsabilidad
legal por cualquier lesión que sea el resultado de no acatarse a
estas instrucciones o cualquier otro uso inadecuado o mal manejo
del aparato.
ENCHUFE POLARIZADO
Este aparato tiene un enchufe polarizado (una pata
es más ancha que la otra). Para reducir el riesgo de
descarga eléctrica, este enchufe está diseñado para
ajustarse sólo de una forma en un tomacorriente
polarizado. Si el enchufe no se ajusta completamente en el
tomacorriente, dé vuelta al enchufe. Si todavía no se ajusta, contacte a
un electricista calificado. No intente modificar el enchufe de ninguna
manera. Si el enchufe está flojo en el tomacorriente de CA, o si el
tomacorriente se siente caliente, no utilice ese tomacorriente.
S3
APRENDA ACERCA DE SU PLANCHA
e
d
c
f
b
a
g
h
i
j
a Rociador
b Apertura para llenado de agua
c Botón de emisión de vapor
d Botón de rocío
e Selector de temperatura
f
Talòn de descanso
S4
g Luz indicadora de
funcionamiento
h Tanque de agua
i Falda
j Suela con recubrimiento
antiadherente
CÓMO USER SU PLANCHA
IMPORTANTE: ¡LÍMPIELA ANTES DE USARLA POR PRIMERA VEZ!
Vea la sección de CUIDADO Y LIMPIEZA para más información.
Durante el primer uso de la plancha, el aparato puede parecer que
“humea”, ésto cesará y no significa un defecto o peligro. Se deben
limpiar los conductos de vapor antes del primer uso para remover
cualquier residuo que haya quedado durante el procedimiento de
fabricación y para asegurarse que ninguna mancha aparecerá en la
tela cuando se use la plancha por primera vez.
PARA LIMPIAR LOS CONDUCTOS DE VAPOR
1. Asegúrese de que la plancha está desconectada del tomacorriente
de parer.
2. Gire el SELECTOR DE TEMPERATURA a la posición de “ NO
STEAM” (Sin vapor).
3. Llene la plancha con agua hasta la línea de llenado “MAX”.
Llenar en exceso la plancha pude causar que la plancha
derrame agua durante su uso.
NOTA: No llene en exceso el TANQUE DE AGUA y nunca lo llene
con otra cosa que no sea agua.
4. Enchufe el cordón en un tomacorriente eléctrico de 120
voltios, y fije la perilla del SELECTOR DE TEMPERATURA a su
posición más alta “LINO”.
5. Deje que la plancha precaliente por 2 minutos mientras
descansa sobre el talòn de descansa.
6. Gire el BOTÓN DE EMISION DE VAPOR en dirección de las
manecillas del reloj hacia la posición de alto vapor.
7. Planche a vapor con la plancha sobre una tela vieja y deje que
salga vapor por unos minutos. La plancha puede arrojar o chispear
agua durante los primeros usos con agua del grifo. A medida que la
cámara de vapor se acondiciona, esto dejará de ocurrir.
S5
LLENADO DEL TANQUE DE AGUA
1. Desenchufe la plancha antes de llenar el tanque.
2. Fije el BOTÓN DE EMISION DE VAPOR a la posición “NO
VAPOR” (NO STEAM) “ ” para que el agua entre directamente
en el tanque y para evitar que se rebalse.
3. Para llenar el tanque, quite el tapón de llenado y vierta el agua
en el orificio de llenado de agua.
NOTA: nunca deje que el agua rebase el límite del llenado
“MAX”.
4. El nivel del agua se puede ver a través del tanque de agua.
Si la plancha necesita más agua durante el uso, primero
desconéctela y luego llénela en posición vertical.
CONSEJOS PARA EL PLANCHADO
1. Separe los artículos a ser planchados de acuerdo a las
condiciones de temperatura que requieren. Comience a
planchar en las posiciones más bajas y aumente la temperatura
a medida que sea necesario. Si tiene alguna duda sobre la
temperatura para alguna tela, comience en una posición de
baja temperatura y planche el interior de alguna costura.
Aumente gradualmente las posiciones del calor y del vapor
hasta que se eliminen las arrugas sin dañar la tela.
2. Cuando cambie de una posición de alta temperatura a una
posición más baja, permita un tiempo de 5 minutos para
alcanzar la temperatura más baja.
FUNCION DE ROCIO
Asegúrese que el tanque de la plancha se haya llenado con agua.
Si las telas están demasiado secas o tienen pliegues o arrugas
pronunciadas, utilice la función de rocío para humedecer esas
áreas. Cuando el botón de (rocío) sea presionado (mientras
la plancha esté en posición horizontal ) un fino rociado de agua
será emitido de la boquilla de rocío frontal. Puede ser necesario
presionar el botón de (rocío) unas cuantas veces antes que
comience el rociado.
PLANCHADO SIN VAPOR
Ordene las piezas a planchar de acuerdo a las temperaturas
indicadas en las etiquetas de cada prenda de vestir. Coloque
la plancha en posición vertical. Fije el BOTÓN DE EMISION DE
VAPOR a la posición de NO VAPOR (NO STEAM) “ ”, y gire
la perilla del CONTROL DE TEMPERATURA hasta una posición
adecuada para cada prenda.
Comience a planchar las prendas que requieran menor temperatura
(telas sintéticas y seda) y gradualmente aumente el calor para
planchar prendas de vestir que requieran mayor temperatura.
Cuando cambie de una posición de alta temperatura a una
posición de baja temperatura, deje aproximadamente 5 minutos
para alcanzar la temperatura menor.
PLANCHADO A VAPOR
Enchufe la plancha después de llenar el tanque de agua, Fije el
CONTROL DE VAPOR REGULABLE en la cantidad deseada de vapor,
de acuerdo a la temperatura deseada. Coloque la plancha en
posición vertical. Después de que la luz indicadora de temperatura
se haya apagado presione el botón de vapor.
S6
S7
CUIDADO Y LIMPIEZA
INSTRUCCIONES DE LIMPIEZA
CUIDADO Y LIMPIEZA DE LA SUELA ANTIADHERENTE
• Nunca planche sobre cierres, alfileres, broches o remaches de
metal porque la suela antiadherente se puede rayar.
• Para limpiar la base antiadherente de la ocasional acumulación
de residuos, limpie la plancha fría y desenchufada con un paño
enjabonado. No use limpiadores abrasivos o plantillas metálicas
para fregado.
VACIADO Y ALMACENAMIENTO DE SU PLANCHA
1. Gire la perilla del CONTROL DE TEMPERATURA hacia APAGADO
(MIN) y el BOTÓN DE EMISION DE VAPOR a NO VAPOR (NO
STEAM) “ ”, desenchufe la plancha y deje enfriar.
2. Para vaciar el agua de la plancha, incline lentamente la punta
de la plancha sobre el fregadero o lavabo. El agua saldrá por la
APERTURA PARA LLENADO DE AGUA.
3. Envuelva el cordón un poco suelto alrededor de la plancha
fría y almacene en posición vertical sentada sobre su TALON
DEDESCANSO. Envolver el cordón muy apretado puede dañar el
cordón. No almacene la plancha de forma horizontal sobre su
SUELA, dado que cualquier residuo o humedad pueden causar
que la SUELA pierda color.
S8
GUIA PARA TELAS
La siguiente tabla está diseñada para ayudarle a seleccionar
la mejor posición y método para la tela que usted intenta
planchar. Verifique las etiquetas de las vestimentas y siga las
recomendaciones proporcionadas por el fabricante.
Etiqueta
Tipo textil
Fibra del material
Sintética
Acrílico
Polipropileno
Poliuretano
Sintética
Acetato
Triacetato
Sintética
Poliamida (Nylon)
Poliéster
Modal
Rayón
Seda
Seda
Lana
Lana
Algodón
Algodón
Lino
Lino
S9
SOLUCIÓN DE PROBLEMAS
LA PLANCHA NO SE CALIENTA
1. La plancha debería ser enchufada solamente en un
tomacorriente de corriente alterna de 120 volts.
2. Verifique si el control la temperatura está fijado a la
temperatura deseada.
3. Verifique el tomacorriente, enchufando una lámpara que funciona.
4. Si la plancha todavía no se calienta, verifique si hay algún daño
visible. Póngase en contacto con los centros de servicio Magic Chef.
LA PLANCHA NO PRODUCE VAPOR
1. Verifique que la plancha tenga agua, añada agua si es necesario.
2. Asegúrese que el control de vapor esté fijado en la posición adecuada.
3. Golpee suavemente la suela en el borde de la mesa de planchar, una o
dos veces, para liberar las válvulas del vapor de cualquier bloqueo.
LA PLANCHA ESCUPE AGUA O GOTEA
1. Asegúrese que se haya permitido a la plancha alcanzar la
temperatura seleccionada para el planchado.
2. Si la plancha gotea cuando la perilla del CONTROL DE
TEMPERATURA está en APAGADO (OFF) o mientras que la
plancha está SECA, asegúrese de que el BOTÓN DE EMISION DE
VAPOR esté fijado a NO VAPOR (NO STEAM) “ ”.
3. Si se plancha a vapor, coloque el control de la temperatura
en una posición ligeramente más alta y espere hasta que se
apague la luz indicadora de temperatura. Verifique que la
posición más alta es segura para la tela que está siendo usada.
4. La plancha no debe llenarse en exceso. Si la plancha se llena en
exceso, coloque la toloque la plancha en la posición “OFF” y
desenchúfela. Permita que la plancha se enfríe y saque el agua
del tanque. Vuelva a llenar el tanque de agua. Enchufe la plancha
en el tomacorriente y espere a que se caliente.
S10
INFORMACION DE LA GARANTIA
INSTRUCCIONES DE REPARACIÓN
1. NO intente reparar o ajustar ninguna función eléctrica o mecánica de esta unidad. El hacerlo invalidará la garantía.
2. Si necesita cambiar la unidad, devuélvala en su caja original, con el recibo de compra, al negocio donde la haya comprado.
Si devuelve la unidad más de 30 días después de la fecha de compra, vea la garantía adjunta.
3. Si tiene algún comentario o pregunta acerca del funcionamiento de la unidad, o cree que debe ser reparada, favor llamar
a nuestro Departamento de Servicio al Cliente al 1-888-474-3178 o visite nuestro sitio de Internet en
www.magicchefappliance.com.
GARANTÍA LIMITADA DE 1 AÑO
Sunbeam Products, Inc. operando bajo el nombre de Jarden Consumer Solutions, o en Canadá, Sunbeam Corporation
(Canada) Limited operando bajo el nombre de Jarden Consumer Solutions, (en forma conjunta, “JCS”), garantiza que por un
período de un año a partir de la fecha de compra, este producto estará libre de defectos de materiales y mano de obra. JCS,
a su elección, reparará o reemplazará este producto o cualquier componente del mismo que presente defectos durante el
período de garantía. El reemplazo se realizará por un producto o componente nuevo o reparado.
Si el producto ya no estuviera disponible, se lo reemplazará por un producto similar de valor igual o superior. Ésta es su
garantía exclusiva. No intente reparar o ajustar ninguna función eléctrica o mecánica de este producto. Al hacerlo elimínará
ésta garantía.
La garantía es válida para el comprador minorista original a partir de la fecha de compra inicial y la misma no es transferible.
Conserve el recibo de compra original. Para solicitar servicio en garantía se requiere presentar un recibo de compra. Los
agentes y centros de servicio de JCS o las tiendas minoristas que venden productos de JCS no tienen derecho a alterar,
modificar ni cambiar de ningún otro modo los términos y las condiciones de esta garantía.
Esta garantía no cubre el desgaste normal de las piezas ni los daños que se produzcan como resultado de uso negligente
o mal uso del producto, uso de voltaje incorrecto o corriente inapropiada, uso contrario a las instrucciones operativas, y
desarme, reparación o alteración por parte de un tercero ajeno a JCS o a un Centro de Servicio autorizado por JCS. Asimismo,
la garantía no cubre actos fortuitos tales como incendios, inundaciones, huracanes y tornados.
¿Cuál es el límite de responsabilidad de JCS?
JCS no será responsable de daños incidentales o emergentes causados por el incumplimiento de alguna garantía o
condición expresa, implícita o legal.
Excepto en la medida en que lo prohíba la ley aplicable, cualquier garantía o condición implícita de comerciabilidad o aptitud
para un fin determinado se limita, en cuanto a su duración, al plazo de la garantía antes mencionada.
JCS queda exenta de toda otra garantías, condiciones o manifestaciones, expresa, implícita, legal o de cualquier otra
naturaleza.
JCS no será responsable de ningún tipo de daño que resulte de la compra, uso o mal uso del producto, o por la imposibilidad
de usar el producto, incluidos los daños incidentales, especiales, emergentes o similares, o la pérdida de ganancias, ni de
ningún incumplimiento contractual, sea de una obligación esencial o de otra naturaleza, ni de ningún reclamo iniciado contra
el comprador por un tercero.
Algunas provincias, estados o jurisdicciones no permiten la exclusión o limitación de los daños incidentales o emergentes ni
las limitaciones a la duración de las garantías implícitas, de modo que es posible que la exclusión o las limitaciones antes
mencionadas no se apliquen en su caso.
Esta garantía le otorga derechos legales específicos y es posible que usted tenga otros derechos que varían de un estado,
provincia o jurisdicción a otro.
Cómo solicitar el servicio en garantía
En los Estados Unidos
Si tiene alguna pregunta sobre esta garantía o desea recibir servicio de garantía, llame al
1-888 474-3178 y podrá obtener la dirección del centro de servicio que le resulte más conveniente.
En Canadá
Si tiene alguna pregunta sobre esta garantía o desea recibir servicio de garantía, llame al
1-888 474-3178 y podrá obtener la dirección del centro de servicio que le resulte más conveniente.
En los Estados Unidos, esta garantía es ofrecida por Sunbeam Products, Inc. operando bajo el nombre de Jarden Consumer
Solutions, Boca Ratón, Florida 33431. En Canadá, esta garantía es ofrecida por Sunbeam Corporation (Canada) Limited
operando bajo el nombre de Jarden Consumer Solutions, 20 B Hereford Street, Brampton, Ontario L6Y 0M1. Si usted tiene
otro problema o reclamo en conexión con este producto, por favor escriba al Departamento de Servicio al Consumidor.
POR FAVOR NO DEVUELVA ESTE PRODUCTO A NINGUNA DE ESTAS DIRECCIONES NI AL LUGAR DE COMPRA.
S11