1
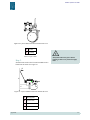
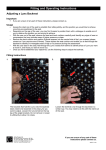
eDART™ System User Guide
Lynx™ Mold-Closed Limit Switch
L-LS
The Lynx™ L-LS Mold-Closed Limit Switch is a tie-bar or
machine mountable machine cycle input module designed to be
used with the eDART System™.
The L-LS switch can be used to easily get a machine trigger off of
most injection molding machines by following the installation steps
below.
U
Always power down before working on
any equipment.
Figure 25: Lynx™ Mold-Closed Limit Switch side view
L-LS Installation
Step 1.
Switch the molding machine to Manual mode and close
the mold.
Step 2.
Set the limit switch on the tie-bar as shown in figures 26
and 27.
Appendix
U
!
Be careful to note the position of the
ejector plate, the mold, the limit switch
and its cable, so the limit switch and/or
its cable does not get caught as the
mold opens and closes.
32
eDART™ System User Guide
B
A
Figure 26: Lynx™ Mold-Closed Limit Switch front view
A
Tie Bar
B
Ty-Wrap
U
Table 25: Figure Labels
Step 3.
Slide the limit switch to the left until an audible click is
heard form the switch. See Figure 27.
Always disconnect the power before
working on this or any electrical equipment.
B
A
L-LS
D
C
Figure 27: Lynx™ Mold-Closed Limit Switch side view
Appendix
A
Moving Half
B
Ejector Plate
C
Tie Bar
D
Slide
33
eDART™ System User Guide
Step 4.
Hold the limit switch in place and use a ty-wrap to tighten
it down to the tie-bar. See figure 29.
More than one ty-wrap can be tied together if the tie-bar is
large.
B
U
Always power down before working on
any equipment.
A
L-LS
C
D
Figure 29: Lynx™ Mold-Closed Limit Switch L-LS side view
A
Moving Half
B
Ejector Plate
C
Tie Bar
D
Tighten Ty-Wrap
Table 26: Figure Labels
Step 5.
Plug a Lynx™ cable between the limit switch and the
eDART System™.
Step 6.
Run the machine to ensure proper use, while monitoring
the eDART™ software.
Appendix
34


![USER Manual for WiFi edited5[1] - the Naples Free-Net](http://vs1.manualzilla.com/store/data/005874834_1-4f1e4f9158101a49e1c12c3e2f124ebe-150x150.png)