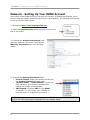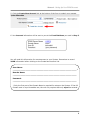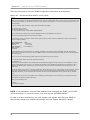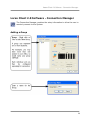
1
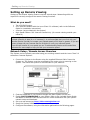
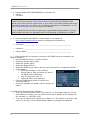
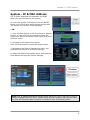
Setting Up Remote Viewing on
the L20WD800 Series
Combo DVR/
Monitor System
Network Setup
English Version 090808.1
MODEL:
SG19LD – SG17LD Series
www.lorexcctv.com
Copyright © 2008 Lorex Technology Inc.
Setting up Remote Viewing
Setting up Remote Viewing
Setting up the Remote Viewing Feature requires several steps. Networking skills are
required to correctly configure the remote viewing functions.
What do you need?
•
•
•
•
The LCD/DVR System.
A PC with the installed with the Lorex Client 2.0 software (refer to the Software
Guide for installation instructions)
A Router (not provided with the system)
High Speed Cable or DSL Internet Connectivity* (for remote viewing outside your
network)
* Note: High Speed Internet refers to a minimum Upload speed of 384 kbps. If sending
multiple channels of data (8 or 16 cameras) it is recommended that you work with your
Internet Service Provider to increase your Upload speed to 500 kbps or greater. If you are
unsure, please call your Internet Service Provider to verify your network speed.
If you are still unsure of your speed, see our Troubleshooting Section at the end of this
document for some steps to help you find your connection speed.
Network Setup / Remote Access Overview
The System can be remotely controlled using your existing network and the Lorex Client 2.0
software or Internet Explorer.
1. Connect the System to the Router using the supplied Ethernet Cable. Power the
System on. The System must be connected to the router prior to powering on the
system. This allows the system to communicate on your network.
2. Find the IP address of your System through the Menu System on the unit.
3. Enable PORT FORWARDING on your Router. Refer to the included Router Guide
and Basics of Remote Video Access Guide for further assistance with your specific
network setup and hardware.
4. Set up a web account at http://ddns.strategicvista.net.
5. Setup the System DDNS.
6. Configure the software, using the information gathered on the following pages.
2
Network Checklist
Network Checklist
The following checklist is provided to assist you in confirming that all steps have been
successfully performed during Network Setup. Use this checklist in conjunction with the
detailed steps outlined on the following pages, ticking off each option as you complete it.
□
1.
□
□
□
□
□
□
2. I have confirmed that my System is set to automatically complete my Network
settings (DHCP is set to ON):
□ Press the SETUP button on the Front Panel -or- Press SETUP on the Remote
□ Select the SYSTEM SETUP option.
□ Select the System option
□ Select the Network Menu. Confirm that the options for DHCP, WEB and DDNS have
checkmarks in the boxes. If not, select all and choose APPLY.
□
3. I have turned off the System, and performed the following:
□ Connected the Ethernet Cable to the back of the System
□ Connected the other end of the Ethernet Cable to my Router
□
I have all of the following:
High Speed Internet
A Router
The Ethernet Cable provided with this system
The System
A PC with the Remote Access software installed
My Router is a Brand & Model :
___________________________________________
□
My Modem is a Brand & Model:
___________________________________________
NOTE: Network Setup will not work if you do not have a router.
□
4. I have found my System Information by either Pressing the ENTER button on the
Front Panel:
□
My IP Address is: ________________________________
□
My MAC Address is: ______________________________
NOTE: If your IP address is showing as 127.0.0.1, please return to Step 1 and review all
menu settings. Check to make sure that your Ethernet cable is properly connected to your
Router and System.
3
Network Checklist
□
5. I have enabled PORT FORWARDING on my Router for:
□ Port 80
□ Port 6100
NOTE: Each Router is different, therefore the port forwarding settings will vary by model.
Please visit us on the web at http://www.lorexcctv.com/support for assistance with
several of the most common router types. If your router is not listed, please refer to the
manual that came with your Router, or your Router manufacturer for assistance, or visit
http://www.portforward.com for common router details.
If your Internet Service Provider has given you a combination Modem/Router, you may
need to speak with them for assistance with Port Forwarding or Bridging your Modem.
□
6. I have configured the DDNS for remote access to my system at
http://ddns.strategicvista.net and my configuration information is:
□
Username: __________________________________________________
□
Password: __________________________________________________
□
Domain Name: _______________________________________________
□
7. I have configured my System to connect to the DDNS Server by completing my
Network settings:
□ Press the SETUP button on the Front Panel
□ Select the System Setup option
□ Select the System option
□ Select the Network Menu.
□ Select the DDNS Server option, and use your information to complete the DDNS
□ Configuration:
• DDNS Server Name: Lorex (default)
• Domain Name: Enter the name you set for
the DDNS web configuration.
• User ID: Enter your user ID
• Password: Enter your password
□ Click the DDNS Status button to confirm the
connection details.
□ A success message will appear, and the system will
restart.
8. Configure the Remote Access Software:
□ If you are connecting from within your network (i.e. The System and your PC are
both inside your house), you only need to enter the IP address of the System into
the software (i.e. 192.168.0.105)
□ If you are connecting from outside your network (i.e. The System is at Home, and
your PC is at work), use the DDNS Domain Name to configure the software)
4
System - IP & MAC Address
System - IP & MAC Address
The IP & MAC Addresses are necessary for DDNS
Setup (for remote access to the System).
To Locate the System information, Press the ENTER
button on the Front Panel while viewing the Cameras.
The System Info window will be displayed.
- OR 1. Press the Menu Button on the Front Panel or Remote
Control, or right click with the mouse to access the
Setup Menu. Select the System Setup option and press
the Enter button.
2. Navigate to the System Menu option.
Press the Enter button to access the System Menu.
3. Navigate to the System Management menu, and
press the Enter Button to access the settings.
4. Select the System Information option, and press the
Enter Button to display the System Settings.
NOTE: Your IP address should look similar to 192.168.0.105, 10.0.0.105, etc. If your IP
address is appearing as 127.0.0.1, please review all menu settings, and check to make
sure that your Ethernet cable is properly connected to your Router and System.
5
Network - Router Port Forwarding
Network - Router Port Forwarding
You will need to enable port forwarding on your Router to allow for external communications
with your System for ports:
• TCP/IP PORT 6100
• WEB PORT 80
Computers, Systems, and other devices inside your network can only communicate directly
with each other within the internal network. Computers and systems outside your network
cannot directly communicate with these devices. When a system on the internal network
needs to send or receive information from a system outside the network (i.e. from the
Internet), the information is sent through the modem to the Router.
You may experience difficulties with Port Forwarding if:
• You have several routers connected together and your system is connected to the
last one.
• You are in an environment with either an additional software or hardware firewall.
• Your modem is a combination Router/Modem such as a Slipstream, WesTell, Netopia,
ActionTec, 2Wire, SMC or another model.
In these situations, we recommend that you contact a local technician for assistance.
NETWORK EXAMPLE
When a computer on the Internet needs to send data to your internal network, it sends this
data to the external IP address of the Router. The Router then needs to decide where this
data is to be sent to. This is where setting up Port Forwarding becomes important. Port
Forwarding tells the router which device on the internal network to send the data to. When
you set up port forwarding on your Router, it takes the data from the external IP
address:port number and sends that data to an internal IP address:port number (i.e Router
External IP 216.13.154.34:6100 to System Internal IP 192.168.0.3:6100).
The instructions found online in the Router Configuration Guide will assist you in the port
forwarding configurations for a selection of different router models.
Visit our Consumer Guides Support website at http://www.lorexcctv.com/support
for details
6
Network - Router Port Forwarding
Web - Finding Your External IP Address
You will need to have your External IP address to set up your DDNS account. One of the
fastest ways to find this information is to use a 3rd Party website such as
http://www.showmyip.com Your IP address can also be found within your Router
settings. Refer to your router user guide for further details.
Checking to see if your Ports are Open
This step is VERY IMPORTANT – if your ports are not open, you will not be able to
remotely access your system over the internet!
To test if your ports are open:
1. Visit http://www.canyouseeme.org/. Your external IP address will be displayed at
the top.
2. Type the number 80 in
the “what port” box,
and press the Check
button.
3. You will get a response back on that web page to let you know if your port has been
forwarded successfully or not. If you get a message as shown below, your port has
NOT been forwarded successfully, and you will need to repeat your forwarding steps
or speak to your ISP:
Error: I could not see your service on 111.111.111.111 on
port (6100)
4. Repeat Steps 2 & 3 for port 6100 as well.
Note: If both Port 80 and Port 6100 are not successfully forwarded, you will not be able
to connect to your system remotely over the internet. Please make sure these ports are
forwarded before continuing with your System Setup.
7
Network - Setting Up Your DDNS Account
Network - Setting Up Your DDNS Account
Lorex offers a free DDNS service for use with your System. A DDNS account allows you to
set up a web site address that points back to your Local Network. The following outlines how
to set up your free DNS account.
1. Navigate to http://ddns.strategicvista.net
2. Select the Create Account option from the list on the left
side of the screen.
3. Complete the Account Information fields
with your personal information. Complete the
Warranty Information with your purchase
details.
4. Complete the System Information fields:
• Product License: Select your product model from
the Product License drop down menu
• <Product Code> - <MAC Address>: Locate the
MAC address of your System (recorded while
loading the System in the Checklist)
• URL Request: Choose a URL for your DDNS
connection (i.e. your name, your company or
business name, or anything of your choice.)
NOTE: Make sure to write down your information BEFORE clicking on the Create New
Account link. This information is important for your System Setup
8
Network - Setting Up Your DDNS Account
5. Click the Create New Account link at the bottom of the form to submit your request.
6. Your Account information will be sent to you at the E-mail Address you used in Step 3.
You will need this information for remote access to your System. Remember to record
YOUR information before clicking on the Create New Account link.
User Name:
_____________________________________________________________*
Domain Name:
_____________________________________________________________
Password:
_____________________________________________________________
* Only the first part of the Domain Name is required for setup on the System. If the full
Domain sent is myurl.lorexddns.net, the unit only requires that only myurl be entered.
9
Network - Setting Up Your DDNS Account
There are two ways to find your DDNS Configuration information at a later date.
Option #1: Review the Email sent to you by Lorex:
Dear A,
Thank you for activating your free Dynamic DNS account for your Lorex DVR Combo. Once you have set up your Lorex device and
configured your network, you will be able to view your video images from anywhere in the world using the URL shown at the end
of this message.
When you visit the Lorex web site at: https://secure.lorexddns.net/webapp
Your account name is: aa321
Your account password is: 1111
Your Lorex license number is: SG19LD800-AAAAAAAAAAAA
You can visit this site to change your account information and to set up additional Lorex devices.
Set up the Lorex DVR Combo to use this service as follows:
On the monitor console (or from the remote control) press the set-up button. Select the 'DDNS Server' option under network.
Enter the following settings:
DDNS SERVER NAME: LOREX
DOMAIN NAME:
your domain
USER ID:
your user ID
USER PASSWORD:
[your password]
DDNS STATUS: ------OK CANCEL
Press DDNS STATUS button and wait for the message 'SUCCESS'. If the message returns 'SUCCESS' press OK and press the
return button to exit the menu (when you do, the DDNS set up for the first time system will prompt you to save the changes and
restart the system).
Note: if you receive a failed message, please check the information that you have entered.
For more information please refer to the remote client manual.
*** Important ***
Please note that normal latencies in the update protocol and Internet propagation delays require you to wait between 5 and 15
minutes and sometimes even longer for your network URL to become fully available and operational over the Internet. This is
normal for the DDNS system. Attempting to use the URL within the first 5 minutes of registration may also prolong the URL
update time.
The URL for accessing your video is: holycats.lorexddns.net. When setting up the Lorex client software for remote access, use this
URL in place of the IP Address. If you have decided to use the free Lorex Email Service (default option) for any system event
notifications and alerts, you must register with lorexddns.net and activate the DDNS option in the System's Set Up / Network
menu.
Alternatively, you can use your own email service by disabling the default mail service and entering your personal mail server
information in the System's Set Up / Mail menu.
Thank you for choosing Lorex.
Sincerely,
Lorex Customer Support
NOTE: If you entered an incorrect Email address when setting up the DDNS, you will NOT
receive this email. To review the email, you must log into the DDNS Website.
In order to receive email alerts, you must register your system with the Lorex DDNS, or
alternatively change your default mail settings (see your System Manual for details).
10
Network - Setting Up Your DDNS Account
Option #2: Log into the Lorex DDNS Website at
http://ddns.strategicvista.net and enter your Username and
Password.
Click the ACTION button located on the console to display a copy of the Configuration
email:
11
System - DDNS SETUP
System - DDNS SETUP
Once the DDNS settings have been configured online, the information must be entered on
the System to allow for remote connection via the Lorex Client 2.0 Software (or through
Internet Explorer):
1. Access the Main Menu Setup screens, and
navigate to the SYSTEM option. Press the
ENTER button to access the setup.
2. Navigate to the NETWORK option. Press the
Enter button to access the Network settings.
Select the DDNS Server option, and press the
ENTER button to enter the DDNS SETUP.
3. Enter the information received in email
(including the password). Press the DDNS Status
first - wait for the SUCCESS MESSAGE (as long
as the information is correct).
Select OK to save the settings.
The System will restart to activate the new
configuration.
NOTE: This does *NOT* mean that your ports
are forwarded correctly, or that you are ready for
network connection. This only means that your
DDNS information has been confirmed at the
DDNS server.
NOTE: Once all Network settings are configured, the System can be accessed using the
Lorex Client 2.0 Software.
12
Lorex Client 2.0 Software - Connection Manager
Lorex Client 2.0 Software - Connection Manager
The Connection Manager contains the setup information to allow the user to
remotely connect to the System.
Adding a Group
13
Lorex Client 2.0 Software - Connection Manager
Adding a Site (Individual Unit Configuration)
NOTE: When entering the information for the IP / DOMAIN NAME:
• If you are connecting from within your network (i.e. The System and your PC are
both inside your house), you only need to enter the IP address of the System into
the software (i.e. 192.168.0.105)
• If you are connecting from outside your network (i.e. The System is at Home, and
your PC is at work), use the DDNS Domain Name to configure the software).
14
Lorex Client 2.0 Software - Remote Connection
Lorex Client 2.0 Software - Remote Connection
Once the site setup profile has been created, a connection can then be made to the System:
15
Network Troubleshooting Tree
Network Troubleshooting Tree
Use the following tree to assist you with troubleshooting your network setup.
Step #1 - I have connected my System to
my Router. When I press the ENTER
button on my System, my IP is …
Similar to 192.168.###.### or
anything other than 127.0.0.1
This means that your system has
leased an IP address from the Router.
127.0.0.1
See Step #1 Troubleshooting. Once
troubleshooting has been
performed, please repeat Step #1.
My System Information is:
IP Address: ________________________ // MAC Address: ______________________
Step #2 – My Internet Connection is:
High Speed DSL or Cable Modem
with a minimum of 384kbps Upload
This means that your internet
connection is fast enough to upload my
video stream.
Dial-Up or Internet Service termed
“Lite” or “Light” , Dial-up
Replacement, ISDN, Dial Channel
Analog or PRI
See Step #2 Troubleshooting
Step #3 – My Internet Modem is:
A High Speed Cable or DSL Modem
which is *NOT* a dual
Modem/Router
This means that your internet
connection is fast enough to upload my
video stream.
16
A High Speed Cable or DSL Modem
which *IS* a dual Modem/Router
Your modem may be a model
Slipstream, WestTel, Netopia,
ActionTec, 2Wire, SMC or another
model.
See Step #3 Troubleshooting
Network Troubleshooting Tree
Step #4 – My Network Setup is:
One Router connected to the
Modem
Proceed to Port Forwarding for your
Model of Router. We have
walkthroughs for several models. If
your model is not listed, please refer to
your Router Manual or Support, or visit
http://www.portforward.com for
detailed walkthroughs.
Multiple Routers connected to the
Modem
Multiple Routers require extra setup
during the Port Forwarding Section.
See Step #4 Troubleshooting
Step #5 – I have configured my DDNS
Settings at http://ddns.strategicvista.net
I successfully configured my DDNS
Account
Enter the information you received in
email on your System.
I did not get an email, and I have
forgotten my User Name,
Password, or selected domain
name
Multiple Routers require extra setup
during the Port Forwarding Section.
See Step #5 Troubleshooting
My DDNS Information is:
DDNS Server Name:
_________LOREX______________________________
Domain Name: _________________________________________________
User ID: ______________________________________________________
Password: _____________________________________________________
17
Network Troubleshooting Tree
Step #6 – I have entered the Settings
on my System and pressed the “DDNS
STATUS” button
You have received a SUCCESS
message
Your system should be connected to
the remote DDNS server now.
You have received a FAILED
message
Your system is not communicating with
the remote DDNS Server.
See Step #6 Troubleshooting
Step #7 – I have installed the software
on my PC inside my Local Network and
have tested my connection
I am able to locally connect to my
System
Your system is connecting on your local
network.
I am unable to locally connect to
my system
Your system is not communicating on
your local network.
See Step #7 Troubleshooting
Step #8 – I have installed the software
on my PC in a remote location and
have tested my connection
I am able to locally connect to my
System
Your system is connecting and working
over the Internet.
Congratulations!
You can now view your system
remotely!
18
I am unable to remotely connect to
my system
Your system is not communicating over
the internet.
Confirm that all previous steps
have been successfully completed,
especially the Port Forwarding
section. If you are still
experiencing problems, please call
for support.
Troubleshooting Steps
Troubleshooting Steps
We have included troubleshooting steps for the most common issues with each step of the
Network Troubleshooting Tree. Please try all the steps listed below before calling for support.
Step #1 – My IP is 127.0.0.1
This means that your system is NOT communicating on the network. Some things to try:
• Power off the system, and disconnect the Ethernet Cable from both the System and
Router. Reconnect the Ethernet cable to the System and to the router, and turn the
system on.
• Check that DDNS is enabled in the Menu (see page 3, Option #2 on the checklist)
• Make sure that you have a Router, and are not using a similar device (such as a Hub
or Wireless Repeater)
• Check that the Router has lights on corresponding to the port that the System is
connected into
• Check that the Ethernet cable has not become bent or broken
• Make sure the Router is turned on
• Check to make sure the Router is set to lease a DHCP address to networking devices
(refer to your Router Manual for details)
Step #2 – My Internet is Dial-Up or Internet Service termed “Lite” or “Light”, Dialup Replacement, ISDN, Dial Channel Analog or PRI
• This means that your internet connection is NOT fast enough to upload my video
stream. You will need to speak with your Internet Service Provider for another
alternative.
• One way to check your Connection Speed is to visit http://www.speedtest.net/ and
follow these steps:
1) Load the website
http://www.speedtest.net/
2) Click on any of the Blue Pyramids
to get started with your Speed
Test
3) The speed test will give you
results once it has been
completed, and if your Upload
speed is under 384kbps, then
you will not be able to remotely
access your system:
19
Troubleshooting Steps
Step #3 – My Internet Modem is A High Speed Cable or DSL Modem which *IS* a
dual Modem/Router
• Your modem may be a model Slipstream, WestTel, Netopia, ActionTec, 2Wire, SMC
or another model of dual Router/Modem.
• We recommend that you speak with your Internet Service Provider to:
o Help you to forward ports 6100 and 80 to the IP address of your System
(press the Enter button on the system to get the System IP address)
o Have them assist you with Bridging your modem if port forwarding is not an
option
o Have your Internet Service Provider get you a different model of Modem
which is not a dual modem/router
• Once they have helped you port forward, visit http://www.canyouseeme.org/ and
check both port 80 and 6100 – if you are getting a “Could Not See Service” message,
then the ports are NOT forwarded.
Step #4 – I have Multiple Routers connected to the Modem
• Multiple Routers require extra setup during the Port Forwarding Section. We
recommend that you get the assistance of an IT professional to assist you with this
complicated process.
• Visit http://www.portforward.com for assistance with many different types of routers
• If you have an open space on your first router, or directly on your router/modem, we
recommend that you attach your system there.
Step #5 – I did not get an email, and I have forgotten my User Name, Password,
or selected domain name
• Double check your email inbox for one from Lorex. If you don’t have your
information, you will need to call us for a reset for your information in our Database.
Please press the Enter Button on the front panel of your System and have ready your
System MAC address and System IP address before calling.
Step #6 – I have entered my DDNS Settings on my system, but have received a FAILED
message
• Double check that you entered your login information into the DDNS Section exactly
as it was sent to you in Email, including all numbers and letters.
• Try to log into the http://ddns.strategicvista.net website to confirm that your login
information is working
• Double check that your system has a proper IP address (Press the Enter Button on
the front panel of the system)
Step #7 – I am unable to locally connect to my system
• Check all previous steps
• Check to make sure that the PC is on the same network as your System
• Make sure you have correctly entered the internal IP address into the Software
• Double check the Hardware and Software Manuals that came with your System for
additional software setup and connection information
20
Glossary
Glossary
Below is a glossary of terms commonly used throughout this document.
•
DDNS – Dynamic Domain Name System. A Domain Name System assigns a name
to an IP Address – for example, www.google.com has an IP address of
64.223.167.99. If you type in www.google.com into your Internet Explorer address
bar, your computer sends a request to a Name System, which looks to the IP
address for Google to bring the information back to your computer.
A Dynamic Domain Name System means that even if the IP address changes (which
happens with most internet providers), the name that you type into your browser
address bar will always find your system. So, typing in
http://mysystem.lorexddns.net will always find your external IP address, and locate
your system even if your IP address changes.
•
DHCP - Dynamic Host Configuration Protocol. Your Router is a DHCP Server, which
will give any device on your network an IP Address when asked. If you have set your
System to have DHCP to ON, when it is connected to your Router it will automatically
get an Internal IP Address.
•
Domain Name – The Name that identifies a Website. www.google.com is a Domain
Name.
•
DSL – Digital Subscriber Line. A type of internet connectivity between you and your
telephone company.
•
IP Address – Internet Protocol Address. Each device on your network (like a
computer, or your System) will have an individual Internal Address (like
192.168.0.103). Your Modem has been assigned an External IP address, like
72.48.166.9 – this address can periodically change.
•
Kbps – Kilobits per Second. Refers to the speed of a signal transmission (upload or
download), and in this document refers to your Internet Connection Upload Speed.
•
LCD/DVR – Liquid Crystal Display / Digital Video Recorder. This is your System
(combo Monitor / Recorder)
•
MAC Address - Media Access Control address . An address which is typically made
up of numbers 0~9 and letters A~F and is assigned to your hardware that uniquely
identifies it’s place on the network.
•
PC – Personal Computer
•
URL - Uniform Resource Locator. A URL is the address of a page on the World Wide
Web, such as http://www.google.com or http://mysystem.lorexddns.net
21
Glossary
It’s all on the web
Product Information
Specification Sheets
User Manuals
Software Upgrades
Quick Start Guides
Firmware Upgrades
VISIT
www.lorexcctv.com
www.lorexcctv.com
Lorex Technology Inc.
22