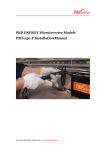
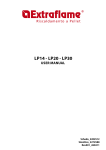
1
960-Hour Time Lapse Video Cassette Recorder
User’s Guide
SG-7960
Be sure to read carefully and follow all the SAFETY
INFORMATION on pages i, ii, iii.
Keep the manual in a safe place for future reference.
960-Hour Time Lapse Video Cassette Recorder
960-Hour Time Lapse Video Cassette Recorder
Safety information
CAUTION
RISK OF ELECTRIC SHOCK
DO NOT OPEN
CAUTION: TO REDUCE THE RISK OF ELECTRIC SHOCK, DO NOT REMOVE
COVER (OR BACK). NO USER-SERVICEABLE PARTS INSIDE.
REFER SERVICING TO QUALIFIED SERVICE PERSONNEL.
The lightning flash with arrowhead symbol, within an equilateral triangle, is intended to alert
the user to the presence of uninsulated “dangerous voltage” within the product’s enclosure
that may be of sufficient magnitude to constitute a risk of electric shock.
The exclamation point within an equilateral triangle is intended to alert the user to the
presence of important operating and servicing instructions in the literature accompanying the
appliance.
WARNING : TO REDUCE THE RISK OF FIRE OR ELECTRIC SHOCK, DO NOT EXPOSE THIS
APPLIANCE TO RAIN OR MOISTURE.
CAUTION : TO PREVENT ELECTRIC SHOCK, MATCH WIDE BLADE OF PLUG TO WIDE SLOT,
FULLY INSERT.
IMPORTANT SAFEGUARDS
In addition to the careful attention devoted to quality standards in the manufacture of your
video product, safety is a major factor in the design of every instrument. However, safety is
your responsibility too. This sheet lists important information that will help to assure your
enjoyment and proper use of the video product and accessory equipment. Please read them
carefully before operating and using your video product.
Installation
1 Read and Follow Instructions – All the safety and operating instructions should be read before the
video product is operated. Follow all operating instructions.
2 Retain Instructions – The safety and operating instructions should be retained for future
reference.
3 Heed Warnings – Comply with all warnings on the video product and in the operating instructions.
4 Polarization – This video product is equipped with a polarized alternating -current line plug (a plug
having one blade wider than the other). This plug will fit into the power outlet only one way.
This is a safety feature. If you are unable to insert the plug fully into the outlet, try reversing the
plug. If the plug still fails to fit, contact your electrician to replace your obsolete outlet. To prevent
electric shock, do not use this polarized plug with an extension cord, receptacle, or other outlet
unless the blades can be fully inserted without blade exposure. If you need an extension cord,
use a polarized cord.
5 Power Sources – This video product should be operated only from the type of power source
indicated on the marking label. If you are not sure of the type of power supply to your home,
consult your video dealer or local power company. For video products intended to operate from
battery power, or other sources, refer to the operating instructions.
i
960-Hour Time Lapse Video Cassette Recorder
960-Hour Time Lapse Video Cassette Recorder
Specifications
General Specifications
Recording method
Audio recording
Tape speed
Specified video cassette tape
Recording/playback time
Fast forward/rewind time
Television system
Dual-azimuth 4-head rotating helical scanning system
In 2, 6, and 18 hour modes
33.35 m/sec (2 hour mode)
VHS 1/2 inch video cassette tape
2, 6, 18, 24, 36 hours(when using T-120 tape)
Within 3 minutes(when using T-120 tape)
NTSC color TV system
Video
Recording method
Video input
Video output
Horizontal resolution
Luminance signal : FM recording
~0.8V Down-converted subcarrier phase shift system
1 Vp-p, BNC, 75Ω, unbalanced
1 Vp-p, BNC, 75Ω, unbalanced
Black & white mode 350 lines
Color mode
300 lines
Audio
Input
Output
Microphone input
RCA pin jack more than 47kΩ -8.8dBm, unbalanced
RCA pin jack less than 1.5kΩ -7.8dBm, unbalanced
-60 dBs, 3.5mm mini jack, 10kΩ, unbalanced
Connectors
Alarm input
Alarm output
Panic input
End output
Warning output
Series input
Series output
Switch output
Common
DC 4~5V(Open), DC 0~0.8V(Closed)/5.7kΩ
DC 4~5V(H), DC 0~0.8V(L)/5.7kΩ
DC 4~5V(Open), DC 0~0.8V(Closed)/5.7kΩ
DC 4~5V(H), DC 0~0.8V(L)/5.7kΩ
DC 4~5V(H), DC 0~0.8V(L)/5.7kΩ
DC 4~5V(H), DC 0~0.8V(L)/5.7kΩ
DC 4~5V(H), DC 0~0.8V(L)/5.7kΩ
DC 4~5V(H), DC 0~0.8V(L)/5.7kΩ
0V( GND)
Other Specifications
Operating temperature range
Operating humidity range
Power requirements
Power consumption
Dimensions
Weight
41ºF - 104ºF
80% or less
AC 120V , 60 Hz
17W
360(W) x 90(H) x 289(D)
approximately 4kg
6 Overloading – Do not overload wall outlets or extension cords as this can result in a risk of fire or
electric shock. Overloaded AC outlets, extension cords, frayed power cords, damaged or cracked
wire insulation, and broken plugs are dangerous. They may result in a shock or fire hazard.
Periodically examine the cord, and if its appearance indicates damage or deteriorated insulation,
have it replaced by your service technician
7 Power-Cord Protection – Power-supply cords should be routed so that they are not likely to be
walked on or pinched by items placed upon or against them, paying particular attention to cords
at plugs, convenience receptacles, and the point where they exit from the video product.
8 Ventilation – Slots and openings in the case are provided for ventilation to ensure reliable
operation of the video product and to protect it from overheating. These openings must not be
blocked or covered. The openings should never be blocked by placing the video product on a bed,
sofa, rug, or other similar surface. This video product should never be placed near or over a
radiator or heat register. This video product should not be placed in a built-in installation such as
a bookcase or rack unless proper ventilation is provided or the video product manufacturer’s
instruction’s have been followed.
9
Attachments – Do not use attachments unless recommended by the video product manufacture
as they may cause a hazard.
10 Water and Moisture – Do not use this video product near water- for example, near a bath tub,
wash bowl, kitchen sink or laundry tub, in a wet basement, or near a swimming pool and the like.
Caution : Maintain electrical safety. Powerline operated equipment or accessories connected to
this unit should bear the UL listing mark or CSA certification mark on the accessory itself and
should not be modified so as to defeat the safety features. This will help avoid any potential
hazard from electrical shock or fire. If in doubt, contact qualified service personnel.
11 Accessories – Do not place this video product on an unstable cart, stand,
tripod, bracket, or table. The video product may fall, causing serious injury to
a child or adult as well as serious damage to the video product. Use this video
product only with a cart, stand, tripod, bracket, or table recommended by the
manufacturer or sold with the video product. Any mounting of the product
should follow the manufacturer’s instructions and use a mounting accessory
recommended by the manufacturer.
12 A video product and cart combination should be moved with care. Quick stops, excessive force,
and uneven surfaces may cause the video product and cart combination to overturn.
13 Power Lines – An outside antenna system should not be located in the vicinity of overhead power
lines, other electric light or power circuits, or where it can fall into such power lines or circuits.
When installing an outside antenna system, extreme care should be taken to keep from touching or approaching such power lines or circuits as contact with them might be fatal. Installing an
outdoor antenna can be hazardous and should be left to a professional antenna installer.
NOTE : The specifications and external appearance of this unit are subject to change
without notice.
41
960-Hour Time Lapse Video Cassette Recorder
960-Hour Time Lapse Video Cassette Recorder
ii
Use
SYMPTOM
14 Cleaning – Unplug this video product from the wall outlet before cleaning. Do not use liquid
cleaners or aerosol cleaners. Use a damp cloth for cleaning.
15 Object and Liquid Entry – Never push objects of any kind into this video product through
openings as they may touch dangerous voltage points or “short-out” parts that could result in a
fire or electric shock. Never spill liquid of any kind on the video product.
16 Lightning – For added protection for this video product during a lightning storm, or when it is left
unattended and unused for long periods of time, unplug it from the wall outlet and disconnect the
antenna or cable system. This will prevent damage to the video product due to lightning and
power line surges.
17 Servicing-Do not attempt to service this video product yourself as opening or removing covers
may expose you to dangerous voltage or other hazards. Refer all servicing to qualified service
personnel.
18 Conditions Requiring Service-Unplug this video product from the wall outlet and refer servicing
to qualified service personnel under the following conditions.
A. When the power-supply cord or plug is damaged.
B. If liquid has been spilled, or objects have fallen into the video product.
C. If the video product has been exposed to rain or water.
D. If the video product does not operate normally by following the operating instructions.
Adjust only those controls that are covered by the operating instructions. Improper
adjustment of other controls may result in damage and will often require extensive work by a
qualified technician to restore the video product to its normal operation.
E. If the video product has been dropped or the cabinet has been damaged.
F. When the video product exhibits a distinct change in performance-this indicates a need for
service.
19 Replacement Parts – When replacement parts are required, have the service technician verify
that the replacements used have the same safety characteristics as the original parts. Use of
replac ments specified by the video product manufacturer can prevent fire, electric shock, or
other hazards.
20 Safety Check – Upon completion of any service or repairs to this video product, ask the service
technician to perform safety checks recommended by the manufacturer to determine that the
video product is in safe operating condition.
21 Wall or Ceiling Mounting – The product should be mounted to a wall or ceiling only as recommended by the manufacturer.
22 Heat – The product should be situated away from heat sources such as radiators, heat registers,
stoves, or other products (including amplifiers) that produce heat.
- Set the date and time correctly.
The unit is not set to timer recording stand-by mode.
- Press the POWER/TIMER button to
display “
” on the display panel.
“N” is selected for the TIMER
PROGRAM SET.
- Be sure to select “Y” for the TIMER
PROGRAM SET.
Alarm recording
is not working
“NO” is selected for alarm recording
in the ALARM REC SET menu.
- Be sure to select “YES” for alarm
recording.
Noise in the
playback picture.
The tracking adjustment is wrong.
- Adjust it by using the manual
tracking.
The video heads need cleaning.
iii
960-Hour Time Lapse Video Cassette Recorder
- Press the PLAY button in the playback mode.
- Clean the video heads.
The date and
time are not
recorded.
“NO” is selected for the date and
time in the DISPLAY SET menu.
The date and time go off the ONSCREEN by pressing the DISPLAY
button.
- Be sure to select “YES” for the
display.
The cassette
tape cannot be
ejected
Problem with the system or tape.
- Unplug the power cord then plug it
back in.
- Press the DISPLAY button to show
the date and time.
Periodic Inspection and Maintenance
Periodic inspection and maintenance should be referred to your dealer. If
there is noise in the playback picture, and it cannot be corrected using the
tracking control, it may indicate that the video heads need cleaning. The
video heads should be cleaned and inspected every 1,000 hours. The video
heads usage can be checked using initial menu, running time.
Note to CATV system installer
This reminder is provided to call the CATV system installer’s attention to Section 820-40 of the NEC
which provides guidelines for proper grounding and, in particular, specifies that the cable ground
shall be connected to the grounding system of the building, as close to the point of cable entry as
practical.
CORRECTIVE ACTION
The date and time are not correct.
Timer recording
is not working.
Service
POSSIBLE CAUSE
System Down
✔
• Press the RESET
button for more
than 5 seconds to
perform the reset.
Running Time will
not be reset.
If the unit does not function at all, try the following.
1 Unplug the power cord then plug it back in.
2 Reset the memory. (Press the RESET button. Under normal conditions,
do not touch the RESET button)
3 If the problem is not corrected after performing steps 1 and 2, consult
your dealer.
960-Hour Time Lapse Video Cassette Recorder
40
Contents
Troubleshooting Guide
If the unit does not operate normally when you follow the instructions indicated in the manual, please
refer to the table below.
SYMPTOM
No power.
POSSIBLE CAUSE
The power cord is not correctly
connected to the wall outlet.
- Connect the power cord firmly into
the wall outlet.
The unit is in timer recording standby mode.
- This is normal, not a malfunction.
No image
displayed on the
monitor TV.
The connections are not correct.
The power to the camera and/or
monitor TV is not turned on.
- Check that all connections are
correct.
The buttons do
not respond.
The unit is in timer recording standby mode.
- Press the POWER/TIMER button.
Alarm recording.
- Wait for the alarm recording to end.
- Press the STOP button for 3
seconds to stop.
- Wait for the panic recording to end.
- Press the STOP button for 3
seconds to stop.
- Cancel the security lock.
Panic recording.
The security lock (SET LOCK) is
engaged.
39
CORRECTIVE ACTION
- Turn all connected devices on.
Unit will not go
into record
mode.
The loaded cassette has no
erasure prevention tab.
- Load a cassette tape with erasureprevention tab or cover the tab hole
with adhesive tape.
Autorepeat is
not working.
“NO” is selected for autorepeat
recording in the REC MODE SET
menu.
During autorepeat recording when
there is an alarm input, autorepeat
recording is canceled.
- Be sure to select “YES” for
autorepeat recording.
- Set “YES” again for autorepeat
recording.
960-Hour Time Lapse Video Cassette Recorder
Locations of controls and indicators . . . . . . . . . . . . . . . . . . . . . . . . . . . . . . . . . . . . . . . . . . . . . . .1
Front panel . . . . . . . . . . . . . . . . . . . . . . . . . . . . . . . . . . . . . . . . . . . . . . . . . . . .1
Digital display . . . . . . . . . . . . . . . . . . . . . . . . . . . . . . . . . . . . . . . . . . . . . . . . . .2
Back panel . . . . . . . . . . . . . . . . . . . . . . . . . . . . . . . . . . . . . . . . . . . . . . . . . . . . .4
Remote control . . . . . . . . . . . . . . . . . . . . . . . . . . . . . . . . . . . . . . . . . . . . . . . . . .5
Connections . . . . . . . . . . . . . . . . . . . . . . . . . . . . . . . . . . . . . . . . . . . . . . . . . . . . . . . . . . . . . . . . . .6
Types of on-screen displays and Display Sequence . . . . . . . . . . . . . . . . . . . . . . . . . . . . . . . . . . .7
Video Cassettes Tapes . . . . . . . . . . . . . . . . . . . . . . . . . . . . . . . . . . . . . . . . . . . . . . . . . . . . . . . . . .9
Setting the Clock . . . . . . . . . . . . . . . . . . . . . . . . . . . . . . . . . . . . . . . . . . . . . . . . . . . . . . . . . . . . . 10
Changing the on-screen display . . . . . . . . . . . . . . . . . . . . . . . . . . . . . . . . . . . . . . . . . . . . . . . . .12
Normal Recording . . . . . . . . . . . . . . . . . . . . . . . . . . . . . . . . . . . . . . . . . . . . . . . . . . . . . . . . . . . . .14
Program Timer Recording . . . . . . . . . . . . . . . . . . . . . . . . . . . . . . . . . . . . . . . . . . . . . . . . . . . . . .15
Alarm Recording . . . . . . . . . . . . . . . . . . . . . . . . . . . . . . . . . . . . . . . . . . . . . . . . . . . . . . . . . . . . .19
Panic Recording . . . . . . . . . . . . . . . . . . . . . . . . . . . . . . . . . . . . . . . . . . . . . . . . . . . . . . . . . . . . . .22
Series Recording . . . . . . . . . . . . . . . . . . . . . . . . . . . . . . . . . . . . . . . . . . . . . . . . . . . . . . . . . . . . .22
Autorepeat Recording . . . . . . . . . . . . . . . . . . . . . . . . . . . . . . . . . . . . . . . . . . . . . . . . . . . . . . . . .24
Normal Playback . . . . . . . . . . . . . . . . . . . . . . . . . . . . . . . . . . . . . . . . . . . . . . . . . . . . . . . . . . . . . 25
Normal Playback . . . . . . . . . . . . . . . . . . . . . . . . . . . . . . . . . . . . . . . . . . . . . . .25
Tracking Control . . . . . . . . . . . . . . . . . . . . . . . . . . . . . . . . . . . . . . . . . . . . . . .25
Audio Playback . . . . . . . . . . . . . . . . . . . . . . . . . . . . . . . . . . . . . . . . . . . . . . . .25
Special Playback . . . . . . . . . . . . . . . . . . . . . . . . . . . . . . . . . . . . . . . . . . . . . . . . . . . . . . . . . . . . .26
Picture Search . . . . . . . . . . . . . . . . . . . . . . . . . . . . . . . . . . . . . . . . . . . . . . . . .26
Still Image .. . . . . . . . . . . . . . . . . . . . . . . . . . . . . . . . . . . . . . . . . . . . . . . . . . . .26
Vertical Lock Control . . . . . . . . . . . . . . . . . . . . . . . . . . . . . . . . . . . . . . . . . . . . 26
Slow . . . . . . . . . . . . . . . . . . . . . . . . . . . . . . . . . . . . . . . . . . . . . . . . . . . . . . . . 26
Recording Check . . . . . . . . . . . . . . . . . . . . . . . . . . . . . . . . . . . . . . . . . . . . . . . 26
Alarm Search . . . . . . . . . . . . . . . . . . . . . . . . . . . . . . . . . . . . . . . . . . . . . . . . . .27
Alarm Scan . . . . . . . . . . . . . . . . . . . . . . . . . . . . . . . . . . . . . . . . . . . . . . . . . . . .28
Index Search . . . . . . . . . . . . . . . . . . . . . . . . . . . . . . . . . . . . . . . . . . . . . . . . . .28
Other functions . . . . . . . . . . . . . . . . . . . . . . . . . . . . . . . . . . . . . . . . . . . . . . . . . . . . . . . . . . . . . . .29
Tape Counter (Zero Search) . . . . . . . . . . . . . . . . . . . . . . . . . . . . . . . . . . . . . . .29
Setting the Security Lock (Set Lock) . . . . . . . . . . . . . . . . . . . . . . . . . . . . . . . . 30
Setting the SW Out Terminal Output . . . . . . . . . . . . . . . . . . . . . . . . . . . . . . . . 30
Setting the Buzzer . . . . . . . . . . . . . . . . . . . . . . . . . . . . . . . . . . . . . . . . . . . . . .31
Changing the Alarm Recording Times . . . . . . . . . . . . . . . . . . . . . . . . . . . . . . . 32
Checking the Power Loss Times . . . . . . . . . . . . . . . . . . . . . . . . . . . . . . . . . . . 32
Checking Usage Duration . . . . . . . . . . . . . . . . . . . . . . . . . . . . . . . . . . . . . . . . .33
Setting In/Out Terminals . . . . . . . . . . . . . . . . . . . . . . . . . . . . . . . . . . . . . . . . . .33
Daily Inspection . . . . . . . . . . . . . . . . . . . . . . . . . . . . . . . . . . . . . . . . . . . . . . . . . . . . . . . . . . . . . . 38
Troubleshooting Guide . . . . . . . . . . . . . . . . . . . . . . . . . . . . . . . . . . . . . . . . . . . . . . . . . . . . . . . . 39
Specifications . . . . . . . . . . . . . . . . . . . . . . . . . . . . . . . . . . . . . . . . . . . . . . . . . . . . . . . . . . . . . . .41
960-Hour Time Lapse Video Cassette Recorder
iv
Daily Inspection
Locations of controls and indicators
The following daily inspections are recommended in order to
assure long-term and trouble-free operation of the unit.
Front panel
The daily inspections are particularly important if using
autorepeat recording.
Inspection Procedure
1 Turn on the power to the camera, TV monitor and other
connected devices.
✔
• If the security lock is engaged,
it has to be released before
proceeding with theinspection.
• If any problem is discovered
during the inspection, unplug
the power cord and consult
your dealer.
1
STOP button
15 MENU button
2
REC button
16 SHIFT (
3
REC CHECK button
4
EJECT button
5
CASSETTE LOADING
DOOR
6
DISPLAY PANEL
7
PLAY button
8
REW button
9
FF button
5 Press the PLAY button and check that the playback image is
correct.
• Check in particular playback of time lapse recording (18 or
24 hour mode)
6 Check that the recorded date and time are correct.
)/
TRACKING (+) button
18 REC/PLAY SPEED (
)
button (SET - button)
19 REC/PLAY SPEED (
)
button (SET + button)
20 AUDIO ON button
21 DISPLAY button
22 POWER (TIMER)
13 SET LOCK switch
4 Press the REW button to rewind the recorded tape a few
seconds.
TRACKING (-) button
17 SHIFT (
11 REMOTE SENSOR
switch
3 Check that the on-screen display of the date and time is
correct.
)/
10 PAUSE/STILL button
12 REMOCON LOCK
2 Check that the image received on the TV monitor is correct.
button
23 COUNTER button
24 CLEAR button
14 RESET button
1
960-Hour Time Lapse Video Cassette Recorder
960-Hour Time Lapse Video Cassette Recorder
38
Connecting to a Multiview System for a Alarm Recording
Digital Display
1
Operation Indicators display the actual operation mode.
Operation Mode
2
3
4
5
37
960-Hour Time Lapse Video Cassette Recorder
Indicator
1
Record(REC)
REC
2
Record pause (REC PAUSE)
REC +
3
Playback (PLAY)
4
Still image (STILL)
5
Fast forward (FF)
6
Rewind (REW)
7
CUE(CUE) +
+
8
Review(REVIEW) +
+
9
Slow(Pause Still + FF, Pause Still + REW)
+
+
Cassette indicator :
Comes on when a cassette is loaded.
Record check indicator : REC
Flashes on during record check
Alarm indicator :
Flashes on when an alarm is being recorded and stops
flashing after alarm recording.
Timer Recording indicator :
Comes on when in timer recording stand-by mode, or
during a timer recording
960-Hour Time Lapse Video Cassette Recorder
2
6
Power Loss indicator :
Flashes on after power loss.
7
CNT indicator : CNT
Comes on when the tape or alarm counter is on.
8
SPD indicator : SPD
Comes on when the play or recording speed is on.
9
AM indicator : AM
(PM : “AM” off)
10
RMC.L indicator : RMC.L
Comes on when the RMC LOCK sw is set to the “ON” position.
11
S.REC indicator : S.REC
Comes on when “YES” is selected in the menu for the series recording.
12
R.REC indicator : R.REC
Comes on when “YES” is selected in the menu for the repeat recording.
13
SET LOCK SW indicator :
Comes on when the SET LOCK sw is set to the “ON” position.
14
Mode display
TAPE COUNTER display (eg:10:HOUR,59:MINUTE)
– Maximum Hour : 19 - Maximum Minute : 59
If you are also using a LOREX Multi View system, use the following diagrams as
a guide to connecting the VCR for normal or alarm recording.
Connecting to a Multiview System for Normal Recording
ALARM COUNTER display (eg: A:Alarm, 32:Alarm No.)
PLAY/REC SPEED display (eg: 960H:Play/Recording Speed)
TIME display (eg: 7:HOUR , 07:MINUTE)
ERROR display (eg: E:Error , 04:Error No.)
– E-01 : The cassette cannot be loaded or unloaded.
– E-02 : The tape stops.
– E-03 : The drum can not rotate properly.
– E-04 : The tape is cut/broken.
AUDIO ON display (eg: A:Audio , 12H:Play Speed)
3
960-Hour Time Lapse Video Cassette Recorder
960-Hour Time Lapse Video Cassette Recorder
36
SW OUTPUT Terminal
Back Panel
While recording, a pulse signal(DC 5V) is output at the SW OUT
terminal after each recording period. This terminal is usually
connected to the switch input of devices like a camera switching
unit, or a quad compressor.
1) Low
2) High
1
SERIES OUTPUT Terminal
During recording, when the end of the tape is reached, the output
becomes DC 5V .
AC POWER CORD
2 WARNING OUT terminal
3 SERIES IN terminal
4 COM terminal
5 SERIES OUT terminal
SERIES INPUT Terminal
If the input becomes DC 5V for 200 msec or more, the VCR
starts series recording.
6 SW OUT terminal
7 VIDEO OUT jack
8 VIDEO IN jack
9 AUDIO IN jack
10 TAPE END terminal
WARNING OUTPUT Terminal
1)
11 PANIC IN terminal
“High”
If the error display on the display panel continues to flash,
the output becomes DC 5V. If the POWER button is
pressed, the emergency mode is released. then the output
becomes 0V.
12 COM terminal
13 ALARM OUT terminal
14 ALARM IN terminal
15 MIC (microphone input) jack
2)
“Low”
16 AUDIO OUT jack
If the error display on the display panel continues to flash,
the output becomes 0V. If the POWER button is pressed,
the emergency mode is released. then the output becomes
DC 5V.
35
960-Hour Time Lapse Video Cassette Recorder
960-Hour Time Lapse Video Cassette Recorder
4
ALARM INPUT Terminal
Remote Control
This terminal is to connect PIR sensors, door contacts or any
type of motion detectror.
1 POWER(TIMER) button
1)
If the input becomes DC 5V for 500 msec or more, the VCR
starts alarm recording.
2 PLAY/STILL TRACKING + button
3 PLAY/STILL TRACKING - button
“N/C” (Normally CLOSED Switch Circuit)
2)
4 PAUSE / STILL + button
“N/O” (Normally OPEN Switch Circuit)
If the input becomes 0V for 500 msec or more, the VCR
starts alarm recording.
5 PAUSE/STILL - button
6 PLAY
button
ALARM OUTPUT Terminal
7 FF
button
This terminal is to connect to any external source, such as a
siren, etc.
8 STOP
button
1)
9 EJECT button
10 REC/PLAY SPEED
11 SHIFT
button
12 SHIFT
button
“High”
When an alarm input is received and the unit is recording,
the output becomes DC 5V. Once the alarm recording is
over, the output returns to 0V.
button
2)
“Low”
When an alarm input is received and the unit is recording,
the output becomes 0V. Once the alarm recording is over,
the output returns to DC 5V.
13 SET + button
14 SET - button
15 DISPLAY button
16 COUNTER button
17 CLEAR button
PANIC INPUT Terminal
1)
“N/C” (Normally CLOSED Switch Circuit)
If the input becomes DC 5V for 500 msec or more, the VCR
starts panic recording.
2)
“N/O” (Normally OPEN Switch Circuit)
If the input becomes 0V for 500 msec or more, the VCR
starts panic recording.
18 PAUSE / STILL button
19 REW
button
20 AUDIO ON button
21 ● REC button
22 PLAY SPEED
button
TAPE END(OUT) Terminal
23 CHECK button
24 MENU button
1)
“High”
During recording, when the end of the tape is reached, the
output becomes DC 5V.
2)
“Low”
During recording, when the end of the tape is reached, the
output becomes DC 0V.
5
960-Hour Time Lapse Video Cassette Recorder
960-Hour Time Lapse Video Cassette Recorder
34
Connections
Checking Usage Duration
1 Press the MENU button to display the initial MENU.
✔
2 Press the SHIFT
button to move the arrow mark ( ) to “Running
Time.” Press the SHIFT
button to display the Running Time.
• The Running Time
data cannot be reset
even though the reset
button is pressed. If
the RESET button is
pressed, all data can
be reset except the
running time data.
Connect the video camera and monitor TV as shown in the
figure below.
NOTE : Make sure to turn the power off on all devices before
making the connections.
Running Time : The video heads usage duration.
3 Press the MENU button, the normal screen is displayed.
Setting In/Out terminals
1 Press the MENU button to display the initial MENU.
2 Press the SHIFT
button to display the VCR MODE SET menu.
3 Press the SHIFT
Set.
button to move the arrow mark (
4 Press the SHIFT
) to In/Output
button to display the IN/OUTPUT SET menu.
5 Press the SHIFT
desired item.
button to move the arrow mark (
6 Press the SHIFT
button to set “Open” or “Closed”, “High” or “Low”.
✔
7 Press the MENU button three times, the normal screen is displayed.
33
Power Cord Installation
Insert the plug of the power cord into an outlet.
) for the
960-Hour Time Lapse Video Cassette Recorder
• For more details, please
refer to the manuals
accompanying all other
devices. If the connections
are not made properly, it
may cause a fire or
damage the equipment.
960-Hour Time Lapse Video Cassette Recorder
6
Checking the Alarm Recording Times
Types of On-screen Displays and Display Sequence
• If the VCR is in timer recording stand-by mode (the “
“ indicator is displayed on the display panel),
the on-screen displays will not be available. First press the Power/Timer button, to cancel the recording stand-by mode, then proceed with the VCR programming. When finished, press the Power/Timer
button again to return the VCR to timer recording stand-by mode.
• When a menu is displayed, recording will not be possible.
• Press the MENU button three times, the setting procedure is now completed and the normal screen is
displayed.
1 Press the MENU button to display the initial MENU.
2 Press the SHIFT
✔
• The data for the
previous alarm
recordings, past 35,
is erased.
3
Press the SHIFT
button to move the arrow mark (
) to Alarm Time.
button to display the ALARM TIME menu.
• The number of alarm triggers and the 35 most recent alarm recording
times are displayed.
• During recording or playback the menus cannot be displayed.
See page 8 – A, B, C.
A
B
•
•
•
•
Press
Press
Press
Press
the
the
the
the
MENU button. (First time)
SHIFT
button to move the arrow mark ( ) downward for the desired item.
SHIFT
button to select the desired item, then the desired menu is displayed.
MENU button to return to the normal screen from the initial menu.
• Press the SHIFT
button to select the desired item.
• Press the SET - (or +) button to set or Press the SHIFT
• Press the MENU button to return to the initial menu.
4 Press the MENU button twice, the normal screen is displayed.
Checking Power Loss Times
button to select “YES” or “NO”.
1 Press the MENU button to display the initial MENU.
C
• Press the SHIFT
(or SHIFT )button to select the desired item.
• Press the SET - (or +) button to set or Press the SHIFT
button to select.
• Press the MENU button to return to the previous menu.
✔
• POWER LOSS …
the number of power
losses and the date
and time of the 35
most recent power
losses and recoveries are displayed.
2 Press the SHIFT
Time.
button to move the arrow mark (
) to Power Loss
3 Press the SHIFT
button to display the POWER LOSS TIME menu.
• The number of power losses, and the 35 most recent power loss times
are displayed.
4 Press the MENU button twice, the normal screen is displayed.
7
960-Hour Time Lapse Video Cassette Recorder
960-Hour Time Lapse Video Cassette Recorder
32
7 Press the MENU button, the normal screen is displayed.
✔
In the following
cases, the buzzer
will be heard approximately 5 times.
– If the REC button
is pressed while a
cassette without
erasure-prevention
tab is loaded.
• The setting procedure is now complete.
Setting the Buzzer
1 Press the MENU button to display the initial MENU.
2 Press the SHIFT
button to select VCR Mode Set. The VCR MODE
SET menu is displayed.
A
– If a cassette, without the erasureprevention tab, is
loaded while the
timer is set.
– If there is a series
recording input
while a cassette
without erasureprevention tab is
loaded.
3 Press the SHIFT
button to move the arrow mark (
4 Press the SHIFT
below.
button to set “YES” for the functions described
) to Buzzer Set.
• The buzzer will be heard whenever a button is pressed.
– If the TIMER
button is pressed
without inserting a
cassette.
B
✔
• If “NO” is set, the
buzzer will not
operate.
C
31
960-Hour Time Lapse Video Cassette Recorder
960-Hour Time Lapse Video Cassette Recorder
8
Video Cassette Tapes
Setting the Security Lock (Set Lock)
✔
The security lock function is designed to prevent accidental stopping of
recording if the STOP button is pressed inadvertently.
• If you try to record on
a cassette without the
erasure-prevention
tab, the VCR will eject
the cassette.
• If the TIMER button is
pressed when a
cassette without the
erasure-prevention tab
is loaded, the VCR will
eject the cassette, the
timer recording indicator ( ) will start flashing and a buzzer willl
sound if “YES” is set in
the menu for buzzer.
✔
• When the cassette is
loaded, the cassette
indicator “ “ will light
on the display panel.
• The counter display
will switch to the reset
counter“0H 00M 00S”
display on the monitor
screen. (“0H 00M” on
the display panel.)
Use only video cassette tapes bearing the
• If your hand gets stuck
in the cassette loading
slot, unplug the power
cord and consult the
dealer where the unit
was bought. Do not
forcibly pull the hand
out as that may cause
severe injuries.
9
1 Set the SET LOCK switch to “ON” position.
✔
•“
“ is displayed on the display panel.
This VCR was primarily designed for use with T-120 cassette tapes. It is
recommended to use T-120 VHS video cassette tapes for optimal
performance.
• While the security
lock is engaged, all
commands are
disabled.
2 To cancel the security lock, set the SET LOCK switch to “OFF” position.
Handling Cassette Tapes
• The security lock
should not be
engaged while a
menu is displayed.
Synchronization pulses for multiplexers can be obtained from the SW OUT
terminal.
Cassette tapes should always be stored vertically in their cases, away from
high temperatures, magnetic fields, direct sunlight, dirt, dust and locations
subject to mold formation.
•“
“ will be erased from the display panel.
Setting the SW Out Terminal Output
1 Press the MENU button, to display the initial MENU.
2 Press the SHIFT
Terminal Set.
button to move the arrow mark (
Do not tamper with the cassette mechanism.
Never touch the tape with your fingers.
3 Press the SHIFT
menu.
button to display the SW OUT TERMINAL SET
4 Press the SHIFT
button to set “FIELD” (or “FRAME”).
Protect cassette tapes from shocks or strong vibrations.
To protect your recordings
After having recorded a tape, if you wish to keep the recording, use a flathead screwdriver to break off the erasure-prevention tab on the cassette.
) to SW OUT
✔
• If “TIMING” is set to
FRAME (see step 6),
“FRAME” will be
indicated instead of
“FIELD”.
To record again on a tape without erasure-prevention tab, cover the hole
with adhesive tape.
Erasure-prevention tab
To prevent accidental erasure, remove the tab after
recording.
✔
• Do not insert any
object in the cassette
loading slot, as that
may cause injury and
damage to the VCR.
logo.
To record again, cover the hole with vinyl tape.
• With each press of the SHIFT
indicated below.
button, the setting will change as
5 Press the SHIFT
button, to select Timing.
6 Press the SHIFT
button to set the “TIMING”.
• FIELD . . .1 pulse is output after each set number of fields.
• FRAME . .1 pulse is output after each set number of frames.
Loading
Place the cassette, label side up, in
the loading slot. Gently push the
center of the cassette until it is loaded
automatically.
Unloading
In STOP mode, press the EJECT button. The cassette is automatically
ejected.
960-Hour Time Lapse Video Cassette Recorder
960-Hour Time Lapse Video Cassette Recorder
30
Other Functions
✔
• When you insert a
cassette, the
counter always
resets to zero.
• There is no tape
counter indication for
the blank
portions of tape.
• In the 2-hour recording speed mode
only, the tape
counter indicates
real hours, minutes
and seconds.
• In the other SP
recording speed
modes (24H, 36H),
the tape counter
indication is a ratio
of the 2-hour mode
base indication. (In
24-hour recording
mode, each
“second” of the tape
counter actually
represents approximately 24/2 =12 real
seconds.)
• There may be a
slight discrepancy
between the position
shown on the tape
counter and the
actual tape position.
Setting the Clock
Tape Counter (Zero Search)
Example: To set the clock to April 12, 2000 at 9:30
Using the counter, it is easy to find a desired recording.
Clock Setting
1 Press the CLEAR button, at the beginning of the desired recording.
• The counter will be reset to “0H 00M 00S” (on screen).
• The counter will be reset to “0H 00M”(on the display panel).
1 Turn the power on to all devices used.
2 Press the MENU button, the initial MENU is displayed.
The arrow mark ( ) is located in “VCR Mode Set”.
2 After recording or playback, press the Menu button to display the initial
MENU.
3 Press the SHIFT
button to move the arrow mark (
Initial Menu
) to Search Select.
4 Press the SHIFT
button to display the SEARCH SELECT menu. The
SEARCH SELECT menu is displayed.
5 Press the SHIFT
button to move the arrow mark (
3 Press the SHIFT
The arrow mark (
button, the VCR MODE SET menu is displayed.
) is located in “Clock Set”.
4 Press the SHIFT
button, the CLOCK SET menu is displayed.
) to Zero Search.
6 Press the SHIFT
button to search the counter “0H 00M 00S” (“0H 00M”
on the display panel).
• The display returns to the normal screen.
• The tape is rewound or advanced to the counter “0H 00M 00S”
reading(“0H 00M” on the display panel).
• When rewinding the
tape past the “0H
00M 00S” position
(“0H 00M” on the
display panel), a
minus(-) is displayed.
5 Press the SET - (or +) button to set the hours (eg : 09), then press
the SHIFT
button.
29
960-Hour Time Lapse Video Cassette Recorder
960-Hour Time Lapse Video Cassette Recorder
10
6 Press the SET - (or +) button to set the minutes (eg : 30), then press the
SHIFT
button.
Alarm Scan
7 The seconds are already set to “00”.
2 Press the SHIFT
button to search forward or in reverse without entering a specific alarm number.
8 Press the SHIFT
1 Repeat steps 1 to 3.
button.
• The display returns to the normal screen.
9 Press the SET - (or +) button to set the month (eg 04), then press the SHIFT
button.
• The VCR will advance (or rewind) the tape at high speed, and playback the first 5 seconds of every alarm recording.
10 Press the SET - (or +) button to set the day (eg : 12), then press the SHIFT
button.
• To cancel the alarm scan mode, press the STOP button.
11 Press the SET - (or +) button to set the year (eg : 00 for 2000).
• The last 2 digits only are displayed.
• The day of the week is set automatically.
3 While the desired recording is being played back, press the PLAY button.
• Playback will start, and alarm scan is cancelled.
12 Press the MENU button three times, the normal screen is displayed.
• The setting procedure is now complete.
Index Search
1 Repeat steps 1 to 2.
2
✔
• In the index search
mode, SHIFT
button should be used
to search forward or in
reverse ( Index FF
/REW).
Move the arrow mark (
as you want to search.
3 Press the SHIFT
) to the FF or REW in the Index Search mode
button to search forward or in reverse.
• The display returns to the normal screen.
• The VCR will advance (or rewind) the tape at high speed and playback
the first 5 seconds of every normal recording.
• To cancel the index search mode, press the STOP button.
4 While the desired recording is being played back, press the PLAY button.
• Playback will start, and index search is cancelled.
11
960-Hour Time Lapse Video Cassette Recorder
960-Hour Time Lapse Video Cassette Recorder
28
Alarm Search
Changing the On-Screen Display
1 Press the Menu button to display the initial menu.
2 Press the SHIFT
button to select Search Select, then press the SHIFT
button to display the SEARCH SELECT menu.
Selecting the On-screen Display
You can select whether or not to display the time, date, frame counter, alarm
counter, counter title.
1 Turn the power on to all devices used.
2 Press the MENU button. The initial MENU is displayed. The arrow mark
( ) is located in “VCR Mode Set”.
Initial MENU
3 Move the arrow mark (
you want to search.
) to FF or REW in the Alarm Search mode as
4 Press the SET -(or +) button to enter the number of alarm marks you
want to search, press the SHIFT
button to search forward or in
reverse.
• The display returns to the normal screen.
• The VCR will locate the desired alarm recording and begin playback.
3 Press the SHIFT
button to select the VCR Mode Set, then the VCR
MODE SET menu is displayed.
4 Press the SHIFT
set”.
button, until the arrow mark (
) points to “Display
5 Press the SHIFT
button to select Display Set, then the DISPLAY SET
menu is displayed.
27
960-Hour Time Lapse Video Cassette Recorder
960-Hour Time Lapse Video Cassette Recorder
12
6 Press the SET - (or +) button to set “YES” for the functions described
below.
✔
• The items for
which “YES” is set
are recorded. The
items for which
“NO” is set at step
6 above are not
recorded.
Time . . . .
Date . . . . .
Frame Cnt
Alarm Cnt .
Counter . .
Title . . . . .
.
.
.
.
.
.
.
.
.
.
.
.
.The
.The
.The
.The
.The
.The
time is displayed.
Month-Day-Year is displayed.
number of frames is displayed.
number of alarms is displayed.
counter is displayed.
title is displayed.
• A maximum of 20 characters can be used (letters, numbers or spaces).
7 Press the SHIFT
button to set the display position.
8 Press the SET - (or +) button to set the position of the time, date, frame
cnt. alarm cnt. to “L-Bottom (or R-Bottom).
• If any of 4 items is set, the position of 4 items is changed identically.
9 Press the SET - (or +) button to set the position of the counter and title to
“C-Top” (or “R-Top” or “L-Top”)
If one of 2 items is set, the position of 2 items is changed identically.
L-Top / C-Top / R-Top
: Left Top / Center Top / Right Top
L-Bottom / R-Bottom
: Left Bottom / Right Bottom
Special Playback
✔
• During picture
search, noise
(horizontal bars) will
appear in the
picture.
Picture Search
1 Press the FF/CUE (or REW/REVIEW) button, during normal playback.
• The image can be seen while the tape is advanced (or rewound) at
high speed.
2 To return to normal playback, press the PLAY button.
• The sound is muted.
✔
• If still mode continues for 5 minutes or
more, the VCR will
go into stop mode to
avoid damaging the
tape.
• If the image is
unstable (rolling
vertically), adjust the
tracking control to
correct.
Still Image
1 Press the PAUSE/STILL button, during normal playback.
• A still image can be viewed.
2 To return to normal playback, press the PLAY button.
• With each press of the PAUSE/STILL button, the still image is
advanced one image (frame).
Vertical Lock Control
During still image mode,
1 Press the TRACKING + button to reduce the vertical rolling of the
image.
2 If it cannot be corrected, press the TRACKING - button.
10 Press the MENU button three times, the normal screen is displayed.
Slow
The setting procedure is now complete.
1 With each press of the FF button, during still image mode, the slow
speed will change as indicated below.
1/15times → 1/20times → 1/30times (forward direction)
2 With each press of the REW button, during still image mode, the slow
speed will change as indicated below.
1/15times → 1/10times → 1/5times (forward direction)
3 To return to normal playback, press the PLAY button.
✔
• During recording
check operation,
recording is
suspended
momentarily.
13
960-Hour Time Lapse Video Cassette Recorder
Recording Check
During recording, press the REC CHECK button.
• The tape will be rewound for about 5 seconds and slow play mode will
be performed. The VCR will then return to the previous recording
mode.
960-Hour Time Lapse Video Cassette Recorder
26
Normal Playback
Normal Recording
Normal Playback
1 Turn on the power to the TV monitor.
2 Load the video cassette tape.
✔
• A slow motion effect
or accelerated playback effect can be
achieved by using a
slower or faster playback speed than the
speed used for
recording.
3 Press the REC/PLAY
speed.
SPEED (or
) button to select the playback
• The selected playback speed is displayed on the display panel.
• A tape recorded with SP heads can be played in 2 / 12 / 24 / 36 / 48 /
72 / 96 / 120 / 168 / 240 / 360 / 480 / 720 / 960 / Hour.
4 Press the PLAY button.
• Playback starts.
• If necessary, adjust the tracking to eliminate the noise from the picture.
5 To stop playback, press the STOP button.
• To advanced or rewind the tape, press the FF/CUE or REW/REVIEW
button.
Tracking Control
If there is noise in the image during playback,
1 While looking at the playback picture, press and hold the TRACKING +
button to minimize the noise.
✔
Normal Recording
• If the Repeat Rec Set
is set to “NO” in the
REC MODE SET
menu, recording will
continue to the end of
the tape, then stop
and the tape will be
ejected.
1 Turn the power on to all devices used.
✔
• A tape recorded on
this VCR cannot be
played back on
another make of time
lapse VCR.
• If you press the REC
button and the loaded
cassette has no
erasure-prevention
tab, the VCR will eject
the cassette.
• During recording, the
Menu button will not
function (the menu
cannot be accessed).
2 If it cannot be minimized, press the TRACKING - button.
3 Press the play button in the playback mode.
Audio Playback
Audio playback is only possible in 2-hour, 12-hour and 24- hour modes.
The playback speed has to be the same as the recording speed, for normal
playback of the audio.
✔
• Noise will appear in
the image when
audio playback is
used in 12/24- hour
mode.
For a tape recorded in 2-hour, 12-hour, and 24-hour modes, press the
AUDIO ON button after pressing the PLAY button. “A” will be displayed to the
left of the playback speed on the display panel. Press the AUDIO ON button
again to remove “A”.
✔
• If you playback the
recorded part where
recording check was
performed, noise may
appear.
• If you change the
recording speed during recording, noise or
a missing signal may
result.
✔
• During pause, the
image appears on
screen but it is not
recorded.
• If a recording pause
continues for 5 minutes or more, the VCR
will go into stop mode
to avoid damage to
the tape.
25
960-Hour Time Lapse Video Cassette Recorder
2 Load a cassette tape with erasure prevention tab in place.
3 Press the REC/PLAY SPEED
speed.
(or
) button to set the recording
• The recording speed is displayed on-screen and on the display panel.
• If you don’t want to record the recording speed, counter, title, time,
date etc, press the DISPLAY button, then start recording.
4 Press the REC button.
• The “REC” indicator is displayed on the display panel and recording
starts.
5 To stop recording, press the STOP button.
<Recording Speed>
Recording
Speeds
Maximum recording
duration (with an
T-120 cassette tape)
Recording
interval
2
Standard mode
1/60 second
12
0.12
24
0.22
36
0.32
48
0.42
Tape Motion
Possible
Continuous
Not possible
Intermittent
0.62
72
96
Audio
Recording
Time Lapse mode
0.82
120
1.02
168
1.42
240
2.02
360
3.02
480
4.02
720
6.02
960
8.02
Record Pause
Recording can be interrupted temporarily.
1 Press the PAUSE/STILL button during recording.
• The “REC” and “
” indicators are displayed on the display panel.
2 To resume recording, press the REC button, or press the PAUSE/STILL
button again.
960-Hour Time Lapse Video Cassette Recorder
14
Program Timer Recording
Autorepeat Recording
There are two program timer recording methods, daily recording or recording on
certain days of multiple weeks (weekly recording).
Autorepeat Recording
The same tape can be recorded over many times. Please note that
if you activate this feature you will lose the entire previous recording.
Example 1 : To record on every Thursday from 10 : 00 to 18 : 00 , in 24hour mode (recording speed)
1 Press the Menu, SHIFT , SHIFT
display the REC MODE SET menu.
1 Make sure that the set date and time are correct.
button in sequence to
2 Load a cassette tape with erasure prevention tab in place.
3 Press the MENU, SHIFT , SHIFT
, SHIFT
display the TIMER PROGRAM SET(1) menu.
buttons in sequence to
✔
• The white block cursor is on “SUN” (Sunday).
4 Press the SHIFT
button, until the cursor is on “THU”.
5 Press the SHIFT
button.
• The cursor is moved to the recording start hour position.
6 Press the SET - (or +) button to set the recording start hour (eg : 10), then
press the SHIFT
button.
• The cursor is moved to the recording start minutes position.
7 Press the SET - (or +) button to set the recording start minute (eg : 00), then
the SHIFT
button.
• The cursor is moved to the recording stop hour position.
8 Press the SET - (or +) button to set the recording stop hour (eg : 06), then
press the SHIFT
button.
• If during autorepeatrecording
there is an alarm trigger,
“
“ is displayed on the
display panel and alarm
recording will take place.
Autorepeat recording will
continue after alarm
recording has completed its
programmed duration.
2 Press the SHIFT
Repeat Rec Set.
button to make the arrow mark (
) point to
3 Press the SHIFT
ing mode.
button to set the desired autorepeat record-
NO … Autorepeat recording doesn’t take place.
YES… Autorepeat recording takes place.
“R.REC” will light on the display panel.
4 Press the Menu button two times, the normal screen is displayed.
• The setting procedure is now complete.
5 Press the REC button.
• Recording will start. When the tape’s end is reached, the VCR
will rewind it to the beginning regardless of the counter
memory, and recording will resume.
• The cursor is moved to the recording stop minutes position.
15
960-Hour Time Lapse Video Cassette Recorder
960-Hour Time Lapse Video Cassette Recorder
24
✔
• During series
recording, autorepeat recording or
timer recording are
not possible.
• If in the REC
MODE SET menu,
“Series Rec Set” is
set to “NO”, series
recording will not
be possible.
3 Press the REC button on VCR No.1.
9
• Recording will start in series recording mode.
4 Set the security lock on VCR No.1.
• When the end of the tape on VCR No.1 is reached, the output at the
SERIES OUT terminal will switch signal. This will start recording on
VCR No.2, the tape will stop and be ejected on VCR No.1.
✔
• If the set stop time is
earlier than or the
same time as the set
start time, the VCR
will consider the stop
time to be the following day.
Press the SET - (or +) button to set the recording stop minutes
(eg : 00), then press the SHIFT
button.
10 Press the SET - (or +) button to select the recording speed (eg : 24),
then press the SHIFT
button.
• The cursor is moved to the N/Y position.
11 Press the SET - (or +) button to select “Y”.
Y . . . . . recording will take place
N . . . . . recording will not take place
Programmed timer recording Example 1
• Repeat steps 4 to 13 to program timer recordings for other days of the
week.
• To set two or more timer recordings the same day of the week, press
the SHIFT
button, until the cursor located in the day of the week for
the second recording, then press the SET - (or +) button, to set the
desired day of the week. With each press of the SET - ( or +) button,
the day will change as indicated below.
SET - : ← direction , SET + :
23
960-Hour Time Lapse Video Cassette Recorder
960-Hour Time Lapse Video Cassette Recorder
→
direction
16
12 Press the MENU button three times, the normal screen is displayed.
Panic Recording
This feature is similar to an alarm recording, but the recording time is
not pre-selected. When there is a panic input at the PANIC IN terminal, recording will start and continue for up to 2 hours.
Series Recording
Using 2 VCRs or more, the series recording function lets you switch
recording from one unit to the next (only with VCRs of the same
model as this one).
13 Press the POWER/TIMER button.
• The timer recording indicator “
“ will light on the display panel. The
VCR is now in timer recording stand-by mode.
✔
• To modify or cancel
timer recording, press
the POWER/TIMER
button to cancel the
timer recording mode.
Example 2 : To record everyday from 10 : 00 to 18 : 00, in 24-hour
mode (recording speed)
1 Repeat steps 1 to 3.
2 Press the SHIFT
button, until the cursor is on “DLY”. The MENU
below is displayed.
Series Recording Setup
1 Connect 2 VCRs or more as illustrated below.
2 Set the following items as indicated.
3 Repeat steps 5 to 13.
Programmed timer recording Example 2
Item
VCR No.1
VCR No.2
and on
Cassette tape
Loaded
Loaded
Operation mode
Stop
Stop
Repeat Rec Set
“NO”
“NO”
Series Rec Set
“YES”
“YES”
Timer recording
OFF (not set)
OFF (not set)
Security lock switch
(SET LOCK switch)
“OFF”
“ON”
Changing a Program Timer Recording
1 Press the MENU, SHIFT , SHIFT
, SHIFT
to display the TIMER PROGRAM SET(1) menu.
2 Press the SHIFT
setting to correct.
(or
buttons in sequence
) button, until the cursor is located in the
3 Press the SET - (or +) button, to correct the setting.
• Press the MENU button three times until the normal screen is
displayed.
4 Press the POWER/TIMER button.
17
960-Hour Time Lapse Video Cassette Recorder
960-Hour Time Lapse Video Cassette Recorder
22
Connecting to a Lorex Monitor for Alarm Recording
To Cancel a Program Timer Recording
1 Repeat step 1 above.
2 Press the SHIFT
(or ) button until the cursor is located in the “Y”
corresponding to the timer recording to cancel.
3 Press the SET - (or +) button, to select “N”.
4 Press the MENU button three times until the normal screen is displayed.
5 Press the POWER/TIMER button.
• The clear button can erase the programmed timer recording in the line
that the cursor is located.
Notes...
• During timer recording all the buttons on the VCR, except the STOP
button, are disabled. If the STOP button is pressed for three seconds
during timer recording, the recording will stop. During timer recording
stand-by, press the POWER/TIMER button if the buttons do not respond.
• If there is a power loss, the recording will be interrupted. When the power
is restored, the recording will resume if the stop time has not yet been
reached, and “
“ will be flashing on the display panel. The VCR internal battery is completely charged after the VCR has been connected to an
AC power outlet for 48 hours, and it will maintain all the VCR settings
memory for up to 30 days.
• Set the timer recordings so that the recording times do not overlap. If they
do, the one with the earliest recording start time will have priority.
(See chart below)
• If the cassette tape is ejected while timer recording is set, the buzzer will
be heard 5 times (when the buzzer function is set to “YES”.)
21
960-Hour Time Lapse Video Cassette Recorder
960-Hour Time Lapse Video Cassette Recorder
18
Alarm Recording
Alarm Recording Counter Display
Alarm Recording Setting
Alarm recording is performed when there is an input (trigger) at the ALARM
IN terminal “
“ is displayed on the display panel.
1 Make all necessary connections.
2 Press the MENU, SHIFT , SHIFT
the REC MODE SET menu.
✔
• During alarm
recording all buttons
are disabled except
the STOP button. If
the STOP button is
pressed, the alarm
recording will stop.
• If an alarm trigger is
received while
alarm recording is in
progress, the
recording duration
for the second
alarm will be calculated from that
point.
• When there is a
power loss during
alarm recording, if
the power is
restored within the
recording set
duration, alarm
recording will
continue.
19
buttons in sequence to display
3 Press the SHIFT
REC SET.
button until the arrow mark (
) points to ALARM
4 Press the SHIFT
button to display the ALARM REC SET menu.
5 Press the SHIFT
button to select “YES” or “NO”.
• YES
The alarm recording takes place when there is alarm trigger
input
• NO
The alarm recording does not take place
6 Press the SHIFT
button to set the Alarm speed.
7 Press the SHIFT
button to select the desired recording speed.
• 2H
2-hour mode recording
• 6H
12-hour mode recording
• 18H
24-hour mode recording
8 Press the SHIFT
9
Press the SHIFT
✔
During alarm recording, “
• Alarm Counter Reset
can be performed by
pressing the CLEAR
key in “AlarmTime” of
Initial Menu screen.
The maximum display number of alarm triggers is “35”, at the next
alarm recording the counter will indicate “00”.
“ will be flashing on the display panel.
Connecting to a Lorex Monitor for Normal Recording
button to set the alarm duration
button to select the desired recording duration.
• Auto : Records as long as the alarm signal is being input. (Minimum 2
minutes is recorded.)
• 3/5/10/15/20/25/30 MIN : Recording for the set duration. (MIN : minute)
• T.END : Records until the tape end is reached when there is alarm
trigger input.
960-Hour Time Lapse Video Cassette Recorder
960-Hour Time Lapse Video Cassette Recorder
20