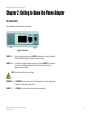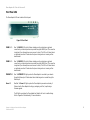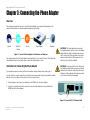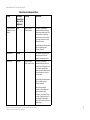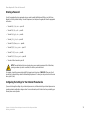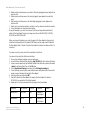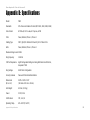
1
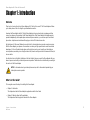
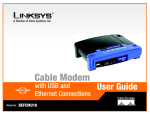
®
A Division of Cisco Systems, Inc.
Phone Adapter
with 2 Ports for Voice-over-IP
WIRED
Model No.
PAP2-NA
User Guide
Phone Adapter with 2 Ports for Voice-over-IP
Copyright and Trademarks
Specifications are subject to change without notice. Linksys is a registered trademark or trademark of Cisco
Systems, Inc. and/or its affiliates in the U.S. and certain other countries. Copyright © 2004 Cisco Systems, Inc. All
rights reserved. Other brands and product names are trademarks or registered trademarks of their respective
holders.
WARNING: This product contains chemicals, including lead,
known to the State of California to cause cancer, and birth
defects or other reproductive harm. Wash hands after handling.
How to Use this Guide
Your guide to the Phone Adapter has been designed to make understanding networking with the Phone Adapter
easier than ever. Look for the following items when reading this User Guide:
This checkmark means there is a note of interest and
is something you should pay special attention to while
using the Phone Adapter.
This exclamation point means there is a caution or
warning and is something that could damage your
property or the Phone Adapter.
This question mark provides you with a reminder about
something you might need to do while using the Phone Adapter.
In addition to these symbols, there are definitions for technical terms that are presented like this:
word: definition.
Also, each figure (diagram, screenshot, or other image) is provided with a figure number and description, like
this:
Figure 0-1: Sample Figure Description
Figure numbers and descriptions can also be found in the “List of Figures” section.
PAP2-NA-UG-40629NC JL
Phone Adapter with 2 Ports for Voice-over-IP
Table of Contents
Chapter 1: Introduction
1
Welcome
What’s in this Guide?
1
1
Chapter 2: Getting to Know the Phone Adapter
Back Panel Ports
Front Panel LEDs
Chapter 3: Connecting the Phone Adapter
Overview
Instructions for Connecting the Phone Adapter
Placement Options
Chapter 4: Using the Phone Adapter’s Interactive Voice Response Menu
Overview
Accessing the Interactive Voice Response Menu
Using the Interactive Voice Response Menu
Entering a Password
Configuring the Settings for Your Internet Phone Service
Appendix A: Troubleshooting
Common Problems and Solutions
Frequently Asked Questions
Appendix B: Windows Help
Appendix C: Glossary
Appendix D: Specifications
Appendix E: Warranty Information
Appendix F: Regulatory Information
Appendix G: Contact Information
3
3
4
5
5
5
7
8
8
8
8
12
12
13
13
18
19
20
25
27
28
29
Phone Adapter with 2 Ports for Voice-over-IP
List of Figures
Figure 2-1: Back Panel
Figure 2-2: Front Panel
Figure 3-1: Connect the Phone Adapter to Your Network and Telephone
Figure 3-2: Connect the RJ-11 Telephone Cable
Figure 3-3: Connect the Ethernet Network Cable
Figure 3-4: Connect the Power
Figure 3-5: Phone Adapter Sitting on a Surface
Figure 3-6: Attaching the Phone Adapter’s Base
Figure 3-7: Phone Adapter Standing on Base
3
4
5
5
6
6
7
7
7
Phone Adapter with 2 Ports for Voice-over-IP
Chapter 1: Introduction
Welcome
Thank you for choosing the Linksys Phone Adapter with 2 Ports for Voice-over-IP. This Phone Adapter will allow
you to make phone or fax calls using the your broadband connection.
How does the Phone Adapter do this? Plug the Phone Adapter into your network router or gateway, and then
connect your phones or fax machines to the Phone Adapter. Each of the Phone Adapter’s two telephone jacks
operates independently, with separate phone service and phone numbers, so you can have up to two Internet
phone lines—telephone service delivered through your cable or DSL Internet connection.
But what does all of this mean? Networks are useful tools for sharing Internet access and computer resources.
With the Phone Adapter, your phones or fax machines can share your high-speed Internet connection and take
advantage of it. You will be able to make phone calls using the account you set up with your Internet phone
service provider, even while you’re surfing the Internet. So, networks not only are useful in homes and offices, but
also can be fun.
Use the instructions in the Quick Installation or this User Guide to help you connect the Phone Adapter after you
have set up an account with your Internet phone service provider. These instructions should be all you need to get
the most out of the Phone Adapter.
NOTE: For information about your Internet phone service, refer to the materials provided by your
Internet phone service provider.
What’s in this Guide?
This user guide covers the steps for installing the Phone Adapter.
• Chapter 1: Introduction
This chapter describes the Phone Adapter’s applications and this User Guide.
• Chapter 2: Getting to Know the Phone Adapter
This chapter describes the physical features of the Phone Adapter.
Chapter 1: Introduction
Welcome
1
Phone Adapter with 2 Ports for Voice-over-IP
• Chapter 3: Connecting the Phone Adapter
This chapter instructs you on how to connect the Phone Adapter to your network and phones (or fax
machines).
• Chapter 4: Using the Phone Adapter’s Interactive Voice Response Menu
This chapter explains how to configure the Phone Adapter’s network settings using its Interactive Voice
Response Menu.
• Appendix A: Troubleshooting
This appendix describes some potential problems and solutions regarding use of the Phone Adapter.
• Appendix B: Windows Help
This appendix describes how you can use Windows Help for instructions about networking, such as installing
the TCP/IP protocol.
• Appendix C: Glossary
This appendix gives a brief glossary of terms frequently used in networking.
• Appendix D: Specifications
This appendix provides the technical specifications for the Phone Adapter.
• Appendix E: Warranty Information
This appendix supplies the warranty information for the Phone Adapter.
• Appendix F: Regulatory Information
This appendix supplies the regulatory information regarding the Phone Adapter.
• Appendix G: Contact Information
This appendix provides contact information for a variety of Linksys resources, including Technical Support.
Chapter 1: Introduction
What’s in this Guide?
2
Phone Adapter with 2 Ports for Voice-over-IP
Chapter 2: Getting to Know the Phone Adapter
Back Panel Ports
The Phone Adapter’s ports are located on the back panel.
Figure 2-1: Back Panel
PHONE 1 Port
For your primary Internet phone line, the PHONE 1 port allows you to connect your telephone
to the Phone Adapter using an RJ-11 telephone cable (not included).
PHONE 2 Port
If you have a second Internet phone service account, then use the PHONE 2 port. It allows you
to connect a second telephone (or fax machine) to the Phone Adapter using an RJ-11
telephone cable (not included).
NOTE: These Phone ports do not carry any voltage.
ETHERNET Port
The ETHERNET port allows you to connect the Phone Adapter to your router or gateway using
a Category 5 (or better) Ethernet network cable.
POWER Port
The POWER port is where you will connect the included power adapter.
Chapter 2: Getting to Know the Phone Adapter
Back Panel Ports
3
Phone Adapter with 2 Ports for Voice-over-IP
Front Panel LEDs
The Phone Adapter’s LEDs are located on the front panel.
Figure 2-2: Front Panel
PHONE 1 LED
Blue. The PHONE 1 LED is solidly lit when a telephone or fax machine has a registered
connection to your Internet phone service provider through the PHONE 1 port. (The connection
is registered if your Internet phone service account is active.) This LED is not lit when there is
no registered connection. It flashes when the phone is being used or an incoming call has
been detected.
PHONE 2 LED
Blue. The PHONE 2 LED is solidly lit when a telephone or fax machine has a registered
connection to your Internet phone service provider through the PHONE 2 port. (The connection
is registered if your Internet phone service account is active.) This LED is not lit when there is
no registered connection. It flashes when the phone is being used or an incoming call has
been detected.
ETHERNET LED
Blue. The ETHERNET LED lights up when the Phone Adapter is connected to your network
through the Ethernet port. It flashes when there is data being sent or received through the
Ethernet port.
Power LED
Blue/Red. The Power LED lights up when the Phone Adapter is powered on and ready. It
flashes when the Phone Adapter is booting up, undergoing a self-test, or performing a
firmware upgrade.
The LED lights up red when the Phone Adapter has failed its self-test or is malfunctioning.
Refer to “Appendix A: Troubleshooting” for more information.
Chapter 2: Getting to Know the Phone Adapter
Front Panel LEDs
4
Phone Adapter with 2 Ports for Voice-over-IP
Chapter 3: Connecting the Phone Adapter
Overview
This chapter gives instructions on how to connect the Phone Adapter to your network and telephones or fax
machines. Shown below is a connection diagram displaying a typical setup.
Internet
Cable/DSL
Modem
Router
Phone Adapter
Telephone
Figure 3-1: Connect the Phone Adapter to Your Network and Telephone
This chapter also describes the Phone Adapter’s placement options. You can place it flat on a surface, attach the
Phone Adapter’s base so it can stand in place, or mount the Phone Adapter on a wall.
Instructions for Connecting the Phone Adapter
If you already have an account set up with your Internet phone service provider, then proceed to step 1.
If you do not have an account set up with your Internet phone service provider, then go to your provider’s website
and sign up for service. After you have set up an account, proceed to step 1.
IMPORTANT: The Phone Adapter includes a ringer
(ring signal generator), which is a source of hazardous
voltage. When the ringer is activated by an incoming
call, do not touch the Phone port wires, the wires of a
cable connected to either of the Phone ports, or the
internal circuitry of the Phone Adapter.
IMPORTANT: Do not connect either of the Phone ports
to a telephone wall jack. Make sure you only connect a
telephone or fax machine to either of the Phone ports.
Otherwise, the Phone Adapter or the telephone wiring
in your home or office may be damaged.
1. Using a telephone cable, connect your telephone to the PHONE 1 port of the Phone Adapter.
2. If you have a second Internet service account, then connect another telephone or a fax machine to the
PHONE 2 port of the Phone Adapter.
Figure 3-2: Connect the RJ-11 Telephone Cable
Chapter 3: Connecting the Phone Adapter
Overview
5
Phone Adapter with 2 Ports for Voice-over-IP
3. Connect the included Ethernet network cable to the ETHERNET port of the Phone Adapter.
Connect the other end to the one of the Ethernet ports on your router or gateway.
4. Connect the included power adapter to the POWER port on the back panel of the Phone Adapter.
Connect the other end to a standard electrical outlet.
5. The Power, Ethernet, and Phone LEDs will be solidly lit when the Phone Adapter is ready for use.
6. Follow the instructions provided by your Internet phone service provider.
Figure 3-3: Connect the Ethernet Network Cable
If you need to manually configure the Phone Adapter’s network settings, you can use the telephone; for
instructions, proceed to “Chapter 4: Using the Phone Adapter’s Interactive Voice Response Menu.”
The installation of the Phone Adapter is complete. Now you can pick up your phone and make calls.
NOTE: Dial 1 + area code + phone number for all calls, including local ones.
Proceed to the next section, “Placement Options,” if you want to attach the Phone Adapter’s base.
Figure 3-4: Connect the Power
Chapter 3: Connecting the Phone Adapter
Instructions for Connecting the Phone Adapter
6
Phone Adapter with 2 Ports for Voice-over-IP
Placement Options
There are three ways to place the Phone Adapter. The first way is to place the Phone Adapter horizontally on a
surface. The second way is to stand the Phone Adapter vertically on a surface. The third way is to mount the
Phone Adapter on a wall. The second and third options are explained in further detail below.
Stand Option
1. Remove the plate from the Phone Adapter’s bottom panel.
2. Line up the pegs of the Phone Adapter’s base with the mounting holes of the Phone Adapter’s bottom panel.
3. Insert the Phone Adapter’s base into the Phone Adapter’s bottom panel. Push the base in until it fits snugly.
Figure 3-5: Attaching the Phone Adapter’s Base
4. Place the Phone Adapter in an appropriate location.
Congratulations! The installation of the Phone Adapter is complete.
If you need to change any of the Phone Adapter’s network settings, proceed to “Chapter 4: Using the
Phone Adapter’s Interactive Voice Response Menu.”
Wall-Mount Option
The Phone Adapter has two wall-mount slots on its back panel. The distance between the two slots is 58 mm
(2.28 inches).
1. Determine where you want to mount the Phone Adapter.
Figure 3-6: Phone Adapter Standing on Base
2. Drill two holes into the wall. Make sure the holes are 58 mm (2.28 inches) apart.
3. Insert a screw into each hole, and leave 5 mm (0.2 inches) of its head exposed.
4. Maneuver the Phone Adapter so the wall-mount slots line up with the two screws.
5. Place the wall-mount slots over the screws and slide the Phone Adapter down until the screws fit snugly into
the wall-mount slots.
Congratulations! The installation of the Phone Adapter is complete.
If you need to change any of the Phone Adapter’s network settings, proceed to “Chapter 4: Using the
Phone Adapter’s Interactive Voice Response Menu.”
Figure 3-7: Measurement between Wall-Mount Slots
Chapter 3: Connecting the Phone Adapter
Placement Options
7
Phone Adapter with 2 Ports for Voice-over-IP
Chapter 4: Using the Phone Adapter’s Interactive Voice
Response Menu
Overview
You may need to manually configure the Phone Adapter by entering the settings provided by your Internet phone
service provider. Chapter 4 explains how to use the Interactive Voice Response Menu to configure the Phone
Adapter’s network settings. You will use the phone’s keypad to enter your commands and select choices, and the
Phone Adapter will respond with voice responses.
NOTE: If your Internet phone service provider sent you the Phone Adapter, then it may be preconfigured for you, and you do not need to change any settings. Refer to the instructions provided
by your service provider for more information.
Accessing the Interactive Voice Response Menu
1. Use a telephone connected to the PHONE 1 or PHONE 2 port of the Phone Adapter.
2. Press **** (in other words, press the star key four times).
3. Wait until you hear “Configuration menu. Please enter option followed by the # (pound) key or hang up to
exit.”
4. Refer to the following table that lists actions, commands, menu choices, and descriptions. After you select an
option, press the # (pound) key. To exit the menu, hang up the telephone.
Using the Interactive Voice Response Menu
While entering a value, such as an IP address, you may exit without entering any changes. Press the * (star) key
twice within half a second. Otherwise, the * will be treated as a decimal point or dot.
After entering a value, such as an IP address, press the # (pound) key to indicate you have finished your selection.
To save the new setting, press 1. To review the new setting, press 2. To re-enter the new setting, press 3. To
cancel your entry and return to the main menu, press * (star).
Chapter 4: Using the Phone Adapter’s Interactive Voice Response Menu
Overview
8
Phone Adapter with 2 Ports for Voice-over-IP
For example, to enter the IP address 191.168.1.105 by keypad, press these keys: 191*168*1*105. Press the #
(pound) key to indicate that you have finished entering the IP address, and then press 1 to save the IP address. To
cancel your entry and return to the main menu, press * (star).
If the menu is inactive for more than one minute, the Phone Adapter will time out. You will need to re-enter the
menu by pressing ****.
The settings you have saved will take effect after you have hung up the telephone. The Phone Adapter may reboot
at this time.
Interactive Voice Response Menu
Action
Command
(press these
keys on the
telephone)
Choices
Enter Interactive Voice
Response Menu
****
Use this command to enter the
Interactive Voice Response Menu. Do
not press any other keys until you
hear, “Configuration menu. Please
enter option followed by the # (pound)
key or hang up to exit.”
Check DHCP
100
Use this command to find out if DHCP
has been enabled or disabled. If
enabled, the Phone Adapter will be
assigned an IP address automatically
by your network router or gateway. If
disabled, then the Phone Adapter will
use a static IP address.
Enable/Disable DHCP
101
Check IP Address
110
Enter 1 to enable
Enter 0 to disable
Description
Enable or disable the Phone Adapter’s
DHCP feature. If your network router
assigns IP addresses, then enter 1.
Otherwise, enter 0.
You will hear the current IP address of
the Phone Adapter.
Chapter 4: Using the Phone Adapter’s Interactive Voice Response Menu
Using the Interactive Voice Response Menu
9
Phone Adapter with 2 Ports for Voice-over-IP
Interactive Voice Response Menu
Action
Command
(press these
keys on the
telephone)
Choices
Description
Set Static IP Address
111
Enter the IP address
using numbers on the
telephone keypad. Use
the * (star) key when
entering a decimal
point.
To set a static IP address, the DHCP
feature must be disabled. If the DHCP
feature is enabled, then you will hear,
“Invalid Option,” if you try to set a
static IP address.
Check Network Mask
(or Subnet Mask)
120
Set Network Mask (or
Subnet Mask)
121
Check Static Gateway
IP Address
130
Set Static Gateway IP
Address
131
Check MAC Address
140
You will hear the MAC address of the
Phone Adapter in hexadecimal string
format.
Check Firmware
Version
150
You will hear the version number of
the firmware currently installed on the
Phone Adapter.
You will hear the current network
mask of the Phone Adapter.
Enter the network
mask using numbers
on the telephone
keypad. Use the *
(star) key when
entering a decimal
point.
To set the network mask, the DHCP
feature must be disabled. If the DHCP
feature is enabled, then you will hear,
“Invalid Option,” if you try to set the
network mask.
You will hear the current gateway IP
address of the Phone Adapter.
Enter the IP address
using numbers on the
telephone keypad. Use
the * (star) key when
entering a decimal
point.
To set a static gateway IP address, the
DHCP feature must be disabled. If the
DHCP feature is enabled, then you will
hear, “Invalid Option,” if you try to set
a static gateway IP address.
Chapter 4: Using the Phone Adapter’s Interactive Voice Response Menu
Using the Interactive Voice Response Menu
10
Phone Adapter with 2 Ports for Voice-over-IP
Interactive Voice Response Menu
Action
Command
(press these
keys on the
telephone)
Choices
Description
Enable/Disable Webbased Utility of Phone
Adapter
7932
Enter 1 to enable
Enter 0 to disable
This feature is protected by a
password available only from your
Internet phone service provider. (The
Web-based Utility is disabled by
default because you will not need to
use it unless instructed to do so by
your service provider.)
If you have been provided a password,
refer to the following section,
“Entering a Password.”
Manual Reboot
732668
Factory Reset
73738
After you hear, “Option successful,”
hang up the phone. The Phone
Adapter will automatically reboot.
Enter 1 to confirm
Enter * (star) to cancel
This feature is protected by a
password available only from your
Internet phone service provider. (You
will not need to reset the Phone
Adapter to its factory default settings
unless instructed to do so by your
service provider.)
If you have been provided a password,
refer to the following section,
“Entering a Password.”
After you have entered your
password, the Phone Adapter will
request confirmation. After
confirmation, you will hear, “Option
successful.” Hang up the phone. The
Phone Adapter will reboot and all
settings will be reset to their factory
default settings.
Chapter 4: Using the Phone Adapter’s Interactive Voice Response Menu
Using the Interactive Voice Response Menu
11
Phone Adapter with 2 Ports for Voice-over-IP
Entering a Password
You will be prompted to enter a password when you want to enable the Web-based Utility or reset the Phone
Adapter to its factory default settings. To enter the password, use the phone’s keypad, and follow the appropriate
instructions.
• To enter A, B, C, a, b, or c — press 2.
• To enter D, E, F, d, e, or f — press 3.
• To enter G, H, I, g, h, or i — press 4.
• To enter J, K, L, j, k, or l — press 5.
• To enter M, N, O, m, n, or o — press 6.
• To enter P, Q, R, S, o, q, r, or s — press 7.
• To enter T, U, V, t, u, or v — press 8.
• To enter W, X, Y, Z, w, x, y, or z — press 9.
• To enter all other characters, press 0.
NOTE: These bulleted instructions only apply when you are entering a password. At all other times,
pressing a number only selects a number, not a letter or punctuation mark.
For example, to enter the password phone@321 by keypad, press these keys: 746630321. Then press the #
(pound) key to indicate that you have finished entering the password. To cancel your entry and return to the main
menu, press * (star).
Configuring the Settings for Your Internet Phone Service
If you want to change the settings for your Internet phone service, visit the website of your Internet phone service
provider and make configuration changes online. For more information, refer to the instructions provided by your
Internet phone service provider.
Chapter 4: Using the Phone Adapter’s Interactive Voice Response Menu
Entering a Password
12
Phone Adapter with 2 Ports for Voice-over-IP
Appendix A: Troubleshooting
This appendix provides solutions to problems that may occur during the installation and operation of the Phone
Adapter. Read the description below to solve your problems. If you can't find an answer here, check the website
of your Internet phone service provider or the Linksys website at www.linksys.com.
Common Problems and Solutions
1. I don’t hear a dial tone, and the PHONE1 (or PHONE2) LED is not lit.
Go through this checklist until your problem is solved:
• Make sure the telephone is plugged into the appropriate port, PHONE 1 or PHONE 2. (You should use the
Phone 2 port only if you have more than one Internet telephone service account.)
• Make sure the ETHERNET LED on the front panel of the Phone Adapter is lit. If it is not lit, then check your
router and network connection to the Internet.
• Pick up the telephone. Press 80#. Hang up the telephone. Wait approximately 30 seconds. Then pick up
the telephone; you should now have a dial tone.
• Follow these instructions to reboot your cable or DSL modem, Phone Adapter, and router:
1. Power off your cable or DSL modem by unplugging its power adapter.
2. Power off the router by unplugging its power adapter.
3. Power off the Phone Adapter by unplugging its power adapter.
4. Wait two minutes, and then power on your cable or DSL modem by plugging its power adapter into an
electrical outlet.
5. Wait two minutes, and then power on the router by plugging its power adapter into an electrical
outlet.
6. Wait five minutes, and then power on the Phone Adapter by plugging its power adapter into an
electrical outlet.
7. Reboot one of your networked computers, and check to see if you have an active Internet connection.
8. Pick up the telephone. You should now have a dial tone.
• Set up port forwarding on your router. You must specify that four port ranges be forwarded to the IP
address of the Phone Adapter. These four port ranges are as follows: 5060-5061 (UDP), 53-53 (UDP),
69-69 (UDP), and 10000-20000 (UDP).
Before you set up port forwarding on your router, change two of the Phone Adapter’s settings using its
Interactive Voice Response Menu. First, disable its DHCP feature, and then assign a static IP address to
the Phone Adapter. Refer to “Chapter 4: Using the Phone Adapter’s Interactive Voice Response Menu” for
instructions.
Appendix A: Troubleshooting
Common Problems and Solutions
13
Phone Adapter with 2 Ports for Voice-over-IP
If you have a non-Linksys router, refer to its documentation for instructions.
If you have a Linksys router, then follow these instructions:
1. On one of your networked computers, open your web browser.
2. Access the Router’s Web-based Utility by going to http://192.168.1.1 or the IP address of the Router.
3. A login screen will appear. Leave the User Name field blank. Enter the Router’s password (the default
is admin) in the Password field. Then click the OK button.
4. Click the Applications & Gaming tab, and then click the Port Range Forwarding tab.
5. For each port range you must specify, enter a different name in the Application field. Then enter the
number or range of external port(s) used by the Phone Adapter.
6. Select the protocol you will be using, UDP.
7. Enter the IP address of the Phone Adapter. For example, if the Phone Adapter’s IP address is
192.168.1.100, you would enter 100 in the field provided.
8. Repeat steps 5-7 until you have entered all four port ranges for the Phone Adapter.
Application
Start and End
Protocol
IP Address
Enable
Internet phone 1
5060 to 5061
UDP
(IP address of
Phone Adapter)
X
Internet phone 2
53 to 53
UDP
(IP address of
Phone Adapter)
X
Internet phone 3
69 to 69
UDP
(IP address of
Phone Adapter)
X
Internet phone 4
10000 to 20000
UDP
(IP address of
Phone Adapter)
X
9. Check the Enable option for the port services you want to use.
10. When you have completed the configuration, click the Save Settings button.
2. When I make a telephone call, the call doesn’t go through; instead, I hear a fast busy signal.
Go through this checklist until your problem is solved:
• Pick up your phone and dial 1 + area code + phone number. You must dial 1 and the area code for all
calls, even local ones.
• Follow these instructions to reboot your cable or DSL modem, Phone Adapter, and router:
1. Power off your cable or DSL modem by unplugging its power adapter.
2. Power off the router by unplugging its power adapter.
3. Power off the Phone Adapter by unplugging its power adapter.
Appendix A: Troubleshooting
Common Problems and Solutions
14
Phone Adapter with 2 Ports for Voice-over-IP
4. Wait two minutes, and then power on your cable or DSL modem by plugging its power adapter into an
electrical outlet.
5. Wait two minutes, and then power on the router by plugging its power adapter into an electrical
outlet.
6. Wait five minutes, and then power on the Phone Adapter by plugging its power adapter into an
electrical outlet.
7. Reboot one of your networked computers, and check to see if you have an active Internet connection.
8. Pick up the telephone. You should now have a dial tone.
• Set up port forwarding on your router. You must specify that four port ranges be forwarded to the IP
address of the Phone Adapter. These four port ranges are as follows: 5060-5061 (UDP), 53-53 (UDP),
69-69 (UDP), and 10000-20000 (UDP).
Before you set up port forwarding on your router, change two of the Phone Adapter’s settings using its
Interactive Voice Response Menu. First, disable its DHCP feature, and then assign a static IP address to
the Phone Adapter. Refer to “Chapter 4: Using the Phone Adapter’s Interactive Voice Response Menu” for
instructions.
If you have a non-Linksys router, refer to its documentation for instructions.
If you have a Linksys router, then follow these instructions:
1. On one of your networked computers, open your web browser.
2. Access the Router’s Web-based Utility by going to http://192.168.1.1 or the IP address of the Router.
3. A login screen will appear. Leave the User Name field blank. Enter the Router’s password (the default
is admin) in the Password field. Then click the OK button.
4. Click the Applications & Gaming tab, and then click the Port Range Forwarding tab.
5. For each port range you must specify, enter a different name in the Application field. Then enter the
number or range of external port(s) used by the Phone Adapter.
6. Select the protocol you will be using, UDP.
7. Enter the IP address of the Phone Adapter. For example, if the Phone Adapter’s IP address is
192.168.1.100, you would enter 100 in the field provided.
8. Repeat steps 5-7 until you have entered all four port ranges for the Phone Adapter.
Application
Start and End
Protocol
IP Address
Enable
Internet phone 1
5060 to 5061
UDP
(IP address of
Phone Adapter)
X
Internet phone 2
53 to 53
UDP
(IP address of
Phone Adapter)
X
Appendix A: Troubleshooting
Common Problems and Solutions
15
Phone Adapter with 2 Ports for Voice-over-IP
Application
Start and End
Protocol
IP Address
Enable
Internet phone 3
69 to 69
UDP
(IP address of
Phone Adapter)
X
Internet phone 4
10000 to 20000
UDP
(IP address of
Phone Adapter)
X
9. Check the Enable option for the port services you want to use.
10. When you have completed the configuration, click the Save Settings button.
3. When I’m on a telephone call, words are dropped intermittently.
Go through this checklist until your problem is solved:
• Are you using a wireless router and cordless phone? If so, the router and cordless phone may be using the
same frequency and interfere with each other. Move the cordless phone farther away from the router.
• There may be heavy network activity, particularly if you are running a server or using a file sharing
program. Try to limit network or Internet activity during any Internet telephone call. For example, if you are
running a file sharing program, files may be uploaded in the background even though you are not
downloading any files, so make sure you exit the program before you make an Internet phone call.
• There may not be enough bandwidth available for your Internet phone call. You may want to test your
bandwidth using one of the bandwidth tests available online. If necessary, access your service account at
your Internet phone service provider’s website, and reduce the bandwidth requirements for your service.
For more information, refer to your service provider’s website.
4. My telephone does not ring, and my calls automatically go to voicemail.
Go through this checklist until your problem is solved:
• Make sure the telephone is plugged into the appropriate port, PHONE 1 or PHONE 2. (You should use the
Phone 2 port only if you have more than one Internet telephone service account.)
• Make sure the ringer volume on your telephone is set to an audible level.
• Follow these instructions to reboot your cable or DSL modem, Phone Adapter, and router:
1. Power off your cable or DSL modem by unplugging its power adapter.
2. Power off the router by unplugging its power adapter.
3. Power off the Phone Adapter by unplugging its power adapter.
4. Wait two minutes, and then power on your cable or DSL modem by plugging its power adapter into an
electrical outlet.
5. Wait two minutes, and then power on the router by plugging its power adapter into an electrical
outlet.
6. Wait five minutes, and then power on the Phone Adapter by plugging its power adapter into an
electrical outlet.
7. Reboot one of your networked computers, and check to see if you have an active Internet connection.
Appendix A: Troubleshooting
Common Problems and Solutions
16
Phone Adapter with 2 Ports for Voice-over-IP
• Set up port forwarding on your router. You must specify that four port ranges be forwarded to the IP
address of the Phone Adapter. These four port ranges are as follows: 5060-5061 (UDP), 53-53 (UDP),
69-69 (UDP), and 10000-20000 (UDP).
Before you set up port forwarding on your router, change two of the Phone Adapter’s settings using its
Interactive Voice Response Menu. First, disable its DHCP feature, and then assign a static IP address to
the Phone Adapter. Refer to “Chapter 4: Using the Phone Adapter’s Interactive Voice Response Menu” for
instructions.
If you have a non-Linksys router, refer to its documentation for instructions.
If you have a Linksys router, then follow these instructions:
1. On one of your networked computers, open your web browser.
2. Access the Router’s Web-based Utility by going to http://192.168.1.1 or the IP address of the Router.
3. A login screen will appear. Leave the User Name field blank. Enter the Router’s password (the default
is admin) in the Password field. Then click the OK button.
4. Click the Applications & Gaming tab, and then click the Port Range Forwarding tab.
5. For each port range you must specify, enter a different name in the Application field. Then enter the
number or range of external port(s) used by the Phone Adapter.
6. Select the protocol you will be using, UDP.
7. Enter the IP address of the Phone Adapter. For example, if the Phone Adapter’s IP address is
192.168.1.100, you would enter 100 in the field provided.
8. Repeat steps 5-7 until you have entered all four port ranges for the Phone Adapter.
Application
Start and End
Protocol
IP Address
Enable
Internet phone 1
5060 to 5061
UDP
(IP address of
Phone Adapter)
X
Internet phone 2
53 to 53
UDP
(IP address of
Phone Adapter)
X
Internet phone 3
69 to 69
UDP
(IP address of
Phone Adapter)
X
Internet phone 4
10000 to 20000
UDP
(IP address of
Phone Adapter)
X
9. Check the Enable option for the port services you want to use.
10. When you have completed the configuration, click the Save Settings button.
Appendix A: Troubleshooting
Common Problems and Solutions
17
Phone Adapter with 2 Ports for Voice-over-IP
5. The Power LED does not light up or lights up red.
Go through this checklist until your problem is solved:
• Unplug the power adapter from the Phone Adapter. Wait five seconds. Then plug the power adapter into
the Phone Adapter again.
• You may be using the wrong power adapter. Make sure the power adapter you are using is the one
included with the Phone Adapter.
6. The ETHERNET LED does not light up.
Go through this checklist until your problem is solved:
• Check the cable connecting the Phone Adapter to your router.
• Make sure your network has an active Internet connection. If it does not, follow these instructions to
reboot your cable or DSL modem, Phone Adapter, and router:
1. Power off your cable or DSL modem by unplugging its power adapter.
2. Power off the router by unplugging its power adapter.
3. Power off the Phone Adapter by unplugging its power adapter.
4. Wait two minutes, and then power on your cable or DSL modem by plugging its power adapter into an
electrical outlet.
5. Wait two minutes, and then power on the router by plugging its power adapter into an electrical
outlet.
6. Wait five minutes, and then power on the Phone Adapter by plugging its power adapter into an
electrical outlet.
7. Reboot one of your networked computers, and check to see if you have an active Internet connection.
Frequently Asked Questions
How do I make a phone call?
Pick up your phone and dial 1 + area code + phone number. You must dial 1 and then the area code for all calls,
even local ones.
Can I make calls if my Internet connection is down?
No. Your high-speed Internet connection must be active when you make Internet phone or fax calls.
Can I make calls while I’m browsing the Internet?
Yes. You can make Internet phone or fax calls while browsing the Internet. However, your web browsing may
affect the quality of your telephone call, depending on the amount of upstream data traffic passing through your
Internet connection.
Appendix A: Troubleshooting
Frequently Asked Questions
18
Phone Adapter with 2 Ports for Voice-over-IP
Appendix B: Windows Help
Almost all Linksys products require Microsoft Windows. Windows is the most used operating system in the world
and comes with many features that help make networking easier. These features can be accessed through
Windows Help and are described in this appendix.
TCP/IP
Before a computer can communicate with a network router, TCP/IP must be enabled. TCP/IP is a set of
instructions, or protocol, all PCs follow to communicate over a network. This is true for wireless networks as well.
Your PCs will not be able to utilize wireless networking without having TCP/IP enabled. Windows Help provides
complete instructions on enabling TCP/IP.
Shared Resources
If you wish to share printers, folder, or files over your network, Windows Help provides complete instructions on
utilizing shared resources.
Network Neighborhood/My Network Places
Other PCs on your network will appear under Network Neighborhood or My Network Places (depending upon the
version of Windows you're running). Windows Help provides complete instructions on adding PCs to your
network.
Appendix B: Windows Help
19
Phone Adapter with 2 Ports for Voice-over-IP
Appendix C: Glossary
Adapter - A device that adds network functionality to your PC.
Backbone - The part of a network that connects most of the systems and networks together, and handles the
most data.
Bandwidth - The transmission capacity of a given device or network.
Bit - A binary digit.
Boot - To start a device and cause it to start executing instructions.
Bridge - A device that connects different networks.
Broadband - An always-on, fast Internet connection.
Browser - An application program that provides a way to look at and interact with all the information on the
World Wide Web.
Buffer - A shared or assigned memory area that is used to support and coordinate different computing and
networking activities so one isn't held up by the other.
Byte - A unit of data that is usually eight bits long
Cable Modem - A device that connects a computer to the cable television network, which in turn connects to the
Internet.
CSMA/CA (Carrier Sense Multiple Access/Collision Avoidance) - A method of data transfer that is used to prevent
data collisions.
CTS (Clear To Send) - A signal sent by a wireless device, signifying that it is ready to receive data.
Daisy Chain - A method used to connect devices in a series, one after the other.
Database - A collection of data that is organized so that its contents can easily be accessed, managed, and
updated.
DDNS (Dynamic Domain Name System) - Allows the hosting of a website, FTP server, or e-mail server with a
fixed domain name (e.g., www.xyz.com) and a dynamic IP address.
Appendix C: Glossary
20
Phone Adapter with 2 Ports for Voice-over-IP
Default Gateway - A device that forwards Internet traffic from your local area network.
DHCP (Dynamic Host Configuration Protocol) - A networking protocol that allows administrators to assign
temporary IP addresses to network computers by “leasing” an IP address to a user for a limited amount of time,
instead of assigning permanent IP addresses.
DMZ (Demilitarized Zone) - Removes the Router's firewall protection from one PC, allowing it to be “seen” from
the Internet.
DNS (Domain Name Server) - The IP address of your ISP's server, which translates the names of websites into IP
addresses.
Domain - A specific name for a network of computers.
Download - To receive a file transmitted over a network.
DSL (Digital Subscriber Line) - An always-on broadband connection over traditional phone lines.
DTIM (Delivery Traffic Indication Message) - A message included in data packets that can increase wireless
efficiency.
Dynamic IP Address - A temporary IP address assigned by a DHCP server.
Encryption - Encoding data transmitted in a network.
Ethernet - A networking protocol that specifies how data is placed on and retrieved from a common transmission
medium.
Finger - A program that tells you the name associated with an e-mail address.
Firewall - A set of related programs located at a network gateway server that protects the resources of a
network from users from other networks.
Firmware - The programming code that runs a networking device.
Fragmentation -Breaking a packet into smaller units when transmitting over a network medium that cannot
support the original size of the packet.
FTP (File Transfer Protocol) - A protocol used to transfer files over a TCP/IP network.
Full Duplex - The ability of a networking device to receive and transmit data simultaneously.
Gateway - A device that interconnects networks with different, incompatible communications protocols.
Appendix C: Glossary
21
Phone Adapter with 2 Ports for Voice-over-IP
Half Duplex - Data transmission that can occur in two directions over a single line, but only one direction at a
time.
Hardware - The physical aspect of computers, telecommunications, and other information technology devices.
HTTP (HyperText Transport Protocol) - The communications protocol used to connect to servers on the World
Wide Web.
Infrastructure - A wireless network that is bridged to a wired network via an access point.
IP (Internet Protocol) - A protocol used to send data over a network.
IP Address - The address used to identify a computer or device on a network.
IPCONFIG - A Windows 2000 and XP utility that displays the IP address for a particular networking device.
IPSec (Internet Protocol Security) - A VPN protocol used to implement secure exchange of packets at the IP layer.
ISM band - Radio bandwidth utilized in wireless transmissions.
ISP (Internet Service Provider) - A company that provides access to the Internet.
LAN (Local Area Network) - The computers and networking products that make up your local network.
MAC (Media Access Control) Address - The unique address that a manufacturer assigns to each networking
device.
Mbps (MegaBits Per Second) - One million bits per second; a unit of measurement for data transmission.
mIRC - An Internet Relay Chat program that runs under Windows.
Multicasting - Sending data to a group of destinations at once.
NAT (Network Address Translation) - NAT technology translates IP addresses of a local area network to a different
IP address for the Internet.
NAT (Network Address Translation) Traversal -A method of enabling specialized applications, such as Internet
phone calls, video, and audio, to travel between your local network and the Internet. STUN is a specific type of
NAT traversal.
Network - A series of computers or devices connected for the purpose of data sharing, storage, and/or
transmission between users.
Appendix C: Glossary
22
Phone Adapter with 2 Ports for Voice-over-IP
NNTP (Network News Transfer Protocol) - The protocol used to connect to Usenet groups on the Internet.
Packet - A unit of data sent over a network.
Ping (Packet INternet Groper) - An Internet utility used to determine whether a particular IP address is online.
POP3 (Post Office Protocol 3) - A standard mail server commonly used on the Internet.
Port - The connection point on a computer or networking device used for plugging in cables or adapters.
RJ-45 (Registered Jack-45) - An Ethernet connector that holds up to eight wires.
Router - A networking device that connects multiple networks together.
RTP (Real-time Transport Protocol) - A protocol that enables specialized applications, such as Internet phone
calls, video, and audio, to occur in real time.
RTS (Request To Send) - A networking method of coordinating large packets through the RTS Threshold setting.
Server - Any computer whose function in a network is to provide user access to files, printing, communications,
and other services.
SMTP (Simple Mail Transfer Protocol) - The standard e-mail protocol on the Internet.
SNMP (Simple Network Management Protocol) - A widely used network monitoring and control protocol.
Software - Instructions for the computer. A series of instructions that performs a particular task is called a
“program”.
SOHO (Small Office/Home Office) - Market segment of professionals who work at home or in small offices.
Static IP Address - A fixed address assigned to a computer or device that is connected to a network.
Static Routing - Forwarding data in a network via a fixed path.
STUN (Simple Traversal of UDP through NATs) - A protocol that enables specialized applications, such as Internet
phone calls, video, and audio, to travel between your local network and the Internet. STUN is a specific type of
NAT traversal.
Subnet Mask - An address code that determines the size of the network.
Appendix C: Glossary
23
Phone Adapter with 2 Ports for Voice-over-IP
Switch - 1. A data switch that connects computing devices to host computers, allowing a large number of
devices to share a limited number of ports. 2. A device for making, breaking, or changing the connections in an
electrical circuit.
TCP (Transmission Control Protocol) - A network protocol for transmitting data that requires acknowledgement
from the recipient of data sent.
TCP/IP (Transmission Control Protocol/Internet Protocol) - A set of instructions PCs use to communicate over a
network.
Telnet - A user command and TCP/IP protocol used for accessing remote PCs.
TFTP (Trivial File Transfer Protocol) - A version of the TCP/IP FTP protocol that has no directory or password
capability.
Throughput - The amount of data moved successfully from one node to another in a given time period.
Topology - The physical layout of a network.
TX Rate - Transmission Rate.
UDP (User Datagram Protocol) - A network protocol for transmitting data that does not require acknowledgement
from the recipient of the data that is sent.
Upgrade - To replace existing software or firmware with a newer version.
Upload - To transmit a file over a network.
URL (Uniform Resource Locator) - The address of a file located on the Internet.
VPN (Virtual Private Network) - A security measure to protect data as it leaves one network and goes to another
over the Internet.
WAN (Wide Area Network)- The Internet.
WINIPCFG - A Windows 98 and Me utility that displays the IP address for a particular networking device.
Appendix C: Glossary
24
Phone Adapter with 2 Ports for Voice-over-IP
Appendix D: Specifications
Model
PAP2
Standards
SIP v2 Session Initiation Protocol (RFC 3261, 3262, 3263, 3264)
Voice Codecs
G.729 A+B, G.711 a-law, G.711µ-law, G.726
Ports
Power, Ethernet, Phone 1, Phone 2
Cabling Type
CAT 5 (RJ45) for Ethernet Port and RJ11 for Phone Ports
LEDs
Power, Ethernet, Phone 1, Phone 2
Maximum Ringer Load 3 REN
Ring Frequency
10-40 Hz
FXS Port Impedance
Eight Configurable Settings Including North America 600 ohms,
European CTR21
Ring Voltage
60-90 Vrms Configurable
Security Features
Password Protected Administration
Dimensions
(W x H x D)
3.98" x 3.98" x 0.59"
(101 mm x 101 mm x 15 mm)
Unit Weight
4.59 oz. (0.13 kg)
Power
5 V DC, 2.0 A
Certifications
FCC, cUL, CE
Operating Temp.
41º~113ºF (5º~45ºC)
Appendix D: Specifications
25
Phone Adapter with 2 Ports for Voice-over-IP
Storage Temp.
-13º~185ºF (-25º~85ºC)
Operating Humidity
10~90% Non-Condensing
Storage Humidity
5~90% Non-Condensing
Appendix D: Specifications
26
Phone Adapter with 2 Ports for Voice-over-IP
Appendix E: Warranty Information
LIMITED WARRANTY
Linksys warrants to You that, for a period of three years (the “Warranty Period”), your Linksys Product will be substantially
free of defects in materials and workmanship under normal use. Your exclusive remedy and Linksys' entire liability under
this warranty will be for Linksys at its option to repair or replace the Product or refund Your purchase price less any
rebates. This limited warranty extends only to the original purchaser.
If the Product proves defective during the Warranty Period call Linksys Technical Support in order to obtain a Return
Authorization Number, if applicable. BE SURE TO HAVE YOUR PROOF OF PURCHASE ON HAND WHEN CALLING. If You are
requested to return the Product, mark the Return Authorization Number clearly on the outside of the package and include a
copy of your original proof of purchase. RETURN REQUESTS CANNOT BE PROCESSED WITHOUT PROOF OF PURCHASE. You
are responsible for shipping defective Products to Linksys. Linksys pays for UPS Ground shipping from Linksys back to You
only. Customers located outside of the United States of America and Canada are responsible for all shipping and handling
charges.
ALL IMPLIED WARRANTIES AND CONDITIONS OF MERCHANTABILITY OR FITNESS FOR A PARTICULAR PURPOSE ARE LIMITED
TO THE DURATION OF THE WARRANTY PERIOD. ALL OTHER EXPRESS OR IMPLIED CONDITIONS, REPRESENTATIONS AND
WARRANTIES, INCLUDING ANY IMPLIED WARRANTY OF NON-INFRINGEMENT, ARE DISCLAIMED. Some jurisdictions do not
allow limitations on how long an implied warranty lasts, so the above limitation may not apply to You. This warranty gives
You specific legal rights, and You may also have other rights which vary by jurisdiction.
This warranty does not apply if the Product (a) has been altered, except by Linksys, (b) has not been installed, operated,
repaired, or maintained in accordance with instructions supplied by Linksys, or (c) has been subjected to abnormal
physical or electrical stress, misuse, negligence, or accident. In addition, due to the continual development of new
techniques for intruding upon and attacking networks, Linksys does not warrant that the Product will be free of
vulnerability to intrusion or attack.
TO THE EXTENT NOT PROHIBITED BY LAW, IN NO EVENT WILL LINKSYS BE LIABLE FOR ANY LOST DATA, REVENUE OR PROFIT,
OR FOR SPECIAL, INDIRECT, CONSEQUENTIAL, INCIDENTAL OR PUNITIVE DAMAGES, REGARDLESS OF THE THEORY OF
LIABILITY (INCLUDING NEGLIGENCE), ARISING OUT OF OR RELATED TO THE USE OF OR INABILITY TO USE THE PRODUCT
(INCLUDING ANY SOFTWARE), EVEN IF LINKSYS HAS BEEN ADVISED OF THE POSSIBILITY OF SUCH DAMAGES. IN NO EVENT
WILL LINKSYS’ LIABILITY EXCEED THE AMOUNT PAID BY YOU FOR THE PRODUCT. The foregoing limitations will apply even
if any warranty or remedy provided under this Agreement fails of its essential purpose. Some jurisdictions do not allow the
exclusion or limitation of incidental or consequential damages, so the above limitation or exclusion may not apply to You.
Please direct all inquiries to: Linksys, P.O. Box 18558, Irvine, CA 92623.
27
Appendix E: Warranty Information
Phone Adapter with 2 Ports for Voice-over-IP
Appendix F: Regulatory Information
FCC STATEMENT
This product has been tested and complies with the specifications for a Class B digital device, pursuant to Part 15
of the FCC Rules. These limits are designed to provide reasonable protection against harmful interference in a
residential installation. This equipment generates, uses, and can radiate radio frequency energy and, if not
installed and used according to the instructions, may cause harmful interference to radio communications.
However, there is no guarantee that interference will not occur in a particular installation. If this equipment does
cause harmful interference to radio or television reception, which is found by turning the equipment off and on,
the user is encouraged to try to correct the interference by one or more of the following measures:
•
•
•
•
Reorient or relocate the receiving antenna
Increase the separation between the equipment or devices
Connect the equipment to an outlet other than the receiver's
Consult a dealer or an experienced radio/TV technician for assistance
SAFETY NOTICES
Caution: To reduce the risk of fire, use only No. 26 AWG or larger telecommunication line cord.
Do not use this product near water, for example, in a wet basement or near a swimming pool.
Avoid using this product during an electrical storm. There may be a remote risk of electric shock from lightning.
Appendix F: Regulatory Information
28
Phone Adapter with 2 Ports for Voice-over-IP
Appendix G: Contact Information
Need to contact Linksys?
Visit us online for information on the latest products and updates
to your existing products at:
http://www.linksys.com or
ftp.linksys.com
Can't find information about a product you want to buy
on the web? Do you want to know more about networking
with Linksys products? Give our advice line a call at:
Or fax your request in to:
800-546-5797 (LINKSYS)
949-823-3002
If you experience problems with any Linksys product,
you can call us at:
Don't wish to call? You can e-mail us at:
800-326-7114
[email protected]
If any Linksys product proves defective during its warranty period,
you can call the Linksys Return Merchandise Authorization
department for obtaining a Return Authorization Number at:
(Details on Warranty and RMA issues can be found in the Warranty
Information section in this Guide.)
949-823-3000
29
Appendix G: Contact Information