1
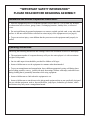
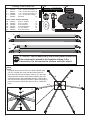
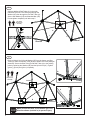
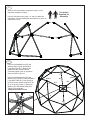
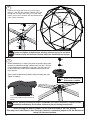
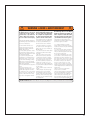
PY
CO
Owner’s Manual and Assembly Instructions
5’ Dome Climber with Handholds Model #101301, 102300
**U.S. and Canada customers ONLY**
IF ASSISTANCE IS NEEDED,
DO NOT CONTACT THE STORE!
CALL OUR CUSTOMER SERVICE DEPARTMENT at 1 (800) 225-3865
HOURS: 7:00 a.m. to 5:00 p.m. Monday through Friday (Mountain Standard Time)
Call or visit our Web site at www.lifetime.com for Saturday hours
**For customers outside the U.S. or Canada, please contact the store for assistance.**
Lifetime Products, Inc.
0/"OXs&REEPORT#ENTER"LDG$
#LEARFIELD5TAH
This product is intended for use by children ages 3 to 12
and is for residential use only.
4/25/2011
Instruction #1050346 1B
Before Beginning Assembly!
Only adults should set up the play equipment. Do not allow children in the
setup area until assembly is complete.
Tools Required for Assembly
Ratchet with 1/2” Socket, deep socket my be needed
2x 3/16” Allen Wrench (included)
Indicates the number of
people required to complete
assembly step.
Two Adults Required for Assembly
PY
Save this owner’s manual for future reference and in
the event that the manufacturer has to be contacted.
WARNING
CO
FAILURE TO FOLLOW THESE WARNINGS MAY RESULT IN SERIOUS
INJURY OR PROPERTY DAMAGE AND WILL VOID THE WARRANTY.
To ensure safety, do not attempt to assemble this play equipment without carefully following
the instructions. Before beginning assembly, read the instructions. Proper and complete
assembly, orientation, and supervision are essential to reduce the risk of accident or injury.
Most injuries are caused by misuse and/or not following instructions. Use caution when using this play equipment.
Customer Service:
1-800-225-3865
Monday-Friday 7 a.m. to 5 p.m. MST
Call or visit our Web site at www.lifetime.com for Saturday hours
Lifetime Products, Inc.
P.O. Box 160010
Clearfield, UT 84016
This product is intended for use by children
ages 3 to 12 and is for residential use only.
2
**IMPORTANT SAFETY INFORMATION**
PLEASE READ BEFORE BEGINNING ASSEMBLY:
Installation and Ground Preparation Instructions:
• Place the equipment on level, well-drained ground, not less than 6 ft. (1.8 m) from any structure
or obstruction such as a fence, garage, house, overhanging branches, laundry lines, or electrical
wires.
• Do not install home playground equipment over concrete, asphalt, packed earth, or any other hard
surface. A fall onto a hard surface can result in serious injury to the equipment user (see page 4).
• To prevent serious injury, warn children that they must not use the equipment until properly installed.
Operating Instructions:
Observing the following instructions and warnings reduces the likelihood of serious or fatal injury.
• The maximum number of occupants that may safely use the entire playset is 6 with a maximum
weight of 600 pounds.
• On-site adult supervision should be provided for children of all ages.
• Instruct children not to use the equipment in a manner other than intended.
• To prevent entanglement and strangulation, dress children appropriately using well-fitting shoes
and avoiding ponchos, scarves, jackets with neck drawstrings, helmets with straps, and other loosefitting clothing that is potentially hazardous while using equipment.
• Instruct children not to climb when the equipment is wet.
• Instruct children not to attach items to the playground equipment that are not specifically designed
for use with the equipment, such as, but not limited to, jump ropes, clothesline, pet leashes, cables
and chain as they may cause a strangulation hazard.
3
Maintenance Instructions:
•
Check surfacing material and replenish as necessary to maintain proper depth (see page 4).
• Check all nuts and bolts twice monthly during the usage season for tightness and tighten as required. It is particularly important that this procedure be followed at the beginning of each season.
•
Replace broken handholds immediately, do not allow children to play on damaged equipment.
•
Remove any tripping hazards, such as exposed concrete footings, tree stumps, or rocks.
• Check all coverings for bolts and sharp edges twice monthly during usage season to be certain they
are in place. Replace when necessary. It is especially important to do this at the beginning of each
new season.
• Sand rusted areas on tubular members and repaint using a nonlead-based paint.
• If the warning sticker is illegible, destroyed or removed, contact Customer Service for a replacement.
Disposal Instructions: Disassemble and dispose of the playground equipment in such a way that
no unreasonable hazards will exist at the time the equipment is discarded. Follow all local disposal
requirements.
Playset dimensions:
6 feet
10’ diameter
Recommended play area:
22’ diameter
6 feet
6 feet
6 feet
4
CONSUMER INFORMATION SHEET FOR PLAYGROUND SURFACING MATERIALS*
The U.S. Consumer Product Safety Commission (CPSC) estimates that about 100,000 playground
equipment related injuries resulting from falls to the
ground surface are treated annually in U.S. hospital
emergency rooms. Injuries involving this hazard pattern
tend to be among the most serious of all playground
injuries, and have the potential to be fatal, particularly
when the injury is to the head. The surface under and
around playground equipment can be a major factor in
determining the injury causing potential of a fall. It is
self evident that a fall onto a shock-absorbing surface
is less likely to cause a serious injury than a fall onto
a hard surface. Playground equipment should never
be placed on hard surfaces such as concrete or asphalt
and while grass may appear to be acceptable, it may
quickly turn to hard packed earth in areas of high traffic. Shredded bark mulch, wood chips, fine sand or fine
gravel are considered to be acceptable shock-absorbing
surfaces when installed and maintained at a sufficient
depth under and around playground equipment.
Table 1 lists the maximum height from which
a child would not be expected to sustain a life-threatening head injury in a fall onto different loose-fill surfacing materials if they are installed and maintained at
depths of 6, 9, and 12 inches. However, it should be
recognized that all injuries due to falls cannot be prevented no matter what surfacing material is used.
It is recommended that a shock-absorbing
material should extend a minimum of 6 ft. in all directions from the perimeter of stationary equipment such
as climbers and slides. However, because children may
deliberately jump from a moving swing, the shock absorbing material should extend in the front and rear of a
swing a minimum distance of 2 times the height of the
pivot point measured from a point directly beneath the
pivot on the supporting structure.
This information is intended to assist in
comparing the relative shock-absorbing properties of
various materials. No particular material is recommended over another. However, each material is only
effective when properly maintained. Materials should
be checked periodically and replenished to maintain
correct depth as determined necessary for your equipment. The choice of a material depends on the type and
height of the playground equipment, the availability of
the material in your area, and its cost.
TABLE 1 — FALL HEIGHT IN FEET FROM WHICH A LIFE THREATENING HEAD
INJURY WOULD NOT BE EXPECTED
Type of Material
6 in. depth
9 in. depth
12 in. depth
Double Shredded Bark Mulch
6
10
11
Wood Chips
6
7
12
Fine Sand
5
5
9
Fine Gravel
6
7
10
10-12
N/A
N/A
Shredded Tires***
*This information has been extracted from the CPSC publications “Playground Surfacing--Technical Information Guide” and “Handbook for Public Playground Safety.” Copies of these reports can be obtained by sending a postcard to the: Office of Public Affairs, U.S. Consumer Product Safety Commission,
Washington, D.C., 20207 or call the toll-free hotline: 1-800-638-2772.
***This data is from tests conducted by independent testing laboratories on a 6-inch depth of uncompressed shredded tire samples produced by four
manufacturers. It is recommended that persons seeking to install shredded tires as a protective surface request test data from the supplier showing the critical
height of the material when it was tested in accordance with ASTM F1292.
**The maximum fall height for this product is 5 feet. We recommend using 6” of Double Shredded Bark Mulch.**
5
Primary Color Parts List
A
B
A-1
B-1
C
8002153
8002151
8002886
8002890
8002067
1 1/8” x 33.875” Red Tubing
1 1/8” x 38.128” Blue Tubing
1 1/4” x 33.875” Red Tubing
1 1/4” x 38.128” Blue Tubing
Handhold
Dome Climber Hardware (8002389)
HA
8002102
5/16” x 1 3/4” Bolt
HB
8000162
5/16” x 3/4” Bolt
HC 8000209
5/16” Nylock Nut
HD 8001390
5/16” Standard Nut
HE
8002027
1/4” Thin Washer
HF
8000355
3/16” Allen Wrench
HB
HA
15
30
15
5
16
16
10
26
16
84
2
HC
HD
HE
C
HF
There may be extra hardware.
A
B
A-1
B-1
A-1 and B-1 can be identified by the sticker placed around the
tube and must be placed in the locations shown in the
instructions. Do not remove the stickers until after step 8.
1
Complete the joint shown five times. Slide a Washer (HE)
over a 1 3/4” Bolt (HA), then slide the Bolt through four
4
Blue Tubes (B) and two Red large Tubes (A-1) in the order
indicated by the numbers. Slide another Washer (HE) over
the Bolt and secure with a Standard Nut (HD). Hold the Nut
with a wrench while tightening the Bolt. Tighten completely to
prevent movement. Repeat this step five times, making five
joints.
A-1
HD
B
B
5
A-1
6
3
4
3
HE
6
B
5
B
HE
2
6
HA
1
2
1
2
Attach a Blue Tube (B) to tubes 1 and 2 at the bottom of each
assembly completed in the previous step (joint a). Slide a 3/4” Bolt
(HB) through a Thin Washer (HE) and the two Blue Tubes (B). Place
a Washer (HE) over the 3/4” Bolt (HB) and Finger tighten Nylock
Nut (HC) for removal later. Follow the same assembly for (joint b)
and repeat this step on all five assemblies.
4
3
5
6
B
HC
HE
1
2
B
HE
HB
joint b
B
joint a
3
Bring two of the assembles completed in steps 1 and 2 together as shown in the image below.
Place a Red Tube (A) over the Blue Tubes (B) and secure the Red and Blue Tubes together at
the top joint as shown below by placing a 1 3/4” Bolt (HA) through Washer (HE) then through
the Blue Tubes (B) and Red Tube (A). Place a Washer (HE) over the 1 3/4” Bolt (HA) and
Finger tighten Standard Nut (HD) for removal later.
The Geo-Dome should be stood upright to complete this step and the rest of the assembly.
Two Adults
Required for
Assembly
B
B
HD
A
HE
HE
HA
Ground
Ground
7
4
Add two additional Red Tubes (A) in the order
indicated. Place the 1 3/4” Bolt (HA) through the
Washer (HE) then through the five Red Tubes (A).
Secure with Washer (HE) and Standard Nut (HD).
Do not tighten completely until after step 5.
3
A
4
Two Adults
Required for
Assembly
5
HD
A
A
HE
1
2
Ground
Ground
HE
HA
5
Remove Nylock Nut (HA) and Washer (HE) from the bottom two Blue
Tubes (B). Place a new Blue Tube (B) at the bottom of the red pentagon
assembly. Secure the Blue Tube (B) and Red Tubes (A) to the existing
joints by replacing the Washer (HE) and the Nylock Nut (HC). Tighten
(joint a), (joint b) and (joint c) completely.
B
A
B
HE HC
Two Adults
Required for
Assembly
HB
Joint c
B
HE
B
A
A
A
B
B
Joint b
Joint a
B
HC HE
HE
Make sure all the bolts on the bottom go in the
direction shown (outside in) to prevent injury.
8
HB
6
Add one of the assemblies completed in step 2, to the
assembly completed in step 5.
Two Adults
Required for
Assembly
Use the instructions from steps 3, 4, and 5 to attach the
assemblies. Continue adding the assemblies from step 2 to
complete the circle.
7
Remove the Standard Nut (HD) and
Washers (HE) at (joint d) and add a
Large Blue Tube (B-1). Replace the
Washer and Nut, however do not
completely tighten (joint d), repeat the
same process for (joint e).
Remove the Standard Nut (HD) and
Washer (HE) at (joint f). Place the added
Large Blue Tubes (B-1) over the bolt in
the order shown. Add a Large Red Tube
(A-1) on the top of (joint f). replace the
Washer (HE) and Standard Nut (HD).
Tighten joint completely.
Complete around the circle.
6
6
joint e
A-1
joint d
B-1
B-1
4
5
joint f
HD
1
2
5
HE
4
3
1
2
HE
HA
3
9
8
Connect five Large Red Tubes (A-1) at the top by
sliding a 1 3/4” Bolt (HA) through a Washer (HE) and
through the five Large Red Tubes (A-1) in the order
shown. Secure with a Washer (HE) and Standard Nut
(HD). Tighten completely.
5
4
A-1
A-1
A-1
HD
3
A-1
5
A-1
2
HE
4
1
3
HE
2
HA
1
Check and tighten all bolts before allowing children to play. Do not allow
Children to play on the Dome Climber before the handholds are in place.
HC
9
Attach Handholds (C) to each of the joints not touching the ground.
Attach the handholds by sliding a Washer (HE) over the 1 3/4” Bolt
(HA) and placing the Handhold (C) over the 1 3/4” Bolt (HA). Line
up the notch on the bottom of the handhold with the tube on the
top of the joint.
HE
C
Secure each Handhold with a Washer (HE) and Nylock Nut (HC).
Tighten completely.
HE
STOP: It is critical that
this washer is added.
HA
Make sure the notch in the handhold
is securely in place over the tube, as
shown.
Before allowing children play ensure handholds are in place and secure. Replace broken
handholds immediately, do not allow children to play on damaged equipment.
When moving the Dome Climber, do not slide the Dome or tip it on its side.
This may cause the Dome to lose its shape. Instead, use several people to lift the Dome and
move it to the new location.
10
7!2.).'s!6)3/s!6%24)33%-%.4
4HISPRODUCTISINTENDEDFORUSE
BYCHILDRENAGESTO$ONOT
INSTALLOVERCONCRETEASPHALT
PACKEDEARTHORANYOTHERHARD
SURFACE!FALLONTOAHARDSURFACECANRESULTINSERIOUSINJURY
%STEPRODUCTOESPARANI×OSDEA
A×OSDEEDAD.OLOINSTALESOBRE
CONCRETOASFALTOTIERRAEMPAQUETADAOCUALQUIEROTRASUPERlCIEDURA
,ACAIDASOBREUNASUPERlCIEDURA
PODRÓAOCASIONARSERIASLESIONES
#EPRODUITESTCONÎUPOURUNUSAGEPAR
DESENFANTSÉGÏSDEËANS.EPAS
INSTALLERSURDUBÏTONDELASPHALTEDE
LATERRECOMPACTÏEOUTOUTEAUTRESURFACE
DURE5NECHUTESURUNESURFACEDURE
PEUTENTRAÔNERDESBLESSURESGRAVES
Observing the following statements
and warnings reduces the likelihood
of serious or fatal injury.
Si se presta atención a los siguientes
enunciados y avisos de advertencia
se reduce la probabilidad de producirse lesiones serias o mortales.
L’observation des déclarations et des
avertissements suivants réduit les risques
de blessures graves ou fatales.
s4HEMAXIMUMNUMBEROFOC
CUPANTSTHATMAYSAFELYUSETHE
EQUIPMENTISWITHAMAXIMUM
WEIGHTOFPOUNDS
s/NSITEADULTSUPERVISIONSHOULD
BEPROVIDEDFORCHILDRENOFALLAGES
s$ONOTUSETHEEQUIPMENTINAMAN
NEROTHERTHANINTENDED
s4OPREVENTENTANGLEMENTAND
STRANGULATIONUSEWELLlTTINGSHOES
ANDAVOIDPONCHOSSCARVESJACK
ETSWITHNECKDRAWSTRINGSHELMETS
WITHSTRAPSANDOTHERLOOSElTTING
CLOTHINGTHATISPOTENTIALLYHAZARDOUS
WHILEUSINGEQUIPMENT
s$ONOTCLIMBWHENTHEEQUIPMENT
ISWET
s$ONOTATTACHITEMSTOTHE
PLAYGROUNDEQUIPMENTTHATARENOT
SPECIlCALLYDESIGNEDFORUSEWITH
THEEQUIPMENTSUCHASBUTNOTLIM
ITEDTOJUMPROPESCLOTHESLINEPET
LEASHESCABLESANDCHAINASTHEY
MAYCAUSEASTRANGULATIONHAZARD
Lifetime Products, Inc.
s%LNÞMEROMÈXIMODEOCUPANTES
QUEPUEDENUSARDEFORMASEGURAEL
EQUIPOESCONUNPESOMÈXIMODE
LBKG
s,OSNI×OSDETODASLASEDADESDEBEN
ESTARBAJOLASUPERVISIØNDEUNADULTO
ENELLUGAR
s.OUSEELEQUIPODEUNAFORMA
DISTINTAPARALACUALESTÈDISE×ADO
s0ARAPREVENIRENREDOSYESTRANGU
LACIØNVISTAALOSNI×OSCORRECTAMENTE
CONCALZADOADECUADOYEVITEELUSO
DEPONCHOSBUFANDASCHAQUETASCON
CORDELESPARAELCUELLOCASCOSCON
CORREASYOTROTIPODEROPAHOLGADAQUE
SEAPOTENCIALMENTEPELIGROSADURANTEEL
USODELEQUIPO
s.OSESUBAALEQUIPOCUANDOÏSTE
MOJADO
s.OlJEALEQUIPODEPATIODEJUEGOS
ELEMENTOSQUENOESTÏNESPECÓlCA
MENTEDISE×ADOSPARAELLOCOMOPOR
EJEMPLOCUERDASPARASALTARTENDEDEROS
PARAROPACORREASDEMASCOTASCABLES
YCADENASETCPUESREVISTENUNPELIGRO
DEESTRANGULACIØN
s,ENOMBREMAXIMALDOCCUPANTS
POUVANTUTILISERCETÏQUIPEMENTENTOUTE
SÏCURITÏESTDEAVECUNPOIDSMAXIMALDE
LBKG
s,APRÏSENCEDUNADULTESURVEILLANTLES
ENFANTSDETOUSÉGESDOITÐTREASSURÏE
s.EPASUTILISERLÏQUIPEMENTËDAUTRES
lNSQUEPOURLUSAGEPRÏVU
s0OURÏVITERLEMMÐLEMENTDESCORDES
ETDESCHAÔNESETAINSIÏVITERTOUTRISQUE
DÏTRANGLEMENTVEILLEZËHABILLERLESEN
FANTSCORRECTEMENT#HAUSSEZDESSOULIERS
BIENADAPTÏS.EMETTEZPASDEPONCHOS
DEFOULARDSÏCHARPESOUDEBLOUSONS
AVECDESCORDONSPRÒSDUCOUNIDE
CASQUESAVECDESSANGLESETTOUTAUTRE
VÐTEMENTAMPLEPOUVANTPOTENTIELLEMENT
SAVÏRERDANGEREUXLORSDELUTILISATIONDE
LÏQUIPEMENT
s.EPASMONTERSURLÏQUIPEMENT
LORSQUECELUICIESTMOUILLÏ
s.EPASATTACHERDOBJETSSURLÏQUIPEMENT
DEJEUNONSPÏCIlQUEMENTCONÎUSPOUR
CELUICITELSQUEMAISSANSSYLIMITERDES
CORDESËSAUTERDESCORDESËLINGEDES
LAISSESDANIMAUXDESCÉBLESETDESCHAÔNES
#EUXCIPOSENTUNRISQUEDÏTRANGLEMENT
0/"OXs&REEPORT#ENTER"LDG$s#LEARlELD54s53!s
11