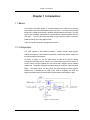
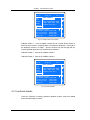
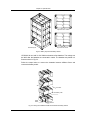
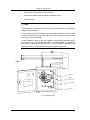
1
Liebert iTRUST UPS System User Manual E1-20020516-C-1.0 Liebert Corporation Contents Chapter 1 Introduction .....................................................................................................................1 1.1 Basics .................................................................................................................................1 1.2 Configuration ......................................................................................................................1 1.3 Operation Theory................................................................................................................2 1.4 Structure and Layout ..........................................................................................................3 1.5 Operation Modes ................................................................................................................4 1.6 Basic Functions ..................................................................................................................8 1.7 Specifications .....................................................................................................................8 Chapter 2 Cabinet Installation .......................................................................................................13 2.1 Environmental Conditions.................................................................................................13 2.2 Unpacking.........................................................................................................................13 2.3 Dimensions.......................................................................................................................13 2.4 Transportation ..................................................................................................................16 2.5 Positioning of UPS............................................................................................................16 2.6 Cable Access....................................................................................................................18 2.7 Ventilation.........................................................................................................................19 2.8 Layout of Cabinet .............................................................................................................20 Chapter 3 Electrical Assembly .......................................................................................................23 3.1 Selection of cables ...........................................................................................................23 3.1.1 Current carrying capacity of cables ........................................................................23 3.1.2 Selection of power cables.......................................................................................23 3.1.3 Selection of signal cables .......................................................................................24 3.2 Cable connections ............................................................................................................24 3.2.1 Power cables ..........................................................................................................24 3.2.2 Signal cable............................................................................................................28 3.3 Connection of Single UPS System ...................................................................................35 Chapter 4 Commissioning of UPS .................................................................................................37 4.1 Startup Procedure ............................................................................................................37 4.1.1 Explanation of Circuit Breakers ..............................................................................37 4.1.2 Startup....................................................................................................................37 4.2 Setting the functions .........................................................................................................38 4.3 Functional checks.............................................................................................................40 4.3.1 Check the function of the display panel ..................................................................41 4.3.2 Switching between operation mode........................................................................41 Chapter 5 Operation of Display Panel ...........................................................................................43 5.1 Display panel ....................................................................................................................43 5.1.1 Layout of Display Panel..........................................................................................43 5.1.2 LED Indication ........................................................................................................44 5.1.3 Functional Keys ......................................................................................................45 5.2 5.3 5.4 5.5 5.1.4 Alarm Buzzer..........................................................................................................46 5.1.5 LCD and Menu Keys ..............................................................................................46 The displayed information ................................................................................................48 5.2.1 Opening display ......................................................................................................48 5.2.2 Main Menu Display.................................................................................................48 5.2.3 UPS Basic Information ...........................................................................................48 5.2.4 Menu Keys Display Window...................................................................................49 5.2.5 Information of main menu.......................................................................................50 Function Setup .................................................................................................................54 5.3.1 Language setup .....................................................................................................54 5.3.2 Address setup ........................................................................................................55 5.3.3 Time setup .............................................................................................................55 5.3.4 Manual battery self-test ..........................................................................................58 5.3.5 Contrast adjustment ...............................................................................................59 5.3.6 History log ..............................................................................................................59 5.3.7 background communication setup..........................................................................60 5.3.8 Call-back number setup ..........................................................................................61 Prompt window.................................................................................................................63 Events and State Information: ..........................................................................................66 Chapter 6 Maintenance .................................................................................................................69 6.1 Setup procedures .............................................................................................................69 6.1.1 Start up...................................................................................................................69 6.1.2 Shutdown ...............................................................................................................70 6.1.3 Transferring between operation modes..................................................................71 6.1.4 Emergency shutdown and recovery .......................................................................71 6.1.5 Mute .......................................................................................................................72 6.1.6 Fault clear ..............................................................................................................72 6.1.7 Monitoring system ..................................................................................................73 6.1.8 Input and output contacts ........................................................................................75 6.1.9 Temperature measuring .........................................................................................76 6.2 Maintenance.....................................................................................................................76 6.2.1 Daily maintenance..................................................................................................76 6.2.2 Battery maintenance ..............................................................................................78 6.2.3 Shutdown maintenance..........................................................................................80 Chapter 7 Troubleshooting ............................................................................................................81 7.1 UPS system troubleshooting ............................................................................................81 7.1.1 Basics.....................................................................................................................81 7.1.2 Procedures.............................................................................................................81 7.2 LED indicator....................................................................................................................81 7.2.1 LED display ............................................................................................................81 7.2.2 LED indicator of lightning protection device ...........................................................82 7.3 Buzzer alarm ....................................................................................................................82 7.4 LCD indication for fault information ..................................................................................83 Chapter 8 Parallel System .............................................................................................................87 8.1 System Introduction..........................................................................................................87 8.1.1 Basics.....................................................................................................................87 8.1.2 Theory of Operation...............................................................................................88 8.1.3 Operation modes ....................................................................................................90 8.2 Installation ........................................................................................................................91 8.2.1 Cabinet installation .................................................................................................91 8.2.2 Electrical installation ...............................................................................................92 8.3 External Power Distribution ..............................................................................................93 8.4 Start up of Parallel Operation System ..............................................................................93 8.5 Using the Parallel Operation System ................................................................................94 8.5.1 Switch on the Parallel System ................................................................................94 8.5.2 Shutdown the Parallel Operation System ...............................................................95 8.5.3 Transferring between Operation Modes .................................................................96 8.5.4 Repairing the failed UPS unit in parallel operation system .....................................97 8.5.5 Emergency shutdown .............................................................................................98 8.5.6 Fault and Fault Process Methods ...........................................................................99 Chapter 9 Optional Parts .............................................................................................................101 9.1 Battery ............................................................................................................................101 9.1.1 Capacity selection ................................................................................................101 9.2 Battery cabinet................................................................................................................102 9.2.1 External Dimensions.............................................................................................102 9.2.2 Installation of battery cabinet................................................................................103 9.2.3 Wiring of the batteries...........................................................................................103 9.3 SNMP Card and the Software ........................................................................................106 9.3.1 Product structure and ports ..................................................................................106 9.3.2 Technical features ................................................................................................106 9.4 Network Software ...........................................................................................................107 9.5 MODEM..........................................................................................................................107 9.6 Temperature sensor TMP12Z.........................................................................................108 9.7 Level C Lightning Protection System SPD24Z...............................................................108 9.7.1 Introduction of SPD24Z ........................................................................................109 9.7.2 Installation procedures of SPD24Z .......................................................................109 9.7.3 Using and Maintenance.........................................................................................111 9.8 Bypass Isolation Transformer .........................................................................................111 Chapter 10 Service after Sales ....................................................................................................112 10.1 Abnormal Fault Handling ..............................................................................................112 10.2 Technical support ............................................................. Error! Bookmark not defined. 10.3 Warranty .......................................................................................................................115 Chapter 1 Introduction Chapter 1 Introduction 1.1 Basics The Liebert iTrust UPS System is connected between the utility source and the critical load to provide uninterruptible power to the load. The power from the UPS being free of voltage and frequency variation and disturbances from utility. The UPS has an output isolation transformer to provide galvanic isolation between the load and utility. The UPS also uses the latest in high frequency double conversion PWM technology and a fully digital control. It also has advanced network management functions. 1.2 Configuration The UPS consists of the following modules : rectifier, inverter, static bypass, maintenance bypass, output isolation transformer, inverter static switch, battery and input and output circuit breakers. As shown in Figure 1-1, the AC utility source is input at Q1 and the rectifier converts the AC Utility into DC source. The Inverter will convert the DC source or the DC source from the batteries into AC source that is output from the isolation transformer. The battery will power the load through the inverter in case of a power failure. The utility source can also power the load through the static bypass. Besides this, if maintenance or repair of the UPS is necessary, the UPS can support the load through the maintenance bypass without interrupting the load. Figure 1-1 Theory of UPS 1 Chapter 1 Introduction 1.3 Operation Theory The UPS circuit diagram is shown in Figure 1-2. TR1 AC2 Q1 FU1 A1 B1 C1 L1 KM1 FU2 FU3 KA1 Res1 Res2 Q2 A2 B1 C1 N2 KM2 BP + BN DC1 Res3 Q3BP U V W N Q5 FU4 FU5 FU6 AC4 AC3 TR2 DZN6 Figure 1-2 Main circuit of UPS The utility source is input at Q1 and flows through the fuse, the transformer, inductor and into the high frequency rectifier which will convert the AC power into DC power. The rectifier has PFC and charger function and make use of soft start and DSP digital technology to improve the system immunity against surge, improve the stability of the DC bus voltage, reduce the charging current ripple and prolongs the battery life. The battery is connected to the UPS through contactor. If the DC bus voltage drop through certain threshold, then the contactor will activate to connect the battery to the DC bus. The battery will supply the DC power to the inverter through a filtering circuit. The inverter uses digital vector control technology based on DSP to modulate six IGBTs through SVPWM and invert DC power to AC three phase power. The output is isolated from the load by Delta/Zig-Zag transformer, static switch, fuse and circuit breakers. The bypass source is input at Q2 and output through the bypass static switch. 2 Chapter 1 Introduction The double DSP and MCU form the full digital control system to realize the powerful function of the UPS. The switching between the operation modes is realized by controlling the bypass static switch and the inverter static switch. Advanced battery management prolongs battery life. Multi-communication ports and management software make it possible for the customer to monitor the UPS performance locally or remotely. The Liebert UPS uses full digital, discrete and on-line parallel operation technology. In parallel operation, several UPS units input parallel logic signals and cross current detection signals through parallel operation boards to enable a maximum of four UPS units to operate in parallel. (N+X) redundancy parallel operation, capacity expansion and hot-standby configuration can be realized. If an additional UPS is required to be added to the system, no auxiliary equipment is required and power to the load need not be interrupted. 1.4 Structure and Layout The structure and layout of the system is shown on Figures 1-3 and 1-4. The system consists of the rectifier, inverter, auxiliary power supply, input and output power distribution, monitoring system, parallel control system, lightning protection unit, EMI filter, fan and input and output isolation filters. 1:Fan 2:rectifier 3:two auxiliary power supply boards ULW2L61M5 4:contactor 5:battery input terminals 6:circuit breaker Q3BP for maintenance 7:Inverter 8:Power distribution board ULK2L61R1 9:D level lightning protection device SPD12Z 10: Output circuit breaker Q5 11:rectifier input circuit breaker Q1 12:bypass input circuit breaker Q2 13:operation keypad board ULW2L61K1 14:LCD 15:parallel board ULW2L61M3 16:monitoring board ULW2L61U2 17:4 leveling feet (M20) Figure 1-3 Components of 20/30kVA UPS 3 Chapter 1 Introduction Front view 1:Fan 2:rectifier 3: softstart relays 4:contactor 5: two auxiliary power supply boards ULW2L61M5 6: D level lightning protection device SPD12Z 7: Hall current sensor 8:battery input terminals 9:circuit breaker Q3BP for maintenance 10:rectifier input circuit breaker Q1 11:bypass input circuit breaker Q2 12:Inverter 13: fast fuse 14: parallel board ULW2L61M3 15: EMI board ULW2L61M4 16: magnetic core 17: output circuit breaker 18:operation keypad board 19: LCD 20: monitoring board ULW2L61U2 21: Battery EMI board 22: Fuse NT100 23: 4 leveling feet (M20) Figure 1-4 Components of 40/60kVA UPS 1.5 Operation Modes 1. Normal mode When the utility is normal, the UPS powers the load through the rectifier and inverter and charges the batteries at the same time, as shown in Figure 1-5. This is called the Normal Mode. 4 Chapter 1 Introduction Bypass Mains ~ - - ~ output Figure 1-5 Normal mode 2. Battery Mode When the utility fails, the UPS system will switch to battery mode without interruption and the battery will power the load through the inverter. The UPS can return to normal mode automatically when the utility returns to normal, as shown in Figure 1-6. Bypass Mains ~ - - output ~ Figure 1-6 battery mode 3. Bypass Mode In the event of an inverter overload which last longer than the typical time, an output short circuit or a fault on the inverter, the UPS will transfer the load to bypass. There are two kinds of bypass modes. In the first kind, the UPS can be set to return to normal mode automatically when the fault is cleared. In the second kind, the UPS is set to return to normal mode only with a manual transfer. When the main UPS circuit fails, the battery is depleted or a severe fault occurs, the inverter will be shut down and the system will remain in the bypass mode. The system can return to normal mode only with a manual reset after the fault is cleared, as shown in Figure 1-7. Bypass Mains ~ - - ~ output Figure 1-7 bypass mode 5 Chapter 1 Introduction 4. ECO Mode If the load has no requirement for power quality but has a high requirement for efficiency, then the UPS can be set in ECO mode. In this mode, the system will power the load through the static bypass switch and the rectifier will charge the batteries. When the bypass source fails or out of normal range, the UPS will revert back to normal mode and powers the load through the batteries. The total transfer time will be less than 15 msecs. When the bypass source recovers back to normal, the system will return to ECO mode automatically and the system efficiency is greatly improved, as shown in Figure 1-8. Note that the ECO mode function can only be set by qualified personnel and applies to single UPS modules only. Bypass Mains ~ - - ~ output Figure 1-8 ECO mode 5. Maintenance Mode When the UPS has to be repaired or has to undergo routine maintenance, the UPS can be set to maintenance mode by switching on the maintenance bypass circuit breaker. The load will be powered from the maintenance bypass supply without interruption. During maintenance, the circuit breakers Q1, Q2, QF1 and Q5 should be switched off to ensure the safety of maintenance personnel. See Figure 1-9. Q3BP Bypass Mains Q1 Q2 ~ - - ~ QF1 Figure 1-9 6 Q5 Output Chapter 1 Introduction 6. United Power Mode When the utility is not available and the capacity of the generator set is inadequate to support the load, the battery will power the load together with the generator automatically. The operating time under this mode should not exceed the autonomy time of the batteries, as shown in Figure 1-10 Note : This mode can only be set by qualified personnel only. Bypass Mains ~ - - ~ output Figure 1-10 7. Parallel Operation mode When several UPS units (maximum four units) are in parallel operation mode, they will share the load automatically amongst themselves. If one unit fails, this unit will be shut down automatically and the remaining units will share the load equally. If overload occurs, the UPS will transfer to bypass operation mode. Parallel operation mode also has normal mode, battery mode, bypass mode, maintenance mode and united power mode. 8. Dual Input Mode The main circuit and the bypass can use the same or different sources. The input methods are shown in Figure 1-11 and Figure 1-12. Mains ~ - - Fig 1-11 7 ~ output Chapter 1 Introduction Bypass Mains ~ - - ~ output Fig 1-12 1.6 Basic Functions Battery Management Function - The UPS has advanced battery management functions including battery fault detection and backup time forecast. Soft Start Function - Complete delay soft start function can reduce the surge to the UPS unit and utility source. Alarm and Protection Function - The UPS can generator audible and visual alarm through LCD, input/output contacts and network transmission. It can help maintenance personnel to locate and clear the faults that are sent out in time, accurately and in detail. Dark Start Function - When the utility is unavailable, the UPS can start from battery that is connected to the DC Bus. Automatic Re-start when Utility returns - This function only applies to the UPS that has batteries. The UPS shuts down due to low battery, and restart automatically when the utility returns. At this time , its operation mode is the one before the utility fails. Monitoring Functions - The UPS monitoring system has an advanced monitoring function and parallel control functions. It supports flexible network monitoring to satisfy different customer requirements. 1.7 Specifications 1. Functional Parameters 8 Chapter 1 Introduction Parameters of Liebert iTrust UPS are given in Table1-1 Rectifier input Capacity 20kVA Model UL33-0200L 30kVA UL33-0300L 40kVA UL33-0400L 60kVA UL33-0600L Input Voltage 380/400/415V(line-to-line voltage) AC Power Input Three-phase three-wire Power Factor >0.99 Harmonic Current <4%(Voltage distortion lower than 2% at rated load) +15%~-20% Voltage Range Lowest operating voltage: -45% Input current limiting Input Current: <115%In for continuous operation; 115~140%In for 5 minutes; 140~165%In for 1minute; Current limiting at current over 165%In(In is the rated output current without deration) frequency range 50Hz ±10% Input Voltage 380/400/415V(line-to-line voltage) Input Voltage Range ±10% AC Power Input Three-phase four-wire Frequency range 50Hz±10% Voltage regulation 380/400/415V±1% (balanced load) (±5% adjustable) Voltage transient response ±5%(0~100%linear load) Transient recovery time <60ms Voltage distortion(linear load) THD<2%(line-to-neutral voltage)(battery float charge state, rated balance load) Voltage distortion(nonlinear load) THD<5%(line-to-neutral voltage)(battery float charge state, rated balance load) Power Factor 0.8(lagged) Frequency Syn. Range 50Hz±2Hz Frequency mode) ±0.1% Bypass input Output regulation(Battery Phase Displacement (ThreePhase) 120± 1°(balanced load or unbalanced load) Voltage unbalance rate 100% unbalance load ±2%(battery float charge state) Frequency slew rate at <1Hz/s 9 Chapter 1 Introduction Capacity 20kVA Model UL33-0200L 30kVA UL33-0300L 40kVA UL33-0400L 60kVA UL33-0600L 105% < load 125% , transfer to bypass mode after 10±0.1min; Overload capability(inverter) 125% < load 150% , transfer to bypass mode after 1 minute; When load > 150%, transfer to bypass mode after 200ms 135% Rated Current continuously 135%~170% for 1 minute Output Overload capability(bypass) >170%, shutdown in 2s 1000% rated current for 20ms(a standard for selecting static switch) System Ratio of output current peak value to RMS value 3: 1 Transfer time(normal mode) 0(uninterrupted transfer),15ms(interrupted transfer) Transfer time(ECO mode) 15ms System efficiency(linear load) 87% 87% 88% 89% Efficiency in battery mode(linear load) 92% 93% 93% 94% Display EMC/EMI LCD+LED Conduction EN50091-2 Radiation EN50091-2 CLASS-A Harmonic IEC1000-3-4 EN 61000-4-2.3.4..6.8.9.11 Level III, Immunity EN 61000-4-5 Level Ⅳ MTBF(inverter) 30,000 hours MTBF(Single UPS) 150,000 hours MTBF(1+1 parallel operation system) 400,000 hours Safety CCEE Audible noise at 2m <60dB Cross current without load(1+1) <3A Cross current without load(3+1) <4A current unbalance rate(1+1) <3% current unbalance rate(3+1) <4% 10 <65dB Chapter 1 Introduction System Capacity 20kVA Model UL33-0200L 30kVA 40kVA UL33-0300L UL33-0400L 60kVA UL33-0600L Insulation Resistance >2M(500VDC) Dielectric Strength (input to earth, output to earth)2820Vdc, leakage current lower than 3.5mA, 1min without arc Surge Immunity Satisfy the class IV requirements specified by IEC60664-1, the ability to withstand 1.2/50us+8/20us not lower than 6kV/3kA Protection index IP20 Number of battery cells 30 battery cells(12V) Installation top/bottom cable access modes optional Cable access mode 2. Electrical Parameters For designing of utility power source, air-conditioner, input and output power distribution and cable selection, please refer to Table 1-2 Table 1-2 electrical parameters Model UL33-0200L UL33-0300L UL33-0400L UL33-0600L UPS rated power 20kVA 30kVA 40kVA 60kVA AC input Rated loss Rectifier: 380/400/415V+15%~(3¢3W), Bypass: 380/400/415V±10%(3¢4W) 2.40kW 3.60kW 4.37kW 5.94kW Air intake(m /hour) 500 800 1400 2200 Rectifier input current 44A 66A 88A 132A Bypass input current 37A 56A 74A 112A UPS output current 37A 56A 74A 112A Battery input current 56A 84A 112A 168A 3 11 Chapter 2 Cabinet Installation Chapter 2 Cabinet Installation 2.1 Environmental Conditions Operating Temperature : 0~ 40°C Storage Temperature: -40~ 70°C(with no battery) -20~ 55°C(with battery) Relative Humidity:5%~95%, no condensation Cooling method : Fan cooling Elevation:1500m Maximum Tilt : 5 degrees Pollution :Class II The UPS should be installed in a cool place with good ventilation, low humidity and free of dust. The recommended operating temperature is 20 – 25 degree C, and the humidity should be controlled at 50% RH. Note : The UPS room should not be stored with flammable, corrosive or explosive materials. It is not advisable to install the UPS in areas with conductive dust. 2.2 Unpacking Unpack the UPS only at the installation site and check the equipment for completeness and damage. Keep accessories for later use. Unpacking method is illustrated on the carton. For reliable operation of the UPS, the installation method should be based on the actual environment condition and site design standard. 2.3 Dimensions The dimensions of the UPS are listed in Table 2-1 13 Chapter 2 Cabinet Installation Figure 2-1 4 fixing holes 4 screws for levelling feet Figure 2-2 External Dimensions of 40/60kVA UPS are shown in Fig. 2-3 and its installation position is shown in Fig. 2-4. 14 Chapter 2 Cabinet Installation Figure 2-3 40/60kVA UPS Outline Dimension 4 fixing holes 4 screws for levelling feet Figure 2-4 40/60kVA UPS Fixing Holes 15 Chapter 2 Cabinet Installation 2.4 Transportation 1. Hoisting the UPS Prepare four cables of length 1.5 m and the weight bearing capacity of each cable of 1.5 tons. The UPS has four lifting rings and should be installed at the top of the UPS 2. Transportatio with Forklift The UPS can be raised by forklift in four directions – front, back, left and right. But the transportation distance should not exceed 10 m. 2.5 Positioning of UPS The UPS cabinet exerts its weight on the floor through four castors. If the load bearing capacity of the floor is inadequate, add auxiliary equipment to distribute the weight over a larger area, such as a big iron sheet or increasing the number of supporting castor wheels. Note As the UPS is cooled from the bottom, at least 10 cm space should be left at the bottom of the UPS for ventilation There are three kinds of positioning methods: 1. Non-Fixed position Place the UPS directly on the flat ground . The ground should be made of Industrial cement. Level the UPS by lowering and adjusting the leveling bolt at the base of the UPS. 4 M20 screws for levelling feet Figure 2-5 16 Chapter 2 Cabinet Installation 2. Fixed position without a base In earthquake prone areas, place UPS on a conduit as shown in Figure 2-6. 1. At the edge of the conduit, drill holes for fixing expansion bolts 2. Hoist the cabinet at least 250 mm to remove the four leveling bolts. Take off the plastic cover of the installation holes on the beam. 3. Position the cabinet at the right position and align the holes on the beam and the holes on the expansion bolts. 4. Insert the expansion bolts into the installation holes. Adjust the tilt of the cabinet and screw the expansion bolts to fix the cabinet. Front door Cabinet Steel of conduit floor of machine room Expansive bolts Cables Cement floor Conduit Cement floor Figure 2-6 Install UPS on a Conduit 3. Fixed cabinet position on a base If the UPS is place in a ESD proof floor, a support rack should be designed to support the cabinet. The design of the rack is illustrated in Figure 2-4 and Figure 27 considering the load carrying capacity of the floor. Level the cabinet according to section 2.5 – 1 17 Chapter 2 Cabinet Installation Figure 2-7 Install the UPS on a support rack 1. Finished state 2. Concrete floor 3. Nut 4. Spring washer 5. Flat washer 6. Supporting frame 2.6 Cable Access The UPS has various methods of cable access. One is bottom access where the cables are routed in conduit from the bottom of the UPS. This is shown in Figure 28. Another is top access where the cables are routed on cable trays from the top and into the UPS as shown in Figures 2-9. Cabinet Signal cables Battery cables input N UPS output output N Cabinet Battery cables Bypass input Fig. 2-8 UPS input/output cables 18 Signal cables input N UPS output Rectifier output N input Chapter 2 Cabinet Installation Input cable Battery cable Output cable Signal cable Fig. 2-9 UPS top cable output 2.7 Ventilation The cooling air comes into the UPS from the bottom and the fan circulates the cool air inside the UPS. The air is expelled out of the UPS from the back. Table 2-3 shows the relationship between the power consumed and air intake. The rear clearance required by the UPS is 500 mm. The front clearance required is 1 m for the convenient of door opening and maintenance, shown in Figure 2-10. Battery cabinet UPS cabinet bottom board Fig. 2-10 Relative position of cabinet 19 Chapter 2 Cabinet Installation 2.8 Layout of Cabinet Besides the UPS cabinet, there are also battery cabinets, input/output distribution cabinet and cabinet for bypass transformer. All these cabinets should be laid out correctly. The layout of battery cabinet and UPS cabinet is shown below. 1. One UPS cabinet and one battery cabinet If the required battery backup time is 15 – 16 minutes, one battery cabinet is required to hold all the required batteries. There is no strict requirement for the relative position of the UPS and the battery cabinet. Figure 2-11 shows this kind of layout. Capacity expansion must be considered into layout design. Battery cabinet UPS cabinet Fig. 2-11 Layout 1 2. One UPS cabinet and several battery cabinets More than one UPS cabinet should be used if the required backup time is more than 30 minutes. Please refer to Chapter 9 for the relationship between the battery backup time and the battery capacity. The battery cabinets should be placed side-by-side and the UPS cabinet can be placed on the left or right side, in front of or behind the battery cabinets. Be sure to leave space for maintenance. 20 Chapter 2 Cabinet Installation Battery cabinet 1 Battery cabinet 2 Fig. 2-12 Layout 2 21 UPS cabinet Chapter 3 Electrical Assembly Chapter 3 Electrical Assembly This chapter introduces the connection methods of the power and signal cables. 3.1 Selection of cables 3.1.1 Current carrying capacity of cables The current carrying capacity can be selected according to the voltage drop and permissible temperature increase. Table 3-1 Current carrying capacity of cables Current carrying capacity (A) Cross sectional area(mm2) 1 1.5 2.5 4 6 10 16 25 35 50 70 95 120 150 185 240 Rubber 21 27 35 45 58 85 110 145 180 230 285 345 400 470 540 660 Plastic 19 24 32 42 55 75 105 138 170 215 265 325 / / / / Rubber 20 25 33 42 54 80 103 136 168 215 267 323 374 439 505 617 Plastic 18 22 30 39 51 70 96 129 159 201 248 304 / / / / 25°C 35°C 3.1.2 Selection of power cables The power cables include input power cables of main circuit and that of the bypass, the UPS output cables, battery input cables, protective earth cables and the lightning protection cables. 1. Calculation of current of power cables The first calculation method is done according to the following formula: If the power factor is 0.80, the efficiency is 0.9, the minimum input voltage is 176 volts, output line to neutral voltage is 220V, minimum battery voltage is 324 V, bypass overload capability is 135% and that of the inverter is 125%, 2. Selection of cable cross sectional areas Power cables are selected according to two factors - 3 – 5 A/mm2 current density and the maximum voltage drop be less than 3 W. The cross-sectional areas of bypass input neutral cable and UPS output neutral cable should be 1.5 times of the phase cable. The cross sectional area of the 23 Chapter 3 Electrical Assemble protective earth cable and lightning protection earth cable, should be 0.5 times of phase cable. The relationship between the current and cross-sectional area is shown in Table 32. Table3-2 Recommended cross sectional area of cables 20kVA Name 30kVA 40kVA Current Cable (mm ) (A) 56 25 Bypass 37 Output Input 60kVA Current Cable (mm ) (A) 84 25 16 56 37 16 44 16 Current Cable (A) Battery 2 Current Cable (mm ) (A) (mm ) 112 35 168 50 16 74 25 112 35 56 16 74 25 112 35 66 16 88 25 132 35 2 2 2 Neutral line 25 25 35 50 Earth cable 16 16 25 25 3.1.3 Selection of signal cables Signal cables should use shielded multi-conductor cables. But if cable with single conductor is used, the different cables should be bonded together to increase the mechanical strength. The number of the bonded cables should not exceed 30. The cross-sectional area of the cable with single conductor should be at least 0.5 sqmm. Serial communication cables should use 3 or 5 shielded conductor cables. 3.2 Cable connections 3.2.1 Power cables 1. Cabling layout Cabling layout is shown in Figures 3-1 and 3-2. For single input UPS, the rectifier input and bypass input are connected together. 24 Chapter 3 Electrical Assembly Battery cables UPS input UPS output input N output N Fig. 3-1 20/30kVA UPS bottom cable output Battery cables Rectifier input Bypass input Bypass N UPS output Output N Fig. 3-2 40/60kVA UPS cable connection at bottom 2. Cable routing 1. Bottom entry configuration – the cables are input and output from the bottom of the UPS 2. Top entry configuration – the cables are input and output from the top of the UPS. To do this, punch out the cable entry cut-outs on the top of the UPS, and feed the cables through the cutouts and guide them through the metal conduit to the bottom of the UPS. From the front view, the battery cable, the input power cables of rectifier and bypass input cables should be input from the left. The output cable and signal cables should be input from the right. The layout of the cables is shown in Figure 2-8. 25 Chapter 3 Electrical Assemble 3. Cable connection Note All the switches should be switched off during cable connection. 1. Feed cables Feed cables according to the cable entry mode, with reference to Figures 2-7, 2-8, 3-1, 3-2 2. Assembling cable lugs to cables First strip the insulation layer 20 mm from the end. Then insert the conductor into the cable lug. Then press the cable lug against the cable till tight. The parameters of the cable lugs are given in Table 3-3 20kVA Name terminal 30kVA Cable (mm2) terminal 40kVA Cable (mm2) terminal 60kVA Cable (mm2) terminal Cable (mm2) Battery GTNR25-8 25 GTNR25-8 25 GTNR50-8 35 GTNR50-8 50 Bypass H16/24 16 H16/24 16 H35/30 25 H35/30 35 Output H16/24 16 H16/24 16 H35/30 25 H35/30 35 Input H16/24 16 H16/24 16 H35/30 25 H35/30 35 Neutral line GTNR25-8 25 GTNR25-8 25 GTNR50-8 35 GTNR50-8 50 Earth cable GTNR25-8 16 GTNR25-8 16 GTNR25-8 25 GTNR25-8 25 3. Connecting the rectifier input to utility Connect the three phase cables of phase A1, B1 and C1 to the circuit breaker Q1 4.Connecting the bypass input to utility Connect the three phase cables of phase A2, B2 and C2 to the circuit breaker Q2. Note : In single input system, jumper the respective terminals on Q1 to Q2 with a 300mm length cable. The utility will be connected to Q1 as described in 3. 26 Chapter 3 Electrical Assembly Wire terminal Input power cable Parallel power cable Fig. 3-3 Power cable connection of One branch utility source 5. Connect the Load to the U, V, W terminals of UPS output breaker Q5. 6.Connection of battery cables The positive and negative cables of batteries are connected to the Positive and Negative terminals of JX3 respectively. 7. Connection of Neutral cable The neutral cable of bypass source is connected to the JX5 copper bar, that is marked with “N/INPUT”. The neutral cable of UPS output source is connected to copper bar JX4, that is marked with “N/OUTPUT”. Note The phase rotation of circuit breakers Q1, Q2, Q5 cannot be wrong and the phase rotation is shown in Figure 3-4. A R U L1 B S V L2 C T W L3 A R U L1 B S V L2 C T W L3 Q1 A R U L1 B S V L2 A R U L1 B S V L2 C T W L3 Q2 C T W L3 A R U L1 B S V L2 C T W L3 Fig. 3-4 Phase rotation 27 Q5 A R U L1 B S V L2 C T W L3 Chapter 3 Electrical Assemble 4. Earthing Method The UPS rectifier source has no neutral cable. The bypass and output source have neutral cables and the input and output neutral cables are short circuited. The lightning protection earth PE and the protection earth of the cabinet are connected as shown in Figure 3-5. The user can decide whether to use a connection cable according to his earthing requirement. PE for lightning protection PE inside cabinet Protective earth Fig. 3-5 Wiring inside cabinet Generally, the separated neutral mode is better for human safety. The united connection mode is better for the UPS system. If there is C-level lightning protection unit inside the UPS, the cabinet protection earth and the lightning protection earth should be connected together. In the bottom cable entry mode, the protection earth cable should be connected with a copper terminal on the beam inside the cabinet or connected to the copper busbar marked with PE. User board M8x12 to fix the cable. Note The leakage current of the UPS should be less than 1 ampere. The earthing resistance of the UPS cabinet should be less than 1 ohm. 3.2.2 Signal cable The Signal cable includes serial communication cables, control cables of input/output contacts, logic and load sharing cables. 1. Routing the signal cable The signal cables should be routed according to Figure 3-6 28 Chapter 3 Electrical Assembly Fig. 3-6 Layout of signal cables of 20/30/40/60kVA UPS 2. Connection method 1.Parallel connection method Open the door of the UPS to see a circuit board ULW2L61M3. On the board, 15pin connectors P1 and P2 are used to connect the parallel logic cables. 9-pin connectors P3 and P4 are used for connecting the load sharing cables. Each UPS system has two pieces of 15 meters length cables. Parallel logic cable Parallel load sharing cable Fig. 3-7 Parallel Board ULW2L61M3 29 Chapter 3 Electrical Assemble 2.Connection of serial connection cables The monitoring board ULW2L61U2 is shown in Figure 3-8, where the locations of RS232, RS485 and input and output contacts are marked. The user can connect the cables with reference to this board. communication cable RS485- C.C. for generator power N.O. for generator power N.O. for over load N.C. for generator power C.C. for over load C.C. for common alarm N.O. for common alarm N.C. for over load N.C. for emergent stop N.O. for emergent stop N.C. for common alarm C.C. for emergent stop N.C. for ambient over temperature C.C. for ambient over temperature N.O. for ambient over temperature N.C. for inverter power C.C. for inverter power C.C. for battery power N.O. for battery power N.C. for inverter power N.O. for battery low alarm N.C. for battery power N.C for battery low alarm C.C. for battery low alarm ground of sensor power source for sensor battery temperature Ambient temperature input +12V power source D.C. for 12V environment value +24V power source D.C. for 24V environment value D.C. for 24V environment value D.C. for 24V environment value Emergency stop A Emergency stop B D.C.B for generator D.C.A for generator communication cable RS485+ Fig. 3-8 Monitoring Board ULW2L61U2 The length of the serial communication cables is different according to actual conditions. The cables are not supplied with the UPS. The communication modes of RS232, RS485, modem and SNMP can be used together, but only one mode can be used at any time. 1) RS232 Connection The J20 is the RS232 communication port. One end of the communication cables should be connected to J20 and the other end should be connected to background monitoring equipment. The meaning of each pin is shown in Figure 3-9. Pin 2:receiving Pin 3:Transmitting Pin 5:Ground Fig. 3-9 RS232 Serial Port 30 Other pins:Void Chapter 3 Electrical Assembly 2) Connection of modem MODEM or SNMP Monitoring board SNMP cables SNMP cables Monitoring board MODEM or SNMP 40/60kVA Front view when right door is opened 20/30kVA Front view when Front door is opened Fig. 3-10 Installation of MODEM or SNMP 1. Figure 3-10 shows the location of Modem and SNMP card. Before installing the modem, the user should remove the iron box use for SNMP card and installed the modem there. communication port communication port serial pore Power source Communication port Fig. 3-11 MODEM Connection Method 2.Connecting the communication cables. The communication cables of modem are connected to J20. 3. Connection of power source cables. Connect the power source cables of modem directly to J8. The Pin 1 of J8 is ground. Pin 2 is 12V power. 4.Connection of Telephone line. Connect the telephone line after connecting the power source and communication cables to realize remote communication. 31 Chapter 3 Electrical Assemble 3)Connection of SNMP Card Installation of SNMP card Unpack the SNMP card and place it in the iron case shown in Figure 3-10 Connect the cables On the monitoring board, there is a jack J22 with a cable to plug in directly to the SNMP card, after the SNMP Card is installed. Please do not remove this cable even if the SNMP card is not used. 4)Connection of RS485 Connector J23 on the monitoring board is the RS485 communication port. One end of the communication cable is connected to J23 while the other end is connected to the user’s equipment. RS485+ RS485SHIELD Pin 1:Signal + Pin 2:Signal J23 1 2 3 4 Pin 4:Shielded ground Fig. 3-12 RS485 Port 3. Connection of input and output voltage free contacts The input and output contacts can be connected to shielded cables, and single cables. One end of the cables are connected to J9 to J18. The other end is for connection by user. Note: The contact should satisfy the SELV safety requirements. The J9-J14 connectors on the monitoring board are monitoring dry contacts of relays. The relays have a normally open, normally closed and a common terminal. The capacity of the contacts are 0.3A/125VAC, 0.3A/110VDC and 1A/24DC. The transmission distance of the dry contact signals are dependent on the voltage level and the cross sectional area of the cables. J15 – J18 are the input contacts for external signals. 32 Chapter 3 Electrical Assembly Table 3-4 Definitions of input/output contacts Connector Name of contacts Board name input/output BLV-C output Central contacts for battery low alarm BLV-S output Normally open contacts battery low alarm BLV-O output Normally closed contacts for battery mode BAT-C output Central mode BAT-S output BAT-O output Normally closed contacts for inverter mode INV-C output Central mode INV-S output INV-O output Normally closed contacts for ambient over-temperature TMP-C output Central contacts for ambient over-temperature TMP-S output Normally open contacts ambient over-temperature for TMP-O output Normally closed contacts emergency shutdown for URG-C output Central contacts for emergency shutdown URG-S output Normally open contacts emergency shutdown URG-O output Normally closed contacts for common alarm WRN-C output Central contacts for common alarm WRN-S output Normally open common alarm WRN-O output OVR-C output Normally closed battery low alarm J9 J10 J11 contacts Normally open battery mode contacts Normally open inverter mode J12 J13 J14 contacts for for battery contacts for for for inverter contacts contacts for for for Normally closed contacts for overload 33 Chapter 3 Electrical Assemble Connector Name of contacts Board name input/output OVR-S output OVR-O output Normally closed contacts for generator mode GEN-C output Central contacts for generator mode GEN-S output Normally open generator mode GEN-O output +24V power for environmental signal +24V power output 24V power for environmental signal 1 ENV1 connect to dry contacts 24V power for environmental signal 2 ENV2 connect to dry contacts 24V power for environmental signal 3 ENV3 connect to dry contacts +12V power for environmental signal +12V power output 12V environmental signal ENV connect to dry contacts Central contacts for overload Normally overload J12 J13 J14 J17 J16 open contacts contacts for for NC NC Ambient temperature input V-AD Dry contacts H of generator GEN-H connect to dry contacts Dry contacts L of generator GEN-L connect to dry contacts Emergency shutdown H UCTRH connect to dry contacts Emergency shutdown L UCTRL connect to dry contacts J18 NC J15 0~5V signal input NC Power Source of Sensor +12V power output Battery Temperature BAT-T 0~5V signal input GND power output GND of Sensor Terminals J9~J14 are the dry contacts for monitoring that can be used by users. The relays have central contacts. 34 Chapter 3 Electrical Assembly 4. Battery Temperature detection cable When the user select the temperature compensation technology, he should select the TMP12Z sensor that is installed inside the battery cabinet or battery room. Use a cable to send a temperature signal to J15 on the monitoring board. Shield cable is recommended to be used because the transmission distance is long. The location of the temperature sensor is shown o Figure 3-13. Fig. 3-13 Dry Contact 1. Circuit Breaker QF1 2. Temperature Sensor TMP12Z Fig. 3-13 Installation of TMP12Z 3.3 Connection of Single UPS System The circuit breaker of bypass source is selected according to its disconnecting capacity and short circuit current. The selected circuit breaker should be able to protect the static switch according to its maximum permissible current. 35 Chapter 4 Commissioning of UPS Chapter 4 Commissioning of UPS 4.1 Startup Procedure 4.1.1 Explanation of Circuit Breakers From the layout of Figure 1-3 and Figure 1-4, the startup of UPS has connections with the following circuit breakers Q1 : Connects rectifier to Utility source Q2 : Connects bypass to Utility source Q5 : Connects UPS output to the Load Q3BP : Connects bypass input source to the load switch QF1 : Battery Circuit Breaker 4.1.2 Startup All the circuit breakers of the UPS should be switched off and phase rotation correct. The battery cables are connected correctly. Q1 and Q2 are connected to utility. Note Before startup, do not connect the load The UPS should be started up according to the following procedures: Step 1 : Switch on Q2 and Q5. The power source indicator on the panel turns on and the LCD displays information during startup. Step 2 : Switch on Q1 and QF1. The sound of the relay closing should be heard. After 2 secs, the main contactor closes. The rectifier starts after the soft start relay opens. The rectifier indicator flashes several times and the rectifier enters normal operation states after about 10 secs. Step 3 : The battery input contactor closes automatically after the DC bus reaches the pre-set value. The battery indicator illuminates before the battery contactor closes and it turns off after the contactor closes. Step 4 : Press the button “inverter start” for two seconds. The inverter will start up and enters normal operating state when the inverter indicator flash. 37 Chapter 4 Commissioning of UPS Step 5 : After the UPS transfers from bypass to inverter, the bypass indicator turns off, and the inverter and the load indicator turns on. The transfer may fail if the phase rotation of bypass and inverter output are different. During operation, if the AC power recovers after failure, the rectifier will restart automatically after some time. If the UPS transfer to generator power, the monitoring system will determine the quality of the generator supply. The time it takes to determine this, ranges from 1 second to 255 seconds. After startup, use the keypad to set the functions of the UPS. Note Power failure means the line to neutral voltage is lower than 120V or the Line to Line voltage is lower than 208V over 10 msecs. 4.2 Setting the functions The methods of setting the functions will be described in details in Chapter 5. This chapter only introduces the setting that relates to commissioning. The user enters the menu of “set functions” shown in the figure below. UL33-0400L 2001-11-08 Inv. On Units 2/4 12:50:30 ID: 1 Language Chinese Out Chinese English Local System Com. Adress Set 1 1 Battery Records Date & Time Set 2001£ -11£ -08 12:50:30 Settings 11£ 0 8 12:09 Input Breaker Closed Byp. Breaker Closed 11£ -08 12:09 Mains Volt. Abnormal UPS in Battery Mode Battery low 11£ -08 12:28 11£ -08 12:28 11£ -08 12:50 Fig. 4-1 Function Setup Menu Language selection : select “Chinese” or “English” as shown in Figure 4-3 Address setup : set the address of this UPS in the monitoring system as shown in Figure 4-3. Date and Time setup : format is “YYYY-MM-DD” and “HH:MM:SS” as shown in Figure 4-3 38 Chapter 4 Commissioning of UPS UL33-0400L 2001-11-08 12:50:30 Inv. On Units 2/4 ID: 1 Language Chinese Out Chinese English Local System Com. Adress Set 1 1 Battery Records Date & Time Set 2001£ -11£ -08 12:50:30 Settings Input Breaker Closed 11£ -08 12:09 Byp. Breaker Closed 11£ -08 12:09 Mains Volt. Abnormal UPS in Battery Mode Battery low 11£ -08 12:28 11£ -08 12:28 11£ -08 12:50 m Fig. 4-2 Setup Language Manual Battery Self Test : Select “start self test” or “stop self test” Contrast Adjustment : Change the display contrast according to the 11 bars, as shown in Figure 4-4. UL33-0400L 2001-11-08 12:50:30 Inv. On Units 2/4 ID: 1 ÊÖ ¶ ¯ µ ç³Batt × ØÔ ¼ ì Manual Test Out Stop Start Local Display contrast adjust System Battery Record Query Range 3 days Records 0: all records Settings Input Breaker Closed 11£ -08 12:09 Byp. Breaker Closed 11£ -08 12:09 Mains Volt. Abnormal UPS in Battery Mode Battery low 11£ -08 12:28 11£ -08 12:28 11£ -08 12:50 m Fig. 4-4 Manual Battery Self-test History Record : The set range is 1-30 days. If “0” is set, all records will be available for viewing. Background Communication Setup : select between modem and RS232, as shown in Figure 4-5 Baud Rate setup : Select from available baud rates of 9600, 4800, 2400 or 1200, as shown in Figure 4-5 Callback time setup : the available set range is from 1-5 times, as shown in Figure 4-5 39 Chapter 4 Commissioning of UPS UL33-0400L 2001-11-08 12:50:30 Inv. On Units 2/4 ID: 1 ʶ Ö¯ µ Mode ç³ × ØÔ ¼Set ì Comm. RS232 Out MODEM RS232 Local Comm. Baudrate Set 9600 System 9600 4800 2400 1200 Battery Callback Times Set 3 Records 3 Settings Input Breaker Closed 11£ -08 12:09 Byp. Breaker Closed 11£ -08 12:09 Mains Volt. Abnormal UPS in Battery Mode Battery low 11£ -08 12:28 11£ -08 12:28 11£ -08 12:50 m Fig. 4-5 Background Communication Callback number 1 : the first callback number can be a mobile phone number, a fixed line phone number, a beeping pager or an extension telephone. The length of the telephone number is 15 digits. Input the number from the first digit and any remaining blanks digits has to be entered with an asterisk “*” Callback number 2 : same as for callback number 1 Callback number 3 : same as for callback number 1 UL33-0400L 2001-11-08 12:50:30 Inv. On Units 2/4 ID: 1 ÊÖ ¶ ¯ µ Mode ç³ Ø × ¼ ÔSet ì Comm. RS232 Out MODEM RS232 Local Comm. Baudrate Set 9600 System 9600 4800 2400 1200 Battery Callback Times Set 3 Records 3 Settings Input Breaker Closed 11£ -08 12:09 Byp. Breaker Closed 11£ -08 12:09 Mains Volt. Abnormal UPS in Battery Mode Battery low 11£ -08 12:28 11£ -08 12:28 11£ -08 12:50 m Fig. 4-6 Fault Call-back 4.3 Functional checks Check the functions of switching between operation modes, visual and audible alarms and the display functions. 40 Chapter 4 Commissioning of UPS 4.3.1 Check the function of the display panel Press the button “inverter shutdown” for 2 seconds and check that the inverter stops. Rectifier indicator Bypass indicator Inverter indicator Battery indicator Load indicator Alarm indicator Emergency shutdown UL33-0400L 2001-11-08 12:50:30 UL33-0400L 2001-11-08 12:50:30 Inv. On Units 2/4 ID: 1 Äæ ± ¿ ä Æ ª ô ² ¢ » ú Ì Ê ¨ ý 2/4 Language Chinese Out A(B) B(C) C(A) Ö ÷ ·Ê ä Èë Chinese English Local à çÑ ¹V 221 220 221 ÅÔ Â ·Ê ä Èë Ï µ System Com. Adress Set 1 ½» Á÷ Êä ³ ö µ ç Á ÷1A 11.8 12.3 Battery Ê z 50.2 50.1 50.1 ± Records » ¾ú ¸ ºÔ Ø Æµ  H Set 0.99 ¦Â Ê Ò&Ê òTime ý 0.99 ² ¢ » ú ¸ Ô º Ø ¹ Date 2001£ -11£ -08 12:50:30 Settings ß çÑ ¹V 381 380 382 µ ç³ Ø Ê¾ ý Ý Ï µ Input Breaker Closed 11£ -08 12:09 Ê Byp. Èë ä ¿¿ Õ ± ª ºÕ Ï Closed 11£ 11£ -0-088 12:09 12:09 Breaker Mains Volt. Abnormal Ê UPS ³ ö ä ¿ in ¿ Õ Battery ± ª ºÕ Ï Mode Ö Battery  ÷ Ä · æ ± ¹älow © µ ç µ ç³ Ø ¾ù ³ ä 11£ 11£ -0-088 12:09 12:28 11£ 11£ -0-088 12:09 12:28 11£ 11£ -0-088 12:15 12:50 11£ -08 12:12 Alarm F1 F2 Inverter stare Inverter stop Fault clearing Mute F3 m F4 Fig. 4-7 Display Panel Press the button “Emergency shutdown” and check that the UPS shuts down Press the button “fault clear” to restart the UPS Simulate a fault to check the visual and audible alarm functions. Press “Mute” button to silence the alarm 4.3.2 Switching between operation mode t Fig. 4-8 UPS Circuit Breaker Operation 41 Chapter 4 Commissioning of UPS 1. Switch from normal mode to battery mode. Switch off Q1 to enter battery mode and after a few seconds, switch on Q1 again to return to normal mode 2. Press “inverter shutdown” button to switch to bypass mode. After a short while, start inverter again to return to normal mode. 3. In bypass mode, switch on Q1 and press “inverter start” button after the rectifier starts. The UPS should switch to normal mode. 4. Switch from normal mode to maintenance bypass mode. Press “inverter shutdown” button, switch off Q1, switch on Q3BP, switch off Q2, Q5, QF1. At this time the bypass source will power the load through Q3BP. 5. Check that the generator set and the UPS battery can work together. 6. A parallel system can also switch between different operation mode. 42 Chapter 5 Operation of Display Panel Chapter 5 Operation of Display Panel 5.1 Display panel 5.1.1 Layout of Display Panel The display panel of the UPS is shown in Figure 5-1. Start Faullt clear 1:LCD 2:Rectifier indicator 3:Battery operation indicator 4:Bypass source indicator 5:Inverter operation indicator 6:UPS output indicator 7:Buzzer 8:Alarm indicator Shutdown Mute 9: cover used for preventing wrong operation of Emergency shutdown button 10:Emergency shutdown button (EPO) 11:Inverter start button 12:Inverter shutdown button 13:Fault clear button 14:Alarm mute button 15:F1 Functional key 16:F2 Functional key 17:F3 Functional key 18:F4 Functional key Fig. 5-1 Display Panel The display panel is divided into three sections: 1.LED section 2.Functional Keys 3.LCD 43 Chapter 5 Operation of Display Panel Rectifier indicator Bypass indicator Inverter indicator Battery indicator Load indicator Alarm indicator Emergency shutdown UL33-0400L 2001-11-08 12:50:30 UL33-0400L 2001-11-08 12:50:30 Inv. On Units 2/4 ID: 1 Äæ ± ¿ ä Æ ª ô ² ¢ » ú Ì Ê ¨ ý 2/4 Language Chinese Out A(B) B(C) C(A) Ö ÷ ·Ê ä Èë Chinese English Local à çÑ ¹V 221 220 221 ÅÔ Â ·Ê ä Èë Ï µ System Com. Adress Set 1 ½Battery Á÷ » Êä ³ ö µ ç Á ÷1A 11.8 12.3 Ê z 50.2 50.1 50.1 ± Records » ¾ú ¸ ºÔ Ø Æµ  H Set 0.99 ¦Â Ê Ò&Ê òTime ý 0.99 ² ¢ » ú ¸ ºÔ Ø ¹ Date 2001£ -11£ -08 12:50:30 Settings ß çÑ ¹V 381 380 382 µ ç³ Ø Ê ý¾ Ý Ï µ Input Breaker Closed 11£ -08 12:09 Ê Byp. È ä ë ¿¿ Õ ± ª ºÕ Ï Closed 11£ 11£ -0-088 12:09 12:09 Breaker Mains Volt. Abnormal Ê UPS ³ä ö ¿ in ¿ Õ Battery ± ª ºÕ Ï Mode Ö Battery  ÷ ·Ä æ ± ¹älow © µ ç µ ç³ Ø ¾ù ³ ä 11£ -08 12:09 11£ -08 12:28 11£ 11£ -0-088 12:09 12:28 11£ 11£ -0-088 12:15 12:50 11£ -08 12:12 Alarm F1 F2 Inverter stare Inverter stop Fault clearing Mute F3 m F4 Fig. 5-2 Function Dividing 5.1.2 LED Indication There are six LEDs to indicate the operation state and fault. Yellow – Normal Red – Fault condition Bypass LED Yellow – Load on Bypass power Red – Bypass Voltage out of normal range Off – Bypass Normal Rectifier LED Yellow – Load on Rectifier Flashing Yellow – Utility Normal, but rectifier not operating Red – Rectifier fault Off – Utility abnormal Battery LED Green – Battery powers the load 44 Chapter 5 Operation of Display Panel Flashing Green – End of battery discharge Red – Battery Abnormal (overtemp, low battery, contactor fused) Off – Battery Normal but not in operation Inverter LED Green – Inverter powers the load normally Flashing Green - Inverter standby Red – Inverter Fails Off – Inverter Normal but not in operation Load LED Green – UPS output on Red – UPS shuts down due to overload Orange – UPS overload Alarm LED: If the red LED turns on, that means the system itself has fault; If green LED turns on, that means there is no alarm; If orange color(actually red and green illuminate together) means there is a fault in the environment of the system, such as rectifier input abnormal, bypass voltage abnormal and battery disconnected. 5.1.3 Functional Keys There are five buttons. Emergency shutdown – Use to totally shut down the UPS including the rectifier, the inverter and the battery Inverter Start-Use to start the inverter, but if the inverter is not ready, pressing this key will have no use Inverter Stop-use to shut down the Inverter during operation, Fault clear – If the UPS shuts down due to a fault, press this key to restart the UPS after the fault is cleared Mute-Use to silence the alarm and re-pressing the button will sound the buzzer again. Any new fault will sound the buzzer again. Pressing any one of the above keys, a short click can be heard. Note To ensure any of the button is properly activated, press down the key for about 2 seconds 45 Chapter 5 Operation of Display Panel 5.1.4 Alarm Buzzer If there is no alarm sound, it means that either the alarm is muted or the system is not in a fault condition There are three types of sound from the buzzer 1.Single click - The sound can be heard when any button is pressed 2. 1 sec click with a 2 secs interval - when system has common fault or alarm 3. Continuous alarm – when system has serious faults Press Mute button to silence alarm. 5.1.5 LCD and Menu Keys There are four menu keys 1. Menu key Each key has two functions, and the functions are defined in the following table Key F1 F2 Shift Up F3 OK Function 1 Function 1 F4 Down C Enter m left Exit Right Modify Fig. 5-3 Icons of functional keys and the meanings 2. LCD The LCD can display alarm information in real time. 220 historical events can be stored and retrieved. 46 Chapter 5 Operation of Display Panel Menu Display Window Current event window UL33-0400L 2001-11-08 Inv. On Units: A(B) Mains Bypass Vphase 221 Iphase A 11.8 Output Freq.Hz 50.2 Local 0.99 System P.F. Vline V 381 Battery 12:30:20 ID 1 B(C) C(A) 220 221 12.3 12.5 50.1 50.1 0.99 0.99 380 382 Input Breaker Close 11£ Byp. Breaker Close 11£ Output Breaker Open 11£ UPS in Normal Mode 11£ Batt. Boost Charging 11£ 12:09 12:09 12:09 12:09 12:09 -08 -08 -08 -08 -08 UPS information window Measuring and setup window Kaypad Window Fig. 5-4 Sections of the LCD The LCD are divided into five windows : UPS information window (restricted for factory use) Keypad window (restricted for factory use) Menu display window Current event window Alarm window Pressing the F1 key can scroll through the windows that can be operated by user. UPS information window-This window displays the UPS basic information and is not necessary for the user to operate. The displayed information is given in the following table. Menu display window-This window displays the information of measuring and setup sub-windows. There are 6 menus, but actually 8. The user can select the menu by pressing F2 or F3. These 8 menus are: rectifier input, bypass input, AC output, load, parallel load, battery data, history record and function setup Keypad Window – The display window shows the picture of the keys and near the pictures of the keys, the operations can be done by the user are displayed. Measuring and Setup window – select the module which you want to query and the parameters will be displayed in this window Current event and alarm window – displays detailed current event and alarms of UPS 47 Chapter 5 Operation of Display Panel 5.2 The displayed information 5.2.1 Opening display At power up of the UPS, the opening display is shown in Figure 5-5. Fig. 5-5 Opening Display 5.2.2 Main Menu Display After the UPS is power up and self test is completed, the main menu will be displayed, as shown in Figure 5-6. Use the arrow-up and arrow-down key to scroll the menu and the history log. UL33-0400L 2001-11-08 Inv. On Units: A(B) Bypass Power KW221 Out Cap. KVA 11.8 Local Load% 50.2 System Battery Crestor 1.41 Records Factor 12:30:20 ID 1 B(C) C(A) 220 221 12.3 12.5 50.1 50.1 1.40 1.41 Input Breaker Close 11£ Byp. Breaker Close 11£ Output Breaker Open 11£ UPS in Normal Mode 11£ Batt. Boost Charging 11£ 12:09 12:09 12:09 12:09 12:09 -08 -08 -08 -08 -08 Fig. 5-6 Main Menu 5.2.3 UPS Basic Information The current basic UPS information will be displayed by pressing the F1 and F4 keys together. 48 Chapter 5 Operation of Display Panel *********************************** *------------------------------------------------------------------* *----------------Emerson Network Power-----------------* *------------------------------------------------------------------* * UPS version£ º 1.00 * * UPS model£ º itrust0400L * * UPS type£ º Single normal * * UPS ID£ º NO.3 * * Rectifier version£ º 1.00 * * Inverter version£ º 1.00 * * Monitor version £ º 1.00 * * Record start time£ º 05-11-02 12: 23: 12 * *----------------Press any key to continue----------------* *------------------------------------------------------------------* *********************************** Fig. 5-7 Display Menu 5.2.4 Menu Keys Display Window The window is displayed in Figure 5-6. Use the arrow-up and arrow-down keys to select from the menu and the measured information will be displayed. For example, if the user the first menu (main rectifier input) then the measuring window will display the input line-line voltage and the current. UL33-0400L 2001-11-08 Inv. On Units: A(B) Mains Vphase 221 Bypass Iphase A 11.8 Output Freq.Hz 50.2 Local 0.99 System P.F. Battery 12:30:20 ID 1 B(C) C(A) 220 221 12.3 12.5 50.1 50.1 0.99 0.99 Input Breaker Close 11£ Byp. Breaker Close 11£ Output Breaker Open 11£ UPS in Normal Mode 11£ Batt. Boost Charging 11£ 12:09 12:09 12:09 12:09 12:09 -08 -08 -08 -08 -08 Fig. 5-8 Press Up(F2) or Down (F3) to Move the Cursor Scroll Up and down the window by pressing the F1 key. If the selected menu is not a historical record, then pressing F1 will display current events and alarms. 49 Chapter 5 Operation of Display Panel UL33-0400L 2001-11-08 Inv. On Units: A(B) Mains Vphase 221 Bypass Iphase A 11.8 Output Freq.Hz 50.2 Local 0.99 System P.F. Battery 12:30:20 ID 1 B(C) C(A) 220 221 12.3 12.5 50.1 50.1 0.99 0.99 Input Breaker Close 11£ Byp. Breaker Close 11£ Output Breaker Open 11£ UPS in Normal Mode 11£ Batt. Boost Charging 11£ 12:09 12:09 12:09 12:09 12:09 -08 -08 -08 -08 -08 Fig. 5-9 Shift key(F1) display If the window displays the current events or current alarms, pressing F2 and F3 can display events and alarms of other modules. 5.2.5 Information of main menu Eight main menu will be displayed on the LCD. They are Rectifier input Bypass input AC output Load of single module UPS system Parallel load Battery data History Log Function setup Pressing F1 can switch from present window to measuring sub-window. Rectifier Input – displays three phase line-line voltage, line current, frequency and power factor of rectifier, as shown in Figure 5-8 Bypass Input - displays three phase line-line voltage, line current, frequency and power factor of bypass source, as shown in Figure 5-10 UL33-0400L 2001-11-08 Inv. On Units: A(B) Mains Vphase 221 Bypass Output Freq.Hz 50.2 Local Vline V 381 System Battery Input Breaker Close 11£ Byp. Breaker Close 11£ Output Breaker Open 11£ UPS in Normal Mode 11£ Batt. Boost Charging 11£ -08 -08 -08 -08 -08 12:30:20 ID 1 B(C) C(A) 220 221 50.1 50.1 380 382 12:09 12:09 12:09 12:09 12:09 Fig. 5-10 Bypass input display LCD 50 Chapter 5 Operation of Display Panel AC Output - displays three phase line-neutral voltage, line current, frequency, power factor and line-line voltage, as shown in Figure 5-11 UL33-0400L 2001-11-08 Inv. On Units: A(B) Mains Vphase 221 Bypass Iphase A 11.8 Output Freq.Hz 50.2 Local 0.99 System P.F. 381 Vline V Battery 12:30:20 ID 1 B(C) C(A) 220 221 12.3 12.5 50.1 50.1 0.99 0.99 380 382 Input Breaker Close 11£ Byp. Breaker Close 11£ Output Breaker Open 11£ UPS in Normal Mode 11£ Batt. Boost Charging 11£ 12:09 12:09 12:09 12:09 12:09 -08 -08 -08 -08 -08 Fig. 5-11 AC output display LCD Parallel load - Displays the power and capacity of parallel load as shown in Figure 5-12 UL33-0400L 2001-11-08 12:30:20 Inv. On Units: ID 1 A(B) B(C) C(A) Mains kWout 21.2 20.3 20.8 Bypass kVAout 22.3 21.7 22.2 Output Local System Battery Input Breaker Close 11£ Byp. Breaker Close 11£ Output Breaker Open 11£ UPS in Normal Mode 11£ Batt. Boost Charging 11£ -08 -08 -08 -08 -08 12:09 12:09 12:09 12:09 12:09 Fig. 5-12 Parallel Load Display LCD Battery Data - Displays battery information under different conditions, such as Battery not connected, equalization charge, float charge, discharge and pre-alarm upon discharge. UL33-0400L 2001-11-08 Inv. On Units: Mains Bypass Output Local System Battery 12:30:20 ID 1 Battery Disconnected Input Breaker Close 11£ Byp. Breaker Close 11£ Output Breaker Open 11£ Batt. Disconnnected 11£ UPS in Normal Mode 11£ -08 -08 -08 -08 -08 12:09 12:09 12:09 12:09 12:09 Fig. 5-13 Displaying contents when the battery are not connected 51 Chapter 5 Operation of Display Panel UL33-0400L 2001-11-08 Inv. On Units: Mains Bypass Output Local System Battery 12:30:20 ID 1 Batt. Volt V 423 Batt. Curr. A 4.56 Batt. Temp. C 23.2 Batt. Boost Charging Input Breaker Close 11£ Byp. Breaker Close 11£ Output Breaker Open 11£ UPS in Normal Mode 11£ Batt. Boost Charging 11£ -08 -08 -08 -08 -08 12:09 12:09 12:09 12:09 12:09 Fig. 5-14 Displaying LCD at equalization charging state UL33-0400L 2001-11-08 Inv. On Units: Mains Bypass Output Local System Battery 12:30:20 ID 1 Batt. Volt V 423 Batt. Curr. A 4.56 Batt. Temp. C 23.2 Batt. Float Charging Input Breaker Close 11£ Byp. Breaker Close 11£ Output Breaker Open 11£ UPS in Normal Mode 11£ Batt. Float Charging 11£ -08 -08 -08 -08 -08 12:09 12:09 12:09 12:09 12:09 Fig. 5-15 Displaying LCD at float charging state UL33-0400L 2001-11-08 Inv. On Units: Mains Bypass Output Local System Battery 12:30:20 ID 1 Batt. Volt V 423 Batt. Curr. A 4.56 Batt. Temp. C 23.2 Backup Time Min 56 Input Breaker Close 11£ Byp. Breaker Close 11£ Output Breaker Open 11£ Mains Volt. Abnormal11£ UPS in Battery Mode 11£ -08 -08 -08 -08 -08 12:09 12:09 12:09 12:25 12:25 Fig. 5-16 Displaying LCD at discharging state 52 Chapter 5 Operation of Display Panel UL33-0400L 2001-11-08 Inv. On Units: Mains Bypass Output Local System Battery 12:30:20 ID 1 Batt. Volt V 423 Batt. Curr. A 4.56 Batt. Temp. C 23.2 Backup Time Sec 176 Input Breaker Close 11£ Byp. Breaker Close 11£ Mains Volt. Abnormal 11£ UPS in Battery Mode 11£ 11£ Battery Low -08 -08 -08 -08 -08 12:09 12:09 12:25 12:25 12:50 Fig. 5-17 Pre-alarm when battery discharges to end of discharge voltage History Log – According to the prompt information in keypad window, pressing F3 key(“Down” key) to display interface of “History Log” as shown in Figure 5-18. UL33-0400L 2001-11-08 Inv. On Units: 12:30:20 ID 1 Byp. Out of Syn. Bypass Output Local System Battery Records 2001£ -11£ -08 2001£ -11£ -08 12:08:30 12:08:58 UPS in Bypass Mode 2001£ -11£ -08 2001£ -11£ -08 12:09:58 12:20:30 UPS in Normal Mode 2001£ -11£ -08 2001£ -11£ -08 12:20:30 12:28:48 Input Breaker Close 11£ Byp. Breaker Close 11£ Mains Volt. Abnormal 11£ UPS in Battery Mode 11£ 11£ Battery Low -08 -08 -08 -08 -08 12:09 12:09 12:25 12:25 12:50 Fig. 5-18 History log Function setup - Pressing F3 key(“Down” key) to display the last interface of “Function setup” as shown in Figure 5-19 UL33-0400L 2001-11-08 Inv. On Units 2/4 12:50:30 ID: 1 Chinese Language Out Chinese English Local System Com. Adress Set 1 1 Battery Records Date & Time Set 2001£ -11£ -08 12:50:30 Settings Input Breaker Closed 11£ -08 12:09 Byp. Breaker Closed 11£ -08 12:09 Mains Volt. Abnormal UPS in Battery Mode Battery low 11£ -08 12:28 11£ -08 12:28 11£ -08 12:50 Fig. 5-19 Functional setup 53 Chapter 5 Operation of Display Panel 5.3 Function Setup In the Menu Display Window select “Function Setup”, pressing F1 key to switch the present window to Measuring and Setup Window and modify each settable items. Pressing F3 key can scroll through all the settable items (total number of the settable items is 12). Pressing F4 to modify and confirm the set parameters. If need no setup, press F1 to exit the current window. UL33-0400L 2001-11-08 12:50:30 Inv. On Units 2/4 ID: 1 Language Chinese Out Chinese English Local System Com. Adress Set 1 1 Battery Records Date & Time Set 2001£ -11£ -08 12:50:30 Settings Input Breaker Closed 11£ -08 12:09 Byp. Breaker Closed 11£ -08 12:09 Mains Volt. Abnormal UPS in Battery Mode Battery low 11£ -08 12:28 11£ -08 12:28 11£ -08 12:50 m Fig. 5-20 Function setup 5.3.1 Language setup According to the information displayed on the Menu Display Window, pressing F4 to enter the Language setting menu, use F2 and F3 keys to select the language, and then pressing F4 to confirm and exit the Language Setting Menu. If you do not want to modify the language, pressing F1(ESC) to escape. UL33-0400L 2001-11-08 12:50:30 Inv. On Units 2/4 ID: 1 Language Chinese Out Chinese English Local c System Com. Adress Set 1 1 Battery Records Date & Time Set 2001£ -11£ -08 12:50:30 Settings Input Breaker Closed 11£ -08 12:09 Byp. Breaker Closed 11£ -08 12:09 Mains Volt. Abnormal UPS in Battery Mode Battery low 11£ -08 12:28 11£ -08 12:28 11£ -08 12:50 Fig. 5-21 Setup the language 54 ok Chapter 5 Operation of Display Panel 5.3.2 Address setup According to the information displayed on Fig.5-22, select the “Equipment Address Setup” and pressing F3(UP) or F2(DOWN) to modify the address of the equipment, and then pressing F4 to confirm and exit. If you do not want to modify the language, pressing F1(ESC) to escape. UL33-0400L 2001-11-08 Inv. On Units 2/4 12:50:30 ID: 1 Language Chinese Out Chinese English Local System Com. Adress Set 1 Battery 1 Records Date & Time Set 2001£ -11£ -08 12:50:30 Settings c Input Breaker Closed 11£ -08 12:09 Byp. Breaker Closed 11£ -08 12:09 Mains Volt. Abnormal UPS in Battery Mode Battery low 11£ -08 12:28 11£ -08 12:28 11£ -08 12:50 ok Fig. 5-22 Equipment address 5.3.3 Time setup According to the information displayed on the Fig.5-23, select the “Time Setup” to modify the system time. If you do not want to modify the language, pressing F1(ESC) to escape. UL33-0400L 2001-11-08 Inv. On Units 2/4 Out Local System Battery Records Settings Language Chinese 12:50:30 ID: 1 Chinese English Com. Adress Set 1 c 1 Date & Time Set 2001£ -11£ -08 12:50:30 Input Breaker Closed 11£ -08 12:09 Byp. Breaker Closed 11£ -08 12:09 Mains Volt. Abnormal UPS in Battery Mode Battery low 11£ -08 12:28 11£ -08 12:28 11£ -08 12:50 ok Fig. 5-23 Setup the date Suppose the time is 2001-11-09 12:50:20, pressing F2 (move left) and F3 (move right) keys to move the cursor to the location of date, as shown in Fig. 5-24. 55 Chapter 5 Operation of Display Panel UL33-0400L 2001-11-08 Inv. On Units 2/4 Out Local System Battery Records Settings Language Chinese 12:50:30 ID: 1 Chinese English 1 Com. Adress Set c 1 Date & Time Set 2001£ -11£ -08 12:50:30 Input Breaker Closed 11£ -08 12:09 Byp. Breaker Closed 11£ -08 12:09 Mains Volt. Abnormal UPS in Battery Mode Battery low 11£ -08 12:28 11£ -08 12:28 11£ -08 12:50 m Fig. 5-24 Setup the date 1 Pressing F4 to let the date to be able to be modified, as shown in Fig. 5-25. UL33-0400L 2001-11-08 Inv. On Units 2/4 Out Local System Battery Records Settings Language Chinese 12:50:30 ID: 1 Chinese English 1 Com. Adress Set c 1 Date & Time Set 2001£ -11£ -08 12:50:30 Input Breaker Closed 11£ Byp. Breaker Closed 11£ Mains Volt. Abnormal 11£ UPS in Battery Mode 11£ 11£ Battery low -08 -08 -08 -08 -08 12:09 12:09 12:28 12:28 12:50 ok Fig. 5-25 Setup the date 2 Pressing F2(up) to change the date to 09, then press F4(Enter) to confirm and exit, as shown in Fig. 5-26. If you do not want to modify the date, pressing F1(ESC) to escape. UL33-0400L 2001-11-08 Inv. On Units 2/4 Out Local System Battery Records Settings Language Chinese 12:50:30 ID: 1 Chinese English Com. Adress Set 1 c 1 Date & Time Set 2001£ -11£ -09 12:50:30 Input Breaker Closed 11£ -08 12:09 Byp. Breaker Closed 11£ -08 12:09 Mains Volt. Abnormal UPS in Battery Mode Battery low 11£ -08 12:28 11£ -08 12:28 11£ -08 12:50 Fig. 5-26 Setup the date 3 56 ok Chapter 5 Operation of Display Panel After escaping the modification state, the date displayed by the UPS basic information window has become a new date. Then use F2 (move left) and F3 (move right) keys to move the cursor to the location of “second”, as shown in Fig. 527. UL33-0400L 2001-11-08 Inv. On Units 2/4 Out Local System Battery Records Settings Language Chinese 12:50:30 ID: 1 Chinese English c 1 Com. Adress Set 1 Date & Time Set 2001£ -11£ -09 12:50:30 Input Breaker Closed 11£ -08 12:09 Byp. Breaker Closed 11£ -08 12:09 Mains Volt. Abnormal UPS in Battery Mode Battery low 11£ -08 12:28 11£ -08 12:28 11£ -08 12:50 ok Fig. 5-27 Setup the date 4 Pressing F4 to let the “second” to be able to be modified, as shown in Fig. 5-28. UL33-0400L 2001-11-08 Inv. On Units 2/4 Out Local System Battery Records Settings Language Chinese 12:50:30 ID: 1 Chinese English C 1 Com. Adress Set 1 Date & Time Set 2001£ -11£ -09 Input Breaker Closed 11£ Byp. Breaker Closed 11£ Mains Volt. Abnormal 11£ UPS in Battery Mode 11£ 11£ Battery low 12:50:30 -08 -08 -08 -08 -08 12:09 12:09 12:28 12:28 12:50 ok Fig. 5-28 Setup the date 5 Pressing F3(down) to change the “second” to 20, press F4(Enter) to confirm and exit, as shown in Fig. 5-29. If you do not want to modify the “second”, pressing F1(ESC) to escape. 57 Chapter 5 Operation of Display Panel UL33-0400L 2001-11-08 Inv. On Units 2/4 Out Local System Battery Records Settings Language Chinese 12:50:30 ID: 1 Chinese English Com. Adress Set 1 c 1 Date & Time Set 2001£ -11£ -09 12:50:20 Input Breaker Closed 11£ -08 12:09 Byp. Breaker Closed 11£ -08 12:09 Mains Volt. Abnormal UPS in Battery Mode Battery low 11£ -08 12:28 11£ -08 12:28 11£ -08 12:50 ok Fig. 5-29 Setup the date 6 After modification, pressing F1(ESC) to exit and the F1 key will become the switching key. Pressing F1(switch) to switch the present alarm Window. Pressing F3 may enter the function setting of next interface. UL33-0400L 2001-11-08 Inv. On Units 2/4 Out Local System Battery Records Settings Language Chinese 12:50:30 ID: 1 Chinese English Com. Adress Set 1 1 Date & Time Set 2001£ -11£ -09 12:50:20 Input Breaker Closed 11£ -08 12:09 Byp. Breaker Closed 11£ -08 12:09 Mains Volt. Abnormal UPS in Battery Mode Battery low 11£ -08 12:28 11£ -08 12:28 11£ -08 12:50 m Fig. 5-30 Setup the date 7 5.3.4 Manual battery self-test Setting of “manual battery self-test” is shown in Fig. 5-31. The Alarm Subwindow will record the setting. Pressing F4 to let “manual battery self-test” to be settable, then pressing F2(left) and F3(right) to move the cursor to “Start Self-test”. If you do not want to start the “manual battery self-test”, pressing F1(ESC) to escape. If pressing F4 to confirm the setting(“Start Self-test”), the Current Events and Alarm Window will record the event of “battery in self test”, after the testing is over, the Window will display “Switching to Equalization Charging”. The whole testing process needs no manual intervening. The testing time is dependent on the load capacity. For example, If the load of 40 kVA UPS is 9kW, the test time is 35 minutes. If the self-test conditions can’t be satisfied, “Battery Self-test is disabled” will be recorded. 58 Chapter 5 Operation of Display Panel UL33-0400L 2001-11-08 12:50:30 Inv. On Units 2/4 ID: 1 Ê ¶ Ö ¯ µ ç ³ × Ø Ô ¼ ì Manual Batt Test Out Stop Start Local Display contrast adjust System Battery Record Query Range 3 days Records 0: all records Settings Input Breaker Closed 11£ -08 12:09 Byp. Breaker Closed 11£ -08 12:09 Mains Volt. Abnormal UPS in Battery Mode Battery low 11£ -08 12:28 11£ -08 12:28 11£ -08 12:50 m Fig. 5-31 Manual battery self test 5.3.5 Contrast adjustment The contrast adjustment is shown in Fig. 5-32. Pressing F2(move left) and F3(move right) to adjust the bars shown the figure below, thus the contrast is adjusted. Store the adjusting results after confirmation and exit the contrast adjustment interface. UL33-0400L 2001-11-08 12:50:30 Inv. On Units 2/4 ID: 1 ÊÖ ¶ ¯ µ ç³Batt × Ô Ø ¼Test ì Manual Out Stop Start Local c Display contrast adjust System Battery Record Query Range 3 days Records 0: all records Settings Input Breaker Closed 11£ -08 12:09 Byp. Breaker Closed 11£ -08 12:09 Mains Volt. Abnormal UPS in Battery Mode Battery low 11£ -08 12:28 11£ -08 12:28 11£ -08 12:50 ok Fig. 5-32 Contrast adjustment 5.3.6 History log Setting of the range of “history log” (the range is 0-30 days). That is, set up the number of the days when the history log recorded can be viewed. “0” means all the history records can be inquired. Pressing F2(up) and F3(left) to adjust the number of days. Thus, the information of recorded in these days can be viewed and scrolled through. After modifying the number of days, pressing F3(down) to select the next item—Background communication mode selection. 59 Chapter 5 Operation of Display Panel UL33-0400L 2001-11-08 12:50:30 Inv. On Units 2/4 ID: 1 ʶ Ö¯ µ ç³Batt Ø × Ô ¼Test ì Manual Out Stop Start Local c Display contrast adjust System Battery Record Query Range 3 days Records Settings 0: all records Input Breaker Closed 11£ -08 12:09 Byp. Breaker Closed 11£ -08 12:09 Mains Volt. Abnormal UPS in Battery Mode Battery low 11£ -08 12:28 11£ -08 12:28 11£ -08 12:50 ok Fig. 5-33 History log 5.3.7 background communication setup Background communication setup includes setting up the communication mode(MODEM or RS232) , baud rate selection(9600, 4800, 2400 and 1200), callback times(1-5 times), as shown in Figure 5-34. Pressing F4(modification key) to start setting the background communication mode, pressing F2 (move left) and F3 (move right) to move the cursor to the expected value, and pressing F4(Enter key) to confirm. If you do not want to modify the parameters, pressing F1(ESC) to escape. The setting method of baud rate is the same with above. The call-back times setup means that when the UPS has a fault, the UPS can call the number in preset times(if it is set to 5, then call 5 times) through MODEM automatically. Pressing F4(modifying key) to enter the menu of setting call-back times, pressing F2 (move left) and F3 (move right) to change the times. Pressing F4 to store the changed parameter and exit. After setting the above three parameters, pressing F3 (down) to select the last three items to be set. 60 Chapter 5 Operation of Display Panel UL33-0400L 2001-11-08 12:50:30 Inv. On Units 2/4 ID: 1 ÊÖ ¶ ¯ µ Mode ç³ Ø × Ô ¼Set ì Comm. RS232 Out MODEM RS232 Local Comm. Baudrate Set 9600 System 9600 4800 2400 1200 Battery Callback Times Set 3 Records 3 Settings Input Breaker Closed 11£ -08 12:09 Byp. Breaker Closed 11£ -08 12:09 Mains Volt. Abnormal UPS in Battery Mode Battery low 11£ -08 12:28 11£ -08 12:28 11£ -08 12:50 m Fig. 5-34 Background communication 5.3.8 Call-back number setup Call-back numbers include call-back number 1, call-back number 2 and call-back number 3, shown in Fig. 5-35. The length of telephone number is 15 digits, the number can be that of fixed phone, mobile phone, BP phone or internal extension phone. Input the number from the first digit and any remaining blanks digits has to be entered with an asterisk “*”. When the UPS has any fault, the UPS will call the number through a MODEM automatically. Example: Set the call-back number as 0755 8787001. First press F4(modification key) to enter setting states, the cursor will stop at No.1 digit, waiting for confirmation and modify this digit or select other digit, as shown in Fig. 5-36. UL33-0400L 2001-11-08 Inv. On Units 2/4 Out Local System Battery Records Settings 12:50:30 ID: 1 ÊÖ ¶ ¯ µ Call ç³ Ø × No. ¼ì1 Ô Phone ******************* Phone Call No. 2 ******************* Phone Call No. 3 ******************* Input Breaker Closed 11£ -08 12:09 Byp. Breaker Closed 11£ -08 12:09 Mains Volt. Abnormal UPS in Battery Mode Battery low 11£ -08 12:28 11£ -08 12:28 11£ -08 12:50 Fig. 5-35 Fault call-back 61 ok Chapter 5 Operation of Display Panel UL33-0400L 2001-11-08 Inv. On Units 2/4 ÊÖ ¶ ¯ µ Call ç³ Ø × No. ¼ Ôì1 Phone Out Local ******************* Phone Call No. 2 System ******************* Battery Phone Call No. 3 Records Settings ******************* 12:50:30 ID: 1 c Input Breaker Closed 11£ -08 12:09 Byp. Breaker Closed 11£ -08 12:09 Mains Volt. Abnormal UPS in Battery Mode Battery low 11£ -08 12:28 11£ -08 12:28 11£ -08 12:50 m Fig. 5-36 Setup fault call-back number 1 Pressing F4 key to confirm and save the changed parameter, and then the functions of keys will be re-defined again, as shown in Fig. 5-37. UL33-0400L 2001-11-08 Inv. On Units 2/4 Ê ¶ Ö ¯ µ Call ç³ Ø × No. ¼ì1 Ô Phone Out Local ******************* Phone Call No. 2 System ******************* Battery Phone Call No. 3 Records Settings ******************* 12:50:30 ID: 1 c Input Breaker Closed 11£ -08 12:09 Byp. Breaker Closed 11£ -08 12:09 Mains Volt. Abnormal UPS in Battery Mode Battery low 11£ -08 12:28 11£ -08 12:28 11£ -08 12:50 ok Fig. 5-37 Setup fault call-back number 2 The range of each digit is 0, 1, 2, 3, 4, 5, 6, 7, 8, 9, *. “*” means the digit is void. Pressing F3 (down key) to change the first digit to 0 and pressing F4 to confirm and return to the higher level menu, as shown in Fig. 5-38. UL33-0400L 2001-11-08 Inv. On Units 2/4 ʶ Ö¯ µ Call ç³ Ø × No. ¼ì1 Ô Phone Out Local 0****************** Phone Call No. 2 System ******************* Battery Phone Call No. 3 Records Settings ******************* 12:50:30 ID: 1 c Input Breaker Closed 11£ -08 12:09 Byp. Breaker Closed 11£ -08 12:09 Mains Volt. Abnormal UPS in Battery Mode Battery low 11£ -08 12:28 11£ -08 12:28 11£ -08 12:50 m Fig. 5-38 Setup fault call-back number 3 62 Chapter 5 Operation of Display Panel Move the cursor to the corresponding bit to modify the number and confirm, then the 0755 8787001 can be set, fill in the “*” character in other blank bits, as shown in Fig.5-39. Pressing F1(ESC) to exit the setup of the fault call-back number 1. Other fault call-back numbers will be set in the same way. At the moment, all the 12 setting items are finished. UL33-0400L 2001-11-08 12:50:30 Inv. On Units 2/4 ID: 1 Ê ¶ Ö ¯ µ ç ³ × Ø ¼ Ô ì Phone Call No. 1 Out Local 07558787001****** C System Phone Call No. 2 Battery ******************* Phone Call No. 3 Records Settings ******************* Input Breaker Closed 11£ -08 12:09 Byp. Breaker Closed 11£ -08 12:09 Mains Volt. Abnormal UPS in Battery Mode Battery low 11£ -08 12:28 11£ -08 12:28 11£ -08 12:50 ok Figure 5-39 Call-back number setup 5.4 Prompt window The prompt window will be displayed during the operation of the system when the system needs the user to confirm or to conduct some operations. This system has about 5 “prompt windows” that will be introduced below. From bypass to inverter mode with interruption: If the bypass voltage or frequency exceeds the synchronized range and utility voltage or frequency is normal, the inverter can’t be in synchronize with the bypass, and the output can only transfer to bypass after an interruption of about 15ms when the user press the “Start” key of inverter. Before transferring, the system should let the user to confirm whether the interruption can be accepted, as shown in Fig.5-40. Other operations can only be done after confirmation. If the bypass voltage restores to normal before the user makes confirmation, the UPS will transfer to inverter mode automatically. At the same time, the prompt window will disappear automatically. 63 Chapter 5 Operation of Display Panel UL33-0400L 2001-11-08 12:30:20 Inv. On Units: ID 1 A(B) B(C) C(A) Mains Bypass Power KW221 220 221 12.3 12.5 with Interupt Cap.Transfer KVA 11.8 Out , Confirm Load% 50.2 50.1 50.1 Local System Crestor 1.41 1.40 1.41 Battery Factor Input Breaker Close 11£ Byp. Breaker Close 11£ Output Breaker Open 11£ UPS in Normal Mode 11£ Batt. Boost Charging 11£ -08 -08 -08 -08 -08 12:09 12:09 12:09 12:09 12:09 OK Fig. 5-40 Bypass to inverter prompt From inverter to bypass mode with interruption: If the bypass voltage or frequency exceeds the synchronized range and the UPS is in inverter mode, the system must let the user to confirm and accept the power interruption danger before pressing the inverter stop key to shutdown the output of the inverter. The user can also cancel the shutdown operation, as shown in Fig. 541. If the bypass voltage restores to normal before the user makes the confirmation, the UPS will transfer to bypass operation mode automatically, and at the same time the prompt window will disappear soon. UL33-0400L 2001-11-08 12:30:20 Inv. On Units: ID 1 A(B) B(C) C(A) Mains Bypass Power KW221 220 221 operation leads 12.5 11.8 12.3 KVA Cap.This Out to output shutdown, 50.1 Load% 50.2 50.1 Local Confirm or cancel System Crestor 1.41 1.40 1.41 Battery Factor Input Breaker Close 11£ Byp. Breaker Close 11£ Output Breaker Open 11£ UPS in Normal Mode 11£ Batt. Boost Charging 11£ -08 -08 -08 -08 -08 12:09 12:09 12:09 12:09 12:09 C OK Fig. 5-41 Transfer to bypass prompt Overload due to shutdown: The parallel operation system is in inverter mode, if the load capacity exceeds the total capacity of the remained UPS units when shut down one UPS unit. The UPS that is to be shut down will display a prompt window to ask the user to confirm before shutting down, as shown in Fig.5-42. If the load is reduced before the user makes confirmation, there will be no overload for the remained UPS units, this UPS unit will shut down automatically, and the Prompt window will disappear automatically, the functions of the keys in the Keypad display window will restore to normal functions. 64 Chapter 5 Operation of Display Panel UL33-0400L 2001-11-08 12:30:20 Inv. On Units: ID 1 A(B) B(C) C(A) Mains Bypass Power KW221 220 221 operation leads 12.5 11.8 12.3 Cap.This KVA Out to overload, Confirm 50.1 Load% 50.2 50.1 Local or cancel System Crestor 1.41 1.40 1.41 Battery Factor Input Breaker Close 11£ Byp. Breaker Close 11£ Output Breaker Open 11£ UPS in Normal Mode 11£ Batt. Boost Charging 11£ -08 -08 -08 -08 -08 12:09 12:09 12:09 12:09 12:09 C OK Fig. 5-42 Capacity expansion Start UPS capacity inadequate: When the UPS is in bypass mode, if the load capacity is larger than that of one or more than one UPS unit, the UPS that has already been start-up will not transfer to inverter mode and prompt a window to ask the user to confirm. When the load is reduced to be lower than the capacity of UPS, the Prompt window will disappear. UL33-0400L 2001-11-08 12:30:20 Inv. On Units: ID 1 A(B) B(C) C(A) Mains Bypass Power KW221 220 221 overload, 12.3 12.5 Cap.System KVA 11.8 Out Turn on50.2 More UPS Load% 50.1 50.1 Local System Crestor 1.41 1.40 1.41 Battery Factor Input Breaker Close 11£ Byp. Breaker Close 11£ Output Breaker Open 11£ UPS in Normal Mode 11£ Batt. Boost Charging 11£ -08 -08 -08 -08 -08 12:09 12:09 12:09 12:09 12:09 Fig. 5-43 UPS capacity inadequate Load capacity higher than that of single module UPS system: If the UPS is in bypass operation mode, and the load capacity exceeds the total capacity of one or more than one UPS units, the LCD of the UPS that start first will display a Prompt window, as shown in Fig. 5-44. Under this condition, the user must decrease the load until the load is lower than the UPS capacity, or switch on the remained UPS until the total capacity exceeds the load capacity, thus the system can transfer to inverter mode and the Prompt window disappears. 65 Chapter 5 Operation of Display Panel UL33-0400L 2001-11-08 12:30:20 Inv. On Units: ID 1 A(B) B(C) C(A) Mains Power KW 221 220 221 Bypass The Load is Too 12.3 12.5 11.8 KVA Cap. Out Heavy to Be Load% 50.2 50.1 50.1 Local Transferred System Crestor 1.41 1.40 1.41 Battery Factor Input Breaker Close 11£ Byp. Breaker Close 11£ Output Breaker Open 11£ UPS in Normal Mode 11£ Batt. Boost Charging 11£ -08 -08 -08 -08 -08 12:09 12:09 12:09 12:09 12:09 Fig. 5-44 Load capacity exceed that of single module UPS system 5.5 Events and State Information: Two kinds of UPS events and status information: Current events and historic events. Current events are the current status information of UPS and the events that happen only just now. The information will be displayed in the current event and alarm display window in time sequence. If a certain status changes or a certain event happens again, then the status or the event will disappear from the current event and alarm display window and becomes the historic information. Historic status information means the information that happens before and not exits at the moment, or the information happens last time. These kinds of information will be recorded in the history log in real time according to the time sequence. Each history log has a start time and if the record is ended normally, there will be an end time for the history log. If the end time is not recorded due to power failure, then the historic log will have no end time. 66 Chapter 5 Operation of Display Panel Table 5-3 UPS Events No. Event Reason Start through keypad The user presses down the inverter start key, the system will start inverter Start through keypad failed The user presses down the inverter start key, the system can’t start inverter 3 Shutdown through keypad The user presses down the inverter stop key 4 Emergency shutdown The user presses down the emergency shutdown key 5 Fault clear The user presses down the fault clear key Manual mute When the system is in alarm state, the user presses down the mute key Manual mute cancel When the system is in mute state, the user presses down the mute key 8 Confirm the interrupted transfer When the system displays the prompt window to require the user to confirm, the user presses the “Enter” key 9 Single UPS shutdown confirmation When the system displays the prompt window to require the user to confirm, the user presses the “Enter” key 10 Parallel operation system shutdown confirmation When the system displays the prompt window to require the user to confirm, the user presses the “Enter” key Manual battery self-test In function setting menu, the user selects the “Manual battery self-test” Stop battery self-test manually In function setting menu, the user selects the “Stop battery self-test manually” 1 2 6 7 11 12 Note: If the same event occurs once again, it will be displayed on the current event and alarm display window according to the time sequence. The last event will become the history log and will disappear from the current event and alarm display window, and this event can be found in history log. So, only the event that occurs most recently can be displayed in the current event and alarm display window. 67 Chapter 5 Operation of Display Panel Table 5-4 UPS states No. State Reason 1 Bypass mode UPS bypass powers the load 2 Normal mode The UPS powers the load through rectifier and inverter 3 Battery mode The UPS powers the load through battery 4 United power mode The UPS powers the load through rectifier and battery together 5 Bypass and inverter all shutdown Bypass and inverter are all shut down 6 Output power interruption The UPS has no output 7 Battery is under self-test UPS is in battery self test condition 8 Generator connection Connect the generator to UPS through dry contacts. 9 Generator exit Rectifier exits the intelligent generator mode 10 Generator run Rectifier enters the intelligent generator mode 11 Non-charging state Battery is not in charging state 12 Equalization charging state Battery in equalization charging state 13 Float charging state Battery in float charging state 14 Input circuit breaker closes Input circuit breaker closes 15 Input circuit breaker opens Input circuit breaker opens 16 Output circuit breaker closes Output circuit breaker closes 17 Output circuit breaker opens Output circuit breaker opens 18 Bypass circuit breaker closes Bypass circuit breaker closes 19 Bypass circuit breaker opens Bypass circuit breaker opens 20 Maintenance closes circuit breaker Maintenance circuit breaker closes 21 Maintenance opens circuit breaker Maintenance circuit breaker opens Note: When the UPS is in the above states, current event and alarm display window will display the states according to the time sequence; When the states are cleared, the information will also be cleared from the current event and alarm display window and the start time and end time of the state will be recorded in history log. 68 Chapter 6 Maintenance Chapter 6 Maintenance This chapter mainly introduces the daily using and maintenance of UPS and the operation inside the UPS is not covered here. If maintenance should be done to the UPS, Q1, Q2 and QF1 should be disconnected, and then wait for 8 minutes until there is no high voltage inside the UPS. Don’t touch any components of the UPS before reading this manual. Anything not understood, please consult out technical support engineer. 6.1 Setup procedures 6.1.1 Start up After the UPS is switched on and if the UPS input power meets specified input requirements, the following operations can be done: 1. Start from utility 1) Make preparations according to Section 4.1.1, introduce the input source to the input terminals of UPS cabinet; 2)Turn on Q2 and Q5 and wait until the bypass indicator turns green; 3) Turn on Q1 and the QF1 according to Section 4.1.2. The UPS will transfer to inverter mode without interruption after the inverter starts normally. 2. Start from utility When the battery is normal and is connected to the DC bus all the time, the inverter can start from battery. The start procedures are: press “start” button on the operation panel for longer than 2s, close Q5 when the inverter operation indicator turns green. Now the inverter powers the load. At this time the battery indicator and load indicator all illuminate green. Note: The UPS can not start from the battery that is used for the first time. 69 Chapter 6 Maintenance 6.1.2 Shutdown 1. Shutdown in normal mode When the UPS requires periodical checking or needs to stop operation, the shutdown process in normal mode is given below: 1.Press the “inverter shutdown” button on the UPS panel for longer than two seconds, shutdown the inverter and the system transfers to bypass mode. 2.Switch off the Q1 and QF1 one by one; At this time the load is powered by bypass. If the load needs not to be powered, then switch off Q2 and Q5 directly; If the load needs to be powered continuously, the UPS should be shutdown for maintenance, follow the steps below: 3.Switch on the internal maintenance bypass switch Q3BP; 4.Switch off Q2 and Q5 one by one; Now the load is powered by the maintenance bypass. Don’t conduct repairing and maintenance work after waiting for 8 minutes until the voltage of DC bus capacitor become zero due to discharging. 5.External maintenance bypass KBP should be installed if the UPS needs to be shutdown totally. Switch off Q2 and Q5, close the KBP, and then switch off the internal maintenance bypass Q3B, the load will transfer to external maintenance bypass power without interruption. After this, the UPS unit replacement or capacity expansion can be done after switching off UPS input and output switches. 2. Shutdown in bypass mode Follow from step 2 to step 5 of the above “shutdown in normal mode” to shut down the UPS in bypass mode. 3. Shutdown in battery mode Note: when the bypass power is abnormal, shut down the UPS in battery mode will result in the power interruption to the load. Because the utility is not available, in order to shut down the UPS that is in battery mode, switch off all the switches to realize shutdown in bypass mode after finishing the first step in “shutdown in normal mode” . 4. Shutdown in ECO mode The procedures of shutdown in ECO mode are the same with those of shutdown in bypass mode. 70 Chapter 6 Maintenance 5. Shutdown in United powering mode The procedures of shutdown in United powering mode is the same with those of shutdown in normal mode. 6.1.3 Transferring between operation modes The UPS can transfer among various operation modes after it is in normal mode. The following operations can be done if the input power source of UPS meets the requirements and the load capacity is lower than that of single module UPS system. 1. From normal mode to battery mode Switch off Q1, the UPS can transfer from normal mode to battery mode automatically. 2. From normal mode to bypass mode Press “inverter shutdown” button to transfer from normal mode to bypass mode without power interruption. 3.From bypass mode to normal mode Q1 is closed, press the “inverter start” button on the display panel to transfer from bypass mode to normal mode. If the bypass source exceeds the normal range, there will be interruption in the transferring process. 4.From ECO mode to normal mode Set the UPS in normal mode again and the UPS can transfer from ECO mode to normal mode. Note: The engineer should set through software. 5.From battery mode to normal mode When the rectifier source is normal, switch on Q1, the UPS will transfer from battery mode to normal mode automatically. 6.1.4 Emergency shutdown and recovery Under any status, press the “emergency shutdown” button on the panel for 2 seconds if overload or the faults that may endanger the safety occur. The system will then shut down the rectifier, inverter and stop outputting power(including the inverter and bypass), at the same time, disconnect the battery contactor. At this, if the user confirms that the fault is cleared, press the “fault clear” button to let the system get out of the emergency shutdown state. When the UPS enters the normal state, the rectifier starts again, the battery contactor closes and the bypass 71 Chapter 6 Maintenance begins to power the load. Press the “inverter start” if the user wants the inverter to operate. 6.1.5 Mute The buzzer sounds when the UPS has faults. The user can press the “Mute” button for two seconds to silence the sound. If the user press the key again, the sound can be heard again. When the UPS is in fault clear state, new fault may cause the buzzer to sound again. 6.1.6 Fault clear 1.Fault mode and fault handling The UPS has self-diagnosing functions and the fault types can be inquired through LCD or background computer. Clear the fault with reference to Chapter 7 or notify the maintenance engineer to repair. The UPS faults can be classified into the following types: 1) Alarm fault: The UPS or its parts have fault, but the system operation states won’t be changed. For example: over load occurs in preset time (Usually overload may change the system operation state) 2) Recoverable fault: After the fault occurs, the system will shut down the rectifier or inverter and can recover to normal operation automatically after the fault is cleared. For example: transformer over-temperature fault. 3) Fault that can be recovered manually: The system is locked up when fault occurs. It can’t recover normal operation without restarting. 2 Shutdown due to battery low According to the user’s setting and the setting of host, when rectifier and bypass power failure occurs, the system will operate from battery continuously until shut down due to battery low. If the Utility power recovers after UPS shutdown, the methods to restart the UPS are given below: 1) If the system is set as “select inverter mode manually”, the system will maintain its locking state until the user starts the inverter. 2) If the system is set as “automatic bypass mode”, the system will transfer from locking state to bypass mode after the Utility source or bypass restores to normal. 3) If the system is set as “automatic inverter mode”, the system will transfer from locking state to inverter mode after the Utility source or bypass restores to normal. 72 Chapter 6 Maintenance 6.1.7 Monitoring system 1. Background communication The monitoring system of this UPS system provides one RS232 port and one RS485 port (the definition of the port is in Section 3.4.3), several input and output dry contacts (refer to Section 3.4.4). The user can introduce the signal to the nearest management office to conduct equipment management. All the data displayed on the panel will be monitored by background monitoring software. Besides, there are also MODEM and SNMP cards, which are used for MODEM and SNMP communication. 1)RS232 mode The transmission distance of RS232 mode is shorter than 15m. This RS232 mode is suitable for the short distance monitoring required by UPS operator or user. 2)RS485 mode The J23 connector on the monitoring board is used for user’s RS485 port. “485+” and “485-” are used as the user’s positive terminal and negative terminal respectively. SHIELD terminal is used as the shielding terminal that connects the shielding layer. The transmission distance is shorter than 1000m. The user can use any RS485/RS232 converter(such as the OCI-6 provided by us) to realize networking of RS485+RS232 mode. 3)MODEM mode The user can monitor the UPS remotely via a MODEM and the monitoring software- POWERSTAR by dialing the preset telephone number. Refer to “Directions of MODEM” and “Directions of POWERSTAR” for details. 4)SNMP mode The parts of SNMP card UF-SNMP111 is compatible with 10/100M either net. The SNMP card supports various kinds of protocols of SNMP, TFTP, HTTP and TELNET and providing a solution for high speed network access method. The user can connect the UPS to the LAN through the SNMP card and realize the network management. Refer to “Directions of SNMP” card for details. 73 Chapter 6 Maintenance 2. Monitoring single UPS UPS support the communication modes through RS232, RS485, MODEM and SNMP card. These communication modes can’t be used by one same UPS. The single UPS monitoring theory is shown in Fig.6-1. Fig. 6-1 Monitoring of Single UPS 3. Monitoring parallel operation system The communication of parallel operation system is realized through its internal RS485 bus. Any UPS module can be nominated as a master UPS. The user can use any communication mode to get the information of any UPS module through this master UPS. The monitoring method of parallel system is shown in Fig.6-2. Fig. 6-2 Monitoring of Parallel UPS System 74 Chapter 6 Maintenance 6.1.8 Input and output contacts The functions of input and output contacts are introduced in Chapter 3. 1. Output dry contact This UPS provides 8 kinds of dry contacts output and the definition is given below: Battery low: This signal is active when the pre-alarm of UPS battery occurs; Battery mode: This signal is active when the battery powers the load; Inverter mode: This signal is active when the utility powers the inverter normally; Ambient over-temperature: This signal is active when the ambient temperature is too high; Emergent shutdown: This signal is active when the UPS is shut down by user in emergency; Common alarm: This signal is active when the UPS has fault; Overload: This signal is active when the load is too heavy; Generator mode: This signal is active when the generator powers the UPS; 2. Input contacts The UPS can connect to 6 circuit-branches of contacts for environment parameters: 24V contacts for environment parameters (3 circuit branches): ENV1-3, suitable for connecting the 24V sensor for environment parameters, such as the infrared sensor. The contacts are relay dry contacts. 12V contacts for environment parameters (1 circuit branch): ENV, suitable for connecting the 12V sensor for environment parameters, such as the water sensor. The contacts are relay dry contacts. Generator contacts: These are the dry contacts of intelligent generator and are connected to the UPS input terminals. The contacts are used to notify the UPS that the generator has been connected. If the user wants to use intelligent generator mode, but the generator has no signal to transmit to these contacts, short connect the “GEN-H” and “GEN-L” to notify the UPS that the generator is connected after the generator starts. Note: If the user wants to use the generator mode, it is required that the UPS should be set to “Generator mode enabled” through the background host first. Otherwise, the generator signal is inactive. 75 Chapter 6 Maintenance Emergent stop: If the user is in short distance, short connecting the “UCTRH” and “UCTRL” can make the UPS shut down. Relay dry contacts should be used here. Note: The user should be careful when using this function. The power will be interrupted completely once the emergency shutdown happens. When the user connects the wires, the length of the wire should be no longer than 10m. Protection measures should be done to the wire if the length of the wire is longer than 10m. 6.1.9 Temperature measuring Two circuit branches of temperature can be measured. J12 socket: Used to measure the battery temperature with the temperature sensor TMP12Z made by Avansys. During installation, our service engineer has set the function of “temperature compensation enabled”. Temperature compensation is realized once the TMP12Z is connected. J16 socket: The V-AD pin of this socket is used to measure the ambient temperature of other points. Our service engineer can set the over temperature alarm point through background host. The UPS will alarm when the temperature is too high. Note: The 1.0~5.0V signal corresponds to 0~100°C. 6.2 Maintenance 6.2.1 Daily maintenance There are few moving parts inside the UPS with the exception of the fans, thus few components need to be maintained. The user should check according to the following methods: 1. Daily checking 1)Check the control panel: All the LEDs should illuminate normally. The LCD should display all the parameters normally without alarm. 2)Check whether there is over-temperature phenomena of the air blown out by fan; 3)Check whether there is any abnormal noise; 4)Check whether the ventilation holes are obstructed; 76 Chapter 6 Maintenance 5)Check whether all the fans operate normally. The life of the fan in continuous operating state is 20000—40000 hours and will be shortened if the fan operates in high temperature environment. 2. Weekly checking 1)Measure and record the battery charging voltage; 2)Measure and record the battery charging current; 3)Measure and record the UPS three-phase output voltage; 4)Measure and record the output current of each output phase of UPS; If the current differs greatly with previous values, record the load capacity, types and location for later analysis. Please contact us if the displayed value differs with the calculated value. 3. Annual checking Note: The annual checking must be done by qualified person because the person may be required to test the high voltage components inside the UPS. During annual checking, the load should be powered by maintenance bypass. Each year, the UPS should be cleaned and the following items should be checked: 1)At first, check the weekly checking items; 2)Switch off the UPS and let the maintenance bypass to power the load; 3)Switch off the input switch and battery switch; 4)Make sure that the input terminals of the UPS(R1, S1 and T1), battery terminals, output terminals(U4, V4 and W4) and bypass input terminals (R4, S4 and T4) are not energized; 5)Open the UPS door and internal protection door 6)Check the UPS power components and auxiliary components, pay attention to the following parts: Capacitor: check whether there is any leakage and deform phenomenon; Magnetic component: Check whether there is any over-temperature marks and cracks, and the secure degree 77 Chapter 6 Maintenance Cable and connectors: Check whether the cable is aged, damaged or burnt; check whether the connector of the PCB is secure; PCB: Check the cleaness and completeness 7)Use vacuum pump to clear the dirt on the surface; 8)Switch on the UPS again and let the inverter powers the load according to the start-up process of UPS; 9)If necessary, switch off the Q1, check the battery backup time, switch on Q1 when the battery voltage is higher than the end of discharge voltage by 5V(Note: The end of discharge voltage is 300Vdc. When the battery voltage reaches 300Vdc, the battery input contactor will disconnect and the load will transfer to bypass ), and record the backup time. 4. Other checking 1)Check the insulation sleeve of input/output cables and the connectors: check periodically and the UPS should be switched off when checking. The checking interval should not be longer than 2 years; 2 ) Lightning protection checking: Check according to the methods of weekly checking because you can only check the indicator of lightning protection device by opening the door. Check each day in wet seasons or the seasons with lots of thunders. Check the lightning device in time when lightning occurs nearby to find problems in time. 6.2.2 Battery maintenance The internal battery of iTrust series UPS is a sealed, lead-acid, maintenance-free battery. The battery life depends on the ambient temperature, charge and discharge times. High ambient temperature and deep discharge will shorten battery life. 1 battery storage To ensure battery life, the battery should be maintained regularly: 1)Check the battery state periodically. Keep the battery room and battery cabinet clean. Clear the oxidization objects at the terminal or connection bar periodically and apply some butter. Tighten the loose screws and keep the battery well connected to prevent big voltage drop during discharging. 2)Check the battery insulation every 2-3 months. Check the total battery voltage once a week. Use the automatic battery management function to charge the battery whose voltage is low. Clean the leakage solutions periodically. 78 Chapter 6 Maintenance 3)Keep the ambient temperature between 15℃ and 25℃. 4 ) To prevent small current discharge, continuous battery discharge time exceeding 24 hours is prohibited. 5)Please contact the distributor if the battery backup time is greatly shortened, or the UPS LCD displays “battery needs to be replaced”. Confirm whether the battery needs to be replaced. Please confirm whether the parameters of the replaced battery and new battery are same. 6)Check whether the auto battery management function is normal because many battery maintenance work is done automatically through the battery management functions, for example, charging the battery periodically, temperature compensation, EC/FC switchover, battery low alarm and battery life forecast. 2. Manual battery self-test The conditions for self test: 1)Battery contactor closes 2)Battery is in float charging state; 3)Rectifier and inverter communicate normally; 4)Battery status is normal; 5)Rectifier operates normally; 6)Utility source voltage is normal; 7)Inverter operates normally 8)Load capacity is larger than the battery capacity set by battery curves; 9)UPS is not in united operation (generator + battery) mode The battery self test will be conducted only all of the above conditions are satisfied. During the self test, if any one of the above condition is not satisfied, the system will exit the self test state and enter equalization charging state. Pressing the “stop manual self test” can stop the self test process and the battery transfers to equalization state. Battery will transfer to equalization state after self test is over. 3. Auto battery self test Auto self-test is start if the UPS operation states satisfies the manual self-test condition and the last self-test interval satisfy the “battery discharging interval”. The 79 Chapter 6 Maintenance system will not start battery self test if the last self-test interval satisfies the “battery discharging interval”, but does not satisfy the manual self test condition, and the system will wait until the conditions are satisfied. 6.2.3 Shutdown maintenance For large capacity UPS, periodical checking is required to ensure the normal operation and proper condition. Notify us if any fault is found. In order to maintain the uninterrupted power supply to the load, please shut down the UPS according to the following procedures: 1.Press the “inverter shutdown” button to shut down the inverter, the system transfers to bypass mode; 2. Switch off Q1 and QF1 one by one; 3. Switch on the maintenance bypass switch Q3BP; 4. Switch off the Q2 and Q5 one by one. 5. Now, the load is powered by the maintenance bypass of UPS. Conduct maintenance or checking to the UPS after waiting for 8 minutes and the DC bus capacitor discharges to zero voltage. If the UPS is required to be shutdown totally, switch on the external maintenance bypass switch KBP after switch off the Q2 and Q5; then switch off the Q3BP, thus the load can be powered by the maintenance bypass with interruption, and the UPS units replacement and capacity expansion can be done after switching off the input and output power distribution switches. 80 Chapter 7 Troubleshooting Chapter 7 Troubleshooting 7.1 UPS system troubleshooting The following information are only for service engineers who are trained in the repair and troubleshooting of the UPS. The maintenance engineer must be familiar with the UPS because the UPS is rather complicated. 7.1.1 Basics Generally, the UPS faults happen suddenly and the UPS will be shutdown or transfer to bypass mode. So making record is very important for maintenance. Please observe the following contents: The error of UPS output voltage should not exceed 2%; The battery charging current should not exceed 6A. Find out the reasons if the UPS displayed value differs greatly with the calculated values. The user should be informed of the load condition before starting troubleshooting. 7.1.2 Procedures Status recording: Record the displayed information, the buzzer sound, states of indicators and the states of various switches when fault occurs. Fault types: After recording all the information, look up the fault information table and the fault indicators, if the fault type can not be determined yet, please contact supplier or technical support engineer. Fault record: After identifying the fault type, please notify our service engineers for repairing. 7.2 LED indicator 7.2.1 LED display There are 6 LEDs used for indicate the operation status and fault. There is a fault if the LED illuminates red. Bypass indicator: If it turns red, that means the bypass input exceeds the normal range; 81 Chapter 7 Troubleshooting Rectifier indicator: If it turns red, that means the rectifier fails; Battery indicator: If it turns red, that means the battery is abnormal; Inverter indicator: If it turns red, that means the inverter fails; Load indicator: If it turns red, that means overload occurs; Alarm indicator: If it turns red, that means the system fails; 7.2.2 LED indicator of lightning protection device Fig. 7-1 Lightning protection LED LED indicators of lightning protection device of 40/60kVA UPS are shown in Fig.7-1. From bottom to up the LEDs are: Lightning protection indicators of Phase A, B and C; LED indicators of lightning protection device of 40/60kVA UPS are arranged from left to right and are indicators of Phase A, B and C respectively. The device is normal if the indicator illuminates green, and fails if the indicator turns off. The checking of the indicators is described in Chapter 6. 7.3 Buzzer alarm If the buzzer sounds 1 second “click” every 2 seconds, that means the system has normal alarm or the system is abnormal; If the buzzer sounds continuously, that means the system has serious fault. 82 Chapter 7 Troubleshooting 7.4 LCD indication for fault information The LCD on the UPS displays the fault information of Table 7-1 and Table 7-2. The user should locate and analyze the fault according to the tables and feedback the fault information to our service engineers. Table 7-1 Fault information No.1 Fault description Reason Actions to be taken 1 Communication of inverter fails Communication between monitoring Notify the service engineer for repairing unit and inverter fails 2 Communication of rectifier fails Communication between monitoring Notify the service engineer for repairing unit and rectifier fails 3 Ambient overtemperature over-temperature of UPS room 4 Environment Environment parameter channel 1 Check the devices relating to the channel parameter 1 abnormal has alarm 5 Environment Environment parameter channel 2 Check the devices relating to the channel parameter 2 abnormal has alarm 6 Environment Environment parameter channel 3 Check the devices relating to the channel parameter 3 abnormal has alarm 7 Environment parameter abnormal 8 Rectifier input voltage Line-to-neutral voltage of rectifier Check the line-to-neutral abnormal exceeds normal operation range amplitude of rectifier 9 Line-to-neutral voltage of rectifier Rectifier input underCheck the line-to-neutral lower than 305V, but higher than voltage amplitude of rectifier 208V 10 Rectifier’s input voltage frequency is abnormal Rectifier frequency normal range 11 Input fuse blows Rectifier input fuse blows up 12 Input transformer over Temperature of input transformer is Check the ambient temperature and temperature too high ventilation 13 Input phase rotation Rectifier’s input phase rotation is Notify the UPS service engineer, check reverse reverse the wiring of rectifier input cables 14 Input softstart fails Check the ventilation of UPS room 12V environment parameter channel Check the devices relating to the channel has alarm exceeds Input softstart fails the Check the frequency rectifier’s input voltage voltage voltage Notify the service dept for repairing Notify the service dept for repairing 83 Chapter 7 Troubleshooting No.1 Fault description Reason Actions to be taken Bypass voltage or frequency is out of normal range and inverter output Check the bypass voltage and frequency is not synchronized with the bypass output. 15 Bypass unsynchronized 16 Bypass voltage or frequency Bypass ratings exceed exceeds the normal range and the Check the bypass voltage and frequency the normal range bypass will not power the load anymore. 17 Bypass SCR fails Bypass SCR is damaged 18 Bypass over current timeout If the over current time exceeds the Check the load, if it is normal, then restart limit, the UPS may shut down the the UPS bypass and the inverter. 19 Shutdown due to bypass fault When the overload delay time is due Repair the bypass and reduce the load, in inverter mode, if at this time the and then restart the UPS. Note: Don’t let bypass has fault, then the inverter is the UPS in over load state for a long time. shutdown. 20 The battery life is reduced due to Notify the service dept for replacing the aging, which may endanger the battery and set the battery model and Battery needs to be normal operation of UPS. Warn the parameters through software. replaced user that the battery is abnormal and needs to be replaced. 21 No battery Notify the service dept for repairing Batteries are not connected. Check the battery and the wiring of batteries 22 The battery discharges to pre-alarm Pre-alarm for end of point (the battery capacity is Shut down the load in time battery discharging inadequate), the system may shut down after a few minutes 23 battery over temperature 24 Battery contactor abnormal is 25 battery self-test disabled is The battery condition for self-test is Start the self test after the conditions can not satisfied meet the requirements 26 Battery is connected Battery is connected reverse reverse Notify the UPS service engineer to connect the battery again 27 Bypass phase rotation Bypass phase rotation is reverse is reverse Notify the UPS service engineer to change the bypass phase rotation 28 Rectifier fails 29 Rectifier heatsink over Rectifier heatsink temperature is too The UPS can recover automatically. temperature high Check the environment and ventilation battery temperature is too high Check the ventilation Battery contactor fails Notify the service dept for repairing Rectifier is serious fault abnormal 84 and battery temperature and has Notify the service dept for repairing Chapter 7 Troubleshooting No.1 Fault description Reason Actions to be taken Rectifier fan is abnormal Replace the fan in time and the UPS can recover automatically 30 Rectifier fan fails 31 Rectifier contactor abnormal Rectifier contactor can’t be closed or Notify the service dept for repairing opened normally 32 Auxiliary contactor abnormal Auxiliary contactor abnormal can’t Notify the service dept for repairing be closed or opened normally 33 Auxiliary power supply At least one auxiliary power supply Notify the service dept for repairing 1 fails fails 34 Rectifier over current 35 Inverter Inverter asynchronous bypass 36 Inverter fails 137 Inverter heatsink over Inverter heatsink temperature is too The UPS can recover automatically. temperature high Check the environment and ventilation 38 Inverter fan fails Inverter fan is abnormal 39 Inverter SCR fails Inverter SCR fails and has no Notify the service dept for repairing output. UPS shuts down 40 Auxiliary power supply At least one auxiliary power supply Notify the service dept for repairing 2 fails fails 41 Inverter over current The IGBT of inverter has over Restart the inverter, if the fault can’t be current resulting in the shut down of cleared, notify the service dept for inverter. repairing. 42 Shutdown due to low bus voltage DC bus voltage is too low resulting Check whether there is fault in rectifier in the shutdown of inverter side, if no, then check whether overload occurs. Restart after clearing the fault. 43 Output transformer over temperature Output transformer temperature is too high Auto recovery, ambient and ventilation of UPS should be checked. 44 overload Load is too heavy Disconnect unnecessary load and ensure the safety. 45 Overload exceeds normal time Over load occurs in inverter mode, If the load decreases after 5 minutes, the transfers to bypass mode system will back to inverter mode 46 Output fuse blows up Output fuse blows 47 AC output voltage 48 Output surge current The IGBT of rectifier has over current resulting in the shut down of Notify the service dept for repairing rectifier. is asynchronous with Inverter output fails and shuts down Check if the bypass is normal. The fault alarm stops automatically after the bypass recovers normal Notify the service dept for repairing Replace the fan in time and the UPS can recover automatically Notify the service dept for repairing over Output over voltage Notify the service dept for repairing Surge current occurs in bypass Avoid applying big load abruptly and short mode, the system shutdown circuit 85 Chapter 7 Troubleshooting No.1 Fault description Reason Actions to be taken 49 Transfer to bypass due to surge The system transfers to bypass mode due to surge current and back Avoid applying load abruptly and the UPS to inverter mode after load is can recover automatically decreased 50 User’s wrong operation Wrong operation such as start the UPS with the maintenance bypass Operate with reference to User’s Manual switched on 51 The actual transfer times exceed the permissible transfer times per hour Transfer times exceed the times set by background. The system will stay Avoid frequent overload in bypass mode until next hour. Table 7-2 Fault of parallel operation system No. Fault description Reasons Fault processing 1 Overload of parallel Overload occurs and the Disconnect the load of low priority, maintain the operation system redundancy is not available power supply to important load 2 In parallel operation system, some UPS module may require to transfer to bypass Neighbouring UPS due to surge or overload, module requires to other modules will transfer to transfer to bypass bypass after receiving the mode signal sent by this UPS module that requires to transfer to bypass mode If the parallel operation system transfers to bypass mode, and the operation condition enables, all the UPS modules can recover to normal mode synchronously. 3 Load sharing fault The load current of each UPS module is noticeably Notify the service dept for repairing unbalanced, thus the system loading ability is affected. 4 Parallel operation board fails The board is damaged. 86 Notify the service dept for repairing Chapter 8 Parallel System Chapter 8 Parallel System 8.1 System Introduction 8.1.1 Basics The Liebert UPS uses intelligent and reliable decentralized parallel operation technology. A maximum of four single units of the same capacity can operate in parallel. The UPS system has two paralleling modes: Paralleling for redundancy Paralleling for capacity 1. Conditions for parallel operation Each UPS unit has the same capacity, same software and hardware version Each UPS in the system must share the same bypass source The UPS output are connected together. The rectifier input can be from a different source, but the phase rotation of the rectifier input, bypass input and output must be the same The parallel logic cable and load sharing cable must be connected 2. Features of parallel systems 1)The hardware and firmware of each unit in the system must be compatible and changing the operation mode can be done only with changing the software setting. 2)The parallel signal bus is simple, reliable and designed for redundancy, which provides the user with maximum flexibility. Shutting down or starting up the UPS in the parallel system can be done in any sequence. If an overload occurs, the system can recover automatically from bypass mode after the overload is cleared. 3)The operation status can be queried from each UPS’s LCD display. 4)The UPS monitoring module (optional) can monitor the system parameters of the whole system. 5)Any single module UPS system in the parallel system can be designated as the host for communication with remote computer. The total load current, number of 87 Chapter 8 Parallel System UPS in the system, and operation condition of each unit can be monitored through the remote computer. 8.1.2 Theory of Operation 1. Parallel System consisting of two units This is the most frequently used configuration and its operation theory is shown in Figure 8-1 Fig. 8-1 UPS parallel operation mode(two UPS modules) 2. Paralleling for Redundancy of more than two units (N+X) system : N number of UPS is supporting the load and X number of UPS are redundant. If the rating of each UPS unit is Po and the total load capacity is Pmax, then (N-1) x Po < Pmax < N x Po, as shown in Figure 8-2 88 Chapter 8 Parallel System Fig. 8-2 Redundancy operation mode This system can improve the system reliability noticeably. In normal condition, each UPS does not work at full load, so even if the load is increased, the system will not transfer to bypass. When X number of UPS shuts down due to failure, the remaining N numbers of UPS can still powers the load. At this time, the system will give out the alarm. 3. Paralleling for Capacity Expansion In this system, X is zero then if the rating of each UPS unit is Po and the total load capacity is Pmax, then (N-1) x Po < Pmax < N x Po, as shown in Figure 8-3. This system cannot improve the reliability, but can improve the system capacity to support an increased load. Fig. 8-3 Capacity expansion 4. Series “Hot-Standby” parallel system Two UPS units are connected in series, one is the Master and the other Slave. The Slave output is the bypass source of the Master, as shown in Figure 8-4. In normal condition, both UPS are in normal mode with the inverter supporting the load. If one unit fails, the other will power the load. In order for the system to rotate powering the load, the alternative operation time must be set. If two different UPS are connected in series, the load capacity must be smaller than the UPS with the smallest rating. 89 Chapter 8 Parallel System Fig. 8-4 Series backup mode Note The default value of alternative operation time is 168 hours and the range is 0-4320 hours 8.1.3 Operation modes The parallel operation system also has operation modes such as normal mode, battery mode, bypass mode and maintenance bypass mode. All the UPS units inside the parallel operation system should operate in harmony. For example if one UPS is in inverter mode, the bypass of other units should be shut down. Normal mode: The load is powered by the inverters of all the UPS units inside the system. If the bypass frequency is in the synchronous range, the inverter will be synchronous with the bypass. Otherwise, the system will operate at nominal frequency. Battery mode: The batteries of the system powers the load through inverters of all the UPS units. The system operates at nominal frequency. Bypass mode: The condition to transfer to bypass mode is same with that of single module UPS system. The bypasses of all the UPS units power the load. 90 Chapter 8 Parallel System Maintenance mode: The condition to transfer to maintenance mode is same with that of single module UPS system. The maintenance switches should be switched on synchronously as possible. Thus the system can be repaired without interrupting the power supply to load. 8.2 Installation The installation method of parallel operation system is the same with that of single module UPS system. The following contents only introduce the installation procedures relating to parallel operation system. 8.2.1 Cabinet installation 1. Parallel operation system with two UPS units The layout of 40/60 kVA UPS system is shown in Fig.8-5. Two UPS units are placed in the middle side by side. Each battery cabinet is placed next to the UPS unit. The battery cabinet should be placed in front of or behind the UPS cabinet if considering capacity expansion. The layout of 20/30 kVA UPS system is the same with that of 40/60kVA UPS. battery cabinet 1 UPS cabinet 1 UPS cabinet 2 battery cabinet 2 Fig. 8-5 40/60KVA UPS Layout 2. Parallel operation system with multi UPS units Please place the battery cabinet in front of or behind the UPS cabinet for shorten the battery cables and battery temperature sampling cables and for convenient capacity expansion. 91 Chapter 8 Parallel System 8.2.2 Electrical installation 1. Power cables Wiring of power cables is the same with that of single module UPS system. Note: The length and specifications of power source cables including the bypass input and UPS output cables should be the same, thus the load can be shared evenly in bypass mode. 2. Signal cables Wiring of signal cables is the same with that of single module UPS system. Parallel connection cables should be connected. You can see the holes for parallel connection cables when opening the front door of the UPS system. According to the routes, two parallel connection cables are connected to the P1(P2) and P3(P4) sockets on the ULW2L61M3 parallel board, at the same time tighten the screws between the connector and sockets. P1/P2 on the ULW2L61M3 board are two 15-pin sockets with same functions and are used to transmit parallel logic signal. P3/P4 are two parallel 9-pin sockets with same functions and are used to transmit the load sharing detection signal. The wiring method of parallel connection cables of three UPS units are shown in Fig.8-6. left post left post left post Logic cable Load sharing detection UPS 1 parallel board Logic cable Load sharing detection Logic cable UPS 2 parallel board Fig.8-6 Connection of Parallel Operation Cables 92 Load sharing detection UPS 3 parallel board Chapter 8 Parallel System 8.3 External Power Distribution Parameters such as maximum permissible input current (In is the rated input current) of each UPS, capacity of input circuit breaker(suitable for rectifier input and bypass input) are given in Table 3-5. It is recommended that the input power source of each UPS unit should be input to its own circuit breaker in the switchgear. The battery group shouldn’t be shared among the UPS units. Each UPS unit should be equipped with an output circuit breaker for the convenience of switching off the UPS during maintenance. The capacity of the output switch of the power cabinet should be selected according to the maximum capacity of the parallel operation system considering the redundancy. The specifications of the switch are given in Table 8-2. Table 8-2 Output Power distribution parameters Capacity of output circuit breaker 20kVA Parallel operation modes UPS capacity 30kVA 40kVA 60kVA Single module UPS system 63A 63A 100A 100A 1+1 63A 63A 100A 100A 2+1 125A 125A 200A 200A 3+1 200A 200A 300A 300A 4+1 250A 250A 400A 400A 5+1 300A 300A 500A 500A 6+1 400A 400A 600A 600A 7+1 450A 450A 700A 700A 8 UPS units 500A 500A 800A 800A 8.4 Start up of Parallel Operation System Check the input and output wiring of each UPS unit. Ensure that the phase rotation of the rectifier, bypass and output of each UPS unit is same. Ensure the parallel connection cables are connected firmly. 1. Switch on the UPS units one by one and check their operation states: (1)Commission each UPS unit referring to Chapter 4 for the methods. (2)Set the parameters of each UPS unit through background host and adjust the parameters of parallel operation system. Configuration setup: Each UPS unit should be set as “parallel” mode. The UPS unit that is connected to the background host should be set as “connect to background host”; 93 Chapter 8 Parallel System Code setup: Each UPS unit has its own code, and set the codes of each UPS unit as 1, 2, 3 .n(n 8) one by one; Set the number of UPS units N and number of redundancy UPS units X: If there is M UPS units in the system, if the system is the paralleling system for capacity expansion, then M=N, X=0; In redundancy system, M=N+X, Xƒ1. The settings of N and X should take the actual load capacity into considerations. (3)After the commissioning of each UPS unit is completed, press “inverter shutdown” to shutdown the inverter, switch off Q2 and Q5; 2. Switch on Q5 of each UPS unit, press the “inverter start” button of each UPS unit and check the output phase rotation. If the phase rotation is not correct, the LCD on the UPS unit will display “inverter asynchronized” , the inverter indicator flashes continuously and the unit cannot transfer to inverter mode. If some UPS unit has abnormal alarm sound, the parallel connection cables must have problem. 3. Switch on the bypass switch Q2 of each UPS unit to input the bypass source; 4. Press the “inverter shutdown” button of each UPS unit one by one, transfer to bypass source; 5. Switch on each UPS inverter one by one and apply the load after the last UPS transfers to inverter mode. The load parameters can be inquired through the panel of any UPS. When the load is heavy, check the load rate of each UPS unit and if the rates are roughly the same, then the parallel operation system must operate normally. Note: After commissioning, the UPS can only operate after the qualified engineers have set the parameters. 8.5 Using the Parallel Operation System The user can use the UPS that has start up. The using methods of parallel system are the same with that of single module UPS system. 8.5.1 Switch on the Parallel System 1. Start from utility The process of switching on the parallel system that has no load is same with the start up process. 94 Chapter 8 Parallel System When switching on the parallel system, external maintenance bypass switch KBP is recommended be equipped to maintain the power supply to load in case of UPS shutdown due to failure or maintenance. Before switching on the UPS, all the circuit breakers but the KBP should be disconnected, the utility powers the user’s load directly. 1. Switch on the internal bypass maintenance switch Q3BP of the UPS; 2. Disconnect KBP; 3. Switch on the Q2 and Q5 of each UPS unit; 4. When each UPS unit finishes the self test and the bypass operates normally (the bypass indicator and load indicator illuminate green) , disconnect the Q3BP inside each UPS unit; 5. Switch on Q1 of each UPS unit and QF1 of correspondent battery cabinet; 6. After the rectifier starts (rectifier indicator illuminates green) , press the “inverter start” button to start the inverter; 7. After each UPS unit’s inverter starts, each UPS unit will transfer from bypass to inverter and powers the load together. At this time, the start-up of the UPS parallel operation system is over. 2. Start from battery When the parallel operation system starts without load, start each UPS unit,and then connect the load. The start process of each UPS unit is the same with that of start of single UPS, that is, press the “inverter start” button one by one and then switch on Q5. When starting the parallel operation system with load, start each UPS unit one by one, and the start process is same with that of starting single module UPS system. If the inverter capacity is smaller than the load capacity, the inverter indicator will flash until the total capacity of the inverters that have start is bigger than the load capacity. At last, all the inverters that have start power the load together. 8.5.2 Shutdown the Parallel Operation System 1. Shutdown in normal mode UPS parallel operation system should shut down in normal mode if the periodical maintenance and repairing are required: 95 Chapter 8 Parallel System 1. Press the “inverter shutdown” to shut down the inverter and the system transfers to bypass mode; 2. Switch off each UPS unit’s Q1 and the QF1 of battery cabinet; 3. Switch on each UPS unit’s Q3BP; 4. Switch on each UPS unit’s Q2 and Q5; AT this time, the user’s load is totally dependent on the maintenance bypass of the UPS; Common checking or maintenance work can be done after waiting for 8 minutes( that is, after the DC bus capacitor discharges to zero voltage). If the UPS requires to be switched off totally, switch on the KBP,switch off all the Q3BP switches, and then transfer the load to external maintenance bypass. Then the replacing or capacity expansion operation can be done after disconnecting the UPS input and output switches. 2. Shutdown in bypass mode Follow the step 2-step 5 of “shutdown in normal mode” to shut down the UPS in bypass mode. 3. Shutdown in battery mode If the utility is unavailable, conduct the step 1 of “shutdown in normal mode”, and then switch off all the switches. 4. Shutdown in united operation mode The procedures of “shutdown in united operation mode” is the same with that of “shutdown in normal mode”. 8.5.3 Transferring between Operation Modes When the parallel operation system is in normal mode, it can transfer between different operation modes, so the maintenance engineer can judge whether the system operate normally according to the transferring condition. If all the sources of the UPS is in normal range, conduct the following operations: 1. Normal mode to battery mode Switch off all the UPS units’ Q1 and Q2,the system will transfer from normal mode to battery mode. 96 Chapter 8 Parallel System 2. Normal mode to bypass mode Press the “inverter shutdown” button on the UPS panels one by one, all the UPS can transfer to bypass mode. In the above operation, if the total capacity of all the inverters is smaller than the load capacity, all the UPS unit will transfer from normal mode to bypass mode. 3. Bypass mode to normal mode Q1 has already been switched on, press the “inverter start” button on the UPS panels one by one until the total capacity of all inverters is bigger or equal to load capacity, all the UPS units will transfer from bypass mode to normal mode. 4. Battery mode to normal mode If the utility is normal and the Q1 of all the UPS units are switched on, the UPS will transfer from battery mode to normal mode automatically. 5. Normal mode to maintenance bypass mode Follow the Steps 1~4 in section 8.5.2 to switch the UPS from normal mode to maintenance bypass mode. 8.5.4 Repairing the failed UPS unit in parallel operation system 1. Shut down and isolate the failed UPS in parallel operation system When some UPS unit fails in the system, isolate it and let other UPS units continue to operate, the procedures are given below: 1) press “inverter shutdown” button to shut down the inverter of the UPS. Note: Before switching off this UPS, verify whether the remaining UPS units can power the load; 2) switch off this failed UPS unit’s Q5, Q2 and Q1; 3) switch off this failed UPS unit’s battery switch QF1; 4) maintenance work can be done after waiting for 8 minutes( that is, after the DC bus capacitor discharges to zero voltage). 97 Chapter 8 Parallel System Note At this time, the input and output terminals of this failed UPS unit are still energized. Switch off the unit’s input and output circuit breakers if these terminals may be touched during maintenance. 2. After repairing the failed UPS, connect it to the parallel operation system again After repairing the failed UPS, the procedures to connect it to the parallel operation system are given below: 1) If this UPS unit’s input and output circuit breakers have been switched off during maintenance, switch on them again; 2) Switch on this UPS unit’s Q1 and Q2; 3) Switch on this UPS unit’s battery switch QF1; 4) When this UPS unit’s rectifier starts (the rectifier indicator illuminates green), press the “inverter start” button to start the inverter. If the inverter can be start, then the UPS recovers to normal, otherwise switch off and isolate the UPS unit again and repair it; 5) After the inverter starts, switch on Q5,this UPS unit will operate together with other UPS units normally. 8.5.5 Emergency shutdown In parallel operation system, if only one UPS unit needs to be shut down, the user should press the “emergency shutdown” button on this UPS unit. If all the UPS units need to be shutdown, connect all the “emergency shutdown” dry contacts of the UPS units together and set up a “emergency shutdown” button for the whole system. But the UPS units should be repaired separately. The operation procedures are given in Chapter 6. Method of setting up a “emergency shutdown” button for the whole system A isolated multi-branch button should be used as emergency shutdown button, pressing this button can switch off multi UPS units at the same time. The method is shown in Fig. 8-6. That is, connect the control cables from the J12(pin 1 is normally closed contact, pin 2 is central contact and pin 3 is the normally open contacts, select the normally open and normally closed contacts according to control mode) on the ULW2L61U2 board to the switch of the “emergency shutdown” button. In order to avoid EMI, the EPO(emergency shutdown) cables must be shielded and the shielded cables must be grounded at the EPO switch. 98 Chapter 8 Parallel System This figure only shows the connection method of control cables of parallel operation system with 3 UPS units. The others can be done according to the same methods. 1 2 3 4 1 2 3 4 Emergency stop button 1 2 3 4 Fig. 8-6 Emergency shutdown button Where, “1”-Normally closed contacts for emergency shutdown “2”- Central contacts for emergency shutdown “3”- Normally open contacts for emergency shutdown “4”- Normally closed contacts for common alarm 8.5.6 Fault and Fault Process Methods The faults of single module UPS system is given in Chapter 7. The faults that specially belong to the parallel operation system are given in Table 8-3. If some UPS unit has fault, it can exit the system and other units can maintain the normal operation mode. But redundancy is not available, so the faulty UPS unit must be repaired as soon as possible. 99 Chapter 8 Parallel System Table 8-3 Fault and fault process methods of parallel operation system No. Fault description Reasons Fault processing 1 Disconnect the load of low priority, Overload of parallel Overload occurs and the maintain the power supply to important operation system redundancy is not available load 2 In parallel operation system, some UPS unit may require to transfer to bypass due to Single module UPS surge or overload, other system requires to units will transfer to bypass transfer to bypass after receiving the signal mode sent by this UPS unit that requires to transfer to bypass mode If the parallel operation system transfers to bypass mode, and the operation condition enables, all the UPS units can recover to normal mode synchronously. The load current of each UPS unit is noticeably Notify the service dept for repairing unbalanced, thus the system loading ability is affected. 3 Load sharing fault 4 Parallel operation The board is damaged. board fails 100 Notify the service dept for repairing Chapter 9 Optional Parts Chapter 9 Optional Parts 9.1 Battery 9.1.1 Capacity selection Calculate the discharging current according to rated load capacity and then select the battery according to the current and the battery backup time required by user. There are various specifications of battery, we recommend that 30 12V battery cells should be connected in series to form a battery string. The capacity of battery cell can be 38Ah, 65Ah and 100Ah. Note If the battery capacity exceeds 100Ah,the user should connect the battery of same model and same capacity in parallel or use large capacity 2V battery to make up the battery group. The capacity data of battery string are listed in Table 9-2 and the capacity data are selected according to rated load. Select the battery of 70%~100% rated capacity according to the actual load and required backup time. Table 9-1 Battery capacity equipped for single UPS (Ah,25℃) UPS capacity 20kVA 30kVA 40kVA 60kVA Discharging current 50A 75A 100A 150A Backup time Battery capacity(Ah) 15min 38 65 100 100 30min 65 65 100 150 1h 100 130 180 340 2h 150 200 340 420 3h 200 340 420 630 4h 250 340 510 680 5h 340 420 630 840 6h 340 510 680 1020 8h 420 630 840 1260 101 Chapter 9 Optional Parts 9.2 Battery cabinet 9.2.1 External Dimensions The UPS system has two kinds of battery cabinets that are UF-B0100-30 and UFB0065-30 respectively. The External Dimensions are given in Fig. 9-1 and Fig. 9-2 respectively. The structural parameters are given in Table 9-3. Table 9-2 structural parameters Height (mm) Width (mm) Depth (mm) Size when opening front door(mm) UF-B0065-30 1400 850 800 620 150° 500 150 850 UF-B0100-30 1800 1000 800 660 150° 500 150 1350 Name Angle of opened Ventilation Weight Weight(including door(degree) channel (kg) battery (kg) (mm) Select the support rack and floor with proper bearing ability because the battery cabinet is rather heavy after being filled with batteries. Fig. 9-1 Outline of battery cabinet 102 Chapter 9 Optional Parts 4 fixing holes 4 fixing holes 4 levelling bolts 4 levelling bolts Fig. 9-2 Positions of leveling feet of battery cabinet 9.2.2 Installation of battery cabinet The requirements for the locations of battery cabinet are the same with those of UPS cabinet, so are the installation and fixing methods. Install the cabinet with reference to the Fig. 9-1 and 9-2 and Fig. 2-5. The battery cabinet exerts its weight on the floor through four leveling bolts(40mm diameter). If the load bearing capacity of the floor is inadequate, add auxiliary equipment to distribute the weight over a larger area, such as a big iron sheet or increasing the number of supporting castor wheels. The cabinet has flexible top and bottom cable access mode. 9.2.3 Wiring of the batteries The front and back door, the cover board and each separation board should be removed when installing the batteries. The installation should start from bottom to up. The battery terminal should be bound with insulation tape after finishing the wiring. Fig. 9-3 shows the layout of the battery with the UF-B0100-30 battery cabinet as an example. The installation of UF-B0065-30 is the same with UF-B0100-30, the following contents may not be suitable for installation if different batteries are used because the direction and wiring method of the battery are different. 103 Chapter 9 Optional Parts Layout for No.2~4 floors General Layout Layout for No.1 floors Fig.9-3 Battery layout inside battery cabinet UF-B0100-30 can hold 30 12V/100Ah maintenance free batteries. The voltage can be 360V after the batteries are connected in series. The batteries are placed in 4 floors as shown in Fig.9-4. Follow the steps below to connect the batteries between different floors and connect the battery switch: Front view 30 12V battery cells output switch filter inductor Fig. 9-4 Wiring of the batteries inside the UF-B0100-30 battery cabinet 104 Chapter 9 Optional Parts a. Unpack the battery, measure the battery voltage, charge the battery before installation if the single battery cell voltage is lower than 2.13V(each battery has 6 cells, 12.8Vdc); b. Open the front door, remove the back door and cover, switch off all the battery switches, clear the battery cabinet and take out the accessories(battery connection cables, cable sleeves and nylon fastener)inside the cabinet; c. Install the 6 batteries at the bottom floor of the battery cabinet; d. Connect the battery connection cables D(4 cables), cable E(1 cable) that connects output switch and inductor, cable C (1 cable) that connects the inductor and the first battery(front view) in right side. Connect the cable B(1 cable)between different floors and bound one end of the cable with insulation tape,the other end of the cable should be connected to negative pole of the battery at the rear part of the floor; e. When selecting the temperature compensation function, fix the temperature sensor TMP12Z(one of the accessories of battery cabinet) on the board where the battery circuit breaker is installed, bound the signal cables and lead the cables to the place where the wiring is convenient; f. Place the 8 batteries on the second floor, connect the connection cables D (7 cables) between the batteries. The connection cables of the first floor will be connected to the positive pole of the first battery in the left side of second floor. One end of the connection cable B(1 cable) is bound with insulation tape, the other end is connected to the negative pole of the battery in the left rear part; g. The wiring and layout of batteries in third and fourth floors are the same with that in second floor; h. After connecting and installing the batteries in third and fourth floors, connect one end of the cable A (1 cable) to output switch, and another end to the negative pole of the battery in left rear part; i. Install the cover board, front and back doors. j. Connect the cables between the UPS and battery switch and the temperature detection cables that should be shielded cables and should be bound together with power source cables. k. There are two kinds of installation methods if the UPS needs to be equipped with large capacity batteries : The first one is to connect multi strings of batteries of same capacity (lower than 100Ah) in parallel, and use the above methods to install the batteries. The output cables of each battery cabinet are connected to the battery terminals of UPS. The method is used if the required backup time is shorter than 2 hours;The second method is to select high capacity 2V battery. The battery cabinet and connection copper bars are 105 Chapter 9 Optional Parts provided by battery manufacturer. The battery output circuit breaker should be made separately. The method is used if the required backup time is longer than 2 hours. l. The connection cables between battery and UPS will not be provided in accessories. Refer to Table 3-2 in Chapter 3 to select the battery cables. 9.3 SNMP Card and the Software UPS SNMP card UF-SNMP111 is inserted into the slot for SNMP card in the UPS. The card enables the remote management of the UPS via network. SNMP card is compatible with 10M/100M ether net and support the SNMP, HTTP, TFTP, TELNET and TTY protocols. The immunity satisfies the IEC 1000-4-2.3.4 LEVER III . The conduction of radiation satisfies CISPR 22 CLASS A standard. Hot swappable design enables quick and convenient maintenance. It can access to network management system via MIB, and is able to monitor the UPS via IE. It is also a part of centralized monitoring system. 9.3.1 Product structure and ports Fig.9-5 SNMP structure The ports and functions of SNMP card are given in Table 9-4. Table 9-3 Ports and functions of SNMP card Serial No. Name Functions 1 RJ45 port Connect to network cables 2 Status indicator(green) Indicate the operation states of SNMP card 3 Network indicator(yellow) Indicate the network connection and communication status 4 SNMP card Inserted into UPS and used for UPS connection 9.3.2 Technical features Compatible with 10/100M either net, the SNMP card can adapt to 10M and 100M ether net automatically and can realize the smooth connection from 10M to 100M; 106 Chapter 9 Optional Parts Support SNMP, HTTP, TFTP and Telnet protocols and can monitor the UPS through the UPS network monitoring software (UPSiteCenter), NMS and Web explorer(IE and Netscape). The SNMP card can be upgraded online; Provide the computer safety protection functions. Provide the computer safety shutdown software for Windows, UNIX and Linux together with SNMP card. In case of utility source abnormal and battery depletion, the shutdown software will shut down the computer to protect it. Easy installation and maintenance: Hot swappable design enables the replacing of UPS unit without shutting down the power. Note: Please check the directions of SNMP card for detailed explanations. 9.4 Network Software UL33 UPSiteCenter network monitoring software UF-WIN210N can monitor up to 60,000 UPS units and can manage the UPS units level by level with the following functions: a. Real time data display; b. Inquire and print the historic log(including historic data, historic event and historic control); c. Remote control, remote adjusting and remote measuring; Schedule and mission processing, user management and safety management; d. Alarm notification through BP and EMAIL. Centralized monitoring software needs the support of SNMP card. Each UPS should be installed with a SNMP card to make itself be a node in the network before starting monitoring through WAN. 9.5 MODEM UPS monitoring system enables the flexible application of MODEM, so the remote management functions can be realized. The typical application methods are given below: a. Use a MODEM to connect the user’s host computer to the internet through public telephone network to realize remote management functions; 107 Chapter 9 Optional Parts b. Set up the fault call-back parameters. The monitoring system can realize fault call-back functions through the MODEM. When the UPS has fault, it will dial the user automatically and require actions. 9.6 Temperature sensor TMP12Z TMP12Z temperature sensor is an ambient temperature detection device developed by Avansys. Its operation voltage is 12V, the detected temperature range is 0~100℃, and output signal is 1~5V. Fig.9-6 shows the structure of temperature sensor and meanings of output terminals. fixing terminal Fig.9-6 TMP12Z Temperature sensor The meanings are given below: Fixing terminal: Use M4~M6 screws to fix the temperature sensor; VCC: Positive pole of power source of temperature sensor, and generally it is 12V; GND: GND pole of power source of temperature sensor, and generally it is 0V; Vout: Output terminal of temperature sensor and the output signal varies between 1V and 5V with the varying of temperature in the range of 0~100℃; 9.7 Level C Lightning Protection System SPD24Z Level C Lightning Protection System SPD24Z used for SPD-24-UPS can be used to protect the input power source of machine room to prevent the external lightning surge from entering the machine room. SPD24Z should be selected if no lightning protection system lower than level C is equipped in the power distribution system, or the machine room is far away from the power distribution system, or the machine room is in area where the lightning or thunder frequently happens. The capacity of the Level C lightning protection device is 20kA,the maximum value is 40kA(can only be used one time),and the surge current is 8/20us. 108 Chapter 9 Optional Parts 9.7.1 Introduction of SPD24Z The SPD24Z lightning protection box has a switch(3) on its panel, a lightning protection indicator(green, 1) and fault indicator(red,2). Its top cover has 3 holes for cable input(I~III) and its bottom has 3 holes for cable output. Its rear side has two holes for fixing the device, as shown in 9-7. Panel Back Top Figure 9-7 Outline of SPD24Z 9.7.2 Installation procedures of SPD24Z Procedures: a. Use too expansive bolts smaller than Φ10 to fix the lightning protection box on the wall through fixing holes; b. The cross sectional area of input and output cables of the lightning protection box should be at least 6mm and copper-core cables are recommended to be used; c. The cooper-core cable with 10mm cross sectional area should be used for protective earth cable(PE cable), and the minimum area should be at least 6mm; d. Th earthing resistance should be less than 5 ohm; e. The SPD24Z should be fixed in proper location in the room. The AC power cable between the lightning protection device and the equipment should be 5~ 10m; f. Open the panel of the lightning protection box, wire according to the figure printed on the rear side of the panel and Fig 9-8; g. Switch on the circuit breaker after confirming that all the cables are well connected. Check whether the green indicator illuminates. The red indicator should turn on if the circuit breaker is switched off. 109 Chapter 9 Optional Parts h. Check whether the cables are well connected. i. Use a 4mm2 cable to earth the lightning protection device. j. Close the cover. Note 1. All operations should be done with power off and confirm there is no dangerous voltage on the neutral line。 2. Connect two pieces of PE cables from the lightning protection device. One cable is connected to the case of the UPS, the other one is connected to earth(shorter than 30m, as short as possible). 3. After installation, switch on the circuit breaker of the lightning protection device, then the device is in normal operation state. If the circuit breaker is switched off, there will be no lightning protection functions. The circuit breaker is prohibited to be switched off during normal operation of the lightning protection device。 M Equipment User Protection Earth earthing bus bar Fixing holes lightning protection box wiring diagram circuit breaker capper bar Fig. 9-8 SPD24Z wiring 110 Chapter 9 Optional Parts 9.7.3 Using and Maintenance 1. Ambient condition a. Ambient temperature ranges from -40℃ to 40℃; b. Elevation lower than 1000m; c. The utility frequency is 45~65Hz; d. The highest wind speed not exceed 35m/s. 2. Maintenance 1) The lightning protection device operates normally if the green indicator illuminates while the red indicator is off; 2) If the green indicator is off while the red indicator illuminates, that means the circuit breaker is switched off. If the circuit breaker is not switched off manually, please check the varistor. The lightning protection device is damaged if the varistor turns into red. At this time the device must be replaced; 3) If the green indicator and the red one are all off, that means the lightning protection device is damaged, please notify our service engineers for repairing; 4) If the PE cables must be disconnected due to certain reason, please switch off the lightning protection device first to let the device de-energized. Be sure to confirm that whether the neutral cable has hazard voltage; 5) Please refer to Using Directions of SPD24Z for details. 9.8 Bypass Isolation Transformer Specifications: Input voltage: 380/400/415V, three phases; Output voltage: 380/400/415V, three phases; Rated frequency: 50Hz; Rated capacity: 20/30/40/60kVA Insulation level: F; Wiring: Y/Y 111 Chapter 10 Service after Sales Chapter 10 Service after Sales 10.1 Abnormal Fault Handling If the UPS is abnormal without alarm indication, check according to Table 10-1. Table 10-1 Fault handling No.1 1 Fault description Utility switch is put to “ON”, no display by LCD, no self test of system Reason A. Input power is disconnected from system Actions to be taken Check the input voltage B. Input under voltage 2 UPS has no output power Output power cables are not Check the output cables and no alarm well connected 3 Abnormal sound and smell UPS has internal fault Contact the distributor When the UPS is abnormal with visual/audible alarm, check the LCD display first and then process the fault according to Table10-2. 112 Chapter 10 Service after Sales Table 10-2 Fault information of Single module UPS system No.1 Fault description Reason Actions to be taken 1 Ambient over-temperature over-temperature of UPS room 2 Environment parameter 1 Environment parameter channel 1 Check the devices relating to the abnormal has alarm channel 3 Environment parameter 2 Environment parameter channel 2 Check the devices relating to the abnormal has alarm channel 4 Environment parameter 3 Environment parameter channel 3 Check the devices relating to the abnormal has alarm channel 5 Environment parameter abnormal 12V environment channel has alarm 6 Rectifier input voltage abnormal Line-to-neutral voltage of rectifier Check the input line-to-neutral voltage exceeds normal operation range amplitude of rectifier 7 Rectifier input undervoltage Line-to-neutral voltage of rectifier Check the input line-to-neutral voltage lower than 305V, but higher than amplitude of rectifier 208V 8 Rectifier’s input voltage Rectifier frequency exceeds the Check the rectifier’s input voltage frequency is abnormal normal range frequency 9 Input fuse blows Rectifier input fuse blows up 10 Input transformer over temperature Temperature of input transformer Check the ambient temperature and is too high ventilation 11 Input phase rotation Reverse Rectifier’s input phase rotation is Notify the UPS service engineer, check reverse the wiring of rectifier input cables bypass voltage and 12 Bypass unsynchronized Bypass voltage or frequency is Check the out of normal range and inverter frequency output is not synchronized with the bypass output. bypass voltage and 13 Bypass voltage or frequency Check the Bypass ratings exceed the exceeds the normal range and frequency normal range the bypass will not power the load anymore. 14 Bypass over current timeout If the over current time exceeds Check the load, if it is normal, then the limit, the UPS may shut down restart the UPS the bypass and the inverter. 15 Shutdown due to bypass fault When the overload time is due in inverter mode, if at this time the bypass has fault, then the inverter is shut down. 113 Check the ventilation parameter Check the devices relating to the channel Notify the service dept for repairing Repair the bypass and reduce the load, and then restart the UPS. Note: Don’t let the UPS in over load state for a long time. Chapter 10 Service after Sales No.1 Fault description 16 Battery needs to be replaced 17 No battery 18 Pre-alarm for end of battery discharging Reason Actions to be taken The battery life is reduced due to aging, which may endanger the Notify the service dept for replacing the normal operation of UPS. Warn battery and set the battery model and the user that the battery is parameters through software. abnormal and needs to be replaced. Batteries are not connected. Check the battery and the wiring of batteries The battery discharges to prealarm point(the battery capacity is inadequate),the system may Shut down the load in time shut down after a few minutes Check the battery temperature and ventilation 19 battery over temperature battery temperature is too high 20 battery self-test is disabled The battery condition for self-test Start the self test after the conditions is not satisfied can meet the requirements 21 Battery is connected reverse Battery is connected reverse 22 Bypass phase rotation is Bypass phase rotation is reverse reverse 23 Rectifier heatsink temperature 24 Rectifier fan fails Rectifier fan is abnormal 25 Inverter asynchronous Inverter bypass 26 Inverter heatsink temperature 27 Inverter fan fails Inverter fan is abnormal 28 Inverter over current The IGBT of inverter has over Restart the inverter, if the fault can’t be current resulting in the shut down cleared, notify the service dept for if inverter. repairing. 29 Check whether there is fault in rectifier Shutdown due to low bus DC bus voltage is too low result in side, if no, then check whether voltage the shutdown of inverter overload occurs. Restart after clearing the fault. 30 Output transformer over Output transformer temperature is Auto recovery, ambient and ventilation temperature too high of UPS should be checked. 31 Overload of single UPS Load is too heavy Disconnect unnecessary ensure the safety. load and 32 Overload of system System load is too heavy Disconnect unnecessary ensure the safety. load and 33 Overload exceeds normal Over load occurs in inverter If the load decreases after 5 minutes, time mode, transfers to bypass mode the system will back to inverter mode Notify the UPS service engineer to connect the battery again Notify the UPS service engineer to change the bypass phase rotation over Rectifier heatsink temperature is The UPS can recover automatically. too high Check the environment and ventilation is asynchronous Replace the fan in time and the UPS can recover automatically with Check if the bypass is normal. The fault alarm stops automatically after the bypass recovers normal over Inverter heatsink temperature is The UPS can recover automatically. too high Check the environment and ventilation 114 Replace the fan in time and the UPS can recover automatically Chapter 10 Service after Sales No.1 Fault description Reason Actions to be taken Surge current occurs in bypass Avoid applying big load abruptly and mode, the system shutdown short circuit 34 Output surge current 35 The system transfers to bypass Transfer to bypass due to mode due to surge current and Avoid applying load abruptly and the surge back to inverter mode after load is UPS can recover automatically decreased 36 In parallel operation system, some UPS module may require to transfer to bypass due to surge or Neighbouring UPS module overload, other modules will requires to transfer to transfer to bypass after receiving bypass mode the signal sent by this UPS module that requires to transfer to bypass mode 37 User’s wrong operation 38 The actual transfer times Transfer times exceed the times exceed the permissible set by background. The system Avoid frequent overload transfer times per hour will stay in bypass mode until next hour. If the parallel operation system transfers to bypass mode, and the operation condition enables, all the UPS modules can recover to normal mode synchronously. Wrong operation such as start the Operate UPS with the maintenance Manual bypass switched on with reference to User’s 10.2 Warranty We provide 1 year of free service for our UPS (including the battery). The above warranty shall not apply in the following circumstances: The battery is provided by user; Damage resulting from operation not in accordance with the user manual; Damage as a result of fire, flood, etc.; Different levels of customized service packages are available with reasonable charge, including responsive, preventive maintenance, warranty period extension, etc. For detailed information, please contact the distributor or the local technical support center. 115